Tài liệu Module 3: Administering Active Directory pptx
Bạn đang xem bản rút gọn của tài liệu. Xem và tải ngay bản đầy đủ của tài liệu tại đây (592.47 KB, 60 trang )
Contents
Overview 1
Introduction to Administering
Active Directory 2
Managing Active Directory Objects 3
Publishing Resources in Active Directory 7
Locating Objects in Active Directory 11
Lab A: Managing, Publishing, and
Locating Objects in Active Directory 18
Controlling Access to Objects 29
Delegating Administrative Control 34
Lab B: Delegating Administrative
Control in Active Directory 39
Best Practices 47
Review 48
Module 3: Adminis
tering
Active Directory
Information in this document is subject to change without notice. The names of companies,
products, people, characters, and/or data mentioned herein are fictitious and are in no way intended
to represent any real individual, company, product, or event, unless otherwise noted. Complying
with all applicable copyright laws is the responsibility of the user. No part of this document may
be reproduced or transmitted in any form or by any means, electronic or mechanical, for any
purpose, without the express written permission of Microsoft Corporation. If, however, your only
means of access is electronic, permission to print one copy is hereby granted.
Microsoft may have patents, patent applications, trademarks, copyrights, or other intellectual
property rights covering subject matter in this document. Except as expressly provided in any
written license agreement from Microsoft, the furnishing of this document does not give you any
license to these patents, trademarks, copyrights, or other intellectual property.
??1999 Microsoft Corporation. All rights reserved.
Microsoft, Active Directory, PowerPoint, and Windows are either registered trademarks or
trademarks of Microsoft Corporation in the U.S.A. and/or other countries.
The names of companies, products, people, characters, and/or data mentioned herein are fictitious
and are in no way intended to represent any real individual, company, product, or event, unless
otherwise noted.
Other product and company names mentioned herein may be the trademarks of their respective
owners.
Project Lead and Instructional Designer: Mark Johnson
Instructional Designers : Aneetinder Chowdhry (NIIT Inc.), Kathryn Yusi
(Independent Contractor)
Lead Program Manager: Ryan Calafato
Program Manager: Joern Wettern (Wettern Network Solutions)
Graphic Artist: Julie Stone (Independent Contractor)
Editing Manager: Tina Tsiakalis
Substantive Editor: Kelly Baker (Write Stuff)
Copy Editor: Wendy Cleary (S&T OnSite)
Online Program Manager: Nikki McCormick
Online Support: Arlo Emerson (MacTemps)
Compact Disc Testing: Data Dimensions, Inc.
Production Support: Arlene Rubin (S&T OnSite)
Manufacturing Manager: Bo Galford
Manufacturing Support: Mimi Dukes (S&T OnSite)
Lead Product Manager, Development Services: Elaine Nuerenberg
Lead Product Manager: Sandy Alto
Group Product Manager: Robert St ewart
Module 3: Administering Active Directory iii
Introduction
This module provides students with the knowledge and skills to administer
Active Directory
™
directory service by managing Active Directory objects and
by delegating administrative control of Active Directory objects.
In the hands-on labs in this module, students will have a chance to manage,
publish, and locate Active Directory objects and to assign Active Directory
permissions. In the first lab, students will create an organizational unit (OU)
structure based on a scenario and move Active Directory objects within a
domain. Next, students will publish shared folders and printers in Active
Directory. Then students will search for objects in Active Directory by using
several methods, and use the search results to access objects. In the second lab,
students will review Active Directory permissions and delegate administrative
control by using the Delegation of Control wizard.
Materials and Preparation
This section provides you with the materials and preparation needed to teach
this module.
Materials
To teach this module, you need the following materials:
?? Microsoft® PowerPoint® file 1558a_03.ppt
Preparation
To prepare for this module, you should:
?? Read all the materials for this module.
?? Complete the labs.
?? Study the review questions and prepare alternative answers to discuss.
?? Anticipate questions that students may ask. Write out the questions and
provide the answers.
?? Read appendices A and B.
?? Read the white paper, Active Directory Technical Summary on the Student
Materials compact disc.
?? Read the white paper, Microsoft Windows Active Directory: An Introduction
to the Next Generation Directory Services on the Student Materials
compact disc.
?? Read the white paper, Microsoft® Active Directory Service Interfaces: ADSI
Open Interfaces for Managing and Using Directory Services on the Student
Materials compact disc.
?? Read the technical walkthrough, Managing the Active Directory on the
Student Materials compact disc.
?? Read the technical walkthrough, Using the Delegation of Control Wizard on
the Student Materials compact disc.
Presentation:
75 Minutes
Labs:
75 Minutes
iv Module 3: Administering Active Directory
Instructor Setup for the Labs
Perform the following setup on your instructor computers for the labs.
Lab A: Managing, Publishing, and Locating Objects in
Active Directory
??To prepare for the lab
Ensure that the instructor domain contains a user account named Suzan Fine.
This user account should have been created during classroom setup.
Lab B: Delegating Administrative Control in Active
Directory
No setup required for the instructor computer.
Module 3: Administering Active Directory v
Module Strategy
Use the following strategy to present this module:
?? Introduction to Administering Active Directory
In this topic, you will introduce the concept of centralized management and
decentralized administration in Active Directory. Emphasize that centralized
management allows you to access network resources from a single location,
and decentralized administration allows you to delegate administrative
control of portions of your network. Do not spend too much time explaining
these concepts because they were covered earlier in the course.
?? Managing Active Directory Objects
In this topic, you will introduce organizing Active Directory objects by
using OUs. Explain the planning factors involved in creating an OU and
why each of the given planning factors is important. Demonstrate how to
create an OU by using Active Directory Users and Computers. Illustrate
how to move objects within a domain. Point out to students how
permissions are affected when you move objects.
?? Publishing Resources in Active Directory
In this topic, you will introduce publishing resources. Emphasize that
resources should be published in Active Directory if the information is
important to the users. Explain how to publish shared folders. Demonstrate
how to publish a shared folder in Active Directory and how to add a
description and keywords to the published shared folder. Show students
some examples of meaningful descriptive words and keywords. Illustrate
how to publish printers. Emphasize that Microsoft® Windows® 2000
automatically publishes a printer in Active Directory. You need to manually
publish a printer in Active Directory only if the printer is on a computer that
is not running Windows 2000.
?? Locating Objects in Active Directory
In this topic, you will introduce how the global catalog locates objects in
Active Directory. Provide examples when telling students about the
attributes for objects contained in the global catalog. Illustrate how to
perform a basic search operation by using the Find command in Active
Directory Users and Computers. Emphasize that you can administer objects
from the Results box once they have been located. Demonstrate how to
perform an advanced search operation by using the Find command in
Active Directory Users and Computers. Explain to students that different
objects have different attributes available to search for in an advanced
search operation. Demonstrate how to search Active Directory to locate
objects by using Windows Explorer. Emphasize that this technique of
locating objects is for users and that you can search for only specific types
of objects by using Search and My Network Places.
?? Lab A: Managing, Publishing, and Locating Objects in Active Directory
Prepare students for the lab in which they will create an OU structure based
on a scenario, move Active Directory objects within a domain, publish
shared folders and printers in Active Directory, search for objects in Active
Directory, and connect to objects in Active Directory search results. Make
sure that students run the command file for the lab and tell them that they
will work with their partners’ computers. After students have completed the
lab, ask them if they have any questions concerning the lab.
vi Module 3: Administering Active Directory
?? Controlling Access to Objects
In this topic, you will introduce the purpose of Active Directory
permissions. Tell students that only an administrator or the owner of an
object can assign permissions for the object. Demonstrate how to set
permissions for objects and attributes of objects. Demonstrate how to view
special permissions by using the Access Control Settings dialog box.
Explain how to prevent inheritance of permissions. Emphasize that when
you prevent inheritance, Windows 2000 prompts you to either assign new
permissions to the object or copy the previously inherited permissions.
?? Delegating Administrative Control
In this topic, you will introduce the purpose of delegating administrative
control of objects. Explain that you can decentralize administration by
delegating specific tasks to other administrators. Delegation of
administrative control at the OU level enables you to easily track
permissions. Demonstrate how to assign permissions at the OU level by
using the Delegation of Control wizard. Explain all of the options that are
available under Predefined tasks and Custom task. Emphasize that you
normally select delegation tasks from a predefined list, but that you can
customize delegation tasks. Explain guidelines for delegating administrative
control of objects.
?? Lab B: Delegating Administrative Control in Active Directory
Prepare students for the lab in which they will review Active Directory
permissions and delegate administrative control by using the Delegation of
Control wizard. Make sure that students run the command file for the lab.
After students have completed the lab, ask them if they have any questions
concerning the lab.
?? Best Practices
Present best practices for administering Active Directory. Emphasize the
reason for each best practice.
Module 3: Administering Active Directory vii
Customization Information
This section identifies the lab setup requirements for a module and the
configuration changes that occur on student computers during the labs. This
information is provided to assist you in replicating or customizing Microsoft
Official Curriculum (MOC) courseware.
The labs in this module are also dependent on the classroom
configuration that is specified in the Customization Information section at the
end of the Classroom Setup Guide for course 1558A, Advanced Administration
for Windows 2000.
Lab Setup
The following list describes the setup requirements for the labs in this module.
Setup Requirement 1
The labs in this module require that the Log on locally right on domain
controllers be assigned to the Everyone group. To prepare student computers to
meet this requirement, perform one of the following actions:
?? Run C:\MOC\Win1558A\Labfiles\Lab03\Setup\Lab0301.cmd.
?? Assign the right manually.
Setup Requirement 2
The labs in this module require a South OU and a North OU. To prepare student
computers to meet this requirement, perform one of the following actions:
?? Run C:\MOC\Win1558A\Labfiles\Lab03\Setup\Lab0301.cmd.
?? Create the OUs manually.
Setup Requirement 3
The labs in this module require the
C:\MOC\Win1558A\Labfiles\Lab03\Documents folder, shared as Documents,
and the C:\MOC\Win1558A\Labfiles\Lab03\Documents2 folder, shared as
Documents2. To prepare student computers to meet this requirement, perform
one of the following actions:
?? Run C:\MOC\Win1558A\Labfiles\Lab03\Setup\Lab0301.cmd.
?? Create the folders manually and share them.
Setup Requirement 4
The labs in this module require a Package Handling OU and a Human
Resources OU with several computer and user objects in it. To prepare student
computers to meet this requirement, perform one of the following actions:
?? Run C:\MOC\Win1558A\Labfiles\Lab03\Setup\Lab0301.cmd.
?? Create the OUs manually.
Important
viii Module 3: Administering Active Directory
Setup Requirement 5
The labs in this module require a printer called Laser Printer on each student
computer. To prepare student computers to meet this requirement, perform one
of the following actions:
?? Run C:\MOC\Win1558A\Labfiles\Lab03\Setup\Lab0301.cmd.
?? Create the printer manually.
Setup Requirement 6
The labs in this module require shortcuts to Active Directory Users and
Computers, Active Directory Sites and Services, and Active Directory Domains
and Trusts on the desktop for All Users. To prepare student computers to meet
this requirement, perform one of the following actions:
?? Run C:\MOC\Win1558A\Labfiles\Lab03\Setup\Lab0301.cmd.
?? Create the shortcuts manually and place them in
C:\Winnt\Profiles\All Users\Desktop.
Setup Requirement 7
The labs in this module require a regular user account for the student. To
prepare student computers to meet this requirement, create the user
account manually.
Setup Requirement 8
The labs in this module require the following user accounts in the default Users
container in Active Directory: User 1, User 2, User 3, User 4, User 5, and
User 6. To prepare student computers to meet this requirement, perform one of
the following actions:
?? Run C:\MOC\Win1558A\Labfiles\Lab03\Setup\Lab0301.cmd.
?? Create the user accounts manually.
Setup Requirement 9
The labs in this module require the following computers in the default
Computers container in Active Directory: Computer 1, Computer 2,
Computer 3, Computer 4, Computer 5, and Computer 6. To prepare student
computers to meet this requirement, perform one of the following actions:
?? Run C:\MOC\Win1558A\Labfiles\Lab03\Setup\Lab0301.cmd.
?? Create the computers manually.
Setup Requirement 10
The labs in this module require a Security1 OU and the Assistant1 and
Secretary1 user accounts in this OU. The labs also require a Security2 OU and
the Assistant2 and Secretary2 user accounts in this OU. To prepare student
computers to meet this requirement, perform one of the following actions:
?? Run C:\MOC\Win1558A\Labfiles\Lab03\Setup\Lab0302.cmd.
?? Create the OUs and user accounts manually.
Module 3: Administering Active Directory ix
Lab Results
Performing the labs in this module introduces the following configuration
changes:
?? Students move user accounts and computers to the North and South OUs.
?? Students move the Laser Printer printers to the North and South OUs.
?? Students change the Location attribute of the Laser Printer printer.
?? Students change the Active Directory permissions for the Security1 and
Security2 OUs.
You can run
C:\MOC\Win1558A\Labfiles\Lab03\Setup\Lab03Rm.cmd to remove most
configuration changes introduced during the course of the labs in the module.
Remove the Log on locally right from the Everyone group manually. Remove
the Laser Printer printer manually.
Important
Module 3: Administering Active Directory 1
Overview
? Introduction to Administering Active Directory
? Managing Active Directory Objects
? Publishing Resources in Active Directory
? Locating Objects in Active Directory
? Controlling Access to Objects
? Delegating Administrative Control
? Best Practices
Active Directory
™
directory service in Microsoft® Windows® 2000 provides
centralized management of enterprises. This means that information about the
enterprise is centrally stored and administrators are able to manage an
organization’s network from a single location. Active Directory supports the
delegation of administrative control over Active Directory objects. This enables
administrators to grant specific administrative permissions for objects, such as
user or computer accounts, to other users and administrators.
At the end of this module, you will be able to:
?? Identify the tasks involved in administering objects in Active Directory.
?? Manage Active Directory objects.
?? Publish resources in Active Directory.
?? Locate objects in Active Directory.
?? Control access to Active Directory objects.
?? Delegate administrative control of Active Directory objects.
?? Apply best practices for administering Active Directory.
Slide Objective
To provide an overview
of the module topics
and objectives.
Lead-in
In this module, you will learn
to administer Active
Directory by managing and
delegating administrative
control of Active
Directory objects.
2 Module 3: Administering Active Directory
Introduction to Administering Active Directory
Active Directory Allows Administrators to:
? Decentralize administration
by delegating administrative
control of resources
? Centralize management of
resources by administering
network resources from a
single location
Resources
Published
Published
Active Directory stores information about resources (such as user accounts,
computers, printers, and shared folders) on the network and makes it easy for
users and administrators to use, locate, and manage these resources.
Active Directory allows administrators to:
?? Centralize management by administering most network resources from a
single location. There is a single location for resource information that can
be accessed from anywhere in the network. Centralizing the location of this
information allows you to configure enterprise-wide resource access, and to
choose whether you want to have a centralized or a decentralized model of
management. By using administrative utilities, administrators can manage
user accounts and groups, physical resources (such as computers and
printers), shared folders, and organizational units (OUs). They can also
publish and locate these resources in Active Directory, and control access to
resources throughout the network.
?? Decentralize administration by delegating administrative control of user
accounts, computers, printers and other network resources to other
administrators. By delegating administrative control, appropriate individuals
in an organization can be given the responsibility for administering and
managing network resources. Distributing administrative and management
responsibilities decentralizes administration and decreases an
administrator’s workload.
Active Directory Service Interfaces (ADSI) is the primary and
recommended application programming interface (API) for Active Directory.
You can create applications that use ADSI to gain access to Active Directory.
These applications can automate tasks or present a customized user interface.
You can use ADSI with many popular programming languages. For
information on ADSI, see appendix A, “Active Directory Service Interfaces,”
on the course 1558A, Advanced Administration for Microsoft Windows 2000,
Student Materials compact disc.
Slide Objective
To identify the tasks
involved in administering
objects in Active Directory.
Lead-in
Windows 2000 uses Active
Directory to make it easy for
you to use, locate, and
manage network resources.
Ask students what
centralized and
decentralized administration
of network resources
means. Emphasize that
centralized management
allows you to access
network resources from a
single location, and that
decentralized administration
allows you to delegate
administration of portions of
your network.
Do not spend too much time
explaining these concepts,
because they were covered
earlier in the course.
Key Point
Because Active Directory is
a central repository of
objects and object
information, it enables
centralized management
and decentralized
administration of
network resources.
Note
Module 3: Administering Active Directory 3
? Managing Active Directory Objects
? Organizing Active Directory Objects
? Creating Organizational Units
? Moving Objects
Organizing objects into OUs allows you to group network resources for easier
administration and delegation of control. Before creating OUs, you need to plan
an OU structure for your organization. After creating OUs, you can populate
them with user accounts, groups, computers, and other OUs by creating them in
the OU itself, or by moving existing objects from other OUs.
Slide Objective
To introduce the topics
related to managing Active
Directory objects.
Lead-in
Active Directory provides
administrators with a way to
centrally organize and
manage network resources.
4 Module 3: Administering Active Directory
Organizing Active Directory Objects
? Use OUs to Define Administrative Boundaries
? Set Up an OU Hierarchy to Group Active Directory Objects for
Simplified Administration
? Use an OU Hierarchy to Create an Administrative Model
Domain
Domain
OU1
OU1
OU3
OU3
OU2
OU2
User1
User1
Computer1
Computer1
Printer1
Printer1
User2
User2
Active Directory
Active Directory
Active Directory
OU2
Computer1
User1
Printer1
User2
OU1
OU3
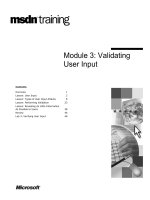
You can use OUs to define administrative boundaries within your domain. OUs
that hold and organize Active Directory objects are similar to folders that hold
and organize other folders and files.
Setting up an OU hierarchy allows you to group Active Directory objects for
simplified administration, for example, to easily delegate administrative control
over a number of user accounts, groups, or other resources. You delegate
administrative control by assigning specific permissions to other individuals
and groups for OUs and the objects that they contain.
You can use an OU hierarchy to create an administrative model that can be
scaled to any size. A user can be granted administrative authority for all OUs in
a domain, or a single OU. An administrator of an OU does not need to have
administrative authority for any other OUs in the domain. For example, in your
company, there may be one administrator who is responsible for all user
accounts, and a different administrator who is responsible for all printers. In this
case, you would create an OU for user accounts and a different OU for printers.
Slide Objective
To explain how to organize
Active Directory objects by
using OUs.
Lead-in
You can use OUs to define
administrative boundaries
within Active Directory.
Key Points
You create OUs for objects
that have similar
administrative and security
requirements.
A user can be granted
administrative authority for
all OUs in a domain, or for a
single OU.
The administrator of an OU
does not need to have
administrative authority for
any other OUs in
the domain.
Module 3: Administering Active Directory 5
Creating Organizational Units
? Create an OU if You Want to:
? Delegate administrative control over network resources
? Group similar network resources under one OU
? Restrict the visibility of network resources in
Active Directory
? Prevent the number of objects in an existing OU from
increasing to an unmanageable number
? Create an OU in a Domain or Within Another OU by
Using Active Directory Users and Computers
Within a domain, you can organize users and resources by using a hierarchy of
OUs to reflect the administrative model of your organization. You should plan
to create an OU if you want to:
?? Delegate administrative control over network resources, while still
maintaining the ability to manage them. You can grant administrative
permissions to users or groups of users at the OU level.
?? Group similar network resources under one OU to ease the task of
administering these resources. For example, you could group all user
accounts for temporary employees in one OU.
?? Restrict the visibility of network resources in Active Directory. In this way,
users can view only the objects to which they have access.
?? Prevent the number of objects in an existing OU from increasing to an
unmanageable number that would make it difficult for you to keep track of
the objects.
Planning to create an OU structure is a complex process. You
should take the time to plan carefully before implementing OUs.
You can create an OU in a domain or within another OU. After you create an
OU, you can add objects to it.
To create an OU, perform the following steps:
1. In Active Directory Users and Computers, right-click the container (domain
or OU) in which you want to create the new OU.
2. Point to New, and then click Organizational Unit.
3. Type the name of the OU, and then click OK.
Slide Objective
To identify the planning
factors involved in creating
an OU.
Lead-in
Before you create OUs, you
need to do extensive
planning. You can organize
users and resources by
using a hierarchy of OUs to
reflect the administrative
model of your organization.
Explain why each of the
given planning factors is
important before creating
an OU.
Delivery Tip
Demonstrate how to create
an OU by using Active
Directory Users and
Computers.
Key Point
Use OUs to organize
network resources so
that you can manage
them better.
Important
6 Module 3: Administering Active Directory
Moving Objects
dsa - [Active Directory Users and Computers]
Console Window Help
Active View
Active Directory Users
Builtin
Computer
Domain Controllers
LostAndFound
System
Users
nwtraders.msft
nwtraders.msft
Builtin
Computer
Domain Controllers
LostAndFound
System
Users
nwtraders.msft
Delegate control…
Add members to a Group…
Move…
Find…
New
All Tasks
New Window from Here
Delete
Rename
Refresh
Properties
Help
Move
Move
Builtin
Computer
Domain Controllers
LostAndFound
System
Users
nwtraders
OK Cancel
? Object Permissions Assigned Directly to the
Object Move with the Object
? Previously Inherited Permissions No Longer Apply
? You Can Move Multiple Objects
? Object Permissions Assigned Directly to the
Object Move with the Object
? Previously Inherited Permissions No Longer Apply
? You Can Move Multiple Objects
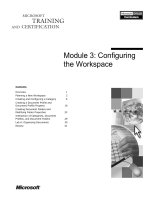
You can move objects between OUs in Active Directory when administrative
functions change—for example, when an employee moves from one department
to another and the user account will be administered differently. You can also
move an entire OU and all objects within it.
The following conditions apply when you move objects between OUs:
?? Object permissions assigned directly to the object move with the object.
?? Permissions that were previously inherited from the parent object no longer
apply. Instead, permissions are inherited from the new parent object.
?? You can move multiple objects at the same time.
To move multiple objects within a domain, perform the following steps:
1. In Active Directory Users and Computers, press the CTRL key and select
the objects to be moved.
2. Right-click the objects that you selected, and then click Move.
3. In the Move dialog box, expand the domain tree, click the container to
which you want to move the objects, and then click OK.
To move objects between domains when you reorganize domains or are
populating new domains with existing objects, you can use the Movetree utility,
included in the Windows 2000 Resource Kit. For information on Movetree, see
appendix B, “Moving Objects Between Domains,” on the course 1558A,
Advanced Administration for Microsoft Windows 2000, Student Materials
compact disc.
Slide Objective
To illustrate how to move
objects within a domain.
Lead-in
You move objects from one
location to another when
organizational or
administrative
functions change.
Explain to students how
permissions are affected
when you move objects.
Delivery Tip
Demonstrate how to move
objects in Active Directory
within a domain.
Note
Module 3: Administering Active Directory 7
? Publishing Resources in Active Directory
? Introduction to Publishing Resources
? Publishing Shared Folders
? Publishing Printers
One of the key challenges of network administration is providing secure and
selective publication of network resources to users. Another challenge is
making it easy for employees to find information on the network. Active
Directory addresses these challenges by storing information about network
objects, offering rapid information retrieval, and providing security mechanisms
that control access to Active Directory information.
Slide Objective
To introduce the topics
related to publishing objects
in Active Directory.
Lead-in
To enable you to locate
resources centrally, you
publish resources in Active
Directory by adding Active
Directory objects that
point to the location of
the resource.
8 Module 3: Administering Active Directory
Introduction to Publishing Resources
Publish Resources:
? To Create Objects in Active Directory that:
? Directly contain the required information
? Provide a reference to the required information
? That Are Relatively Static and Change Infrequently
? To Enable Administrators and Users to Locate Resources
Even if the Physical Location of Resources Changes
PublishedPublished
Resource
Publish to Active
Directory
Publish to ActivePublish to Active
Directory
Directory
Server1
Resource
Resource
Active
Directory
Publishing means creating objects in Active Directory that either directly
contain the information that you want to make available, or provide a reference
to that information. For example, a user object, which resides in Active
Directory, contains useful information about users, such as their telephone
numbers and e-mail addresses, while a shared folder object contains a reference
to a shared folder, which resides on a computer in your network. Resources
should be published in Active Directory when the information contained in
them is useful to a user or when it needs to be highly accessible. You do not
need to publish resources that already exist in Active Directory, such as user
accounts. Examples of two resources that do not exist in Active Directory are
shared folders and printers on a computer that is not running Windows 2000.
The main characteristic of information published in Active Directory is that it is
relatively static and changes infrequently. Not publishing highly volatile
information, such as network adapter statistics, prevents extensive replication
traffic across a network. Telephone numbers and e-mail addresses are examples
of relatively static information that is suitable for publishing.
Publishing resources in Active Directory enables you to locate resources even if
the physical location of the resources changes. For example, as long as you
update the reference to the physical location, all shortcuts pointing to an Active
Directory object that represents a published shared folder will continue to work
after the shared folder has been moved to another computer. No user action is
required to continue gaining access to the shared folder.
Slide Objective
To introduce publishing
resources.
Lead-in
You can publish resources
to make them easily
accessible to users. One of
the main benefits of
publishing resources is that
users can locate resources
even if the physical location
of the resources changes.
Key Points
Resources should be
published in Active Directory
when access to these
resources is important
to users.
Publishing resources for
users enables users to
easily locate resources on
the network.
Module 3: Administering Active Directory 9
Publishing Shared Folders
? Publish Shared Folders That Can Be Accessed by UNC name
? Make a Shared Folder Accessible by First Sharing the Folder and Then
Publishing in Active Directory
? Use Active Directory Users and Computers to Publish a Shared Folder
? Add Description and Keywords to Shared Folder Object to Facilitate
Search Operations
Published
Published
Shared
Folder
Publish to Active
Directory
Publish to Active
Publish to Active
Directory
Directory
Server1
Shared
Folder
Shared
Folder
Active
Directory
You can publish any shared folder in Active Directory that can be accessed by
using a Universal Naming Convention (UNC) name. A computer running
Windows 2000 can use Active Directory to locate the object representing the
shared folder and then connect to the shared folder. You can publish shared
folders in Active Directory by using Active Directory Users and Computers. To
make a shared folder accessible, you first share the folder, and then publish the
shared folder in Active Directory.
To publish a shared folder, perform the following steps:
1. In Active Directory Users and Computers, right-click the OU where you
want to publish the shared folder, click New, and then click Shared Folder.
2. In the Shared Folder Name text box, type the name of the folder.
3. In the UNC Path text box, type the UNC name that you want to publish in
Active Directory.
The UNC path is the complete Windows 2000 name of a network resource
that conforms to the \\servername\sharename syntax.
After you have published a shared folder, you can add a description and
keywords to the shared folder objects to facilitate searching for it.
To add a description and keywords to the shared folder objects, perform the
following steps:
1. In Active Directory Users and Computers, right-click the shared folder, and
then click Properties.
2. Type the description for the shared folder in the Description text box, and
then click Keywords.
3. Type the keyword that will facilitate searching for this folder, click
Add, and then click Close. You can add more than one keyword for a
shared folder.
Slide Objective
To illustrate how to publish
shared folders.
Lead-in
After sharing a folder on a
computer, you can publish
the shared folder in
Active Directory.
Delivery Tip
Demonstrate how to
publish a shared folder in
Active Directory.
Demonstrate how to add a
description and keywords to
the published shared folder.
Show students some
examples of meaningful
descriptive words
and keywords.
Key Point
You can publish any shared
folder in Active Directory
that can be accessed by
using a UNC name.
10 Module 3: Administering Active Directory
Publishing Printers
? Windows 2000 Automatically Publishes the Printer in Active Directory
? Administer Published Printers by:
? Selecting the Users, Groups, and Computers as containers option to
view all default published printers
? Selecting the Manage option to manage printers
? Selecting the Properties option to view printer object’s properties
? Organize Shared Printers by Placing Them in One OU
? Use Active Directory User and Computers to Publish Printers on a
Computer Not Running Windows 2000
Published
Published
Printer
Publish to Active
Directory
Publish to Active
Publish to Active
Directory
Directory
Server1
Active
Directory
Printer
When you install and share a printer on a computer running Windows 2000 that
belongs to a domain, Windows 2000 automatically publishes the printer in
Active Directory. Windows 2000 creates a printer object as a child object of the
computer on which the printer is installed. To administer published printers,
you can use the following options:
?? To view printer objects in Active Directory Users and Computers, on the
View menu, click Users, Groups, and Computers as containers, and then
expand the console tree to show the computer on which you installed
the printer.
?? To manage a printer, right-click the printer object in the details pane, and
then click Manage.
?? To view a printer’s properties, right-click the printer object, and then
click Properties.
To organize shared printers, you can move related printers that are installed on
multiple computers into a single OU. If you do not move printer objects, you
can use the Active Directory search capabilities to locate the printers that you
administer. To ensure accurate search results, follow a naming standard for the
printer’s properties, such as standard printer names or a standard way to locate.
Note that when you configure or revise the printer’s properties, Windows 2000
automatically updates the printer object’s attributes in Active Directory.
If you install and share a printer on a computer that is not running
Windows 2000, the printer is not automatically published in Active Directory.
However, you can publish these shared printers in Active Directory by
performing the following steps:
1. In Active Directory Users and Computers, right-click the OU where you
want to publish the printer.
2. Point to New, and then click Printer.
3. Type the UNC name of the printer that you want to publish in
Active Directory.
Slide Objective
To describe how to
publish printers.
Lead-in
By default, computers
running Windows 2000 that
belong to a domain publish
all shared printers in Active
Directory. You publish
printers that are on a
computer not running
Windows 2000.
Emphasize that
Windows 2000 automatically
publishes a printer in
Active Directory.
Tell the students that to
facilitate searching, you
should try to populate all of
the fields in the Properties
dialog box of
published printers.
Key Points
A computer running
Windows 2000 that belongs
to a domain automatically
publishes all shared printers
in Active Directory.
On a computer that is not
running Windows 2000, you
need to publish a printer.
Module 3: Administering Active Directory 11
? Locating Objects in Active Directory
? What Is the Global Catalog?
? Using the Find Command for Basic Search
? Using the Find Command for Advanced Search
? Using Windows Explorer to Locate Objects
Everyday tasks on a network involve communication with other users and
connection to published resources. These tasks require finding the names and e-
mail addresses of users, or locating information about shared resources to which
you want to connect. You can find a user by first name, last name, e-mail
address, office location, or any other attribute of that person’s user account in
Active Directory. Finding information is optimized by the use of the global
catalog if you are searching the entire directory.
Slide Objective
To introduce the topics
related to locating objects in
Active Directory
Lead-in
Administrators and users
can easily search and find
information in Active
Directory by using Active
Directory Users and
Computers and
Windows Explorer.
12 Module 3: Administering Active Directory
What Is the Global Catalog?
? Global Catalog Stores Information About Objects in
All Domains
? Global Catalog Contains:
? An entry for each Active Directory object
? Commonly used attributes to facilitate searching
? Access permissions for each object and attribute
Attributes
AttributesAttributes
First Name
Last Name
Home Page
First Name
Last Name
Home Page
Attributes
Attributes
Attributes
Printer Name
Printer Port
Printer Name
Printer Port
Global Catalog
Global CatalogGlobal Catalog
First Name
Last Name
First Name
Last Name
Printer Name
Printer Name
The global catalog stores information about objects in all domains. It facilitates
the location of information regardless of the domain that contains the data. So
that the size of the global catalog remains manageable, it contains only selected
attributes of objects.
The global catalog contains the following attributes for objects in
Active Directory:
?? Entries for all Active Directory objects, allowing you to search for objects in
all domains.
?? The commonly used attributes that facilitate searching. For example, you
can look for a user based on the user’s first name, last name, e-mail address,
or other attributes.
?? The access permissions for each object and attribute in the global catalog. If
you are searching for an object and you do not have the appropriate
permissions to view the object, you will not see the object in the list of
search results. This ensures that users can find only objects to which they
can gain access.
Slide Objective
To introduce the global
catalog that is used by
Windows 2000 to locate
objects in Active Directory.
Lead-in
Finding information is
optimized by the use of the
global catalog, which
contains selected
information about all Active
Directory objects.
Provide examples when
telling students about the
attributes for objects
contained in the
global catalog.
Key Point
The global catalog contains
entries for all Active
Directory objects, commonly
used attributes, and access
permissions for each object
and attribute.
Module 3: Administering Active Directory 13
Using the Find Command for Basic Search
Find Users, Contacts, and Groups
File Edit View Help
Find: Entire Directory
Users, Contacts, and Groups
In:
Find Now
StopStop
Clear All
Browse
Name DescriptionType
Domain Admins
Enterprise Admins
Schema Admins
Group
Group
Group
Designated administrators of the domain
Designated administrators of the enterpri
Designated administrators of the schema
Users, Contacts, and Groups
Computers
Printers
Shared Folders
Organizational Units
Custom Search
Routers
Entire Directory
Nwtraders
Namerica
Asia
Organizational Unit
Results Box
Results Box
Entire Active Directory
or Specific Domain
Entire Active Directory
or Specific Domain
Because of the centralized location of information about network objects in
Active Directory, administrators can easily perform basic search operations,
such as searching for computers, printers, and users in the entire Active
Directory or in specific domains. After locating these objects, users can manage
these objects from the search results.
Locating Objects
Administrators can use Active Directory Users and Computers to retrieve
information needed to perform administrative tasks.
To start a basic search operation, perform the following steps:
1. In Active Directory Users and Computers, on the Action menu, click Find.
2. In the Find dialog box, select the type of object for which you want
to search.
3. Enter the search text in the search criteria boxes in the Find dialog box. The
type of search criteria that are available varies depending on the type of
object that you select in the Find option.
Slide Objective
To illustrate how to perform
a basic search operation by
using the Find command in
Active Directory Users
and Computers.
Lead-in
Administrators use Active
Directory Users and
Computers to retrieve
information needed
to perform
administrative tasks.
Delivery Tip
Demonstrate how to perform
the basic search operations
by using the Find command
in Active Directory Users
and Computers.
Demonstrate how to view
and use different options in
the Find dialog box. Be sure
to demonstrate the Custom
Search option.
In the Results box,
right-click one of the objects
and demonstrate to students
how to administer it.
Key Points
When you select the Entire
Directory option,
Windows 2000 searches the
global catalog.
You can perform
administrative functions on
the objects that are listed in
the Results box after a
successful search operation
has been completed.
14 Module 3: Administering Active Directory
The following table describes the basic options in the Find dialog box.
Option Description
Find
The option that you use to select the type of objects for which you
can search.
?? Use the Users, Contacts and Groups option to locate users,
contacts, or groups by name or description.
?? Use the Computers option to locate computers by
name, owner, or role, such as workstation, server, or
domain controller.
?? Use the Printers option to locate printers by name, location,
or model.
?? Use the Shared Folders option to locate shared folders by
name or keywords.
?? Use the Organizational Units option to locate OUs by name.
?? Use the Custom Search option to search for a wide range of
object types, such as Computer, Contact, Group, OU, and User
instead of selecting one object type at a time. You can further
specify attributes to use to locate these object types.
?? Use the Routers option to locate different types of
routers, such as LAN-to-LAN, Demand-dial, and remote
access servers.
In The option that you use to select the location that you want
to search.
?? Use the Entire Directory
option to locate objects by searching
the global catalog.
?? Use the Domain option to locate objects in a specific domain.
The Results box is also present in the Find dialog box. The Results box
displays the results of your search after you click Find Now.
Administering Objects in the Results Box
After you have successfully completed a search, the search results appear. You
can then perform administrative functions on the objects that are listed in the
Results box. For example, to change the attribute values of an object, right-
click the object, and then click Properties. To manage the network resource
that an object represents, such as a computer, right-click the object, and then
click Manage.
When you right-click the object in the Results box, the same property sheet that
is invoked through Active Directory Users and Computers appears. Therefore,
you can manage the objects by selecting an appropriate option related to the
function that you want to perform on the object. The functions that are available
will depend on the type of object that you located.
Module 3: Administering Active Directory 15
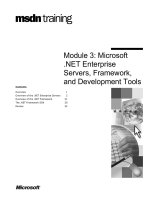
Using the Find Command for Advanced Search
Find Users, Contacts, and Groups
File Edit View Help
Find:
Find Now
StopStop
Clear All
Browse
Advanced
Users, Contacts, and Groups
Users, Contacts, and Groups
In:
Entire Directory
Field
User
Group
Contact
Condition: Value:
Add Remove
<Add criteria from above to this list>
Select Attributes
for Searching
Select Attributes
for Searching
Set Condition
Set Condition
Specify Value of
the attribute
Specify Value of
the attribute
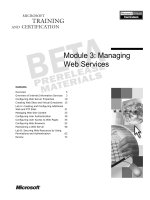
Active Directory Users and Computers provides the Advanced option in the
Find dialog box to allow administrators to further customize searches and filter
data retrieved from Active Directory. The Advanced option allows you to
specify search criteria that define the objects for which you are searching. By
using the Advanced option, you can search for objects by any attribute that is
valid for the object type. For example, you can search Active Directory for all
user accounts that do not have a telephone number configured (telephone
number not present). You can then use the search results to edit the properties
of each user object and enter the user’s telephone number.
To start an advanced search operation, perform the following steps:
1. In Active Directory Users and Computers, on the Action menu, click Find.
2. Select an appropriate option in the Find and In boxes, and then
click Advanced.
Slide Objective
To illustrate how to perform
an advanced search
operation by using the
Find command in
Active Directory Users
and Computers.
Lead-in
By using Active Directory
Users and Computers, you
can also perform an
advanced search operation.
The Advanced option
enables you to search for
objects based on any of the
objects’ attributes.
Explain to students
that different objects have
different attributes available
for which to search in an
advanced search operation.
Delivery Tip
Demonstrate how to locate
objects by using the
Advanced option in the
Find dialog box.