Tài liệu Module 8: Supporting Remote Access Policy doc
Bạn đang xem bản rút gọn của tài liệu. Xem và tải ngay bản đầy đủ của tài liệu tại đây (1 MB, 34 trang )
Contents
Overview 1
Examining Remote Access Policies 2
Examining Remote Access Policy Evaluation 4
Creating a Remote Access Policy 9
Lab A: Configuring a RAS Policy 13
Troubleshooting Remote Access 20
Review 28
Module 8: Supporting
Remote Access Policy
Information in this document, including URL and other Internet Web site references, is subject to
change without notice. Unless otherwise noted, the example companies, organizations, products,
domain names, e-mail addresses, logos, people, places, and events depicted herein are fictitious,
and no association with any real company, organization, product, domain name, e-mail address,
logo, person, places or events is intended or should be inferred. Complying with all applicable
copyright laws is the responsibility of the user. Without limiting the rights under copyright, no
part of this document may be reproduced, stored in or introduced into a retrieval system, or
transmitted in any form or by any means (electronic, mechanical, photocopying, recording, or
otherwise), or for any purpose, without the express written permission of Microsoft Corporation.
Microsoft may have patents, patent applications, trademarks, copyrights, or other intellectual
property rights covering subject matter in this document. Except as expressly provided in any
written license agreement from Microsoft, the furnishing of this document does not give you any
license to these patents, trademarks, copyrights, or other intellectual property.
2001 Microsoft Corporation. All rights reserved.
Microsoft, MS-DOS, Windows, Windows NT, <plus other appropriate product names or titles.
The publications specialist replaces this example list with the list of trademarks provided by the
copy editor. Microsoft, MS-DOS, Windows, and Windows NT are listed first, followed by all
other Microsoft trademarks listed in alphabetical order. > are either registered trademarks or
trademarks of Microsoft Corporation in the U.S.A. and/or other countries.
<The publications specialist inserts mention of specific, contractually obligated to, third-party
trademarks, provided by the copy editor>
The names of actual companies and products mentioned herein may be the trademarks of their
respective owners.
Module 8: Supporting Remote Access Policy iii
Instructor Notes
This module provides students with the knowledge and skills necessary to
support remote access to a Microsoft
®
Windows
®
2000 network through the use
of remote access policies and profiles, and to troubleshoot common remote
access problems.
At the end of this module, students will be able to:
!
Explain remote access policy and profile concepts.
!
Describe the process of remote access policy evaluation.
!
Create a remote access policy and configure a remote access profile.
!
Maintain and troubleshoot remote access.
Materials and Preparation
This section provides you with the required materials and preparation tasks that
are needed to teach this module.
Required Materials
To teach this module, you need the Microsoft PowerPoint
®
file 2126a_08.ppt.
Preparation Tasks
To prepare for this module, you should:
!
Read all of the materials for this module.
!
Complete the labs.
Presentation:
45 Minutes
Lab:
15 Minutes
iv Module 8: Supporting Remote Access Policy
Module Strategy
Use the following strategy to present this module:
!
Examining Remote Access Policies
Explain the purpose of remote access policies. Solicit examples of when
remote access policies could benefit a company. Describe the components
of a remote access policy.
!
Examining Remote Access Policy Evaluation
Students must understand the evaluation process to effectively manage
remote access policies in a network. Describe the evaluation process that
occurs when a user attempts to access a network remotely. Next, discuss the
default remote access policy, and then explain the impact of multiple remote
access policies.
!
Creating a Remote Access Policy
Explain how to configure dial-in settings, policy conditions, and policy
settings, while emphasizing that all settings must match. Demonstrate each
of the procedures.
!
Troubleshooting Remote Access
Discuss the type of information that can be obtained by monitoring the
remote access server. Explain methods for checking the communication
lines, and demonstrate methods for checking communication hardware to
locate the source of a remote access problem. Finally, discuss the various
configuration settings that could be the source of a remote access problem.
Module 8: Supporting Remote Access Policy 1
Overview
!
Examining Remote Access Policies
!
Examining Remote Access Policy Evaluation
!
Creating a Remote Access Policy
!
Troubleshooting Remote Access
In Microsoft
®
Windows
®
2000, you can define and create remote access
policies to control the level of remote access that a user or group of users has to
the network. Remote access policies are a set of conditions and connection
settings that give network administrators more flexibility in granting remote
access permissions and usage.
The Windows 2000 Routing and Remote Access service uses remote access
policies to determine whether to accept or reject connection attempts. As the
administrator, you must to troubleshoot and maintain the remote access server
for optimum performance.
At the end of this module, you will be able to:
!
Explain remote access policy and profile concepts.
!
Describe the process of remote access policy evaluation.
!
Create a remote access policy and configure a remote access profile.
!
Maintain and troubleshoot remote access.
The information in this module applies to remote access policies in an
environment in which the Active Directory
™
directory service is enabled. In a
native mode domain, all domain controllers run Windows 2000, which you can
use to take advantage of the full functionality of Active Directory.
Topic Objective
To provide an overview of
the module topics and
objectives.
Lead-in
In this module, you will learn
about remote access
policies, creating remote
access policies, and
troubleshooting remote
access.
Note
2 Module 8: Supporting Remote Access Policy
Examining Remote Access Policies
A Remote Access Policy:
A Remote Access Policy:
!
Is stored locally, not in Active Directory
!
Consists of
" Conditions
" Permissions
" Profile
You can use remote access policies to assign settings to a connection, based on
the user who is connecting and the properties of the connection. Understanding
how policies are applied will help you provide customized access to the various
users and groups in your organization. The default policy settings are probably
adequate for your remote access needs. However, it is important that you
become familiar with remote access policies because using them effectively
provides you with flexibility in granting remote access permissions and usage.
Policies Are Stored Locally
Windows 2000 stores remote access policies on the remote access server, not in
Active Directory, so that policies can vary according to remote access server
capabilities.
Components of a Policy
A remote access policy consists of three components that cooperate with Active
Directory to provide secure access to remote access servers. The three
components of a remote access policy are its conditions, permissions, and
profile.
Slide Objective
To identify the concepts
essential to an
understanding of remote
access policies.
Lead-in
To create effective remote
access policies, you must
understand the concepts
behind policies, their
associated profiles, and how
they are evaluated and
applied.
Key Point
Remote access policies are
stored on the remote access
server, not in Active
Directory. This allows
policies to vary according to
the capabilities of the
server.
Module 8: Supporting Remote Access Policy 3
Conditions
The conditions of a remote access policy are a list of attributes, such as the time
of day, user groups, caller IDs, or Internet Protocol (IP) addresses, which are
compared to the settings of the connection attempt by the client.
When a user connects to the remote access server, the characteristics of the
connection attempt are compared with the conditions of the remote access
policy. If there are multiple conditions, all of the conditions must match the
settings of the connection attempt for the policy to be activated.
If you are using a stand-alone remote access server that is running
Windows 2000, you cannot use the local groups on that server as the user
groups parameter.
Permissions
Remote access connections are permitted on the basis of a combination of the
dial-in properties of a user account and remote access policies. The permission
setting on the remote access policy works with the user’s dial-in permissions in
Active Directory.
If all of the conditions of a remote access policy are met, remote access
permission is either granted or denied. When you create a remote access policy,
you can choose to either grant or deny remote access permission for the policy.
You can also grant or deny remote access permission for each user account. The
user remote access permission overrides the policy remote access permission.
However, when remote access permission on a user account is set to the
Control access through Remote Access Policy option, the policy remote
access permission determines whether the user is granted access.
Profile
Each policy includes a profile of settings, such as authentication and encryption
protocols, that are applied to the connection. The settings in the profile are
applied to the connection immediately, and may cause the connection to be
denied. For example, if the profile settings for a connection specify that the user
is required to use Microsoft Challenge Handshake Authentication Protocol
version 2 (MS-CHAP v2) authentication, but the client cannot use that
authentication protocol, access will be denied. Additionally, the profile can
require that the connection meet other restrictions, such as origination from a
specific telephone number and call duration.
Note
4 Module 8: Supporting Remote Access Policy
#
##
#
Examining Remote Access Policy Evaluation
!
Following Policy Evaluation Logic
!
Examining Default and Multiple Policies
It is important to understand how remote access policies are evaluated, so that
you can determine the settings that will apply to incoming connections and plan
your policies appropriately. Familiarity with the logic of remote access policy
evaluation, the features of the default policy, and the interaction of multiple
policies will help you manage effective remote access policies.
Slide Objective
To identify topics related to
remote access policy
evaluation.
Lead-in
It is important to understand
the logic of remote access
policy evaluation, the
function of the default policy,
and the interaction of
multiple policies.
Module 8: Supporting Remote Access Policy 5
Following Policy Evaluation Logic
Routing and Remote Access
matches the conditions of the
remote access policy to the
characteristics of the connection
Routing and Remote Access
matches the conditions of the
remote access policy to the
characteristics of the connection
Connection
Connection
No
No
Routing and Remote Access
checks the user’s dial-in
permission in Active Directory
Routing and Remote Access
checks the user’s dial-in
permission in Active Directory
Yes
Yes
Allow
Allow
Profile
Evaluation
Profile
Evaluation
Deny
Deny
Allow
Allow
Deny
Deny
Use Remote
Access Policy
Use Remote
Access Policy
Routing and Remote Access
matches the connection to the
settings of the user account and
the policy profile
Routing and Remote Access
matches the connection to the
settings of the user account and
the policy profile
Connection
Connection
Yes
Yes
No
No
Connection
Connection
No
No
Connection
Connection
Yes
Yes
No
No
Yes
Yes
Allow
Allow
Deny
Deny
Allow
Allow
Deny
Deny
Use Remote
Access Policy
Use Remote
Access Policy
Conditions
Permissions
Profile
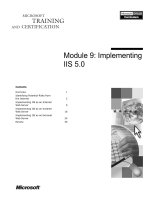
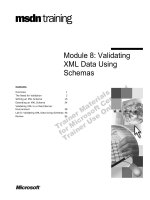
Windows 2000 evaluates a connection attempt on the basis of logic that
incorporates policy conditions, user and remote access permissions, and profile
settings.
Remote access policies are evaluated as follows:
1. Routing and Remote Access matches the conditions of the remote access
policy to the characteristics of the attempted connection:
• If there is no policy that contains a set of conditions that matches the
characteristics of the connection, access is denied.
• If there is a match between the policy and the characteristics of the
connection, the dial-in permissions of the user account are checked.
Thus, the connection is authenticated according to the profile of the
remote access policy.
2. Routing and Remote Access checks the user account’s dial-in permissions:
• If the permission is set to Deny access, the user is denied access.
• If the permission is set to Allow access, the remaining user account
properties, such as Verify Caller ID and Assign a Static IP Address,
are applied if enabled. Then, the profile for the policy is applied.
• If the permission is set to Control access through Remote Access
Policy, the policy’s permission setting (to either allow or deny access to
connections that meet the policy conditions) determines user access.
Slide Objective
To illustrate the logic that is
used to evaluate remote
access permissions,
policies, and profiles.
Lead-in
Remote access policies
work together with user
properties to create a robust
model for granting remote
access to users and groups.
Delivery Tip
The slide for this topic
includes animation. Click or
press the SPACEBAR to
advance the animation.
The numbers in the slide
animation correspond to the
numbers in this list. (The
numbered text boxes are
visible only in the
animation.)
Use this text to explain the
flowchart in the slide.
Explain that the flow
consists of three basic parts:
checking conditions, then
permissions, and then the
profile.
6 Module 8: Supporting Remote Access Policy
If the dial-in permission for the user account is set to Allow access,
the policy permission is set to Deny access, and all other profile conditions
are met, the connection will be accepted.
3. Routing and Remote Access applies the settings in the policy’s profile to the
incoming connection.
The connection may not be accepted if a critical setting in the profile does not
match a setting on the remote access server. For example, the profile for an
incoming connection may specify that a group can connect only at night. If a
user in that group tries to connect during the day, the connection will be denied.
The connection may be disconnected at a later stage because of a setting in the
profile, such as a time restriction on connecting.
Note
Module 8: Supporting Remote Access Policy 7
Examining Default and Multiple Policies
!
Default Remote Access Policy
" Applied to all connection attempts that do not match any
other policies
" Denies all connection attempts unless user’s account is
set to Allow Access
!
Multiple Policies
" Policies are checked in order until a policy matches the
connection attempt
" Profile and user account settings are checked for the
first matching remote access policy only
The default policy is applied to all connection attempts that do not match any
other policies. You must be aware of the settings of this policy and understand
how multiple policies interact.
Default Remote Access Policy
The default policy, called Allow access if dial-in permission is enabled, is
created when Routing and Remote Access is installed. This policy controls
access through the user’s dial-in permission. The following table describes the
settings of the default policy.
Setting Value
Conditions Current date/time = any day, any time
Permissions Deny access
Profile None
Setting the dial-in permission on every user account to Control access through
Remote Access Policy will result in the rejection of all connection attempts if
you do not change the default remote access policy. However, if you set one
user’s dial-in permission to Allow access, that user’s connection attempts will
be accepted. If you change the permission setting on the default policy to Grant
remote access permission, all connection attempts will be accepted.
Multiple Policies
Many organizations have different remote access requirements for different
groups. These organizations require multiple remote access policies. If a
connection attempt does not match any of the remote access policies, the
connection attempt is rejected, even when a user’s dial-in permission is set to
Allow access.
Slide Objective
To identify additional topics
that are relevant to remote
access policy evaluation.
Lead-in
The default remote access
policy provides a policy that
will take effect on all users if
no other policies exist.
Key Point
If no remote access policy
exists (for example, if the
default policy is deleted),
users will not be able to gain
access to the network,
regardless of their individual
dial-in permissions.
8 Module 8: Supporting Remote Access Policy
When a user attempts to connect, the first policy in the ordered list of remote
access policies is checked. If all of the conditions of the policy do not match the
connection attempt, the next policy in the ordered list is checked, until a policy
matches the connection attempt.
The connection attempt is then evaluated against the profile and user account
settings of that profile. If the connection attempt does not match the profile or
user account settings of the first remote access policy that matches the
connection attempt, the connection attempt is rejected. No other policies are
checked.
You can modify the order of remote access policies. For example, you might
want the remote access policy that applies to the majority of your users to be
checked first, so that fewer connection attempts must be evaluated against more
than one policy.
To modify the order of remote access policies:
1. In Routing and Remote Access, in the console tree, click Remote Access
Policies.
2. In the details pane, right-click the policy that you want to move, and then
click either Move Up to move the policy up one level, or Move Down to
move the policy down one level.
Because Routing and Remote Access requires that the conditions of
at least one policy be matched, if the default policy is removed and there are no
other policies, all connection attempts will be rejected. In most situations, you
must leave the default policy unaltered to provide access for users who are
explicitly granted access through their user permissions.
Importan
t
Module 8: Supporting Remote Access Policy 9
#
##
#
Creating a Remote Access Policy
!
Configuring Remote Access Policy Conditions
!
Configuring Remote Access Profile Settings
You can create detailed rules for remote access that are as simple or as complex
as your organization needs. A remote access policy consists of user dial-in
settings, remote access policy conditions, and remote access policy settings.
Although you are not required to complete these settings in any particular order,
it is important to include all components in your planning and implementation.
For more information about user dial-in settings, see Module 7,
“Configuring Remote Access,” in Course 2126A, Managing a Microsoft
Windows 2000 Network Environment (Prerelease).
Slide Objective
To identify the topics that
are relevant to the creation
of a remote access policy.
Lead-in
Creating a remote access
policy involves configuring
the user’s dial-in settings,
creating the policy, and then
defining the profile.
Note
10 Module 8: Supporting Remote Access Policy
Configuring Remote Access Policy Conditions
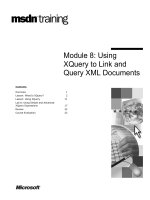
Examples of Connection Attempt Conditions
Examples of Connection Attempt Conditions
!
Is between 8 A.M. and 5 P.M., Monday–Friday
AND
!
Is from any IP address that matches 192.168.*.*
AND
!
Is from any user in the Sales group
Remote access policy conditions are attributes that are compared to the settings
of a connection attempt. If there are multiple conditions in a policy, all of the
conditions must match the settings of the connection attempt, or the next policy
is evaluated.
The following table lists some of the more common conditions that you can set
for a remote access policy.
Condition name
Description
Wildcard
okay (*)
Used by
IAS
NAS IP Address A character string that identifies the IP address of the network access
server (NAS).
Yes Yes
Calling Station ID A character string that identifies the telephone number that the caller
uses. The telephone line, hardware, and hardware driver must support
reception of caller ID data.
Yes No
Day and Time
Restrictions
The day of the week and the time of day of the connection attempt. No No
Client IP Address A character string that identifies the IP address of the RADIUS
(Remote Authentication Dial-In User Service) client.
Yes Yes
Windows Groups The names of the Windows 2000 groups to which the user who is
attempting the connection belongs. For a remote access server in a
domain in native mode, or for an IAS server, use universal groups.
There is no condition for a specific user name.
No No
A network access server (NAS) is a device that accepts Point-to-Point
protocol (PPP) connections and places clients on the network. For example, the
network access server could be your Internet service provider (ISP) RADIUS
server, a remote access server in a branch office, or the remote access server on
your network.
Slide Objective
To illustrate the role of
policy conditions.
Lead-in
Several conditions can be
added to a single policy, so
that you can create highly
customized access for your
organization.
Key Point
Explain that Internet
Authentication Service (IAS)
uses several of these
conditions for RADIUS
support.
Note
Module 8: Supporting Remote Access Policy 11
You can create a remote access policy and an associated profile under Remote
Access Policies in the console tree of Routing and Remote Access.
To add a remote access policy:
1. On the Administrative Tools menu, open Routing and Remote Access.
2. Right-click Remote Access Policies, and then click New Remote Access
Policy.
3. In the Add Remote Access Policy Wizard, type the name of the policy in the
Policy friendly name box, and then click Next.
4. To configure a new condition, click Add.
5. In the Select Attribute dialog box, click the attribute to add, and then click
Add.
6. In the attribute dialog box (the name of this dialog box will vary according
to the attribute selected), enter the information that the attribute requires,
and then click OK.
7. Click Add to add another condition, or click Next to continue with the
wizard.
8. To grant access to callers matching these conditions, click Grant remote
access permission, or to deny access, click Deny remote access
permission, and then click Next.
9. You can then modify the default profile, or click Finish to create a policy
with the default profile settings. You can edit the profile settings after the
policy is created.
Delivery Tip
Demonstrate how to create
a remote access policy.
12 Module 8: Supporting Remote Access Policy
Configuring Remote Access Profile Settings
Examples of Profile Settings
Examples of Profile Settings
!
90-minute connect time
AND
!
Require IPSec encryption
The remote access profile specifies what kind of access the user will be given if
the conditions match. Access will be granted only if the connection attempt
does not conflict with the settings of the user account or the profile. You can
configure a profile in the Edit Dial-in Profile dialog box by clicking Edit
Profile in the Properties dialog box for a policy. The following settings are
some of the more popular settings that you can configure in the Properties
dialog box:
!
Dial-in Constraints. You can use these settings to determine the amount of
idle time before disconnection; the maximum session time; and the days,
times, telephone numbers, and allowed media types, such as Integrated
Services Digital Network (ISDN), and virtual private network (VPN).
!
IP. You can configure client IP address assignment and Transmission
Control Protocol/Internet Protocol (TCP/IP) packet filtering on this tab. You
can define separate filters for inbound or outbound packets.
!
Authentication. You can use these settings to define the authentication
protocols that are allowed for connections that use this policy. Make sure
that any protocols that you select are also enabled in the Properties dialog
box for the server.
!
Encryption. You can use this tab to specify the types of encryption that are
prohibited, allowed, or required.
Slide Objective
To illustrate the role of
profile settings.
Lead-in
After permission has been
granted to a connection
attempt, the settings of the
profile are applied to the
connection. Again, if there is
no match, the connection is
denied.
Module 8: Supporting Remote Access Policy 13
Lab A: Configuring a RAS Policy
Objectives
After completing this lab, you will be able to:
!
Create a remote access policy.
!
Create a remote access profile.
!
Test a policy and a profile.
Prerequisites
Before working on this lab, you must have a familiarity with remote access
policy and profile concepts.
Scenario
Your company requires more control over which employees have remote access
to the network and how those employees connect to the network.
To accomplish this, you must configure remote access policies. You will create
a user account and configure its dial-in properties and group membership. You
will then create a remote access policy for this group and configure access by
using that policy. Finally, you will use the user account that you created to dial
in to your computer through a VPN connection to test the use of the policy.
Estimated time to complete this lab: 15 minutes
Topic Objective
To introduce the lab.
Lead-in
In this lab, you will create,
configure, and test remote
access policies.
Explain the lab objectives.
14 Module 8: Supporting Remote Access Policy
Lab Setup
Tasks Detailed steps
$
Log on to your domain as
Administrator with a
password of password.
a.
Press CTRL+ALT+DEL to open the logon screen.
b.
In the User Name box, type Administrator
c.
In the Password box, type password
d.
In the Domain box, ensure that your domain is listed.
e.
Click OK.
Module 8: Supporting Remote Access Policy 15
Exercise 1
Configuring and Testing Remote Access Policies
In this exercise, you will create a test user in a test group, verify that the default policy denies
access to the test user, and then create and test a remote access policy that grants access to members
of the test group.
Scenario
Northwind Traders has implemented remote access servers for the sales force, to allow for secure
access to the company network from the Internet. As the administrator for the remote access servers
on your network, you must implement a remote access policy that grants access to the sales groups
and denies access to everyone else. Before you set up the actual remote access policy, you will
create a test user and a test group.
Tasks Detailed steps
1.
Create a user called
RemoteUserx (where x is
your student number), with
a password of password.
Configure the user
properties to allow dial-in
access.
a.
On the Administrative Tools menu, open Active Directory Users and
Computers.
b.
In the console tree, under domain, right-click Users, point to New, and
then click User.
c.
In the New Object – User dialog box, in the First name box, type
RemoteUserx (where x is your student number).
d.
In the User logon name box, type RemoteUserx
e.
Select @domain.nwtraders.msft, and then click Next.
f.
Set the password for the new user account to password, click Next,
and then click Finish.
g.
In the details pane, right-click RemoteUserx, and then click
Properties.
h.
On the Dial-in tab, click Allow access, and then click OK.
2.
Create a new global group
called RemoteGroupx. Add
the user that you just created
to the group.
a.
In the console tree, right-click Users, point to New, and then click
Group.
b.
In the New Object – Group dialog box, in the Group name box, type
RemoteGroupx (where x is your student number).
c.
Under Group scope, verify that Global is selected, and under Group
type, verify that Security is selected, and then click OK.
d.
Open the Properties dialog box for RemoteGroupx.
e.
On the Members tab, click Add.
f.
In the Select Users, Contacts, Computers, or Groups dialog box, in
the Look in box, verify that your domain is displayed.
g.
In the list of objects, click RemoteUserx, click Add, and then click
OK.
h.
Click OK to close the RemoteGroupx Properties dialog box.
i.
Minimize Active Directory Users and Computers.
16 Module 8: Supporting Remote Access Policy
(continued)
Tasks Detailed steps
3.
Test your dial-in
configuration by dialing in
to your computer by using
the account that you created,
and then close the
connection.
a.
Right-click My Network Places, and then click Properties.
b.
In Network and Dial-up Connections, double-click Virtual Private
Connection.
c.
Connect as RemoteUserx (where x is your student number) with a
password of password.
d.
Click OK to close the "Connection Complete" message, and then
disconnect the VPN connection.
What enabled the RemoteUserx account to be able to access your computer through the VPN connection?
On the RemoteUser
x
Dial-in Properties tab, you enabled the Allow access option.
4.
Configure the dial-in
permissions for
RemoteUserx to have access
controlled through the
remote access policy.
a.
Restore Active Directory Users and Computers, and then open the
Properties dialog box for RemoteUserx.
b.
On the Dial-in tab, click Control access through Remote Access
Policy, and then click OK.
Note: The domain controllers must be running in native mode for the Control access through Remote
Access Policy option to be available on the Dial-in tab.
4. (continued)
c.
Minimize Active Directory Users and Computers.
5.
Test your dial-in
configuration by dialing in
to your computer as
RemoteUserx.
a.
In Network and Dial-up Connections, double-click Virtual Private
Connection, and then connect as RemoteUserx (where x is your
student number) with a password of password.
b.
In the Error Connecting to Virtual Private Connection dialog box,
click Cancel.
c.
Minimize Network and Dial-up Connections
Why was RemoteUserx denied access through the VPN connection?
The connection
attempt was denied because the default remote access policy denies access to all users.
In native mode, if you select Control access through Remote Access Policy, you must configure a policy
that allows access for your users.
Module 8: Supporting Remote Access Policy 17
(continued)
Tasks Detailed steps
6.
Use Routing and Remote
Access to add a new policy
called Allow RemoteGroupx
access, which allows access
to users in the
RemoteGroupx group. Make
sure that this policy is
evaluated before the default
policy.
a.
On the Administrative Tools menu, open Routing and Remote
Access.
b.
In the console tree, expand server (where server is the name of your
computer), right-click Remote Access Policies, and then click New
Remote Access Policy.
c.
In the Add Remote Access Policy Wizard, on the Policy Name page,
type Allow RemoteGroupx access (where x your student number), and
then click Next.
d.
On the Conditions page, click Add, and in the Select Attribute dialog
box, click Windows-Groups, and then click Add.
e.
In the Groups dialog box, click Add.
f.
In the Select Objects dialog box, in the Look in list, click your
domain.
g.
In the Select Groups dialog box, under Name, click RemoteGroupx,
click Add, and then click OK.
h.
In the Groups dialog box, click OK.
i.
On the Conditions page, click Next.
j.
On the Permissions page, click Grant remote access permission, and
then click Next.
k.
On the User Profile page, click Finish.
l.
In Routing and Remote Access, in the console tree, click Remote
Access Policies, and in the details pane, right-click Allow
RemoteGroupx access, and then click Move Up.
m.
Minimize Routing and Remote Access.
7.
Test your dial-in
configuration by dialing in
to your computer.
a.
Restore Network and Dial-Up Connections, double-click Virtual
Private Network, and then connect as RemoteUserx with a password
of password.
b.
Click OK to close the "Connection Complete" message, and then
disconnect the VPN connection.
Why was RemoteUserx allowed access through the VPN connection?
You created a remote access policy that allows only RemoteGroupx access, and RemoteUserx is a
member of RemoteGroupx
.
8.
Configure the order of the
remote access policies so
that the default policy is
evaluated first.
a.
Restore Routing and Remote Access.
b.
In the console tree, click Remote Access Policies, and in the details
pane, right-click RemoteGroupx, and then click Move Down.
c.
Minimize Routing and Remote Access.
18 Module 8: Supporting Remote Access Policy
(continued)
Tasks Detailed steps
9.
Test your dial-in
configuration by dialing in
to your partner’s computer.
a.
In Network and Dial-Up Connections, double-click Virtual Private
Network, and then connect as RemoteUserx with a password of
password.
b.
In the “Error Connecting to Virtual Private Connection” message, click
Cancel.
Why was RemoteUserx denied access through the VPN connection?
You moved the remote access policy down, so the first policy is the default. The first policy allows
only users configured with the option
Control access through Remote Access Policy;
therefore,
RemoteUserx is denied access
.
10.
Configure the user dial-in
properties of RemoteUserx
to allow access.
a.
Restore Active Directory Users and Computers.
b.
Open the Properties dialog box for RemoteUserx.
c.
On the Dial-in tab, click Allow access, and then click OK.
d.
Close Active Directory Users and Computers.
11.
Test your dial-in
configuration by dialing in
to your computer.
a.
In Network and Dial-Up Connections, double-click Virtual Private
Network, and then connect as RemoteUserx (where x is your student
number) with a password of password.
b.
Click OK to close the "Connection Complete" message, and then
disconnect the VPN connection.
Why was RemoteUserx allowed access through the VPN connection?
On the Dial-in properties tab of RemoteUserx, you configured the option Allow access. After you
made that change, the default remote access policy (which allows access if the user account a has
Allow access enabled) became true.
Module 8: Supporting Remote Access Policy 19
Exercise 2
Disabling Routing and Remote Access
In this exercise, you will disable Routing and Remote Access on your server and then log off.
Scenario
One of your remote access servers is going to be replaced. You must disable Routing and Remote
Access for the server before taking the server offline.
Tasks Detailed steps
1.
Remove the remote access
policy that you added in the
previous exercise.
a.
Restore Routing and Remote Access.
b.
In the console tree, click Remote Access Policies.
c.
In the details pane, right-click Allow RemoteGroupx access, and then
click Delete.
d.
In the Delete Policy box, click Yes.
2.
Use Routing and Remote
Access to disable the service
on your computer, close all
open windows, and then log
off.
a.
Right-click server (where server is the name of your computer), and
then click Disable Routing and Remote Access.
b.
In the Routing And Remote Access dialog box, click Yes.
c.
Close all open windows, and then log off.
20 Module 8: Supporting Remote Access Policy
#
##
#
Troubleshooting Remote Access
!
Monitoring Remote Access
!
Troubleshooting Communication Lines
!
Troubleshooting Communication Hardware
!
Troubleshooting Configuration Settings
Remote access to your organization requires the successful operation of many
components, including computers, communication lines, communication
hardware, and, in some cases, the Internet. Because the successful operation of
remote access relies on such a large number of components to function
correctly, operational problems arise occasionally. The ability to diagnose and
then fix problems is critical to keeping your local and remote users connected to
your network.
Slide Objective
To introduce the topics
related to troubleshooting
the remote access server.
Lead-in
To ensure the smooth
functioning of the remote
access server, it is important
to monitor and troubleshoot
the server regularly.
Module 8: Supporting Remote Access Policy 21
Monitoring Remote Access
Computer Management
A
ction View
Tree
Computer Management (Local)
System Tools
Event Viewer
System
Warning 3/1/2000 7:16:49 AM RemoteAccess
Type Date Time Source
Standard 19200 bps Model Properties
General Advanced
Diagnostics
Modem Information
Field Value
Hardware ID mdmgen192
Command Response
Logging
Append to L
og
Q
uery Modem
V
iew Log
!
Event Logs
!
Modem Logging
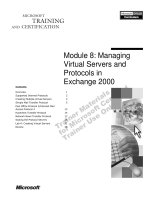
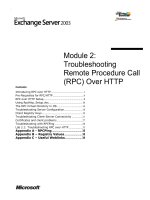
Monitoring the remote access server is the best way to determine the source of
problems on a remote access server. There are several tools and logs that can be
used to monitor and troubleshoot remote access.
Event Logs
The Windows 2000 event log contains information about system components in
Windows 2000 and is one of the first places to check for information about a
problem.
To access the event log, right-click My Computer, and then click Manage.
Under Computer Management, expand Event Viewer, and then click System.
The entries that have RemoteAccess listed in the source column are the event
logs related to remote access.
Modem Logging
Windows 2000 Professional automatically records a log of communication
made from the computer to a modem during a connection. This log is normally
overwritten each time a new connection is made, but can be configured to
append the log file. In Windows 2000 Server and Advanced Server, you must
manually enable the log file.
To enable modem logging:
1. In Control Panel, double-click Phone and Modem Options.
2. In the Phone and Modem Options dialog box, on the Modems tab, click
the modem that you are configuring, and then click Properties.
3. In the Properties dialog box for the modem, on the Diagnostics tab, select
the Record a Log check box, and then click OK. (In Windows 2000
Professional, this option appears as Append to Log. By appending to the
log, you ensure that each connection will not overwrite the existing log file.)
To view the log file, click View log on the Diagnostics tab.
Slide Objective
To explain the process of
monitoring the remote
access server.
Lead-in
It is important to monitor the
remote access server to
identify the source of a
problem.