Tài liệu Configuring Default Routing with RIP and IGRP pptx
Bạn đang xem bản rút gọn của tài liệu. Xem và tải ngay bản đầy đủ của tài liệu tại đây (28.97 KB, 4 trang )
1 - 4 Semester 5: Advanced Routing v2.0 - Lab 3.6.3 Copyright 2001, Cisco Systems, Inc.
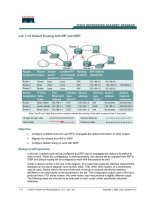
3.6.3: Configuring Default Routing with RIP and IGRP
Internet
Vista
SanJose2SanJose1
S0/1 192.168.2.1 /24
S0/0 192.168.2.2 /24
172.16.1.1 /16
S0/0 192.168.1.1 /24
S0/0 192.168.1.2 /24
Objective
In this lab, you configure a default route and use RIP to propagate this default information
to other routers. When you have this configuration working, you must migrate the network
from RIP to IGRP and configure default routing to work with that protocol as well.
Scenario
International Travel Agency (ITA) asked you to configure default routing for its network,
which currently uses RIP. The company connects to the Internet via SanJose2, so you
decide to configure a static default route on that router. Then you must configure RIP so
that it will propagate the default route to the other RIP routers.
ITA also asked you to explore the possibility of migrating all routers to IGRP. As a test,
you must configure the three routers in this scenario for IGRP and configure default
routing for that protocol as well.
Procedures
Before you begin this lab, it is recommended that you reload each router after
erasing its startup configuration. This prevents problems caused by residual
configurations. After you prepare the equipment, proceed with Step 1.
Step 1
Build and configure the network according to the diagram. Do not configure the
172.16.1.1/16 address on SanJose2 yet. This network connects ITA to its ISP and the
Internet.
On all three routers, configure RIP, but be sure not to configure SanJose2’s RIP process
to include the 172.16.0.0/16 network.
2 - 4 Semester 5: Advanced Routing v2.0 - Lab 3.6.3 Copyright 2001, Cisco Systems, Inc.
Use ping and show ip route to verify full connectivity within the network, excluding
172.16.0.0/16.
Step 2
Configure SanJose2 to simulate the existence of an outside network. For this scenario,
you need to simulate the link between ITA and its provider by configuring a loopback
interface with an IP address. Enter the following commands on SanJose2:
SanJose2(config)#interface loopback0
SanJose2(config-if)#ip address 172.16.1.1 255.255.255.0
Note: If you ping 172.16.1.1 from SanJose2’s console, the loopback interface
replies.
From Vista’s console, attempt to ping 172.16.1.1. This ping should fail because the
172.16.0.0/16 network is not in Vista’s table.
1. If no default route exists, what does a router do with a packet destined for a network that
is not in its table?
Step 3
Next, you must configure SanJose2 with a 0.0.0.0/0 default route pointed at the simulated
ISP. Issue the following command on SanJose2:
SanJose2(config)#ip route 0.0.0.0 0.0.0.0 loopback0
This command statically configures the default route. The default route directs traffic
destined for networks that are not in the routing table to the simulated WAN link
(loopback 0).
Unless you are using IOS version 12.1, RIP automatically propagates statically defined
default routes. So, depending on your IOS version, you might need to explicitly configure
RIP to propagate this 0.0.0.0/0 route. Enter these commands on SanJose2:
SanJose2(config)#router rip
SanJose2(config-router)#default-information originate
Step 4
Now check the routing tables of SanJose1 and Vista using the show ip route
command. Verify that they both have received and installed a route to 0.0.0.0/0 in their
tables.
1. On Vista, what is the metric of this route?
2. On SanJose1, what is the metric of this route?
SanJose1 and Vista still don’t have routes to 172.16.0.0/16 in their tables. From Vista,
ping 172.16.1.1. This ping should be successful.
3 - 4 Semester 5: Advanced Routing v2.0 - Lab 3.6.3 Copyright 2001, Cisco Systems, Inc.
3. Why does the ping to 172.16.1.1 work, even though there is no route to 172.16.0.0/16 in
Vista’s table?
Check to be sure that SanJose1 can also ping 172.16.1.1. Troubleshoot, if necessary.
Step 5
With default routing now working, you must migrate the network from RIP to IGRP for
testing purposes. Issue the following command on all three routers:
SanJose1(config)#no router rip
With RIP removed from each router’s configuration, configure IGRP on all three routers
using AS 24, as shown:
SanJose1(config)#router igrp 24
SanJose1(config-router)#network 192.168.1.0
Vista(config)#router igrp 24
Vista(config-router)#network 192.168.1.0
Vista(config-router)#network 192.168.2.0
SanJose2(config)#router igrp 24
SanJose2(config-router)#network 192.168.2.0
Use ping and show ip route to verify that IGRP is working properly. Don’t worry
about the 172.16.1.1 loopback address on SanJose2 yet.
Step 6
Check SanJose2’s routing table. The static default route to 0.0.0.0/0 should still be there.
To propagate this route with RIP, you issued the default-information originate
command. (Depending on your IOS version, you might not have needed to do that.) The
default-information originate command is not available in an IGRP
configuration. Thus, you must use a different method to propagate default information in
IGRP.
On SanJose2, issue the following commands:
SanJose2(config)#router igrp 24
SanJose2(config-router)#network 172.16.0.0
SanJose2(config-router)#exit
SanJose2(config)#ip default-network 172.16.0.0
These commands configure IGRP to update its neighbor routers about the network
172.16.0.0/16, which includes your simulated ISP link (loopback 0). Not only will IGRP
advertise this network, but the ip default-network command also will flag this
network as a candidate default route (denoted by an asterisk in the routing table). When
a network is flagged as a default, that flag stays with the route as it passed from neighbor
to neighbor by IGRP.
Check the routing tables of SanJose1 and Vista. If they don’t yet have the 172.16.0.0/16
route with an asterisk, you might need to wait for another IGRP update (90 seconds). You
can also issue the clear ip route * command on all three routers if you want to
force them to immediately send new updates.
When the 172.16.0.0/16 route appears as a candidate default in all three routing tables,
proceed to the next step.
4 - 4 Semester 5: Advanced Routing v2.0 - Lab 3.6.3 Copyright 2001, Cisco Systems, Inc.
Step 7
Because the 172.16.0.0/16 network is known explicitly by SanJose1 and Vista, you need
to create a second loopback interface on SanJose2 to test your default route. Issue the
following commands on SanJose2:
SanJose2(config)#interface loopback1
SanJose2(config-if)#ip address 10.0.0.1 255.0.0.0
This loopback interface simulates another external network.
Return to SanJose1 and check its routing table using the show ip route command.
1. Is there a route to the 10.0.0.0/8 network?
From SanJose1, ping 10.0.0.1. This ping should be successful.
2. If there is no route to 10.0.0.0/8 and no route to 0.0.0.0/0, why does this ping succeed?