Tài liệu Practical Database Programming With Visual C#.NET- P2 pdf
Bạn đang xem bản rút gọn của tài liệu. Xem và tải ngay bản đầy đủ của tài liệu tại đây (1.29 MB, 50 trang )
2.11 Create Oracle 10g XE Sample Database 73
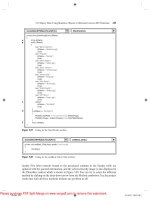
Figure 2.51 Completed LogIn table.
length of the string depends on the number of real letters entered by the user. The data
types for all columns are VARCHAR2 with one exception, which is the phone column
that has a CHAR type with an upper bound of 12 letters since our phone numbers are
composed of 10 digits, and we can extend this length to 12 with two dashes. For all other
columns, the length varies with the different information, so the VARCHAR2 is selected
for those columns.
The fi nished design view of your Faculty table is shown in Figure 2.52 . You need to
check the Not Null checkbox for the faculty_id column since we selected this column as
the primary key for this table.
Click on the Next button to go to the next page to add the primary key for this table,
which is shown in Figure 2.53 .
Check the Not Populated from the primary key list since we don ’ t want to use any
Sequence object to automatically generate a sequence of numeric numbers as our primary
key, and then select the FACULTY_ID(VARCHAR2) from the Primary Key textbox.
In this way, the faculty_id column is selected as the primary key for this table. Keep the
Composite Primary Key box untouched since we do not have that kind of key in this
table, and click on the Next button to go to the next page.
Since we have not created all other tables to work as our reference tables for the
foreign key, click on Next to continue, and we will do the foreign key for this table later.
Click on the Finish button to go to the Confi rm page. Finally click on the Create button
to create this new Faculty table. Your completed columns in the Faculty table are shown
in Figure 2.54 .
c02.indd 73c02.indd 73 2/11/2010 11:50:06 AM2/11/2010 11:50:06 AM
Please purchase PDF Split-Merge on www.verypdf.com to remove this watermark.
74 Chapter 2 Introduction to Databases
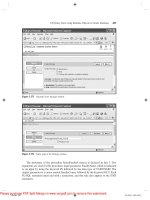
Figure 2.52 Finished design view of the Faculty table.
Figure 2.53 Opened Primary Key window.
c02.indd 74c02.indd 74 2/11/2010 11:50:08 AM2/11/2010 11:50:08 AM
Please purchase PDF Split-Merge on www.verypdf.com to remove this watermark.
2.11 Create Oracle 10g XE Sample Database 75
Figure 2.54 Completed columns in the Faculty table.
Table 2.24 Data in the Faculty Table
faculty_id faculty_name office phone college title email
A52990 Black Anderson MTC-218 750-378-9987 Virginia Tech Professor
A77587 Debby Angles MTC-320 750-330-2276 University of Chicago Associate Professor
B66750 Alice Brown MTC-257 750-330-6650 University of Florida Assistant Professor
B78880 Ying Bai MTC-211 750-378-1148 Florida Atlantic University Associate Professor
B86590 Satish Bhalla MTC-214 750-378-1061 University of Notre Dame Associate Professor
H99118 Jeff Henry MTC-336 750-330-8650 Ohio State University Associate Professor
J33486 Steve Johnson MTC-118 750-330-1116 Harvard University Distinguished Professor
K69880 Jenney King MTC-324 750-378-1230 East Florida University Professor
Now click on the Data object tool to add the data into this new table. Click on the
Insert Row button to add all rows that are shown in Table 2.24 into this table.
Click on the Create and Create Another button when the fi rst row is done, and con-
tinue to create all rows with the data shown in Table 2.24 . You may click on the Create
button for your last row. Your fi nished Faculty table should match the one shown in
Figure 2.55 .
2.11.2.3 Create Other Tables
In a similar way, you can continue to create the following three tables: Course, Student,
and StudentCourse based on the data shown in Tables 2.25 , 2.26 , and 2.27 .
c02.indd 75c02.indd 75 2/11/2010 11:50:12 AM2/11/2010 11:50:12 AM
Please purchase PDF Split-Merge on www.verypdf.com to remove this watermark.
76 Chapter 2 Introduction to Databases
Figure 2.55 Finished Faculty table.
The data types used in the Course table are:
• course_id: VARCHAR2(10) — primary Key
• course: VARCHAR2(40)
• credit: NUMBER(1, 0) — precision = 1, scale = 0 (1 - bit integer)
• classroom: CHAR(6)
• schedule: VARCHAR2(40)
• enrollment: NUMBER(2, 0) — precision = 2, scale = 0 (2 - bit integer)
• faculty_id: VARCHAR2(10)
The data types used in the Student table are:
• student_id: VARCHAR2(10) — primary Key
• student_name: VARCHAR2(20)
• gpa: NUMBER(3, 2) — precision = 3, scale = 2 (3 - bit fl oating point data with 2 - bit after the
decimal point)
• credits: NUMBER(3, 0) — precision = 3, scale = 0 (3 - bit integer)
• major: VARCHAR2(40)
• schoolYear: VARCHAR2(20)
• email: VARCHAR2(20)
The data types used in the StudentCourse table are:
• s_course_id: NUMBER(4, 0) — precision = 4, scale = 0 (4 - bit integer) primary key
• student_id: VARCHAR2(10)
c02.indd 76c02.indd 76 2/11/2010 11:50:14 AM2/11/2010 11:50:14 AM
Please purchase PDF Split-Merge on www.verypdf.com to remove this watermark.
2.11 Create Oracle 10g XE Sample Database 77
Table 2.25 Data in the Course Table
course_id course credit classroom schedule enrollment faculty_id
CSC-131A Computers in Society 3 TC-109 M-W-F: 9:00-9:55 AM 28 A52990
CSC-131B Computers in Society 3 TC-114 M-W-F: 9:00-9:55 AM 20 B66750
CSC-131C Computers in Society 3 TC-109 T-H: 11:00-12:25 PM 25 A52990
CSC-131D Computers in Society 3 TC-119 M-W-F: 9:00-9:55 AM 30 B86590
CSC-131E Computers in Society 3 TC-301 M-W-F: 1:00-1:55 PM 25 B66750
CSC-131F Computers in Society 3 TC-109 T-H: 1:00-2:25 PM 32 A52990
CSC-132A Introduction to Programming 3 TC-303 M-W-F: 9:00-9:55 AM 21 J33486
CSC-132B Introduction to Programming 3 TC-302 T-H: 1:00-2:25 PM 21 B78880
CSC-230 Algorithms & Structures 3 TC-301 M-W-F: 1:00-1:55 PM 20 A77587
CSC-232A Programming I 3 TC-305 T-H: 11:00-12:25 PM 28 B66750
CSC-232B Programming I 3 TC-303 T-H: 11:00-12:25 PM 17 A77587
CSC-233A Introduction to Algorithms 3 TC-302 M-W-F: 9:00-9:55 AM 18 H99118
CSC-233B Introduction to Algorithms 3 TC-302 M-W-F: 11:00-11:55 AM 19 K69880
CSC-234A Data Structure & Algorithms 3 TC-302 M-W-F: 9:00-9:55 AM 25 B78880
CSC-234B Data Structure & Algorithms 3 TC-114 T-H: 11:00-12:25 PM 15 J33486
CSC-242 Programming II 3 TC-303 T-H: 1:00-2:25 PM 18 A52990
CSC-320 Object Oriented Programming 3 TC-301 T-H: 1:00-2:25 PM 22 B66750
CSC-331 Applications Programming 3 TC-109 T-H: 11:00-12:25 PM 28 H99118
CSC-333A Computer Arch & Algorithms 3 TC-301 M-W-F: 10:00-10:55 AM 22 A77587
CSC-333B Computer Arch & Algorithms 3 TC-302 T-H: 11:00-12:25 PM 15 A77587
CSC-335 Internet Programming 3 TC-303 M-W-F: 1:00-1:55 PM 25 B66750
CSC-432 Discrete Algorithms 3 TC-206 T-H: 11:00-12:25 PM 20 B86590
CSC-439 Database Systems 3 TC-206 M-W-F: 1:00-1:55 PM 18 B86590
CSE-138A Introduction to CSE 3 TC-301 T-H: 1:00-2:25 PM 15 A52990
CSE-138B Introduction to CSE 3 TC-109 T-H: 1:00-2:25 PM 35 J33486
CSE-330 Digital Logic Circuits 3 TC-305 M-W-F: 9:00-9:55 AM 26 K69880
CSE-332 Foundations of Semiconductors 3 TC-305 T-H: 1:00-2:25 PM 24 K69880
CSE-334 Elec Measurement & Design 3 TC-212 T-H: 11:00-12:25 PM 25 H99118
CSE-430 Bioinformatics in Computer 3 TC-206 Thu: 9:30-11:00 AM 16 B86590
CSE-432 Analog Circuits Design 3 TC-309 M-W-F: 2:00-2:55 PM 18 K69880
CSE-433 Digital Signal Processing 3 TC-206 T-H: 2:00-3:25 PM 18 H99118
CSE-434 Advanced Electronics Systems 3 TC-213 M-W-F: 1:00-1:55 PM 26 B78880
CSE-436 Automatic Control and Design 3 TC-305 M-W-F: 10:00-10:55 AM 29 J33486
CSE-437 Operating Systems 3 TC-303 T-H: 1:00-2:25 PM 17 A77587
CSE-438 Advd Logic & Microprocessor 3 TC-213 M-W-F: 11:00-11:55 AM 35 B78880
CSE-439 Special Topics in CSE 3 TC-206 M-W-F: 10:00-10:55 AM 22 J33486
Table 2.26 Data in the Student Table
student_id student_name gpa credits major schoolYear email
A78835 Andrew Woods 3.26 108 Computer Science Senior
A97850 Ashly Jade 3.57 116 Information System Engineering Junior
B92996 Blue Valley 3.52 102 Computer Science Senior
H10210 Holes Smith 3.87 78 Computer Engineering Sophomore
J77896 Erica Johnson 3.95 127 Computer Science Senior
c02.indd 77c02.indd 77 2/11/2010 11:50:15 AM2/11/2010 11:50:15 AM
Please purchase PDF Split-Merge on www.verypdf.com to remove this watermark.
78 Chapter 2 Introduction to Databases
• course_id: VARCHAR2(10)
• credit: NUMBER(1, 0) — precision = 1, scale = 0 (1 - bit integer)
• major: VARCHAR2(40)
Your fi nished Course, Student, and StudentCourse tables are shown in Figures 2.56 ,
2.57 and 2.58 , respectively.
2.11.3 Create Constraints Between Tables
Now it is the time for us to set up the relationships between our fi ve tables using the
primary and foreign keys. Since we have already selected the primary key for each table
when we create and build those tables, therefore we only need to take care of the foreign
keys and connect them with the associated primary keys in the related tables. Let ’ s start
from the fi rst table, LogIn table.
Table 2.27 Data in the Student C ourse Table
s_course_id student_id course_id credit major
1000 H10210 CSC-131D 3 CE
1001 B92996 CSC-132A 3 CS/IS
1002 J77896 CSC-335 3 CS/IS
1003 A78835 CSC-331 3 CE
1004 H10210 CSC-234B 3 CE
1005 J77896 CSC-234A 3 CS/IS
1006 B92996 CSC-233A 3 CS/IS
1007 A78835 CSC-132A 3 CE
1008 A78835 CSE-432 3 CE
1009 A78835 CSE-434 3 CE
1010 J77896 CSC-439 3 CS/IS
1011 H10210 CSC-132A 3 CE
1012 H10210 CSC-331 3 CE
1013 A78835 CSC-335 3 CE
1014 A78835 CSE-438 3 CE
1015 J77896 CSC-432 3 CS/IS
1016 A97850 CSC-132B 3 ISE
1017 A97850 CSC-234A 3 ISE
1018 A97850 CSC-331 3 ISE
1019 A97850 CSC-335 3 ISE
1020 J77896 CSE-439 3 CS/IS
1021 B92996 CSC-230 3 CS/IS
1022 A78835 CSE-332 3 CE
1023 B92996 CSE-430 3 CE
1024 J77896 CSC-333A 3 CS/IS
1025 H10210 CSE-433 3 CE
1026 H10210 CSE-334 3 CE
1027 B92996 CSC-131C 3 CS/IS
1028 B92996 CSC-439 3 CS/IS
c02.indd 78c02.indd 78 2/11/2010 11:50:16 AM2/11/2010 11:50:16 AM
Please purchase PDF Split-Merge on www.verypdf.com to remove this watermark.
2.11 Create Oracle 10g XE Sample Database 79
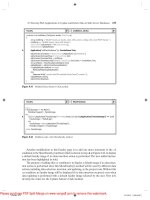
Figure 2.56 Completed Course table.
Figure 2.57 Completed Student table.
c02.indd 79c02.indd 79 2/11/2010 11:50:16 AM2/11/2010 11:50:16 AM
Please purchase PDF Split-Merge on www.verypdf.com to remove this watermark.
80 Chapter 2 Introduction to Databases
2.11.3.1 Create Constraints Between Log In and Faculty Tables
Now let ’ s create the constraints between the LogIn and the Faculty tables by using a
foreign key. Create a foreign key for the LogIn table and connect it to the primary key
in the Faculty table. The faculty_id is a foreign key in the LogIn table but it is a primary
key in the Faculty table. A one - to - many relationship exists between the faculty_id in the
Faculty table and the faculty_id in the LogIn table.
Log on the Oracle Database 10g XE using the customer user name, CSE_DEPT, and
the customer database password, and then open the home page of the Oracle Database
10g XE. Click on the Object Browser icon and select Browse|Table to list all tables. Select
the LogIn table from the left pane to open it, click the Constraints tab and then click the
Create button that is the fi rst button in the second row. Enter LOGIN_FACULTY_FK
into the Constraint Name box, and select the Foreign Key from the Constraint Type box,
which is shown in Figure 2.59 . Check the On Delete Cascade checkbox. Then select the
FACULTY_ID from the LogIn table as the foreign key column. Select the FACULTY
Figure 2.58 Completed StudentCourse table.
c02.indd 80c02.indd 80 2/11/2010 11:50:19 AM2/11/2010 11:50:19 AM
Please purchase PDF Split-Merge on www.verypdf.com to remove this watermark.
2.11 Create Oracle 10g XE Sample Database 81
Figure 2.59 Create the foreign key between the LogIn and the Faculty table.
table from the Reference Table Name box as the reference table, and select the
FACULTY_ID from the Reference Table Column List as the reference table column.
Your fi nished Add Constraint window should match the one shown in Figure 2.59 .
Click on Next to go to the next window, and then click on the Finish button to confi rm
this foreign key ’ s creation.
2.11.3.2 Create Constraints Between Log In and Student Tables
The relationship between the Student table and the LogIn table is a one - to - many rela-
tionship. The student_id in the Student table is a primary key, but the student_id in the
LogIn table is a foreign key. Multiple student_ids can exists in the LogIn table, but only
one or a unique student_id can be found from the Student table.
To create a foreign key from the LogIn table and connect it to the primary key in
the Student table, open the LogIn table if it is not opened and click on the Constraints
tab, and then click on the Create button that is the fi rst button in the second row to open
the Add Constraint window. Enter LOGIN_STUDENT_FK into the Constraint Name
box, and select the Foreign Key from the Constraint Type box, which is shown in Figure
2.60 . Check the On Delete Cascade checkbox. Then select the STUDENT_ID from the
LogIn table as the foreign key column. Select the STUDENT table from the Reference
Table Name box as the reference table, and select the STUDENT_ID from the Reference
Table Column List as the reference table column. Your fi nished Add Constraint window
should match the one shown in Figure 2.60 .
c02.indd 81c02.indd 81 2/11/2010 11:50:21 AM2/11/2010 11:50:21 AM
Please purchase PDF Split-Merge on www.verypdf.com to remove this watermark.
82 Chapter 2 Introduction to Databases
Figure 2.61 Finished foreign key creation window for the LogIn table.
Recall that when we created the LogIn table in Section 2.11.2.1 , we emphasized that
for the blank fi elds in both faculty_id and student_id columns, don ’ t place a NULL into
these fi elds and just leave those fi elds blank. The reason for this is that an ALTER
TABLE command will be issued when you create a foreign key for the LogIn table, and
the NULL cannot be recognized by this command, therefore an error ORA - 02298 occurs
and your creation of a foreign key will fail.
Click on the Next button to go to the next window, and then click on the Finish
button to confi rm this foreign key ’ s creation. Your fi nished foreign key creation window
for the LogIn table should match the one shown in Figure 2.61 .
Figure 2.60 Create the foreign key between the LogIn and the Student table.
c02.indd 82c02.indd 82 2/11/2010 11:50:23 AM2/11/2010 11:50:23 AM
Please purchase PDF Split-Merge on www.verypdf.com to remove this watermark.
2.11 Create Oracle 10g XE Sample Database 83
2.11.3.3 Create Constraints Between Course and Faculty Tables
The relationship between the Faculty table and the Course table is a one - to - many rela-
tionship. The faculty_id in the Faculty table is a primary key, but it is a foreign key in
the Course table. This means that only a unique faculty_id exists in the Faculty table but
multiple faculty_ids can exist in the Course table since one faculty can teach multiple
courses.
Open the Course table by clicking it from the left panel. Click on the Constraints tab
and then click the Create button. Enter COURSE_FACULTY_FK into the Constraint
Name box, and select the Foreign Key from the Constraint Type box, which is shown in
Figure 2.62 . Check the On Delete Cascade checkbox. Then select the FACULTY_ID
from the Course table as the foreign key column. Select the FACULTY table from the
Reference Table Name box as the reference table, and select the FACULTY_ID from
the Reference Table Column List as the reference table column. Your fi nished Add
Constraint window should match the one shown in Figure 2.62 .
Click on the Next button to go to the next window, and then click on the Finish
button to confi rm this foreign key ’ s creation. Your fi nished foreign key creation window
for the Course table should match the one shown in Figure 2.63 .
2.11.3.4 Create Constraints Between Student Course and Student Tables
The relationship between the Student table and the StudentCourse table is a one - to - many
relationship. The primary key student_id in the Student table is a foreign key in the
Figure 2.62 Create the foreign key between the Course and the Faculty table.
c02.indd 83c02.indd 83 2/11/2010 11:50:26 AM2/11/2010 11:50:26 AM
Please purchase PDF Split-Merge on www.verypdf.com to remove this watermark.
84 Chapter 2 Introduction to Databases
StudentCourse table since one student can take multiple different courses. In order
to create this relationship by using the foreign key, fi rst let ’ s open the StudentCourse
table.
Click on the Constraints tab and then click the Create button that is the fi rst button
on the second row. Enter STUDENTCOURSE_STUDENT_FK into the Constraint
Name box, and select the Foreign Key from the Constraint Type box, which is shown in
Figure 2.64 . Check the On Delete Cascade checkbox. Then select the STUDENT_ID
from the StudentCourse table as the foreign key column. Select the STUDENT table
from the Reference Table Name box as the reference table, and select the STUDENT_ID
from the Reference Table Column List as the reference table column. Your fi nished Add
Constraint window should match the one shown in Figure 2.64 .
Click on the Next button to go to the next window, and then click on the Finish
button to confi rm this foreign key ’ s creation.
2.11.3.5 Create Constraints Between Student Course and Course Tables
The relationship between the Course table and the StudentCourse table is a one - to - many
relationship. The primary key course_id in the Course table is a foreign key in the
StudentCourse table since one course can be taken by multiple different students. By
using the StudentCourse table as an intermediate table, a many - to - many relationship can
be built between the Student table and the Course table.
To create this relationship by using the foreign key, open the StudentCourse table
by clicking on it from the left pane. Click the Constraints tab and then click on the
Create button that is the fi rst button on the second row. Enter STUDENTCOURSE_
COURSE_FK into the Constraint Name box, and select the Foreign Key from the
Constraint Type box, which is shown in Figure 2.65 . Check the On Delete Cascade check-
box. Then select the COURSE_ID from the StudentCourse table as the foreign
key column. Select the COURSE table from the Reference Table Name box as the refer-
ence table, and select the COURSE_ID from the Reference Table Column List as the
Figure 2.63 Finished foreign key creation window for the Course table.
c02.indd 84c02.indd 84 2/11/2010 11:50:28 AM2/11/2010 11:50:28 AM
Please purchase PDF Split-Merge on www.verypdf.com to remove this watermark.
2.11 Create Oracle 10g XE Sample Database 85
Figure 2.65 Create the foreign key between the StudentCourse and the Course table.
Figure 2.64 Create the foreign key between the StudentCourse and the Student table.
c02.indd 85c02.indd 85 2/11/2010 11:50:30 AM2/11/2010 11:50:30 AM
Please purchase PDF Split-Merge on www.verypdf.com to remove this watermark.
86 Chapter 2 Introduction to Databases
reference table column. Your fi nished Add Constraint window should match the one
shown in Figure 2.65 .
Click on the Next button to go to the next window, and then click on the Finish
button to confi rm this foreign key ’ s creation. Your fi nished foreign key creation window
for the StudentCourse table should match the one shown in Figure 2.66 .
Our customer database creation for Oracle Database 10g Express Edition is com-
pleted. A completed Oracle 10g XE sample database CSE_DEPT that is represented by
a group of table fi les can be found in the folder Oracle located at the accompanying ftp
web site (see Chapter 1 ). Refer to Appendix F to get more detailed information if you
want to use this sample database in your Visual C# applications.
At this point, we have fi nished developing and creating all sample databases we need
to use later. All of these sample databases will be utilized for different applications we
will develop in this book.
Since the Oracle Database 10g XE is very different with other databases such as
Microsoft Access and SQL Server 2005, you need to refer to Appendix F to get a clear
picture about how to use the CSE_DEPT Oracle database fi les. Refer to Appendix D to
get the knowledge on how to use the Utilities of Oracle Database 10g XE to Unload the
fi ve tables to fi ve Text fi les, and how to Load those fi ve table fi les into a new customer
Oracle database to create a new customer Oracle database easily.
2.12 CHAPTER SUMMARY
A detailed discussion and analysis of the structure and components about databases were
provided in this chapter. Some key technologies in developing and designing databases
were also given and discussed. The procedures and components to develop a relational
database were analyzed in detailed with some real data tables in our sample database
CSE_DEPT. The process in developing and building a sample database was discussed in
detail with the following points:
• D e fi ning relationships
• Normalizing the data
• Implementing the relational database
Figure 2.66 Finished foreign key creation window for the StudentCourse table.
c02.indd 86c02.indd 86 2/11/2010 11:50:33 AM2/11/2010 11:50:33 AM
Please purchase PDF Split-Merge on www.verypdf.com to remove this watermark.
Homework 87
In the second part of this chapter, three sample databases that were developed with
three popular database management systems such as Microsoft Access, SQL Server 2005,
and Oracle Database 10g XE were provided in detail. All of these three sample databases
will be used throughout the whole book.
HOMEWORK
I. True/False Selections
____ 1. Database development process involves project planning, problem analysis, logical design,
physical design, implementation, and maintenance.
____ 2. Duplication of data creates problems with data integrity.
____ 3. If the primary key consists of a single column, then the table in 1NF is automatically in
2NF.
____ 4. A table is in fi rst normal form if there are no repeating groups of data in any column.
____ 5. When a user perceives the database as made up of tables, it is called a Network Model.
____ 6. Entity integrity rule states that no attribute that is a member of the primary (composite) key
may accept a null value.
____ 7. When creating data tables for the Microsoft Access database, a blank fi eld can be kept as
a blank without any letter in it.
____ 8. To create data tables in SQL Server database, a blank fi eld can be kept as a blank without
any letter in it.
____ 9. The name of each data table in SQL Server database must be prefi xed by the keyword dbo.
___ 10. The Sequence object in Oracle database is used to automatically create a sequence of
numeric numbers that work as the primary keys.
II. Multiple Choices
1. There are many advantages to using an integrated database approach over that of a fi le pro-
cessing approach. These include
a. Minimizing data redundancy
b. Improving security
c. Data independence
d. All of the above
2. The entity integrity rule implies that no attribute that is a member of the primary key may
accept _______.
a. Null value
b. Integer data type
c. Character data type
d. Real data type
3. Reducing data redundancy will lead to _____.
a. Deletion anomalies
b. Data consistency
c. Loss of effi ciency
d. None of the above
c02.indd 87c02.indd 87 2/11/2010 11:50:35 AM2/11/2010 11:50:35 AM
Please purchase PDF Split-Merge on www.verypdf.com to remove this watermark.
88 Chapter 2 Introduction to Databases
4. ______ keys are used to create relationships among various tables in a database.
a. Primary keys
b. Candidate keys
c. Foreign keys
d. Composite keys
5. In a small university the Department of Computer Science has six faculty members. However,
each faculty member belongs to only the Computer Science Department. This type of relation-
ship is called _________.
a. One - to - one
b. One - to - many
c. Many - to - many
d. None of the above
6. The Client Server databases have several advantages over the File Server databases. These
include ________.
a. Minimizing chances of crashes
b. Provision of features for recovery
c. Enforcement of security
d. E f fi cient use of the network
e. All of the above
7. One can create the foreign keys between tables ______.
a. Before any table can be created
b. When some tables are created
c. After all tables are created
d. With no limitations
8. To create foreign keys between tables, fi rst one must select the table that contains a _______
key and then select another table that has a _______ key.
a. Primary, foreign
b. Primary, primary
c. Foreign, primary
d. Foreign, foreign
9. The data type VARCHAR2 in Oracle database is a string variable with _______.
a. Limited length
b. Fixed length
c. Certain number of letters
d. Varying length
10.
For data tables in Oracle Database 10g XE, a blank fi eld must be ________.
a. Indicated by NULL
b. Kept as a blank
c. Either by NULL or a blank
d. Avoided
c02.indd 88c02.indd 88 2/11/2010 11:50:35 AM2/11/2010 11:50:35 AM
Please purchase PDF Split-Merge on www.verypdf.com to remove this watermark.
Homework 89
III. Exercises
1. What are the advantages to using an integrated database approach over that of a fi le processing
approach?
2. D e fi ne entity integrity and referential integrity. Describe the reasons for enforcing these rules.
3. Entities can have three types of relationships: one - to - one, one - to - many, and many - to - many .
Defi ne each type of relationship. Draw ER diagrams to illustrate each type of relationship.
4. List all steps to create foreign keys between data tables for SQL Server database in the SQL
Server Management Studio Express. Illustrate those steps by using a real example. For instance,
how to create foreign keys between the LogIn and the Faculty table.
5. List all steps to create foreign keys between data tables for Oracle database in the Oracle
Database 10g XE. Illustrate those steps by using a real example. For instance, how to create
foreign keys between the StudentCourse and the Course table.
c02.indd 89c02.indd 89 2/11/2010 11:50:35 AM2/11/2010 11:50:35 AM
Please purchase PDF Split-Merge on www.verypdf.com to remove this watermark.
c02.indd 90c02.indd 90 2/11/2010 11:50:35 AM2/11/2010 11:50:35 AM
Please purchase PDF Split-Merge on www.verypdf.com to remove this watermark.
Chapter 3
Introduction to ADO . NET
91
It has been a long road for software developers to generate and implement sophisticated
data processing techniques to improve and enhance data operations. The evolution of
data access Application Programming Interface (API ) is also a long process focusing
predominantly on how to deal with relational data in a more fl exible way. The methodol-
ogy development has been focused on Microsoft - based APIs such as Open Database
Connectivity (ODBC), OLEDB , Microsoft Jet, Data Access Objects (DAO), and Remote
Data Objects (RDO), in addition to many non - Microsoft - based APIs. These APIs did
not bridge the gap between object - based and semistructured (XML) data programming
needs. Combine this problem with the task of dealing with many different data stores,
nonrelational data like XML and applications applying across multiple languages are
challenging topics, and one should have a tremendous opportunity for complete rearchi-
tecture. The ADO.NET is a good solution for these challenges.
ADO.NET 2.0 was considered as a full solution between the relational database API
and object - oriented data access API, which was released with the .NET Framework 2.0
and Visual Studio.NET 2005. Today the updated version of the ADO.NET is 3.5, which
is released with the .NET Framework 3.5 and Visual Studio.NET 2008. In this chapter,
fi rst we will provide a detailed review about the history of ADO.NET, and then a full
discussion and description about the components and architectures of ADO.NET 2.0 is
given since most data components used for today ’ s database actions are still covered by
the ADO.NET 2.0. Finally we introduce some new features and components included in
the ADO.NET 3.5.
3.1 ADO AND ADO.NET
ActiveX Data Object (ADO) is developed based on Object Linking and Embedding
(OLE) and Component Object Model (COM) technologies. COM is used by developers
to create reusable software components, link components together to build applications,
and take advantage of Windows services. For the last decade, ADO has been the pre-
Practical Database Programming With Visual C#.NET, by Ying Bai
Copyright © 2010 the Institute of Electrical and Electronics Engineers, Inc.
c03.indd 91c03.indd 91 2/11/2010 11:50:55 AM2/11/2010 11:50:55 AM
Please purchase PDF Split-Merge on www.verypdf.com to remove this watermark.
92 Chapter 3 Introduction to ADO.NET
ferred interface for Visual Basic programmers to access various data sources, with ADO
2.7 being the latest version of this technology. The development history of data accessing
methods can be traced back to the mid - 1990s with DAO and then followed by RDO,
which was based on ODBC. In the late 1990s, the ADO that is based on OLEDB was
developed. This technology is widely applied in most object - oriented programming and
database applications during the last decade.
ADO.NET 3.5 is the updated version of ADO.NET, and it is based mainly on the
Microsoft .NET Framework 3.5. The underlying technology applied in ADO.NET 3.5 is
very different from the COM - based ADO. The ADO.NET Common Language Runtime
provides bidirectional, transparent integration with COM. This means that COM and
ADO.NET applications and components can use functionality from each system. But the
ADO.NET 3.5 Framework provides developers with a signifi cant number of benefi ts
including a more robust, evidence - based security model, automatic memory management
native Web services support, and Language Integrated Query (LINQ). For new develop-
ment, the ADO.NET 3.5 is highly recommended as a preferred technology because of
its powerful managed runtime environment and services.
This chapter will provide a detailed introduction to ADO.NET 2.0 and ADO.NET
3.5 and their components, and these components will be utilized for the rest of the
book.
In this chapter, you will:
• Learn the basic classes in ADO.NET 2.0 and its architecture.
• Learn the different ADO.NET 2.0 data providers.
• Learn about the Connection and Command components.
• Learn about the Parameters collection component.
• Learn about the DataAdapter and DataReader components.
• Learn about the DataSet and DataTable components.
• Learn about the ADO.NET 3.5 Entity Framework (EF).
• Learn about the ADO.NET 3.5 Entity Framework Tools (EFT).
• Learn about the ADO.NET Entity Data Model (EDM).
First let ’ s take a closer look at ADO.NET 2.0 and have a global picture of its
components.
3.2 OVERVIEW OF ADO.NET 2.0
ADO.NET is a set of classes that expose data access services to the Microsoft .NET
programmer. ADO.NET provides a rich set of components for creating distributed, data -
sharing applications. It is an integral part of the Microsoft .NET Framework, providing
access to relational, XML, and application data. ADO.NET supports a variety of devel-
opment needs, including the creation of front - end database clients and middle - tier busi-
ness objects used by applications, tools, languages, or Internet browsers.
All ADO.NET classes are located at the System.Data namespace with two fi les
named System.Data.dll and System.Xml.dll. When compiling code that uses the
System.Data namespace, reference both System.Data.dll and System.Xml.dll.
c03.indd 92c03.indd 92 2/11/2010 11:50:56 AM2/11/2010 11:50:56 AM
Please purchase PDF Split-Merge on www.verypdf.com to remove this watermark.
3.3 Architecture of ADO.NET 2.0 93
Basically speaking, ADO.NET provides a set of classes to support you to develop
database applications and enable you to connect to a data source to retrieve, manipulate,
and update data with your database. The classes provided by ADO.NET are core to
develop a professional data - driven application, and they can be divided into the following
three major components:
• Data Provider
• DataSet
• DataTable
These three components are located at the different namespaces. The DataSet and
the DataTable classes are located at the System. Data namespace. The classes of the Data
Provider are located at the different namespaces based on the types of Data Providers.
Data Provider contains four classes: Connection, Command, DataAdapter, and
DataReader. These four classes can be used to perform the different functionalities to
help you to:
1. Set a connection between your project and the data source using the Connection object.
2. Execute data queries to retrieve, manipulate, and update data using the Command object.
3. Move the data between your DataSet and your database using the DataAdapter object.
4. Perform data queries from the database (read - only) using the DataReader object.
The DataSet class can be considered as a table container and it can contain multiple
data tables. These data tables are only a mapping to those real data tables in your data-
base. But these data tables can also be used separately without connecting to the DataSet.
In this case, each data table can be considered as a DataTable object.
The DataSet and DataTable classes have no direct relationship with the Data Provider
class; therefore they are often called Data Provider – independent components. Four
classes such as Connection, Command, DataAdapter, and DataReader that belong to
Data Provider are often called Data Provider – dependent components.
To get a clearer picture of the ADO.NET, let ’ s fi rst take a look at the architecture
of the ADO.NET.
3.3 ARCHITECTURE OF ADO . NET 2.0
The ADO.NET 2.0 architecture can be divided into two logical pieces: command execu-
tion and caching. Command execution requires features like connectivity, execution, and
reading of results. These features are enabled with ADO.NET Data Providers. Caching
of results is handled by the DataSet.
The Data Provider enables connectivity and command execution to underlying data
sources. Note that these data sources do not have to be relational databases. Once a
command has been executed the results can be read using a DataReader. A DataReader
provides effi cient forward - only stream - level access to the results. In addition, results can
be used to render a DataSet a DataAdapter. This is typically called “ fi lling the DataSet. ”
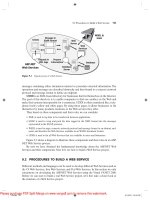
Figure 3.1 shows a typical architecture of the ADO.NET 2.0.
In this architecture, the data tables are embedded in the DataSet as a
DataTableCollection and the data transactions between the DataSet and the Data
c03.indd 93c03.indd 93 2/11/2010 11:50:56 AM2/11/2010 11:50:56 AM
Please purchase PDF Split-Merge on www.verypdf.com to remove this watermark.
94 Chapter 3 Introduction to ADO.NET
Provider such as SELECT, INSERT, UPDATE, and DELETE are made by using the
DataAdapter via its own four different methods: SelectCommand, InsertCommand,
UpdateCommand, and DeleteCommand, respectively. The Connection object is only
used to set a connection between your data source and your applications. The DataReader
object is not used for this architecture. As you will see from the sample project in the
following chapters, to execute the different methods under the DataAdapter to perform
the data query is exactly to call the Command object with different parameters.
Another ADO.NET architecture is shown in Figure 3.2 . In this architecture, the data
tables are not embedded into the DataSet but treated as independent data tables, and
each table can be considered as an individual DataTable object. The data transactions
between the Data Provider and the DataTable are realized by executing the different
methods of the Command object with the associated parameters. The ExecuteReader()
method of the Command object is called when a data query is made from the data source,
which is equivalent to executing an SQL SELECT statement, and the returned data
should be stored to the DataReader object. When performing other data - accessing opera-
tions such as INSERT, UPDATE, or DELETE, the ExecuteNonQuery() method of the
Connection
Command
DataReader
DataSet
Data Provider
Database
Transaction
Parameters
DataAdapter
DeleteCommand
SelectCommand
InsertCommand
UpdateCommand
DataTableCollection
ConstraintCollection
DataTable
DataRowCollection
DataColumnCollection
DataRelationCollection
Your
Application
Figure 3.1 Typical architecture of ADO.NET 2.0.
Connection
DataAdapter
DataReader
Data Provider
Database
Transaction
Command
ExecuteReader
Parameters
ExecuteNonQuery
ExecuteScalar
DataSet
DataRelationCollection
ConstraintCollection
DataTable
DataRowCollection
DataColumnCollection
Your
A
pplication
Figure 3.2 Another architecture of ADO.NET 2.0.
c03.indd 94c03.indd 94 2/11/2010 11:50:56 AM2/11/2010 11:50:56 AM
Please purchase PDF Split-Merge on www.verypdf.com to remove this watermark.
3.4 Components of ADO.NET 2.0 95
Command object should be called with the suitable parameters attached to the Command
object.
Keep these two ADO.NET 2.0 architectures in mind; we will have a more detailed
discussion for each component of the ADO.NET below. The sample projects developed
in the following sections utilized these two architectures to perform the data query from
and the data accessing to the data source.
3.4 COMPONENTS OF ADO . NET 2.0
As we discussed in Section 3.2 , ADO.NET 2.0 is composed of three major components:
Data Provider, DataSet, and DataTable. First let ’ s take a look at the Data Provider.
3.4.1 Data Provider
The Data Provider can also be called a data driver, and it can be used as a major com-
ponent for your data - driven applications. The functionalities of the Data Provider, as its
name means, are to:
• Connect your data source with your applications.
• Execute different methods to perform the associated data query and data - accessing opera-
tions between your data source and your applications.
• Disconnect the data source when the data operations are done.
The Data Provider is physically composed of a binary library fi le, and this library is
in the DLL fi le format. Sometimes this DLL fi le depends on other DLL fi les, so in fact
a Data Provider can be made up of several DLL fi les. Based on the different kinds of
databases, Data Provider can have several versions and each version is matched to each
kind of database. The popular versions of the Data Provider are:
• O pen D ata B ase C onnectivity ( Odbc ) Data Provider (ODBC.NET)
• O bject L inking and E mbeding D ata B ase ( OleDb ) Data Provider (OLEDB.NET)
• SQL Server ( Sql ) Data Provider (SQL Server.NET)
• Oracle ( Oracle ) Data Provider (Oracle.NET)
Each Data Provider can be simplifi ed by using an associated keyword, shown in bold
in the parentheses above. For instance, the keyword for the ODBC Data Provider is
Odbc; the keyword for an SQL Server Data Provider is Sql, and so on.
In order to distinguish from the older Data Providers such as Microsoft ODBC,
Microsoft OLE DB, Microsoft SQL Server, and Oracle, in some books all different Data
Providers included in the ADO.NET are extended by a suffi x .NET, such as OLE
DB.NET, ODBC.NET, SQL Server.NET, and Oracle.NET. Since most Data Providers
discussed in this book belong to ADO.NET, generally we do not need to add the .NET
suffi x but we will add this suffi x if the old Data Providers are used.
The different Data Providers are located at the different namespaces, and these
namespaces hold the various data classes that you must import into your code in order
to use those classes in your project.
c03.indd 95c03.indd 95 2/11/2010 11:50:56 AM2/11/2010 11:50:56 AM
Please purchase PDF Split-Merge on www.verypdf.com to remove this watermark.
96 Chapter 3 Introduction to ADO.NET
Table 3.1 lists the most popular namespaces used by the different Data Providers and
used by the DataSet and the DataTable.
Since a different Data Provider is located at the different namespace as shown in
Table 3.1 , you must fi rst add the appropriate namespace into your Visual C#.NET 2008
project, exactly into each form ’ s code window, whenever you want to use that Data
Provider. Also all classes provided by that Data Provider must be prefi xed by the associ-
ated keyword. For example, you must use “ using System.Data.OleDb ” to add the
namespace of the OLEDB.NET Data Provider if you want to use this Data Provider in
your project, and also all classes belonging to that Data Provider must be prefi xed by the
associated keyword OleDb, such as OleDbConnection, OleDbCommand, OleDbData
Adapter, and OleDbDataReader. The same thing holds true for all other Data Providers.
Although different Data Providers are located at the different namespaces and have
the different prefi xes, the classes of these Data Providers have the similar methods or
properties with the same name. For example, no matter what kind of Data Provider you
are using such as an OleDb, an Sql, or an Oracle, they have the methods or properties
with the same name, such as Connection String property, Open() and Close() methods,
as well as the ExecuteReader() method. This provides fl exibility for the programmers
and allows them to use different Data Providers to access the different data sources by
only modifying the prefi x applied before each class.
The following sections provide a more detailed discussion for each specifi c Data
Provider. These discussions will give you a direction or guideline to help you to select
the appropriate Data Provider when you want to use them to develop the different data -
driven applications.
3.4.1.1 ODBC Data Provider
The .NET Framework Data Provider for ODBC uses native ODBC Driver Manager
(DM) through COM interop to enable data access. The ODBC Data Provider supports
both local and distributed transactions. For distributed transactions, the ODBC Data
Provider, by default, automatically enlists in a transaction and obtains transaction details
from Windows 2000 Component Services.
The ODBC.NET Data Provider provides access to ODBC data sources with the help
of native ODBC drivers in the same way that the OleDb.NET Data Provider accesses
native OLE DB providers.
Table 3.1 Namespaces for Different Data Providers, Data S et, and Data T able
Namespaces Descriptions
System.Data Holds the DataSet and DataTable classes.
System.Data.OleDb Holds the class collection used to access an OLEDB data
source.
System.Data.SqlClient Holds the classes used to access an SQL Server 7.0 data
source or later.
System.Data.Odbc Holds the class collection used to access an ODBC data
source.
System.Data.OracleClient Holds the classes used to access an Oracle data source.
c03.indd 96c03.indd 96 2/11/2010 11:50:56 AM2/11/2010 11:50:56 AM
Please purchase PDF Split-Merge on www.verypdf.com to remove this watermark.
3.4 Components of ADO.NET 2.0 97
The ODBC.NET supports the following Data Providers:
• SQL Server
• Microsoft ODBC for Oracle
• Microsoft Access Driver ( * .mdb)
Some older database systems only support ODBC as the data access technique, which
include older versions of SQL Server and Oracle as well as some third - party database
such as Sybase.
3.4.1.2 OLEDB Data Provider
The System.Data.OleDb namespace holds all classes used by the .NET Framework 2.0
Data Provider for OLE DB. The .NET Framework Data Provider for OLE DB describes
a collection of classes used to access an OLE DB data source in the managed space. Using
the OleDbDataAdapter, you can fi ll a memory - resident DataSet that you can use to
query and update the data source. The OLE DB.NET data access technique supports the
following Data Providers:
• Microsoft Access
• SQL Server (7.0 or later)
• Oracle (9i or later)
One advantage of using the OLEDB.NET Data Provider is to allow users to develop
a generic data - driven application. The so - called generic application means that you can
use the OLEDB.NET Data Provider to access any data source such as Microsoft Access,
SQL Server, Oracle, and other data sources that support the OLEDB.
Table 3.2 shows the compatibility between the OLEDB Data Provider and the OLE
DB.NET Data Provider.
3.4.1.3 SQL Server Data Provider
This Data Provider provides access to a SQL Server version 7.0 or later database using
its own internal protocol. The functionality of the Data Provider is designed to be similar
to that of the .NET Framework Data Providers for OLE DB, ODBC, and Oracle. All
classes related to this Data Provider are defi ned in a DLL fi le and located at the System.
Data.SqlClient namespace. Although Microsoft provides different Data Providers to
access the data in the SQL Server database, such as the ODBC and OLE DB, for the
sake of optimal data operations, it is highly recommended to use this Data Provider to
access the data in an SQL Server data source.
Table 3.2 Compatibility between OLEDB and OLEDB . NET
Provider Name Descriptions
SQLOLEDB Used for Microsoft SQL Server 6.5 or earlier
Microsoft.Jet.OLEDB.4.0 Used for Microsoft JET database (Microsoft Access)
MSDAORA Used for Oracle version 7 and later
c03.indd 97c03.indd 97 2/11/2010 11:50:56 AM2/11/2010 11:50:56 AM
Please purchase PDF Split-Merge on www.verypdf.com to remove this watermark.