Practical Database Programming With Visual C#.NET- P10
Bạn đang xem bản rút gọn của tài liệu. Xem và tải ngay bản đầy đủ của tài liệu tại đây (716.89 KB, 50 trang )
6.3 Insert Data into SQL Server Database Using Sample Project SQLInsertWizard
473
DataBindings
property, expand it to the
Text
subproperty, and perform the following
steps to complete this binding:
1. Expand the
Other Data Sources
item.
2. Expand the
Project Data Sources
item.
3. Expand the
CSE_DEPTDataSet
item.
4. Expand the
Faculty
table.
5. Select the
faculty_id
.
Then click on the Course ID textbox to perform the same fi ve steps to perform another
data binding. The only difference between this binding and the last one is that after step 3,
you need to expand the
Course
table and select the
course_id
from that table.
Immediately you can fi nd that fi ve Design Tools have been added into this form,
which are cSE_DEPTDataSet , facultyTableAdapter , facultyBindingSource , course-
TableAdapter , and courseBindingSource . One point you need to note is that all of
them are objects, not classes, and we can directly use them without needing to instantiate
them. We need to use them to complete this new course insertion query.
The second method used to trigger and connect those Design Tools in our current
form window is to create instances based on the classes provided by Design Tools. To do
that, open the Insert button ’ s Click method from the Insert Course Form window, and
enter the following codes to create three instances:
CSE_DEPTDataSet cSE_DEPTDataSet = new CSE_DEPTDataSet();
CSE_DEPTDataSetTableAdapters.FacultyTableAdapter
facultyTableApt =
new CSE_DEPTDataSetTableAdapters.FacultyTableAdapter();
CSE_DEPTDataSetTableAdapters.CourseTableAdapter courseTableApt =
new CSE_DEPTDataSetTableAdapters.CourseTableAdapter();
Now we are ready to build our new course insertion query. However, before we can
do that using the TableAdapter Query Confi guration Wizard, let ’ s fi rst do some coding
for the project initialization and data validation.
6.3.4 Project Initialization and Validate
Data Before Data Insertion
Just as we did for the last sample project, a data validation must be performed before
the course information can be inserted into the database. To save time and space, we use
a string array to store all course information. In total we have seven pieces of course
information: faculty_id, course_id, course title, course schedule, course classroom, course
credits, and course enrollment, and all of these pieces of information should be entered
by the user into seven textboxes as the project runs. Also the combobox Faculty Name
should be initialized by adding all faculty members to allow users to make the selection
from this box as the project runs, too.
To do these jobs, open the constructor of the Insert Course Form, and then enter
the codes into this constructor shown in Figure 6.26 .
c06.indd 473c06.indd 473 2/11/2010 11:56:05 AM2/11/2010 11:56:05 AM
Please purchase PDF Split-Merge on www.verypdf.com to remove this watermark.
474
Chapter 6 Data Inserting with Visual C#.NET
Let ’ s take a look at this piece of code to see how it works.
A. First, we create a string array CourseInfo with the upper bound of 6, which means that
this array contains 7 items with the index starting from 0. This array is used to store seven
pieces of course information entered by the user to the seven textboxes.
B. All faculty members are added into the combobox ComboName by executing the Add()
method, and the fi rst item is selected as the default faculty member.
C. T h e fi rst method, TableAdapter Insert, in the Combo Method box is selected as the default
by setting the SelectedIndex property to 0 (the index of the combobox also starts from 0).
D. These two instructions are used to clean up the binding contents in two textboxes, Faculty
ID and Course ID. As you know, in order to use Design Tools to perform this new course
insertion, we performed the data binding for them. One problem for those data bindings
is that the bound columns would be displayed in these two textboxes as the project runs.
In order to make them blank to allow users to enter new course information to these two
textboxes, we prefer to clean them up. This cleaning will remove the bound relationships
without affecting the Design Tools.
Now let ’ s develop the codes for the data validation before performing the data inser-
tion. This data validation makes sure that all textboxes that contain the course informa-
tion are nonempty. This means that you need to fi ll out all textboxes with a certain piece
of course - related information and the project does not allow an empty textbox or a blank
piece of information to be inserted into the database. If you try to intentionally keep
some columns in the Course table empty, you need to place a
NULL
into the associated
textbox.
Open the Insert button Click method by double - clicking on the Insert button from
the Insert Course Form window. Enter the codes shown in Figure 6.27 into this method.
public partial class InsertCourseForm : Form
{
string[] CourseInfo = new string[7];
public InsertCourseForm()
{
InitializeComponent();
ComboName.Items.Add("Ying Bai");
ComboName.Items.Add("Satish Bhalla");
ComboName.Items.Add("Black Anderson");
ComboName.Items.Add("Steve Johnson");
ComboName.Items.Add("Jenney King");
ComboName.Items.Add("Alice Brown");
ComboName.Items.Add("Debby Angles");
ComboName.Items.Add("Jeff Henry");
ComboName.SelectedIndex = 0;
ComboMethod.Items.Add("TableAdapter Insert");
ComboMethod.Items.Add("TableAdapter Update");
ComboMethod.SelectedIndex = 0;
txtCourseID.DataBindings.Clear();
txtFacultyID.DataBindings.Clear();
}
}
A
B
C
D
SQLInsertWizard.InsertCourseForm InsertCourseForm()
Figure 6.26
Coding for the constructor of the InsertCourseForm.
c06.indd 474c06.indd 474 2/11/2010 11:56:05 AM2/11/2010 11:56:05 AM
Please purchase PDF Split-Merge on www.verypdf.com to remove this watermark.
6.3 Insert Data into SQL Server Database Using Sample Project SQLInsertWizard
475
The functionality of this piece of code is very simple. First, a user - defi ned method
InitCourseInfo() is called to assign each textbox ’ s content to the associated string item
in the string array, and then another user - defi ned method CheckCourseInfo() is executed
to make sure that all textboxes are fi lled with a piece of course - related information and
no empty textbox exists. The code for these two methods is shown in Figure 6.28 .
The functionality of these two methods is:
A. The so - called initialization of the course information assigns each textbox ’ s content to the
associated string item in the string array CourseInfo. In this way, it is easier for us to check
those textboxes to make sure that no textbox is empty later.
B. Two local variables pos and check are created. The fi rst one is used as a loop counter for
the for loop, and the second is used to store the checking result for this method.
C. A for loop is utilized to scan all elements in the string array, which is equivalent to scan
all textboxes, to check whether any of them is empty. The checking result check will be
increased by one if this situation happened.
D. Finally, the checking result is returned to the calling method. A nonzero value means that
there are some empty textboxes in this Course Form window, and the value of this variable
equals the number of empty textboxes checked.
private void cmdInsert_Click(object sender, EventArgs e)
{
int check = 0;
InitCourseInfo();
check = CheckCourseInfo();
}
SQLInsertWizard.InsertCourseForm
cmdInsert_Click()
Figure 6.27
Coding for the Insert button Click method.
private void InitCourseInfo()
{
CourseInfo[0] = txtFacultyID.Text;
CourseInfo[1] = txtCourseID.Text;
CourseInfo[2] = txtCourse.Text;
CourseInfo[3] = txtSchedule.Text;
CourseInfo[4] = txtClassRoom.Text;
CourseInfo[5] = txtCredits.Text;
CourseInfo[6] = txtEnroll.Text;
}
private int CheckCourseInfo()
{
int pos = 0, check = 0;
for (pos = 0; pos <= 6; pos++)
{
if (CourseInfo[pos] == string.Empty)
check++;
}
return check;
}
SQLInsertWizard.InsertCourseForm InitCourseInfo()
A
B
C
D
Figure 6.28
Coding for two user - defi ned methods.
c06.indd 475c06.indd 475 2/11/2010 11:56:06 AM2/11/2010 11:56:06 AM
Please purchase PDF Split-Merge on www.verypdf.com to remove this watermark.
476
Chapter 6 Data Inserting with Visual C#.NET
The other coding jobs for the project initialization are the coding for the Cancel and
the Back command buttons. When the Back button is clicked, the current form should
be closed and the project needs to be returned to the Course Form to perform the valida-
tion for that new course insertion. The coding for this button is easy. Open this method
and enter
this.Close();
. Yes, that ’ s it!
The functionality of the Cancel button is to clean up most textboxes ’ contents to
allow users to reenter all course - related information into those textboxes. Open the
Cancel button ’ s Click method by double - clicking on that button and enter the codes
shown in Figure 6.29 into this method.
The coding for this method is straightforward and easy to understand. All textboxes ’
contents, except the Course ID, are cleaned up to allow users to reenter new course
information. One reason we keep the Course ID textbox ’ s contents unchanged is that
this piece of information will be used later for data validation purposes since we need to
retrieve the new inserted course record from the database based on the Course ID.
Another reason is that we try to stop the TextChanged event from occurring to reenable
the Insert button (refer to Section 6.2.8 and Figure 6.36 ).
Now we can start to confi gure the TableAdapters to build our inserting data query.
6.3.5 Confi gure T able A dapter and Build Data Insertion Query
Recall that when we built our sample database CSE_DEPT in Chapter 2 , there is no
faculty name column in the Course table, and the only relationship that existed between
the Faculty and the Course tables is the
faculty_id
, which is a primary key in the
Faculty table but a foreign key in the Course table. As the project runs and the Insert
Course Form window appears, the user needs to insert a new course record based on the
faculty name, not the faculty ID. So for this new course record insertion, we need to
perform two queries with two tables: First, we need to make a query to the Faculty table
to get the faculty_id based on the faculty name selected by the user, and second we can
insert a new course record based on the faculty_id we obtained from our fi rst query.
These two queries belong to two TableAdapters: the FacultyTableAdapter and the
CourseTableAdapter. Now let ’ s create these two query functions under two TableAdapters.
Recall that in Section 5.14 we built a query function under the FacultyTableAdapter,
FindFacultyIDByName() . In this section, we don ’ t need to redo this operation and we
can use that query function directly from this project. We do need to create the second
query function to insert new course records based on the selected faculty_id we obtained
from the fi rst query function FindFacultyIDByName() .
private void cmdCancel_Click(object sender, EventArgs e)
{
txtFacultyID.Text = String.Empty;
txtCourse.Text = String.Empty;
txtSchedule.Text = String.Empty;
txtClassRoom.Text = String.Empty;
txtCredits.Text = String.Empty;
txtEnroll.Text = String.Empty;
}
SQLInsertWizard.InsertCourseForm cmdCancel_Click()
Figure 6.29
Coding for the Cancel button ’ s Click method.
c06.indd 476c06.indd 476 2/11/2010 11:56:06 AM2/11/2010 11:56:06 AM
Please purchase PDF Split-Merge on www.verypdf.com to remove this watermark.
6.3 Insert Data into SQL Server Database Using Sample Project SQLInsertWizard
477
Open the Data Source window by clicking on the Data|Show Data Sources menu
item from the menu bar. Then right - click on any place inside this window and select the
Edit DataSet with Designer item to open the DataSet Designer Wizard. Right - click on
the last line of the Course table and choose the Add|Query item to open the TableAdapter
Query Confi guration Wizard. Keep the default item Use SQL statements selected and
click on the Next button to go to the next window. Select the INSERT item by checking
this radio button and click on Next again to continue. Click on the Query Builder button
on the next window to open the Query Builder dialog box, which is shown in Figure 6.30 .
The default INSERT statement is matched to our data insertion command, so we ’ d
like to keep it as our query command and click on the OK button to go to the next window.
On the next window, the Query Builder needs us to confi rm this query function.
Two queries are displayed in this window. The fi rst one is an INSERT statement and it
is what we need for our data insertion. However, the second one is the SELECT state-
ment and we do not need this one for this data insertion. Therefore, highlight the second
statement and delete it from this window. Click on the Next button to continue.
In the next window, we need to enter the name for our query function. Enter
InsertCourse into the name box and click on the Next button to go to the next window,
and then click on the Finish button to complete this Query Builder dialog box and exit
this process.
Now we have fi nished the confi guration and the query building for the Course
TableAdapter. Next, we need to develop the codes to execute this data insertion function.
6.3.6 Develop Codes to Insert Data Using
T able A dapter . I nsert Method
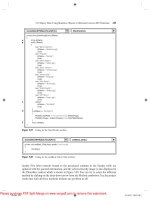
Open the Insert Course Form window and double - click on the Insert button to open
its Click method, and then enter the codes shown in Figure 6.31 into this method. The
Figure 6.30
Query Builder dialog box.
c06.indd 477c06.indd 477 2/11/2010 11:56:06 AM2/11/2010 11:56:06 AM
Please purchase PDF Split-Merge on www.verypdf.com to remove this watermark.
478
Chapter 6 Data Inserting with Visual C#.NET
codes we developed in the previous section for this method have been highlighted with
shading.
Let ’ s take a look at this piece of code to see how it works.
A. A local integer variable intInsert is created, and it is used to hold the returning status of
calling the second query function InsertCourse().
B. After the methods InitCourseInfo() and CheckCourseInfo() are executed, the validation
result for all textboxes is returned and stored in the local variable check . A returned value
of zero means that this validation is successful and no textbox is empty. Then the
ClearBeforeFill property of the TableAdapter is set to
true
to clean up the TableAdapter ’ s
associated data table, the Faculty table in the DataSet, to make it ready to be fi lled with
new records.
C. T h e fi rst query function FindFacultyIDByName(), which we built in Section 5.14 , in
Chapter 5 , is used to return a single data value — faculty_id — from the Faculty table based
on the faculty name selected by the user from the combobox ComboName as the project
runs. A string variable strFacultyID is created, and it will be used to hold the returned
faculty_id obtained from the fi rst query function.
D. T
he returned faculty_id value is assigned to the Faculty ID textbox. This step is neces-
sary. Later you will fi nd that as the project runs, only the faculty name appears and can
private void cmdInsert_Click(object sender, EventArgs e)
{
int check = 0, intInsert = 0;
InitCourseInfo();
check = CheckCourseInfo();
if (check == 0)
{
facultyTableAdapter.ClearBeforeFill = true;
string strFacultyID = facultyTableAdapter.FindFacultyIDByName(ComboName.Text);
txtFacultyID.Text = strFacultyID;
if (ComboMethod.Text == "TableAdapter Insert")
{
intInsert = courseTableAdapter.InsertCourse(txtCourseID.Text, txtCourse.Text, txtClassRoom.Text,
txtSchedule.Text, int.Parse(txtEnroll.Text), txtFacultyID.Text, double.Parse(txtCredits.Text));
}
else
{
// insert new course using the TableAdapter.Update() method….
}
if (intInsert != 0) // data insertion is successful
{
cmdCancel.PerformClick(); // clean up all faculty information
cmdInsert.Enabled = false; // disable the Insert button
}
else
{
MessageBox.Show("The course insertion is failed");
cmdInsert.Enabled = true;
}
}
else
MessageBox.Show("Fill all Course Information box, enter a NULL for blank column");
}
A
B
C
D
E
F
G
H
I
SQLInsertWizard.InsertCourseForm cmdInsert_Click()
Figure 6.31
Coding for the Insert button Click method.
c06.indd 478c06.indd 478 2/11/2010 11:56:07 AM2/11/2010 11:56:07 AM
Please purchase PDF Split-Merge on www.verypdf.com to remove this watermark.
6.3 Insert Data into SQL Server Database Using Sample Project SQLInsertWizard
479
be selected by the user to perform this data insertion since the user has no knowledge
about the faculty_id . Therefore, when this new course insertion is performed, a NULL
must be fi lled into the faculty_id textbox in order to make this data insertion operate
properly.
E. If the user selected the TableAdapter Insert() method to perform this data insertion, the
second query function InsertCourse(), which we just built in the last section, is executed
to insert new course record into the Course table in the database. Note that not only the
order of inserted parameters in this InsertCourse() query function, but also the data type
of each parameter, must be identical with those of the inserted parameters in the same
query function InsertCourse() we built in the last section. Refer to Figure 6.30 to confi rm
the order and data types for those parameters if you are not sure. Here, the Parse() method
is used to convert the txtEnroll and the txtCredit from string to the integer and the double
data types, respectively.
F. If the user selected the TableAdapter.Update() method to perform this data insertion, the
associated codes that will be developed in the next section will be executed to fi rst add
the new course record into the Course table in the DataSet; and then it will be updated
into the Course table in the database.
G. The second query function InsertCourse() will return an integer to indicate the execution
status of calling this function. Actually, the returned integer ’ s value equals the number of
records that have been successfully added or inserted into the database. A returned
nonzero means that this insertion is successful and a new record has been inserted into
the database. If that occurred, we need to clean up the contents of all textboxes (except
the Faculty Name) by executing the PerformClick() method. Also in order to avoid mul-
tiple insertions for the same record, the Insert button is disabled by resetting its Enabled
property to false .
H. A returned zero means that no record has been inserted into the database, and this data
insertion has failed. If that case occurs, a message box with a warning message is displayed.
The Insert button is enabled again to allow users to perform another insertion.
I. If the CheckCourseInfo() method returns a nonzero value, it means that the validation
for all textboxes has failed and there are some unfi lled textboxes. A message box with a
warning message is displayed to ask users to fi ll all textboxes.
Now let ’ s test this data insertion by running our project. We have two ways to do it.
One way is to trigger the Insert Course Form window by clicking on the Insert button
from the Course Form window. To start the project in this way, we must start from the
LogIn form, and then continue to the Selection Form, and to the Course Form by select-
ing the Course Information item from the Selection Form window. Another way is simple.
We can start the project directly from the Insert Course Form window. To start the
project in this way, one needs to modify the startup object located inside the Main()
method. To do that, double - click on the Program.cs item from the Solution Explorer
window, and then change the startup object by replacing
Application.Run(new LogInForm());
with
Application.Run(new InsertCourseForm());
To start the project in the fi rst way, we need to do a little modifi cation to the Course
Form. First, we need to create a fi eld - level instance of the InsertCourseForm class,
c06.indd 479c06.indd 479 2/11/2010 11:56:07 AM2/11/2010 11:56:07 AM
Please purchase PDF Split-Merge on www.verypdf.com to remove this watermark.
480
Chapter 6 Data Inserting with Visual C#.NET
InsertCourse , and then add some codes to the Insert button ’ s Click method to display
the InsertCourseForm window as the user clicks on this Insert button from the Course
Form window. Open the Course Form window, create a fi eld - level instance of the class
InsertCourseForm, which is shown in step A in Figure 6.32 , and then double - click on the
Insert button to open its Click method. Enter the code shown in step B in Figure 6.32
into this method.
As the Insert button is clicked, a new InsertCourseForm object, InsertCourse, is
created and the Show() method is called to display this form window.
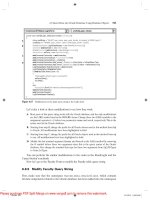
Now let ’ s run the project using the fi rst method to test our data insertion by clicking
on the Start Debugging button. The running status of the project is shown in Figure 6.33 .
Enter the suitable username and password, such as jhenry and test, for the LogIn
form, and select the Course Information item from the Selection Form window to open
the Course Form window. Then click on the Insert button to open the Insert Course
Form window.
At this time, we can only test the fi rst data insertion method — TableAdapter.
Insert() — since we have not developed the codes for the second method. Select a faculty
namespace SQLInsertWizard
{
public partial class CourseForm : Form
{
InsertCourseForm InsertCourse = new InsertCourseForm();
…………
private void cmdInsert_Click(object sender, EventArgs e)
{
InsertCourse.Show();
}
SQLInsertWizard.CourseForm InsertCourse
A
B
Figure 6.32
Coding for the Insert button ’ s Click method in the Course Form.
Figure 6.33
Running status of the project.
c06.indd 480c06.indd 480 2/11/2010 11:56:07 AM2/11/2010 11:56:07 AM
Please purchase PDF Split-Merge on www.verypdf.com to remove this watermark.
6.3 Insert Data into SQL Server Database Using Sample Project SQLInsertWizard
481
from the Faculty Name combobox, and enter the new course information shown in Figure
6.33 into the associated textbox. We may not remember the Faculty ID for the selected
faculty; therefore, a NULL is entered at this moment (of course, you can enter the
selected faculty_id to the Faculty ID textbox if you remember it). Click on the Insert
button; all textboxes that contain the new course information are cleaned up except the
Course ID textbox. We try to keep the content of this Course ID textbox unchanged to
avoid a TextChanged event occurring, and because we want to avoid mistakenly making
multiple insertions of the same data. Click on the Back , Back , and Exit buttons from the
Insert Course Form, Course Form, and Selection Form windows to terminate the project.
We will validate this data insertion in the next section.
Next let ’ s develop the codes to insert new course data using the second method,
TableAdapter.Update().
6.3.7 Develop Codes to Insert Data Using
T able A dapter . U pdate Method
Open the Insert button ’ s Click method from the Insert Course Form window and add
the codes shown in Figure 6.34 into this method. Since we have already developed some
codes for the fi rst data insertion method in the previous section, all of those developed
codes are highlighted with shading.
Let ’ s take a look at this piece of code to see how it works.
A. First, we need to declare a new object of the DataRow class. Each DataRow object can
be mapped to a real row in a data table. Since we are using the DataSet to manage all data
tables in this project, the DataSet must be prefi xed before the DataRow object. Also we
need to create a row in the Course data table. The CourseRow is selected as the DataRow
class.
B. Next, we need to create a new object of the NewCourseRow class.
C. A user - defi ned method InsertCourseRow() is called to add all information about the new
inserting course, which is stored in seven textboxes, into this new created DataRow object.
The functionality and the codes for this user - defi ned method is explained below. This
method returns a completed DataRow in which all information about the new inserted
course record has been added.
D. The completed DataRow is added into the Course table in our DataSet. Note that adding
a new record into the data table in the DataSet is nothing to do with adding a new record
into the data table in the database. The data tables in the DataSet are only mappings of
those real data tables in the database. To add this new record into the database, one needs
to perform the next step.
E. The TableAdapter ’ s Update() method is executed so that this new record is added into
the real database. As we mentioned before, you can control the amount of data to
be added into the database by passing the different arguments. Here we only want to
add one new record into the Course table; therefore, a data table is passed as the argu-
ment. This Update() method supposes returning an integer value to indicate whether this
updating has successful or not. The value of this returned integer is equal to the number
of rows that have been successfully added into the database. A returned value of
zero means that this updating has failed since no new row has been added into the
database.
c06.indd 481c06.indd 481 2/11/2010 11:56:08 AM2/11/2010 11:56:08 AM
Please purchase PDF Split-Merge on www.verypdf.com to remove this watermark.
482
Chapter 6 Data Inserting with Visual C#.NET
The codes for the user - defi ned method InsertCourseRow() are shown in Figure 6.35 .
Open the code window of the Insert Course Form and enter the codes shown in Figure
6.35 into this method.
Let ’ s see how this piece of codes works.
A. The method InsertCourseRow() needs to return a completed DataRow object, and the
returned data type is indicated at the beginning of the method header after the accessing
mode private . The argument is also a DataRow object, but it is a new created blank
DataRow object. The data type of the argument is very important. Here we used a refer-
ence mode for this argument. The advantage of using this mode is that the passed variable
is an address of the DataRow object. Any modifi cation to this object, such as adding new
elements to this DataRow, is permanent, and the modifi ed object can be completely
returned to the calling method.
B. Seven pieces of new course information stored in the associated textboxes are added into
this new DataRow object, that is, added into a new row of the Course table in the DataSet.
Note that the data type of each inserted item must be identical with the data type of each
private void cmdInsert_Click(object sender, EventArgs e)
{
int check = 0, intInsert = 0;
CSE_DEPTDataSet.CourseRow newCourseRow;
InitCourseInfo();
check = CheckCourseInfo();
if (check == 0)
{
facultyTableAdapter.ClearBeforeFill = true;
string strFacultyID = facultyTableAdapter.FindFacultyIDByName(ComboName.Text);
txtFacultyID.Text = strFacultyID;
if (ComboMethod.Text == "TableAdapter Insert")
{
intInsert = courseTableAdapter.InsertCourse(txtCourseID.Text, txtCourse.Text, txtClassRoom.Text,
txtSchedule.Text, int.Parse(txtEnroll.Text), txtFacultyID.Text, double.Parse(txtCredits.Text));
}
else
{
newCourseRow = cSE_DEPTDataSet.Course.NewCourseRow();
newCourseRow = InsertCourseRow(ref newCourseRow);
cSE_DEPTDataSet.Course.Rows.Add(newCourseRow);
intInsert = courseTableAdapter.Update(cSE_DEPTDataSet.Course);
}
if (intInsert != 0) // data insertion is successful
{
cmdCancel.PerformClick(); // clean up all faculty information
cmdInsert.Enabled = false; // disable the Insert button
}
else
{
MessageBox.Show("The course insertion is failed");
cmdInsert.Enabled = true;
}
}
else
MessageBox.Show("Fill all Course Information box, enter a NULL for blank column");
}
A
B
C
D
E
SQLInsertWizard.InsertCourseForm cmdInsert_Click()
Figure 6.34
Modifi ed coding for the Insert button ’ s Click method.
c06.indd 482c06.indd 482 2/11/2010 11:56:08 AM2/11/2010 11:56:08 AM
Please purchase PDF Split-Merge on www.verypdf.com to remove this watermark.
6.3 Insert Data into SQL Server Database Using Sample Project SQLInsertWizard
483
associated column in the Course table. The Parse() method is utilized to perform the
conversion between the string and different other built - in data types for columns
credit
and
enrollment
.
C. Finally, this completed DataRow object is returned to the calling method. Another advan-
tage of using this reference value is that we do not need to create another local variable
as the returned variable; instead we can directly use this passed argument as the returned
data.
We have one more step to go to fi nish this data insertion process. As we mentioned,
after one new data is inserted into the database, the Insert button will be disabled to
avoid the multiple insertions of the same data. In order to reenable this button, you have
to change the content of the Course ID textbox, and this means that you want to insert
a new course record. To make this happen, we need to use the TextChanged event of
the Course ID textbox to trigger its TextChanged method to enable the Insert button.
To do that, open the Insert Course Form window and double - click on the Course ID
textbox to open its TextChanged method. Enter one line of code into this method, as
shown in Figure 6.36 .
Now we have completed developing two methods to perform the data insertion
operation. You can run the project to test the second data insertion method with the
following new course information (the selected Faculty Name is Ying Bai):
• Faculty ID NULL
• Course ID CSE - 566
• Course Title Introduction to Fuzzy Logic
• Schedule TH: 1:30 – 2:45 PM
private CSE_DEPTDataSet.CourseRow InsertCourseRow(ref CSE_DEPTDataSet.CourseRow courseRow)
{
courseRow.faculty_id = txtFacultyID.Text;
courseRow.course_id = txtCourseID.Text;
courseRow.course = txtCourse.Text;
courseRow.schedule = txtSchedule.Text;
courseRow.classroom = txtClassRoom.Text;
courseRow.credit = double.Parse(txtCredits.Text);
courseRow.enrollment = int.Parse(txtEnroll.Text);
return courseRow;
}
A
B
C
SQLInsertWizard.InsertCourseForm
InsertCourseRow()
Figure 6.35
Coding for the user - defi ned InsertCourseRow method.
private void txtCourseID_TextChanged(object sender, EventArgs e)
{
cmdInsert.Enabled = true;
}
SQLInsertWizard.InsertCourseForm txtCourseID_TextChanged
Figure 6.36
Coding for the TextChanged method of the Course ID textbox.
c06.indd 483c06.indd 483 2/11/2010 11:56:09 AM2/11/2010 11:56:09 AM
Please purchase PDF Split-Merge on www.verypdf.com to remove this watermark.
484
Chapter 6 Data Inserting with Visual C#.NET
• Classroom TC - 309
• Credits 3
• Enrollment 20
Next, we need to discuss how to validate these data insertions to confi rm that these
new course record insertions are successful.
6.3.8 Use Select Button in Course Form to
Perform Data Validation
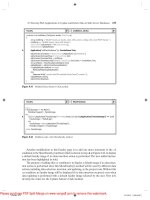
Using this method to validate the new inserted data is very simple and effi cient. The basic
idea of this method is to use the query function FillByFacultyID(), which we developed
in Figure 5.59 , to retrieve new inserted records from the Course table and display them
in a CourseList box in the Course Form window. Since that query function has been
developed, we can directly use it. The Select button ’ s Click method contains two query
functions: FindFacultyIDByName() and FillByFacultyID(). We need both functions to
validate our new inserted record.
To use this method to validate the new inserted data, run the project and go to the
Course Form window. To validate new inserted records, select the desired faculty from
the Faculty Name combobox (such as Ying Bai) and click on the Select button to retrieve
all course records and display them in the CourseList box. You can fi nd that two new
inserted courses, CSE - 538 and CSE - 566, have been successfully inserted into our data-
base and displayed in the Course Listbox, which is shown in Figure 6.37 . By clicking on
each of these new records, all pieces of course - related information are displayed in the
associated textboxes, as shown in Figure 6.37 .
At this point, we completed inserting new data into the SQL Server database using
the two methods. Next, we want to discuss how to insert new records into the database
Figure 6.37
Data validation using the Course Form window.
c06.indd 484c06.indd 484 2/11/2010 11:56:09 AM2/11/2010 11:56:09 AM
Please purchase PDF Split-Merge on www.verypdf.com to remove this watermark.
6.3 Insert Data into SQL Server Database Using Sample Project SQLInsertWizard
485
using the stored procedures. Recall that we did not discuss this for the Microsoft Access
database in Section 6.2 since the Microsoft Access database does not allow users to use
stored procedures to access it using the Visual Studio.NET design tools and wizards such
as the TableAdapter Query Confi guration Wizard and Query Builder. However, for the
SQL Server database, it does allow users to use stored procedures to access it to perform
different data actions.
6.3.9 Insert Data into Database Using Stored Procedures
In this section, we want to discuss how to insert new records into the database using the
stored procedures. To make it simple, we still use the Course and the Insert Course Form
windows to show readers how to insert a new course record into the Course table in the
database using the stored procedure. To do that, fi rst we need to create a stored proce-
dure named
InsertCourseSP
under the Course table using the TableAdapter Query
Confi guration Wizard, and then we need to make little modifi cations to the coding of the
Insert button ’ s Click method and the coding for the constructor of the Insert Course
Form. The modifi cations include the following steps:
1. Open the constructor of the Insert Course Form window and add one more item “ Stored
Procedure ” into the combobox ComboMethod to allow users to select this method to
perform the data insertion.
2. In the Insert button ’ s Click method, change the
else
clause to the
else if
clause for
the
if
block to allow users to select the second method, TableAdapter.Update(), and add
one more
else
clause for the third method, “ Stored Procedure ” , to allow users to select
this method.
3. In the Insert button ’ s Click method, add the associated codes to call the built stored pro-
cedure to perform the data insertion.
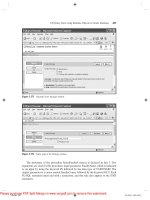
Let ’ s fi rst create a stored procedure under the Course table using the TableAdapter
Query Confi guration Wizard.
6.3.9.1 Create Stored Procedure Using T able A dapter Query
Confi guration Wizard
Open the Data Source window by clicking the Data|Show Data Sources menu item, and
then right - click on any location inside the Data Source window and select the Edit the
DataSet with Designer item from the pop - up menu to open this window. Right - click
on the last item from the Course table and select the Add Query item from the pop - up
menu to open the TableAdapter Query Confi guration Wizard. Check the Create new
stored procedure radio button since we want to create a new stored procedure to do
the data insertion, and click on the Next button to go to the next window. Check the
INSERT radio button and click on Next to continue. Click on the Query Builder button
on the opened window since we need to build a new query. The opened Query Builder
dialog box is shown in Figure 6.38 .
You may note that the order of the inserted columns in this stored procedure is dif-
ferent from the order of columns in the InsertCourse() query function we built in Figure
6.30 . Of course, you can modify this order to make it identical with the order in the
c06.indd 485c06.indd 485 2/11/2010 11:56:09 AM2/11/2010 11:56:09 AM
Please purchase PDF Split-Merge on www.verypdf.com to remove this watermark.
486
Chapter 6 Data Inserting with Visual C#.NET
InsertCourse() query function if you like. However, the important issue is that it doesn ’ t
matter if these orders are identical or not, the only key issue is that you must make
sure that the order in this query function is identical with the order in the function that
will be called from the Insert button ’ s Click method later in your program. Click on the
OK button to the next dialog box to confi rm our built query function, which is shown in
Figure 6.39 .
Figure 6.38
Opened Query Builder dialog box.
Figure 6.39
Confi rmation dialog box.
c06.indd 486c06.indd 486 2/11/2010 11:56:09 AM2/11/2010 11:56:09 AM
Please purchase PDF Split-Merge on www.verypdf.com to remove this watermark.
6.3 Insert Data into SQL Server Database Using Sample Project SQLInsertWizard
487
Since we only need to insert a record into the database, highlight the second SELECT
statement and delete it by pressing the Delete key on your keyboard. Click on the Next
button again, and enter
InsertCourseSP
as the name of this query stored procedure
into the name box. Click on the Next and the Finish buttons to close this process.
6.3.9.2 Modify Codes to Perform Data Insertion Using Stored Procedure
The fi rst modifi cation is to add one more item “ Stored Procedure ” into the combobox
ComboMethod in the constructor of the Insert Course Form to allow users to select it to
perform the data insertion. Open the constructor and add one more line of the code,
which is shown in Figure 6.40 , into this constructor. The codes we developed in the previ-
ous sections are indicated with shading.
Both the second and the third modifi cations are performed inside the Insert button ’ s
Click method in the Insert Course Form window. Both modifi cations include adding an
else if
clause in the
if
block and adding related codes to perform the inserting new
course records using the stored procedure method.
Open the Insert button ’ s Click method from the Insert Course Form window and
add the codes shown in Figure 6.41 into this method. The new added codes, which are
highlighted in bold, are indicated in steps A and B , respectively. In step B , the stored
procedure we developed in the last section using the TableAdapter Query Confi guration
Wizard is called to insert a new course record into the Course table in our database. Note
that the order and the data types of inserted items must be identical with those we defi ned
in the stored procedure in the last section.
Now you can run the project to test inserting data using the stored procedure. It
seems there is no difference between calling a query function and calling a stored proce-
dure to perform this data insertion. Yes, that is true for this data action because the stored
procedure is a function or a collection of functions that performs some special functional-
public InsertCourseForm()
{
InitializeComponent();
ComboName.Items.Add("Ying Bai");
ComboName.Items.Add("Satish Bhalla");
ComboName.Items.Add("Black Anderson");
ComboName.Items.Add("Steve Johnson");
ComboName.Items.Add("Jenney King");
ComboName.Items.Add("Alice Brown");
ComboName.Items.Add("Debby Angles");
ComboName.Items.Add("Jeff Henry");
ComboName.SelectedIndex = 0;
ComboMethod.Items.Add("TableAdapter Insert");
ComboMethod.Items.Add("TableAdapter Update");
ComboMethod.Items.Add ("Stored Procedure");
ComboMethod.SelectedIndex = 0;
txtCourseID.DataBindings.Clear();
txtFacultyID.DataBindings.Clear();
}
SQLInsertWizard.InsertCourseForm
InsertCourseForm()
Figure 6.40
Modifi cation to the codes in the constructor.
c06.indd 487c06.indd 487 2/11/2010 11:56:13 AM2/11/2010 11:56:13 AM
Please purchase PDF Split-Merge on www.verypdf.com to remove this watermark.
488
Chapter 6 Data Inserting with Visual C#.NET
ity or functionalities. However, we cannot create a stored procedure that can be used
to perform multiple data actions to the multiple different data tables by using the
TableAdapter Query Confi guration Wizard since each TableAdapter can only access the
associated data table. To insert data into the database using the runtime objects method,
which we will discuss it in Part II, one stored procedure can access multiple different data
tables and fulfi ll multiple different data manipulation operations.
At this point, we fi nished developing our sample project to insert data into the SQL
Server database. A completed project SQLInsertWizard is located at the folder
DBProjects\Chapter 6 located at the accompanying ftp site (See Chapter 1 ).
Next we will discuss how to insert data into the Oracle database using the Visual
Studio.NET design tools and wizards.
private void cmdInsert_Click(object sender, EventArgs e)
{
int check = 0, intInsert = 0;
CSE_DEPTDataSet.CourseRow newCourseRow;
InitCourseInfo();
check = CheckCourseInfo();
if (check == 0)
{
facultyTableAdapter.ClearBeforeFill = true;
string strFacultyID = facultyTableAdapter.FindFacultyIDByName(ComboName.Text);
txtFacultyID.Text = strFacultyID;
if (ComboMethod.Text == "TableAdapter Insert")
{
intInsert = courseTableAdapter.InsertCourse(txtCourseID.Text, txtCourse.Text, txtClassRoom.Text,
txtSchedule.Text, int.Parse(txtEnroll.Text), txtFacultyID.Text, double.Parse(txtCredits.Text));
}
else if (ComboMethod.Text == "TableAdapter Update")
{
newCourseRow = cSE_DEPTDataSet.Course.NewCourseRow();
newCourseRow = InsertCourseRow(ref newCourseRow);
cSE_DEPTDataSet.Course.Rows.Add(newCourseRow);
intInsert = courseTableAdapter.Update(cSE_DEPTDataSet.Course);
}
else
intInsert = courseTableAdapter.InsertCourseSP(txtCourseID.Text, txtCourse.Text,
double.Parse(txtCredits.Text), txtClassRoom.Text, txtSchedule.Text,
int.Parse(txtEnroll.Text), txtFacultyID.Text);
if (intInsert != 0) // data insertion is successful
{
cmdCancel.PerformClick(); // clean up all faculty information
cmdInsert.Enabled = false; // disable the Insert button
}
else
{
MessageBox.Show("The course insertion is failed");
cmdInsert.Enabled = true;
}
}
else
MessageBox.Show("Fill all Course Information box, enter a NULL for blank column");
}
A
B
SQLInsertWizard.InsertCourseForm cmdInsert_Click()
Figure 6.41
Code modifi cations for the Insert button ’ s Click method.
c06.indd 488c06.indd 488 2/11/2010 11:56:13 AM2/11/2010 11:56:13 AM
Please purchase PDF Split-Merge on www.verypdf.com to remove this watermark.
6.4 Insert Data into Oracle Database Using Sample Project OracleInsertWizard
489
6.4 INSERT DATA INTO ORACLE DATABASE USING SAMPLE
PROJECT O RACLE I NSERT W IZARD
Because of the similarity in data insertion between the SQL Server database and the
Oracle database, all the codes we developed in the last section can be used to access the
Oracle database to perform data insertion. The only difference between both databases
is the connection string when the Oracle database is connected to the Visual C#.NET
applications. To save space and time, we will not duplicate those codes in this section.
Refer to Section 5.2.2.2 in Chapter 5 and Appendix E to get more detailed informa-
tion on how to add and connect an Oracle database with your Visual C#.NET applica-
tions using the Design Tools and Wizards as well as the associated codes. Refer to
Appendix F to get a clear picture on how to use the sample Oracle 10g XE database
CSE_DEPT in C# projects. As long as this connection is set up, all coding jobs are
identical with those we did for the SQL Server database in the last section, and you
can directly use those codes to access the Oracle database to perform the different
data actions. A complete data insertion project named OracleInsertWizard Project is
located at the folder DBProjects\Chapter 6 located at the accompanying ftp site (See
Chapter 1 ).
PART II DATA INSERTION WITH RUNTIME OBJECTS
Inserting data into the database using the runtime objects method is a fl exible and profes-
sional way to perform the data insertion operation in the Visual C#.NET environment.
Compared with those methods discussed in Part I in which Visual Studio.NET design
tools and wizards were utilized to insert data into the database, the runtime objects
method provides more sophisticated techniques to do this operation more effi ciently and
conveniently. Relatively speaking, the methods we discussed in the fi rst part are easy to
learn, but some limitations existed with those methods. First, each TableAdapter can only
access the associated data table to perform data actions such as inserting data to that
table only. Second, each query function built by using the TableAdapter Query
Confi guration Wizard can only perform a single query such as data insertion. Third, after
the query function is built, no modifi cations can be made to that function dynamically,
which means that the only time you can modify that query function is either before the
project runs or after the project terminates. In other words, you cannot modify that query
function as the project runs.
To overcome these shortcomings, we will discuss how to insert data using the runtime
objects method in this part. Three sections are covered in this part: inserting data using
the general runtime objects method is discussed. Inserting data into the database using
the LINQ to DataSet and LINQ to SQL queries is introduced in the second Section.
Inserting data using the stored procedures is presented in the third Section.
Generally, you need to use the TableAdapter to perform data actions in the database
if you developed your applications using the Visual Studio.NET design tools and
wizards in the design time. However, you should use the DataAdapter to make
these data manipulations if you developed your projects using the runtime objects
method.
c06.indd 489c06.indd 489 2/11/2010 11:56:13 AM2/11/2010 11:56:13 AM
Please purchase PDF Split-Merge on www.verypdf.com to remove this watermark.
490
Chapter 6 Data Inserting with Visual C#.NET
6.5 GENERAL RUNTIME OBJECTS METHOD
We provided a very detailed introduction and discussion about the runtime objects
method in Section 5.17 in Chapter 5 . Refer to that section to get more detailed informa-
tion about this method. For your convenience, we highlight some important points and
general methodology of this method as well as some key points in using this method to
perform the data actions again the databases.
As you know, ADO.NET provides different classes to help users develop profes-
sional data - driven applications by using different methods to perform specifi c data actions
such as inserting data, updating data, and deleting data. For data insertion, two popular
methods are widely applied:
1. Add new records into the desired data table in the DataSet, and then call the DataAdapter.
Update() method to update the new added records from the table in the DataSet to the
table in the database.
2. Build the INSERT command using the Command object, and then call the command ’ s
ExecuteNonQuery() method to insert new records into the database. Or you can assign the
built command object to the InsertCommand property of the DataAdapter and call the
ExecuteNonQuery() method from the InsertCommand property.
The fi rst method is to use the so - called DataSet - DataAdapter method to build a
data - driven application. DataSet and DataTable classes can have different roles when
they are implemented in a real application. Multiple DataTables can be embedded into
a DataSet, and each table can be fi lled, inserted, updated, and deleted by using the dif-
ferent properties of a DataAdapter such as the SelectCommand, InsertCommand,
UpdateCommand, or DeleteCommand when the DataAdapter ’ s Update() method is
executed. The DataAdapter will perform the associated operations based on the modifi -
cations you made for each table in the DataSet. For example, if you add new rows into
a table in the DataSet, then you call this DataAdapter ’ s Update() method. This method
will perform an InsertCommand based on your modifi cations. The DeleteCommand will
be executed if you delete rows from the table in the DataSet and call this Update()
method. This method is relativly simple since you do not need to call some specifi c
methods such as the ExecuteNonQuery() to complete these data queries. But this simplic-
ity brings some limitations for your applications. For instance, you cannot access different
data tables individually to perform multiple specifi c data operations. This method is very
similar to the second method we discussed in Part I, so we will not discuss it further here.
The second method allows you to use each object individually, which means that you
do not have to use the DataAdapter to access the Command object, or use the DataTable
with DataSet together. This provides more fl exibility. In this method, no DataAdapter
or DataSet is needed, and you only need to create a new Command object with a new
Connection object. Then build a query statement and attach some useful parameter into
that query for the new created Command object. You can insert data into any data table
by calling the ExecuteNonQuery() method that belongs to the Command class. We will
concentrate on this method in this part.
In this section, we provide three sample projects named SQLInsertRTObject,
AccInsertRTObject, and OracleInsertRTObject to illustrate how to insert new records
into three different databases using the runtime objects method. Because of the coding
similarity between these three databases, we will concentrate on inserting data to the
SQL Server database using the SQLInsertRTObject project fi rst. Then we will illustrate
c06.indd 490c06.indd 490 2/11/2010 11:56:14 AM2/11/2010 11:56:14 AM
Please purchase PDF Split-Merge on www.verypdf.com to remove this watermark.
6.6 Insert Data into SQL Server Database Using Runtime Objects Method
491
the coding differences between these databases by using the real codes for the two other
sample projects.
Now let ’ s fi rst develop the sample project SQLInsertRTObject to insert data into the
SQL Server database using the runtime objects method. Recall that in sections 5.18.3 to
5.18.5 in Chapter 5 , we discussed how to select data for the Faculty, Course, and Student
Form windows using the runtime objects method. For the Faculty Form, a regular runtime
selecting query is performed, and for the Course Form, a runtime joined - table selecting
query is developed. For the Student table, the stored procedures are used to perform the
runtime data query.
We will concentrate on inserting data to the Faculty table from the Faculty Form
window using the runtime object method in this part. To avoid duplication of the coding,
we will modify an existing project named SQLSelectRTObject we developed in Chapter
5 to create our new project SQLInsertRTObject used in this section.
6.6 INSERT DATA INTO SQL SERVER DATABASE USING
RUNTIME OBJECTS METHOD
Open Windows Explorer and create a new folder Chapter 6 if you have not done that,
and then browse to the folder DBProjects\Chapter 5 located at the accompanying ftp site
(See Chapter 1 ). Then copy the project SQLSelectRTObject to our new folder C:\
Chapter 6. Change the names of the solution and the project from SQLSelectRTObject
to SQLInsertRTObject. Change the project fi le name from SQLSelectRTObject.csproj
to SQLInsertRTObject.csproj. Double - click on the SQLInsertRTObject.csproj to open
this project.
On the opened project, perform the following modifi cations to get our desired project:
• Go to Project|SQLInsertRTObject Properties menu item to open the project ’ s property
window. Change the Assembly name from SQLSelectRTObject to SQLInsertRTObject
and the Default namespace from SQLSelectRTObject to SQLInsertRTObject,
respectively.
• Click on the Assembly Information button to open the Assembly Information dialog box
and change the Title and the Product to SQLInsertRTObject. Click on
OK
to close this
dialog box.
Go to the File|Save All to save those modifi cations. Now we are ready to develop
our graphic user interfaces based on our new project SQLInsertRTObject. To insert data
into the Faculty data table, we need to add one more Windows Form as the user interface
into this new project.
6.6.1 Add Inserting Data Form Window: Insert Faculty Form
The function of the Insert Faculty Form is as follows: As the project runs, after the user
has successfully fi nished the login process and selected the Faculty Information from the
Selection Form, the Faculty Form window will be displayed. When the user clicks on the
Insert button, the Insert Faculty Form window will appear. This form allows users to
insert data into the Faculty data table in the database using the runtime objects method.
The form also allows users to enter all pieces of information into the appropriate text-
boxes for the new inserted faculty. By clicking the Insert button, a new faculty record is
c06.indd 491c06.indd 491 2/11/2010 11:56:14 AM2/11/2010 11:56:14 AM
Please purchase PDF Split-Merge on www.verypdf.com to remove this watermark.
492
Chapter 6 Data Inserting with Visual C#.NET
inserted into the database. However, if the user wants to reenter those pieces of informa-
tion before fi nishing this insertion, the Cancel button can be used and all pieces of infor-
mation entered will be erased. The Back button is used to allow users to return to the
Faculty Form to perform the validation to confi rm that the data insertion is successful.
Go to the Project|Add Windows Form menu item to open the Add New Item dialog
box. Keep the default Template s,
Windows Form
, selected and enter the
Insert
Faculty Form.cs
into the Name box as the name for this new form. Then click the
Add button to add this form into our project.
To save time and space, we can copy all controls on this Faculty Form from the
project InsertWizard Project we developed in this chapter. Open that project from the
folder DBProjects\Chapter 6 located at the accompanying ftp site (See Chapter 1 ), and
open the Insert Faculty Form window. Then go to the Edit|Select All menu item to select
all controls on that form window. Go to the Edit|Copy menu item to copy those items.
Now open our newly created project SQLInsertRTObject and our new form Insert
Faculty Form window, enlarge it to an appropriate size, and go to the Edit|Paste menu
item to paste those controls into this form. Note that the project InsertWizard is devel-
oped using the Visual Studio.NET design tools and wizards, so some objects related to
those design tools and wizards such as the Data BindingSource will be added into this
form as you paste those controls. Because we don ’ t need those objects in this runtime
objects method, just delete all of them from our new Insert Faculty Form window. To do
that, right - click on FacultyBindingSource from the bottom of this form window and select
the Delete item from the pop - up menu to remove it.
In addition to removing the components related to the design tools and wizards, you
also need to perform the following modifi cations to this form:
• Remove the combobox control ComboMethod from this form since we only use one method,
the ExecuteNonQuery method of the Command class, to perform this runtime data
insertion.
• Remove the Select button from this form since we will not perform the data validation until
we click the Back button to return to the Faculty form window. In other words, the data
validation is performed in the Faculty Form.
• Make sure the following properties of the form are set up:
• Name:
InsertFacultyForm
• Text:
CSE DEPT Insert Faculty Form
• AcceptButton:
cmdInsert (select the Insert button as the default button)
• StartPosition:
CenterScreen (locate the form in the center of the screen)
Your fi nished form window, Insert Faculty Form, is shown in Figure 6.42 .
The detailed descriptions of the function of each control on this form can be found
in Section 6.2.3 in this chapter. Simply speaking, the Faculty Photo checkbox is used to
control both the Photo Name and the Photo Location textboxes to allow users to select
the newly inserted faculty ’ s photo. The Faculty ID textbox is a key textbox since the
Insert button will be enabled if this textbox ’ s content is changed, which means that a new
faculty will be inserted. The Cancel button enables users to clean up the contents of all
textboxes (except the Faculty ID) to reenter the faculty information. A new faculty
record will be inserted into the database as the Insert button is clicked.
Our graphical user interface design is done. Next let ’ s modify the codes for the copied
project to make them match our new project.
c06.indd 492c06.indd 492 2/11/2010 11:56:14 AM2/11/2010 11:56:14 AM
Please purchase PDF Split-Merge on www.verypdf.com to remove this watermark.