Tài liệu Practical Database Programming With Visual C#.NET- P3 pptx
Bạn đang xem bản rút gọn của tài liệu. Xem và tải ngay bản đầy đủ của tài liệu tại đây (916.98 KB, 50 trang )
3.4 Components of ADO.NET 2.0 123
In addition to a schema, a DataTable must also have rows to contain and order data.
The DataRow class represents the actual data contained in a table. You use the DataRow
and its properties and methods to retrieve, evaluate, and manipulate the data in a table.
As you access and change the data within a row, the DataRow object maintains both its
current and original state.
3.4.7.1 Data T able Constructor
The DataTable has four overloaded constructors and Table 3.18 lists three of the most
often used constructors. You can create a DataTable object by using the appropriate
DataTable constructor. You can add it to the DataSet by using the Add method to add
it to the DataTable object ’ s Tables collection.
You can also create DataTable objects within a DataSet by using the Fill() or
FillSchema() methods of the DataAdapter object, or from a predefi ned or inferred XML
schema using the ReadXml(), ReadXmlSchema(), or InferXmlSchema() methods of the
DataSet. Note that after you have added a DataTable as a member of the Tables collec-
tion of one DataSet, you cannot add it to the collection of tables of any other DataSet.
When you fi rst create a DataTable, it does not have a schema (that is, a structure).
To defi ne the schema of the table, you must create and add DataColumn objects to the
Columns collection of the table. You can also defi ne a primary key column for the table
and create and add Constraint objects to the Constraints collection of the table. After
you have defi ned the schema for a DataTable, you can add rows of data to the table by
adding DataRow objects to the Rows collection of the table.
You are not required to supply a value for the TableName property when you create
a DataTable; you can specify the property at another time, or you can leave it empty.
However, when you add a table without a TableName value to a DataSet, the table will
be given an incremental default name of Table N , starting with “ Table ” for Table0.
Figure 3.17 shows an example of creating a new DataTable and a DataSet and then
adding the DataTable into the DataSet object.
Table 3.18 Three Popular Constructors of the Data T able Class
Constructors Descriptions
DataTable() Initializes a new instance of the DataTable class
with no arguments.
DataTable(String) Initializes a new instance of the DataTable class
with the specifi ed table name.
DataTable(String, String) Initializes a new instance of the DataTable class
using the specifi ed table name and namespace.
DataSet FacultyDataSet;
DataTable FacultyTable;
FacultyDataSet = new DataSet();
FacultyTable = new DataTable(“Faculty”);
FacultyDataSet.Tables.Add(FacultyTable);
Figure 3.17 Example of adding a DataTable into a DataSet.
c03.indd 123c03.indd 123 2/11/2010 11:50:59 AM2/11/2010 11:50:59 AM
Please purchase PDF Split-Merge on www.verypdf.com to remove this watermark.
124 Chapter 3 Introduction to ADO.NET
First, you need to create an instance for both the DataSet and the DataTable classes,
respectively. Then you can add this new DataTable instance into the new DataSet object
by using the Add() method.
3.4.7.2 DataTable Properties
The DataTable class has more than 20 properties. Table 3.19 lists some of the most often
used properties. Among these properties, the Columns and Rows properties are very
important to us, and both properties are collections of DataColumn and DataRow in the
current DataTable object. The Columns property contains a collection of DataColumn
objects in the current DataTable and each column in the table can be considered as a
DataColumn object and can be added into this Columns collection. A similar situation
happened to the Rows property. The Rows property contains a collection of DataRow
objects that are composed of all rows in the current DataTable object. You can get the
total number of columns and rows from the current DataTable by calling these two
properties.
3.4.7.3 DataTable Methods
The DataTable class has about 50 different methods with 33 public methods, and
Table 3.20 lists some of the most often used methods. Among these methods, three of
them are important to us: NewRow(), ImportRow(), and LoadDataRow(). Calling the
NewRow() adds a row to the data table using the existing table schema, but with default
values for the row, and sets the DataRowState to Added. Calling the ImportRow() pre-
serves the existing DataRowState along with other values in the row. Calling the
LoadDataRow() is to fi nd and update a data row from the current data table. This method
Table 3.19 Popular Properties of the Data T able Class
Properties Descriptions
Columns The data type of the Columns property is DataColumnCollection, which
means that it contains a collection of DataColumn objects. Each column
in the DataTable can be considered as a DataColumn object.
By calling this property, a collection of DataColumn objects that exists in
the DataTable can be retrieved.
DataSet Gets the DataSet to which this table belongs.
IsInitialized Gets a value that indicates whether the DataTable is initialized.
Namespace Gets or sets the namespace for the XML representation of the data stored
in the DataTable.
PrimaryKey Gets or sets an array of columns that function as primary keys for the data
table.
Rows The data type of the Rows property is DataRowCollection, which means
that it contains a collection of DataRow objects. Each row in the
DataTable can be considered as a DataRow object.
By calling this property, a collection of DataRow objects that exists in the
DataTable can be retrieved.
TableName Gets or sets the name of the DataTable.
c03.indd 124c03.indd 124 2/11/2010 11:50:59 AM2/11/2010 11:50:59 AM
Please purchase PDF Split-Merge on www.verypdf.com to remove this watermark.
3.4 Components of ADO.NET 2.0 125
Table 3.20 Popular Methods of the Data T able Class
Methods Descriptions
Clear Clears the DataTable of all data.
Copy Copies both the structure and data for this DataTable.
Dispose Releases the resources used by the MarshalByValueComponent.
GetChanges Gets a copy of the DataTable containing all changes made to it
since it was last loaded or since AcceptChanges was called.
GetType Gets the Type of the current instance.
ImportRow Copies a DataRow into a DataTable, preserving any property
settings, as well as original and current values.
Load Fills a DataTable with values from a data source using the
supplied IDataReader. If the DataTable already contains rows,
the incoming data from the data source is merged with the
existing rows.
LoadDataRow Finds and updates a specifi c row. If no matching row is found,
a new row is created using the given values.
Merge Merge the specifi ed DataTable with the current DataTable.
NewRow Creates a new DataRow with the same schema as the table.
ReadXml Reads XML schema and data into the DataTable.
RejectChanges Rolls back all changes that have been made to the table since it
was loaded or the last time AcceptChanges was called.
Reset Resets the DataTable to its original state.
Select Gets an array of DataRow objects.
ToString Gets the TableName and DisplayExpression, if there is one as a
concatenated string.
WriteXml Writes the current contents of the DataTable as XML.
has two arguments, the Value (Object) and the Accept Condition (Boolean). The Value
is used to update the data row if that row were found, and the Condition is used to indi-
cate whether the table allows this update to be made or not. If no matching row is found,
a new row is created with the given Value.
3.4.7.4 Data T able Events
The DataTable class contains 11 public events and Table 3.21 lists these events. The most
often used events are ColumnChanged, Initialized, RowChanged, and RowDeleted. By
using these events, one can track and monitor the real situations that occur in the
DataTable.
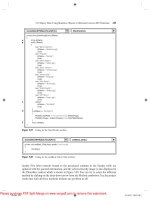
Before we can fi nish this section, we need to show users how to create a data table
and how to add data columns and rows into this new table. Figure 3.18 shows a complete
example of creating a new data table object and adding columns and rows into this table.
The data table is named FacultyTable.
Refer to Figure 3.18 , starting from step A , a new instance of the data table
FacultyTable is created and initialized to a blank table. In order to add data into this new
table, you need to use the Columns and Rows collections, and these two collections
c03.indd 125c03.indd 125 2/11/2010 11:50:59 AM2/11/2010 11:50:59 AM
Please purchase PDF Split-Merge on www.verypdf.com to remove this watermark.
126 Chapter 3 Introduction to ADO.NET
Table 3.21 Public Events of the Data T able Class
Events Descriptions
ColumnChanged Occurs after a value has been changed for the specifi ed DataColumn
in a DataRow.
ColumnChanging Occurs when a value is being changed for the specifi ed DataColumn
in a DataRow.
Disposed Adds an event handler to listen to the Disposed event on the
component.
Initialized Occurs after the DataTable is initialized.
RowChanged Occurs after a DataRow has been changed successfully.
RowChanging Occurs when a DataRow is changing.
RowDeleted Occurs after a row in the table has been deleted.
RowDeleting Occurs before a row in the table is about to be deleted.
TableCleared Occurs after a DataTable is cleared.
TableClearing Occurs when a DataTable is being cleared.
TableNewRow Occurs when a new DataRow is inserted.
//Create a new DataTable
DataTable FacultyTable = new DataTable("
FacultyTable
System.int32
FacultyId
System.string
FacultyOffice
FacultyId
FacultyOffice TC-
");
//Declare DataColumn and DataRow variables
DataColumn column;
DataRow row;
//Create new DataColumn, set DataType, ColumnName and add to DataTable
column = new DataColumn();
column.DataType = System.Type.GetType(" ");
column.ColumnName = " ";
FacultyTable.Columns.Add(column);
//Create another column.
column = new DataColumn();
column.DataType = Type.GetType(" ");
column.ColumnName = " ";
FacultyTable.Columns.Add(column);
//Create new DataRow objects and add to DataTable.
int Index = 0;
for (Index = 1; Index <= 10; Index++)
{
row = FacultyTable.NewRow();
row(" ") = Index;
row(" ") = " " + Index;
FacultyTable.Rows.Add(row);
}
A
B
C
D
E
F
Figure 3.18 Example of creating a new table and adding data into the table.
contain the DataColumn and DataRow objects. So next you need to create DataColumn
and DataRow objects, respectively. Step B fi nished these object declarations.
In step C , a new instance of the DataColumn, column, is created by using the new
keyword. Two DataColumn properties, DataType and ColumnName, are used to initial-
ize the fi rst DataColumn object with the data type as integer (System.int32) and with the
column name as “ FacultyId ” , respectively. Finally the completed object of the DataColumn
c03.indd 126c03.indd 126 2/11/2010 11:50:59 AM2/11/2010 11:50:59 AM
Please purchase PDF Split-Merge on www.verypdf.com to remove this watermark.
3.4 Components of ADO.NET 2.0 127
is added into the FacultyTable using the Add() method of the Columns collection
class.
In step D , the second data column, with the column data type as string (System.string)
and the column name as the “ FacultyOffi ce ” , is added into the FacultyTable in a similar
way as we did for the fi rst data column FacultyId.
In step E , a for loop is utilized to simplify the procedure of adding new data rows
into this FacultyTable. First a loop counter Index is created, and a new instance of the
DataRow is created with the method of the DataTable — NewRow(). In total we create
and add 10 rows into this FacultyTable object. For the fi rst column “ FacultyId ” , the loop
counter Index is assigned to this column for each row. But for the second column
“ FacultyOffi ce ” , the building name combined with the loop counter Index is assigned to
this column for each row. Finally in step F , the DataRow object, row, is added into this
FacultyTable using the Add() method that belongs to the Rows collection class.
When this piece of codes runs, a complete FacultyTable can be obtained and it should
match the one shown in Table 3.22 .
3.4.8 ADO . NET 3.5 Entity Framework
Most traditional databases use the relational model of data, such as Microsoft Access, SQL
Server, and Oracle. But today almost all programming languages are object - oriented lan-
guages, and the object - oriented model of data structures are widely implemented in
modern programs developed with those languages. Therefore, a potential contradiction
exists between the relational model of data in databases and the object - oriented model of
programming applied today. Although some new components were added into the ADO.
NET 2.0 to try to solve this contradiction, still it does not give a full solution for this issue.
A revolutionary solution of this problem came with the release of ADO.NET 3.5
based on the .NET Framework 3.5 and the addition of Language Integrated Query
(LINQ) to Visual Studio.NET 2008. The main contributions of the ADO.NET 3.5 include
some new components: ADO.NET 3.5 Entity Framework (ADO.NET 3.5 EF) and ADO.
NET 3.5 Entity Data Model Tools are added into ADO.NET 3.5. With these new com-
ponents, the contradiction exists between the relational model of data used in databases
and the object - oriented programming projects that can be fully resolved.
Table 3.22 Completed Faculty T able
FacultyId FacultyOffi ce
1 TC - 1
2 TC - 2
3 TC - 3
4 TC - 4
5 TC - 5
6 TC - 6
7 TC - 7
8 TC - 8
9 TC - 9
10 TC - 10
c03.indd 127c03.indd 127 2/11/2010 5:15:14 PM2/11/2010 5:15:14 PM
Please purchase PDF Split-Merge on www.verypdf.com to remove this watermark.
128 Chapter 3 Introduction to ADO.NET
A primary goal of the ADO.NET 3.5 EF is to raise the level of abstraction available
for data programming, thus simplifying the development of data - aware applications and
enabling developers to write less code. The Entity Framework is the evolution of ADO.
NET that allows developers to program in terms of the standard ADO.NET 3.5 abstrac-
tion or in terms of persistent objects (Object Relational Mapper ORM) and is built upon
the standard ADO.NET 3.5 Provider model, which allows access to third - party databases.
The Entity Framework introduces a new set of services around the Entity Data Model
(EDM) (a medium for defi ning domain models for an application).
ADO.NET 3.5 provides an abstract database structure that converts the traditional
logic database structure to an abstract or object structure with three layers:
• Conceptual layer
• Mapping layer
• Logical layer
ADO.NET 3.5 EF defi nes these three layers using a group of XML fi les, and these
XML fi les provide a level of abstraction to enable users to program against the object -
oriented Conceptual model instead of the traditional relational data model.
The Conceptual layer provides a way to allow developers to build object - oriented
codes to access databases, and each component in databases can be considered as an
object or entity in this layer. The Conceptual Schema Defi nition Language (CSDL) is
used in those XML fi les to defi ne entities and relationships that will be recognized and
used by the Mapping layer to setup mapping between entities and relational data tables.
The Mapping layer uses Mapping Schema Language (MSL) to establish mappings
between entities in the Conceptual layer and the relational data structure in the Logical
layer. The relational database schema is defi ned in an XML fi le using Store Schema
Defi nition Language (SSDL) in the Logical layer. The Mapping layer works as a bridge
or a converter to connect the Conceptual layer to the Logical layer and interpret between
the object - oriented data model in the Conceptual layer and the relational data model in
the Logical layer. This mapping, shown in Figure 3.19 , allows users to code against the
Conceptual layer and map those codes into the Logical layer.
Conceptual Layer
Mapping Layer
Logical Layer
Relational Data
Model
Object-Oriented
Model
Figure 3.19 Mapping relationship between three layers.
c03.indd 128c03.indd 128 2/11/2010 11:50:59 AM2/11/2010 11:50:59 AM
Please purchase PDF Split-Merge on www.verypdf.com to remove this watermark.
3.4 Components of ADO.NET 2.0 129
A useful data component is provided by the Conceptual layer to enable users to
develop object - oriented codes and it is called EntityClient. The EntityClient is a Data
Provider with the associated components such as Connection (EntityConnection),
Command (EntityCommand), and DataReader (EntityDataReader). The EntityClient is
similar to other Data Providers we discussed in the previous sections in this chapter, but
it includes new components and functionalities.
The core of ADO.NET 3.5 EF is its Entity Data Model (EDM), and the user can
access and use this model using the ADO.NET 3.5 Entity Data Model Tools that includes
the EDM item template, the EDM wizard, the EDM Designer, entity mapping details,
and the entity model browser.
In the following sections, we will discuss the Entity Data Model and how to use these
EDM Tools to create, build, and develop the Entity Data Model and implement it in
actual data - driven applications.
First let ’ s take a closer look at the ADO.NET 3.5 Entity Data Model.
3.4.8.1 ADO . NET 3.5 Entity Data Model
The ADO.NET 3.5 Entity Data Model (EDM) is a data model for defi ning application
data as sets of entities and relationships to which common language runtime (CLR) types
and storage structures can be mapped. This enables developers to create data access
applications by programming against a conceptual application model instead of program-
ming directly against a relational storage schema.
The following tools are designed to help you work with the EDM:
• The ADO.NET 3.5 Entity Data Model item template is available for Visual C# project
type, and ASP.NET Web Site and Web Application projects, and launches the EDM
Wizard.
• The EDM Wizard generates an EDM, which is encapsulated in an .edmx fi le. The wizard
can generate the EDM from an existing database. The wizard also adds a connection string
to the App.Confi g or Web.Confi g fi le and confi gures a single - fi le generator to run on the
conceptual model contained in the .edmx fi le. This single - fi le generator will generate C# or
VB code from the conceptual model defi ned in the .edmx fi le.
• The ADO.NET EDM Designer provides visual tools to view and edit the EDM graphically.
You can open an .edmx fi le in the designer and create entities and map entities to database
tables and columns.
• EdmGen.exe is a command - line tool that can be used to also generate models, validate
existing models, and perform other functions on your EDM metadata fi les.
We will provide a detailed discussion for each of these tools in the following
sections.
3.4.8.1.1 Entity Data Model Item Template The ADO.NET 3.5 EDM item tem-
plate is the starting point to the EDM tools. The ADO.NET 3.5 EDM item template is
available for Visual C# and Visual Basic project types. It can be added to Console
Application, Windows Application, Class Library, ASP.NET Web Service Application,
ASP.NET Web Application, or ASP.NET Web Site projects. You can add multiple
ADO.NET 3.5 EDM items to the same project, with each item containing fi les that were
generated from a different database and/or tables within the same database.
c03.indd 129c03.indd 129 2/11/2010 11:50:59 AM2/11/2010 11:50:59 AM
Please purchase PDF Split-Merge on www.verypdf.com to remove this watermark.
130 Chapter 3 Introduction to ADO.NET
When you add the ADO.NET 3.5 EDM item template to your project, Visual Studio:
• Adds references to the System.Data, System.Data.Entity, System.Core, System.
Security, and System.Runtime.Serialization assemblies if the project does not already have
them.
• Starts the EDM Wizard. The wizard is used to generate an EDM from an existing database.
The wizard creates an .edmx fi le, which contains the model information. You can use the
.edmx fi le in the ADO.NET EDM Designer to view or modify the model.
• Creates a source code fi le that contains the classes generated from the conceptual model.
The source code fi le is autogenerated and is updated when the .edmx fi le changes, and is
compiled as part of the project.
Next let ’ s have a look at the EDM Wizard.
3.4.8.1.2 Entity Data Model Wizard The EDM Wizard starts after you add an ADO.
NET 3.5 Entity Data Model to your project. The wizard is used to generate an EDM.
The wizard creates an .edmx fi le that contains the model information. The .edmx fi le is
used by the ADO.NET 3.5 EDM Designer, which enables you to view and edit the map-
pings graphically.
You can select to create an empty model or to generate the model from an existing
database. Generating the model from an existing database is the recommended practice
for this release of the EDM tools.
The Wizard also creates a source code fi le that contains the classes generated from
the CSDL information encapsulated in the .edmx fi le. The source code fi le is autogene-
rated and is updated when the .edmx fi le changes.
Depending on your selections, the Wizard will help you with the following steps:
• Choose the Model Contents: It is recommended that you select to generate the model from
an existing database. The Wizard steps you through selecting the data source, database, and
database objects to include in the EDM.
• Choose the Database Connection: You can choose an existing connection from the list of
connections or click New Database Connection to open the Connection Properties dialog
box and create a new connection to the database .
• Choose your Database Objects: You can select the tables, views, and stored procedures to
include in the EDM.
Now let ’ s have a look at the real part — ADO.NET 3.5 Entity Data Model Designer.
3.4.8.1.3 Entity Data Model Designer The ADO.NET 3.5 EDM Designer provides
visual tools for creating and editing an EDM.
The ADO.NET EDM Designer includes the following components:
• A visual design surface for creating and editing the conceptual model. You can create,
modify, or delete entities and associations.
• An Entity Mapping Details window to view and edit mappings. You can map entity types
or associations to database tables and columns.
• An Entity Model Browser to give you a tree view of the EDM.
• Toolbox controls to create entities, associations, and inheritance relationships.
c03.indd 130c03.indd 130 2/11/2010 11:50:59 AM2/11/2010 11:50:59 AM
Please purchase PDF Split-Merge on www.verypdf.com to remove this watermark.
3.4 Components of ADO.NET 2.0 131
The ADO.NET 3.5 EDM Designer is integrated with the Visual Studio.NET 2008
components. You can view and edit information using the Properties window and errors
are reported in the Error List.
Figure 3.20 shows an example of the ADO.NET 3.5 EDM Designer. Two important
functionalities of using the EDM Designer are:
Opening the ADO . NET Entity Data Model Designer The ADO.NET 3.5 EDM
Designer is designed to work with an .edmx fi le. The .edmx fi le is an encapsulation of
three EDM metadata artifact fi les, the CSDL, the SSDL, and the MSL fi les. When you
run the EDM Wizard, an .edmx fi le is created and added to your solution. You open the
ADO.NET EDM Designer by double - clicking on the .edmx fi le in the Solution Explorer.
Validating the EDM As you make changes to the EDM, the ADO.NET EDM Designer
validates the modifi cations and reports errors in the Error List. You can also validate the
EDM at any time by right - clicking on the design surface and selecting Validate Model .
3.4.8.1.4 Entity Model Browser The Entity Model Browser is a Visual Studio tool
window that is integrated with the ADO.NET 3.5 EDM Designer. It provides a tree view
of the EDM. The Entity Model Browser groups the information into two nodes.
The fi rst node shows you the conceptual model. By expanding the underlying nodes,
you can view all entity types and associations in the model.
Figure 3.20 Example of the ADO.NET 3.5 Entity Data Model Designer.
c03.indd 131c03.indd 131 2/11/2010 11:50:59 AM2/11/2010 11:50:59 AM
Please purchase PDF Split-Merge on www.verypdf.com to remove this watermark.
132 Chapter 3 Introduction to ADO.NET
The second node shows you the target database model. By expanding the underlying
nodes you can see what parts of the database tables, views, and stored procedures have
been imported into the model.
The EDM Browser enables you to do the following:
• Clicking on an item in the Entity Model Browser makes it active in the Properties window
and the Entity Mapping Details View window. You can use these windows to modify the
properties or entity mappings.
• Create a function to import a stored procedure.
• Update the SSDL information from the database.
The Entity Model Browser opens when the ADO.NET 3.5 EDM Designer is opened.
If the Entity Model Browser is not visible, right - click on the main design surface and
select Show Entity Model Browser .
3.4.8.2 Using ADO.NET 3.5 Entity Data Model Wizard
In this section, we will use a project example to illustrate how to use the EDM Wizard
to develop a data - driven application to connect to our database, to create entity classes,
to set up associations between entities, and to set up mapping relationships between enti-
ties and data tables in our database. Creating applications using the EDM can be signifi -
cantly simplifi ed by using the ADO.NET EDM item template and the EDM Wizard.
This section steps you through the following tasks:
• Create a new Visual C# Windows - based application.
• Use the EDM Wizard to select a data source and generate an EDM from our CSE_DEPT
database.
• Use the entities in this application.
Let ’ s begin with creating a new Visual C# Windows - based project named EDModel.
3.4.8.2.1 Create New Visual C# Windows -Based Project Open Visual Studio.
NET 2008 and select File|New|Project items to create a new project. Select the Visual C#
as the project type and Windows Forms Applications as the Template for this new project.
Enter EDModel into the Name box and select any folder as the Location to save this
project, then click the OK button to create this new project. Perform the following opera-
tions to change the properties of this new project:
1. Change the fi le object ’ s name from Form1.cs to EDModel Form.cs.
2. Change the Windows Form object ’ s name from Form1 to EDModelForm.
3. Change the content of the Text property of the Windows Form object from Form1 to Entity
Data Model Form.
4. Change the StartPosition property of the form window to CenterScreen.
5. Add a Button control to the form window and name this button as cmdShow and set its
Text property to ‘ Show Faculty ’ . Set its Font property to Bold — 12.
6. Add a Listbox control to the form window and name it as FacultyList. Set its Font property
to Bold — 10.
Your fi nished EDModelForm window should match the one shown in Figure 3.21 .
c03.indd 132c03.indd 132 2/11/2010 11:51:01 AM2/11/2010 11:51:01 AM
Please purchase PDF Split-Merge on www.verypdf.com to remove this watermark.
3.4 Components of ADO.NET 2.0 133
Now let ’ s generate our EDM Wizard using the EDM Tools. The ADO.NET EDM
item template is the starting point for the EDM tools.
3.4.8.2.2 Generate Entity Data Model Files Before we can continue to generate the
EDM fi les, we must fi rst confi rm whether we have installed ADO.NET 3.5 Entity
Framework and ADO.NET 3.5 Entity Framework Tools in our computer. To do this
confi rmation, just right - click on the project EDModel and select Add|New Item to open
the Add New Item dialog box. If you cannot fi nd the item ADO.NET EDM from the
Templates box, this means that you have not installed ADO.NET 3.5 Entity Framework
and its Tools. Therefore let ’ s fi rst download these components and install them on your
computer.
Let ’ s perform the following operations to complete the download and installation for
these two components:
1. Open the Microsoft download home page: .
2. Select the item Microsoft ADO.NET from the Recommended Downloads box.
3. Two components need to be downloaded and installed from this page: ADO.NET Entity
Framework Beta 3 and ADO.Net Entity Framework Tools Dec 07 CTP .
4. Click the fi rst component ADO.NET Entity Framework Beta 3 and click the Download
button associated with the fi le EFB3SetupX86.exe .
5. Click the Run button to complete this downloading and installation.
6. Click the Finish button to close this dialog box.
7. Return to the Microsoft ADO.NET page and click another component ADO.Net Entity
Framework Tools Dec 07 CTP .
8. Click the Download and Run buttons to begin this downloading and installation
processes.
9. You may encounter a potential bug displayed with an error message shown in Figure 3.22 .
10. Click the OK button and open Internet Explorer and go to />fwlink/?LinkID=104985 .
11. Click the Run button to complete this Visual Studio patch installation.
Figure 3.21 The EDModelForm window.
c03.indd 133c03.indd 133 2/11/2010 11:51:02 AM2/11/2010 11:51:02 AM
Please purchase PDF Split-Merge on www.verypdf.com to remove this watermark.
134 Chapter 3 Introduction to ADO.NET
12. Then return to the Microsoft ADO.NET page and click the component ADO.Net Entity
Framework Tools Dec 07 CTP to reinstall this EF Tools. The installation process is shown
in Figure 3.23 .
When the installation completes, click the Finish button as shown in Figure 3.24 to
close this process. Now you have to reboot your computer to make these installations
effective and available. Restart your computer to fi nish these installations. Now we can
continue the process to generate the EDM Files and use the EDM Wizard.
Perform the following operations to generate our EDM Wizard:
1. Right - click on the project EDModel from the Solution Explorer window and select the
Add|New Item from the pop - up menu.
2. In the opened Add New Item dialog box, select the item ADOEntity Data Model from the
Templates box and name it EDModel.edmx . Your fi nished Add New Item dialog box
should match the one shown in Figure 3.25 . Click on the Add button to add this component
to the new project.
3. The EDM Wizard is opened with two options: Generate from database and Empty model.
Select the fi rst item Generate from database since we want to create this EDM from our
sample database CSE_DEPT. Click on the Next button to continue.
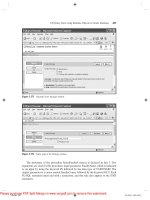
Figure 3.23 Installation process of ADO.NET EF Tools.
Figure 3.22 Error message related to install the Entity Framework Tools.
c03.indd 134c03.indd 134 2/11/2010 11:51:02 AM2/11/2010 11:51:02 AM
Please purchase PDF Split-Merge on www.verypdf.com to remove this watermark.
3.4 Components of ADO.NET 2.0 135
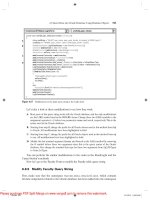
Figure 3.24 Last dialog box for installation of ADO.NET 3.5 EF Tools.
Figure 3.25 Add an ADO.NET Entity Data Model.
4. The next dialog box, Choose Your Data Connection, allows us to select our desired data-
base to connect to. Click on the New Connection button to make a new connection. The
Choose Data Source dialog box is displayed, which is shown in Figure 3.26 .
5. In this application, we want to use a local SQL Server installed on our computer; therefore,
select the second item: Microsoft SQL Server Database File and click on the Continue
button to go to the next dialog box, Connection properties, which is shown in Figure 3.27 a.
c03.indd 135c03.indd 135 2/11/2010 11:51:02 AM2/11/2010 11:51:02 AM
Please purchase PDF Split-Merge on www.verypdf.com to remove this watermark.
136 Chapter 3 Introduction to ADO.NET
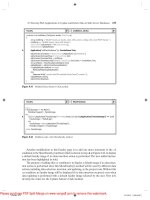
6. Click the Browse button to fi nd our desired database fi le CSE_DEPT.mdf that is located
at the default folder of Microsoft SQL Server 2005 Express: C:\Program Files\Microsoft
SQL Server\MSSQL.1\MSSQL\Data. Select this fi le and click on the Open button to add
it into our project.
7. To avoid the possible confl ict for duplicated installation of SQL Server Express with dif-
ferent versions, click on the Advanced button and change the property of User Instance
from True to False, which is shown in Figure 3.27 b. In this way, we can prevent the system
from identifying this instance as a unique one. Click on the OK to return to Connection
properties dialog box.
Figure 3.26 The Choose Data Source dialog box.
(a) (b)
Figure 3.27 Connection properties and Advanced Properties dialog boxes.
c03.indd 136c03.indd 136 2/11/2010 11:51:07 AM2/11/2010 11:51:07 AM
Please purchase PDF Split-Merge on www.verypdf.com to remove this watermark.
3.4 Components of ADO.NET 2.0 137
Figure 3.28 Choose Your Data Connection dialog box.
8. For the logon security, we prefer to use the default Windows Authentication mode. You can
test this connection by clicking on the Test Connection button, and a successful connection
message will be displayed if this connection is fi ne. Click on OK to go to the next step.
9. The Choose Your Data Connection dialog box appears again with all the settings we have
created in the previous steps, which is shown in Figure 3.28 .
10. Make sure that Save entity connection settings in App.Confi g is checked since we need
this connection string when we access our database as the project runs. Also change this
connection string to EDModelEntitiesConnString as shown in Figure 3.28 . Click on the
Next button to continue.
11. The Choose Your Database Objects dialog box appears, and this dialog box allows us to
select our desired database objects such as tables, views, and stored procedures. Make sure
to check both the Tables and the Stored Procedures checkboxes since we may need both
of them. For the Views, which is optional and you can check it if you want to use this
object to open and view the details for tables or stored procedures. But it will not hurt if
you check it without using it later. So just check this object. Now expand the Tables and
the Stored Procedures objects by clicking the small plus icon before each of them, and you
can fi nd all the data tables and stored procedures we developed for our sample database
CSE_DEPT, which include fi ve tables: LogIn, Faculty, Course, Student, and StudentCourse.
Change the model name to CSE_DEPTModel. An example of this dialog box is shown in
Figure 3.29 .
12. Click on the Finish button to complete this process.
Now open the Solution Explorer window and you can fi nd that an EDM named
EDModel.edmx has been added into our project, which is shown in Figure 3.30 .
To see this EDM in Designer view, double - click on the new added Entity Data Model
EDModel.edmx. The Designer view is shown in Figure 3.31 .
c03.indd 137c03.indd 137 2/11/2010 11:51:07 AM2/11/2010 11:51:07 AM
Please purchase PDF Split-Merge on www.verypdf.com to remove this watermark.
138 Chapter 3 Introduction to ADO.NET
Five tables and connections between them are displayed in this view. On each table,
two groups of entity properties are displayed, Scalar Properties and Navigation proper-
ties. The fi rst category contains all entity properties (mapped to columns in our physical
table), and the second category contains all related entities (mapped to related tables by
using the primary and foreign keys) in this database. The connections between each entity
(mapped to data table) are called associations.
As you double - click on this Entity Data Model EDModel.edmx, another tool, Mapping
Details, is also displayed under this Designer view, which is shown in Figure 3.32 .
Figure 3.29 Example of Choose Your Database Objects dialog box.
Figure 3.30 Added EDModel.
c03.indd 138c03.indd 138 2/11/2010 11:51:09 AM2/11/2010 11:51:09 AM
Please purchase PDF Split-Merge on www.verypdf.com to remove this watermark.
3.4 Components of ADO.NET 2.0 139
Figure 3.31 Designer view of the Entity Data Model EDModel.
Figure 3.32 Example of Mapping Details — Faculty entity.
c03.indd 139c03.indd 139 2/11/2010 11:51:13 AM2/11/2010 11:51:13 AM
Please purchase PDF Split-Merge on www.verypdf.com to remove this watermark.
140 Chapter 3 Introduction to ADO.NET
If this Mapping Details did not open, you can open it by right - clicking on this
Designer view and select the item Mapping Details from the pop - up menu. To see a
Mapping Details, you also need to select an entity (table) to do it.
Besides these tools, an XML mapping fi le associated with our EDM EDModel is also
created. To open this fi le, right - click on our new created EDM EDModel.edmx from the
Solution Explorer window and select the item Open With to open the Open With dialog
box, which is shown in Figure 3.33 .
Select the item XML Editor and then click on the OK to open this XML mapping
fi le. Now if you open the App.Confi g fi le, you can fi nd that our connection string,
EDModelEntitiesConnString created using the Entity Data Model Wizard, is under the
< connectionStrings > tag in this fi le.
At this point, we have fi nished creating our EDM, and now we can use this model
to build our Visual C# data - driven application to show readers how to make it work.
3.4.8.2.3 Use the ADO.NET 3.5 Entity Data Model Wizard The functionality of
this project is that all faculty members in our Faculty table will be retrieved and displayed
in the listbox control FacultyList as the user clicks the Show Faculty button as the project
runs. Now let ’ s use the EDM to perform the coding for the EDModelForm to realize this
functionality.
The fi rst coding is to add the namespace System.Data.EntityClient to the namespace
declaration section of the code window of the EDModelForm object since we need to
use this Data Provider that is defi ned in that namespace.
Then we need to do the coding for the Show Faculty button ’ s Click method. Select
the form object EDModel Form.cs from the Solution Explorer window and click the
View Designer button to open its form window. Double - click on the Show Faculty
button to open its Click method, and enter the codes are shown in Figure 3.34 into this
method.
Figure 3.33 Open With dialog box.
c03.indd 140c03.indd 140 2/11/2010 11:51:17 AM2/11/2010 11:51:17 AM
Please purchase PDF Split-Merge on www.verypdf.com to remove this watermark.
3.4 Components of ADO.NET 2.0 141
Let ’ s have a look at this piece of code to see how it works.
A. The namespace System.Data.EntityClient is added into the namespace declaration section
of this code window to make sure that we can use this Data Provider.
B. The query string is defi ned fi rst, and this string is different with those we used for SQL
Server or Access databases. The fname is a nominal entity and the Faculty is the real entity
that can be accessed via the connection string. The column we want to query is the
faculty_name that is mapped to an entity property in this query string. The FROM clause
is composed of EntityContainer.EntitySet, therefore the connection string that represents
the EntityContainer is prefi xed before the table Faculty that is exactly an EntitySet.
C. An EntityConnection object is created here to replace either a SqlConnection or
OleDbConnection object with the connection string as the argument. You can copy this
connection string from the App.Confi g fi le if you like.
D. The Open() method is executed to open this connection.
E. An EntityCommand instance cmd is created using the CreateCommand() method based
on the Connection object. Then the Command object is initialized by assigning the query
string cmdString to the CommandText property.
using System;
using System.Collections.Generic;
using System.ComponentModel;
using System.Data;
using System.Drawing;
using System.Data.EntityClient;
using System.Linq;
using System.Text;
using System.Windows.Forms;
namespace EDModel
{
public partial class EDModelForm : Form
{
public EDModelForm()
{
InitializeComponent();
}
private void cmdShow_Click(object sender, EventArgs e)
{
string cmdString = "SELECT fname.faculty_name FROM EDModelEntitiesConnString.Faculty as fname";
EntityConnection Conn = new EntityConnection("name=EDModelEntitiesConnString");
Conn.Open();
EntityCommand cmd = Conn.CreateCommand();
cmd.CommandText = cmdString;
EntityDataReader rd = cmd.ExecuteReader(CommandBehavior.SequentialAccess);
FacultyList.Items.Clear();
while (rd.Read())
{
FacultyList.Items.Add(rd["faculty_name"]);
}
Conn.Close();
}
}
}
A
B
C
D
E
F
G
H
I
EDModel.EDModelForm cmdShow_Click()
Figure 3.34 Coding for the cmdShow_Click method.
c03.indd 141c03.indd 141 2/11/2010 11:51:20 AM2/11/2010 11:51:20 AM
Please purchase PDF Split-Merge on www.verypdf.com to remove this watermark.
142 Chapter 3 Introduction to ADO.NET
F. The ExecuteReader() method is called to retrieve back all faculty_name and assign them
to the EntityDataReader object.
G. The listbox control FacultyList is cleaned up before it can be fi lled.
H. A while loop is utilized to pick up all faculty_name from the EntityDataReader and add
each of them into the FacultyList control by using the Add() method. The point is that all
faculty_name is read out using the SequentialAccess mode; therefore, all data are read
out and stored in a collection or an array in the EntityDataReader. In Visual C#, a square
bracket is used to indicate each element in a collection or an array. Also since we created
a nontyped DataSet, each column or entity property must be clearly indicated with the
name of the column or the entity.
I. Finally the connection is closed to release the connection object.
Now let ’ s run the project to test our codes. Click on the Start Debugging button to
run the project. The EDModelForm window is displayed as shown in Figure 3.35 . Click
on the Show Faculty button to connect to our sample database and retrieve back all
faculty names. The running result is shown in Figure 3.35 .
Click on the Close button located at the upper - right corner of this form to close our
project. It can be found from this piece of code that it is relatively simple and easy to use
the EDM to access and manipulate data against the database.
3.5 CHAPTER SUMMARY
The main topic of this chapter is an introduction to the ADO.NET, which includes the
architectures, organizations, and components of the ADO.NET 2.0 and ADO.NET 3.5.
Detailed discussions and descriptions are provided in this chapter to give readers
both fundamental and practical ideas and pictures of how to use components in ADO.
NET 2.0 and ADO.NET 3.5 to develop professional data - driven applications. Two
ADO.NET 2.0 architectures are discussed to enable users to follow the directions to
design and build their preferred projects based on the different organizations of the
ADO.NET 2.0.
Figure 3.35 Running result of the project EDModel.
c03.indd 142c03.indd 142 2/11/2010 11:51:20 AM2/11/2010 11:51:20 AM
Please purchase PDF Split-Merge on www.verypdf.com to remove this watermark.
3.5 Chapter Summary 143
A history of the development of ADO.NET 2.0 is fi rst introduced in this chapter.
Different data - related objects are discussed such as Data Access Object (DAO), Remote
Data Object (RDO), Open Database Connectivity (ODBC), OLE DB, and the ADO.
The difference between the ADO and the ADO.NET is provided in detail.
Fundamentally, the ADO.NET is a class container and it contains three basic com-
ponents: Data Provider, DataSet, and DataTable. Furthermore, the Data Provider con-
tains four subcomponents: Connection, Command, TableAdapter, and DataReader. You
should keep in mind that the Data Provider comes in multiple versions based on the type
of database you are using in your applications. So from this point of view, all four sub-
components of the Data Provider are called Data Provider – dependent components. The
popular versions of the Data Provider are:
• OLE DB Data Provider
• ODBC Data Provider
• Microsoft SQL Server Data Provider
• Oracle Data Provider
Each version of Data Provider is used for one specifi c database. One exception is
that both OLE DB and ODBC Data Providers can work for some other databases, such
as Microsoft Access, Microsoft SQL Server, and Oracle databases. In most cases, you
should use the matched version of the Data Provider for a specifi c database. Even the
OLE DB and ODBC can work for that kind of database since the former can provide
more effi cient processing technique and faster accessing and manipulating speed com-
pared with the latter.
To access and manipulate data in databases, you can use one of two ADO.NET 2.0
architectures: You can use the DataAdapter to access and manipulate data in the DataSet
that is considered as a DataTables collector by executing some properties of the
DataAdapter, such as SelectCommand, InsertCommand, UpdateCommand, and
DeleteCommand. Alternatively, you can treat each DataTable as a single table object
and access and manipulate data in each table by executing the different methods of the
Command object, such as ExecuteReader and ExecuteNonQuery.
A key point in using the Connection object of the Data Provider to set up connection
between your applications and your data source is the connection string, which has a
different format and style depending on the database you are using. The popular com-
ponents of the connection string include Provider, Data Source, Database, User ID, and
Password. But some connection strings only use a limited number of components, such
as the Data Provider for the Oracle database.
An important point in using the Command object to access and manipulate data
in your data source is the Parameter component. The Parameter class contains all pro-
perties and methods that can be used to set up specifi c parameters for the Command
object. Each Parameter object contains a set of parameters, and each Parameter object
can be assigned to the Parameters collection that is one property of the Command
object.
The latest version of ADO.NET, ADO.NET 3.5 is discussed with some examples in
the last section in this chapter. The properties and functionalities of the ADO.NET 3.5
Entity Framework (EF) and ADO.NET 3.5 Entity Framework Tools (EFT) are discussed
in detail. The core of ADO.NET 3.5 EF, Entity Data Model, and associated Item
c03.indd 143c03.indd 143 2/11/2010 11:51:22 AM2/11/2010 11:51:22 AM
Please purchase PDF Split-Merge on www.verypdf.com to remove this watermark.
144 Chapter 3 Introduction to ADO.NET
template, Wizard and Designer, is also discussed and analyzed with a real project example
EDModel.
By fi nishing this chapter, you should be able to:
• Understand the architecture and organization of the ADO.NET 2.0.
• Understand three components of the ADO.NET 2.0, such as the Data Provider, DataSet,
and the DataTable.
• Use the Connection object to connect to a Microsoft Access, Microsoft SQL Server, and
Oracle database.
• Use the Command and Parameter objects to select, insert, and delete data using a string
variable containing an SQL statement.
• Use the DataAdapter object to fi ll a DataSet using the Fill method.
• Read data from the data source using the DataReader object.
• Read data from the DataTable using the SelectCommand property of the DataAdapter
object.
• Create DataSet and DataTable objects and add data into the DataTable object.
• Understand the ADO.NET 3.5 Entity Framework (EF) and ADO.NET 3.5 Entity
Framework Tools (EFT).
• Understand the ADO.NET 3.5 Entity Data Model (EDM) and associated Item template,
Wizard, and Designer.
• Create and implement ADO.NET 3.5 Entity Data Model Tools to develop professional
data - driven applications in Visual C# 2008 environment
In Chapter 4 , we will discuss a new technique, Language Integrated Query (LINQ),
that was released with ADO.NET 3.5 and .NET Framework 3.5 in Visual Studio.NET
2008. With the help of this new technique, the operational process of the data queries
and manipulations with different data sources can be signifi cantly simplifi ed and the
effi ciency of the data actions against the data sources can be greatly improved.
HOMEWORK
I. True/False Selections
____ 1. ADO.NET 2.0 is composed of four major components: Data Provider, DataSet, DataReader,
and DataTable.
____ 2. ADO is developed based on Object Linking and Embedding (OLE) and Component Object
Model (COM) technologies.
____ 3. ADO.NET 3.5 is a new version of ADO.NET and it is based mainly on the Microsoft .NET
Framework 2.0.
____ 4. The Connection object is used to set up a connection between your data - driven application
and your data source.
____ 5. Both OLE DB and ODBC Data Providers can work for the SQL Server and Oracle
databases.
____ 6. Different ADO.NET components are located at the different namespaces. The DataSet
and DataTable are located at the System.Data namespace.
c03.indd 144c03.indd 144 2/11/2010 11:51:22 AM2/11/2010 11:51:22 AM
Please purchase PDF Split-Merge on www.verypdf.com to remove this watermark.
Homework 145
____ 7. The DataSet can be considered as a container that contains multiple data tables, but those
tables are only a mapping of the real data tables in the database.
____ 8. The ExecuteReader() method is a data query method that can only be used to execute a
read - out operation from a database.
____ 9. Both SQL Server and Oracle Data Providers used a so - called Named Parameter Mapping
technique.
___ 10. The DataTable object is a Data Provider – independent object.
II. Multiple Choices
1. To populate data from a database to a DataSet object, one needs to use the _____.
a. Data Source
b. DataAdapter (TableAdapter)
c. Runtime object
d. Wizards
2. The Parameters property of the Command class ________.
a. Is a Parameter object
b. Contains a collection of Parameter objects
c. Contains a Parameter object
d. Contains the parameters of the Command object
3. To add a Parameter object to the Parameters property of the Command object, one needs
to use the ______ method that belongs to the _______.
a. Insert, Command
b. Add, Command
c. Insert, Parameters collection
d. Add, Parameters collection
4. DataTable class is a container that holds the _______ and _______ objects.
a. DataTable, DataRelation
b. DataRow, DataColumn
c. DataRowCollection, DataColumnCollection
d. Row, Column
5. The _______ is a property of the DataTable class, and it is also a collection of DataRow objects.
Each DataRow can be mapped to a _____ in the DataTable.
a. Rows, column
b. Columns, column
c. Row, row
d. Rows, row
6. The ______ data provider can be used to execute the data query for ______ data providers.
a. SQL Server, OleDb and Oracle
b. OleDb, SQL Server and Oracle
c. Oracle, SQL Server and OleDb
d. SQL Server, Odbc and Oracle
c03.indd 145c03.indd 145 2/11/2010 11:51:22 AM2/11/2010 11:51:22 AM
Please purchase PDF Split-Merge on www.verypdf.com to remove this watermark.
146 Chapter 3 Introduction to ADO.NET
7. To perform a Fill() method to fi ll a data table, it executes ______ object with suitable
parameters.
a. DataAdapter
b. Connection
c. DataReader
d. Command
8. The DataReader is a read - only class, and it can only be used to retrieve and hold the data rows
returned from a database when executing a(n) _______ method.
a. Fill
b. ExecuteNonQuery
c. ExecuteReader
d. ExecuteQuery
9. One needs to use the ______ method to release all objects used for a data - driven application
before one can exit the project.
a. Release
b. Nothing
c. Clear
d. Dispose
10. To ____ data between the DataSet and the database, the ___ object should be used.
a. Bind, BindingSource
b. Add, TableAdapter
c. Move, TableAdapter
d. Remove, DataReader
III. Exercises
1. Explain two architectures of the ADO.NET 2.0 and illustrate the functionality of these two
architectures using block diagrams.
2. List three basic components of the ADO.NET 2.0 and the different versions of the Data Provider
as well as their subcomponents.
3. Explain the relationship between the Command and Parameter objects. Illustrate how to add
Parameter objects to the Parameters collection that is a property of the Command object using
an example. Assuming that an SQL Server Data Provider is used with two parameters: param-
eter_name: username, password, parameter_value: “ NoName ” , “ ComeBack ” .
4. Explain the relationship between the DataSet and DataTable. Illustrate how to use the Fill
method to populate a DataTable in the DataSet. Assume that the data query string is an SQL
SELECT statement: “ SELECT faculty_id, name FROM Faculty ” , and an SQL Server Data
Provider is utilized.
5. Explain the components and functionalities of ADO.NET 3.5 Entity Framework (EF) and
ADO.NET 3.5 Entity Framework Tools (EFT).
6. Illustrate the relationship between the ADO.NET 3.5 Entity Data Model and its associated
components, such as Item template, Wizard, and Designer.
7. Explain the relationship between three layers of the ADO.NET 3.5 Entity Data Model,
Conceptual layer, Mapping layer, and Logical layer.
8. Explain the associations between entities listed in Figure 3.31 .
c03.indd 146c03.indd 146 2/11/2010 11:51:22 AM2/11/2010 11:51:22 AM
Please purchase PDF Split-Merge on www.verypdf.com to remove this watermark.
Chapter 4
Introduction to Language -
Integrated Query (LINQ)
147
Language - Integrated Query (LINQ) is a groundbreaking innovation in Visual Studio
2008 and the .NET Framework version 3.5 that bridges the gap between the world of
objects and the world of data. Traditionally, queries about data are expressed as simple
strings without type checking at compile time or IntelliSense support. Furthermore, you
have to learn a different query language for each type of data source: Microsoft Access,
SQL databases, XML documents, various Web services, and Oracle databases. LINQ
makes a query as a fi rst - class language construct in C# and Visual Basic. You write queries
about strongly typed collections of objects by using language keywords and familiar
operators.
In Visual Studio.NET you can write LINQ queries in C# with SQL Server databases,
XML documents, ADO.NET DataSets, and any collection of objects that supports
IEnumerable or the generic IEnumerable < T > interface. As we mentioned in Chapter 3 ,
LINQ support for the ADO.NET 3.5 Entity Framework is also planned, and LINQ pro-
viders are being written by third parties for many Web services and other database
implementations.
You can use LINQ queries in new projects or alongside non - LINQ queries in
existing projects. The only requirement is that the project be developed under the .NET
Framework 3.5 environment.
Before we can dig deeper into LINQ, we had better have a general and global picture
about LINQ. Let ’ s start from the basic introduction about LINQ.
4.1 OVERVIEW OF LANGUAGE -INTEGRATED QUERY
The LINQ pattern is established on the basis of a group of methods called Standard
Query Operators (SQO). Most of these methods operate on sequences, where a sequence
is an object whose type implements the IEnumerable < T > interface or the IQueryable < T >
interface. The standard query operators provide query capabilities including fi ltering,
projection, aggregation, sorting, and more.
Practical Database Programming With Visual C#.NET, by Ying Bai
Copyright © 2010 the Institute of Electrical and Electronics Engineers, Inc.
c04.indd 147c04.indd 147 2/11/2010 11:52:09 AM2/11/2010 11:52:09 AM
Please purchase PDF Split-Merge on www.verypdf.com to remove this watermark.