Tài liệu Adding Menus and Processing Menu Events ppt
Bạn đang xem bản rút gọn của tài liệu. Xem và tải ngay bản đầy đủ của tài liệu tại đây (24.22 KB, 9 trang )
Adding Menus and Processing Menu Events
Microsoft Visual Studio 2005 lets you add menus and menu items to a form in two ways.
You can use the Visual Studio 2005 integrated development environment (IDE) and the
menu editor to create a menu graphically. You can also write code that creates a
MenuStrip object (MenuStrip is a class defined in the Windows Forms library), and then
add ToolStripMenuItem objects to it (ToolStripMenuItem is another class in the
Windows Forms library).
Laying out a menu is only half of the story. When a user clicks a command on a menu,
the user expects something to happen! You activate the commands by trapping menu
events and executing code in much the same way as you do for handling control events.
Creating a Menu
In the following exercise, you will use the graphical approach to create menus for the
Middleshire Bell Ringers Association application. We will cover how to manipulate and
create menus programmatically later in this chapter.
Create the File menu
1. Start Visual Studio 2005.
2. Open the BellRingers project, located in the \Microsoft Press\Visual CSharp Step
by Step\Chapter 21\BellRingers folder in your My Documents folder. This is the
Middleshire Bell Ringers application. It should be the same as the version that you
completed in Chapter 20.
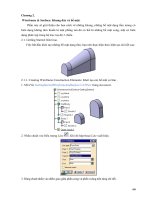
3. Display MemberForm in the Design View window. (Click MemberForm.cs in the
Solution Explorer, and then click Designer on the View menu, or double-click
MemberForm.cs in the Solution Explorer).
MemberForm appears.
4. In the Toolbox, expand the Menus & Toolbars category. Drag a MenuStrip control
anywhere onto MemberForm.
IMPORTANT
Be sure to drop the MenuStrip control onto the form, and not onto a control on the
form. Some controls, such as GroupBox, can have their own menus, and dropping
a menu on such a control will create a menu for that control only.
The control, by default called menuStrip1, appears at the bottom of the form, and a
menu strip containing the caption, Type Here, is added to the top of the form.
5. Click the Type Here caption on the menu strip, type &File, and then press Enter.
(If the Type Here caption on the menu strip disappears, click the mainStrip1
control at the bottom of the form and the menu reappear.)
When you click the Type Here caption, a second Type Here caption appears to the
right of the current item, and a third Type Here caption appears under the File
menu item.
TIP
The & character in front of a letter provides fast access to that menu item when the
user presses the Alt key and the letter following the & (in this case, Alt+F). This is
another common convention. When you press the Alt key, the F at the start of File
appears with an underscore. Do not use the same access key more than once on
any menu because you will confuse the user (and probably the application).
6. Click the Type Here caption that appears under the File menu item, type &New,
and then press Enter.
Another Type Here caption appears under the New menu item.
7. Click the Type Here caption under the New menu item, type &Open, and then
press Enter.
TIP
If you mistype the text for a menu item, you can easily correct it. Click the menu
item, and then use the Properties window to change the Text property of the item
to the correct value.
8. Click the Type Here caption under the Open menu item, type &Save Member, and
then press Enter.
9. Click the Type Here caption under the Save Member menu item, type a minus sign
(–), and then press Enter.
The minus sign appears as a menu separator bar used to group related menu items
together.
10. Click the Type Here caption under the separator bar, type &Print, and then press
Enter.
11. Click the Type Here caption under the Print menu item, type a minus sign (–), and
then press Enter.
Another separator bar appears.
12. Click the Type Here caption under the second separator bar, type E&xit, and then
press Enter.
Notice that the conventional access key for exit is “x.” When you have finished,
the menu should look like this:
Menu Strip Item Types
You have been using MenuItem controls, which are the default item type for MenuStrip
objects. However, you can also add combo boxes and text boxes to menus in Visual
Studio 2005 applications. You might have noticed that a drop-down arrow appears when
hovering the mouse over the Type Here caption in a MenuStrip control. If you click this
drop down, you will see three items: MenuItem, ComboBox, and TextBox, as shown in
the following graphic:
The combo box and text box controls in a MenuStrip behave in a similar manner to
ComboBox and TextBox controls on a form, and you can set their properties in the same
way that you saw in Chapter 20. However, strictly speaking they are different from the
versions of the controls that you drop onto forms. They are ToolStripComboBox and
ToolStripTextBox controls, and are designed and optimized specifically for use in
MenuStrip controls, and other related “strip” controls, such as the ContextMenuStrip and
ToolStrip controls.
Setting Menu Item Properties
In the following exercise, you will set the properties of the MainMenu control and the
menu items. You will use the Properties window to perform these tasks.
Set the menu item properties
1. Click the menuStrip1 control under the form. In the Properties window, change its
name to mainMenu. (If the Properties window is not displayed, click Properties
Window on the View menu, or press F4.)
2. Right-click the File menu item on the menu strip of MemberForm. On the menu
that appears, click Edit DropDownItems.
The Items Collection Editor displays the names of the menu items as well as their
properties.
TIP
You can use the Items Collection Editor to delete menu items, add new menu
items, reorder the items in a drop-down menu, and set the properties of menu
items.
3. Notice the names generated for each menu item. They should be the same as those
listed in the following table. If not, click the menu item and then change the
(Name) property using the properties displayed on the right-hand side of the Items
Collection Editor.
Item New name
New newToolStripMenuItem
Open openToolStripMenuItem
Save Member saveMemberToolStripMenuItem
Print printToolStripMenuItem
Exit exitToolStripMenuItem
4. The access keys for menu items (such as Alt+X for the Exit command) are
available only when the menu is actually displayed. Commonly accessed menu
items should also have shortcut keys that the user can press at any time to invoke
the corresponding command. For example, the New command can usually be
executed by pressing Ctrl+N in many Windows applications. You can add a
shortcut key to a menu item by setting the ShortcutKeys property.
5. Select the newToolStripMenuItem from the list of members, and then click
ShortcutKeys in the list of properties. Check the Ctrl Modifier, and select N for the
key, then press Enter.
6. There is another property called ShowShortcutKeys under the ShortcutKeys
property. This property determines whether the shortcut key is displayed on the
menu when the application runs. Verify that this property is set to True.
7. Change the shortcut keys for the other menu items using the values in the
following table. Ensure that the ShowShortcut property for each menu item
remains set to True.
Item Shortcut
openToolStripMenuItem Ctrl+O
saveMemberToolStripMenuItem Ctrl+S
printToolStripMenuItem Ctrl+P
exitToolStripMenuItem Alt+F4
8. Menu items can be enabled and disabled (disabled items are unavailable and their
text appears dimmed) depending on the current actions and context. For example,
in the Middleshire Bell Ringers Association application, it would not make sense
to allow the user to use the Save Member or Print commands if there is no data to
save or print.
9. Select the printToolStripMenuItem item, and then click Enabled in the list of
proper- ties. Select the False option from the drop-down list. You will write some
code later to update this property to True after data has displayed.
Repeat this task for the saveMemberToolStripMenuItem item.
10. Click OK to close the Items Collection Editor.
Test the menu
1. On the Debug menu, click Start Without Debugging to compile and run the
application.
2. When the form appears, click the File menu.
The new menu appears.
Notice that the Print and Save commands are disabled. You can click any of the
other commands (although they won't do anything yet).
3. Close the form. You can't use the Exit command on the File menu yet; click the
Close button (the ‘X’ button in the top right-hand corner of the form) instead.
Other Menu Item Properties
Menu items have a number of other properties. The following table describes the most
common ones. If you want more information about the other properties, consult the
documentation in the MSDN Library for Visual Studio 2005.
TIP
You can set menu item properties using the Items Collection Editor as described in the
previous exercises, or by clicking a menu item in the Designer View window and then
using the Properties window.
Property Description
(Name) This property is the name of the menu item.
Checked
Menu items can act like check boxes and cause a check mark to appear
when they are clicked. Setting the Checked property to True displays a
check mark, and setting it to False hides the check mark.
CheckOnClick
Setting the CheckOnClick property to True causes the menu item to be
checked and unchecked automatically when the user clicks it.
DisplayStyle
Menu items can display images as well as text names. If you set the
DisplayStyle property to the value Image or ImageAndText, the image
specified by the Image property will appear on the menu.
Enabled
This property specifies whether the menu item is enabled or disabled. If a
menu item is not enabled, it appears dimmed and the user will not be able
to select it.
Shortcut
This property specifies the shortcut key that a user can press to execute
the corresponding menu command.
ShowShortcut
If this property is True, the shortcut key is displayed on the menu
alongside the text of the menu item.
Text
This is the text that is displayed on the menu for the menu item. You can
use the & character to specify an access key.
ToolTipText
This property specifies the text to display as a tool tip when the user
hovers the mouse over the menu item.
Visible
This property determines whether the item should be displayed on the
menu. It is more common to use the Enabled property to show that a
menu item is present but unavailable.
Menu Events
There are several different events that can occur when a user gains access to a menu item.
Some are more useful than others. The most frequently used event is the Click event,
which occurs when the user clicks the menu item. You typically trap this event to
perform the tasks associated with the menu item.
In the following exercise, you will learn more about menu events and how to process
them. You will create Click events for the New and Exit menu items. The purpose of the
New command is to allow the user to enter the details of a new member. Therefore, until
the user clicks New, all fields on the form should be disabled. When the user clicks the
New command on the File menu, you want to enable all the fields, reset the contents of
MemberForm so that the user can start adding information about a new member, and
enable the Print command.
Handle menu item events
1. In the MemberForm in the Design View window, click the firstName text box. In
the Properties window, set the Enabled property to False. Repeat this process for
the lastName, towerNames, isCaptain, memberSince, yearsExperience, methods,
add, and clear controls.
TIP
If you press the Shift key and click several controls they will all be selected. You
can then set properties, such as Enabled, to the same value for all the controls at
once.
2. Click the File menu, and then click New.
3. In the Properties window, click the Events button. Select the Click event, type
newClick, and then press Enter.
A new event method is created and the source code displayed in the Code And
Text Editor window.
4. In the body of the newClick event method, type the following statement:
this.Reset();
This calls the Reset method. If you remember in Chapter 20, the Reset method
resets the controls on the form to their default values. (If you don't recall how the
Reset method works, scroll the Code And Text Editor window to display the
method and refresh your memory.)
5. You now need to enable the Save Member and Print menu items to allow the user
to save and print the current member's information. You can do this by setting the
Enabled property of the saveMemberToolStripMenuItem and
printToolStripMenuItem items to true.
After the call to the Reset method in the newClick event method, add the
following statements:
saveMemberToolStripMenuItem.Enabled = true;
printToolStripMenuItem.Enabled = true;
6. You must also enable the controls on the form. Append the following statements
to the newClick method:
7. firstName.Enabled = true;
8. lastName.Enabled = true;
9. towerNames.Enabled = true;
10. isCaptain.Enabled = true;
11. memberSince.Enabled = true;
12. yearsExperience.Enabled = true;
13. methods.Enabled = true;
14. add.Enabled = true;
clear.Enabled = true;
15. Next, you need to create a Click event method for the Exit command. This method
should cause the form to close. Return to the Design View displaying
MemberForm, and then on the File menu, click Exit.
16. In the Properties window, verify that the events are displayed and select the Click
event. Type exitClick, and press Enter.
The exitClick event method is created and the source code displayed in the Code
And Text Editor window.
17. In the body of the exitClick method, type the following statement:
this.Close();
The Close method of a form attempts to close the form. Notice the use of attempts
in that sentence—remember that a form might intercept the Closing event and
prevent the form from closing. The Middleshire Bell Ringers Association
application does precisely this, and asks the user if he or she wants to quit. If the
user says no, the form does not close and the application continues to run.
Test the menu events
1. On the Debug menu, click Start Without Debugging to compile and run the
application.
Notice that all the fields on the form are disabled.
2. Click the File menu.
The Print and Save commands are disabled.
3. Click New. Click the File menu again.
The Print and Save commands are now enabled, as are all the fields on the form.
4. Click Exit. The form tries to close. You are asked if you are sure you want to close
the form. If you click No, the form remains open; if you click Yes, the form closes
and the application finishes.
5. Click Yes to close the form.