Tài liệu Algae Culture Manual (nuôi tảo phục vụ cho nuôi trồng thủy sản) pdf
Bạn đang xem bản rút gọn của tài liệu. Xem và tải ngay bản đầy đủ của tài liệu tại đây (183.4 KB, 11 trang )
Algae Culture Manual
Species for use:
1. Chaetoceros gracilis Stock from USA and Thailand (good for all stages of culture)
2. Thalassiosira weissflogii Stock from USA (especially for early zoea to help prevent Z2
syndrome)
Nutrients:
1. AGP-C (Algae Growth Promoter Complete)
Plates and tubes : 250ppm (= 0.25 ml/litre)
200 ml and 500 ml bottles : 250ppm (= 0.25 ml/litre)
2 litre and 20 litre bottles: 100ppm (= 0.2 ml/2 litres & 2 ml/20 litres)
2 mt tanks: 25ppm (= 50ml/2 mt tank)
6.5 mt tanks: 15ppm (= 97.5 ml/6.5 mt tank)
2. Sodium metasilicate solution
60 g of sodium metasilicate and make up to 2 l with distilled water in a 2 l flask for lab up to 20
litres. Filter through 0.5 micron filter paper and use 1ml/litre of water in lab;
180g of sodium metasilicate and make up to 1 litre with distilled water
Then use 200ml/2 mt tank or 650ml/6.5mt tank.
3. EDTA
10ppm of EDTA (either powder or preferably Verses 100) for all cultures = 65 g(ml)/6.5 mt
tank, 20g(ml)/2 mt tank, 0.2g(ml)/20 litre bottle.
4. Vitamin B mixture (B1,B6 &B12)
Put 1 vial into 100 ml of autoclaved distilled water
Use at 0.1ml/litre = 0.02ml/200 ml, 0.05ml/500ml, 0.2ml/2 litre, or 2ml/20 litre bottle.
(Do not use for 2mt or 6.5mt tanks)
5. Tris buffer solution
Tris 50 g + distilled water: 250ml in a 500ml flask – shake to dissolve
6. HCl solution
37% concentrated Hydrochloric acid (HCL) and a plastic Pasteur pipette to use as a dropper
7. Liquid Chlorine (Sodium hypochlorite) solution
8-10% active chlorine solution. Used in all tanks from 2 litres upwards at 10ppm active chlorine
= 100ml/mt (0.1ml/litre) to give 10ppm and left without air overnight, then aerated and treated
with sodium thiosulphate to dechlorinate.
1
8. Sodium Thiosulphate solution
250 g Sodium thiosulphate crystals made up to 1 litre of distilled water in a 1 litre flask and
shaken to dissolve.
9. Neutralization of chlorine
Volume of sodium thiosulphate solution (ml) = ppm chlorine *volume (litres)
250
Cleaning and sterilizing equipment:
Cleaning: All equipment (Petri dish, tubes, flasks, pipettes, funnels etc) must be washed with
freshwater and neutral detergent, left in a solution of 100ml HCL in 10 litres of water for 12-24
hours, and then rinsed with distilled water.
All the glassware and metal loops, once washed must be wrapped in aluminum foil and sent for
autoclaving.
Sterilizing in autoclave: All this equipment must be autoclaved for 15 minutes at 121
o
C at a
pressure of 15 bar. The autoclave is located next door to the algae lab.
1. Put water in bottom of autoclave
2. Put the tray with the equipment for autoclaving inside
3. Open the valve and turn on the gas full
4. Once steam starts escaping, close the valve and wait until pressure is 15 bar
5. Set the timer for 15 minutes and turn down heat to maintain 15 bar
6. After 15 minutes, turn off the heat and wait for pressure to go down to <5 bar
7. Open the valve to allow steam to escape
8. Once steam all escaped, lever up lid with screwdriver, unlock and remove
9. Take tray and equipment into algae lab, remove from tray, close lids or wrap with foil
and allow to cool
Checking/counting algae cells:
Algal cells at the end of each culture period (each 2-3 days) should be checked for quality and
density.
Only those cultures with a high density of high quality and regularly-dividing algae should be
used. The poor quality, low density or contaminated (with bacteria or parasites) ones should be
discarded. This is particularly important for the first stages of algae culture in tubes.
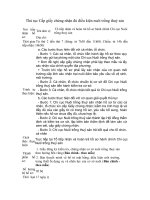
Using a Pasteur pipette, collect a sample from the vial to be placed on the counting chamber
(Haemocytometer). Centre the cover slip over the counting chamber (Fig. 1). Place the tip of the
pipette in one of the two grooves and release the sample from the pipette into the groove. It is
important that no air bubbles form otherwise the estimated count is incorrect. Keep releasing the
sample until both grooves have been filled and there are no air bubbles. Also, be sure that there is
not too much of the sample between the cover slip and the counting chamber. The cover slip
should not be able to slide freely.
2
Figure 1. Counting Chamber (Haemocytometer)
The Haemocytometer consists of two grids on which the microalgae are to be counted. Use low
magnification (x40) on the microscope to first find one of the grids. Then, use the high power
(x100) to focus on the centre of the grid that has the highest number of boxes - 25 boxes (each
with 0.2mm × 0.2mm) consisting of 16 small boxes each (0.05mm × 0.05mm). Using a counter,
count how many micro-algae are within the centre grid; large area-(1) (1mm×1mm), consisting of
400 small boxes as shown in Fig. 2. The gap between the cover slip and the counting chamber is
0.1mm (0.01cm).
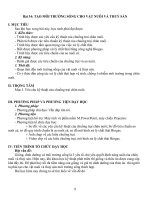
Figure 2. The grid of the counting chamber
Thus, the volume of this space (large area (1)) is; 1mm×1mm×0.1mm=0.1mm
3
= 0.0001cm
3
=10-
3ml. If a total of α cells are counted in the space over this area-(1), the estimated number of cells
per ml in the sample is: α×10
4
. In order to obtain the algal density in the culture, get average
counts from at least 4 replicates of grids (samples): (α1+α2+α3+ α4) cells per ml.
i.e. if α = 100 then there are 100*104 = 1 million cells/ml
or if α = 10, then there are 10*104 = 100,000 cells/ml.
It is best to count in a pattern going up and down or across and back. If the algae cells are
touching the line of the box, it is to be included in a count. If a size of algae is very small and it is
only touching the outside of the borderline, do not include in a count (see Fig. 3).
3
Figure 3. Determining micro-algae cell counts
Algal culture rooms
The algae culture system is divided into 4 separate rooms:
1. Algae lab: for fridge containing bactoagar plates, 10ml tubes, 20 ml tubes, 200ml flasks
and 500 ml flasks
2. Bottle room: for 2 litre flasks and 20 litres bottles
3. 2 mt concrete tank room
4. 6.5 mt concrete tank room
Room 1: Algae laboratory.
This room should be kept strictly clean with constant air conditioning so that the temperature is
18-20
o
C 24 hours/day. The unit has low level of 1-2 fluorescent tubes for the small volume algae
culture.
Water for this room is seawater from the UV unit located inside the bottle room. The water will
be collected from the bottle room in a cleaned (washed with 10% HCL water) and rinsed 20 litre
bucket (bottle) and then carried into the algae laboratory.
To this water is added all of the required nutrients and then correct volumes of water are then
measured into the tubes/flasks, which are then autoclaved, sealed with aluminium foil and then
cooled ready for inoculation.
Additions for these inoculations are as follows:
20 litre bottle
• 20 litres seawater
• 5 ml AGP-C
• 20 ml silicate solution (decreased to pH 2-3 with about 0.75ml of HCL/50ml silicate)
• 0.2 g (ml) EDTA
• 2 ml Vitamin B solution
Decrease the pH with drops of HCl to pH 7.2-7.5.
4
(If the pH drops too much, increase with drops of Tris buffer until pH is 7.2-7.5)
Then distribute from here to fill the lab glassware with:
10 ml for the 10ml test tubes,
18 ml for the 20ml test tubes,
160ml for the 200ml flasks, and
400ml for the 500 ml flasks
Then take to autoclave and sterilize for 15 minutes, remove, allow to cool and innoculate with
algal culture as follows:
Into each10 ml agar tube: put one colony of algae from a plate and leave 4-7 days
Into each10 ml dilution tube: 2 ml of algae from an agar tube and leave 4-5 days
Into each 20ml tube: put 2 ml of the best quality 10 ml test tubes and leave 4-5 days
Into each 200ml flask: put 2 * 20 ml of the best quality 20ml tubes and leave 3 days
Into each 500ml flask: put 0.5 (100ml) of a 200ml flask and leave 3 days
At full capacity we require:
105 * 10 ml test tubes, with 15 new prepared every day
250 * 20 ml test tubes, with 50 new prepared every day
60 * 200 ml flasks, with 20 new prepared every day
90 * 500 ml flasks with 30 new prepared every day
167 * 2 litre flasks with 56 new prepared every day
167 * 20 litre bottles, with 56 new prepared every day
21 * 2 mt tanks, with 7 new prepared every day
21 * 6.5 mt tanks, with 7 new prepared every day.
Re-plating algae
In order to maintain clean stocks of algae over a long time, we need to transfer algae from the
petri dishes we bought to new Petri dishes. This should be done every 2 weeks in the following
way:
Preparation of petri dishes:
1. Wash and leave to dry the glass Petri dishes
2. Wrap well in aluminum foil and take to the autoclave
3. Place 250ml of seawater prepared with all the nutrients (as described for the 20 litre
inoculations above) inside a 500ml flask (solution 1), cover with foil and take to
autoclave
4. Put 50 ml of distilled water and 5g of bactoagar in a 200ml flask (solution 2), cover with
foil and take to autoclave.
5. Autoclave all the above for 15 minutes, then remove from heat
6. Remove everything from tray, mix the 2 solutions (1 and 2) together (in the 500ml flask)
and allow everything to cool on the tiled counter which has been cleaned with alcohol.
7. Before the 2 solutions solidify (when cool), pour the agar mixture into the clean plates
and close them.
8. When the agar solidifies, turn the petri upside down and seal them with paraffin.
Inoculation of Petri dishes:
5
• Choose the best of the 10ml test tubes of algae (5-7 days after inoculation).
• Examine the algae under the microscope to select the best, least contaminated tube.
• Disinfect the bench and your hands and equipment with alcohol
• Hold the mouth of the tube briefly over the alcohol burner to sterilize it
• Take a 1 ml glass pipette (already sterilized and wrapped in foil) and take 0.1 ml of algae
from the 10ml tube
• Again, hold the mouth of the tube briefly over the alcohol burner to sterilize it and
replace the cap of the tube
• Open the Petri dish and slowly drip the 0.1ml algal sample over the top of the agar in a
zig-zag pattern
• Close the Petri dish and seal with paraffin and place upside down on a lightly illuminated
shelf
• Mark on the Petri dish the date and species of algae with permanent market
• Leave to grow for 4-20 days, then use this plate to re-inoculate new agar 10 ml tubes
Inoculating Petri dishes to 10 ml agar tubes (done once a week):
Preparing the agar test tubes:
• Retrieve test tubes from the bucket with 10% HCl solution
• Wash the tubes well with water and detergent then dry upside down in test tube rack
• Use cleaned (autoclaved) 10 ml glass pipette to transfer 10 ml of culture medium (as
above) into the test tube.
• Screw cap lightly (still loose) to tube
• Take tubes to autoclave and steam for 15 minutes as described above
• Take back to lab, tighten screw caps and leave to cool in test tube rack
Inoculating agar tubes from Plates
• Select a plate with clean, isolated colonies without bacterial infections
• Clean bench, hands and wire loop with alcohol
• Take paraffin of Petri dishes
• Place wire loop in flame until red, then take out of fire and cool in air
• Take one colony of algae from Petri dish
• Take top off test tube and put wire loop in media and shake, so it goes into water
• Pass top of test tube through flame quickly and reseal with cap
• Write species and date on test tube with permanent marker
• Leave in test tube rack for 4-7 days until ready for inoculating 10ml dilution tubes
• Shake test tubes once per day
Inoculating 10 ml dilution tubes from 10 ml agar tubes (done daily to maintain production):
Preparing the dilution test tubes:
• Retrieve test tubes from the bucket with 10% HCl solution
• Wash the tubes well with water and detergent then dry upside down in test tube rack
6
• Use cleaned (autoclaved) 10ml glass pipette to transfer 10 ml of culture medium (as
above) into the test tube.
• Screw cap lightly (still loose) to tube
• Take tubes to autoclave and steam for 15 minutes as described above
• Take back to lab, tighten screw caps and leave to cool in test tube rack
Inoculating dilution tubes from agar tubes
• Select a 10ml agar test tube with dense, high quality algae without bacterial infections
• Clean bench, hands and wire loop with alcohol
• Take cap off 10ml dilution test tube and pass mouth over flame quickly
• Using autoclaved 5ml pipette, remove 2 ml from tube
• Take top off new 10 ml test tube and add 2 ml of algae solution
• Pass top of test tube through flame quickly and reseal with cap
• Write species and date on test tube with permanent marker
• Leave in test tube rack for 4-5 days until ready for inoculating 20ml tubes
• Shake test tubes once per day
Inoculating 20 ml production tubes from 10 ml dilution tubes
Preparing the production test tubes:
• Retrieve test tubes from the bucket with 10% HCl solution
• Wash the tubes well with water and detergent then dry upside down in test tube rack
• Use cleaned (autoclaved) 10ml glass pipette to transfer 20 ml of culture medium (as
above) into the test tube.
• Screw cap lightly (still loose) to tube
• Take tubes to autoclave and steam for 15 minutes as described above
• Take back to lab, tighten screw caps and leave to cool in test tube rack
Inoculating dilution tubes from agar tubes
• Select a 10ml dilution test tube with dense, high quality algae without bacterial infections
• Clean bench, hands and wire loop with alcohol
• Take cap off 10ml dilution test tube and pass mouth over flame quickly
• Using autoclaved 5ml pipette, remove 2 ml from tube
• Take top off new 10 ml test tube and add 2 ml of algae solution
• Pass top of test tube through flame quickly and reseal with cap
• Write species and date on test tube with permanent marker
• Leave in test tube rack for 4-5 days until ready for inoculating 200ml flasks
•
Shake test tubes once per day
Inoculating 200 ml flasks from 20 ml production tubes
Preparing the 200 ml flasks:
• Retrieve 200ml flasks from the bucket with 10% HCl solution
• Wash the flasks well with water and detergent then dry upside down
7
• Use cleaned (autoclaved) 500ml glass measuring cylinder to transfer 160 ml of culture
medium (as above) into the flask
• Close top of flask with aluminum foil
• Take flasks to autoclave and steam for 15 minutes as described above
• Take back to lab, tighten foil cap and leave to cool on bench
Inoculating 200 ml flasks from 20 ml production test tubes
• Select a 20 ml production test tube with dense, high quality algae without bacterial
infections
• Clean bench, hands and wire loop with alcohol
• Take cap off two 20 ml production test tubes and pass mouth over flame quickly
• Take top off new 200 ml flask and add two 20 ml tubes to each 200 ml flask
• Pass top of flask through flame quickly and reseal with foil
• Write species and date on flask with permanent marker
• Place a rigid air pipe connected to airline into the bottom of the flask and open air valve
• Leave on shelf in front of single 40 watt bulb for 2-3 days until ready for inoculating
500ml flasks
• Shake flasks once per day
Innoculating 500 ml flasks from 200 ml flasks
Preparing the 500 ml flasks:
• Retrieve 500 ml flasks from the bucket with 10% HCl solution
• Wash the flasks well with water and detergent then dry upside down
• Use cleaned (autoclaved) 500ml glass measuring cylinder to transfer 400 ml of culture
medium (as above) into the flask
• Close top of flask with aluminum foil
• Take flasks to autoclave and steam for 15 minutes as described above
• Take back to lab, tighten foil cap and leave to cool on bench
Inoculating 500 ml flasks from 200 ml flasks
• Select a 200 ml flask with dense, high quality algae without bacterial infections
• Clean bench, hands and wire loop with alcohol
• Take cap off a 200 ml production test tubes and pass mouth over flame quickly
• Take top off new 500 ml flask and add half of one 200 ml flask (i.e. 100ml) to each of
two 500 ml flasks
• Pass top of flasks through flame quickly and reseal with foil
• Write species and date on flasks with permanent marker
•
Place a rigid air pipe connected to airline into the bottom of the flasks and open air valve
• Leave on shelf in front of double 40 watt bulbs for 2-3 days until ready for inoculating 2
litre flasks
• Shake flasks once per day
Room 2: Bottle room:
8
This room should be kept strictly clean with constant air conditioning so that the temperature is
about 20-24
o
C 24 hours/day. The unit has high level of 2-4 fluorescent tubes for the medium
volume algae culture.
Water for this room is seawater from the UV unit located inside the bottle room. From here, the
flexible hose transfers it directly into the clean 2 litre flasks and 20 litre bottles. These
flasks/bottles are first washed with freshwater and detergent and scrubbed with bottle brushes,
then flushed with 10% HCL solution, then rinsed in clean seawater and dried by turning upside
down inside the bottle room.
At full capacity, we require 56 * 2 litre flasks and 56 * 20 litre bottles every day, with each bottle
being cultured for 2 days then transferred. Thus, we require 168 * 2 l flasks and 168 * 20 litre
bottles in total.
The flasks and bottles are then filled up (to 1.75 l or 18 litres, respectively) with seawater. Then
liquid chlorine is added at 0.18 ml/2 litres and 1.8ml/20 litres
In the morning, the chlorine is neutralized with sodium thiosulphate solution at 0.1ml/2 litre flask
or 0.8ml/20 litre bottle.
After checking with the chlorine test kit to ensure that the chlorine is all gone, the flasks/bottles
are inoculated with nutrients and then the starter culture of algae added. This is half of a 500ml
flask (250ml) per 2 litre flask, or one 2 litre flask per 20 litre bottle, giving a total of 2 litres and
20 litres, respectively.
Additions for these inoculations are as follows:
2 litre flask 20 litre bottle
• 1.8 litres seawater 18 litres seawater
• 0.2 ml AGP-C 2 ml AGP-C
• 2 ml silicate solution 20 ml silicate solution
• 0.02 g (ml) EDTA 0.2 g (ml) EDTA
• 0.2 ml Vitamin B solution 2 ml Vitamin B solution
+ +
• 0.25 litres algae (0.5*500ml flask) 2 litres algae (1*2l flask)
1000 liter outside tank area
This area should be kept strictly clean with transparent plastic roof tiles to allow light to pass
inside the room. The unit should also have fluorescent tubes left on 24 hours per day for this high
volume algae culture. Temperature is ambient, but should not be allowed to rise too high. Try to
maintain at 24-28
o
C by opening windows or installing fans in the hot season.
After each harvest of the tanks and before refilling, the tanks are scrubbed with scrubbing
brushes, soap and freshwater. The a 15-20 litre bucket containing 10 litres of water and 100ml of
HCL is used to wash the entire inner surface of the tanks with the use of a long handled brush.
The workers must wear rubber boots and gloves during this procedure. After this, the tanks are
flushed again with clean seawater and are then ready for refilling.
9
Water for this room is seawater from the algae culture reservoirs, via the cartridge filtration and
35gpm UV system.
The 2 mt tanks are then filled up (to 1.84 mt) with seawater. Then liquid chlorine is added at 184
ml/tank
In the morning, the chlorine is neutralized with 75ml of sodium thiosulphate solution/2 mt tank.
After checking with the chlorine test kit to ensure that the chlorine is all gone, the tanks are
inoculated with nutrients and then the starter culture of algae added. This is 8 *20 l bottles/2 mt
tank, giving a total of 2 mt.
Additions for these inoculations are as follows:
1 mt tank 2 mt tank
• 920 litres seawater 1.84 mt seawater
• 25 ml AGP-C 50 ml AGP-C
• 100 ml silicate solution 200 ml silicate solution
• 10 g (ml) EDTA 20 g (ml) EDTA
+ +
• 80 litres algae (4*20 l bottles) 160 litres algae (8 *20 l bottles)
6.5 mt concrete tanks
This room should be kept strictly clean with transparent plastic roof tiles to allow light to pass
inside the room. The unit should also have fluorescent tubes left on 24 hours per day for this high
volume algae culture. Temperature is ambient, but should not be allowed to rise too high. Try to
maintain at 24-28
o
C by opening windows or installing fans in the hot season.
After each harvest of the tanks and before refilling, the tanks are scrubbed with scrubbing
brushes, soap and freshwater. The a 15-20 litre bucket containing 10 litres of water and 100ml of
HCL is used to wash the entire inner surface of the tanks with the use of a long handled brush.
The workers must wear rubber boots and gloves during this procedure. After this, the tanks are
flushed again with clean seawater and are then ready for refilling.
Water for this room is seawater from the algae culture reservoirs via the cartridge filtration and
35gpm UV system.
The 6.5-mt tanks are then filled up (to 4.5 mt) with seawater. Then liquid chlorine is added at 450
ml/tank
In the morning, the chlorine is neutralized with 180ml of sodium thiosulphate solution/6.5 mt
tank.
After checking with the chlorine test kit to ensure that the chlorine is all gone, the tanks are
inoculated with nutrients and then the starter culture of algae added. This is 1 *2 mt tank/6.5 mt
tank, giving a total of 6.5 mt.
10
11
Additions for these inoculations are as follows:
Per 1 mt of tank 6.5 mt tank
• 900 litres seawater 4.5 mt seawater
• 15 ml AGP-C 100ml AGP-C
• 100 ml silicate solution 650 ml silicate solution
• 10 g (ml) EDTA 65g (ml) EDTA
+ +
• 100 litres algae 2 mt algae (1*2 mt tank)
Distribution of Algae.
For rooms 1 and 2, the algae is carried in the flasks/bottles and emptied by hand into the next
stage of algae culture.
The 20 litre bottles from the bottle room (Room 2) are carried by hand or by wheelbarrow into the
2 mt algal tank room (room 3) and emptied into the already-prepared tanks.
The 2 mt tanks are pumped by submersible pump connected to a clean (washed and chlorinated
and rinsed) 1 inch hose pipe into the 6.5 mt concrete tanks (Room 4). Where the algae passes into
the large algae tank, it passes through a 100micron mesh bag, to filter out any insects/debris from
the algae tank.
The algae from the 6.5 mt tanks (Room 4) are pumped by submersible pump connected to a clean
(washed and chlorinated and rinsed) 1 inch hose pipe into the larval rearing units that require
algae. Where the algae passes into the larval rearing tank, it passes through a 100micron mesh
bag, to filter out any insects/debris from the algae tank.
Cleaning the distribution pump and pipes
After the last pumping of algae per day, the submersible pump is placed into a large fiberglass
tank filled with 20ppm chlorine solution (200 ml liquid chlorine/mt water) and the plastic tubes
filled with this solution and left overnight. The next morning, before pumping algae, the
fiberglass tank is filled with clean seawater and this is emptied through the submersible pump and
hose pipe down the drain to flush all the chlorine pout of the pipes.
Cleaning of algae culture rooms
All the air-stones and airlines used should be washed in soap and water after each use and then
wiped with a cloth with 10% HCL solution (100 ml Acid in 10 litres water) before reinstalling
into the tanks for the next stocking.
All the floors and walls of each room should be washed down daily with chlorinated water (20g
chlorine in 10 litres of water, using a brush. All surfaces in the room 1 & 2 should be wiped down
with alcohol on a cloth daily.
Once per month, all water and air tubes should be filled with 10% solution of HCL (100ml acid in
10 litres water), left for 12 hours and then washed out with clean freshwater.