Tài liệu Adobe Photoshop 7.0 for Photographers- P6 doc
Bạn đang xem bản rút gọn của tài liệu. Xem và tải ngay bản đầy đủ của tài liệu tại đây (5.68 MB, 50 trang )
Adobe Photoshop 7.0 for Photographers
230
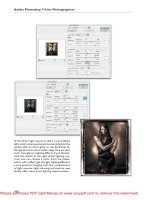
Figure 9.6 Curves corrections can be exactly
the same as making a Levels adjustment. In this
example, the two ends of the curve have been
dragged in as you would in Levels, in order to
set the optimum shadow and highlight points. You
can control both the lightness and the contrast
of the image by adjusting the shape of the curve.
Click on the bottom right box to enlarge the
curves dialog, as shown below.
Figure 9.7 If you click on the horizontal output
ramp, the curve point readouts will be displayed
using density percentages when in RGB and ink
percentages when in CMYK. The curve is also
reversed in CMYK, with the shadow point in the
top right corner and the highlight point in the
bottom left. If you Option/Alt-click anywhere
inside the grid area the grid units will switch from
25% to 10% increments.
For example, Chapter Fourteen shows how coloring effects can be achieved through
individual channel curves adjustments. The default RGB units are measured in bright-
ness levels from 0 to 255. CMYK curves are by default displayed differently (click on the
horizontal output ramp to toggle between displaying with levels or ink percentage read-
outs). This alternate mode (see Figure 9.7) is designed for repro users who primarily
prefer to see the output values expressed as ink percentages.
The next example shows how you adjust the curve to both improve image contrast
and correct the color balance at the same time. Providing the monitor has been cor-
rectly calibrated, this can all be judged by eye on the screen.
Please purchase PDF Split-Merge on www.verypdf.com to remove this watermark.
Color adjustments
231
1 The photograph shown here lacks detail in the
shadows. The information is there but in its cur-
rent state the hair will print too dark. We don’t
want to lighten all of the photograph, otherwise
the mood in the original picture will become lost.
Choose Image > Adjustments > Curves. The
dialog box contains a line on a graph on which
you can remap the image tones. Identify which
portion of the curve needs adjustment by mous-
ing down in the image area (such as on the darker
areas of the hair) and watch where the circle
appears on the curve.
3 In this corrected version the midtone and high-
light tone values remain unaltered, while the
shadow detail has been lifted. You can always use
Curves in this way to exert fine control over the
lightening or darkening at precise points on the
tonal scale.
2 Click on the curve line to anchor both the
midpoint and the highlights. Now refer back to
stage one which helped you determine where to
add a point on the shadow end of the curve, click
on the curve and drag upwards to lighten. The
line bends to form a smooth curve and the
shadows are made lighter. Precise positioning of
the curve anchor points is achieved by using
either the keyboard arrow keys or entering
numeric values in the Input and Output boxes
below.
Client: Schwarzkopf Ltd. Model: Maria at M&P.
There is also a more precise way of correcting the color balance. If you exploit the
fine tuning capabilities built into the Curves dialog and combine this with the use of
the color sampler tool, you can correct with absolute precision. Repro professionals
will often rely more on the numeric readouts to judge the color in a digital image.
Please purchase PDF Split-Merge on www.verypdf.com to remove this watermark.
Adobe Photoshop 7.0 for Photographers
232
1 The above photograph has a cold color cast.
This is particularly noticeable in the backdrop,
which should be a neutral gray. If I want to cor-
rect the color in this picture, the best method is
to apply a curves image adjustment. Go to the
Image > Adjustments menu and choose Curves
2 This shows you the curves corrected version.
The main Curves dialog allows you to make tonal
corrections to the composite color channel (in
this case, the RGB composite channel). I dragged
down from the RGB channel to select first the
red color channel and added a couple of control
points to the curve to adjust the color balance
for the midtones and highlights. If you are not
happy about the position of a curve point, it is
very easy to move it around and change the shape.
When a control point is selected, to select the
next point, use Control/Right mouse-click+Tab. To
select the previous control point, use Control/
Right mouse-click+Shift+Tab. To get rid of a point
altogether, drag it to the outer edge of the graph
or Command/Ctrl-click on the point in the grid. I
then went to the Blue channel and added a couple
of points. This time to correct the color for the
shadows and highlights in the Blue channel.
Client: Anita Cox Salon.
Please purchase PDF Split-Merge on www.verypdf.com to remove this watermark.
Adobe Photoshop 7.0 for Photographers
234
To add a new color value as a control point on the curve, Command/Ctrl-click inside
the document window and you will see a control point appear on the corresponding
portion of the curve. If you use Shift+Command/Ctrl to click in the document win-
dow, Control points will be automatically added to all three color channels at once.
So when adding control points to color correct the white boot, I would
Shift+Command/Ctrl click on top of each of the color sampler points to add these as
control points in all three color channels in the Curves dialog. When you are editing
the points in the Curves dialog, use Shift-click to select multiple points. As you adjust one
control point the others will move in unison. To deselect all the points, use Com-
mand/Ctrl-D. When a single point is selected you can select the next point using
Control/Right mouse-click+Tab and the previous point by using Control/Right mouse-
click+Shift+Tab.
3 The color sample points can be repositioned
as necessary by dragging on them with the color
sampler (you can access the tool while in an image
adjustment dialog, by holding down the Shift key).
Apply a Curves adjustment and adjust each color
channel curve as necessary. The first RGB read-
out figure in the Info palette tells you exactly where
to position the point on the curve (see the In-
put numeric box). Either manually drag the
point or use the keyboard arrows (Shift+arrow
key moves the control points in multiples of 10)
to balance the output value to match those of
the other two channels. What you adjust at one
point on the curve will affect the shape and con-
sequently the color in another part. This is why
it is advisable to monitor the color values across
the range of tones from light to dark. Remember
that you can shift select image sampled colors
to add points to the curve.
Photograph: Davis Cairns. Client: Red or Dead Ltd.
Please purchase PDF Split-Merge on www.verypdf.com to remove this watermark.
Color adjustments
233
2 Follow the Levels adjustment procedure as
outlined in the previous chapter (Assigning
shadow and highlight points, page 216). Expand
the tonal range and neutralize the shadows and
highlights as much as possible. This improves the
picture already and removes most of the cyan cast.
1 When you have a white object photographed
against a white background, any color cast will
always be very noticeable. First of all select the
color sampler tool and click on the image in up
to four places to locate the persistent color read-
outs at different places on the boot.
The follow-on tutorial, featuring the white boot, is a good example of where the Info
palette readout can be used to determine the neutrality of the image tones and is the
ultimate guarantee of perfect color correction. If you match up the RGB values so
that red = green = blue, the resulting color is always a neutral gray. Remember, this
is not the case with CMYK color (see Chapter Four on color management).
Please purchase PDF Split-Merge on www.verypdf.com to remove this watermark.
Color adjustments
235
Arbitrary Map mode
If you click on the Arbitrary Map mode button in the Curves dialog, you can sketch
in the grid area with the pencil cursor to create a freehand curve map shape. The
results are likely to be quite repulsive, but if you click on the smooth button a few
times you will see the curve become less jagged and the tonal transitions will then
become more gentle. Another example of an Arbitrary Map mode curves adjustment
can be found in Chapter Thirteen on black and white effects.
Client: Anita Cox Salon. Model: Sorcha, Bookings.
Figure 9.8 If you click on the Arbitrary Map button in the Curves dialog, you can draw a freehand
curve shape like the one shown here. Click on the Smooth button to produce a gentler effect.
Please purchase PDF Split-Merge on www.verypdf.com to remove this watermark.
Adobe Photoshop 7.0 for Photographers
236
1 This is the before image. Using the Replace
Color adjustment command we can quickly take
the image information in the purple backdrop
and alter the Hue, Saturation and Lightness val-
ues. This image adjustment command is not avail-
able as an adjustment layer, because the single
command is a combined two-stage process which
involves making a pixel selection.
2 Choose Image > Adjustments > Replace Color.
To make the selection, first click with the eye-
dropper either on the image or in the dialog box
mask preview window. Click again with the ‘add
eyedropper’ icon to add to the selection. Click
with the ‘minus eyedropper’ to remove colors. Use
the Fuzziness control slider to determine how
much tolerance you want to apply to the selection
area (see magic wand tool). Now change the Hue/
Saturation values. As you can see here, the biggest
change took place with the Hue, making the back-
ground go green instead of purple. Small saturation
and lightness adjustments were also necessary.
Replace Color
Hue/Saturation crops up again in the Replace Color command, which is really like a
combination of the Select > Color Range and Hue/Saturation command combined in
one. With Replace Color, you can select a color or range of colors, adjust the fuzziness
of your selection and apply the Hue/Saturation adjustments to those selected pixels
only. Alas, the selection made this way is not savable. For critical situations you will
want to make a Color Range type selection first and while the selection is active,
choose New Adjustment Layer > Hue/Saturation from the Layers palette. This two-
step process is probably the more flexible approach.
Please purchase PDF Split-Merge on www.verypdf.com to remove this watermark.
Color adjustments
237
Figure 9.9 To use Color Range, click in the docu-
ment window or dialog preview to sample a color
on which to base your selection. The Fuzziness
control is like the Tolerance control in the magic
wand options. Click on the plus or minus
eyedroppers to add or remove colors from the
selection. The dialog preview can either display
the original image or preview the selection as a
mask. The Selection Preview can allow you to
view the selection represented as a quickmask.
3 After performing the Replace Color operation,
there was a little spill-over on to the blue plate.
All you have to do is erase the offending areas –
you can use the history brush to do this, then
make a circular selection with the elliptical mar-
quee tool. The marquee actions can be modified
when you hold down the Option/Alt key to draw
out from the center and constrained to a circle
when you hold down the Shift key at the same
time. If at any time you also hold down the
Spacebar, you can drag to reposition the selec-
tion. If you release the Spacebar (but have still
held down the Option/Alt+Shift keys), you can
carry on expanding or contracting the selection.
Now feather the selection and select the Open
image state as the History source and restore
the original unaltered image.
Photograph: Rod Wynne-Powell.
Please purchase PDF Split-Merge on www.verypdf.com to remove this watermark.
Adobe Photoshop 7.0 for Photographers
238
Color Range
Where the magic wand creates selections solely based on luminosity, the Select >
Color Range option creates selections that are based on color values which are simi-
lar to the sample pixel color. Among other things, you can use the Color Range
command to make a selection based on out-of-gamut colors. This means you can use
Color Range to make a selection of all those ‘illegal’ RGB colors outside the CMYK
gamut and apply corrections to these pixels only. This task is made easier if you
feather the selection slightly and hide the selection edges (View > Hide Extras).
Then choose View > Gamut Warning. Adjustments can be made using the Selective
Color or Hue/Saturation commands as before. Local areas may also be corrected
with the sponge tool set to Desaturate.
Adjustment layers
Adjustment layers and the Image > Adjustments commands are identical in purpose.
Adjustment layers offer the facility to apply multiple image adjustments and/or fills
to an image and have these changes remain ‘dynamic’. In other words, an adjustment
layer is an image adjustment that can be revised at any time – adjustment layers
enable the image adjustment processing to be deferred until the time when the image
is flattened. Adjustment layers are automatically ‘layer masked’ layers, which when
selected, can be painted upon in black to remove areas from the adjustment effect. Used
in conjunction with History, they give Photoshop a three-dimensional work space of
not just multiple, but limitless, undos. One potential drawback is that having a lot of
adjustment layers in an image may slow down the monitor preview. This slowness is
not a RAM memory issue, but to do with the extra calculations that are required to
redraw the pixels on the screen. Adjustment layers are savable in the Photoshop
native, TIFF and PDF formats. Also note that the threshold preview mode is now
enabled in the Levels adjustment layer dialog.
Multiple adjustment layers
You can have more than one adjustment layer saved in a document, with each
producing a separate image adjustment. In this respect, they are very useful because
combinations of adjustments can be previewed to see how they will affect a single
layer or the whole image before you apply them. You can have several adjustment
layers in a file and choose to readjust the settings as many times as you want. It is
possible to keep changing your mind and make multiple changes to an adjustment
layer without compromising the image quality. The ability to edit adjustment layers
and mask them to selectively apply an adjustment provides the most obvious benefit
Please purchase PDF Split-Merge on www.verypdf.com to remove this watermark.
Color adjustments
239
over making a series of normal image adjustments. I used to wrongly assume that
when you flattened all the adjustment layers, the effect of doing so was as if you had
made a single image adjustment. But this is not so. When you flatten an image,
Photoshop will apply all the adjustment layers sequentially as if you had made a
series of normal image adjustments.
Blending mode adjustments
1 You can use the layer blending modes as an
alternative method to lighten or darken an image.
In this example we have a dark image that needs
to be made brighter. Go to the Layers palette
and add a new adjustment layer. It does not par-
ticularly matter which – in this example I chose
Levels.
2 Highlight the adjustment layer and change the
blending mode to Screen. The result of this will
be the same as if you had made a copied Back-
ground layer and set it to Screen blend mode.
Screening will make the image lighter and Multi-
ply will make the image darker. I then added a
gradient to the adjustment layer using the default
foreground/background colors. This partially hid
the adjustment layer and retained some of the
original darker tones at the top of the picture.
Please purchase PDF Split-Merge on www.verypdf.com to remove this watermark.
Adobe Photoshop 7.0 for Photographers
240
1 When you increase the contrast in an image,
you will also increase the color saturation.
2 If you apply a Curves adjustment as an adjust-
ment layer, try changing the blending mode to
Luminosity. This will increase the contrast in the
original scene, but without increasing saturation.
Not many people are aware of the fact that you can make use of the layer blending
modes in conjunction with adjustment layers to lighten or darken an image. The
example on page 239 demonstrates how the screen blending mode can be used to
lighten a dark photograph. There is an argument suggesting that the calculations
used in a screen or multiply blending mode will actually add levels to an image. So
this technique may well help in situations where you wish to preserve the fragile
image data instead of pulling the levels apart through the use of aggressive Levels or
Curves image adjustments.
Please purchase PDF Split-Merge on www.verypdf.com to remove this watermark.
Color adjustments
241
16 bits per channel support
Most of the techniques described in this book have been carried out in Photoshop on
files that were in 24-bit RGB color. And a 24-bit image is made up of three 8-bit
color channels. But most scanners and professional digital cameras are able to cap-
ture more than 8 bits per channel – they can capture what is known as high-bit data.
If an imported file has more than 8 bits per channel data, it will be opened in Photoshop
in 16 bits per channel mode (an RGB file will be treated as 48-bit color). The main
advantage of this is that instead of having only 256 data points per color channel and 8
bits per channel image, you can have up to 65 000 in a 16-bit file. That is quite a lot more
levels of tone to play around with, especially when using levels or curves. Figure 9.10
shows two histogram displays that compare the result of editing an image in 8 bits
per channel and 16 bits per channel modes.
Photoshop will support color adjustments, cropping, rotating and use of the clone
tool and healing brush in 16 bits per channel mode. And since Photoshop 6.0 this has
been extended to include Lab color, Canvas Size adjustments and the following fil-
ters: Gaussian Blur; Add Noise; Dust & Scratches; Median; Unsharp Mask; Solar-
ize; and High Pass. Wherever possible, I always aim to begin my editing with a file
that has been scanned or captured using high-bit data and brought into Photoshop in
16 bits per channel mode. I will crop the picture and apply a Levels and Curves
adjustment to get the picture looking good on the screen and then and only then, will
I convert the image to 8 bits per channel mode as this will enable me to use all the
features in Photoshop. You may not feel the need to use 16 bits per channel all the
time for every job, but I would say that for critical jobs where you don’t want to lose
an ounce of detail, it is essential to make all your preliminary edits in this mode.
Figure 9.10 The histogram on the left is from an image in 8 bits per channel mode that started out
in 16 bits per channel mode but where the levels were expanded using a couple of Levels and Curves
adjustments. The histogram on the right is of the same image after the same adjustments had been
applied as before, but the image was in 8 bits per channel mode throughout. As you can see, if you
keep a picture in 16 bits per channel mode while you apply levels and curves adjustments, much more
of the levels data will be preserved as a result.
Please purchase PDF Split-Merge on www.verypdf.com to remove this watermark.
Adobe Photoshop 7.0 for Photographers
242
Selective Color
The Selective Color command is the ultimate, precision color control tool. It allows
you to selectively fine tune the color balance in the additive and subtractive prima-
ries, blacks, neutrals and whites. In that respect the controls are fairly similar to the
Hue/Saturation command, except here you can adjust the cyan, magenta, yellow and
black component of the chosen color range. The Selective Color command is there-
fore a tool for correcting CMYK color, but you can also use it to prepare an RGB file
before converting it to CMYK. The color control available with Selective Color is a
bit like adjusting the sound on a music system with a sophisticated graphics equal-
izer. Subtle or quite strong changes can be made with ease to the desired band of
color tones. The Selective Color command is therefore another alternative to the
Hue/Saturation adjustment for getting RGB colors to fit the CMYK color space. In
the accompanying example, I show how the gamut warning can help you pinpoint
the illegal out-of-gamut colors in RGB. You may want to consider carrying out such
adjustments using two window views: one with the normal RGB version and the
other with gamut warning and the Working CMYK proofing switched on in the View
menu.
As a final note on the above technique – there is bound to be a noticeable color shift
and more than just the blue colors will benefit from adjustment. Since the initial blue
did not exist in CMYK it had to be converted to something else. What that some-
thing else is, well, that is the art of preparing images for four-color printing. The
trick is to convert the existing colors in a way that the color values obviously change
but the final perception looks right to the eye. Blue skies are a good example – bright
deep blues do not convert well to CMYK, as deep blue will fall outside the CMYK
gamut, and the default conversion that does work convincingly to the eye. But you
can use Selective Color to adjust the values of the magenta, cyan and black color
plates so that these will produce another type of blue using a different combination
of inks. Where the color matching is critical, Selective Color may help to correct an
imbalance and improve the output color, provided the output color to be targeted is
within the CMYK gamut. When this is not so, special printing techniques must be
adopted, like adding an extra printing plate to substitute a custom color.
You may like to explore other refinements to the technique shown here. For ex-
ample, the CMYK Preview window could also have the Gamut Warning switched
on as well. As corrections are made using Selective Color, you can see whether the
colors are changing to your satisfaction and still falling inside the CMYK gamut.
Please purchase PDF Split-Merge on www.verypdf.com to remove this watermark.
Color adjustments
243
3 In the previous picture the ‘illegal’ RGB colors
have been adjusted so that when the conversion
takes place all the RGB colors now have a direct
CMYK equivalent. You can also just as easily use
the Hue/Saturation command to do this job. I
used Selective Color because it is a fine-tuning
color adjustment tool and one based around the
destination CMYK color model. A Relative per-
centage change will proportionally add or sub-
tract from the current value. So if the cyan value
is currently 40% adding a Relative 10% will equal
44%. Adding an Absolute 10% will make the new
value 50%.
1 This is not an easy one to show because we
are starting with an ‘RGB’ image that is printed
in CMYK. But imagine you have an RGB scan that
looks fine on screen, but not all the colors fall
within the CMYK gamut. A relative colorimetric
CMYK conversion will automatically translate the
out-of-gamut RGB colors to their nearest CMYK
equivalent. If there are only a few out-of-gamut
RGB colors to start with, there will be little
change to the image appearance after converting.
2 To check if this is the case, you can select View >
Proof Setup > Working CMYK and then choose
View > Gamut Warning. The latter will display out-
of-gamut RGB colors with a predefined solid color
(refer to the Preferences section in Chapter Six). If
the gamut warning shows any out-of-gamut pixels
you can bring them within the CMYK gamut using
the Image > Adjustments > Selective Color com-
mand to selectively shift the magenta and yellow
percentages that affect the blue component color.
Please purchase PDF Split-Merge on www.verypdf.com to remove this watermark.
Adobe Photoshop 7.0 for Photographers
244
Repairing an Image
Chapter Ten
M
ost photographers are interested in the potential of using Photoshop as a
tool for retouching pictures. So we shall start with simple techniques like
cloning and then go on to explore some other advanced methods that can be
used to clean up and repair damaged photographs. The clone stamp is a popular
retouching tool even if it is a little difficult to master. But everyone has been very
excited by the healing brush and patch tool, both of which are new to Photoshop 7.0,
which can make Photoshop retouching so much easier to accomplish. The healing
brush in particular can always be guaranteed to impress!
Basic cloning methods
The clone stamp tool is used to repeat parts of an image elsewhere and requires some
basic keyboard/mouse coordination. Select the clone stamp from the Tools palette.
To establish the area where you wish to sample from, hold down the Option/Alt key
and click. Then release the Option/Alt key and click or mouse down to paint over the
area you want to clone to. When the Aligned box is checked, the sample area retains
the same angle and distance in relation to where you paint with the clone stamp tool.
When the Aligned option is unchecked, the sample point remains fixed for all brush
strokes. This latter mode is ideally used when the sample area is very small, as you
can keep a tight control over the area you are sampling from. But the Aligned mode
is the most appropriate option to select for everyday spotting. Select the Use All
Layers option to sample from all merged layers. As with all the other painting tools,
you can change brush size, shape and opacity to suit your needs. While you may find
it useful working with different combinations of these settings with the painting
Please purchase PDF Split-Merge on www.verypdf.com to remove this watermark.
Repairing an image
245
2 This example shows the source image area
identified by a surrounding yellow rectangle.
All the other clones (which are marked with
cyan rectangles) were repeated from the same
source starting point using the clone stamp in
Nonaligned mode.
3 In Aligned mode, Photoshop will always maintain
the relationship (the alignment) between the sample
and painting points. The clone stamp tool can only
act on the active layer, but when the Use All Layers
box is checked, Photoshop will sample data from
all the layers that are currently visible, as if they
were a single flattened layer.
tools, the same does not apply to the clone stamp tool. Typically you want to stick to
using the fine to medium-sized brushes (just as you would always choose a fine
paintbrush for spotting bromide prints). I mostly always leave the opacity set to
100%. Cloning at less than full opacity usually leads to telltale evidence of cloning.
Where the film grain in the photograph is visible, this can lead to a faint overlapping
grain structure, making the retouched area look slightly blurred or misregistered.
When smoothing out skin tone shadows or blemishes, I will occasionally switch to
an opacity of 50% or less. Retouching light soft detailed areas means I can get away
1 Normally snapped to the top or bottom of the
screen, the Options bar displays the clone stamp op-
tions. The ‘Aligned’ box is normally checked by
default. The Nonaligned mode allows you to set
the source sample point so that repeat cloning
always commences from the same source point
for each new stroke you paint. The tool opacity
should be left at 100%. Sometimes painting at a
lower opacity will work, but the best way to dis-
guise your cloning is to use the clone stamp at
100%.
Please purchase PDF Split-Merge on www.verypdf.com to remove this watermark.
Adobe Photoshop 7.0 for Photographers
246
with this. Otherwise stick to 100%. And for similar reasons, you don’t want the clone
stamp to have too soft an edge; ideally make the clone stamp brush shape have a
slightly harder edge. Lines and wrinkles can be removed effectively with the dodge
tool or with the brush tool set to Lighten mode. If you are cloning over an area where
there is a gentle change in tonal gradation, unless the point you sample from matched
the destination point exactly in hue and lightness, it will be almost impossible to
disguise your retouching work. In these situations you will be better off using the
healing brush, which is described later in this chapter.
Figure 10.1 You can sample the sky from one image window and copy it using the clone stamp to
another separate image. Option/Alt-click with the clone stamp in the source image, select the other
image window and click to establish a cloning relationship between the source and destination images.
Please purchase PDF Split-Merge on www.verypdf.com to remove this watermark.
Repairing an image
247
Retouching a color negative
It is possible to retouch a masked color negative and output again to film as a nega-
tive. In the accompanying example, the client wanted the color negative original to
be scanned as a positive, so that it could be output again to film as a color negative.
The color negative scan can be displayed on the screen as a positive image by the
introduction of an extra layer and three adjustment layers, one to neutralize the mask,
one to invert the image and the others to expand the levels and increase the color
saturation. You can then spot and retouch the active background layer without actu-
ally altering the color or masking the color negative original.
Figure 10.2 Gradient banding is a common problem in Photoshop. Banding can occur whenever you
apply a heavy blur filtration. It can also sometimes appear on gradient fills. The gradient options
include a dither mode and this will help somewhat. However, the best way to hide banding is to apply
a small amount of noise, using the Noise > Add Noise filter. The Gaussian option will produce a more
irregular distribution of noise. The example here shows a noticeably banded gradient with and with-
out the noise being added. The noise filter is well worth remembering any time you wish to hide
banding or make Photoshop paintwork appear to merge better with the grain of the scanned original.
Spotting used to be such a laborious and tricky process. I am reminded of an old
story about a commercial photographer who rather than use a scalpel knife to re-
move a black speck in the sky, would paint in a couple of wings and turn it into a
seagull. Thankfully with Photoshop anyone can learn to quickly spot a picture now.
Please purchase PDF Split-Merge on www.verypdf.com to remove this watermark.
Adobe Photoshop 7.0 for Photographers
248
1 The scanned negative requires
some retouching prior to being out-
put as a negative again. It would be
hard to retouch the negative as it is
because the colors are inverted with
an orange colored mask and the
tonal range is too narrow for us to
see properly what is going on. The
following steps are intended for
viewing a positive version of the image.
The added layers can be discarded
later.
2 The first stage is to counterbalance the orange
mask – sample from the rebate using the eyedropper
tool set to a 3 × 3 pixel sample radius (go to the
eyedropper tool options). Then go to the Layers
palette, click on the adjustment layer button and
add a Color Fill adjustment layer. And then add
an Invert adjustment layer above this. Option/
Alt-click on the dividing line between the two
adjustment layers – this will create a clipping
group with the color fill layer. Now change the
color fill layer opacity to 50% and the blending
mode to Color. As you can see, this neutralizes
the orange mask.
The following example uses a color negative photograph that was scanned as if it
were a positive original to include the orange color mask and was then output to film
as a color negative again. This is a refined version of a technique which was devised
by Rod Wynne-Powell of Solutions Photographic.
Please purchase PDF Split-Merge on www.verypdf.com to remove this watermark.
Repairing an image
249
Alternative spotting technique using the history brush
This method of spotting a photograph has evolved from a technique that was first
described by Russell Brown, Senior Creative Director of the Adobe Photoshop team.
It revolves around using the Remove Dust & Scratches filter, which is found in the
Filter > Noise submenu and can be used to remove image defects. If this filter is
applied globally to the whole image, you will always end up with a soft-looking
result. You are actually only meant to apply this filter selectively to the damaged
portions of a picture in Photoshop. The technique shown here has the advantage of
applying the filtered information precisely to fill in the dirty areas without the risk of
destroying the tonal values in the rest of the picture.
3 Next add an Invert adjustment layer to the top
of the layer stack. This step inverts the tonal values
exactly which converts the negative into a pale
positive image.
4 To boost the contrast, make a second adjustment
layer. Select Levels and in the Levels dialog box, click
on the Auto Levels button. Finally add a Hue/
Saturation adjustment layer and increase the
overall saturation. We now have an approximated
positive image preview. If I want to do any
retouching, this must be carried out on the
background layer. When the retouching is
completed, discard the adjustment layers and
output to transparency.
Please purchase PDF Split-Merge on www.verypdf.com to remove this watermark.
Adobe Photoshop 7.0 for Photographers
250
1 This photograph serves as a good example
with which to demonstrate the history brush
spotting technique, as there are a lot of hair
and scratch marks that are clearly visible in
this picture.
2 Go to the Filter menu and choose
Noise > Remove Dust & Scratches to
the image. Check the filter dialog
preview and adjust the Amount and
Threshold settings so that most of the
marks appear to have become dissolved
away by the filter and click OK to apply
this filtration to the image.
3 Now go to the History palette and click on
the previous unfiltered image history state, but
set the history brush source to paint from the
filtered version. Select the history brush and
change the history brush blending mode in the
tool options bar to Lighten. As you paint over
the dark spots, the history brush will lighten only
those pixels that are lighter than the sampled
history state. All other pixels will remain un-
changed.
4 Continue using the history brush in this way.
To remove light spots, change the tool blending
mode to Darken.
Please purchase PDF Split-Merge on www.verypdf.com to remove this watermark.
Repairing an image
251
As you can see, this method works well when you have a picture that is very badly
damaged and where using the clone stamp would be a very tedious process. What is
really clever is the way that the history brush is used in Lighten or Darken mode so
that Photoshop can be made to target replacing specific pixels. However, you may
encounter a problem if the photographic original contains noticeable film grain. It
may help to apply a small amount of noise after applying the Dust & Scratches filter.
Add enough noise to match the grain of the original. This will enable you to better
disguise the history brush retouching. To add noise on a separate layer, Option/Alt
click the Add New Layer button in the Layers palette. This will pop a New Layer
dialog. Select Overlay as the blending mode and you will notice that you can now
check the Fill with Overlay-neutral color (50% Gray) box below. In this blending
mode the layer will have no visible impact on the underlying layers. But if you filter
the layer and add noise, you can create a film grain layer. Try adding a layer mask to
this layer to selectively add or remove the noise.
Working with the healing brush
The healing brush is a dream tool to use for all types of retouching work. The healing
brush and patch tool utilize some extremely clever math to perform complex blends
to produce smooth seamless retouching results. I did once try asking Marc Pawliger,
who is the principal engineer on the Photoshop team, to explain how the healing
brush worked, but all I can remember is that it has something to do with complex
algebra which went completely over my head. But it will help you to understand a
little about how the Healing brush and patch tool work, so here is my simplified
interpretation of what these tools do.
The healing brush is used in the same way as the Clone Stamp tool, although it is
important to stress that the healing brush is more than just a magic clone stamp and
has its own unique characteristics and methods of working with it. You can establish
a pixel sample point by Option/Alt-clicking an area of an image to sample from. You
then release the Option/Alt key and mouse and click in a new part of the image and
paint with the healing brush to carry out your retouching.
After you set the sample point and paint with the healing brush, it will analyze the
texture from the sample area and apply a blend to the painting area that merges the
texture sampled from the sample point and smoothly blend this with the color and
luminosity of the painting area. Around the outer edge of where you paint with the
healing brush, a soft edge with a feathered radius of up to 10 pixels is used to calcu-
late a smooth transition of color and luminosity with the pixels outside the painting
area. For this reason there is no need to use a soft edged brush and in fact you will
find that you get more controlled results using a hard edged brush.
Please purchase PDF Split-Merge on www.verypdf.com to remove this watermark.
Adobe Photoshop 7.0 for Photographers
252
In practice, the healing brush is able to perfectly blend sampled pixels with the
destination point. When you paint with the healing brush it can seem a little strange
that you don’t need to match the sample area with the color and lightness of the
destination point. To get the best results you have only to look at matching the tex-
tures. The default mode for the healing brush has the Aligned box unchecked. This
makes sense, because when you are using the healing brush to specifically retouch
just the skin tones (as shown in the accompanying example) you ideally want the
sample point to always be made from the same area of skin tone texture. If you want to
switch to retouching the backdrop (as in the second example) you can then set a fresh
sample point that matches the texture of the background pixels. The healing brush can
only work on a layer that contains actual pixels. Unlike the Clone Stamp tool, you
cannot create an empty layer and check an All Layers box in the Options bar to have all
the retouching take place on that layer only. You can either retouch with the healing
brush directly on to the Background layer or make a selection of the area of interest,
copy this as a new layer: Layer > New > Layer via Copy (Command/Ctrl+J) and re-
touch the pixels on this layer and thereby have the ability to always be able to undo
all the retouching. The problem with adding pixel layers is that this will increase the
file size and potentially slow down the healing brush. On a fast machine there should
only be a very slight time-lag after applying each click or small stroke with the
healing brush.
You can also use a pattern preset as the source for the healing brush. You can either
choose a pre-loaded preset or create your own. The Pattern Maker in the Filter menu
in Photoshop 7.0 is ideal for this purpose as you can sample from just a small area of
useful texture in an image and use the Pattern Maker to create a randomly generated
pattern source that can be used to apply a smoothly blended texture over a larger area
of the picture using the healing brush. The healing brush has a choice of blending
modes. The Replace mode is identical to the clone stamp tool, except it allows you to
merge film grain more reliably and smoothly around the edges of your brush strokes.
Or choose from a cutdown list of brush blending modes. The healing brush is already
utilizing a special form of image blending to perform its work. The other healing
brush blending modes can produce different results, but in my opinion they won’t
actually improve upon the ability of the healing brush in Normal mode.
Although the healing brush can appear to be a miracle retouching tool once you get
the hang of how it works, you still have to be careful about retouching any blemishes
that are close to a sharp change in tonal contrast. The second example using the
healing brush illustrates the problem quite clearly. Even though a hard edged brush
is being used, the healing brush stroke will tend to pick up the darker colored pixels
adjoining the edge of the brush painting area.
Please purchase PDF Split-Merge on www.verypdf.com to remove this watermark.
Repairing an image
253
1 If you use the healing brush to retouch this
photograph, the healing brush retouching must
be carried out on the Background layer or on a
copied background layer. Select the healing brush
from the Tools palette and edit the brush style
to make a hard edged brush. The brush blending
mode should be Normal, the Source radio but-
ton checked and the Aligned box left unchecked.
2 To use the healing brush, Option/Alt-click to
define the source point. This should be a clean
area of skin texture. You are now ready to re-
touch with the healing brush. Click on the areas
of skin tone with the healing brush where you
wish to remove a blemish. If you are using a
pressure-sensitive tablet as an input device, then
the default brush dynamics will be size-sensitive.
Apply light pressure to paint with a small brush,
apply heavy pressure for a full-sized brush.
3 Continue using the healing brush to complete
the skin tone retouching. In this example I
sampled one pixel source point for the chest and
neck areas and another to retouch the face.
Client: Thomas Macmillan.
Model: Sophie Boeson – Models One.
Please purchase PDF Split-Merge on www.verypdf.com to remove this watermark.
Adobe Photoshop 7.0 for Photographers
254
1 The healing brush is the perfect retouching tool
to use when you are faced with the challenge of
having to retouch blemishes against a backdrop
such as the one shown here. This is because the
backdrop contains gentle transitions of tone. It
used to be extremely difficult to retouch back-
drops in shots like this when all you had was the
clone stamp.
2 A potential problem arises when you wish to
retouch a blemish that is adjacent to a sudden
shift in lightness or color.
3 In this picture you can see that even if you use
the healing brush with a small hard edged brush,
the brush may pick up the darker tones of the
model’s dress and you will get to see the ugly
looking shading shown here.
4 The answer to the problem is to make a pre-
selection first of the area you wish to heal (with
maybe some minimal feathering) and thereby
restrict the extent to which the healing brush
tool analyzes the surrounding pixels.
Client: Anita Cox. Model: Steph at IMG.
Please purchase PDF Split-Merge on www.verypdf.com to remove this watermark.