Adobe Photoshop 7.0 for Photographers- P10
Bạn đang xem bản rút gọn của tài liệu. Xem và tải ngay bản đầy đủ của tài liệu tại đây (980.36 KB, 31 trang )
Adobe Photoshop 7.0 for Photographers
430
4 The Omni light source is like a round diffuse
light, which when positioned centered behind the
model adds an extra glow to the backdrop, al-
though this time with a softer edge. One can also
color the lights in Lighting Effects. If you double-
click the swatch to the right of the lighting con-
trols, one can choose a color from the picker,
which will in effect ‘gel’ the light. Lighting Effects is
a very powerful imaging tool. The combinations
of light sources, light coloring and texture map
facility offer many more lighting opportunities.
Please purchase PDF Split-Merge on www.verypdf.com to remove this watermark.
Filters
431
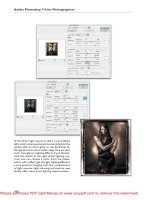
1 Take an object and isolate it from the back-
ground layer by defining an outline selection and
making a Layer > New Layer > Via Copy. The 3D
Transform filter is then chosen from the filter
menu to affect this new layer only. The dialog
box displays a monochrome preview of the im-
age on the layer. Select one of the object draw-
ing tools to surround the selected area and match
its perspective. Next select the view angle tool
to twist the perspective.
2 When the 3D Transform has finished process-
ing the transformation, the before image may
show through from below. Here I went to the
background layer and deleted them, filling these
areas with white.
3 The cleaned-up after shot appears to show the
camera as if it had been rotated toward the lens
axis. Excessive 3D transforms will not work so
convincingly. After all, not even Photoshop can
reproduce the back of an object.
3D Transform
Please purchase PDF Split-Merge on www.verypdf.com to remove this watermark.
Adobe Photoshop 7.0 for Photographers
432
3D Transform
This filter effect bears some resemblance to one of the early Andromeda series of
plug-in effects. The filter can be used to take an object and effectively change the
perspective view relative to the remaining image. It is not an easy filter tool to mas-
ter and there are restrictions on how far round you can rotate what is a ‘2D captured’
object. The example on the previous page was done with the ciné camera on a back-
ground copy layer, where the camera was first carefully cut out.
Practical applications
People either overuse Photoshop filters and techniques or dismiss them as pure fakery
and having nothing to do with photography. There is a middle line where I believe
there is nothing wrong with experimenting, mixing illustration techniques and
photography. When used properly, the Lighting Effects filter is an exceptionally
useful Photoshop tool for generating textures, 3D objects or lighting fills. I once saw
a good example of a floodlit hotel exterior where some of the outside lights were not
working. The client couldn’t get it together to organize replacement bulbs and the
photographer had to shoot the scene as it was. Because the outside walls were not
completely pitch black, there was plenty of shadow detail recorded and the Photoshop
artist was able to apply the Lighting Effects filter to replicate the missing lights. He
used one of the image color channels as a texture map to make the floodlighting
appear more realistic and made the light source color match that of the other exterior
lights.
So is it real or is it Photoshopped? Where the integrity of an image matters, such as
in photojournalism, we would all prefer that photographers don’t mess around with
the subject matter. On a commercial shoot everything we do is all lies anyway, so
who is going to care? If Photoshop can do something quickly and effectively, it
makes sense to do it on the computer rather than waste time in the studio when you
could be more productive and creative attending to other important things. I hope
the tips and techniques demonstrated throughout have helped you understand more
about the power of Photoshop as a professional quality image editor. Don’t forget that
the CD-ROM features some of the tutorials as movies and that there is a website for the
book: <www.photoshopforphotographers.com>. This contains an FAQ section and
email support links to help people who are experiencing problems running the CD-
ROM movies. I hope that you find using Photoshop to be a fascinating and rewarding
experience. It literally changed my life and the way I work and opened up many new
avenues to explore!
Please purchase PDF Split-Merge on www.verypdf.com to remove this watermark.
Appendix
433
Appendix
M
ost of the photographs you see in this book were taken by myself. Some
were from commissioned assignments, others are personal shots. I also asked
friends and colleagues to include work too, all of whom are professional
photographers. Here then is some biographical information on the other con-
tributors whose work has been featured.
Davis Cairns
A partnership specializing in fashion accessory still-life photography with clients
who include Red or Dead Ltd and Paul Smith. Davis Cairns are currently moving
into more portrait and fashion-based work with an emphasis in portraying creative
textiles. I have worked on all the Davis Cairns computer retouching work and a
number of these commissioned and personal images were used in this book.
Email:
Julian Calder
Julian Calder’s early inspiration came from the great photo stories in Life Magazine.
He acquired his photographic education at art college and as an assistant to several
London photographers. Julian is an inveterate traveler, who enjoys the discipline of
working on assignments for companies and magazines. He utilizes all the technical
gadgetry available in order to realize the full potential of a picture, stretching the
versatility of his camera system to the utmost to capture the picture he wants.
Tel: +44(0) 20 8780 5352
Please purchase PDF Split-Merge on www.verypdf.com to remove this watermark.
Adobe Photoshop 7.0 for Photographers
434
Laurie Evans
Laurie Evans was born in Scotland in 1955. Having studied photography at Art School
he spent two or three years as a rock and roll photographer before coming to London
to seek his fortune. Transferring his interests to still life, and always a passionate
cook, he quickly found that he could combine work with pleasure as he discovered
the joys of food photography. He works extensively in the advertising and design
industry and contributes to a broad range of magazines in the UK and abroad, and
has also illustrated more than 40 cookbooks. He is married, has two sons and lives
and works in London.
Tel: +44 (0)20 7284 2140 Email:
Thomas Fahey
Thomas Fahey, originally from Oklahoma, opened his Atlanta studio in 1990. His
photography takes him from New York to Miami and occasionally overseas to Lon-
don and Milan. He is a regular cover and feature photographer for Atlanta magazine,
among others, and his pictures have appeared in numerous advertising campaigns.
Formerly, Thomas trained and worked as an archival photographic printer and worked
as a photojournalist. Today he enjoys a diversified client base and relies on his
Mamiya RZ, Pentax 6×7, Norman light control, and an indispensible Macintosh
G4 workstation.
Tel: 001 404 355 5948 Email:
Website: www.thomasfahey.com
Jon Gibson-Skinner
Jon is a young photographer who lives and works in central London. Jon discovered
the virtues of Adobe Photoshop 2.0 while studying for his degree at Farnham and has
since embraced digital photography as well. His work as a creative crosses all boundaries
from music to design and advertising. Jon is one of the founder members of LightZoo.
Tel: +44 (0)20 7402 4116 Email:
Website: www.lightzoo.com
Thomas Holm
Thomas Holm from Pixl is an advertising photographer, who also provides ad-
vanced tutoring in color management, Photoshop and digital photography. Pixl has
a remote custom ICC profile service available online at www.pixl.dk.
E-mail:
Website: www.pixl.dk
Please purchase PDF Split-Merge on www.verypdf.com to remove this watermark.
Appendix
435
Peter Hince
Peter Hince is an advertising photographer specializing in people/lifestyle. He works
mainly on location throughout the world and is very experienced with big pro-
ductions and ‘round the globe’ projects. He also has a unique style of underwater
work and produces toned and textured black and white shots for his ‘Ocean Images’
collection. His work has won many advertising and photographic awards.
Tel: +44 (0)20 7386 0244 Email:
Ian McKinnell
One of the first Macintosh owners in the UK. Ian began incorporating computer
graphics for his illustration work back in the mid-eighties. He photographs mainly
for editorial and design clients like The Observer magazine. Ian uses Photoshop and
3D package programs for nearly all his work.
Tel: +44 (0)20 7631 3017 Email:
Eric Richmond
Eric Richmond specializes in arts publicity photography. Despite (or perhaps
because of) his being American, he loves anything beginning with Royal: Royal
Ballet, Royal Opera House, Royal Festival Hall, Royal Court, Royal Albert Hall. He
has worked for all these venues and thinks that all arts bodies should be named in
this fashion. In the past year he has traveled to Argentina to photograph tango, and
Cuba to shoot a CD cover. Digital retouching is increasingly becoming a feature of
his work, and like every other photographer Eric is frantically playing catchup with
new technology.
Tel: +44 (0)20 8880 6909 Email:
Website: www.ericrichmond.net
Paul Webster
Paul Webster now does all his work digitally, much of it food photography for the
likes of Sainsbury’s. He also runs an extensive prop hire business for use by other
photographers as well as his own studio in west London.
Tel: +44 (0)20 8749 0264 Email:
Please purchase PDF Split-Merge on www.verypdf.com to remove this watermark.
Adobe Photoshop 7.0 for Photographers
436
Rod Wynne-Powell
Rod Wynne-Powell, who helped with the checking into some of the technical
aspects of this book, set up SOLUTIONS Photographic in 1986, and bought his first
Mac in 1987.
SOLUTIONS Photographic came about because, after a period as a commercial/
industrial photographer, and later as sales manager of a London color laboratory,
many calls he received began with the words: ‘Rod, I’ve got a problem...’
His attention to detail and dogged determination led some developers to accept his
offers to beta test their graphics products. This gave him the opportunity to fashion
products to meet the requirements of retouchers and manipulators, which naturally
gave his clients an edge against their competitors. It allowed him to offer in-depth
training very early in the product lifecycle, and gain insights into the developers’
future direction.
Speaking the same language as photographers has enabled him to guide others past
the problems that might ensnare them when introducing them to the digital world. He
offers help from the basics of Mac housekeeping, its interface, and fault diagnostics,
through to the far more enjoyable aspects of teaching techniques for the productive
and creative use of Photoshop as a montaging and retouching tool. His help has been
valued and respected amongst his peers in the digital arena.
SOLUTIONS Photographic is now in its sixteenth year. His work is rarely credited, but
lies behind many images for book jackets, report and accounts brochures, advertisements
and packaging designs. His clients tend to have completely individual understandings
of his services, and so he relies on most of his work by personal recommendation;
the consultancy offered varies from the ad hoc to the retained, and he is particularly
pleased with his ‘flying doctor’ service over the telephone, as this allows him to
utilize time which might otherwise have been a tedious waste, spent inhaling ex-
haust fumes on the M1 or M25 car parks! His training sessions are careful to avoid
‘information overload’ in these increasingly technical times, but if the student can
take the pace, he will continue to provide answers! Rod is much sought after for his
grasp of the digital technology pitfalls. In this vein, he can be found contributing to
internet lists, such as ProDIG. Also, increasingly photographers who are happier to
keep shooting than retouching, find it handy to bring him into the studio to do any
manipulating alongside the art director.
SOLUTIONS Photographic can be contacted by the following means:
Mobile: 07836-248126
Tel: +44 (0)1582-725065 Email:
Please purchase PDF Split-Merge on www.verypdf.com to remove this watermark.
Appendix
437
Appendix A
Adobe ImageReady™ 7.0
Since the release of ImageReady 2.0 with Photoshop 5.5, there has been even more
integration between the two programs. Version 7.0 of ImageReady is bundled with
Adobe Photoshop 7.0. This packaging primarily met the needs of web designers who
use Photoshop. PSD documents created for the Web in Photoshop or ImageReady
will integrate better with Adobe GoLive™ (you can output GoLive compatible HTML
code or drop PSD files directly into GoLive). I have provided information in this
book on all the graphic uses of Photoshop that are relevant to photographers.
Web design is really a separate skill. Nevertheless, ImageReady deserves an inclu-
sion here because it is now an important component of the Photoshop program.
Interface
Many of the ImageReady features are common to Photoshop. For instance, you will
find details of the file optimization methods have already been covered in Chapter
Seven. I have chosen here to concentrate on some of the unique features contained in
ImageReady rather than provide a detailed step by step guide to the whole program.
Many of the ImageReady tools are identical to Photoshop and Figure A1 provides
you with an overview of the Tools palette layout and the keyboard shortcuts. Options
include: the ability to add image maps; toggle the visibility of image maps; a rollover
preview; toggle slice visibility; and preview in a default web browser. The palettes
are similar too: the Optimize and Color palettes match the features found in
Photoshop’s ‘Save for Web’ feature.
Jump to
When you click on the Jump to button at the bottom of the Tools palette you are able
to switch editing a document between two different editing programs. The Jump to
command from Photoshop will allow you to switch to editing in ImageReady or (if
specified) any another graphics-editing program. The Jump to command in ImageReady
will also allow you to switch between other HTML editing programs, such as Adobe
GoLive. To specify additional programs to jump to place an alias of the application
(Mac) or shortcut (PC) in the Adobe Photoshop 7.0 > Helpers > Jump To Graphics
Editor folder. Place curly brackets ({}) around an application to jump to from
Photoshop and straight brackets ([]) around an application to jump to from ImageReady.
In ImageReady you can choose either File > Jump to > Graphics Editor or File >
Jump to > HTML Editor. The auto-updating of documents between the separate
Please purchase PDF Split-Merge on www.verypdf.com to remove this watermark.
Adobe Photoshop 7.0 for Photographers
438
applications now automatically happens in the background. This means that the
jump tos between ImageReady and Photoshop are now therefore that much smoother
and faster. The image is displayed in each program in its own document window and
the window preview will be dimmed in the application which is inactive.
ImageReady layers
You can add layers in ImageReady just as you do in Photoshop. The layer features
are shared between the two programs, so when you transfer a Photoshop image into
ImageReady, all the layers, layer masks and layer effects will be preserved. The new
Photoshop layer management and extended layer limit means that you can add as
many layers as you want and organize them better using layer sets. While adjustment
layers can only be edited in Photoshop, the adjustment will be previewed in ImageReady.
Gradient map and fill layers can be edited though (see Styles, below). Using layers
Figure A1 The ImageReady™ 7.0 Tools palette, showing the keyboard shortcuts. The Tools palette
fly-outs can be torn off and converted into stand-alone palettes.
Move tool (V)
Magic wand (W)
Eyedropper (I)
Zoom tool (Z)
Eraser/magic eraser (E)
Clone stamp (S)
Blur/sharpen/smudge (R)
Dodge/burn/sponge (O)
Paint bucket (G)
Hand tool (H)
Lasso tools (L)
Marquee selection tools (M)
Background color
Exchange colors (X)
Foreground color
Default colors setting (D)
Screen display modes (F)
‘Jump to’ button
Adobe Online
Crop tool (C)
Rectangle/round rectangle/
ellipse/line tools (U)
Paintbrush (B)
Airbrush (J)/Pencil (N)
Type tool (T)
Slice/Slice select tool (K)
Image map tools (P)
Toggle Slices visibility (Q)
Preview in default browser
Toggle image maps visibility (A)
Rollover preview (Y)
Please purchase PDF Split-Merge on www.verypdf.com to remove this watermark.
Appendix
439
in ImageReady, you can construct a sophisticated web page with dynamic content
such as rollover buttons and animations, which in turn can be linked, because the
HTML code associated to the images can be generated on saving.
Figure A2 The Layers palette showing
several layer effects applied to layer 2.
The effects controls are located in the
Layer Options palette, including the
new Gradient/Pattern effect, which
comes with over 50 pre-installed
patterns. You can add your own cus-
tomized designs. These can then be
located inside the Adobe Photoshop
7\Presets\Patterns folder.
Styles
ImageReady supports all the layer effects in Photoshop and also all the vector-based
features like Shape layers and vector masks. For more information on Photoshop
layer effects, refer to Chapter Fifteen. To add a layer style in ImageReady, click on
the effects button (
) at the bottom of the Layers palette and click on one or more of
the options in the effects menu. The layer style options are displayed in the Layer
Options palette. Here you will find the same controls as found in the main Photoshop
program.
Single or combined layer effects can be saved as a Style, which is also a feature of
Photoshop, ImageReady Styles are ideal for generating contoured 3D buttons for a
website and these can be repeatedly applied to all buttons, to maintain continuity
throughout the site. Preset styles are contained in the Styles palette and these can be
further controlled via the Edit > Preset Manager. The examples in Figure A3 were
created by making Shape layers with a type layer added above and different preset
style was applied to each layer. The shape tools include a rectangle, rounded rectangle
and ellipse. As with Photoshop, these tools will create a filled layer clipped by a
vector mask. The shape tool Options bar allows you to modify the roundness of the
rounded rectangle corners or create a fixed size shape. To apply a style, highlight a
layer and double-click a style in the Styles palette, or drag the style thumbnail from
Please purchase PDF Split-Merge on www.verypdf.com to remove this watermark.
Adobe Photoshop 7.0 for Photographers
440
the palette to the image window – this will apply the style to the topmost layer. Or
drag the style thumbnail on to a layer in the Layers palette. If you hold down the
Shift key as you do so, the current layer effects will be preserved, but only if they are
not duplicated by the new style.
You can create your own styles by dragging either an individual effect icon (
) or
Style icon ( ) from the Layers palette to the list in the Styles palette or onto the New
Item button at the bottom of the Styles palette. Or you can highlight the layer in the
Layers palette and click on the New Item button in the Styles palette. To name or
rename a style, go to the Styles palette fly-out menu and choose Style Options...
Styles can be viewed three different ways: Small List, Small Thumbnail and Large
Thumbnail; all views show a swatch indicating the Style, with the smallest icons
being alongside the List. Small Thumbnails is shown below in Figure A3, and Large
Thumbnail shows single icons against a highlighted item in the List.
Figure A3 Examples of filled bitmapped
shape layers created with the shape
tools (see the Tools palette – rectangle,
rounded rectangle and ellipse). A pre-
set style was added to the shape layer
and then a type layer was added above.
A separate style was applied to the
type layer.
Actions
The Actions palette works the same as in Photoshop. It allows you to record a
sequence of steps in ImageReady that can then be replayed on other images or used to
carry out a batch action for a folder of files (the batch options are located in the
Actions palette fly-out menu) and it is also possible to record playing an action within an
action. There are some interesting preset actions installed with ImageReady – the flaming
text example is shown here in Figure A4. But there are also actions which can be used to
generate rollover and animation effects, which are discussed further on in this section.
Please purchase PDF Split-Merge on www.verypdf.com to remove this watermark.
Appendix
441
Image resizing
The image size dialog in ImageReady enables you to resize an image to specific
pixel dimensions or as a percentage of the original size. Normally you will want to
keep the Constrain Proportions option checked. The constrain options include: Width,
which will constrain the proportions to the new width setting; Height, which will
constrain the proportions to the new height setting; and Either, which will constrain
the new size using one or other of the pixel dimensions entered. ‘Either’ is useful
when establishing a batch action in which you wish all the images to fit within the
envelope of a specific pixel size. There are two interpolation options: Jagged, which
is the same as Nearest Neighbor in Photoshop and Smooth (Bicubic) interpolation.
Cropping
The crop tool is similar to the Photoshop crop tool. Use Hide (in the Options bar)
when working on animations where you wish to preserve elements on other layers
which move in and out of the live image area. Use the Image > Trim command to
make a crop removing an outer border based on transparent pixels for instance.
Color management
When you are designing a web page you have to be conscious of the fact that visitors
will be seeing your graphics under a wide variety of monitor viewing conditions.
Photoshop 5.0+ handles color differently compared to previous versions of the pro-
gram (see color management – Chapter Four). In particular, the RGB color you edit
within Photoshop can be in one of a number of spaces. So long as an ICC profile
remains attached to the file, the colors you see in Photoshop can be interpreted correctly
by other ICC savvy programs. Under the View menu, choose Preview > Photoshop
Figure A4 An example of the Flaming Text action.
Please purchase PDF Split-Merge on www.verypdf.com to remove this watermark.