Adobe Photoshop 7.0 for Photographers- P9
Bạn đang xem bản rút gọn của tài liệu. Xem và tải ngay bản đầy đủ của tài liệu tại đây (5.72 MB, 50 trang )
Adobe Photoshop 7.0 for Photographers
380
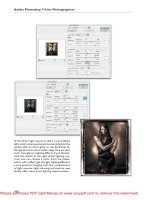
3 So far so good. Now I want to add some glow
to the foliage. It is important that the underlying
image has remained in RGB (because it is the
adjustment layer which is making the monochrome
conversion). I went to the Channels palette and
highlighted the green channel and applied a
Gaussian blur filtration to that channel only. The
result of the full blur is shown opposite. This isn’t
the desired result, so I followed that with an Edit
> Fade Filter command, reducing the blur to a
26% opacity and Screen blend mode.
4 This is the final result after applying the Channel
Mixer adjustment and green channel blur on the
Background layer. To further simulate the infra-
red emulsion, try adding a hefty amount of Gaus-
sian noise filtration to either all three color chan-
nels or the green channel only.
Adding a photographic rebate
This final example combines several of the black and white techniques discussed in
this chapter. If I want to mimic the effect of a photographic type rebate, like that
associated with a Polaroid™ negative emulsion, I will go about this by opening a
prepared scan of such a rebate, add this as an image layer and set the blend mode to
Multiply. The rebate image must have clear 100% white areas. That way, only the
dark areas will show through using the Multiply blending mode.
Please purchase PDF Split-Merge on www.verypdf.com to remove this watermark.
Black and white effects
381
The Levels adjustment layer above it darkens the
image, but I made a rectangular selection feathered
of about 150 pixels and filled with black. Only
the inside edges of the image are now affected
by this adjustment.
The third layer is a specially prepared image layer
made from a Polaroid™ processed shot. This layer
is set to Multiply mode which will successfully
merge the border rebate to blend with the un-
derlying background image. Lastly, a Curves
adjustment layer is added. The red and blue color
channel curves were adjusted to alter the color
balance.
In this example we can see how the combination
of an image layer and three adjustment layers
produce a sepia toned print effect. The back-
ground image has remained in RGB throughout.
The first adjustment layer is a Channel Mixer
adjustment – this layer converts the RGB color
image to monochrome, using a custom mix of
the RGB channel contents.
Client: Tresemme. Model: Stevie at Nevs.
Please purchase PDF Split-Merge on www.verypdf.com to remove this watermark.
Adobe Photoshop 7.0 for Photographers
382
Coloring Effects
Chapter Fourteen
A
t a recent exhibition of digital photography, a visitor was heard to remark:
‘It’s all cheating isn’t it?’ A fair comment I suppose, although one should
realize that photographers and printers were manipulating their images (or
cheating) in darkrooms long before computers came along. The quest for new
photographic styles has always inspired image makers to seek out and develop
fresh techniques like processing films in the wrong chemistry.
It’s all a matter of using any means at your disposal to achieve your ends, which is
why computer manipulation should be seen as just another aspect of the image mak-
ing process. The following techniques begin by emulating the results achieved with
chemicals, but as will be seen, there is ample room for exploration to go further and
create many types of color shifted results. Use the basic formula as a springboard for
new ideas and variations beyond the scope of a wet darkroom.
Photoshop is especially able to handle wild distortions thanks to extended 16-bit
channel support with color adjustments This is now available for a limited range of
Photoshop functions, including basic filters. Extreme or repeated color changes com-
pound the data loss in each color channel – you may not necessarily notice this
unless you later inspect the color channels individually. A Levels histogram readout
will certainly show where gaps in the levels occur. Data gets lost when working at
16-bit too, but crucially when you revert or compress to 8-bit color there is more
than enough data to fill in the gaps. Close analysis will show the difference between
a series of color adjustments made in 16-bit and 8-bit. An 8-bit image may result in
some signs of posterization at certain delicate parts of the image. You will see better
preserved image detail in the 16-bit color manipulated image.
Please purchase PDF Split-Merge on www.verypdf.com to remove this watermark.
Coloring effects
383
Cross-processing
There are two types of cross-processing, both of which gained popularity towards
the late eighties. There was the E-6 transparency film processed in C-41 color nega-
tive chemicals technique and C-41 film processed in E-6. For the latter effect, you
used Kodak VHC film, overexposed by 2 stops and overprocessed by 1 stop. The
highlights became compressed in the yellow and magenta layers, so pure whites
appeared pinky orange and shadow tones contained a strong cyan/blue cast. Most of
the mid to highlight detail (like skin tones) got compressed or lost. It was a very
popular technique with fashion and portrait photographers who were fond of bleach-
ing out skin tones anyway. In fact, Kodak designed this emulsion specifically for
wedding photographers. This was in order to cope with the high contrast subject
tones of black morning suits and white bridal gowns. The sales of VHC rocketed.
Kodak must have assumed the new demand was coming from their traditional wed-
ding market base, so set about improving the VHC emulsion after which VHC did
not cross-process so effectively unfortunately. From a technical standpoint, the
manipulation of silver images in this unnatural way is destructive. I have had to scan
in cross-processed originals and typically there are large missing chunks of data on
the histogram. The digital method of manipulating images to such extremes carries
its own risks too. It is all too easy to distort the color in such a way that image data
slips off the end of the histogram scale and is irrevocably lost. Having said that, the
digital method has the added benefit that you can be working on a copy file and so
therefore the original data is never completely thrown away. Secondly, you are in
precise control of which data is to be discarded, taking the hit or miss element out of
the equation.
I have looked at several methods of imitating the cross-processed look in Photoshop
and concluded that Curves adjustments are probably the best method with which to
demonstrate these particular techniques. Figure 14.1 replicates the C-41 film pro-
cessed in E-6 effect. Notice the adjustment of the highlight points in the red and blue
channels – this creates the creamy white highlight and the curve shape of the lower
portions of the red and blue channels produces the cross-curved color cast in the
shadows.
The curves in Figure 14.2 show that the tonal range is uncompressed. A contrast
increasing curve is introduced to both the red and green channels, while the blue
channel has a complementary shaped contrast-reducing curve – this again creates a
cross-curved color cast, as in Figure 14.1. But overall Figure 14.2 produces a more
contrasty outcome, similar to the effect of processing E-6 transparency film pro-
cessed in C-41 color negative chemicals.
Please purchase PDF Split-Merge on www.verypdf.com to remove this watermark.
Adobe Photoshop 7.0 for Photographers
384
Figure 14.1 The C-41 film processed in E-6 chemicals cross-processing color effect.
Client: West Row, Leeds.
Please purchase PDF Split-Merge on www.verypdf.com to remove this watermark.
Coloring effects
385
Figure 14.2 The C-41 film processed in E-6 chemicals cross-processing color effect.
Model: Ane Linge. Photograph by Thomas Fahey.
Please purchase PDF Split-Merge on www.verypdf.com to remove this watermark.
Adobe Photoshop 7.0 for Photographers
386
Channel Mixer adjustments
As the Photoshop program develops, so you adapt your way of working. The Chan-
nel Mixer can achieve the sort of coloring effects that once could only be done with
the Apply Image command. The Channel Mixer is an interesting image adjustment
tool, which alters the image by swapping color channel information, sometimes pro-
ducing quite unique and subtle color adjustments which cannot necessarily be achieved
with the other color adjustment tools. Controlling the Channel Mixer is no easy task.
The example here shows you how to make a photograph appear to have been taken at
sunset and make the scene appear to have richer, golden colors.
1 This image is correctly color balanced, but it
lacks the drama of a golden warm sunlit image.
One answer would be to adjust the overall color
balance by applying a curves correction. The
Channel Mixer, however, offers a radically
different approach, it allows you to mix the color
channel contents and does so on-the-fly.
2 Examine the Channel Mixer settings shown be-
low. The main color enhancement occurs in the
red channel. I boosted the red channel to 125%,
mixed in a little of the green channel and sub-
tracted 34% with the blue channel. Very slight
adjustments were made to the green and blue
channels, but you will notice how the green and
blue channel percentages remained anchored
close to 100%.
Please purchase PDF Split-Merge on www.verypdf.com to remove this watermark.
Coloring effects
387
Color overlays
There are various ways you can colorize an image in Photoshop and my favorite
method is to add a solid color fill layer from the adjustment layer menu in the Layers
palette and alter the layer blending mode to either Color or Overlay mode.
The Overlay blend mode generally produces the most satisfying results. Try adding
a solid color fill layer, set the blend mode to Overlay (or Color for a slightly more
washed-out look) and reduce the opacity to 20–30%. The Color blending mode is
grouped with Luminosity, Hue and Saturation. Each of these blending modes oper-
ates along a similar principle: an HSB component of the pixel values of the blend
layer replaces those of the underlying pixels. HSB refers to Hue, Saturation and
Brightness (luminosity). The following technique illustrates how you can combine a
color gradient fill in an Overlay blend mode to simulate the effect of filtering the
light that is used to light the subject in a photograph.
1 This is a fairly simple technique to reproduce,
which uses a Gradient Fill layer to simulate the
effect of lighting a subject with strong colored
gels. To reproduce the technique shown here,
the subject has to be shot against a white back-
ground. Go to the Layers palette and click on
the Adjustment layer button and choose Gradi-
ent Fill. It doesn’t matter which gradient loads
to start with. Close the gradient dialog and
change the blend mode for the Gradient Fill layer
to Overlay and maybe reduce the Opacity per-
centage down to 66%. Now double-click the
Gradient Fill layer (I also selected the radial gra-
dient option) and choose a suitable color gradi-
ent. In this example I chose Blue, Red, Yellow and
I checked the Dither checkbox.
Please purchase PDF Split-Merge on www.verypdf.com to remove this watermark.
Adobe Photoshop 7.0 for Photographers
388
2 If the gradient was seen in
Normal blend mode it would
look like this. But because it is
set to Overlay blend mode we
get a nice colorized effect as
shown in the next diagram.
3 When the Align with layer
checkbox is left unchecked and
you move the cursor over to the
document window, it will change
to become a move tool and en-
able you to position the gradi-
ent anywhere you please in the
image. To change gradient set-
tings, click on the gradient bar in
the Gradient Fill dialog. You can
use the Scale setting to scale the
proportions of the gradient.
Please purchase PDF Split-Merge on www.verypdf.com to remove this watermark.
Coloring effects
389
Color mode: The hue and saturation values of the blend layer are combined with the
luminosity of the underlying layers. The effect is to colorize the layers below.
Hue mode: Only the hue values of the blend layer are combined with the underlying
saturation and luminosity values. The layers beneath are colorized, but the saturation
of the base image is retained.
Saturation mode: The saturation values of the blend layer replace those of the un-
derlying layer. A pastel colored overlay layer will cause the underlying layers to
become desaturated, but not alter the hue or luminosity values.
Luminosity mode: The brightness values of the blend layer replace those of the
underlying, but do not effect the hue and saturation.
Retouching with overlays
Let’s look at more ways these and other overlay blending modes can be applied
when retouching a photograph. Suppose you have a landscape picture and are look-
ing for a simple method to remove the clouds from the sky. Cloning with the clone
stamp tool or cutting and pasting feathered selections could possibly work, but you
would have to be very careful to prevent your repairs from showing. For example,
how will you manage to clone in the sky around the branches and leaves?
The sky is graduated from dark blue at the top to a lighter blue on the horizon. The
easiest way to approach this task is to fill the sky using a gradient set to the Darken
blending mode. The foreground and background colors used in the gradient are
sampled from the sky image. Darken mode checks the pixel densities in each color
channel. If the pixel value is lighter than the blend color it gets replaced with the
blend color. In the accompanying example, the clouds (which are lighter than the fill
colors) are removed by a linear gradient fill. The trees, which are darker than the
fill colors, are left almost completely unaltered. To apply a gradient fill, I clicked the
fill layer button at the bottom of the Layers palette and chose Gradient. The Gradient
type was Foreground to Background, and I changed the fill layer blending mode to
Darken. Before I did this, I loaded the blue channel as a selection. The Blue channel
contains the most contrast between the sky and the trees. When a selection is active
and you add a new fill or adjustment layer, or you click on the Add layer mask
button, a layer mask is automatically added which reveals the selected areas only. As
with adjustment layers, fill layers can be adjusted on-the-fly while retaining the layer
masking.
Please purchase PDF Split-Merge on www.verypdf.com to remove this watermark.
Adobe Photoshop 7.0 for Photographers
390
1 The before picture contains a cloudy sky. Sample
colors from the top of the sky and from the horizon
to set the foreground and background colors.
2 Load the blue channel as a selection and click
on the Create new fill button at the bottom of
the Layers palette to add a new gradient fill layer.
The Gradient Fill dialog opens. Click OK to add
a new layer using the Foreground to Background
gradient at the angle shown. Then set the fill layer
to Darken blending mode. The pre-loaded selec-
tion will have added a layer mask to hide the
tree branch outlines.
Please purchase PDF Split-Merge on www.verypdf.com to remove this watermark.
Coloring effects
391
Overlay blending mode at 40%.Normal blending mode at 45%.
Figure 14.3 The above examples show how various types of gradient layers can be applied to a color
image as a Gradient Map and how the original photograph can be radically colored in many different
ways. The Noise gradients can look very interesting as well. In most cases, I have discovered that it
pays to fine tune the smoothness and shape of the gradient using the gradient edit options and also to
experiment with the layer blending modes.
Client: Crescendo Ventures. Agency: Moline Willett.
Gradient Map coloring
Please purchase PDF Split-Merge on www.verypdf.com to remove this watermark.
Adobe Photoshop 7.0 for Photographers
392
Layer Effects
Chapter Fifteen
T
his chapter shows you some of the special things you can now do in Layers
and how these features will be of use to image makers as well as designers
working in graphics or web design. Layer effects enable multiple (and revers-
ible) Photoshop layering actions. This is a wonderful tool with which to automate
the application of various Photoshop effects like embossing or adding a drop shadow.
Layer effects can be used in various ways: applying effects to an image element on a
layer; text effects with a type layer; and creating special painting effects where an
empty layer can have layer effects active and anything painted in that layer will have
the effect applied as you add image data to it.
Layer effects and Styles
In Photoshop you can add various layer effects to any of the following: a type layer;
an image layer; or a filled layer masked by either a vector mask or a layer mask. The
individual layer effects can be accessed via the Layer menu or by clicking on the
Add a layer style button at the bottom of the Layers palette. Layer effects can be
applied individually or as a combination of effects and these can be saved to become
a ‘layer Style’ and added to the Styles palette presets. Layer effects are fully editable
and will follow any edits you make to the type or the contents of a layer. When you
add a new effect, the Layer Style dialog will open and allow you to adjust the effect
settings. After creating a new layer effect, an italicized
symbol appears in the layer
caption area with a layer called ‘Effects’ and an itemized list of all the effects below.
Double-clicking the layer/layer effect name or
symbol reopens the Layer Style dialog.
Drag and drop the ‘Effects’ layer to copy the effects to another layer.
Please purchase PDF Split-Merge on www.verypdf.com to remove this watermark.
Layer effects
393
Drop Shadow
As you can see, there are quite a range of options associated with each layer effect.
The Drop Shadow uses the Multiply blending mode to make the shadow with the
default color set to black. Now obviously you can change these parameters, so the
effect can become something like a drop glow instead, applied using any color you
want and with varying opacities. Below this is the angle setting, where you can
either enter a numeric value or use the rotary control to manually set the shadow
angle. The Use Global Angle comes into play when you want to link the angle set
here with those used in the Inner Shadow and the Bevel and Emboss layer effects
and that of any other Layer Styles layers. Deselect this option if you want to set the
angles independently. You can also adjust the drop shadow angle and position by
simply dragging with the cursor in the document window area. Below this are the
shadow distance and blur controls.
Inner Shadow
The Inner Shadow controls are more or less identical to the Drop Shadow effect. The
only difference being that this applies a shadow within the layered type or object
area. The result may appear to be either that of a recessed shadow or will give a
convex 3D appearance to the layer object. It all depends on the angle you choose and
the size and distance of the shadow. The shadow and glow effects feature a Noise
slider. At one level this will reduce the risk of banding, but the noise can also be used
to add a grainy texture to your layer style.
Please purchase PDF Split-Merge on www.verypdf.com to remove this watermark.
Adobe Photoshop 7.0 for Photographers
394
Outer Glow and Inner Glow
These both have similar controls. The Outer Glow is very much like the Drop Shadow,
but is defaulted to the Screen blending mode, spreading evenly outwards from the
center; you could say that the Inner Glow corresponds with the Inner Shadow effect.
The glow layer effects can apply either a solid or a gradient-based glow. The Inner
Glow contains options for edge and center glows. Used in conjunction with the Inner
Shadow, you can achieve a very smooth 3D ‘contoured’ appearance with the centered
Inner Glow setting. Note the Spread and Choke controls that are available with the
shadow and glow effects.
Please purchase PDF Split-Merge on www.verypdf.com to remove this watermark.
Layer effects
395
Bevel and Emboss
This adds a highlight and a shadow edge 180 degrees apart from each other. When
you adjust the height or angle settings of the light, the two move in sync, creating an
illusion of depth. There are many options here – the bevel style can be applied to create
an outer bevel, an inner bevel, or pillow emboss. The embossing technique can be
‘chisel hard’ or ‘soft’. There are some interesting Gloss Contour options in the shading
section which can produce metallic-looking effects and you can also add a contour
separately to the bevel edge and add an ‘embossed’ pattern texture to the surface.
Satin
This can add a satin type finish to the surface of the layer or type. You will want to adjust
the distance and size to suit the pixel area of the layer you are applying the effect to.
Please purchase PDF Split-Merge on www.verypdf.com to remove this watermark.
Adobe Photoshop 7.0 for Photographers
396
Gradient Overlay
This will add a gradient fill. Separate opacity and blend modes can be applied to create
subtle combinations of coloring. Use Align with layer to center align the gradient to
the middle of the layer. The scale option will enlarge or shrink the spread of the gradient.
As with other effects, the settings can be adjusted by dragging in the window area.
Pattern Overlay
Select a saved pattern from the presets. The opacity and scale sliders will modify the
appearance of the overlay pattern. Use ‘Link with Layer’ to lock the pattern relative
to the layer object.
Please purchase PDF Split-Merge on www.verypdf.com to remove this watermark.
Layer effects
397
Stroke
The Stroke effect applies a stroke to the outline of the layer or text with either a
color, a gradient or a pattern. The options in this dialog are similar to those in the
Edit > Stroke command, except as with all layer effects, the stroke is scalable and
will adapt to follow any edits or modifications made to the associated layer.
Color Overlay
This Layer effect will add a color fill overlay to the layer contents. You are able to
vary the opacity and change the blending mode.
Please purchase PDF Split-Merge on www.verypdf.com to remove this watermark.
Adobe Photoshop 7.0 for Photographers
398
Applying layer styles to image layers
The illustrations opposite show how you can add layer effects and styles to image
layers. Layer effects operate in the same way as adjustment layers do – they create a
live preview of the final effect and only when you flatten down the layer are the
pixels modified and does the effect become fixed. Layer effects are not scalable in
the same way as the image data is. If you resize the image the Layer effect settings will
not adapt, they will remain constant. If you go to the Layer menu and choose Layer Style
> Scale Effects, you will have the ability to scale the effects up or down in size. The layer
effect parameters in Photoshop are now large enough to suit high-resolution images.
In the Layer Styles dialog you can select or deselect the global angle to be used by all
the other layer effects. Although normally the effects work best when the same glo-
bal angle is used throughout (the global light setting can be established in the Layer
> Layer Styles menu). The Create Layers option is also in the Layer Styles menu
options. This will deconstruct a layer style into its separate components. You can use
this to edit individual layer elements if so desired. Layer effects and styles can be
shared with other files or other layers. Select a layer that already has a style applied
to it. Go to the Layer Styles submenu and choose Copy Layer Style, then select a
different layer and choose Paste Layer Style from the same submenu.
Creating Styles
Figure 15.1 When you add a new
layer effect, the effect will appear in a
list below the layer in the Layers pal-
ette in the same descending order that
the layer effects appear in the Layer
Styles dialog. Each effect has its own ‘f’
effect icon and the effect can be made
visible or invisible by toggling the eye
icon next to it in the Layers palette.
Or you can hide all of the effects at
once by clicking on the eye icon next to
‘Effects’. When you have found an effect
setting or a combination of settings
which you would like to keep, you can
save these as a style via the Layer Style
dialog. Click on the New Style button
and give the style a name and it will be
appended in the Styles palette. There
are several preset styles that you can load
in Photoshop 7.0. The Styles palette
shown opposite contains the ‘Textures’
Styles presets using the Large Thumb-
nail view setting.
Please purchase PDF Split-Merge on www.verypdf.com to remove this watermark.
Layer effects
399
1 Layer effects can be used to add glows and
shadows to a type layer but Layer effects can
work equally well on pixel image layers too. An
EPS logo is first imported into Photoshop using
the File > Place command. After resizing, hitting
the Return or Enter key will rasterize the vector
art as an image layer. A series of Layer effects
were applied to the layer to create a new layer
style.
2 In more detail, Bevel and Emboss, Inner Glow
and Inner Shadow Layer styles were applied to
the image layer. The global angle settings were
deselected so that the Inner Glow angle was
separate to the Bevel and Emboss angle. Note
that the angle controls in the Bevel and Emboss
dialog contain adjustments for both the lighting
angle and the attitude of the light source.
3 If a layer mask is added to the layer you can
then mask out portions of the layer contents. The
combined layer effects in the layer style will adapt
to follow the new contours and update as the layer
contents change. When painting in the layer mask,
the layer style adapts to follow the mask outline.
Please purchase PDF Split-Merge on www.verypdf.com to remove this watermark.