Tài liệu Adobe Photoshop 7.0 for Photographers- P7 doc
Bạn đang xem bản rút gọn của tài liệu. Xem và tải ngay bản đầy đủ của tài liệu tại đây (4.19 MB, 50 trang )
Adobe Photoshop 7.0 for Photographers
280
Montage Techniques
Chapter Eleven
C
onfusion often arises when trying to understand the relationship between
alpha channels, masks, Quick mask mode and selections. Let me help ease
the learning curve by saying they are interrelated and essentially all part of
the same thing. That is to say, a selection can be viewed as a Quick mask or saved as
an alpha channel (also referred to as a mask channel). An alpha channel can be con-
verted to make a selection, which in turn can be viewed back in Quick mask mode.
Also discussed later in this chapter is the use of image layer masks and vector masks
and how to draw paths with the pen tool and convert these to selections.
Selections and channels
So when you read somewhere about masks, mask channels, image layer mask
channels, alpha channels, Quick masks and saved selections, the writer is basically
describing the same thing: either an active, semipermanent or permanently saved
selection. We will begin with defining a selection. There are several tools you can
use to do this – the marquee, lasso, magic wand and Select > Color Range. The
marquee comes in four flavors: rectangular, oval, single pixel horizontal row and
vertical column. The lasso has three modes – one for freehand, another for polygon
(point by point) drawing and a magnetic lasso tool. When you use a selection tool to
define an area within an image (see Figure 11.1), you will notice that a selection is
defined by a border of marching ants. Selections are only temporary. If you make a
selection and accidentally click outside the selected area with the selection tool, it
will disappear – although you can restore the selection with Edit > Undo (Command/
Ctrl-Z).
Please purchase PDF Split-Merge on www.verypdf.com to remove this watermark.
Montage techniques
281
During a typical Photoshop session, I will draw basic selections to define areas of
the image where I want to carry out image adjustments and afterwards deselect them.
If you end up spending any length of time preparing a selection then you will usually
want to save the selection as an alpha channel (also referred to as a mask channel). To do
this, choose Save Selection from the Select menu. The dialog box will ask if you want to
save as a new selection. Doing so creates a brand new alpha channel. If you check the
Channels palette, you will notice the selection appears there labeled as an alpha channel
(#4 in RGB mode, #5 if in CMYK mode). To reactivate this saved selection, choose
‘Load Selection’ from the Select menu and select the appropriate channel number from
the submenu, or Command/Ctrl-click the alpha channel in the Channels palette.
You don’t have to use the selection tools at all. You can also create a new alpha channel
by clicking on the Make New Channel button at the bottom of the Channels palette
and fill the empty new channel with a gradient or paint in the alpha channel with a
painting tool using the default white or black colors. This new channel can then be
converted into a selection. In between masks and selections we have what is known
as a Quick mask. To see how a selection looks as a mask, switch to Quick mask mode
(click on the right-hand icon third up from the bottom in the Tools palette). Now you
see the selection areas as a transparent colored overlay mask. If the mask color is too
similar to the subject image, double-click the Quick mask icon, click on the Color box in
the opened dialog and choose a different color with the Color Picker. In Quick mask
mode (or when working directly on the alpha
channel) you can use any combination of
Photoshop paint tools, Image adjust commands
or filters to modify the alpha channel content.
To revert from a Quick mask to a selection, click
the selection icon in the Tools palette (a quick
tip is to press ‘Q’ to toggle between the two
modes). To reload a selection from the saved
mask channel, go Select > Load Selection.
Command/Ctrl-clicking a channel is the other
shortcut for loading selection and by extension,
combining Option/Alt+Command/Ctrl-channel
# (where # equals the channel number) does
the same thing. Alternatively you can also drag
the channel icon down to the Make Selection
button in the Channels palette.
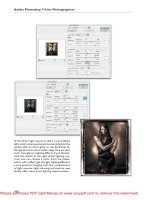
Figure 11.1 The right half of the image shows a feathered selection (feathering is discussed later in
this chapter) and the left half the Quick mask mode equivalent display.
Please purchase PDF Split-Merge on www.verypdf.com to remove this watermark.
Adobe Photoshop 7.0 for Photographers
282
Summary of channels and selections
Selections
In marching ants mode, a selection is active and available for use. All image modifi-
cations made will be effective within the selected area only. Selections are tempo-
rary and can be deselected by clicking outside the selection area with a selection tool
or choose Select > Deselect (Command/Ctrl-D).
Quick mask mode
A semipermanent selection, whereby you can view a selection as a transparent
colored mask overlay. To switch to Quick mask mode from a selection, click on the
Quick mask icon in the Tools palette or use the keyboard shortcut ‘Q’ to toggle
between selection and Quick mask mode. Quick mask modifications can be carried
out using any of the fill or paint tools.
Alpha channels
A selection can be stored as a saved selection, converting it to become a new alpha
channel (Select > Save Selection). A selection can be reactivated by loading a selec-
tion from the saved channel (Select > Load Selection). Alpha channels, like color
channels, contain 256 shades of gray, 8-bit information. An anti-aliased selection, or
one that has been modified in Quick mask mode with the fill and paint tools, will
contain graduated tonal information. An active alpha channel (click on the channel
in the Channels palette to make it active) can be manipulated any way you want in
Photoshop. A saved channel can be viewed as a colored transparent mask, overlay-
ing the composite channel image, identical in appearance to a Quick mask. To view
this way, highlight the chosen mask channel to select it and click on the eye icon next
to the composite channel.
Work paths
A work path can be created in Photoshop using the pen tool in work path mode. A path
is (among other things) an alternative method for defining an image outline. A work
path (closed or not) can be converted to a foreground fill, stroke or a selection. For
example, in the Paths palette, drag the path icon down to one of the buttons such as
the Make Selection button. An active selection can be saved as a path – choose Make
Path from the Paths palette submenu. Saving a selection as a path occupies just a few
Please purchase PDF Split-Merge on www.verypdf.com to remove this watermark.
Montage techniques
283
Figure 11.2 The above diagram shows the relationship between selections, channels, paths and layers.
A selection can be saved as a
mask channel or as a path
(choose Make Work Path from
the Paths palette submenu).
Paths and mask channels can be
converted back to selections.
When a selection is active
(shown by the marching ants
surrounding the border), only
the pixels inside the selection
area will be modified by further
Photoshop commands.
Duplicate the background layer,
load the alpha 1 channel as a
selection and click on the Add
a mask button. This will add a
layer mask to the active layer
and reveal the selection area.
An active selection can be
viewed in Quick mask mode,
shown here as a semitransparent
red color. Double-click on the
Quick mask icon and click on
the color box, and you can choose
a different color from the picker.
Making a new ‘Layer via Copy’
based on an active selection
creates a new layer. The back-
ground is switched off and the
transparent areas are shown as
a checkerboard pattern.
Please purchase PDF Split-Merge on www.verypdf.com to remove this watermark.
Adobe Photoshop 7.0 for Photographers
284
kilobytes of file space. This is only more economical than saving as an alpha channel if
you are saving in the TIFF format. Paths cannot save graduated tone selections though. A
saved path can only generate a non-anti-aliased, anti-aliased or feathered selection, but
we’ll come to that later on in the chapter. A path can be used to define a vector mask
(which will mask a layer’s contents) or it can be used in Create Shape Layer mode to add
a filled layer which is auto masked as you define a path outline.
Modifying selections
As was mentioned in Chapter Six, to modify the content of a selection you need to
learn how to coordinate the use of the modifier keys with the dragging of the mouse
as you define a selection. To add to a selection with a selection tool, hold down the
Shift key as you drag. To subtract from a selection with a selection tool, hold down
the Option/Alt key as you drag. To intersect a selection with a selection tool, hold
down the Shift+Option/Alt keys as you drag. Placing the cursor inside the selection
and dragging moves the selection boundary position, but not the selection contents.
The magic wand is a selection tool too – click with the wand, holding down the appropri-
ate key(s) to add or subtract from a selection.
To expand or shrink a selection, choose Select > Modify > Expand/Contract. Selections
can be modified up to a maximum of 100 pixels (but produces angled corners when
expanding a rectangular marquee selection). Other options include Border and
Smooth. To see how these work, make a selection and choose Select > Modify options.
Enter various pixel amounts and inspect the results by switching from selection to
Quick mask mode. The border modification feature is rather crude and can be improved
by applying feathering or saving the selection as a channel and filtering with Gaussian
blur. An example of a border modification is featured in the Extract tutorial on page 323.
Smoothing and enlarging a selection
Selections that are made using the magic wand or Color Range method, under close
inspection are rarely complete. The Smooth option in the Select > Modify submenu
addresses this by enabling you to smooth out the pixels selected or not selected to the
level of tolerance you set in the dialog box.
The Grow and Similar options enlarge the selection using the same criteria as with
the magic wand tool, regardless of whether the original selection was created with
the wand or not. To determine the range of color levels to expand the selection by,
enter a tolerance value in the Options palette. A higher tolerance value means that a
wider range of color levels will be included in the enlarged selection.
Please purchase PDF Split-Merge on www.verypdf.com to remove this watermark.
Montage techniques
285
The Select > Grow option expands the selection, adding contiguous pixels, i.e. those
immediately surrounding the original selection of the same color values within the
specified tolerance. The Select > Similar option selects more pixels from anywhere
in the image of the same color values within the specified tolerance.
Anti-aliasing and feathering
All selections and converted selections are by default anti-aliased. A bitmapped im-
age consists of a grid of square pixels. Without anti-aliasing, a diagonal line would
be represented by a sawtooth of jagged pixels. Photoshop gets round this problem by
anti-aliasing the edges – filling the gaps with in-between tonal values. All non-vertical/
1 The objective here is to make a simple soft
edged selection based on tonal values and change
the color of the background slightly. Use the
magic wand tool to make a selection of the back-
drop. A tolerance setting of 25 was used. Enlarge
the selection locally by choosing Select > Grow.
Note that the amount of growth is governed by
the tolerance values linked to the magic wand
tool options.
2 The magic wand tool may not select all the
desired backdrop pixels. Choose Select > Modify
> Smooth, entering a Radius value of between 1
and 16. The selection is now a lot smoother.
Smooth works like this: if the Radius chosen was
5, Photoshop will examine all pixels with an 11 ×
11 pixel block around each pixel. If more than
half are selected, any stray pixels will be selected
as well. If less than half are selected, any stray
pixels will be deselected.
Please purchase PDF Split-Merge on www.verypdf.com to remove this watermark.
Adobe Photoshop 7.0 for Photographers
286
horizontal sharp edges are rendered smoother by this process. Therefore anti-aliasing
is chosen by default. There are only a few occasions when you may wish to turn it
off. Sometimes you have an 8-bit image which resembles a 1-bit data file (say an
alpha channel after you have applied the Threshold command) which needs to be
anti-aliased. If it is just a small portion that requires correction, use the blur tool to
lightly soften the edge, otherwise follow the technique on the following page.
Anti-aliasing sorts out the problem of jagged edges. Selections usually need to be
softened more than this. It is obvious when a photograph has been retouched or
montaged, when the edges of a picture element are too sharply defined – the result
looks unnatural. The secret of good compositing lies in keeping the edges of your
picture elements soft. Study a scanned image in close-up and even the sharpest of
images display smooth tonal gradation across the image edges.
To soften a selection edge, go to the Select menu, choose Feather and enter the pixel
radius value to feather by. A value between 1.0 or 2.0 is enough to dampen the sharp-
ness of a selection outline, but you can select a much higher radius. For example, if
you want to create a custom vignette effect, use the lasso tool to define the outline,
feather the selection heavily (50–100 pixels or more depending on file size), invert
the selection and apply a Levels or Curves adjustment. This will enable you to lighten
or darken the outside edges with a smooth vignette. See Figure 11.1 for an example
of a feathered selection seen in marching ant and Quick mask mode.
Photograph by Eric Richmond.
3 With the selection satisfactorily complete, hide
the selection edges (View > Hide Extras) and
open the Hue/Saturation dialog box. Adjust the Hue
and Saturation sliders to color the selected area.
Please purchase PDF Split-Merge on www.verypdf.com to remove this watermark.
Montage techniques
287
Layers
Layers are like image layers on acetate overlaying the base background image. Fig-
ure 11.2 shows an example of a layered image. You can now add as many new layers
as you like to a document up to a new limit of 8000. Every time you drag and drop
the contents from one document window into another using the move tool, it be-
comes a new layer in the destination document. New empty layers can be created by
clicking the New Layer button in the Layers palette. A new layer can also be made
based on a selection. Choose Layer > New via copy (Command/Ctrl-J). This will
‘float’ the selection contents, duplicating them to become a new layer in register
with the image below. Layers are individually controllable image elements. In any
1 Apply a 1 pixel Gaussian blur filter to the alpha
channel only.
2 Apply a Levels adjustment using the follow-
ing settings: set the shadow point to 65, the gamma
setting to 1.0 and highlight point at 190.
Please purchase PDF Split-Merge on www.verypdf.com to remove this watermark.
Adobe Photoshop 7.0 for Photographers
288
Figure 11.3 This is an overview of the Photoshop 7.0 Layers palette. Note how the layers that
belong to a set are colored a light gray in the layer stack and also indented. Photoshop allows you to
label layers with different colors. The type and layer effect/style features are discussed in greater
detail in Chapter Fifteen.
multilayered document, you can selectively choose which layers are to be viewed
(by selecting and deselecting the eye icons), link layers together in groups, arrange
groups of layers into layer sets, merge linked layers or merge just those that are
visible. To rename a layer in Photoshop 7.0, simply double-click the layer name. The
same is also now true for the Paths and Channels palettes. Layers are easily dis-
carded – just drag the layer icon to the Layers palette delete button. In Photoshop 7.0
there is now a Delete Hidden Layers command in both the Layers palette submenu
and the Layer > Delete submenu. To duplicate a layer, drag the layer icon to the New
Layer button.
Add layer effects
Add layer mask
Create new set
Create new fill/adjustment layer
Create new layer
Delete current layer/layer mask/vector mask/effect
Layer set 1 contains the four layers below.
Text layer symbolized with the capital ‘T’.
Layer style associated with the above text
layer, indicated by an italicized
.
Shape layer with linked vector mask. It is fully
locked as part of a clipping group. Visibility is off.
Image layer with a linked layer mask. Lock Trans-
parency is on, it is also locked in position and
linked with the above two layers.
Curves adjustment layer, with layer visibility
switched off. This layer forms a clipping group.
The Background layer.
Blending mode
Lock Transparency
Lock Pixels
Layer opacity
Full Layer locking
Lock Layer
Fill opacity.
Please purchase PDF Split-Merge on www.verypdf.com to remove this watermark.
Montage techniques
289
Normal
This is the default mode. Changing opacity simply
fades the intensity of overlaying pixels by averag-
ing the color pixels of the blend layer with the
values of the composite pixels below (Opacity
set to 80%).
Dissolve
Combines the blend layer with the base using a
randomized pattern of pixels. No change occurs
when using Dissolve at 100% opacity. As the
opacity is reduced, the diffusion becomes more
apparent (Opacity set to 80%).
Multiply
Multiplies the base by the blend pixel values,
always producing a darker color, except where
the blend color is white. The effect is similar to
viewing two transparency slides sandwiched
together on a lightbox.
Blending modes
Photoshop layers can be blended with those layers underneath by using any of
the twenty two different blending modes available. It helps if you understand and
can anticipate the effect an alteration in the blending mode will have upon the
final image. The next few pages provide visual examples and a brief description
of each of the blending modes in Photoshop. These blending modes are also
available as mode options for the painting and fill tools.
Darken
Looks at the base and blending colors and color
is only applied if the blend color is darker than
the base color.
Please purchase PDF Split-Merge on www.verypdf.com to remove this watermark.
Adobe Photoshop 7.0 for Photographers
290
Lighten
Looks at the base and blending colors and color
is only applied if the blend color is lighter than
the base color.
Color Dodge
Brightens the image using the blend color. The
brighter the color, the more pronounced the
effect. Blending with black has no effect (Opacity
set to 80%).
Color Burn
Darkens the image using the blend color. The
darker the color, the more pronounced the effect.
Blending with white has no effect.
Screen
Multiplies the inverse of the blend and base pixel
values together, always making a lighter color,
except where the blend color is black. The effect
is similar to printing with two negatives
sandwiched together in the enlarger.
Linear Burn
The Linear Burn mode produces an even more
pronounced darkening effect than Multiply or
Color Burn. Note that the Linear Burn blending
mode will clip the darker pixel values. Blending
with white has no effect.
Please purchase PDF Split-Merge on www.verypdf.com to remove this watermark.
Montage techniques
291
Overlay
This plus the following five blend modes, should
be grouped together as variations on the theme
of projecting one image on top of another. The
Overlay blending mode is usually the most effec-
tive, superimposing the blend image on the base
(multiplying or screening the colors depending
on the base color) whilst preserving the high-
lights and shadows of the base color. Blending
with 50% gray has no effect.
Soft Light
Darkens or lightens the colors depending on the
base color. Soft Light produces a more gentle
effect than the Overlay mode. Blending with 50%
gray has no effect.
Hard Light
Multiplies or screens the colors depending on
the base color. Hard Light produces a more
pronounced effect than the Overlay mode.
Blending with 50% gray has no effect.
Linear Dodge
This blending mode does the opposite of the
Linear Burn tool. It produces a stronger lighten-
ing effect than Screen or Lighten, but will clip
the lighter pixel values. Blending with black has
no effect.
Please purchase PDF Split-Merge on www.verypdf.com to remove this watermark.
Adobe Photoshop 7.0 for Photographers
292
Difference
Subtracts either the base color from the blend-
ing color or the blending color from the base,
depending on whichever has the highest
brightness value. In visual terms, a 100% white
blend value will invert (i.e. turn negative) the base
layer completely, a black value will have no effect
and values in between will partially invert the
base layer. Duplicating a background layer and
applying Difference at 100% will produce a black
image. Dramatic changes can be gained by
experimenting with different opacities. An
analytical application of Difference is to do a pin
register sandwich of two near identical images
to detect any image changes – such as a com-
parison of two images in different RGB color
spaces, for example.
Linear Light
Applies a Linear Dodge or Linear Burn blending
mode, depending on the base color. Linear Light
produces a slightly stronger effect than the Vivid
Light mode. Blending with 50% gray has no ef-
fect.
Vivid Light
Applies a Color Dodge or Color Burn blending
mode, depending on the base color. Vivid Light
produces a stronger effect than Hard Light mode.
Blending with 50% gray has no effect.
Pin Light
Applies a Lighten blend mode to the lighter colors
and a Darken blend mode to the darker colors.
Pin Light produces a stronger effect than Soft
Light mode. Blending with 50% gray has no effect.
Please purchase PDF Split-Merge on www.verypdf.com to remove this watermark.
Montage techniques
293
Hue
Preserves the luminance and saturation of the
base image, replacing with the hue of the blending
pixels.
Saturation
Preserves the luminance and hue of the base
image, replacing with the saturation of the blend-
ing pixels.
Color
Preserves the luminance values of the base image,
replacing the hue and saturation values of the
blending pixels. Color mode is particularly suited
for hand coloring photographs.
Luminosity
Preserves the hue and saturation of the base
image while applying the luminance of the
blending pixels.
Exclusion
A slightly muted variant of the Difference blend-
ing mode. Blending with pure white will invert
the base image.
Please purchase PDF Split-Merge on www.verypdf.com to remove this watermark.
Adobe Photoshop 7.0 for Photographers
294
Masking layers
There are two ways to mask a layer in Photoshop. Portions of the layer image can be
removed by adding either a layer mask or a vector mask to the individual layer,
which will hide the layer contents. Layer masks are defined using a pixel-based
mask while vector masks are defined using path outlines. Either method (or both)
can be used to mask unwanted areas in a layer, and do so without permanently erasing
the layer contents. By using a layer mask to hide rather than erase unwanted image areas,
you can go back and change the mask at a later date. Or if you make a mistake when
editing the layer mask, it is easy to correct mistakes – you are not limited to a single level
of undo.
Adding an empty image layer mask
If you create an empty layer mask (one that is filled with white) on a layer, you can
hide pixels in a layer using the fill and paint tools. To add a layer mask to a layer with
all the layer remaining visible, click the Layer Mask button in the Layers palette.
Alternatively, choose Layer > Add Layer Mask > Reveal All. To add a layer mask to
a layer that hides all the pixels, Option /Alt-click the Add Layer Mask button in the
Layers palette. Alternatively, choose Layer > Add Layer Mask > Hide All. This will
add a layer mask filled with black.
Adding an image layer mask based on a selection
To add a layer mask based on a selection, highlight a layer, make the selection active
and click on the Add Layer Mask button at the bottom of the Layer menu. Or, choose
Layer > Add Layer Mask > Reveal Selection. To add a layer mask to a layer with the
area within the selection hidden, choose Layer > Add Layer Mask > Hide Selection.
Or Option/Alt-click the Layer Mask button in the Layers palette. Choosing ‘Add
Layer Mask > Reveal Selection’ was how I created the top layer in Figure 11.2. A
layer mask is active when a thin black border appears around the layer mask icon and
the Brush icon in the Layers palette changes to a circle surrounded by gray (
).
Viewing an image layer mask in Mask or Rubylith mode
The small Layer Mask icon shows you roughly how the mask looks. You can if you
wish view the mask on its own as a full screen image: Option/Alt-click the Layer
Mask icon to view the layer mask as a full mask. Option/Alt+Shift-click to display
the layer mask as a transparent overlay (rubylith). Both these actions can be toggled.
Please purchase PDF Split-Merge on www.verypdf.com to remove this watermark.
Montage techniques
295
1 To separate an object like this tree from the
background, you need to create an alpha chan-
nel mask of the tree outline and use this as a
layer mask to hide the unwanted areas.
2 This shows the completed alpha channel mask.
A pixel-based mask is more suitable for this type
of masking as the subject contains soft detailed
edges (the following masking technique makes
use of a vector mask in which the subject to be
masked contains smooth geometric edges).
3 Duplicate the Background layer and keep this
layer active. Switch off the eye icon for the origi-
nal Background layer and load the alpha mask
channel as a selection. Click on the Add layer
mask button in the Layers palette. This will use
the active selection to form a layer mask with
the selected areas hiding the layer contents.
Please purchase PDF Split-Merge on www.verypdf.com to remove this watermark.
Adobe Photoshop 7.0 for Photographers
296
1 To make an outline of the leather top in this pho-
tograph, I drew a pen path first. I made the work
path active and clicked on the New adjustment layer
button in the Layers palette and selected Hue/Satu-
ration. This added an adjustment layer with a linked
vector mask. You can use Layer > Change Layer
Content to switch between different types of ad-
justment/fill layers.
2 I can make a Hue/Saturation adjustment and
apply this to the top only. To edit a vector mask,
use the direct path selection tool to revise the
path edges.
Client: Anita Cox. Model: Amanda at Nevs.
Applying and removing image layer masks
When work is complete there are several ways to remove a layer mask. From the
Layer menu, choose Layer > Remove Layer Mask. A dialog box asks do you want to
Discard, Cancel the operation or Apply the layer mask? Select either option and
Please purchase PDF Split-Merge on www.verypdf.com to remove this watermark.
Montage techniques
297
click OK. With the mask icon for the layer selected in the Layers palette, click on the
palette delete button or drag the active layer mask icon to the delete button. The
same dialog box appears asking do you want to Discard, Cancel the operation, or
Apply the layer mask? To temporarily disable a layer mask, choose Layer > Disable
Layer Mask. To reverse this, choose Layer > Enable Layer Mask. Another shortcut is
to Shift-click the Layer Mask icon to disable, click again to enable. When a layer mask
is disabled the icon is overlaid with a red cross. Control/right mouse-click the mask icon
to open the full list of contextual menu options to apply, discard or disable a layer mask.
Vector masks
A vector mask is just like an image layer mask, except the masking is described
using a vector path. A vector mask can be edited using the pen path tools or the shape
geometry tools. Because a vector mask is vector based, it is resolution-independent
and can be transformed or scaled to any size without a loss in image quality. To add
a vector mask from an existing work path, go to the Paths palette, make a work path
there active and choose Layer > Add Vector Mask > Current Path.
Figure 11.4 The above diagram shows the relationship between paths and vector masks.
An active path can be chosen to form a vector
mask. From the Layer menu choose Add Vec-
tor Mask > Current Path.
Please purchase PDF Split-Merge on www.verypdf.com to remove this watermark.
Adobe Photoshop 7.0 for Photographers
298
You will notice that a vector mask icon is represented by a path outline. The gray fill
represents the hidden areas. This visual clue will become important when you wish
to make a hole in the layer and need to draw an additional path in subtract mode,
which is placed inside the first and subtracts from it. An example of this scenario
is shown later in the Spirit of St Louis tutorial.
Working with multiple layers
Layers have become such an essential Photoshop feature for doing complex mon-
tage work. It was not always so – in the early days of digital imaging, even high-end
workstations were limited to working with just one layer at a time. When working
with more than one layer you can choose to link layers together by creating links in
the Layers palette. To do this, click in the column space between the eye icon and the
layer name – you will see a link icon appear. When two or more layers are linked,
movement or transform operations will be applied to the linked layers as if they were
one, but they still remain as separate layers, retaining their individual opacity and
blending modes. To unlink a layer, click on the link icon to switch it off.
Layer masks and vector masks are by default linked to the layer content. If you move a
masked layer, the mask moves with it, as long as no selection is active – then any
movement or transformation of the layer content will be carried out independently of
the associated mask. Switch off the link between layer mask/vector mask and the
layer, then the two become unlinked. Any further movements or transformations can
now be applied to the layer or the layer/vector mask separately. You can tell if the
layer or the layer/vector mask are selected – a thin black border surrounds the layer
or layer mask icon and the icon the right of the eye icon changes from a paint brush to
a selection icon. Photoshop’s adjustment layers act just like real layers. If you want an
image to interact with itself (i.e. apply a Multiply blend), rather than make a copy
layer as before, create an adjustment layer (any one will do) and apply the required
blending mode, this will save you consuming extra RAM memory.
Layer set management
Layers can now be organized more efficiently in sets. This brings several advan-
tages: because multilayered documents can be grouped together inside the Layers
palette in nested folders or ‘sets’, the Layers palette stack can be made less cluttered
and groups of layers in a complex document can therefore be organized more logi-
cally. Layers grouped in a set can be made visible/invisible by clicking on the Layer
set eye icon. It is possible to adjust the opacity and blending mode of a set as if it
were a single layer, while the layers inside the set itself can contain subsets of layers
Please purchase PDF Split-Merge on www.verypdf.com to remove this watermark.
Montage techniques
299
Photograph: Peter Hince.
Client: Araldite.
Agency: Warman & Bannister.
Layer sets
1 A total of forty-six layers were used
in the construction of this image.
When a Photoshop document ends
up with this many layers, the layer
stack can become extremely unwieldy.
It is possible to organize layers within
layer sets. All the layers which relate
to the yellow butterfly fish are
grouped together in a single layer set
folder. I was able to group them by
shift-clicking on the fish in the docu-
ment window using the move tool in
Auto Select mode. This linked each
layer I clicked on. Then I chose New
Set From Linked from the Layers
palette menu.
2 The visibility of all layers in a set
can be switched on or off and the
opacity of the layer set group can be
adjusted as if all the layers were a
merged layer. Double-clicking a layer
set will call up the Layer Set Proper-
ties dialog. Here you can select a label
color and rename the set.
with individually set opacities and blend modes or adjustment layers. You can also
add a layer mask or vector mask to a layer set and use this to edit the layer set
visibility as you would with an individual layer. To reposition a layer, click on the
layer and drag it up or down the layer stack. To move a layer into a set, drag it to the
set icon or into the open set list. Dragging a layer down and to the left of the icon of
Please purchase PDF Split-Merge on www.verypdf.com to remove this watermark.
Adobe Photoshop 7.0 for Photographers
300
1 The four letter layers here are grouped together
in a set. Layer A is using the Multiply blending
mode; B is using Overlay; C is using Difference; and
D is using the Screen blending mode. The blending
mode of the set these layers are contained in is
‘Pass Through’. This means that the layers in the set
blend with the layers below the same as they would
if they were in a normal layer stack.
2 If I select Layer D and Option/Alt+double-click
the layer to open the Layer Style dialog, I can
alter the advanced blending options. The Knock-
out option allows you to ‘punch through’ the lay-
ers. A ‘Deep’ knockout will make Layer D punch
through the three layers below it, straight down
to the background layer. Layer D now appears as
it would if resting directly above the background
layer. A ‘Shallow’ Knockout will punch through
to just above the layer or layer set immediately
below.
3 The default layer set blend mode is Pass
Through. If you change the layer set blending
mode to anything else, then the layers within
the set will continue to blend with each other as
before, but will not interact with the layers un-
derneath as they did in Pass Through mode. When
the layer set blend mode is Normal, the set’s
layers appear as they would if you switched off
the visibility of the background layer.
Please purchase PDF Split-Merge on www.verypdf.com to remove this watermark.
Montage techniques
301
the last layer in a set and releasing will move the layer out of the set. To drag the last
layer in a set out of that set, drag it across to the left and release. Clicking on the
Create a new set button will add a layer set above the current target layer. Command/
Ctrl-clicking on the Create a new set button will add a layer set below the target
layer. Option/Alt-clicking opens the New Layer Set dialog. In Photoshop 7.0, you
can also lock all layers inside a set via the Layers palette submenu.
Advanced blending options
Layer sets allow you to group a number of layers together such that the layers con-
tained within a set are in effect like a single layer. In Pass Through blending mode
the layer blending passes through the set and the interaction is no different than if the
individual layers were in a normal layer stack. However, when you select any other
blending mode, this is equivalent to what would happen if you chose to merge all the
layers in the current set and made them become a single layer.
Color coding
Figure 11.5 Layers can now be color coded. Choose Layer Properties
from the Layers palette fly-out menu and pick a color to identify a layer with.
Among the Advance Blending modes, the Knockout blending options enable you to
force a layer to punch through some or all of the layers underneath it. A Shallow
knockout will punch through to the bottom of the layer set. A Deep knockout will
punch through to just above the Background layer. Layer styles are normally applied
independent of the layer blending mode. When you check the Blend Interior Effects
as Group box, such effects will take on the blending characteristics of the selected
layer. Try opening the image opposite from the CD-ROM and observe the Blend
Interior Effects options using Layer C which is using the Difference blending mode.
The result is the same as if you had ‘fixed’ the interior layer effect in normal mode
and then changed the blend mode to Difference. Other aspects of the Layer Style
blending options dialog box are covered in Chapter Fifteen.
Please purchase PDF Split-Merge on www.verypdf.com to remove this watermark.
Adobe Photoshop 7.0 for Photographers
302
Layer locking
Layers and their contents can be locked in a number of ways. The Lock Transparency
option is identical to the old Preserve Transparency checkbox. When Lock Transparency
is switched on, any painting you do to that layer will only affect the opaque portion of the
layer and where the image is semitransparent, will retain that level of transparency. The
Lock Image Pixels option will lock both pixels and the transparent areas. If you attempt
to paint on a layer locked this way, you will see a prohibit warning sign.
Lock Image will lock the Layer position only. This means that while you can con-
tinue to edit a layer’s pixel contents, you are not able to accidentally ‘knock’ the
layer position with the move tool or apply a transform command. You can select
combinations of Lock Transparency; Lock Image Pixels; and Lock Image, but you
can also check the Lock All box for those situations where you wish to lock every-
thing absolutely.
1 This shows the Layers palette with a new im-
age layer (Layer 1) above the Background layer.
Lock Transparent Pixels will prevent you from acci-
dentally painting in transparent areas of a layer.
2 Lock Image Pixels will preserve transparency
and prevent you from accidentally painting on
any part of the image layer, yet allow movement
of the layer.
3 Lock Layer Position will prevent the layer from
being moved, while you can continue to edit the
layer pixels.
4 Checking the Locking All box will lock the layer
absolutely. The layer will be locked in position,
the contents cannot be edited, nor can the opac-
ity or blend modes be altered, but the layer can
be moved up or down the layer stack.
Please purchase PDF Split-Merge on www.verypdf.com to remove this watermark.
Montage techniques
303
2 Place the cursor outside the bounding border
and drag in any direction to rotate the image.
Holding down the Shift key as you drag constrains
the rotation in 15 degree increments.
4 If you want to constrain the distortion sym-
metrically around the center of the image, hold
down the Option/Alt key as you drag a handle.
Transform commands
You have a choice of options in the Image menu to rotate or flip an image. You use these
commands to reorientate a document where, for example, the photograph was perhaps
scanned upside down. The Edit > Transform commands are applied to a layer or grouped
1 You can rotate, skew or distort an image in
one go using the Edit > Free Transform com-
mand. The following steps show you some of the
modifier key commands to use to constrain a
free transform adjustment.
3 Hold down the Command/Ctrl key as you click
any of the handles of the bounding border to
perform a free distortion.
Please purchase PDF Split-Merge on www.verypdf.com to remove this watermark.
Adobe Photoshop 7.0 for Photographers
304
layers only, whereas the Image menu commands rotate or flip the whole canvas. Select a
layer or make a selection and choose either Edit > Transform or Edit > Free Transform (or
check Show Bounding Box in the move tool Options bar). Rotating, flipping, scaling,
skew and perspective controls can be applied either singly or combined in one process.
All these commands are to be found under the Edit > Transform menu and also under the
contextual menus (Ctrl/right mouse-click). The Free Transform options permit you to
apply any number of tweaking adjustments before applying the actual transform. A
low resolution preview quickly shows you the changed image shape. At any time
you can use the Undo command (Command/Ctrl-Z) to revert to the last defined trans-
form preview setting.
Numeric Transforms
When you select any of the transform commands from the Edit menu or check Show
Bounding Box in the move tool options, the Options bar will display the numeric
transform commands shown over the page. The numeric transform options enable
you to accurately define any transformation as well as choose where to position the
centering reference point position. For example, a common use of the Numeric Trans-
6 To carry out a perspective distortion, hold
down the Command/Ctrl+Option/Alt+Shift keys
together and drag a corner handle. When you
are happy with the new shape, press Enter to
carry out the transform. Press ESC to cancel. The
transform uses the default interpolation method
selected in Preferences to calculate the new
image shape.
5 To skew an image, hold down the Command/
Ctrl+Shift key and drag one of the side handles.
Photograph by Davis Cairns. Client: Red or Dead.
Please purchase PDF Split-Merge on www.verypdf.com to remove this watermark.