Tài liệu Adobe Photoshop 7.0 for Photographers- P8 ppt
Bạn đang xem bản rút gọn của tài liệu. Xem và tải ngay bản đầy đủ của tài liệu tại đây (3.62 MB, 50 trang )
Adobe Photoshop 7.0 for Photographers
330
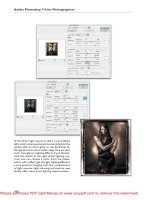
3 The models were cut out using mainly paths
for their bodies and clothing and variable
density masks for the hair. The original outlines
were not followed slavishly and a number of
areas were smoothed over and modified. These
cutouts were then added as new layers on top
of the viaduct image.
4 The exact sizing was carried out by reducing
the opacity of the models (so that the original
column could be seen through them) and care-
fully tweaking the exact shapes using the Free
Transform. In some instances, a little perspective
control had to be introduced, but this was mini-
mal and was done by eye until it looked right.
This took many attempts, so I kept the original
cutouts handy in case I needed to start over again.
To ensure the highest quality in an image, it is
best to avoid using the Transform more than once.
If I cannot get it right the first time, I will not
transform it again, but start from scratch.
5 When the models were placed in their final
positions, work could begin on extending the
background to remove the viaduct columns and
create the impression they were supporting the
bridge. The clone stamp retouching was carried
out on separate layers so that any mistakes could
easily be corrected. To control the shape of the
mountains in the background, the outline was
defined with a path, converted to a selection and
feathered by one or two pixels. Using Command/
Ctrl+Shift-I, I could swap between the mountains
and the sky to build up a convincing edge.
Please purchase PDF Split-Merge on www.verypdf.com to remove this watermark.
Montage techniques
331
6 The most difficult and time-consuming area to
fix was the grass around the legs and feet. I try
not to keep cloning the same areas of the origi-
nal images repeatedly. Instead, I try to find areas
from elsewhere in the image, then copy and paste
it over the area I need to cover and then use a
curves adjustment to try to match the color and
density of the area underneath. I then erase the
areas I don’t need. In many cases, adding a little
noise over a cloned area can help it look more
convincingly part of the photograph. A great ad-
vantage of using 5 × 4 originals is that there is
very little grain in the scanned images. With
smaller format films it can be very difficult to
match the more pronounced grain.
7 One of the touches that (hopefully) makes this
image seem more convincing, are the little bits
of grass and vegetation which go over the people’s
shoes. It is little touches like this which help
create a sense of scale. This was achieved by copy-
ing part of the background image behind the
shoes, pasting it into a new layer on top of the
shoes and using the eraser tool to remove the
areas I didn’t want. There is usually more than
one way of approaching a problem in Photoshop.
For example, I could have achieved the same
result by using a layer mask.
8 A lot of work had to be done on the faces and
hands of the models to try to get them to look
as if they had really had been there and that the
viaduct was casting shadows on them. Much of
this was done using the brush tool on a separate
layer that is set to the Darken blending mode.
Some areas were lightened using curves, with a lot
of attention paid to keeping the colors consistent.
Photograph: Ian McKinnell.
Client: Logica. Agency: Stocks Austin Sice.
Please purchase PDF Split-Merge on www.verypdf.com to remove this watermark.
Adobe Photoshop 7.0 for Photographers
332
Exporting clipping paths
Clipping paths are vector paths that can be used to mask the outline of an image
when it is exported to be used in a DTP layout program such as Adobe PageMaker™,
Adobe InDesign™ or QuarkXPress™. You will remember me saying earlier that a
selection can be converted to and from a path? If an image document contains a
closed path, when you save it as an EPS format file, there is an option for selecting
that path as a clipping path. In Adobe Illustrator™, for example, you can use the
saved clipping path as a masking object.
Imagine a catalog brochure shoot with lots of products shot against white ready for
cutting out. Still-life photographers normally mask off the areas surrounding the
object with black card to prevent unnecessary light flare from softening the image
contrast. Whoever is preparing the digital files for export to DTP will produce an
outline mask and convert this to a path in Photoshop or simply draw a path from
scratch. This is saved with the EPS file and used by the DTP designer to mask the
object.
Clipping paths are an effective tool for lots of projects, but not in every case. I had a
design job to do for photographer Peter Hince, who asked me to design a brochure
showing a collection of his underwater photographs, Ocean Images. I assembled the
twelve black and white pictures in Adobe PageMaker™. They all had rough edged
9 Each person had their own curves adjustment
layer for small tweaks to their density and color,
using a mask so as not to affect the rest of the
image, and another curves adjustment layer over
the whole image. I use these adjustment layers
so that I can keep changing my mind and try lots
of variations with-
out changing the
original image until
the last minute.
The most vital
part of building an
image such as this
is the planning, vi-
sualizing the final
image in your mind
and then working
backwards from
there.
Please purchase PDF Split-Merge on www.verypdf.com to remove this watermark.
Montage techniques
333
1 The background layer consisted of a water re-
flection pattern. All the individual photographs
were aligned to Guides, as they would appear in
the final design and grouped on the one layer.
Before proceeding to the next stage, I copied
this layer by dragging it down to the New Layer
button.
2 To demonstrate the following steps, I worked
on a cropped view of the above layout, which
shows just a single picture against the water
background layer. I switched off the Eye icon for
the copy layer and made the original Turtle layer
active. I now wanted to remove the white pixels
from the outer edges of the turtle image frame.
rebates that Peter wanted preserved. I could have made a path outline of each image
and placed these on top of the background image. What I did instead was to prepare
the design in PageMaker™, scaling the individual images and working out their
position. After that I reproduced a similar guideline layout in Photoshop and created
a multilayered image, positioning the individual images and merging them all into
one to make a single CMYK, EPS file. The steps below demonstrate how I retained
the subtlety of the borders, which may otherwise have become lost.
Another good reason for doing things this way is that it saves on the RIP time for
proofing and imposition and reduces the chances of file errors. On the other hand,
clients might ask you to alter one of the images after seeing the proof, so save that
multilayered Photoshop original for backup!
Photographs: Peter Hince/Ocean Images.
Please purchase PDF Split-Merge on www.verypdf.com to remove this watermark.
Adobe Photoshop 7.0 for Photographers
334
4 I activated the copy layer again and marqueed
inside the image border. When finished, I inverted
the selection (Select > Invert Selection) and de-
leted or cut the selected area (Edit > Cut). I then
flattened the image before saving to export to
the DTP program, but also saved a layered copy
of the image in case any further adjustments were
required.
3 I Option/Alt+double-clicked the layer to open
the Layer Options dialog box and held down the
Option/Alt key to split and drag the highlight
sliders for This Layer, as shown here. What this
does is to remove the pure white tones from
blending with the underlying layers. It also made
some of the inner highlight areas transparent. These
can be covered up with the copy layer.
Please purchase PDF Split-Merge on www.verypdf.com to remove this watermark.
Shortcuts
335
Shortcuts
Chapter Twelve
G
etting to know the basics of Photoshop takes a few months, learning how to
become fluent takes a little longer. There are a great many keyboard short-
cuts and not all of them are listed in the manual. In this chapter I have grouped
together a list of tips and keyboard shortcuts
to help expand your knowledge of
Photoshop. These are a reminder of some of the suggestions covered elsewhere in
the book – use it as a reference for productive and efficient Photoshopping. Learn the
keyboard shortcuts a few at a time, and don’t try to absorb everything at once.
The key to efficient
working is to plan your projects in advance. Rather than dive
straight in, think through first about what you want to achieve – either write down or
make a mental note of what it is you want to do and work out the best order in which
to do everything. An obvious
example would be to avoid preparing your work at
high resolution when the final and only use was just a few megabytes. Yo u would
want to reduce the file size at the beginning of the Photoshop session rather than at
the end in order to save on the computer processing time. Another
reason is that there
is often more than one way of doing something and a little time spent thinking through
things at the beginning will save much in the long run. This is particularly true if
working on an underpowered computer or you are pushing your machine to its limits.
Where a
project requires experimentation to see which ef fects work best, it may be wise
to start with a low resolution version first. This will enable you to edit quickly without
waiting for the dreaded wristwatch or egg timer. Make a note of the settings that looked
best and repeat these at higher resolution.
This is a particularly handy way of exploring
the dif ferent blending modes and filters but remember that the filter effects may work
slightly differently at higher resolutions and the settings will need to be scaled up.
Please purchase PDF Split-Merge on www.verypdf.com to remove this watermark.
Adobe Photoshop 7.0 for Photographers
336
Instead of making notes you could try recording the steps used as an action. This can
then be replayed on subsequent images. Process an image once, recording each step
used, stop the recording and play the action on single images or batches of images.
You will find several Actions already available when
you install Photoshop and dis-
cover many more which are freely available on the Internet. One such site is Actions
X Change maintained by Joe Cheng and can be found at: <www.actionxchange.com>.
Another is the Elated site <www.elated.com/toolbox/actionkits/>. Both these sites
have ready prepared actions or sets of actions with examples of the
types of effects
achieved with them for you to freely download for use in Photoshop. To find out
more about actions, see the section Working with actions on page 346. Macintosh/
Windows key equivalents are used everywhere else in this book, but due to lack of
space, only the Macintosh keys are
listed in the tables. Remember, the PC equivalent
for the Command key is Ctrl and the Option key is Alt. Here are the single key shortcuts
for accessing tools and commands in the Tools palette:
To cycle through the hidden tools, hold down the Option/Alt key and click again on the tool icon in the
Tools palette or hold down Shift and press the key shortcut again. For example, if the eraser tool is currently
selected, Option/Alt-click the eraser tool icon or press Shift-E to cycle through the other eraser tools.
There is also an option in the first dialog of the General Preferences that allows you to cycle through the
tools without using the Shift key modifier.
xoblooT
A slootnoitcelestnenopmochtap/htapnoitcelestceriD
B slootlicnep/hsurB
C lootporC
D srolocdnuorgkcaB/dnuorgeroFtluafedotteseR
E resarecigam/resarednuorgkcab/resarE
F sedomyalpsidneercseerhtehtelggoT
)Ftsrifretfa(F+tfihS sedomyalpsidyradnocesowtniffo/norabunemelggoT
G sloottekcubtniap/tneidarG
H lootdnaH
rabecapS evitcasilootrehtoynatslihwlootdnahsseccA
I slooterusaem/relpmasroloc/reppordeyE
J sloothctap/hsurbgnilaeH
K sloottcelesecils/ecilS
Please purchase PDF Split-Merge on www.verypdf.com to remove this watermark.
Shortcuts
337
deunitnocxoblooT
L slootossalcitengam/ossallanogylop/ossaL
M slooteeuqramlacitpille/ralugnatceR
N slootnoitatonnaoidua/setoN
O slootegnops/nrub/egdoD
P slootgniwardhtapnepmrofeerf/neP
Q edomnoitceles/edomksamkciuQ
R slootegdums/neprahs/rulB
S slootpmatsnrettap/pmatsenolC
T lootepyT
U :slootgniwardepahS
motsuc/enil/nogylop/espille/elgnatcerdednuor/elgnatcer
V lootevoM
yekdnammoC lootneprab,evitcasilootynatslihwlootevomsseccA
syekworrA lexip1yb,ylnoredrobnoitcelesegduN
syekworrA lexip1ybnoitcelesegdun:detceleslootevomtslihW
syekworrA+tfihS stnemercnilexip01gnisuegduN
W lootdnawcigaM
X srolocdnuorgkcab/dnuorgerofegnahcxE
Y hsurbyrotsihtra/hsurbyrotsiH
Z lootmooZ
yeknoitpOnwoddloH detcelessilootmoozehtnehwtuomooZ
kcilc-rabecapS+dnammoC nimooZ
kcilc-rabecapS+noitpO tuomooZ
Please purchase PDF Split-Merge on www.verypdf.com to remove this watermark.
Adobe Photoshop 7.0 for Photographers
338
Efficient running
Allocate as much RAM memory as possible (see Chapter Six) and run Photoshop on
its own. Keep the minimum number of image files open at any one time. Check the
scratch disk size by having the status box at the bottom of the image/application
window set to show Scratch Disk memory usage.
Once the left-hand value starts to
exceed the right, you know that Photoshop is running short of RAM memory and
employing the scratch disk as virtual memory. To copy selections and layers between
documents, use drag and drop actions with the move tool. This will save on memory
usage and preserve any clipboard
image at the same time. Save either in the native
Photoshop format or as a TIFF to the hard disk and not to removable media devices (nor
should a removable drive be used as a scratch disk).
deunitnocxoblooT
A+tfihS slootnoitcelestnenopmochtap/tcelestceridneewtebelggoT
B+tfihS slootlicnepdnahsurbneewtebelggoT
E+tfihS slootresarehguorhtelcyC
G+tfihS sloottekcubtniapdnatneidargneewtebelggoT
I+tfihS looterusaemdnaslootreppordeyehguorhtelcyC
J+tfihS loothctapdnahsurbgnilaehneewtebelggoT
K+tfihS sloottcelesecilsdnaecilsneewtebelggoT
L+tfihS slootossalhguorhtelcyC
M+tfihS slooteeuqramlacitpillednaralugnatcerneewtebelggoT
N+tfihS slootnoitatonnaoiduadnasetonneewtebelggoT
O+tfihS slootgninothguorhtelcyC
P+tfihS slootnepmrofeerfdnanepneewtebelggoT
R+tfihS slootegdumsdnasucofhguorhtelcyC
S+tfihS slootpmatsnrettapdnapmatsenolcneewtebelggoT
T+tfihS slootepyttnereffidehtneewtebelcyC
U+tfihS slootepahstnereffidehtneewtebelcyC
Y+tfihS slootyrotsihtradnayrotsihneewtebelggoT
Please purchase PDF Split-Merge on www.verypdf.com to remove this watermark.
Shortcuts
339
Contextual menus
A good many shortcuts are just a mouse-click away. Contextual menus are
available throughout Photoshop. On a Macintosh you use Control-click and on
the PC use right mouse-click to open a contextual menu in an image document
window or a Photoshop palette such as the Layers, Channels or Paths palette. For
example, you
can Control-click/right mouse-click in the document window to
access a list of all the menu options associated with the currently selected tool.
unemeliF
tuctrohsdraobyeK noitcnuF
N-dnammoC eliFweN>eliF
N-noitpO+dnammoC sgnittesdetcelesylsuoiverpgnisueliFweN>eliF
O-dnammoC eliFnepO>eliF
O-tfihS+dnammoC resworBeliFnepO>eliF
W-dnammoC eliFesolC/wodniWesolC>eliF
W-tfihS+dnammoC llAesolC>eliF
S-dnammoC evaS>eliF
S-tfihS+dnammoC sAevaS>eliF
S-noitpO+tfihS+dnammoC beWrofevaS>eliF
P-tfihS+dnammoC puteSegaP>eliF
P-dnammoC )secnereferPees(eliFtnirP/weiverPhtiwtnirP>eliF
P-dnammoC )secnereferPees(weiverPhtiwtnirP/eliFtnirP>eliF
P-noitpO+tfihS+dnammoC ypoCenOtnirP>eliF
M-tfihS+dnammoC noitacilppaotpmuJtluafedehtotspmuJ
Q-dnammoC tiuQ>eliF
5F weiveerttsilresworBeliFehthserfeR
21F etatsyrotsihwenasanoisrevdevastsalottreveR>eliF
DrocsE )dnammocmetsyS(esolC>eliFretfaevaSt'noDetavitcA
).(doireP-dnammoCrocsE )dnammocmetsyS(noitcnuftrobArolecnaC
Please purchase PDF Split-Merge on www.verypdf.com to remove this watermark.
Adobe Photoshop 7.0 for Photographers
340
unemtidE
tuctrohsdraobyeK noitcnuF
Z-dnammoC )secnereferPees(noitarepotsalodnU>tidE
Z-tfihS+dnammoC yrotsihhguorhtdrawrofpetS>tidE
Z-noitpO+dnammoC yrotsihhguorhtdrawkcabpetS>tidE
F-tfihS+dnammoC ).cteretlif,tnemtsujdaegami(noitarepotsaledaF>tidE
X-dnammoC tuC>tidE
C-dnammoC ypoC>tidE
C-tfihS+dnammoC degreMypoC>tidE
V-dnammoC etsaP>tidE
V-tfihS+dnammoC otnIetsaP>tidE
ecapskcaB/eteleD+noitpO rolocdnuorgerofhtiwlliF>tidE
ecapskcaB/eteleD+dnammoC rolocdnuorgkcabhtiwlliF>tidE
/eteleD+tfihS+noitpO
ecapskcaB
gnivreserpelihwrolocdnuorgerofhtiwreyallliF
ycnerapsnart
/eteleD+tfihS+dnammoC
ecapskcaB
gnivreserpelihwrolocdnuorgkcabhtiwreyallliF
ycnerapsnart
ecapskcaB/eteleD+tfihS xobgolaidlliF>tidEnepO
/eteleD+noitpO+dnammoC
ecapskcaB
yrotsihmorflliF
T-dnammoC mrofsnarTeerF>tidE
T-tfihS+dnammoC mrofsnarTdeilppatsalehttaepeR
T-noitpO+dnammoC noitacilpuDhtiwmrofsnarTeerF
T-tfihS+noitpO+dnammoC noitacilpuDhtiwniagamrofsnarT
K-tfihS+dnammoC sgnittesroloC>tidE
K-dnammoC secnereferPlareneGnepO
K-noitpO+dnammoC )xobgolaiddesutsal(secnereferPlareneGnepO
Please purchase PDF Split-Merge on www.verypdf.com to remove this watermark.
Shortcuts
341
Selections
Holding down the Shift key when drawing a marquee selection constrains the selec-
tion being drawn to a square or circle.
Holding down the Option/Alt key when drawing a marquee selection centers the
selection around the point from where you first dragged.
Holding down the Shift+Option/Alt keys when drawing a marquee selection con-
strains the selection to a square or circle and centers the selection around the point
where you first clicked.
If you hold down the Spacebar at any point, you can reposition the center of the
selection. Release the Spacebar and continue to drag using any of the above combi-
nation of modifier keys
to finish defining the selection.
After drawing a selection and releasing the mouse, hold down the Shift key to add to
the selection with the lasso, marquee or magic wand tool.
Hold down the Option/Alt key to subtract from the existing selection with the lasso,
marquee or magic wand tool.
Hold down the
Shift+Option/Alt key to intersect with the existing selection using
the lasso, marquee or magic wand tool.
Window display options
Choose Window > Documents > Cascade to display windows stacked one on top of the
other going from top left to bottom right of the screen. Choose Window > Documents >
T ile to display document windows edge to edge.
Moving and cloning selections
To move the border outline only, place the cursor inside the selection border and
drag. To move the selection contents, use the move tool (Command/Ctrl) – just
hold down the Command/Ctrl key and drag inside the selection. If a selection is
active, and you drag a layer, dragging outside the selection area,
the selection
will move with the layer. To clone a selection (without making it a layer), hold
down the Option/Alt key+Command/Ctrl key and drag.
Please purchase PDF Split-Merge on www.verypdf.com to remove this watermark.
Adobe Photoshop 7.0 for Photographers
342
The Option/Alt key can be used in combination with any of the above image adjustment commands
(just as you can with filters) to open up the relevant dialog box with the last used settings in place.
Thi s is a generic Photoshop interface convention. The above fade command will fade filters,
i mage adjustments and all types of brush strokes. It used to be located in the Filter menu, but is
now an Edit menu item.
unemtceleS
tuctrohsdraobyeK noitcnuF
A-dnammoC llAtceleS>tceleS
D-dnammoC enoNtceleS>tceleS
D-tfihS+dnammoC tceleseR>tceleS
D-noitpO+dnammoC rehtaeF>tceleS
I-tfihS+dnammoC noitceleStrevnI>tceleS
unemegamI
tuctrohsdraobyeK noitcnuF
L-dnammoC sleveL>stnemtsujdA>egamI
L-tfihS+dnammoC sleveLotuA>stnemtsujdA>egamI
L-noitpO+tfihS+dnammoC tsartnoCotuA>stnemtsujdA>egamI
B-tfihS+dnammoC roloCotuA>stnemtsujdA>egamI
M-dnammoC sevruC>stnemtsujdA>egamI
B-dnammoC ecnalaBroloC>stnemtsujdA>egamI
U-dnammoC noitarutaS/euH>stnemtsujdA>egamI
U-tfihS+dnammoC etarutaseD>stnemtsujdA>egamI
I-dnammoC roloCegamItrevnI>stnemtsujdA>egamI
F-tfihS+dnammoC tnemtsujdAegamIedaF>tidE
etacilpuD>egamI+noitpO >egamIgnisoohctslihwyeknoitpOehtnwodgnidloH
xobgolaidetacilpuDehtsessapybetacilpuD
Please purchase PDF Split-Merge on www.verypdf.com to remove this watermark.
Shortcuts
343
unemreyaL
tuctrohsdraobyeK noitcnuF
N-tfihS+dnammoC reyaLweN>reyaL
N-tfihS+noitpO+dnammoC )xobgolaidtuohtiw(reyaLweN>reyaL
G-dnammoC reyaLsuoiverPhtiWpuorG>reyaL
G-tfihS+dnammoC puorgnU>reyaL
E-dnammoC nwoDegreM>reyaL
E-noitpO+dnammoC wolebyltceridreyalehtotstnetnocreyalenolC
J-dnammoC )reyalwenottaolf(ypoCaiVreyaL>weN>reyaL
J-tfihS+dnammoC tuCaiVreyaL>weN>reyaL
E-tfihS+dnammoC elbisiVegreM>reyaL
]+dnammoC kcatsehtnidrawrofreyalagnirB>egnarrA
]+tfihS+dnammoC kcatsehtfopotehtotreyalagnirB>egnarrA
[+dnammoC kcatsehtnidrawkcabreyaladneS>egnarrA
[+tfihS+dnammoC mottobehtotreyaladneS>egnarrAkcatsehtfo
unemretliF
tuctrohsdraobyeK noitcnuF
F-dnammoC )sgnittesemashtiw(desuretliftsalylppA>retliF
F-tfihS+dnammoC retlifedaF>tidE
F-noitpO+dnammoC sgnittesretlifdesutsalhtiwgolaidnepO
X-noitpO+dnammoC tcartxE>retliF
X-tfihS+dnammoC yfiuqiL>retliF
X-noitpO+tfihS+dnammoC rekaMnrettaP>retliF
Please purchase PDF Split-Merge on www.verypdf.com to remove this watermark.
Adobe Photoshop 7.0 for Photographers
344
unemweiV
tuctrohsdraobyeK noitcnuF
Y-dnammoC )secnereferPees(sroloCfoorP>weiV
Y-dnammoC+tfihS gninraWtumaG>weiV
sulp-dnammoC gniziserwodniwhtiwnimooZ>weiV
sulp-noitpO+dnammoC eziswodniwgnizisertuohtiwnimooZ>weiV
sunim-dnammoC gniziserwodniwhtiwtuomooZ>weiV
sunim-noitpO+dnammoC eziswodniwgnizisertuohtiwtuomooZ>weiV
orez-dnammoC )settelapnepoybdeniartsnoc(neercSoTtiF>weiV
lootdnahkcilc-elbuoD )settelapnepoybdeniartsnoc(neercSoTtiF>weiV
orez-dnammoC+noitpO %001taslexiPlautcA>weiV
lootmoozkcilc-elbuoD %001taslexiPlautcA>weiV
H-dnammoC
/dirg/htaptegrat/snoitceles(sartxEwohS>weiV
)seton/secils/sediug
H-dnammoC+tfihS ylnohtaPediH/wohS>weiV
;-dnammoC ylnosediuGediH/wohS>weiV
'-dnammoC ylnodirGediH/wohS>weiV
R-dnammoC sreluRediH/wohS>weiV
;-dnammoC+tfihS )sdnuobtnemucod/secils/dirg/sediug(panS>weiV
;-noitpO+dnammoC sediuGkcoL>weiV
htiwediugkcilc-elbuoD
lootevom
stnemercnidnaroloc:sgnittesdirG&sediuGtidE
baT+lortnoC )caM(swodniwtnemucodnepohguorhtelcyC
Please purchase PDF Split-Merge on www.verypdf.com to remove this watermark.
Shortcuts
345
Info and Navigator
Double-click the ruler margins to open the Units & Rulers preferences. Control/
Right mouse-click on a ruler to change the Units settings. Yo u can use the keyboard
numbers to set the tool opacity while any paint or fill tool is selected (1 = 10%, 9 =
90%, 0 = 100%). For more
precise settings, enter any double number values in quick
succession (i.e. 04, 23, 75 etc.). Use the up arrow to increase values in the box by 1%
and use the down arrow to decrease values in the box by 1% (hold down the Shift
key to decrease or increase by 10%). The
Navigator palette provides a swift way of
scrolling across an image. The bottom left box in the Navigator palette indicates the
current viewing percentage scale. As with the identical box in the document window
display, any value can be entered between 0.19% and 1600.00%. To zoom to a speci-
fied percentage and keep
this box highlighted, hold down the Shift key whilst press-
noitagivaN
tuctrohsdraobyeK noitcnuF
puegaP neercsenoybpullorcS
nwodegaP neercsenoybnwodllorcS
puegaP+tfihS spetsrellamsnipullorcS
nwodegaP+tfihS spetsrellamsninwodllorcS
nwodegaP/puegaP+tfihS elifpirtsmliFafoemarfelgnisanwodropullorcS
puegaP+dnammoC neercsenotfelllorcS
nwodegaP+dnammoC neercsenothgirllorcS
puegaP+tfihS+dnammoC spetsrellamsnineercsenotfelllorcS
nwodegaP+tfihS+dnammoC spetsrellamsnineercsenothgirllorcS
yekemoH egamiforenroctfelpotyalpsiD
yekdnE egamiforenrocthgirmottobyalpsiD
unemwodniW
tuctrohsdraobyeK noitcnuF
yekbaT settelapllawohs/ediH
yekbaT-tfihS rabsnoitpOdnaettelapslooTtpecxesettelapllawohs/ediH
Please purchase PDF Split-Merge on www.verypdf.com to remove this watermark.
Adobe Photoshop 7.0 for Photographers
346
ing Enter. Use the Navigator slider control to zoom in and out or mouse down on the
left button to zoom out incrementally and the right button to zoom in. The dialog
palette preview display indicates by a red rectangle which portion of the image is
visible in relation to the whole
– the rectangle border color can be altered by going
to the palette options. To scroll quickly, drag the rectangle across the Navigator pal-
ette screen. Hold down the Command/Ctrl key and marquee within the thumbnail
area to specify an area to zoom to. The Navigator palette can also be resized to
make
the preview window larger.
Working with Actions
Photoshop is able to record a script of the operations performed in a Photoshop ses-
sion and save them as an Action. These Actions can then be replayed on other images
and shared with other Photoshop users so that they can repeat this sequence of
Photoshop steps on their computer. Actions can
save you the bother of laboriously
repeating the same steps over and over again on subsequent images. To make things
even easier, there is a Batch command in the File > Automate menu. You can use the
Batch interface to automatically process any folder of images and have the files
either save and
overwrite or save to a new folder location, such as batch opening the
images from a Kodak Photo CD disc.
Playing an Action
A folder set of prerecorded Actions was added to the Actions palette when you
installed Photoshop 7.0. To test them out, open an image, select an Action
from the
menu and press the Play button. Photoshop automatically starts running through the
recorded sequence of commands, just like a pianola. If the number of steps in a
complex Action exceeds the number of available histories, there will be no way of
completely undoing all the commands when the action has
completed. So as a
precaution, either take a snapshot in the History palette or save the document before
executing an Action and if you are not happy with the result, fill from the saved
snapshot in History or revert to the last saved version. Extra sets of Actions are easily
loaded by simply
going to the Actions palette menu and highlighting one of the
named sets in the list. The Commands.atn set will install a number of useful preset
Actions that will assign basic Photoshop actions like Cut and Paste with Function
keys. Note that the Adobe Photoshop 7.0 > Presets > Actions folder contains
a PDF
document illustrating all the preset Action outcomes. If you are sent a Photoshop
Action as an Action document (it may be appended with .atn), instead of loading it
via the Actions palette, you can just double-click it to open Photoshop and automati-
cally install it in the Actions palette.
Please purchase PDF Split-Merge on www.verypdf.com to remove this watermark.
Shortcuts
347
Recording Actions
First, record your action using a dummy image. Click the New Action button at the
bottom of the Actions palette. Name the new Action you are about to record and then
press the Record button. You can also at this stage assign a Function key combina-
tion that will
in future initiate the Action. Now carry out the Photoshop steps you
wish to record and when finished, press the Stop button in the Actions palette.
Actions will be able to record most Photoshop operations including use of the Paths,
History palette steps, the Lighting Effects filter, Apply Image and most of
the tools
in Photoshop including the shape tools. Tools such as the marquee and gradient fills
are recorded based on the currently set ruler unit coordinates. Where relative
positioning will be required, choose the Percent units in Units & Rulers preferences
before you begin recording. Avoid using commands which as yet cannot be
recorded
with an Action. This is less of a problem now, as the scriptability of Photoshop has
been vastly improved, but certain operations like brush strokes (or any of the other
painting tools) cannot be recorded as this goes beyond the scope of what can be
scripted.
Watch out for recording commands that
rely on the use of named layers or channels
(that may be present in your dummy file, but will not be recognized when the Action
is applied to a new image). Also try to make sure that your actions will not always be
conditional on starting in one color mode only, or
being of a certain size. If you need
the Action to work with different sized images, set the ruler units to Percent before
recording. If you intend recording a complex Action, the best approach is to care-
fully plan in advance the sequence of Photoshop steps you intend to record. The
example
overleaf demonstrates how to record a basic Action. A break can be in-
cluded in an Action. This will initiate a message dialog to appear on screen. This
message dialog can include a memo to yourself (or another user replaying the Action),
reminding you of what needs to be done at this
stage. Actions can be saved as Sets of
Actions. If you want to save a single action, duplicate it by Option/Alt dragging to a
new Set. If you hold down the Command/Ctrl+Option/Alt keys as you choose Save
Actions this will save the text descriptions of the Action steps for every Photoshop
Action displayed
in the Actions palette.
Tro ubleshooting Actions
Check that the image to be processed is in the correct color mode. Many Actions,
such as those that use certain Photoshop filters, are written to operate in RGB color
mode only. Color adjustment commands will not work properly if the starting image
is in Grayscale or Indexed Color. Some pre-written Actions
require that the start
image fits certain criteria. For example, the Photoshop text effect Actions require
Please purchase PDF Split-Merge on www.verypdf.com to remove this watermark.
Shortcuts
349
3 In this Action, a new layer is created and filled
with a KPT gradient. The Action requires that a
mask channel is present in the starting image to
be loaded as a layer mask to reveal the object on
the background layer.
4 When the recording is complete, hit the Stop
button in the Actions palette. Expand the Action
items to inspect the recording. Just before the
filter step, I inserted a ‘Stop’ with a message re-
minding me that the next step requires me to
select a KPT gradient. The Stop allows the Ac-
tion to continue playing after pressing Enter.
Automation plug-ins
This Photoshop feature will allow third-party developers to build plug-ins for
Photoshop that will be able to perform complex Photoshop operations. The Photoshop
suite of automated plug-ins is described on the following pages. These should be of
special interest to everyone, including those who only use Photoshop occasionally
and wish to carry out
skilled tasks like resizing an image without constantly having
to refer to the manual. They can operate like ‘wizards’. An on-screen interface will
lead you through the various steps or else provide a one-step process which can save
you time or be built into a recorded Action.
Please purchase PDF Split-Merge on www.verypdf.com to remove this watermark.
Adobe Photoshop 7.0 for Photographers
348
1 The normal procedure when recording an Ac-
tion is to start with a dummy image, record all
your steps and then test the Action to make sure
it is running correctly. The Action can easily be
edited later where there are gaps or extra steps
that need to be included.
Photograph: Davis Cairns. Client: Red or Dead Ltd.
that you begin with an image that already contains layered text. If you have just
recorded an Action and having trouble getting it to replay, you can inspect it command
by command. Open a test image and expand the Action to display all the items. Hold
down the Command/Ctrl key and click
on the Play button. This will play the first
command only. If there is a problem, double-click the command item in the list to
rerecord it. Hold down the Command/Ctrl key again and click on the Play button to
continue. To replace an item completely, press Record and perform a new step,
then
click Stop. This will delete the old step and replace it with the one you have just recorded.
Batch processing Actions
One of the great advantages of Actions is the ability to record an Action and then
apply it to a batch of files. The Batch Actions dialog
can be accessed via the File >
Automate menu. You will need to select a Source folder and a Destination folder (if
you want to save copy files to a new folder). Photoshop will also accept all currently
opened files as the source. Figures 12.1 and 12.2 show you how to configure
Batch
Actions processing.
2 This Action is designed to add a color fill layer
and apply a custom gradient fill. Action recordings
should be as unambiguous as possible. For
example, if you record a step in which a named
layer is brought forward in the layer stack, on
playback the action will look for a layer with that
name. Therefore, use the main Layer menu or
Layer key command shortcuts listed in this
chapter. Doing so will make your Action more
universally recognized.
Please purchase PDF Split-Merge on www.verypdf.com to remove this watermark.
Shortcuts
351
Picture Package
The Picture Package can automatically produce a picture package page layout based
on one or more images and has been enhanced in version 7.0. Figure 12.3 shows how
you could have a combination of a single 5 × 7, with two postcards plus four smaller
sized versions all
oriented to fit within a single page design. Many preset templates
are available for you to choose from in the dialog layout menu. If you are feeling
adventurous, you can go to the Photoshop 7.0/Presets/Layouts folder and open the
‘Read Me’ file. This describes how to write the basic code to design
your own custom
layouts. You can base the design on either the frontmost, open document, or browse
to select a specific file. Yo u can also click in one of the Picture Package template
spaces to load an image file, or replace one of the repeated images. The Label section
is useful if you
wish to add, say, the file name or have the caption appear within the
image area. Yo u can even use this as a way to enter custom text at a low opacity and
have it appear in the center of each image (such as a copyright message). If you
select the Folder
option, Photoshop will use the selected Picture Package template to
batch apply to each image in the specified folder. Although this revision of Picture
Package is more versatile, it has been done at the expense of being more cumbersome
and slower to use.
Figure 12.3 The Picture Package dialog box and an example of the resulting print output.
Please purchase PDF Split-Merge on www.verypdf.com to remove this watermark.
Adobe Photoshop 7.0 for Photographers
350
Fit Image
Fit Image is a very simple automated plug-in that bypasses the Image > Image Size
menu item. It is well suited for the preparation of screen-based design work. Enter
the pixel dimensions you want the image to fit to, by specifying the maximum pixel
height or width. With the Multi-Page
PDF to PSD plug-in, you can open multiple
pages of a PDF document as individual Photoshop image files. The opening dialog
offers a choice of source file, which pages you want to select, what resolution to open
to and the location of the folder to save to.
Figure 12.2 The Batch interface in Photoshop
6.0 features a section where you can specify the
file naming rules of files saved from a Batch pro-
cess. For example, the file document name itself
can be made to be capitalised or made all lower
case. Likewise, the file extension can be config-
ured the same way. As you can see from the lists
opposite, you can have Photoshop name the batch
processed files in a great many ways. The example
in the File Naming section (see Figure 12.1) indi-
cates how the resulting file name will appear.
Figure 12.1 An example of
the Batch Action dialog set to
apply a prerecorded Action.
Select the Acti on you wish to
apply from the pop-up menu
at the top. Then choose the
source folder containing the
images to process. You can
either instruct Photoshop to
save and close, overwriting the
original or select a destination
folder where the processed
files should be saved to. If you
included an Open command in
the recorded Action, then
don’t override this command,
although you will want to over-
ride the save file operation as
the recorded command will
probably be to a different des-
tination folder. The file naming
options enable you to define
the precise naming structure of
the batch processed files
.
Please purchase PDF Split-Merge on www.verypdf.com to remove this watermark.
Adobe Photoshop 7.0 for Photographers
352
Figure 12.4 The Contact Sheet II interface and an example of a Contact Sheet II output, using the
Filename As Caption option.
Contact Sheet II
The Contact Sheet II is able to take all the images in a selected folder and construct
a contact sheet of these and (if you wish) print the file name as a caption below each
picture.
Just choose a source folder and all the images will be opened
up and assembled to
form a contact sheet page. If there are more images in the folder than will fit on a
single page grid then these will spill over into a second contact sheet document. The
Contact Sheet layout and save destination are specified in the opening dialog box.
You can
choose to use any font for the caption and also have a choice over the
caption point size. Another thing to watch out for is the limit on the caption length, as
only the first twelve characters will be displayed, so check how you name the files. A
nice refinement with Contact
Sheet II is that it remembers the last used settings
rather than always opening with the standard default settings. Fans of the Contact
Sheet plug-in will be pleased to know that the Photoshop 7.0 version produces contacts
with narrower gaps between each image.
Please purchase PDF Split-Merge on www.verypdf.com to remove this watermark.
Shortcuts
353
Export Tr ansparent Image and Resize Image
These last two Automation plug-ins are located in the Help menu. They are very
nicely designed and illustrate just what we might come to expect in the future. The
Export Transparent Image interface starts by asking you whether the purpose of the
final
image is for print or online use. For example, if you want to make a transparent
GIF and there is no selection currently active, it will tell you to cancel and make a
selection first. From there on it will duplicate the current image and ask clearly put
questions about the intended
final output and guide you towards that desired goal.
The Resize Image Automation plug-in also has a clearly designed interface and takes
the user step by step through the process of sizing an image for reprographic or
online use (see Figure 12.5).
Figure 12.5 Tw o d ialog boxes from Actions plug-ins found in the Help menu. On the left: the Export
Transparent Image, which is asking if the image is already on a transparent background or a selection
is currently active. On the right: Resize Image where the user can select the ratio of image resolution
to screen resolution selected, plus a warning that the image may need to be rescanned if this size is
selected.
Please purchase PDF Split-Merge on www.verypdf.com to remove this watermark.
Adobe Photoshop 7.0 for Photographers
354
Web Photo Gallery
This is one of my favorite automated plug-ins. The Web Photo Gallery (WPG) can
process a folder of images and automatically generate all the HTML code needed to
build a website complete with thumbnail images, individual gallery pages and navi-
gable link buttons. This Photoshop feature can therefore save
you many hours of
repetitious work. Imagine you have a set of Photoshop images that need to be for-
warded to a client or colleague who has access to the Internet. When you build a self-
contained web photo gallery in Photoshop, the processed images and HTML pages
are output to a
destination folder. You can then upload this processed folder to your
web server and simply pass the URL link on to the person who needs to see the
photographs. In the Figure 12.6 example, I decided to call the destination folder
‘alcatraz’ and I therefore appended ‘/alcatraz’ to my normal website address
as the
full URL for the recipient to follow.
The source can be any folder of images, regardless of the color mode or color space
they are in (subsets of folders can be processed too). But if you want to achieve some
level of consistency, you might wish to convert all the source
images to sRGB color.
It is not essential that you resize them to the exact viewing size, as the Web Photo
Gallery options allow you to precisely scale the gallery images and thumbnails down
in size while being processed. There is now a choice of eleven template styles to
choose from. Some
of these are based on a simple HTML table design and others
utilize frames and basic JavaScript. Under Options you can enter the banner infor-
mation, including your contact details and email address. Note that not every custom
layout will make use of this information. If you process a folder of images
and are
not sure about the look of the layout chosen, then try selecting an alternate WPG
style. It is worth pointing out that if you have to redo a Web Photo Gallery, Photoshop
will usually not need to reprocess all the image data and will instead recode the
HTML. You can customize
the gallery image, thumbnail sizing, layout appearance
and security settings. If you go to the Gallery Thumbnail options, you can choose
whether to use the file name, or the File Info information, or both as the caption.
You can also choose the number of columns and rows of thumbnail images that
should
be used with the Simple and Table style layouts. In the Customize Colors
options, you can edit the background, text, banner and active link colors. When all
the options are set, these will be remembered the next time you use the Web Photo
Gallery. Choose your destination folder and click OK. Yo u
can also create your own
layout templates. Go to the Photoshop 7.0/Presets/Web Contact Sheet folder and use
the folders in there as a guide for designing your own customized HTML templates.
Remember , when the output folder is complete, you can further enhance the appearance
of your gallery pages by importing them into a
separate website editing program such as
Adobe GoLive™.
Please purchase PDF Split-Merge on www.verypdf.com to remove this watermark.