Tài liệu Customize Photoshop for Your Projects- P7 pptx
Bạn đang xem bản rút gọn của tài liệu. Xem và tải ngay bản đầy đủ của tài liệu tại đây (4.18 MB, 28 trang )
252
11
44
22
33
55
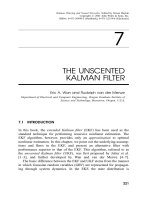
1 Click Silver Efex Pro in the
Selective tool.
Note: If the Selective tool is not
open, click File, Automate, and
then Nik Selective Tool.
Note: You can optionally click
Filter, Nik Software, and then Color
Efex Pro 3.0 to open the Nik
Color Efex Pro 3 interface.
2 Click any of the preset styles in
the left panel to view the preset
conversion in the main preview
window.
3 Click and drag any of the sliders
to adjust the overall tones in
the image.
Note: Increasing the Brightness
slider increases the lightness of the
image. Increasing the Contrast slider
increases the contrast in the image.
Increasing the Structure slider makes
finer details more noticeable.
Decreasing the Structure slider gives
the area a smoother appearance.
● You can click Add Control Point;
click in the image to add a control
point and drag the sliders to
adjust the tones in a specific area.
4 Click the Show Image Only
button to hide the style browser
and make the image in the
preview area larger.
5 Click a color filter, such as the
red filter.
Photoshop CS5’s Adjustments panel includes many
presets and adjustments for converting a color photo
to black and white nondestructively. Nik Software’s
Silver Efex Pro is a sophisticated and yet easy-to-use
tool for converting color images to grayscale and
re-creating the different techniques for traditional
darkroom photographic film processing. As with other
Nik plug-ins, Silver Efex Pro enables you to selectively
control the tones and contrast in the image with the U
Point technology. Silver Efex Pro conversions have
the look of traditional film black-and-white images
because the Nik plug-in re-creates the film grain from
the pixels in the photo, instead of overlaying a grain
pattern as with other digital conversions. You can also
select a black-and-white film type so your final image
more closely emulates the look of a grayscale photo
shot with film.
Silver Efex Pro includes a number of presets, including
tints and toners, so you can vary the resulting
conversion in numerous ways. You can add a vignette
or burned-in edges, and you can even save your own
settings as presets. You can download a trial version to
use with your images at www.Niksoftware.com.
Create a dynamic black-and-white image with
NIK SILVER EFEX PRO
13_612651-ch11.indd 25213_612651-ch11.indd 252 6/2/10 3:30 PM6/2/10 3:30 PM
253
Chapter 11: Plug In to Photoshop CS5
00
##
@@
$$
77
88
!!
^^
99
%%
66
Did You Know?
You can select a
different location for
the center of the
vignette by clicking the
Place Center button
(
) in the Vignette
pane and then clicking
the image in the area
you want for the
center.
More Options!
Stylize a black-and-
white image by clicking
one of the presets,
such as Copper Toner
as in step 11. Then
move the Strength,
Balance, and Paper
Toning sliders to
customize the look.
! Click a preset to apply it.
@ Click the Vignette arrow or the
word Vignette.
The Vignette options appear.
# Scroll to view the sliders.
$ Click and drag the Amount and
Size sliders to adjust the vignette.
% Click and drag the slider under
Rectangle to create a rectangular
vignette as in this example, or
under Circle for a circular
vignette effect.
^ Click OK.
The black-and-white filter is
applied to the image as a
separate layer.
The preview
enlarges and
the color filter
changes the
grayscale
composition.
6 Scroll to view more
options.
7 Click Stylizing
( changes to ).
8 Click the Toning arrow.
9 Click the Presets arrow
to view the presets.
0 Position the cursor over
each preset to view the
results.
Try This!
Click the Burn Edges arrow or
the words Burn Edges at the
bottom of the Stylizing pane.
Click one of the four edge
buttons to adjust the left, top,
right, or bottom edge. Then
click and drag the Strength,
Size, and Transition sliders to
digitally burn one edge of your
image for a unique look.
13_612651-ch11.indd 25313_612651-ch11.indd 253 6/2/10 3:31 PM6/2/10 3:31 PM
254
33
77
55
44
11
66
99
22
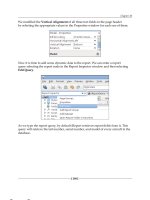
The Coloriage interface appears.
5 Click and drag the slider to
reduce or enlarge your preview.
6 Click a color you want to apply to
one area, such as the skin in this
example.
7 Click the Pencil tool to make the
size slider appear.
8 Press the left or right bracket keys
to adjust the pencil size.
9 Click and drag to draw in the
image with the first color.
1 Press Ô+J (Ctrl+J) to duplicate the
Background layer.
2 Click Filter.
3 Click AKVIS.
4 Click Coloriage.
You can add color to a grayscale photo in Photoshop
using adjustment layers, masks, and brushes; however,
the Coloriage plug-in from AKVIS makes colorizing a
black-and-white photograph quick and automatic. You
can easily add color to a variety of images from antique
photos to hand-drawn sketches and cartoons and still
maintain a very natural look. You can even use
Coloriage to replace the colors in a color image.
Your image must be in RGB mode for the Coloriage
filters to be applied. Click Image in the menu, and
then click Mode and RGB before selecting AKVIS
Coloriage from the Photoshop filters.
You can colorize an image with Coloriage by clicking
different colors from the Colors palette or use the
Color Library for difficult colors such as skin, hair, and
lips. Paint over the areas in the photo with loose
brush strokes. When you click the green forward
button, the software determines the borders of the
various areas and applies the color based on the
grayscale values.
You can find Coloriage along with other AKVIS filters
at .
Colorize a black-and-white photo with
AKVIS COLORIAGE
13_612651-ch11.indd 25413_612651-ch11.indd 254 6/2/10 3:31 PM6/2/10 3:31 PM
255
Chapter 11: Plug In to Photoshop CS5
!!
$$
00
##
@@
%% ^^
Did You Know?
If you want to change
one particular color in a
color image and not alter
the rest of the colors, use
the Pencil tool (
) and
draw on the object. Then
use the Keep-Color
Pencil tool (
) and
draw a closed outline
around the object.
Try This!
When you colorize a
black-and-white
photograph, select the
less saturated colors in
the Color palette to
make the colorization
appear more natural. The
less saturated colors are
at the bottom of the
palette.
More Options!
You can save the color
strokes to edit colors
later or vary different
colorization schemes.
Click the Save Strokes
button (
) after
drawing all the strokes
but before applying
them and closing the
interface.
● AKVIS determines the blends, and
the colorized image appears in
the After pane.
$ Click the Before tab and repeat
steps 6 to 12 to change any
colors as needed.
% Click the Run button again to
view the corrections.
^ Click the Apply button.
The final colorization is applied to
the image.
Note: If the colors are too vibrant
in the Background copy layer, you
can lower the opacity of the layer.
0 Repeat steps
5 to 9 to set
all the colors
to be used.
! Click the Eraser
tool.
@ Click and drag
to correct any
stray marks.
# Click the Run
button to see
a preliminary
colorization.
13_612651-ch11.indd 25513_612651-ch11.indd 255 6/2/10 3:31 PM6/2/10 3:31 PM
256
33
55
66
88
44
11
77
77
22
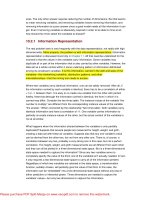
The Sketch interface appears with
a default sketch sample selected
in the center of the image.
5 Click to maximize the interface.
6 Click and drag the selection area
around to view different parts of
the sketch.
7 Click and drag the Sketch Effects
and the Strokes sliders to adjust
the sketching style.
8 Click and drag here to zoom in
on the image.
1 Press Ô+J (Ctrl+J) to duplicate the
layer.
2 Click Filter.
3 Click AKVIS.
4 Click Sketch.
In addition to Coloriage, AKVIS makes a number of
other plug-ins for Photoshop to restore, retouch, and
enhance your photographs. AKVIS art-styled plug-ins
are the best for creating natural-looking art from
photos.
You can easily turn a photo into art using AKVIS
Sketch or AKVIS Artwork. Both these plug-ins give
you control over the style and thickness of lines and
brush strokes, as well as other artistic attributes in a
preview mode. You can change a setting, run a new
preview, and make changes before applying the
effects. By creating the art version of your photo on a
separate layer, you can create multiple artistic
versions of the original Background layer for
comparison or to blend together for different effects.
You can also use Photoshop CS5’s new Bristle tip
brushes and the Mixer Brush tool to further customize
the sketch or painting on another, separate layer.
Using a photo-to-art plug-in from AKVIS alone or in
combination with Photoshop CS5’s art tools enables
you to unleash your creativity, learn to draw and
paint, or improve your artistic skills.
Create a graphite drawing with
AKVIS SKETCH
13_612651-ch11.indd 25613_612651-ch11.indd 256 6/2/10 3:31 PM6/2/10 3:31 PM
257
Chapter 11: Plug In to Photoshop CS5
%%
@@
00
$$
!!
##
99
Try This!
AKVIS Artwork is one of the
best plug-ins available to turn
a photo into a painting. The
sliders and settings are very
similar to those in Sketch, and
you can select the style of paint,
thickness of brush strokes, and
more to make your painting
look more as though it were
done with natural media.
AKVIS redraws the image as a
sketch.
@ Click here and select Fit Image to
view the whole image at once.
# Click and drag any of the sliders
to readjust the drawing.
$ Click the Run button to preview
the new settings.
% Click the Apply button to apply
the sketch to the layer in
Photoshop.
● You can optionally click Save to
save the settings as a preset.
9 Click the Edges
tab.
0 Click and drag
the Edge Strength,
Sensitivity, and
Edge Width sliders
to increase or
decrease quality
of the lines.
! Click the Run
button to preview
the changed
settings.
Did You Know?
AKVIS makes plug-ins to create special
lighting and other effects. With AKVIS
LightShop you can even add reflection
to shiny objects. AKVIS Magnifier can
help you change the size of an image
without loss of quality, and AKVIS
Noise Buster helps in noise reduction.
You can try any of the AKVIS plug-ins
or stand-alone applications with the
trial software at www.AKVIS.com.
More Options!
Selecting areas and masking are
often easier to accomplish with a
plug-in such as AKVIS SmartMask.
Using technology similar to Coloriage,
you draw over areas to keep with a
blue pencil and then draw with a red
pencil to define the areas that should
be cut away. SmartMask finds the
borders and removes the unwanted
areas in the photo.
13_612651-ch11.indd 25713_612651-ch11.indd 257 6/2/10 3:31 PM6/2/10 3:31 PM
258
33
99
77
44
00
55
66
22
88
11
The Alien Skin Snap Art 2
interface for that media appears.
5 Click the Basic tab.
6 Click to apply the filter to a
separate layer ( changes to ).
7 In the small preview window,
click and drag the red box over
the main subject.
8 Click here and select a preview
split.
9 Click and drag any of the sliders
to adjust the look.
A progress bar appears briefly,
and the large preview image
displays the results.
0 Click OK.
Create a Stylized Drawing
1
Press Ô+J (Ctrl+J) to duplicate the
Background layer.
2 Click Filter.
3 Click Alien Skin Snap Art 2.
4 Click a filter such as Stylize.
Turning a photograph into a fine-art piece such as an
oil painting or a pencil sketch using Photoshop’s
actions and brushes can be a lot of fun. It can also be
time-consuming. By using the Snap Art 2 plug-in from
Alien Skin Software, you can transform a photograph
into art that looks as though it was done with
traditional art tools with just a few clicks. You can
apply the Snap Art 2 filter settings and then move the
various sliders and controls and view your painting or
sketch as it builds in the large preview window.
The Snap Art 2 interface includes several split screen
previews so that you can see both your photo as a
reference and the effects as you apply them. By
applying different types of art media filters on
multiple layers and changing the blending modes,
you can completely alter the results and make your
artwork unique. The plug-ins work best on smaller
images with defined contrast areas.
You can find many other powerful plug-ins at
www.alienskin.com.
USE ALIEN SKIN SNAP ART 2
to change your photos into art
13_612651-ch11.indd 25813_612651-ch11.indd 258 6/2/10 3:31 PM6/2/10 3:31 PM
259
Chapter 11: Plug In to Photoshop CS5
##
$$
((
!!
^^
**
&&
@@
Did You Know?
Snap Art 2 uses edge detection to
outline the objects in the photo. It uses
this outline to place the natural media
strokes and fill areas with colors. Snap
Art 2 uses an advanced paint engine to
transform your photo into an artistic
composition, preserving enough detail
while giving the piece a loose and
artistic appearance.
Try This!
Each filter in Snap Art 2 has many
sliders and options. Move a slider to try
a different look. To undo a change,
press Ô+Z (Ctrl+Z) or, to redo the
change, press Ô+Y (Ctrl+Y). You can
return to the default settings anytime by
clicking the Settings tab in the Snap Art
2 interface and clicking Factory Default,
or by pressing Ô+R (F5) to reset the
filter to the original settings.
● The filter is applied to a new layer
named for the type of filter (Impasto
in this example).
Note: You can change the order of the
layers to change the blended effect.
^ Click the top layer to select it.
& Click here and select a layer blend
mode such as Soft Light or Overlay.
* Click Opacity and drag slightly to
the left.
( Double-click the Zoom tool to view
the image at 100%.
Note: Optionally, to vary the effect
more, repeat steps 11 to 18 using
different Alien Skin Snap Art 2 filters
in step 14.
The final image looks more like
artwork than a photograph.
● The filter is applied
to a new layer
named for the type
of filter (Stylize in
this example).
Change the Look by Adding
Another Filter
!
Click Layer 1 to select it.
@ Click Filter.
# Click Alien Skin Snap Art 2.
$ Click another filter such as
Impasto.
% Repeat steps 5 to 10 to
apply the other art media
filter on a separate layer.
13_612651-ch11.indd 25913_612651-ch11.indd 259 6/2/10 3:31 PM6/2/10 3:31 PM
260
33
66
44
11
77
55
22
The Alien Skin interface appears.
6 Click any of the Natural Wood
types in the Settings window.
● You can optionally click any of
the other tabs — Basic, Knots,
or Grain — to customize the
wood look.
7 Click OK.
Note: This task starts with a shape
on one layer and text on a type
layer.
1 Click the type layer.
2 Click Filter.
3 Click Alien Skin Eye Candy 6:
Textures.
4 Click a texture such as Wood.
Note: The type layer will be
changed to a pixel layer and the
text will no longer be editable.
5 Click OK in the warning dialog
box.
Eye Candy 6 from Alien Skin helps you create a
diverse range of designs and specialty effects. You
can easily build glass-like buttons for a Web interface,
add depth to stylize a logo, design custom titles, or
even simulate natural phenomena, such as fire and
smoke. You can create metal, gel, or animal fur
textures simply by moving the sliders. You can even
add a drop shadow to text and make it converge in
perspective. Eye Candy 6 includes 30 filters you can
use and combine to make designs come to life. The
filters perform complex simulations to render detailed
images, and the results are easier to accomplish and
often more realistic than using the filters built into
Photoshop.
You can start with text or a flat logo and then add
texture to extrude it and add a shadow that makes
the design pop off the page. Experimentation is key
to designing with Eye Candy 6. Eye Candy 6 includes
1,500 presets that you can use or visually edit to fit
your particular design.
Create special effects with
ALIEN SKIN EYE CANDY 6
13_612651-ch11.indd 26013_612651-ch11.indd 260 6/2/10 3:31 PM6/2/10 3:31 PM
261
Chapter 11: Plug In to Photoshop CS5
!!
00
99
88
@@
Note: You can also or optionally
click Filter, Eye Candy 6: Text &
Selection, and Bevel to add a bevel
to the shape and text.
! In the Alien Skin interface, click
any of the perspective shadow
options in the Settings pane.
● You can optionally click and drag
on the anchor points to alter the
perspective shadow.
● You can optionally click the Basic
tab to make changes to the
offset, opacity, blur, or fade of
the shadow.
@ Click OK to apply the perspective
shadow to the layer.
The Wood texture
is applied to text
on a layer above the
rasterized black text
layer.
8 Click the Eye icon of the
white Background layer
to deselect it.
9 Press Ô+Opt+Shift+E
(Ctrl+Alt+Shift+E) to
combine the layers into
a new one with a
transparent background.
0 Click Filter, click Eye
Candy 6: Text &
Selection, and
Perspective Shadow.
Did You Know?
The Eye Candy 6 Filters work
with CMYK files and 16-bit per
channel images. They can be
used on very large files because
they work in the 64-bit version
of Photoshop. And because
they can be applied to Smart
Objects and can be built on
separate layers, the filters are
nondestructive.
More Options!
Alien Skin offers a number of plug-in filters
to help the photographer as well as the
professional graphic designer. Alien Skin
Blow Up helps resize images, and the Bokeh
filter gives the photographer the ability to
selectively change the depth of field after
capture. Image Doctor and Exposure help
with image restoration and film simulation.
The photo-oriented plug-ins are also
available as a bundle at www.alienskin.com.
13_612651-ch11.indd 26113_612651-ch11.indd 261 6/2/10 3:31 PM6/2/10 3:31 PM
262
11
22
33
44
66
55
The main Mystical 2.0 interface
fills the screen.
5 Click Special Effects to open the
menu.
6 Click an effect such as Enriched
Black.
1 With an image open in
Photoshop, press Ô+J (Ctrl+J)
to duplicate the Background
layer.
2 Click Filter.
3 Click Auto FX Software.
4 Click Mystical Tint • Tone •
Color.
The colors in your images can express moods and
messages that transcend the subject matter. Using
software plug-in filters such as Mystical Tint, Tone,
and Color (MTTC) from Auto FX Software makes it
easy to visually explore color tones and reinterpret
your images in an artistic way. MTTC includes many
different visual effects and presets. You can apply the
changes to your images globally, or you can apply
them to specific regions of the image by brushing
them on, using gradients, effect masks, or an effect
ellipse to apply different tones to different areas. Auto
FX plug-ins let you work nondestructively to
transform images with dynamically adjustable layers
so you can combine multiple effects and still control
the settings for each one. You can try the layer
presets from a visual gallery or explore the results
with any number of the individual special effects,
experiment with various settings, and watch the
results in a large display. When you see the results
you want, you apply the filters to the image.
You can find other visual imaging solutions for creative
effects on the gallery pages at www.AutoFx.com.
Explore colors and tones visually with
AUTO FX SOFTWARE
13_612651-ch11.indd 26213_612651-ch11.indd 262 6/2/10 3:31 PM6/2/10 3:31 PM
263
Chapter 11: Plug In to Photoshop CS5
99
88
77
##
$$
%%
^^
@@
00
!!
More Options!
Auto FX provides other creative
plug-ins such as Photographic
Edges for adding edges and effects
to images, and Mystical Lighting
and Ambience to change the
lighting and shading of your image
with complete visual control. You
can use Mystical Lighting and
Ambience to create both photo-
realistic and surrealistic effects.
The plug-in adds a Saturate Colors layer.
0 Repeat steps 7 to 9, selecting another effect such
as Deepen Tones.
! Click and drag the sliders to change the effect.
Note: You can optionally click and drag a layer and
move it to a different position in the Auto FX layer
palette to alter the effect.
@ Click Mode Global.
# Click Brush On from the menu.
The overall effect reverts to the previous look.
$ Click the Brush button.
% Click and drag in the image to change the effect.
^ Click OK to apply the filters.
The image reopens in Photoshop with the filter
applied to Layer 1.
● The plug-in adds
an Enriched Black
layer to its layer
palette.
7 Click and drag the
sliders to change the
effect.
8 Click Special Effects
again.
9 Click an effect from the
menu such as Saturate
Colors.
Did You Know?
Mystical Tint Tone and
Color includes portrait-
enhancing filters to
smooth skin, edit skin
color, naturally brighten
the eyes, enhance the
hair, and even enlarge
eyes and lips.
Try This!
After applying an effect in
the Global mode as in step
12, click the Auto FX Eraser
tool (
). Change the size,
feathering, and opacity
using the small sliders in
the thumbnail below the
Eraser. Click and drag in
the image to remove the
effect from specific areas.
13_612651-ch11.indd 26313_612651-ch11.indd 263 6/2/10 3:31 PM6/2/10 3:31 PM
264
44
77
33
55
22
66
3 Click the slider to zoom in or
select 100%.
4 Click Accurate to see the most
accurate preview (
changes
to
).
5 Click here and select New Layer.
6 Click Create Transparency Mask
to apply the adjustments on a
transparent layer (
changes
to
).
7 Click and drag the Detail
Smoothing sliders to increase
or decrease the effect.
● You can optionally click here to
select another preset, such as
Smoothing: Normal.
1 With a photo open in Photoshop,
click Filter, Imagenomic, and
Portraiture.
● The Portraiture interface fills the
screen and the default smoothing
is applied.
● Portraiture remembers the last
settings you applied. You may
need to click here and select Auto
if it is not selected.
2 Click a Split Preview Window
button to see a before and after
preview.
Retouching portraits and softening skin in Photoshop
involves many different tools and techniques, and
multiple masks and steps. You have to make detailed
selections of areas such as hair and eyelashes to
protect them when you apply softening effects to the
skin. Using Imagenomic’s Portraiture plug-in, you can
smooth skin and remove imperfections without
making selections or manually creating masks.
Portraiture’s algorithms work differently compared to
standard Photoshop tools. The plug-in includes an Auto
Mask feature that automatically selects only the range
of skin tones in the image so you can build an effective
mask without selecting the hair, eyelashes, or other
detailed areas. You can adjust the auto mask and then
select from different tones to give your particular
image the most natural-looking results. You can refine
the corrections using the Enhancement sliders.
Portraiture includes presets you can use as a starting
point. You can tailor any preset and save the modified
version as your own custom preset to speed up your
processing time. Imagenomic also makes Noiseware,
an excellent plug-in for noise reduction, and
RealGrain for adding grain to digital images.
www.imagenomic.com
Enhance your portraits with
IMAGENOMIC PORTRAITURE
13_612651-ch11.indd 26413_612651-ch11.indd 264 6/2/10 3:31 PM6/2/10 3:31 PM
265
Chapter 11: Plug In to Photoshop CS5
%%
88
00
@@
$$
##
!!
99
Try This!
You can apply
Portraiture’s Auto Mask
even when batch-
processing images. The
masks are built based
on each image’s
unique skin tone range,
so even in a group of
photos every skin type
is handled individually.
More Options!
You can add a
glamour effect to a
portrait quickly by
using the sliders
under Enhancements
to change the
sharpness, softness,
warmth, brightness,
and contrast for a
different effect.
Did You Know?
The area on the
forehead between
the two eyebrows is
generally a good
representation of the
overall skin tone in the
portrait and a good
area to select from
with Portraiture’s
eyedropper tool.
@ Click the most representative area
of skin in the image.
● A new mask appears in the after
view.
# Click None to hide the mask
and show the preview of the
smoothed image ( changes
to ).
$ Click in the image and drag to
preview other areas.
% Click OK.
The smoothing appears on a
separate layer above the
Background layer in Photoshop.
8 Click White to
see the current
Auto Mask
( changes to ).
9 Click and drag the
Hue, Saturation,
Luminance, and
Latitude sliders
completely to
the left.
0 Click the left
eyedropper.
! Move the cursor
over the skin tones
to see the mask
selections in the
Mask Preview
window.
13_612651-ch11.indd 26513_612651-ch11.indd 265 6/2/10 3:31 PM6/2/10 3:31 PM
266
44
22
66
55
77
88
33
99
Apply a Starburst Vignette with the
Dashboard
1 Load the Kubota actions and
Dashboard following the step-by-
step instructions.
Note: Some instructions are also
available in the Kubota Dashboard.
2 Open a photo in Photoshop.
3 In the Kubota Action Dashboard,
click here and select an action
type.
● You can optionally type the name
of an action to search for it.
4 Click an action from the list such
as StarBurst Vignette.
5 Click Apply.
6 Click Continue in the dialog box
that appears.
The action creates a custom
shape layer and stops so you can
adjust the starburst shape to fit
your photo.
7 Click and drag the anchors to
adjust the shape.
8 Click and drag the shape into
position over the main subject,
if necessary.
9 Press Ô+Return (Ctrl+Enter) or
click the Commit button to apply
the shape.
Kubota Image Tools designs image-enhancing tools to
help photographers process images quickly. The
various tool packs include an assortment of Photoshop
actions you can use to change an image with one click.
You can increase the strength of the colors, add overall
contrast, lighten shadow detail, sharpen, resize
images, add frames, and more without working
through the steps in Photoshop. Kubota Image Tools
uses a customizable Dashboard interface with all the
Kubota actions either listed alphabetically or grouped
by the type of effect. You can add your own custom
actions to the Kubota dashboard and even create
favorites so you can access them more quickly.
Because actions are a series of prerecorded steps,
some actions stop and ask you to adjust a selection for
your photo or enter values in a dialog box before the
transformation is complete.
To apply a Kubota Image Tools enhancement, you
click the desired action in the Kubota Dashboard and
click the Apply button. You can process multiple
images with a single action using the batch command
in Photoshop to increase your productivity. You can
view the results of many of Kubota Image Tools
actions at www.kubotaimagetools.com.
Transform an image with an action from
KUBOTA IMAGE TOOLS
13_612651-ch11.indd 26613_612651-ch11.indd 266 6/2/10 3:31 PM6/2/10 3:31 PM
267
Chapter 11: Plug In to Photoshop CS5
00
!!
@@
##
More Options!
Kubota Image Tools also makes a
separate Border and Textures
Dashboard. Using the actions listed in
this Dashboard, you can apply different
styles of colors, patterns, or edges and
have them blend automatically into the
image. You can easily add a texture over
the whole image and then erase the
texture using a layer mask where the
added texture hides the main subject.
! Click a border, such as Border
Black with White Vertical.
@ Click Apply.
● The action applies a new layer
with a black frame and a white
keyline on the photo.
● Depending on the action
selected, a dialog box may
appear with more instructions.
Close the dialog box by clicking
Stop.
# Click Layer and then Flatten
Image to finish the enhancement.
● The action
applies a
blended starburst
vignette-shaped
layer and mask
to the photo.
Apply a Frame with the
Dashboard
0
Type a word, such
as border, into the
search field of the
Kubota Dashboard.
The corresponding
actions are listed in
the menu.
Try This!
Using the search
field in the
Dashboard, you can
type the first letters
of the name of an
action, and the list
of corresponding
actions appears in
the main Dashboard
section.
Did You Know?
Once installed, you
can open either of the
Kubota Dashboards by
clicking the Photoshop
File menu, Automate,
and Kubota Dashboard
3 Palette or Kubota
Bor-Tex Dashboard
Palette.
13_612651-ch11.indd 26713_612651-ch11.indd 267 6/2/10 3:31 PM6/2/10 3:31 PM
268
22
55
33
44
66
77
88
11
The PhotoFrame Library opens.
5 Type acid to find acid-burn-styled
frames.
6 Scroll to find the style to work
with.
7 Click a frame style to apply it.
8 Click Add Frame.
1 Open the image to frame.
2 Click OnOne in the menu.
3 Click PhotoFrame 4.5 Professional
Edition.
4 Click PhotoFrame 4.5 Professional
Edition to view the entire library,
or click an individual designer
frame style.
OnOne software makes a variety of plug-ins for
Photoshop, as well as stand-alone products for
enlarging images, creating photographic effects and
frames, selective masking, adjusting tone, and
changing the focal point. OnOne’s Plug-In Suite 5
includes 6 separate plug-ins for Photoshop, including
PhotoFrame.
PhotoFrame contains a complete library of instant
frames, edges, backgrounds, textures, and ornaments
you can add as a finishing touch to your images. You
can also use PhotoFrame’s predesigned album pages
to lay out your own photo books. You can browse the
library of frame styles and pages, and preview the
designs on your image to find the one that best fits
your design and the photograph. PhotoFrame even
includes authentic film and darkroom looks, including
film and Polaroid edges, and you can control the size,
colors, and blending of the effect.
PhotoFrame also includes a number of textures,
backgrounds, and ornaments you can use to
completely customize a photo frame or a complete
photo album at www.ononesoftware.com.
Add a frame for a finishing touch with
ONONE PHOTOFRAME
13_612651-ch11.indd 26813_612651-ch11.indd 268 6/2/10 3:31 PM6/2/10 3:31 PM
269
Chapter 11: Plug In to Photoshop CS5
00
99
Did You Know?
Adding a frame with
PhotoFrame is one of the
last steps in editing your
images. You should add
the frame after all the
color and tonal corrections
are completed but before
resizing and sharpening for
final output.
Try This!
You can stack individual
design elements to create
your own custom preset
and save it, so you can
easily apply it to other
images with one click.
● The image opens in Photoshop
with the frame parts as layers
above the image.
The image
appears in the
selected frame.
9 Click and drag
on the anchor
points to resize
the image inside
the frame.
0 Click Apply.
More Options!
In addition to PhotoFrame, the
OnOne Software suite also includes
Genuine Fractals for resizing images,
PhotoTune for color-correcting
photos, FocalPoint for changing the
point of focus, and PhotoTools for
enhancing the overall image. The
Mask Pro plug-in helps you remove
backgrounds without complicated
selections.
13_612651-ch11.indd 26913_612651-ch11.indd 269 6/2/10 3:31 PM6/2/10 3:31 PM
270
22
44
33
55
66
4 Click the Exposure tab.
5 Click and drag the sliders to
change the exposure settings.
6 Click the Details tab.
1 With a duplicated layer converted
to a Smart Object in Photoshop,
click Filter, Topaz Labs, and then
Adjust 4.
The Topaz Adjust interface opens.
2 Click a preset such as Clarity.
3 Click here to open the right panel
if necessary.
The various Photoshop plug-ins from Topaz Labs
enable photographers to easily adjust images to fit
their creative vision. You can improve image quality,
reduce noise, manipulate details, smooth and stylize
a photograph, or change a photo into unique artwork,
effectively reinterpreting photographic realism with an
artist’s brush. And by applying Topaz plug-ins to a
Smart Object layer, you can change the settings even
after they are applied. From artistic exposure effects
to edge manipulation, Topaz plug-ins make many
complicated photo-editing tasks easy.
Topaz Adjust helps you intensify your images and
includes many presets for different styles from mild
exposure enhancements to dynamic photographic
effects. You can create a simulated HDR look without
having multiple exposures and make the final image
look natural or extreme. You can apply a variety
of presets and then customize the look to fit your
photo. The Topaz Adjust plug-in includes separate
adjustments for exposure, detail, color, and noise so
you have complete control over the way your photo
appears at different settings or for unique effects.
www.topazlabs.com
Give a photo greater color depth with
TOPAZ ADJUST
13_612651-ch11.indd 27013_612651-ch11.indd 270 6/2/10 3:31 PM6/2/10 3:31 PM
271
Chapter 11: Plug In to Photoshop CS5
99
!!
88
00
77
Did You Know?
Topaz ReMask offers
simple steps for
extracting detailed
selections, and Topaz
Detail gives images a
sense of depth by
enhancing details
without creating edge
artifacts.
● The adjustments are applied to
the Smart Object layer.
7 Scroll down.
8 Click Process
Details Independent of
Exposure ( changes
to ).
Note: The details will
now be adjusted without
affecting the exposure
and reducing the overall
image noise.
9 Click and drag the
sliders to change the
Details settings.
0 Repeat steps 4 to 9 for
the Color and Noise tabs.
! Click OK.
More Options!
Topaz Simplify gives you many
options for transforming a photo
into art. You can create paintings
in different artistic styles, as well
as shaded line-art sketches. You
can apply the presets or modify
these and save the edited
versions as a custom preset so
you can reapply the tool to
another image.
Important!
Topaz plug-ins work
on both 8- and 16-bit
images so you can take
advantage of the larger
color space. And
because the plug-ins
work on Smart Object
layers in Photoshop,
they are completely
nondestructive.
13_612651-ch11.indd 27113_612651-ch11.indd 271 6/2/10 3:31 PM6/2/10 3:31 PM
272
Index
A
Aberration, chromatic, 70
accessing
adjustment layers, 38
Camera Raw preferences, 127
custom shapes, 43
Keyboard Shortcuts and Menus dialog box, 19
Acrobat (Reader), 239
actions, 20–21, 226
active layer, 37
adding
bevels to signature layers, 193
brushes to Brush Picker, 191
canvas-colored layers as backgrounds, 219
catchlights, 96–97
color depth with Topaz Adjust, 270–271
color stops, 27
depth to eyes, 92–95
designs to custom shape layers, 42–43
drop shadows to signature layers, 193
eyeliner to eyes, 95
files to be merged, 73
frames with OnOne PhotoFrame, 268–269
glamour effects to portraits, 265
gradient layers to eyes, 88–89
items in perspective, 160–161
keyboard shortcuts to filters, 18–19
layer masks, 41, 167
layers as Smart Objects, 52–53
patterns, 25
perspective to type, 180–181
signatures to artwork, 192–193
simulated motion blurs, 140–141
vignette effects, 139
white space, 67
Adjustment Brush tool, 127
adjustment layers, 38–39, 102, 116–117
Adobe Bridge, 14–15, 148
Adobe Lens Profile Creator tool, 71
Adobe RGB (1998), 4
AKVIS software, 74, 242, 254–257
Alien Skin software, 74, 258–261
alignment (type), 185
alpha channel, 152
Amount slider, 154
Apple’s Preview application, 239
Application frame (Macintosh), 63
applying
actions to folders, 21
filters, 54–55, 138, 228–229, 248–249
gradient fill layers, 45
Graduated Filter adjustments, 133
high pass sharpening, 120–121
Imagenomic Portraiture Auto Mask, 265
layer styles, 187
Artistic filters, 221
artwork. See digital artwork
assembling panoramas, 72–73
Auto-Align Layers command, 56–57, 146–147, 157
Auto-Blend Layers command, 56–57, 147
Auto-Blend tool, 156–159
Auto-Enhance option, 47
Auto Fx Software, 262–263
B
Background layer, 36–37
backgrounds, 15, 183
barrel distortion, 70
Bicubic Sharper/Smoother, 74–75
Black & White adjustment layer, 39
black-and-white images
colorizing, 108–109, 169, 254–255
creating with Nik Silver Efex Pro, 252–253
Blade Curvature slider, 154
blemishes, removing, 78–81
blending images
images with displacement maps, 166–169
into custom edges, 146–147, 231
overview, 40–41, 56–57
blending modes, 215
Blow Up (Alien Skin), 74
Boomerang icon, 17
Bridge (Adobe), 14–15, 148
brightness
of eyes, 90–91
of LCD monitors, 29
Brightness slider, 154
Bristle Brush preview, 23
Brush Name dialog box, 23
Brush Picker, 24–25, 191
Brush tool, 22–23, 113
brushes
changing, 47, 213, 231
designing customized, 22–23, 193
loading sets, 24–25
saving, 23
viewing, 191
Burn tool, 199
burning with layers, 114–115
C
calibrating monitors, 28–29
Camera Raw, processing in
creating split tones, 134–135
cropping, 125, 128–129
graduated filter, 132–133
overview, 122
recovering highlights, 126–127
setting preferences, 124
straightening, 125
Targeted Adjustment tool, 130–131
canvas color, setting, 233
canvas size, expanding, 62–63
Carousel view, 17
catchlights, 96–97
changing
Background layer, 36–37
backgrounds, 15, 183
brushes, 47, 213, 231
color of text, 179, 183
depth of field, 152–159
eye color, 86–87
hardness of Eraser/Brush tools, 113
layer blending modes, 215
14_612651-bindex.indd 27214_612651-bindex.indd 272 6/2/10 3:29 PM6/2/10 3:29 PM
273
creating
actions, custom, 20–21
black-and-white photographs, 252–253
brushes, 22–23, 193
channels, 153
clipping masks, 183
colored shadows, 184–185
contact sheets, 236–237
digital artwork
digital pen-and-ink drawings, 206–207
hand-painted oil paintings, 216–219
high-contrast stylized images, 194–195
HUD, 200–201
Mixer Brush, 200–201
overview, 188
painting digital watercolors, 220–223
pastel drawings, 208–211
pen-and-colored wash drawings, 212–215
pencil sketches, 202–205
posterizing photographs, 196–199
signatures, 192–193
sketch appearance, 190–191
digital pen-and-ink drawings, 206–207
diptychs, 66–67
displacement maps, 166
dual brushes, 213
duplicates of Smart Object layers, 53
dynamic black-and-white images with Nik Silver Efex Pro, 252–253
edges, custom, 230–231
gradient fills, 43
gradients, 26–27, 195
graphite drawings with AKVIS Sketch, 256–257
layers for dodging/burning, 115
line frames, 227
neon signs, 172–173
pastel drawings from photographs, 208–211
photo-filled titles, 182–183
quadriptychs, 66–67
selections, 46–47
slide shows, 238–239
special effects with Alien Skin Eye Candy 6, 260–261
split tones, 134–135
text wraps, 176–177
triptychs, 66–67
watermarks, custom, 174–175
Web photo galleries, 240–241
Crop and Straighten Photos command, 64–65
Crop tool, 68–69
cropping
in Camera Raw, 125
creating diptychs/quadriptychs/triptychs, 66–67
images, 60
reversing, 62–63
Custom Shape tool, 175
customizing
view of Bridge, 14–15
workspaces, 8–9
D
Darker Color mode, 194–195
Decontaminate Colors option, 49
depth, adding to eyes, 92–95
masking color, 51
opacity, 69
perspective with Crop tool, 68–69
photographs
color to grayscale, 110–111
into art with Alien Skin Snap Art 2, 258–259
overview, 38–39
preview mode, 49
Smart Filter effects, 55
softness of Eraser/Brush tools, 113
transition styles, 239
type alignment, 185
white balance, 128–129
window views, 12–13
channels, 153
chromatic aberration, 70
Cintiq tablet, 30–31
clipping masks, 183
Clone Stamp tool, 164–165
closing Layer tabs, 34
color
background
changing text, 179, 183
enhancing with Nik Viveza 2, 250–251
hand-coloring grayscale photographs, 112–113
importance of, 102
masking, changing, 51
depth of, 270–271
selecting to tone, 111
settings, 4–5
color-coding layers, 34–35
Color Picker, 63, 109
Color Range, 245
Color Replacement tool, 87
color stops, 27
colorcasts, removing, 106–107
colorizing black-and-white photographs, 108–109, 169, 254–255
commands
Auto-Align Layers, 56–57, 146–147, 157
Auto-Blend Layers, 56–57, 147
Crop and Straighten Photos, 64–65
Match Color, 106–107
Merge to HDR Pro, 148–149
Posterize, 196–199
Shadows/Highlights, 105
comparing images, 15
Conner-ziser, Jane (photographer), 80, 96
contact sheets, 236–237
Content-Aware fills, 142–143
Content-Aware scaling feature, 144–145
controlling noise, 244–245
converting
open image layers to Smart Object layers, 52
photographs
to black-and-white, 169
to hand-painted oil paintings, 216–219
to high-contrast stylized images, 194–195
into pencil sketches, 202–205
to pen-and-colored-wash drawings, 212–215
to sketches, 190–191
RAW files to DNG files, 129
video frames into layers, 159
copying
Background layers, 36–37
Smart Filters, 55
text between documents, 177
14_612651-bindex.indd 27314_612651-bindex.indd 273 6/2/10 3:29 PM6/2/10 3:29 PM
274
IndexIndex
exposure, 104–105
ExpressKey, 31
eyes
adding depth, 92–95
brightening, 90–91
changing eye color, 86–87
eyelash brush, 93
sharpening, 98–99
F
feather radius, 185
feathering selections, 51, 101
files
adding to be merged, 73
DNG, 129
finding with Mini Bridge, 16–17
RAW, 53, 129, 247
Fill dialog box, 205, 223
Fill Light slider, 127
fills, 142–143
film grain, 155
filters
adding keyboard shortcuts to, 18–19
Alien Skin Snap Art 2, 259
applying
with Nik Color Efex Pro 3, 248–249
overview, 138, 228–229
as Smart Filters, 54–55
Artistic, 221
Displace, 168–169
Gaussian Blur, 155
Glowing Edges, 172
graduated, 132–133
High Pass, 121
Indian Summer, 248–249
Lens Blur, 152–155
Lens Correction, 70–71
Motion Blur, 140–141
Neon Glow, 172
Nik Software, 242
Poster Edges, 197
Sketch, 202–205
Smart Sharpen, 75, 99
Vanishing Point, 160–163
Wind, 141
folders, applying actions to, 21
Frame actions, 226
frames, 226–227, 268–269
G
gallery print photographs, 232–235
Gaussian Blur filter, 155
General Preferences dialog box, 6
Genuine Fractals (OnOne Software), 74, 269
geometric distortion, 70–71
Glowing Edges filter, 172
Gradient Editor dialog box, 26–27
Gradient Fill dialog box, 44–45
gradient fills, 43–45
gradient layers, 88–89
Gradient tool, 25, 41, 89
depth of field
Auto-Blend tool, 156–159
Lens Blur filter, 152–155
designs, adding to custom shape layers, 42–43
desktop picture, 5
digital artwork
digital pen-and-ink drawings, 206–207
hand-painted oil paintings, 216–219
high-contrast stylized images, 194–195
HUD, 200–201
Mixer Brush, 200–201
overview, 188
painting digital watercolors, 220–223
pastel drawings from photographs, 208–211
pen-and-colored-wash drawings, 212–215
pencil sketches, 202–205
posterizing photographs, 196–199
signatures, 192–193
sketch appearance, 190–191
digital sharpening, 119
digital softening, 118–119
digital special effects
Auto Blend tool, 156–159
blending photographs, 146–147, 165–169
changing depth of field, 152–155
Clone Stamp tool, 164–165
Content-Aware fills, 142–143
creating greater depth of field, 156–159
dynamic range, 148–149
editing in perspective, 160–163
Lens Blur filter, 152–155
merging photographs, 148–149
overview, 136
photo filters, 138
Puppet Warp tool, 150–151
removing image elements, 142–143
scaling images, 144–145
simulated motion blur, 140–141
Vanishing Point filter, 160–163
vignette effects, 139
digital watercolors, 220–223
diptychs, 66–67
Displace filter, 168–169
displacement maps, 166–169
Distort mode, 151
distortion, 70–71
DNG files, 129
documents, copying text between, 177
Dodge tool, 199
dodging with layers, 114–115
downloading Adobe Lens Profile Creator tool, 71
dragging windows, 13
drop shadows, 193
dynamic range, 148
E
edges, 228–231
editing
in perspective, 160–163
Smart Object layer contents, 53
Eraser tool, 113, 221
14_612651-bindex.indd 27414_612651-bindex.indd 274 6/2/10 3:29 PM6/2/10 3:29 PM
275
burning with, 114–115
changing blending modes, 215
color-coding, 34–35
converting video frames into, 159
creating for dodging/burning, 115
defined, 32
dodging with, 114–115
gradient, 88–89
gradient fill, 44–45
grouping, 35
merging, 45
naming, 34–35
renaming, 34
shape, adding designs to, 42–43
Layers panel, 34–35, 175
LCD monitors, 29
Lens Blur filter, 152–155
Lens Correction dialog box, 70–71
Lens Correction filter, 70–71
leveling images, 61
light, enhancing, 250–251
Lighter Color mode, 194–195
lighting (studio portrait), 97
line frames, 227
loading brush sets, 24–25
M
Macintosh Application frame, 63
mask, 32
masking color, 51
Match Color command, 106–107
memory requirements for filter effects, 205
Merge to HDR Pro command, 148–149
merging
layers, 35, 45
photographs, 148–149
Mini Bridge, 16–17
Mixer Brush, 200–201
monitors, 28–29
Motion Blur filter, 140–141
Mystical Tint Tone and Color, 263
N
naming layers, 34–35
Neon Glow filter, 172
neon signs, designing, 172–173
New Action dialog box, 20–21
New File dialog box, 21
New Workspace dialog box, 9, 15
Nik software, 242, 244–253
noise, 121, 155, 244–245
North America Prepress 2, 4
O
OnOne PhotoFrame, 268–269
OnOne’s Genuine Fractals, 74
opacity, 69
gradients, 26–27, 195
graduated filter, 132–133
graphics, weaving with text, 186–187
graphite drawings, 256–257
grayscale photographs, 110–113
grouping layers, 35
H
hand-painted oil painting, converting photographs to, 216–219
hiding adjustment layer effects, 117
high dynamic range (HDR), 148
High Pass filter, 121
high pass sharpening, 120–121
highlights, 126–127
histogram, 131
Histogram panel, 107
HUD, 200–201
Hue/Saturation adjustment layer, 39
I
Image Size dialog box, 74–75
Imagenomic Portraiture, 264–265
images. See photographs
improving skin tone, 78–81
Indian Summer filter, 248–249
inkjet printing, 75
Interface Preferences dialog box, 7
K
keyboard shortcuts
adding to filters, 18–19
changing
brush size, 47
preview mode, 49
creating
clipping masks, 183
neon signs, 173
Crop tool, 69
duplicating Background layers, 37
printing, 19
resizing Brush tool, 113
saving, 19
setting preferences, 7
Keyboard Shortcuts and Menus dialog box, 18–19
Kubota Image Tools, 266–267
L
LAB Black & White Technique, 111
layer masks, 40–41, 167
layers
active, 37
adding as Smart Objects, 52–53
adjustment, 38–39, 102, 116–117
applying styles, 187
Background, 36–37
14_612651-bindex.indd 27514_612651-bindex.indd 275 6/2/10 3:29 PM6/2/10 3:29 PM
276
Index
leveling, 61
merging, 148–149
opening in Camera Raw, 124
overexposed, 105
posterizing, 196–199
processing in Camera Raw
changing white balance, 128–129
creating split tones, 134–135
cropping, 125
graduated filter, 132–133
overview, 122
recovering highlights, 126–127
setting preferences, 124
straightening, 125
Targeted Adjustment tool, 130–131
protecting, 239
resizing, 74–75, 213
scaling, 144–145
scanning, 64–65
sharpening, 118–119, 246–247
stacking, 15
transforming with Kubota Image Tools, 266–267
underexposed, 104
zooming, 13, 47
Photomerge dialog box, 72–73
picture (desktop), 5
pincushion distortion, 70
plug-ins
AKVIS, 254–257
Alien Skin, 258–261
Auto FX Software, 262–263
Imagenomic’s Portraiture, 264–265
Kubota Image Tools, 266–267
Nik, 244–253
OnOne software, 268–269
Topaz, 270–271
portraits, retouching
adding
catchlights, 96–97
depth to eyes, 92–95
gradient layers, 88–89
brightening eyes, 90–91
changing eye color, 86–87
Imagenomic Portraiture, 264–265
overview, 76
reducing wrinkles, 82–83
removing
blemishes, 78–82
red eye, 84–85
sharpening eyes, 98–99
whitening teeth, 100–101
Poster Edges filter, 197
posterizing photographs, 196–199
Preferences dialog box, 6–7
preferences, setting, 6–7, 124, 127
presentation
applying filters, 228–229
creating
contact sheets, 236–237
custom edges, 230–231
line frames, 227
slide shows, 238–239
Web photo galleries, 240–241
Frame actions, 226
gallery prints, 232–235
overview, 224
Open dialog box, 12–13
opening
Color Picker, 63, 109
files in Camera Raw as Smart Objects, 132
images
in Camera Raw, 124
as Smart Objects, 52–53, 135
Kubota Dashboards, 267
Merge to HDR, 148
RAW files as Smart Objects, 53
Overlay Blend mode, 115
P
Paintbrush tool, 25
painting
digital watercolors, 220–223
Quick Masks, 50–51
panels
Histogram, 107
Layer, 34–35
Refine Edge, 48–49
panoramas, assembling, 72–73
Parametric Curve, 130–131
pastel drawings, creating from photographs, 208–211
Path Selection tool, 187
patterns, 25, 205
pen-and-colored-wash drawings, converting photographs to,
212–215
pen-and-ink drawings, creating digital, 206–207
pen tablets, 30–31, 41, 79
pencil sketches, converting photographs into, 202–205
perspective
adding to type, 180–181
changing with Crop tool, 68–69
editing in, 160–163
Photo Filter adjustments, 138
photographs
adjusting, 38–39
blending
with displacement maps, 166–169
for group shots, 146–147
into custom edges, 231
overview, 40–41, 56–57
changing
color to grayscale, 110–111
into art with Alien Skin Snap Art 2, 258–259
colorizing black-and-white, 108–109, 169, 254–255
comparing, 15
converting
to black-and-white, 169
to hand-painted oil painting, 216–219
to high-contrast stylized images, 194–195
into pencil sketches, 202–205
to pen-and-colored-wash drawings, 212–215
to sketches, 190–191
creating
black-and-white, 252–253
pastel drawings from, 208–211
cropping, 60
framing, 226
gallery print, 232–235
grayscale, 110–113
hand-coloring grayscale, 112–113
14_612651-bindex.indd 27614_612651-bindex.indd 276 6/2/10 3:29 PM6/2/10 3:29 PM