Tài liệu Thiết kế flash với flash cs5 part 20 docx
Bạn đang xem bản rút gọn của tài liệu. Xem và tải ngay bản đầy đủ của tài liệu tại đây (527.18 KB, 5 trang )
ptg
Working with Groups,
Symbols, and Instances
Introduction
All vector objects are editable. As the complexity of your doc-
ument increases, you can protect artwork from being inad-
vertently changed by storing it in special modes called
groups and symbols. Groups provide a quick way to seal a
shape by storing it in a bounding box that can only be edited
by entering a group editing mode. Groups are created on the
Stage and are not stored anywhere else. For items that are
more global to your movie, you can convert them into sym-
bols. The basis for interactivity and animation in Flash resides
in its use of these reusable objects.
You can create artwork and then save that artwork as a
symbol that is stored in the Library of your Flash document.
Symbols are an efficient way to build your movies because
you can reuse these assets as instances on the Timeline, and
Flash will only store it in your file once. Apply ActionScript to
control a movie clip symbol instance and to add interactivity,
place art inside of button symbols to create hit states, or
apply a variety of transparency and color effects to instances
on the Stage. The Library stores all of the reusable art and
objects in your movie including symbols, sounds, video clips,
bitmaps, and components. It can be organized and sorted for
easy access to your movie's assets. A Library can also be
shared with other Flash documents.
4
4
What You’ll Do
Create Groups
Arrange Multiple Groups
Use the Library
Create Symbols
Edit in Symbol Mode
Create Instances
Change Symbol and Instance Behaviors
Swap Symbol Instances
Use Graphic and Button Symbols
Enable and Disable Buttons
Create Invisible Buttons
Use Movie Clip Symbols
Break Symbols Apart
Modify Instance Properties
Modify Instance Color Styles and
Blends
Use Advanced Color Options
Use 9-Slice Scaling on a Movie Clip
Symbol
Set Highlight Color Preferences
131
From the Library of Wow! eBook
From the Library of Michele Renth
ptg
132 Chapter 4
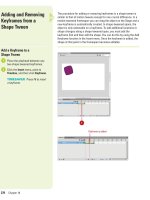
When you group artwork on the Stage, you prevent it from interacting
with other artwork on the same layer. Grouping essentially stores the
artwork in a bounding box that can only be edited by entering a special
group editing mode, which you can easily do by double-clicking the
group. For example, if you draw a shape over another shape on the
same layer, the strokes and fills of the second shape will cut through or
replace the strokes and fills of the shape directly beneath it. Grouping
your artwork prevents this from happening. You can also use grouping
to combine several shapes into one group so you can manipulate them
simultaneously. You can ungroup artwork or objects that have been
grouped by using the ungroup option or by breaking them apart. Doing
so removes the bounding box and the artwork can be freely edited.
Creating Groups
Group Artwork on the
Same Layer
Select the artwork on the Stage
that you want to group with any of
Flash's selection tools or methods.
Click the Modify menu, and then
click Group.
TIMESAVER
Press
A
+G
(Mac) or Ctrl+G (Win) to quickly
group selected objects or artwork.
Ungroup Artwork
Select the artwork on the Stage
that you want to ungroup.
Click the Modify menu, and then
click Ungroup.
TIMESAVER
Press Shift+
A
+G
(Mac) or Shift+Ctrl+G (Win) to
quickly ungroup selected objects
or artwork.
2
1
2
1
1
Selected ungrouped artwork
Selected
grouped
artwork in
bounding
box
2
1
Selected grouped artwork
Artwork
ungrouped
or broken
apart
2
See Also
See “
Breaking Symbols Apart
” on
page 155 for information on taking
apart elements.
From the Library of Wow! eBook
ptg
Chapter 4 Working with Groups, Symbols, and Instances 133
When objects are grouped they appear on top of shapes that aren't
grouped on the same layer. Each subsequent group that is created will
appear on top of the last. This is called the stacking order. Flash allows
you to change this order with the Arrange command. You can send a
group or symbol to the bottom of this stack or bring one at the bottom
to the top. Additionally, you can change the order incrementally.
Arranging Multiple
Groups
Change the Stacking Order
Select the group whose stacking
order you want to change.
Click the Modify menu, point to
Arrange, and then click:
◆ Bring To Front. The selected
object is brought to the top of
the stack.
TIMESAVER
Press
Option+Shift+Up (Mac) or
Ctrl+Shift+Up (Win).
◆ Bring Forward. The selected
object is brought up one level
in the stacking order.
TIMESAVER
Press
A
+Up
(Mac) or Ctrl+Up (Win).
◆ Send Backward. The selected
object is brought down one
level in the stacking order.
TIMESAVER
Press
A
+Down (Mac) or Ctrl+Down
(Win).
◆ Send To Back. The selected
object is brought to the bottom
of the stack.
TIMESAVER
Press
Option+Shift+Down (Mac) or
Ctrl+Shift+Down (Win).
2
1
1
2
Bring To Front
From the Library of Wow! eBook
ptg
134 Chapter 4
The Library panel is where all of the reusable assets in your Flash
movie are stored. An asset is any artwork or object you have made into
symbols, such as fonts, graphic symbols, movie clips, and buttons.
Flash also stores bitmaps, sounds, video clips, and components in the
Library. You can also open libraries from other Flash files to quickly
transfer assets from one project to another. In Flash, you can use a sin-
gle Library panel to view the library items of multiple Flash files at the
same time.
Opening the Library
Panel
Open the Library
Click the Window menu, and then
click Library.
TIMESAVER
Press
A
+L
(Mac) or Ctrl+L (Win) to open the
Library panel.
Click the Document list arrow, and
then select a library from a
currently opened document.
If you want one library selected
regardless of what document is
active, simply select the library
from the Document list arrow
menu, and click the Pin button.
3
2
1
1
New Library
Panel
Options menu
2
3
From the Library of Wow! eBook
ptg
Chapter 4 Working with Groups, Symbols, and Instances 135
Open Other Libraries
Click the File menu, point to
Import, and then click Open
External Library.
TIMESAVER
Press
A
+Shift+O
(Mac) or Ctrl+Shift+O (Win) to
open the Open As Library dialog
box.
Navigate to the drive or folder
where the Flash movie containing
the Library is located.
Select the library file.
Click Open.
The Library appears docked
underneath the Library of the
active project.
4
3
2
1
3
Imported Library
4
Did You Know?
You can use sample common libraries
included with Flash and create your
own.
To us e a co mmo n lib rary, click
the Window menu, point to Common
Libraries, select the library type you
want from the submenu, and then drag
items from the library to your docu-
ment. To create a common library, cre-
ate a Flash file (.fla) with a library
containing the symbols you want, and
then save the file to the Libraries folder
located in the Flash application folder
on your hard disk.
2
From the Library of Wow! eBook