Tài liệu Thiết kế flash với flash cs5 part 40 doc
Bạn đang xem bản rút gọn của tài liệu. Xem và tải ngay bản đầy đủ của tài liệu tại đây (510.77 KB, 6 trang )
ptg
262
Chapter 9
The frame rate describes the amount of frames the Flash Player will
play each second. The higher you set the frame rate, the smoother your
animations will play. Traditional animations play at a rate of 24 frames
per second, the same rate at which film plays, while NTSC video plays
at 29.97 frames per second. It is important to keep your audience in
mind and what the destination of the Flash movie will be. For delivery
via the Web, you should consider the processor speeds of the destina-
tion computers. If you set the frame rate too high, the computer may
not be powerful enough to play all of the frames. When this happens,
Flash will drop frames in order to stay in sync. Try to avoid this scenario
because it can make your animations play choppily. Consider where
your Flash movie is going to be played and choose accordingly. Avoid
frame rates over 30 fps, and, for slower computers, you can go as low
as 12 fps, which is the default frame rate in Flash.
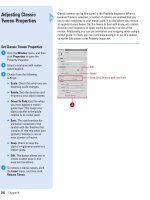
Changing the Frame
Rate
Change Frame Rate
Click a blank area on the Stage.
Click in the Frame Rate field in the
Property Inspector or at the
bottom of the Timeline, and then
type in a frame rate.
2
1
Document settings appear in the Property Inspector
when nothing is selected on the Stage or the Timeline.
The frame rate is also
available to change at the
bottom of the Timeline.
2
Did You Know?
You can also change the frame rate in
the Document options window.
Access this window by clicking the
Document button in the Property
Inspector or in the Modify menu.
The frame rate is ignored for FLV Flash
video.
You need to set its frame rate in
the encoder or editing application.
From the Library of Wow! eBook
ptg
Chapter 9 Animating with Classic Tweening
263
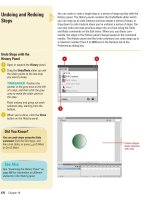
With a classic tween, use the Reverse Frames command to reverse the
frames in the Timeline. You can access this action in the Modify menu
and it will be applied to all selected frames. This works for animations
created frame-by-frame or with motion or shape tweening applied.
Flash changes the order of the frames so your animation plays back-
wards.
Reversing Frames
Reverse Frames
Click and drag on the range of the
frame span or tween you want to
reverse.
Click the Modify menu, point to
Timeline, and then click Reverse
Frames.
TROUBLE?
If the tween is not
preserved when you use the
reverse frames command, you
might not have applied motion or
shape tweening to the end
keyframe in the tween. Flash only
requires you to apply tweening to
the starting keyframe in a tween. It
is implied that it tweens into the
next (or end) keyframe. To fix this,
do one of the following: (1) Before
you reverse frames, select the end
keyframe and apply Motion (for
motion tweening) or Shape (for
shape tweening) to it from the
Property Inspector. (2) After you
reverse frames, select the
beginning keyframe (which use to
be the end keyframe) and apply
Motion (for motion tweening) or
Shape (for shape tweening) to it
from the Property Inspector.
2
1
Frames before reversing
Click and drag to select a range of frames
Frames after reversing
Did You Know?
You can select an entire layer and
reverse all the frames on that layer.
To
select an entire layer, click the layer
name to select it, and then reverse
frames.
From the Library of Wow! eBook
ptg
264
Chapter 9
With a classic tween, you can add keyframes to a motion tween by
simply dragging the object on the Stage on the frame on which you
want the change (or keyframe) to be created or by using the Add
Keyframe function in the Insert menu. For example, if you want the
object to move to another coordinate before it reaches the end posi-
tion, you can set another keyframe between them. In this way, you can
animate shapes in several directions in the same motion tween.
Alternately, you can clear a keyframe from the tween by selecting it
and using the Clear Keyframe function in the Modify menu. In either
case, the length of the tween is preserved; the frame’s status as a
keyframe is removed and Flash redraws the animation, connecting the
keyframes located before and after.
Adding and Removing
Keyframes from a
Classic Tween
Add a Keyframe to a
Classic Tween
Click on a frame in a tweened
framespan you want to add a
keyframe to.
Click the Insert menu, point to
Timeline, and then click Keyframe.
TIMESAVER
Press F6 to insert
a keyframe.
2
1
1
Keyframe is added
Did You Know?
You can click and drag the object on
the Stage and move it to another coor-
dinate.
Flash automatically creates a
keyframe on the active frame if the
playhead is in a motion tweened
framespan.
From the Library of Wow! eBook
ptg
Chapter 9 Animating with Classic Tweening
265
Remove a Keyframe from a
Classic Tween
Click on the keyframe you want to
remove in the motion tween.
Click the Modify menu, point to
Timeline, and then click Clear
Keyframe.
The keyframe is cleared but the
duration of the tween is preserved.
The first and last keyframe are
automatically reconnected and
Flash redraws the tween.
TIMESAVER
Press Shift+F6 to
remove the keyframe.
2
1
1
Keyframe is removed
Duration is maintained
From the Library of Wow! eBook
ptg
266
Chapter 9
With a classic tween, any change made to an object on either
keyframe can be tweened. Included are any changes made to the scale
or rotation of objects on either keyframes in a tweened span. Simply
alter the size or rotation of the instance on either frame, and Flash
gradually tweens these properties. To change scale, you must select
the scale option in the Property Inspector, while rotation has several
options to choose from, including clockwise and counter-clockwise
rotation, and frequency of rotation.
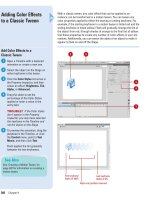
Scaling and Rotating
a Classic Tween
Change Scale During a
Classic Tween
Open a document with a tweened
animation or create a new one.
Select the first keyframe in the
tween to open the Motion settings
in the Property Inspector.
Select the Scale check box in the
Property Inspector.
Change the size of the object on
either keyframe with any of Flash's
transform methods including the
Free Transform tool, the Transform
panel or the transform options in
the Modify menu.
To preview the animation, drag the
playhead in the Timeline, or click
the Control menu, point to Test
Movie, and then click Test.
Flash gradually increases or
decreases the size of the object.
TIMESAVER
Press
A
+Return
(Mac) or Ctrl+Enter (Win) to test it.
5
4
3
2
1
4
First keyframe Last keyframe
3
Scale and position changes tweened
2 1
From the Library of Wow! eBook