Tài liệu Windows Server 2003 pdf
Bạn đang xem bản rút gọn của tài liệu. Xem và tải ngay bản đầy đủ của tài liệu tại đây (1.64 MB, 42 trang )
Step-by-Step Guide for Setting Up Network Quarantine
and Remote Access Certificate Provisioning in a Test Lab
Microsoft Corporation
Published: July 2003
Abstract
This white paper describes how to configure a test lab with five computers for testing Network Access
Quarantine Control and remote access certificate provisioning for computers not joined to a domain. This white
paper offers only step-by-step procedures, not a conceptual overview of all the required technologies. It is
intended for enterprise-level administrators who have experience managing L2TP/IPSec remote access
connections, creating and debugging scripts, using the advanced features of the Connection Manager
Administration Kit, downloading and installing elements of the Microsoft® Windows Server™ 2003 Resource Kit,
administering the Active Directory® directory service, and operating a test lab.
The information contained in this document represents the current view of Microsoft Corporation on
the issues discussed as of the date of publication. Because Microsoft must respond to changing
market conditions, it should not be interpreted to be a commitment on the part of Microsoft, and
Microsoft cannot guarantee the accuracy of any information presented after the date of publication.
This White Paper is for informational purposes only. MICROSOFT MAKES NO WARRANTIES,
EXPRESS, IMPLIED OR STATUTORY, AS TO THE INFORMATION IN THIS DOCUMENT.
Complying with all applicable copyright laws is the responsibility of the user. Without limiting the rights
under copyright, no part of this document may be reproduced, stored in or introduced into a retrieval
system, or transmitted in any form or by any means (electronic, mechanical, photocopying, recording,
or otherwise), or for any purpose, without the express written permission of Microsoft Corporation.
Microsoft may have patents, patent applications, trademarks, copyrights, or other intellectual property
rights covering subject matter in this document. Except as expressly provided in any written license
agreement from Microsoft, the furnishing of this document does not give you any license to these
patents, trademarks, copyrights, or other intellectual property.
Unless otherwise noted, the example companies, organizations, products, domain names, e-mail
addresses, logos, people, places and events depicted herein are fictitious, and no association with
any real company, organization, product, domain name, email address, logo, person, place or event
is intended or should be inferred.
© 2003 Microsoft Corporation. All rights reserved.
Microsoft, Active Directory, Windows, the Windows logo, and Windows Server are either registered
trademarks or trademarks of Microsoft Corporation in the United States and/or other countries.
The names of actual companies and products mentioned herein may be the trademarks of their
respective owners.
Contents
Contents 3
Introduction 1
Conguring the Initial Test Lab 2
Conguring and Testing Network Access Quarantine Control and Certicate Provisioning
10
Summary 38
Related Links 38
Introduction
Network administrators who design and implement remote access solutions often face two problems:
how to deploy a practical implementation of Layer Two Tunneling Protocol with Internet Protocol
Security (L2TP/IPSec) and how to enforce network access requirements on remote computers. By
using the Microsoft Windows Server 2003 family and the Windows Server 2003 Resource Kit Tools,
network administrators can solve both problems using certificate provisioning and Network Access
Quarantine Control.
L2TP/IPSec connections require certificates to be installed on both the remote computer and on the
server. However, many users do not have their home computers joined to a domain, so these
computers cannot be issued certificates through autoenrollment. Network administrators can use
certificate provisioning to install certificates on remote computers that are not joined to a domain. By
using Windows Server 2003 Resource Kit Tools and the advanced customization features of
Connection Manager, network administrators can create connections that automatically install
certificates on remote computers the first time that the users are authenticated and the client computers
connect to the network. For a conceptual overview of certificates and certificate deployment, see Public
Key Infrastructure Product and Technology Security Center ( />LinkID=17815).
Network administrators can solve the problem of enforcing network access requirements on remote
computers with Network Access Quarantine Control. Lack of access makes enforcing network
requirements (such as the use of antivirus software) on remote computers difficult. By using Windows
Server 2003 Resource Kit Tools and the advanced customization features of Connection Manager,
network administrators can create connections that check for required programs, registry settings, files,
or combinations thereof, and they can quarantine a remote access session until these checks have
been performed. For a conceptual overview of Network Access Quarantine Control, see Network
Access Quarantine Control in Windows Server 2003 (
Although certificate provisioning and Network Access Quarantine Control are separate configuration
processes, both processes are demonstrated in the single Connection Manager profile described in this
test lab. This white paper describes how to configure the example.com domain so that:
• Remote access clients that are not joined to the domain can automatically obtain certificates over
the network.
• Remote access clients that do not comply with network access requirements are restricted to only
the file share and Web site that are available on the quarantine resource.
• Remote access policies limit the duration of Point-to-Point Tunneling Protocol (PPTP) connections
but not of L2TP/IPSec connections.
As part of this configuration, this white paper demonstrates how to create a Connection Manager
profile that automatically requests and installs a certificate for an L2TP/IPSec connection. The profile
also installs a quarantine agent and installs and runs a custom quarantine script that checks for the
presence of a required file and takes appropriate action based on its presence or absence.
Because this test lab simulates an Internet connection from CLIENT1 to VPN1, the Connection
Manager profile is configured as a VPN-only connection. In a production environment, you could
configure the profile to first dial an Internet service provider (ISP) before making a VPN connection to
the intranet (known as a double-dial profile).
This white paper takes you step by step through the following tasks:
• setting up the test network
• writing a custom script that verifies the presence of a file on the remote access client
• creating a configuration file for certificate installation on the remote access client
• building Web pages for the two connection states (quarantined and full access)
Windows Server 2003 White Paper 1
• creating and testing a Connection Manager profile that checks for compliance with network access
requirements and that automatically installs the required certificate after the connection to the
corporate network is established.
This white paper is intended for enterprise-level administrators who have experience managing remote
access connections, creating Connection Manager profiles using the Connection Manager
Administration Kit, installing and using resource kit tools, creating and testing scripts, administering
Active Directory, and operating a test lab. It does not provide a comprehensive conceptual overview of
any of the technologies that you implement in the lab or of general test lab operations. If you are
unfamiliar with the Connection Manager Administration Kit and managed remote access connections, it
is strongly recommended that you first complete the test lab detailed in Step-by-Step Guide for Creating
and Testing Connection Manager Profiles in a Test Lab (
For links to other conceptual information, general deployment information, and product details, see
Related Links at the end of this paper.
The instructions in this white paper are cumulative. To reproduce the test lab configurations detailed in
this white paper, you must complete each section in the sequence in which it appears, and you must
follow the steps in each section in sequence.
Note: The following instructions describe configuring a test lab to test the relevant scenarios. To clearly
separate the services provided on the network and to show the desired functionality, you need a
minimum of four servers and one client computer.
In addition, these test lab configurations reflect neither best practices nor a desired or recommended
configuration for a production environment. For example, the test lab uses the same computer as a
domain controller, a Domain Name System (DNS) server, a Dynamic Host Configuration Protocol
(DHCP) server, and an Internet Authentication Service (IAS) server. In a production environment, you
should not run other services on a domain controller. These test lab configurations, including IP
addresses and all other configuration parameters, are designed to work only on a test lab network.
Configuring the Initial Test Lab
To follow the steps in this white paper, you will need to configure five computers in a specific topology.
Each computer in the lab has specific hardware and operating system requirements, which are
specified in the subsections below.
To set up this test lab, you will need the following hardware and software:
• Four computers that are capable of running members of the Windows Server 2003 family
• One server must have two network adapters.
• One server must have a floppy disk drive.
• One computer that is capable of running Microsoft Windows XP Professional and that has a floppy
disk drive
• Two network hubs or Layer 2 switches
• Two operating system discs for Windows Server 2003, Enterprise Edition
• Two operating system discs for Windows Server 2003, Standard Edition
• One operating system disc for Windows XP Professional
• One copy of the Windows Server 2003 Resource Kit Tools
Windows Server 2003 White Paper 2
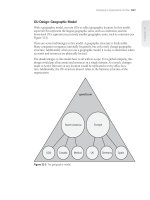
Figure 1 shows the network topology for this lab.
As shown in Figure 1, one segment of the test lab network represents a corporate intranet, and another
segment represents the Internet. Connect all computers on the intranet segment to a common hub or
Layer 2 switch. Connect all computers on the Internet segment to a separate common hub or Layer 2
switch.
The following subsections describe how you will set up the basic infrastructure. To reconstruct this test
lab, configure the computers in the order presented. Additional sections of this paper describe the
specific configuration steps required for testing Network Access Quarantine Control and certificate
provisioning on the remote access client.
DC1
As part of setting up the basic infrastructure for the test lab, configure DC1 as the domain controller, the
DNS server, the DHCP server, and the IAS server for a domain that is named example.com.
Perform basic installation and configuration
1. Install Windows Server 2003, Enterprise Edition, and configure the computer as a stand-alone server
named DC1.
2. Configure the connection to the intranet segment with the IP address of 172.16.0.1 and the subnet
mask of 255.255.255.0.
Configure the computer as a domain controller
1. Click Start, click Run, type dcpromo.exe, and click OK to start the Active Directory Installation
Wizard.
2. Follow the instructions in the wizard to create a domain named example.com in a new forest. Install
the DNS service when prompted to do so.
3. Raise the functional level of the example.com domain to Windows Server 2003.
Windows Server 2003 White Paper 3
Install and configure DHCP
1. Install DHCP as a subcomponent of the Networking Services component.
2. Click Start, point to Administrative Tools, and click DHCP.
3. In the console tree, click dc1.example.com. On the Action menu, click Authorize to authorize the
DHCP service.
4. In the console tree, right-click dc1.example.com, and then click New Scope.
5. On the Welcome page of the New Scope Wizard, click Next.
6. On the Scope Name page, type CorpNet in Name, and click Next.
7. On the IP Address Range page, type 172.16.0.10 in Start IP address, type 172.16.0.100 in End IP
address, type 24 in Length, and click Next.
8. On the Add Exclusions page, click Next.
9. On the Lease Duration page, click Next.
10. On the
Configure DHCP Options page, click Yes, I want to configure these options now, and click Next.
11. On the
Router (Default Gateway) page, click Next.
12. On the
Domain Name and DNS Servers page, type example.com in Parent domain. Type 172.16.0.1 in
IP address, click Add, and click Next.
13. On the WINS
Servers page, click Next.
14. On the
Activate Scope page, click Yes, I want to activate this scope now, and click Next.
15. On the
Completing the New Scope Wizard page, click Finish.
Add computers to the domain
1. Open Active Directory Users and Computers.
2. In the console tree, double-click example.com.
3. Right-click Users, point to New, and then click Computer.
4. In the New Object – Computer dialog box, type CA1 in Computer name, and click Next.
5. In the Managed dialog box, click Next.
6. In the New Object – Computer dialog box, click Finish.
7. Follow steps 3-6 to create additional computer accounts for IIS1 and VPN1.
Windows Server 2003 White Paper 4
Install and configure Internet Authentication Service
1. Install Internet Authentication Service as a subcomponent of the Networking Services component.
2. Click Start, point to Administrative Tools, and click Internet Authentication Service.
3. Right-click Internet Authentication Service, and then click Register Server in Active Directory.
When the Register Internet Authentication Server in Active Directory dialog box appears, click
OK. When the Server registered dialog box appears, click OK.
4. In the console tree, right-click RADIUS Clients, and then click New RADIUS Client.
5. On the Name and Address page of the New RADIUS Client wizard, type VPN1 in Friendly name,
type 172.16.0.2 in Client address (IP or DNS), and then click Next.
6. On the Additional Information page, type the same shared secret for VPN1 in both Shared secret
and in Confirm shared secret.
7. Click Finish.
CA1
As part of setting up the basic infrastructure for the test lab, configure CA1 as the certification authority
for the example.com domain and as the quarantine resource (a Web and file server that the client can
access while still quarantined).
Perform basic installation and configuration
1. Install Windows Server 2003, Enterprise Edition, and configure the computer as a member server
named CA1 in the example.com domain.
Note: The autoenrollment of remote access clients with the appropriate certificate requires the creation
and usage of a Version 2 certificate template. Version 2 certificates are not available on or distributable
by Windows Server 2003, Standard Edition, but they are distributable by Windows Server 2003,
Enterprise Edition.
2. Configure the connection to the intranet segment with the IP address of 172.16.0.4, the subnet mask
of 255.255.255.0, and the DNS server IP address of 172.16.0.1.
Install IIS
• Install Internet Information Services (IIS) as a subcomponent of the Application Server component.
Install Certificate Services and configure the certification
authority
1. When IIS finishes installing, click Add/Remove Windows Components.
2. In Windows Components, select the Certificate Services check box. Click Yes when warned about
not changing the name or domain membership of this computer. Click Next.
3. On the CA Type page, click Enterprise Root CA, and click Next.
Windows Server 2003 White Paper 5
4. On the CA Identifying Information page, type Example Root CA in Common name for this CA
(as shown in the following figure), and then click Next.
5. On the Certificate Database Settings page, click Next.
6. When asked whether to temporarily stop IIS, click Yes.
7. When asked whether to enable ASP pages, click Yes.
8. On the Completing the Windows Components Wizard page, click Finish.
Configure a shared folder
• On CA1, create a folder named Quarantine on the drive on which you installed the operating
system. Share this folder, and retain the default permissions.
Test Web and file share access
1. Start Internet Explorer on DC1. If the Internet Connection Wizard prompts you, configure Internet
access through a LAN connection. In Internet Explorer, type in
Address. You should see the welcome page for certificate Web enrollment.
2. In Internet Explorer, type \\ca1\quarantine in Address and press ENTER. You should see the
contents of the Quarantine folder, which should be empty.
3. Close Internet Explorer.
IIS1
As part of setting up the basic infrastructure for the test lab, configure IIS1 as a Web server and a file
server for the example.com domain.
Windows Server 2003 White Paper 6
Perform basic installation and configuration
1. Install Windows Server 2003, Standard Edition, and configure the computer as a member server
named IIS1 in the example.com domain.
2. Configure the connection to the intranet segment with the IP address of 172.16.0.3, the subnet mask
of 255.255.255.0, and the DNS server IP address of 172.16.0.1.
Install and configure IIS
1. Install Internet Information Services (IIS) as a subcomponent of the Application Server component.
2. Start Internet Explorer on DC1. In Internet Explorer, type in Address. You
should see the Under Construction default Web page.
Configure a shared folder
1. On IIS1, share the root folder of the drive on which you installed the operating system. Name the
share ROOT, and retain the default permissions.
2. To determine whether file sharing is working correctly, on DC1, click Start, click Run, type
\\IIS1\ROOT, and then click OK. You should see the files in the root folder on IIS1.
VPN1
As part of setting up the basic infrastructure for the test lab, configure VPN1 as a remote access server
and as the computer from which you will create Connection Manager profiles using the Connection
Manager Administration Kit. VPN1 must have two network adapters. As part of configuring VPN1 for
Network Access Quarantine Control, you must also install the Windows Server 2003 Resource Kit
Tools, either from CD or by temporarily connecting VPN1 to the Internet and downloading the tools from
the Microsoft Web site ( />Perform basic installation and configuration
1. Install Windows Server 2003, Standard Edition, and configure the computer as a member server
named VPN1 in the example.com domain.
2. Rename the connection to the intranet segment as CorpNet, and rename the connection to the
Internet segment as Internet.
3. Configure the CorpNet connection with the IP address of 172.16.0.2, the subnet mask of
255.255.255.0, and the DNS server IP address of 172.16.0.1.
4. Configure the Internet connection with the IP address of 10.0.0.2 and the subnet mask of
255.255.255.0.
Configure Routing and Remote Access
1. Click Start, point to Administrative Tools, and click Routing and Remote Access.
2. In the console tree, right-click VPN1, and click Configure and Enable Routing and Remote
Access.
Windows Server 2003 White Paper 7
3. On the Welcome to the Routing and Remote Access Server Setup Wizard page, click Next.
4. On the Configuration page, Remote access (dial-up or VPN) is selected by default. Click Next.
5. On the Remote Access page, select the VPN check box, and click Next.
6. On the VPN Connection page, click the Internet interface in Network interfaces, and click Next.
7. On the Network Selection page, click the CorpNet interface in Network Interfaces, and click Next.
8. On the IP Address Assignment page, Automatically is selected by default. Click Next.
9. On the Managing Multiple Remote Access Servers page, click Yes, set up this server to work
with a RADIUS server, and click Next.
10. On the
RADIUS Server Selection page, type 172.16.0.1 in Primary RADIUS server, type the shared secret
in Shared secret, and click Next.
11. On the
Completing the Routing and Remote Access Server Setup Wizard page, click Finish.
12. When a message about configuring the DHCP Relay Agent appears, click OK.
Configure DHCP Relay Agent
1. In the console tree, double-click VPN1, double-click IP Routing, and right-click DHCP Relay Agent,
as shown in the following figure.
2. Click Properties.
3. In the DHCP Relay Agent Properties dialog box, type 172.16.0.1 in Server address, and click Add.
The server address will be added to the list, as shown in the following figure. Click OK.
Windows Server 2003 White Paper 8
Install Connection Manager Administration Kit (CMAK)
1. Click Start, point to Control Panel, and click Add or Remove Programs.
2. Click Add/Remove Windows Components, click Management and Monitoring Tools, and click
Details.
3. Select the Connection Manager Administration Kit check box (as shown in the following figure),
and install CMAK.
Install the Windows Server 2003 Resource Kit Tools
• Insert the Windows Server 2003 Resource Kit Tools CD into the CD-ROM drive, and follow the
instructions for installing the tools. Accept all the default paths and configurations.
Windows Server 2003 White Paper 9
CLIENT1
As part of setting up the basic infrastructure for the test lab, configure CLIENT1 as a standalone
computer on a separate network segment. Because this test lab does not actually connect to the
Internet, you must also configure the hosts file on CLIENT1 to simulate Internet access to VPN1.
1. Install Windows XP Professional, and configure the computer as a standalone computer named
CLIENT1.
2. Configure the connection to the Internet segment with the IP address of 10.0.0.1 and the subnet
mask of 255.255.255.0.
3. Open the \WINDOWS\system32\drivers\etc folder, and open the hosts file in Notepad.
4. Add the line 10.0.0.2 vpn1.example.com # vpn server (as shown in the following figure), and save
the file. Make sure not to accidentally save it with an extension (for example, as hosts.txt).
Configuring and Testing Network
Access Quarantine Control and
Certificate Provisioning
The following subsections describe how you will set up and test network quarantine and automated
L2TP/IPSec certificate provisioning for remote access clients.
Note: For certificate provisioning to work, the user on CLIENT1 must be logged on with administrative
credentials on the local computer. Otherwise, the certificate cannot be stored and an L2TP/IPSec
connection cannot be established.
Windows Server 2003 White Paper 10
DC1
• To configure the test lab for VPN access and network quarantine, create an appropriate user
account and an appropriate group, and configure remote access policies on DC1.
Create a user account for VPN connections
1. Open Active Directory Users and Computers.
2. In the console tree under the example.com domain, right-click Users, point to New, and then click
User.
3. In the New Object – User dialog box, type VPNUser in First name, type VPNUser in User logon
name, and click Next.
4. In the New Object – User dialog box, type a password of your choice in Password and Confirm
password. Clear the User must change password at next logon check box, select the Password
never expires check box, and click Next.
5. In the New Object – User dialog box, click Finish.
Create a group for VPN connections
1. In the console tree, right-click Users, point to New, and then click Group.
2. In the New Object – Group dialog box, type VPNUsers in Group name, and then click OK.
3. In the details pane, double-click VPNUsers.
4. In the VPNUsers Properties dialog box, click the Members tab, and then click Add.
5. In the Users, Contacts, Computers, or Groups dialog box, type VPNUser in Enter the object
names to select, and click OK.
6. In the Multiple Names Found dialog box, click OK.
7. Click OK to save changes to the VPNUsers group.
Create a remote access policy for L2TP/IPSec VPN connections
1. Open Internet Authentication Service.
2. In the console tree, right-click Remote Access Policies, and then click New Remote Access
Policy.
3. On the Welcome to the New Remote Access Policy Wizard page, click Next.
4. On the Policy Configuration Method page, type L2TP VPN Access in Policy name, and click
Next.
5. On the Access Method page, click VPN, and click Next.
6. On the User or Group Access page, click Group, and click Add.
7. In the Select Groups dialog box, type VPNUsers in Enter the object names to select. Specify the
location as example.com. Click OK. The VPNUsers group in the example.com domain is added to
Windows Server 2003 White Paper 11
the list of groups on the User or Group Access page. Click Next.
8. On the Authentication Methods page, the MS-CHAP v2 authentication protocol is selected by
default. Click Next.
9. On the Policy Encryption Level page, clear the Basic encryption and Strong encryption check
boxes, and click Next.
10. On the
Completing the New Remote Access Policy Wizard page, click Finish.
11. In the details
pane of Internet Authentication Service, right-click the L2TP VPN Access policy, and click
Properties.
12. In the L2TP
VPN Access Properties dialog box, click Add.
13. In the Select
Attribute dialog box, click Tunnel-Type (as shown in the following figure), and then click Add.
14. In the
Tunnel-Type dialog box, click Layer Two Tunneling Protocol, click Add (as shown in the following
figure), and then click OK twice.
Windows Server 2003 White Paper 12
Create a remote access policy for PPTP VPN connections
1. In the console tree for Internet Authentication Service, right-click Remote Access Policies, and then
click New Remote Access Policy.
2. On the Welcome to the New Remote Access Policy Wizard page, click Next.
3. On the Policy Configuration Method page, type PPTP VPN Access in Policy name, and click
Next.
4. On the Access Method page, click VPN, and click Next.
5. On the User or Group Access page, click Group, and click Add.
6. In the Select Groups dialog box, type VPNUsers in Enter the object names to select. Specify the
location as example.com. Click OK. The VPNUsers group in the example.com domain is added to
the list of groups on the User or Group Access page. Click Next.
7. On the Authentication Methods page, the MS-CHAP v2 authentication protocol is selected by
default. Click Next.
8. On the Policy Encryption Level page, clear the Basic encryption and Strong encryption check
boxes, and click Next.
9. On the Completing the New Remote Access Policy Wizard page, click Finish.
10. In the details
pane of Internet Authentication Service, right-click the PPTP VPN Access policy, and click
Properties.
11. In the PPTP
VPN Access Properties dialog box, click Add.
12. In the Select
Attribute dialog box, click Tunnel-Type, and then click Add.
13. In the
Tunnel-Type dialog box, click Point-to-Point Tunneling Protocol (PPTP), click Add, and then click
OK.
14. In the PPTP
Windows Server 2003 White Paper 13
VPN Access Properties dialog box, click Edit Profile.
15. In Edit Dial-
in Profile, click the Dial-in Constraints tab.
16. On the Dial-
in Constraints tab, select the Minutes client can be connected (Session-Timeout) check box,
type 1 (as shown in the following figure), and click OK twice.
Create a remote access policy for network quarantine
1. In the console tree for Internet Authentication Service, right-click Remote Access Policies, and then
click New Remote Access Policy.
2. On the Welcome to the New Remote Access Policy Wizard page, click Next.
3. On the Policy Configuration Method page, type Quarantined VPN remote access connections in
Policy name, and click Next.
4. On the Access Method page, click VPN, and click Next.
5. On the User or Group Access page, click Group, and click Add.
6. In the Select Groups dialog box, type VPNUsers in Enter the object names to select. Specify the
location as example.com. Click OK. The VPNUsers group in the example.com domain is added to
the list of groups on the User or Group Access page. Click Next.
7. On the Authentication Methods page, the MS-CHAP v2 authentication protocol is selected by
default. Click Next.
8. On the Policy Encryption Level page, clear the Basic encryption and Strong encryption check
Windows Server 2003 White Paper 14
boxes, and click Next.
9. On the Completing the New Remote Access Policy Wizard page, click Finish.
10. In the details
pane of Internet Authentication Service, right-click the Quarantined VPN remote access
connections policy, and click Properties.
11. In the
Quarantined VPN remote access connections Properties dialog box, click Edit Profile.
12. In the Edit
Dial-in Profile dialog box, click the Advanced tab (as shown in the following figure), and click Add.
13. In the Add
Attribute dialog box, click MS-Quarantine-Session-Timeout (as shown in the following figure), and
click Add.
Windows Server 2003 White Paper 15
14. In the
Attribute Information dialog box, type 120 in Attribute value (as shown in the following figure), and
then click OK.
15. In the Add
Attribute dialog box, click MS-Quarantine-IPFilter, and click Add.
16. In the IP
Filter Attribute Information dialog box, click Input Filters, as shown in the following figure.
Windows Server 2003 White Paper 16
17. In the
Inbound Filters dialog box (as shown in the following figure), click New.
18. In the Add IP
Filter dialog box, click TCP in Protocol, type 7250 in Destination port (as shown in the following
figure), and click OK. This input filter allows the notification message from the rqc.exe component
configured in the Connection Manager profile and installed on CLIENT1.
Windows Server 2003 White Paper 17
19. In the
Inbound Filters dialog box, click New.
20. In the Add IP
Filter dialog box, click UDP in Protocol, type 68 in Source port, type 67 in Destination port, and
click OK. This input filter allows DHCP traffic to be resolved between remote access clients in
quarantine and the DHCP server (DC1).
21. In the
Inbound Filters dialog box, click New.
22. In the Add IP
Filter dialog box, click UDP in Protocol, type 53 in Destination port, and click OK. This input filter
allows DNS traffic to be resolved between remote access clients that are quarantined and the DNS
server (DC1).
23. In the
Inbound Filters dialog box, click New.
24. In the Add IP
Filter dialog box, select the Destination network check box, type 172.16.0.4 in IP address, type
255.255.255.255 in Subnet mask, click Any in Protocol (as shown in the following figure), and click
OK. This input filter allows remote access clients to access the quarantine resources on CA1.
Windows Server 2003 White Paper 18
25. In the
Inbound Filters dialog box, click Permit only the packets listed below (as shown in the following
figure), and click OK.
26. In the Add
Attribute dialog box, click Close.
27. In the Edit
Dial-in Profile dialog box, click OK.
28. In the
Quarantined VPN remote access connections Properties dialog box, click OK to save the
changes to the policy.
Windows Server 2003 White Paper 19
Review remote access policies
• In Internet Authentication Service, review the remote access policies that you just created. They
should appear in the order shown in the following figure.
Configure Active Directory for autoenrollment of certificates
1. Open Active Directory Users and Computers.
2. In the console tree, right-click the example.com domain, and then click Properties.
3. On the Group Policy tab, click Default Domain Policy, and then click Edit.
4. In the console tree for Group Policy Object Editor, open Computer Configuration, then Windows
Settings, and then Security Settings. Click Public Key Policies.
5. In the details pane, right-click Autoenrollment Settings, and click Properties. Click Enroll
certificates automatically, and select both check boxes, as shown in the following figure. Click OK.
Windows Server 2003 White Paper 20
6. Close Group Policy Object Editor.
Update Group Policy
• At a command prompt, type gpupdate /force to update Group Policy on DC1.
CA1
To configure the test lab for VPN access and network quarantine, create and issue certificate templates,
and create quarantine resources on CA1.
Configure certificate templates
1. Click Start, click Run, and type certtmpl.msc to open Certificate Templates.
2. In the details pane, right-click the Authenticated Session template, and click Duplicate Template.
3. On the General tab, type Authenticated Session for Example.com in Template display name, as
shown in the following figure.
Windows Server 2003 White Paper 21
4. On the Security tab, click Authenticated Users in Group or user names. In Permissions for
Authenticated Users, the Read check box is selected by default. Select the Enroll and Autoenroll
check boxes (as shown in the following figure), and then click OK.
5. In the details pane, right-click the RAS and IAS Server template, and click Properties.
6. On the Security tab, click Authenticated Users in Group or user names, select the Enroll and
Autoenroll check boxes, and then click OK.
Windows Server 2003 White Paper 22