Tài liệu Windows Server 2008 Inside Out- P17 pptx
Bạn đang xem bản rút gọn của tài liệu. Xem và tải ngay bản đầy đủ của tài liệu tại đây (1.52 MB, 50 trang )
N
ame services are essential for communications for Transmission Control Protocol/
Internet Protocol (TCP/IP) networking. Windows Server 2008 uses the Domain
Name System (DNS) as its primary method of name resolution. DNS enables computers
to register and resolve DNS domain names. DNS defi nes the rules under which com-
puters are named and how names are resolved to IP addresses. Windows Server 2008
also supports Windows Internet Naming Service (WINS), which is covered in detail in
Chapter 25, “Implementing and Maintaining WINS.” WINS provides a similar service
for NetBIOS names as DNS provides for DNS domain names. WINS maps NetBIOS
names to IP addresses for hosts running NetBIOS over TCP/IP.
Installing the DNS Server Service
The way you install the DNS Server service depends on whether you plan to use DNS
with the Active Directory or without Active Directory. After you make that decision, you
can install DNS as necessary.
Using DNS with Active Directory
On a domain with Active Directory, DNS is required to install the fi rst domain control-
ler in a domain. Active Directory doesn’t necessarily require Windows DNS, however.
Active Directory is designed to work with any DNS server that supports dynamic
updates and Service Location (SRV) records. This means Active Directory can work
with any DNS server running Berkeley Internet Name Domain (BIND) version 8.1.2 or
later. If you have DNS servers that use BIND version 8.1.2 or later, you can use those
servers. If you don’t already have BIND servers, you probably won’t want to set these up
because there are many benefi ts to using the Microsoft DNS Server service.
When you install the DNS Server service as part of the Active Directory installation
process, you can use Active Directory–integrated zones and take advantage of the many
replication and security benefi ts of Active Directory. Here, any server confi gured as a
domain controller with DNS and using Active Directory–integrated zones is an Active
Directory primary name server.
Installing the DNS Server Service . . . . . . . . . . . . . . . . . . 767
Configuring DNS Using the Wizard . . . . . . . . . . . . . . . . 773
Configuring DNS Zones, Subdomains, Forwarders,
and Zone Transfers . . . . . . . . . . . . . . . . . . . . . . . . . . . . . 783
Adding Resource Records . . . . . . . . . . . . . . . . . . . . . . . . 794
Deploying Global Names . . . . . . . . . . . . . . . . . . . . . . . . 803
Maintaining and Monitoring DNS . . . . . . . . . . . . . . . . . 804
Troubleshooting the DNS Client Service . . . . . . . . . . . . 809
Troubleshooting the DNS Server Service . . . . . . . . . . . 812
CHAPTER 24
Implementing and Managing DNS
767
Please purchase PDF Split-Merge on www.verypdf.com to remove this watermark.
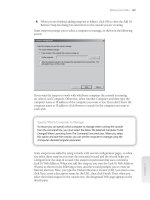
Here’s how installation of DNS on the fi rst domain controller in a domain works:
1. You use the Domain Controller Promotion tool (Dcpromo.exe) to install the fi rst
domain controller. During the installation process, you are prompted to specify
the Active Directory domain name, as shown in the following screen. This sets
the DNS name for the domain as well.
Note
For more information about promoting domain controllers, see “Installing Active Direc-
tory Domain Services” on page 1112.
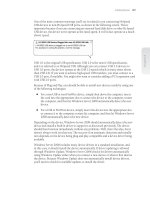
2. When the Active Directory installation process begins, the Active Directory
Domain Services Installation Wizard will check the current DNS confi guration.
If no authoritative DNS servers are available for the domain, the wizard selects
DNS Server as an additional installation option, as shown in the following
screen:
Note
For more information about promoting domain controllers, see “Installing Active Direc-
tory Domain Services” on page 1112.
Chapter 24
768 Chapter 24 Implementing and Managing DNS
Please purchase PDF Split-Merge on www.verypdf.com to remove this watermark.
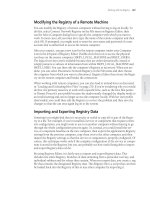
3. In most cases, you’ll want to install DNS. If you install DNS, the Active Directory
Domain Services Installation Wizard will install and then confi gure DNS. As
the next screen shows, this means a forward lookup zone will be created for the
domain. The forward lookup zone will have the Start of Authority (SOA), Name
Server (NS), and host Address (A) records for the server you are working with.
This designates it as the authoritative name server for the domain. If desired, you
can also create reverse lookup zones to allow for IP address to host name lookups.
DNS servers support IPv4 and IPv6 for reverse lookups.
4. For the fi rst DNS server in a forest, the Active Directory Domain Services
Installation Wizard creates the forest-side locator records and stores them in the
_msdcs subdomain. Windows Server 2008 creates this as a separate zone, which
is referred to as the forest root zone.
Installing the DNS Server Service 769
Chapter 24
Please purchase PDF Split-Merge on www.verypdf.com to remove this watermark.
The forest root zone is an important part of Active Directory. It is in this zone that
Active Directory creates SRV resource records used when clients are looking for a par-
ticular resource such as global catalog servers, Lightweight Directory Access Protocol
(LDAP) servers, and Kerberos servers. The _msdcs subdomain is created as its own zone
to improve performance with remote sites. With Windows 2000, remote sites have to
replicate the entire DNS database to access forest root records, which means increased
replication and bandwidth usage. As a separate zone, only the zone will be replicated
to the DNS servers in remote sites as long as Active Directory application partitions are
used. In Windows Server 2008, you can enable application partitions for use with DNS as
discussed in “Confi guring Default Application Directory Partitions and Replication Scope”
on page 804.
On subsequent domain controllers, you must specifi cally install the DNS Server ser-
vice. You do this using the Add Roles Wizard as detailed in “DNS Setup” on the next
page.
In an Active Directory domain, secondary and stub zones can also be useful, as dis-
cussed in “DNS Zones and Zone Transfers” on page 749. In fact, in certain situations
you might have to use a secondary or stub zone for name resolution to work prop-
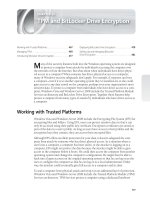
erly. Consider the case when you have multiple trees in a forest, each in their own
namespace. For instance, City Power & Light and The Phone Company are both part
of one company and use the domains cpandl.com and thephone-company.com, respec-
tively. If the namespaces for these domains are set up as separate trees of the same
forest, your organization would have two namespaces. In the cpandl.com domain, you
might want users to be able to access resources in thephone-company.com domain and
vice versa. To do this, you would confi gure DNS as shown in Figure 24-1.
Active
Directory
replication
Active
Directory
sales.cpandl.com
Active
Directory
tech.cpandl.com
Active
Directory
replication
Active
Directory
DNS
Secondary
zone
DNS
thephone-company.com
Secondary
zone
DNS
Active Directory
DNS
cpandl.com
Zone
transfer
Zone
transfer
Figure 24-1 Using secondary zones with Active Directory.
SIDE OUT
Forest root zones
The forest root zone is an important part of Active Directory. It is in this zone that
Active Directory creates SRV resource records used when clients are looking for a par-
ticular resource such as global catalog servers, Lightweight Directory Access Protocol
(LDAP) servers, and Kerberos servers. The _msdcs subdomain is created as its own zone
to improve performance with remote sites. With Windows 2000, remote sites have to
replicate the entire DNS database to access forest root records, which means increased
replication and bandwidth usage. As a separate zone, only the zone will be replicated
to the DNS servers in remote sites as long as Active Directory application partitions are
used. In Windows Server 2008, you can enable application partitions for use with DNS as
discussed in “Confi guring Default Application Directory Partitions and Replication Scope”
on page 804.
Chapter 24
770 Chapter 24 Implementing and Managing DNS
Please purchase PDF Split-Merge on www.verypdf.com to remove this watermark.
The implementation steps for this example are as follows:
1. Set up a secondary or stub zone for thephone-company.com on the authoritative
name server for cpandl.com.
2. Set up a secondary or stub zone for cpandl.com on the authoritative name server
for thephone-company.com.
3. Confi gure zone transfers between cpandl.com and thephone-company.com.
4. Confi gure zone transfers between thephone-company.com and cpandl.com.
Using DNS Without Active Directory
On a domain without Active Directory, DNS servers act as standard primary or stan-
dard secondary name servers. You must install the DNS Server service on each primary
or secondary server. You do this using the Add Roles Wizard as detailed in the next
section.
On primary name servers, you confi gure primary zones for forward lookups and as nec-
essary for reverse lookups. The forward lookup zone will have SOA, NS, and A records
for the server you are working with. This designates it as the authoritative name server
for the domain. You can also create reverse lookup zones to allow for IP address to host
name lookups.
On secondary name servers, you confi gure secondary zones to store copies of the
records on the primary name server. You can create secondary zones for the forward
lookup zones as well as the reverse lookup zones confi gured on the primary.
Stub zones and forwarders are also options for these DNS servers.
DNS Setup
You can install the DNS Server service by completing the following steps:
1. In Server Manager, select the Roles node in the left pane and then click Add Roles.
This starts the Add Roles Wizard. If the wizard displays the Before You Begin
page, read the welcome message and then click Next.
2. On the Select Server Roles page, select DNS Server and then click Next twice.
3. Click Install. The wizard installs DNS Server. From now on, the DNS Server
service should start automatically each time you reboot the server. If it doesn’t
start, you’ll need to start it manually.
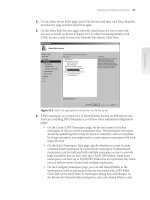
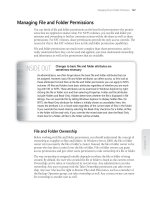
After you install the DNS Server service, the DNS console is available on the Adminis-
trative Tools menu. Start the console by clicking Start, Administrative Tools, DNS. Then
select the DNS server you are working with to see its status as shown in Figure 24-2.
This is telling you to create a scope so that the clients can get IP addresses dynamically
assigned by this server.
Installing the DNS Server Service 771
Chapter 24
Please purchase PDF Split-Merge on www.verypdf.com to remove this watermark.
Figure 24-2 The DNS console.
You don’t have to complete the rest of the confi guration at the server. You can remotely
manage and confi gure DNS. Simply start the DNS console on your computer, right-click
the DNS node in the left pane, and select Connect To DNS Server. In the Connect To
DNS Server dialog box, select The Following Computer, type the name or IP address of
the DNS server, and then click OK. In the DNS console, host addresses are displayed as
IPv4 or IPv6 addresses as appropriate.
The command-line counterpart to the DNS console is Dnscmd. The Dnscmd command-
line tool accepts addresses in IPv4 and IPv6 format. From the command prompt on a
computer running Windows Server 2008, you can use Dnscmd to perform most of the
tasks available in the DNS console as well as to perform many troubleshooting tasks
that are specifi c to Dnscmd. Unlike Netsh, Dnscmd doesn’t offer internal command
prompts. You can specify only the server you want to work with followed by the com-
mand and the command-line options to use for that command. Thus, the syntax is as
follows:
dnscmd ServerName Command CommandOptions
where
ServerName is the name or IP address of the DNS server you want to work with,
such as CORPSVR03 or 192.168.10.15.
Command is the command to use.
CommandOptions are the options for the command.
Note
If you are working on the server you want to confi gure, you don’t have to type the server
name or IP address.
Note
If you are working on the server you want to confi gure, you don’t have to type the server
name or IP address.
Chapter 24
772 Chapter 24 Implementing and Managing DNS
Please purchase PDF Split-Merge on www.verypdf.com to remove this watermark.
After you set up a DNS server, the setup process should confi gure the server’s TCP/IP
settings so that the server attempts to resolve its own DNS queries. Setup does this by
setting the server’s primary DNS server address to its own address for both IPv4 and
IPv6. You can confi rm this by entering ipconfi g /all at a command prompt. In the out-
put of the command, you should see that the DNS servers are set as:
::1
127.0.0.1
::1 is the local loopback address for IPv6 and 127.0.0.1 is the local loopback address for
IPv4. If necessary, you can modify the DNS server entries as discussed in Chapter 21,
“Managing TCP/IP Networking.” For Preferred DNS Server, type the computer’s own IP
address. Set an alternate DNS server as necessary.
You can also set the preferred DNS server IP address from the command line. Type the
following command:
netsh interface ip set dns ConnectionName static ServerIPAddress
where ConnectionName is the name of the local area connection and ServerIPAddress is
the IP address of the server.
Consider the following example:
netsh interface ip set dns "Local Area Connection" static 192.168.1.100
Here, you set the preferred DNS server address for the network connection named
Local Area Connection to 192.168.1.100. The Static option says that you want to use the
local setting for DNS rather than the Dynamic Host Confi guration Protocol (DHCP)
setting when applicable.
You can confi rm the new setting by typing ipconfi g /all at the command prompt and
checking for the DNS server entry. The server should have the same setting for the IP
address and primary DNS server.
Confi guring DNS Using the Wizard
From the DNS console, you can start the Confi gure A DNS Server Wizard and use it
to help you set up a DNS server. This wizard is useful for helping you confi gure small
networks that work with Internet service providers (ISPs) and large networks that use
forwarding.
Configuring DNS Using the Wizard 773
Chapter 24
Please purchase PDF Split-Merge on www.verypdf.com to remove this watermark.
For small networks, the Confi gure A DNS Server Wizard creates only a forward lookup
zone. For large networks, the Confi gure A DNS Server Wizard creates a forward lookup
zone and a reverse lookup zone. This might get you to thinking whether reverse lookup
zones are needed on your network. Computers use reverse lookups to fi nd out who is
contacting them. Often this is so that they can display a host name to users rather than
an IP address. So, although a reverse lookup zone isn’t created by the Confi gure A DNS
Server Wizard for small networks, you might still want to create one. If so, follow the pro-
cedure discussed in “Creating Reverse Lookup Zones” on page 785.
Confi guring a Small Network Using
the Confi gure A DNS Server Wizard
For a small network, you can use the wizard to set up your forward lookup zone and
query forwarding to your ISP or other DNS servers. You can also choose to confi gure
this zone as a primary or secondary zone. You use the primary zone option if your orga-
nization maintains its own zone. You use the secondary zone if your ISP maintains your
zone. This gives you a read-only copy of the zone that can be used by internal clients.
Because small networks don’t normally need reverse lookup zones, these are not cre-
ated. You can, of course, create these zones later if needed.
To confi gure a small network using the Confi gure A DNS Server Wizard, follow these
steps:
1. Right-click the server entry in the DNS console, select Confi gure A Server, and
then when the wizard starts, click Next.
Note
If the server you want to work with isn’t shown, right-click the DNS node in the left pane,
and select Connect To DNS Server. In the Connect To DNS Server dialog box, select The
Following Computer, type the name or IP address of the DNS server, and then click OK.
2. Choose Create A Forward Lookup Zone (Recommended For Small Networks), as
shown in Figure 24-3, and then click Next.
SIDE OUT
Are reverse lookups needed?
For small networks, the Confi gure A DNS Server Wizard creates only a forward lookup
zone. For large networks, the Confi gure A DNS Server Wizard creates a forward lookup
zone and a reverse lookup zone. This might get you to thinking whether reverse lookup
zones are needed on your network. Computers use reverse lookups to fi nd out who is
contacting them. Often this is so that they can display a host name to users rather than
an IP address. So, although a reverse lookup zone isn’t created by the Confi gure A DNS
Server Wizard for small networks, you might still want to create one. If so, follow the pro-
cedure discussed in “Creating Reverse Lookup Zones” on page 785.
Note
If the server you want to work with isn’t shown, right-click the DNS node in the left pane,
and select Connect To DNS Server. In the Connect To DNS Server dialog box, select The
Following Computer, type the name or IP address of the DNS server, and then click OK.
Chapter 24
774 Chapter 24 Implementing and Managing DNS
Please purchase PDF Split-Merge on www.verypdf.com to remove this watermark.
Note
If Active Directory is installed on the network, this zone will be automatically integrated
with Active Directory. To avoid this, you can choose the second option, Create Forward
And Reverse Lookup Zones (Recommended For Large Networks), and then proceed as
discussed in “Confi guring a Large Network Using the Confi gure A DNS Server Wizard” on
page 778. When the wizard gets to the reverse lookup zone confi guration part, you can
skip this if you don’t want to create a reverse lookup zone.
Figure 24-3 Select the first option to configure DNS for a small network.
3. As shown in Figure 24-4, you can now choose whether the DNS server or your ISP
maintains the zone and then click Next. Keep the following in mind:
If the DNS server maintains the zone, the wizard confi gures a primary zone
that you control. This allows you to create and manage the DNS records for
the organization.
If your ISP maintains the zone, the wizard confi gures a secondary zone that
will get its information from your ISP. This means the staff at the ISP will
need to create and manage the DNS records for the organization—and you
will need to pay them to do so.
Note
If Active Directory is installed on the network, this zone will be automatically integrated
with Active Directory. To avoid this, you can choose the second option, Create Forward
And Reverse Lookup Zones (Recommended For Large Networks), and then proceed as
discussed in “Confi guring a Large Network Using the Confi gure A DNS Server Wizard” on
page 778. When the wizard gets to the reverse lookup zone confi guration part, you can
skip this if you don’t want to create a reverse lookup zone.
Configuring DNS Using the Wizard 775
Chapter 24
Please purchase PDF Split-Merge on www.verypdf.com to remove this watermark.
Figure 24-4 Specify whether the zone will be maintained on the server or by your ISP.
4. On the Zone Name page, type the full DNS name for the zone. The zone name
should help determine how the zone fi ts into the DNS domain hierarchy. For
example, if you’re creating the primary server for the cpandl.com domain, you
should type cpandl.com as the zone name. Click Next.
5. If your ISP maintains the zone, you see the Master DNS Servers page, as shown
in Figure 24-5. Type the IP address of the primary DNS server that’s maintaining
the zone for you, and then press Enter. Repeat this step to specify additional
name servers at your ISP. The wizard will automatically validate the IP address
or addresses you’ve entered. Zone transfers will be confi gured to copy the zone
information from these DNS servers.
6. If you choose to maintain the zone, you see the Dynamic Update page, as shown
in Figure 24-6. Choose how you want to confi gure dynamic updates, and then
click Next. You can use one of these options:
Allow Only Secure Dynamic Updates—This option is available only on domain
controllers and when Active Directory is deployed. It provides for the best
security possible by restricting which clients can perform dynamic updates.
Allow Both Nonsecure And Secure Dynamic Updates—This option allows any
client to update resource records in DNS. Although it allows both secure
and nonsecure updates, it doesn’t validate updates, which means dynamic
updates are accepted from any client.
Do Not Allow Dynamic Updates—This option disables dynamic updates in
DNS. You should use this option only when the zone isn’t integrated with
Active Directory.
Chapter 24
776 Chapter 24 Implementing and Managing DNS
Please purchase PDF Split-Merge on www.verypdf.com to remove this watermark.
Figure 24-5 Specify the primary name server and other name servers at the ISP.
Figure 24-6 Set the dynamic updates options.
7. The Forwarders page allows you to confi gure forwarding of DNS queries. If you
want internal DNS servers to forward queries that they can’t resolve to another
server, type the IP address for that server. You can optionally include the IP
address for a second forwarder as well. If you don’t want to use forwarders, select
No, It Should Not Forward Queries.
Configuring DNS Using the Wizard 777
Chapter 24
Please purchase PDF Split-Merge on www.verypdf.com to remove this watermark.
Note
Selecting the No, It Should Not Forward Queries option won’t prevent internal name
servers from forwarding queries altogether. A root hints fi le will still be created, which
lists the root name servers on the public Internet. Thus, if you don’t designate forward-
ers, such as the primary and secondary name servers of your ISP, the internal name
servers will still forward queries. To prevent this, you must modify the root hints fi le as
discussed in “Security Considerations” on page 757.
8. When you click Next, the wizard will search for and retrieve the current root
hints. Click Finish to complete the confi guration and exit the wizard. If there is
a problem confi guring the root hints, you will need to confi gure the root hints
manually or copy them from another server.
Confi guring a Large Network Using
the Confi gure A DNS Server Wizard
For a large network, you can use the wizard to set up your forward and reverse lookup
zones and to set up forwarding with or without recursion. With recursion, queries for
external resources are fi rst forwarded to your designated servers, but if those servers
are unavailable, the DNS server forwards queries to the root name servers. Without
recursion, queries for external resources are only forwarded to your designated servers.
The DNS Server service can send queries to IPv4, IPv4 and IPv6, and IPv6-only servers.
To confi gure a large network using the Confi gure A DNS Server Wizard, follow these
steps:
1. Right-click the server entry in the DNS console, and select Confi gure A Server.
When the wizard starts, click Next.
Note
If the server you want to work with isn’t shown, right-click the DNS node in the left pane,
and select Connect To DNS Server. In the Connect To DNS Server dialog box, select The
Following Computer, type the name or IP address of the DNS server, and then click OK.
Note
Selecting the No, It Should Not Forward Queries option won’t prevent internal name
servers from forwarding queries altogether. A root hints fi le will still be created, which
lists the root name servers on the public Internet. Thus, if you don’t designate forward-
ers, such as the primary and secondary name servers of your ISP, the internal name
servers will still forward queries. To prevent this, you must modify the root hints fi le as
discussed in “Security Considerations” on page 757.
Note
If the server you want to work with isn’t shown, right-click the DNS node in the left pane,
and select Connect To DNS Server. In the Connect To DNS Server dialog box, select The
Following Computer, type the name or IP address of the DNS server, and then click OK.
Chapter 24
778 Chapter 24 Implementing and Managing DNS
Please purchase PDF Split-Merge on www.verypdf.com to remove this watermark.
2. Choose Create Forward And Reverse Lookup Zones (Recommended For Large
Networks), as shown in Figure 24-7, and then click Next.
Figure 24-7 Select the second option to configure DNS for a large network.
3. To create a forward lookup zone, accept the default option on the Forward
Lookup Zone page, and then click Next. Otherwise, click No, and skip to step 10.
4. As Figure 24-8 shows, you can now select the zone type. Choose one of the
following options, and then click Next:
Primary Zone—Use this option to create a primary zone and designate this
server to be authoritative for the zone. Ensure that the Store The Zone In
Active Directory check box is selected if you want to integrate DNS with
Active Directory. Otherwise, clear this check box so that a standard primary
zone is created.
Secondary Zone—Use this option to create a secondary zone. This means the
server will have a read-only copy of the zone and must use zone transfers to
get updates.
Stub Zone—Use this option to create a stub zone. This creates only the nec-
essary glue records for the zone. Optionally, specify that this zone should
be integrated with Active Directory. This means the zone will be stored in
Active Directory and be updated using Active Directory replication.
Configuring DNS Using the Wizard 779
Chapter 24
Please purchase PDF Split-Merge on www.verypdf.com to remove this watermark.
Figure 24-8 Select the zone type.
5. If you created an Active Directory–integrated zone, specify the replication scope,
and then click Next. As Figure 24-9 shows, you have the following options:
To All DNS Servers In This Forest—Enables replication of the zone informa-
tion to all domains in the Active Directory forest. Each DNS server in the
forest will receive a copy of the zone information and get updates through
replication.
To All DNS Servers In This Domain—Enables replication of the zone informa-
tion in the current domain. Each DNS server in the domain will receive a
copy of the zone information and get updates through replication.
To All Domain Controllers In This Domain—Replicates zone information to
all domain controllers in the Active Directory domain. As with a Windows
2000 domain, all domain controllers will get a copy of the zone information
and get updates through replication regardless of whether they are also run-
ning the DNS Server service.
To All Domain Controllers Specifi ed In The Scope Of This Directory Partition—If
you’ve confi gured application partitions other than the default partitions,
you can limit the scope of replication to a designated application partition.
Any domain controllers confi gured with the application partition will get a
copy of the zone information and get updates through replication regardless
of whether they are also running the DNS Server service.
6. On the Zone Name page, type the full DNS name for the zone. The zone name
should help determine how the zone fi ts into the DNS domain hierarchy. For
example, if you’re creating the primary server for the cpandl.com domain, you
should type cpandl.com as the zone name. Click Next.
Chapter 24
780 Chapter 24 Implementing and Managing DNS
Please purchase PDF Split-Merge on www.verypdf.com to remove this watermark.
Figure 24-9 Select the replication scope if you are using Active Directory integration.
7. If you’re creating a standard primary zone, you see the Zone File page. This page
allows you to create a new zone fi le or use an existing zone fi le. In most cases,
you’ll simply accept the default name and allow the wizard to create the fi le for
you in the %SystemRoot%\System32\Dns folder. If you are migrating from a
BIND DNS server or have a preexisting zone fi le, you can select Use This Existing
File, and then type the name of the fi le that you’ve copied to the %SystemRoot%\
System32\Dns folder. Click Next when you are ready to continue.
8. If you’re creating a secondary zone, you see the Master DNS Servers page. Type
the IP address of the primary DNS server that’s maintaining the zone, and then
click Add. Repeat this step to specify additional name servers. Zone transfers will
be confi gured to copy the zone information from these DNS servers.
9. On the Dynamic Update page, choose how you want to confi gure dynamic
updates and then click Next. You can use one of the following options:
Allow Only Secure Dynamic Updates—This option is available only on domain
controllers and when Active Directory is deployed. It provides for the best
security possible by restricting which clients can perform dynamic updates.
Allow Both Nonsecure And Secure Dynamic Updates—This option allows any
client to update resource records in DNS. Although it allows both secure
and nonsecure updates, it doesn’t validate updates, which means dynamic
updates are accepted from any client.
Do Not Allow Dynamic Updates—This option disables dynamic updates in
DNS. You should use this option only when the zone isn’t integrated with
Active Directory.
10. To create a reverse lookup zone, accept the default option on the Reverse Lookup
Zone page, and then click Next. Otherwise, click No, and skip to step 16.
Configuring DNS Using the Wizard 781
Chapter 24
Please purchase PDF Split-Merge on www.verypdf.com to remove this watermark.
11. On the Zone Type page, you can select the zone type. The options available are
the same as when creating a forward lookup zone. Click Next after making a
selection.
12. If you created an Active Directory–integrated zone, specify the replication scope,
and then click Next.
13. Specify whether you are creating an IPv4 reverse lookup zone or an IPv6 reverse
lookup zone and then click Next. Do one of the following:
If you are confi guring a reverse lookup zone for IPv4, type the network ID
for the reverse lookup zone as shown in Figure 24-10 and then click Next.
The values you enter set the default name for the reverse lookup zone. If you
have multiple subnets on the same network, such as 192.168.1, 192.168.2,
and 192.168.3, you should enter only the network portion for the zone
name, such as 192.168 rather than the complete network ID. The DNS
Server service will then fi ll in the necessary subnet zones as you use IP
addresses on a particular subnet.
If you are confi guring a reverse lookup zone for IPv6, type the network pre-
fi x for the reverse lookup zone and then click Next. The values you enter are
used to automatically generate the related zone names. Depending on the
prefi x you enter, up to eight zones may be created.
Figure 24-10 Set the network ID for the reverse lookup zone.
14. If you’re creating a standard secondary zone, you see the Zone File page. This
page allows you to create a new zone fi le or use an existing zone fi le.
15. On the Dynamic Update page, choose how you want to confi gure dynamic
updates, and then click Next.
16. The Forwarders page allows you to confi gure forwarding of DNS queries. If you
want internal DNS servers to forward queries that they can’t resolve to another
Chapter 24
782 Chapter 24 Implementing and Managing DNS
Please purchase PDF Split-Merge on www.verypdf.com to remove this watermark.
server, type the IP address of that server. You can optionally include the IP
address for a second forwarder as well. If you don’t want to use forwarders, select
No, It Should Not Forward Queries.
Note
Selecting the No, It Should Not Forward Queries option won’t prevent internal name
servers from forwarding queries altogether. A root hints fi le will still be created, which
lists the root name servers on the public Internet. Thus, if you don’t designate forward-
ers, such as the primary and secondary name servers of your ISP, the internal name
servers will still forward queries. To prevent this, you must modify the root hints fi le as
discussed in “Security Considerations” on page 757.
17. When you click Next, the wizard will search for and retrieve the current root
hints. Click Finish to complete the confi guration and exit the wizard. If there is
a problem confi guring the root hints, you will need to confi gure the root hints
manually or copy them from another server.
Confi guring DNS Zones, Subdomains, Forwarders, and
Zone Transfers
Windows Server 2008 supports primary, secondary, Active Directory–integrated, and
stub zones, each of which can be created to support either forward lookups or reverse
lookups. Forward lookup queries allow a client to resolve a host name to an IP address.
Reverse lookups allow a client to resolve an IP address to a host name. At times you
might also need to confi gure subdomains, forwarders, and zone transfers. All of these
topics are discussed in this section.
Creating Forward Lookup Zones
To create the initial forward lookup zone or additional forward lookup zones on a
server, follow these steps:
1. In the DNS console, expand the node for the server you want to work with. Right-
click the Forward Lookup Zones entry, and then choose New Zone. Afterward, in
the New Zone Wizard, click Next.
2. Select the zone type. Choose one of the following options, and then click Next:
Primary Zone—Use this option to create a primary zone and designate this
server to be authoritative for the zone. Ensure that the Store The Zone In
Active Directory check box is selected if you want to integrate DNS with
Active Directory. Otherwise, clear this check box so that a standard primary
zone is created.
Note
Selecting the No, It Should Not Forward Queries option won’t prevent internal name
servers from forwarding queries altogether. A root hints fi le will still be created, which
lists the root name servers on the public Internet. Thus, if you don’t designate forward-
ers, such as the primary and secondary name servers of your ISP, the internal name
servers will still forward queries. To prevent this, you must modify the root hints fi le as
discussed in “Security Considerations” on page 757.
Configuring DNS Zones, Subdomains, Forwarders, and Zone Transfers 783
Chapter 24
Please purchase PDF Split-Merge on www.verypdf.com to remove this watermark.
Secondary Zone—Use this option to create a secondary zone. This means
the server will have a read-only copy of the zone and will need to use zone
transfers to get updates.
Stub Zone—Use this option to create a stub zone. This creates only the nec-
essary glue records for the zone. Optionally, specify that this zone should
be integrated with Active Directory. This means the zone will be stored in
Active Directory and be updated using Active Directory replication.
3. If you created an Active Directory–integrated zone, specify the replication scope,
and then click Next. You have the following options:
To All DNS Servers In This Forest—Enables replication of the zone informa-
tion to all domains in the Active Directory forest. Each DNS server in the
forest will receive a copy of the zone information and get updates through
replication.
To All DNS Servers In This Domain—Enables replication of the zone informa-
tion in the current domain. Each DNS server in the domain will receive a
copy of the zone information and get updates through replication.
To All Domain Controllers In This Domain—Replicates zone information to
all domain controllers in the Active Directory domain. As with a Windows
2000 domain, all domain controllers will get a copy of the zone information
and get updates through replication regardless of whether they are also run-
ning the DNS Server service.
To All Domain Controllers Specifi ed In The Scope Of This Directory Partition—If
you’ve confi gured application partitions, you can limit the scope of replica-
tion to a designated application partition. Any domain controllers confi g-
ured with the application partition will get a copy of the zone information
and get updates through replication regardless of whether they are also run-
ning the DNS Server service.
4. On the Zone Name page, type the full DNS name for the zone. The zone name
should help determine how the zone fi ts into the DNS domain hierarchy. For
example, if you’re creating the primary server for the cpandl.com domain, you
should type cpandl.com as the zone name. Click Next.
5. If you’re creating a standard primary zone, you see the Zone File page. This page
allows you to create a new zone fi le or use an existing zone fi le. In most cases,
you’ll simply accept the default name and allow the wizard to create the fi le for
you in the %SystemRoot%\System32\Dns folder. If you are migrating from a
BIND DNS server or have a preexisting zone fi le, you can select Use This Existing
File and then type the name of the fi le that you’ve copied to the %SystemRoot%\
System32\Dns folder. Click Next when you are ready to continue.
6. If you’re creating a secondary zone, you see the Master DNS Servers page. Type
the IP address of the primary DNS server that’s maintaining the zone, and then
click Add. Repeat this step to specify additional name servers. Zone transfers will
be confi gured to copy the zone information from these DNS servers.
Chapter 24
784 Chapter 24 Implementing and Managing DNS
Please purchase PDF Split-Merge on www.verypdf.com to remove this watermark.
7. On the Dynamic Update page, choose how you want to confi gure dynamic
updates, and then click Next. You can use one of these options:
Allow Only Secure Dynamic Updates—This option is available only on domain
controllers and when Active Directory is deployed. It provides for the best
security possible by restricting which clients can perform dynamic updates.
Allow Both Nonsecure And Secure Dynamic Updates—This option allows any
client to update resource records in DNS. Although it allows both secure
and nonsecure updates, it doesn’t validate updates, which means dynamic
updates are accepted from any client.
Do Not Allow Dynamic Updates—This option disables dynamic updates in
DNS. You should use this option only when the zone isn’t integrated with
Active Directory.
8. Click Next and then click Finish to complete the confi guration and exit the
wizard.
Creating Reverse Lookup Zones
To create the initial reverse lookup zone or additional reverse lookup zones on a server,
follow these steps:
1. In the DNS console, expand the node for the server you want to work with. Right-
click the Reverse Lookup Zones entry, and choose New Zone. Afterward, in the
New Zone Wizard, click Next.
2. On the Zone Type page, you can select the zone type. The options available are
the same as for forward lookup zones. Click Next after making a selection.
3. If you created an Active Directory–integrated zone, specify the replication scope,
and then click Next.
4. Specify whether you are creating an IPv4 reverse lookup zone or an IPv6 reverse
lookup zone and then click Next. Do one of the following:
If you are confi guring a reverse lookup zone for IPv4, type the network ID
for the reverse lookup zone and then click Next. The values you enter set
the default name for the reverse lookup zone. If you have multiple subnets
on the same network, such as 192.168.1, 192.168.2, and 192.168.3, you
should enter only the network portion for the zone name, such as 192.168
rather than the complete network ID. The DNS Server service will then
fi ll in the necessary subnet zones as you use IP addresses on a particular
subnet.
If you are confi guring a reverse lookup zone for IPv6, type the network pre-
fi x for the reverse lookup zone and then click Next. The values you enter are
used to automatically generate the related zone names. Depending on the
prefi x you enter, up to eight zones may be created.
5. If you’re creating a standard secondary zone, you see the Zone File page. This
page allows you to create a new zone fi le or use an existing zone fi le.
Configuring DNS Zones, Subdomains, Forwarders, and Zone Transfers 785
Chapter 24
Please purchase PDF Split-Merge on www.verypdf.com to remove this watermark.
6. On the Dynamic Update page, choose how you want to confi gure dynamic
updates, and then click Next.
7. Click Next and then click Finish to complete the confi guration and exit the
wizard.
Confi guring Forwarders and Conditional Forwarding
In a normal confi guration, if a DNS name server can’t resolve a request, it forwards the
request for resolution. A server to which DNS queries are forwarded is referred to as a
forwarder. You can specifi cally designate forwarders that should be used by your inter-
nal DNS servers. For example, if you designate your ISP’s primary and secondary name
servers as forwarders, queries that your internal name servers can’t resolve will be for-
warded to these servers. Forwarding can still take place, however, even if you don’t spe-
cifi cally designate forwarders. The reason for this is that the root hints fi le specifi es the
root name servers for the public Internet and these servers can be used as forwarders.
Any time forwarders are not specifi ed or available, requests can be forwarded to the
root name servers. The root name servers then forward the requests to the appropriate
top-level domain name server, which forwards them to the next-level domain server,
and so on. This process is referred to as recursion, and, as you can see, this involves a
number of forwarding actions. DNS servers can send recursive queries to IPv4, IPv4
and IPv6, and IPv6-only servers.
Another forwarding option is to confi gure what is called a conditional forwarder. When
using conditional forwarding, you can tell your DNS name servers that if they see a
request for domain XYZ, they should not forward it to the public DNS name servers for
resolution. Instead, the name servers should forward the request directly to the authori-
tative name server for the XYZ domain.
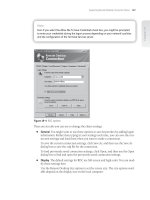
You can confi gure forwarding options by following these steps:
1. In the DNS console, right-click the server you want to work with, and select
Properties. In the Properties dialog box, click the Forwarders tab, as shown in
Figure 24-11.
2. To allow forwarding to root name servers when confi gured forwarders are not
available, select the Use Root Hints If No Forwarders Are Available check box.
3. Display the Edit Forwarders dialog box by clicking Edit. To forward queries
that internal servers can’t resolve to another server, type the IP address or DNS
name for the other server, and then press Enter. Repeat this process to add other
forwarders. You can organize the forwarders in priority order by selecting each in
turn and clicking the Up or Down buttons as appropriate.
4. Use the Number Of Seconds Before Forward Queries Time Out box to set the
query timeout in seconds. By default, a DNS server will continue to attempt to
contact and use a listed forwarder for 3 seconds. When the timeout expires, the
server moves to the next forwarder in the list and does the same. When there are
no additional forwarders, the server uses the root hints to locate a root server to
which the query can be forwarded.
Chapter 24
786 Chapter 24 Implementing and Managing DNS
Please purchase PDF Split-Merge on www.verypdf.com to remove this watermark.