Tài liệu Windows Server 2008 Inside Out- P15 doc
Bạn đang xem bản rút gọn của tài liệu. Xem và tải ngay bản đầy đủ của tài liệu tại đây (1.3 MB, 50 trang )
Confi guring DNS Resolution
DNS is a host name resolution service that you can use to determine the IP address
of a computer from its host name. This lets users work with host names, such as
or , rather than an IP address, such as
192.168.5.102 or 192.168.12.68. DNS is the primary name service for Windows Server
2008 and the Internet.
As with gateways, the best way to confi gure DNS depends on the confi guration of
your network. If computers use DHCP, you’ll probably want to confi gure DNS through
settings on the DHCP server. If computers use static IP addresses or you want to con-
fi gure DNS specifi cally for an individual user or system, you’ll want to confi gure DNS
manually.
Basic DNS Settings
You can confi gure basic DNS settings by following these steps:
1. Click Start and then click Network. In Network Explorer, click Network And
Sharing Center on the toolbar.
2. In Network And Sharing Center, click Manage Network Connections. In Network
Connections, right-click the connection you want to work with and then select
Properties.
3. Double-click Internet Protocol Version 6 (TCP/IPv6) or Internet Protocol Version
4 (TCP/IPv4) as appropriate for the type of IP address you are confi guring.
4. If the computer is using DHCP and you want DHCP to specify the DNS server
address, select Obtain DNS Server Address Automatically. Otherwise, select Use
The Following DNS Server Addresses and then type primary and alternate DNS
server addresses in the text boxes provided.
5. Click OK three times to save your changes.
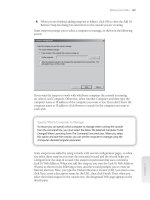
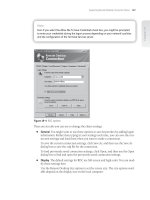
Advanced DNS Settings
You confi gure advanced DNS settings on the DNS tab of the Advanced TCP/IP Settings
dialog box, shown in Figure 21-3. You use the fi elds of the DNS tab as follows:
DNS Server Addresses, In Order Of Use
Use this area to specify the IP address of each
DNS server that is used for domain name resolution. Click Add if you want to add
a server IP address to the list. Click Remove to remove a selected server address
from the list. Click Edit to edit the selected entry. You can specify multiple serv-
ers for DNS resolution. Their priority is determined by the order. If the fi rst server
isn’t available to respond to a host name resolution request, the next DNS server
in the list is accessed, and so on. To change the position of a server in the list box,
select it and then click the up or down arrow button.
Append Primary And Connection Specifi c DNS Suffi xes
Normally, this option is
selected by default. Select this option to resolve unqualifi ed computer names
Configuring TCP/IP Networking 667
Chapter 21
Please purchase PDF Split-Merge on www.verypdf.com to remove this watermark.
in the primary domain. For example, if the computer name Gandolf is used
and the parent domain is microsoft.com, the computer name would resolve to
gandolf.microsoft.com. If the fully qualifi ed computer name doesn’t exist in the
parent domain, the query fails. The parent domain used is the one set in the
System Properties dialog box, on the Computer Name tab. (Click System And
Maintenance\System in Control Panel, then click Change Settings and view the
Computer Name tab to check the settings.)
Append Parent Suffi xes Of The Primary DNS Suffi x
This option is selected by default.
Select this check box to resolve unqualifi ed computer names using the parent/
child domain hierarchy. If a query fails in the immediate parent domain, the suf-
fi x for the parent of the parent domain is used to try to resolve the query. This
process continues until the top of the DNS domain hierarchy is reached. For
example, if the computer name Gandolf is used in the dev.microsoft.com domain,
DNS would attempt to resolve the computer name to gandolf.dev.microsoft.com.
If this didn’t work, DNS would attempt to resolve the computer name to
gandolf.microsoft.com.
Append These DNS Suffi xes (In Order)
Select this option to set specifi c DNS suffi xes
to use rather than resolving through the parent domain. Click Add if you want
to add a domain suffi x to the list. Click Remove to remove a selected domain suf-
fi x from the list. Click Edit to edit the selected entry. You can specify multiple
domain suffi xes, which are used in order. If the fi rst suffi x doesn’t resolve prop-
erly, DNS attempts to use the next suffi x in the list. If this fails, the next suffi x is
used, and so on. To change the order of the domain suffi xes, select the suffi x and
then click the up or down arrow button to change its position.
DNS Suffi x For This Connection
This option sets a specifi c DNS suffi x for the connec-
tion that overrides DNS names already confi gured for use on this connection.
You’ll usually set the DNS domain name through the System Properties dialog
box, on the Computer Name tab.
Register This Connection’s Addresses In DNS
Select this check box if you want all IP
addresses for this connection to be registered in DNS under the computer’s fully
qualifi ed domain name. This option is selected by default.
Note
Dynamic DNS updates are used in conjunction with DHCP to enable a client to update
its A (Host Address) record if its IP address changes, and to enable the DHCP server to
update the PTR (Pointer) record for the client on the DNS server. You can also confi gure
DHCP servers to update both the A and PTR records on the client’s behalf. Dynamic DNS
updates are supported only by BIND 5.1 or higher DNS servers as well as server editions
of Microsoft Windows.
Chapter 21
668 Chapter 21 Managing TCP/IP Networking
Please purchase PDF Split-Merge on www.verypdf.com to remove this watermark.
Use This Connection’s DNS Suffi x In DNS Registration
Select this check box if you want
all IP addresses for this connection to be registered in DNS under the parent
domain.
Figure 21-3 Configure advanced DNS settings on the DNS tab
of the Advanced TCP/IP Settings dialog box.
Confi guring WINS Resolution
You use WINS to resolve network basic input/output system (NetBIOS) computer
names to IPv4 addresses. You can use WINS to help computers on a network determine
the address of other computers on the network. If a WINS server is installed on the net-
work, you can use the server to resolve computer names. Although WINS is supported
on all versions of Windows, Windows Server 2008 primarily uses WINS for backward
compatibility.
You can also confi gure Windows Server 2008 computers to use the local fi le LMHOSTS
to resolve NetBIOS computer names. However, LMHOSTS is consulted only if normal
name resolution methods fail. In a properly confi gured network, these fi les are rarely
used. Thus, the preferred method of NetBIOS computer name resolution is WINS in
conjunction with a WINS server.
As with gateways and DNS, the best way to confi gure WINS depends on the confi gura-
tion of your network. If computers use DHCP, you’ll probably want to confi gure WINS
through settings on the DHCP server. If computers use static IPv4 addresses or you
want to confi gure WINS specifi cally for an individual user or system, you’ll want to con-
fi gure WINS manually.
You can manually confi gure WINS by following these steps:
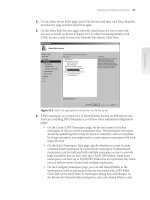
1. Access the Advanced TCP/IP Settings dialog box for IPv4 and click the WINS tab
as shown in Figure 21-4. In the WINS Addresses, In Order Of Use panel, you can
specify the IPv4 addresses of each WINS server that is used for NetBIOS name
Configuring TCP/IP Networking 669
Chapter 21
Please purchase PDF Split-Merge on www.verypdf.com to remove this watermark.
resolution. Click Add if you want to add a server IPv4 address to the list. Click
Remove to remove a selected server from the list. Click Edit to edit the selected
entry.
Figure 21-4 Configure WINS resolution for NetBIOS computer names on the
WINS tab of the Advanced TCP/IP Settings dialog box.
2. You can specify multiple servers, which are used in order, for WINS resolution.
If the fi rst server isn’t available to respond to a NetBIOS name resolution request,
the next WINS server on the list is accessed, and so on. To change the position of
a server in the list box, select it and then click the up or down arrow button.
3. To enable LMHOSTS lookups, select the Enable LMHOSTS Lookup check box. If
you want the computer to use an existing LMHOSTS fi le defi ned somewhere on
the network, retrieve this fi le by clicking Import LMHOSTS. You generally will
use LMHOSTS only when other name resolution methods fail.
4. WINS name resolution requires NetBIOS over TCP/IP services. Select one of the
following options to confi gure WINS name resolution using NetBIOS:
If you use DHCP and dynamic addressing, you can get the NetBIOS setting
from the DHCP server. Select Default: Use NetBIOS Setting From The DHCP
Server.
If you use a static IP address or the DHCP server does not provide NetBIOS
settings, select Enable NetBIOS Over TCP/IP.
If WINS and NetBIOS are not used on the network, select Disable NetBIOS
Over TCP/IP. This eliminates the NetBIOS broadcasts that would otherwise
be sent by the computer.
5. Click OK three times. As necessary, repeat this process for other network
adapters.
Chapter 21
670 Chapter 21 Managing TCP/IP Networking
Please purchase PDF Split-Merge on www.verypdf.com to remove this watermark.
Note
LMHOSTS fi les are maintained locally on a computer-by-computer basis, which can even-
tually make them unreliable. Rather than relying on LMHOSTS, ensure that your DNS and
WINS servers are confi gured properly and are accessible to the network for centralized
administration of name resolution services.
Managing Network Connections
Local area connections make it possible for computers to access resources on the net-
work and the Internet. One local area connection is created automatically for each net-
work adapter installed on a computer. This section examines techniques you can use to
manage these connections.
Checking the Status, Speed, and Activity
for Local Area Connections
To check the status of a local area connection, follow these steps:
1. Click Start and then click Network. In Network Explorer, click Network And
Sharing Center on the toolbar.
2. In Network And Sharing Center, click Manage Network Connections. In Network
Connections, right-click the connection you want to work with and then click
Status.
3. This displays the Local Area Connection Status dialog box. If the connection is
disabled or the media is unplugged, you won’t be able to access this dialog box.
Enable the connection or connect the network cable to resolve the problem and
then try to display the status dialog box again.
The General tab of this dialog box, shown in Figure 21-5, provides useful information
regarding the following:
IPv4 Connectivity
The current IPv4 connection state and type. You’ll typically
see the status as Local when connected to an internal network or Not Connected
when not connected to a network.
IPv6 Connectivity
The current IPv6 connection state and type. You’ll typically
see the status as Local when connected to an internal network or Not Connected
when not connected to a network.
Media State
The state of the media. Because the status dialog box is available
only when the connection is enabled, you’ll typically see this as Enabled.
Note
LMHOSTS fi les are maintained locally on a computer-by-computer basis, which can even-
tually make them unreliable. Rather than relying on LMHOSTS, ensure that your DNS and
WINS servers are confi gured properly and are accessible to the network for centralized
administration of name resolution services.
Managing Network Connections 671
Chapter 21
Please purchase PDF Split-Merge on www.verypdf.com to remove this watermark.
Duration
The amount of time the connection has been established. If the duration
is fairly short, the user either recently connected to the network or the connection
was recently reset.
Speed
The speed of the connection. This should read 10.0 megabits per second
(Mbps) for 10-Mbps connections, 100.0 Mbps for 100-Mbps connections, and
1 gigabit per second (Gbps) for 1-gigabit connections. An incorrect setting can
affect the computer’s performance.
Bytes
The number of bytes sent and the number received by the connection. As
the computer sends or receives packets, you’ll see the computer icons light up to
indicate the fl ow of traffi c.
Figure 21-5 The General tab of the Local Area Connection Status dialog box provides
access to summary information regarding connections, properties, and support.
Viewing Network Confi guration Information
In Windows Server 2008, you can view the current confi guration for network adapters
in several ways. To view confi guration settings using the Local Area Connection Status
dialog box, follow these steps:
1. Click Start and then click Network. In Network Explorer, click Network And
Sharing Center on the toolbar.
2. In Network And Sharing Center, click Manage Network Connections. In Network
Connections, right-click the connection you want to work with and then click
Status. This displays the Local Area Connection Status dialog box. If the con-
nection is disabled or the media is unplugged, you won’t be able to access this
Chapter 21
672 Chapter 21 Managing TCP/IP Networking
Please purchase PDF Split-Merge on www.verypdf.com to remove this watermark.
dialog box. Enable the connection or connect the network cable to resolve the
problem and then try to display the status dialog box again.
3. Click Details to view detailed information about the IP address confi guration,
including:
Physical Address
The machine or Media Access Control (MAC) address of
the network adapter. This address is unique for each network adapter.
IPv4 IP Address
The IPv4 address assigned for IPv4 networking.
IPv4 Subnet Mask
The subnet mask used for IPv4 networking.
IPv4 Default Gateways
The IPv4 address of the default gateways used for
IPv4 networking.
IPv4 DNS Servers
IP addresses for DNS servers used with IPv4 networking.
IPv4 WINS Servers
IP addresses for WINS servers used with IPv4
networking.
IPv4 DHCP Server
The IP address of the DHCPv4 server from which the
current lease was obtained (DHCPv4 only).
Lease Obtained
A date and time stamp for when the DHCPv4 lease was
obtained (DHCPv4 only).
Lease Expires
A date and time stamp for when the DHCPv4 lease expires
(DHCPv4 only).
You can also use the IPCONFIG command to view advanced confi guration settings. To
do so, follow these steps:
1. Click Start and type cmd in the Search fi eld.
2. Press Enter.
3. At the command line, type ipconfi g /all to see detailed confi guration information
for all network adapters confi gured on the computer.
Note
The command prompt is started in standard user mode. This is not an elevated com-
mand prompt.
Enabling and Disabling Local Area Connections
Local area connections are created and connected automatically. If you want to disable
a connection so that it cannot be used, follow these steps:
1. Click Start and then click Network. In Network Explorer, click Network And
Sharing Center on the toolbar.
Note
The command prompt is started in standard user mode. This is not an elevated com-
mand prompt.
Managing Network Connections 673
Chapter 21
Please purchase PDF Split-Merge on www.verypdf.com to remove this watermark.
2. In Network And Sharing Center, click Manage Network Connections. In Network
Connections, right-click the connection and select Disable to deactivate the
connection and disable it.
3. If you want to enable the connection later, right-click the connection in Network
Connections and select Enable.
If you want to disconnect from a network or start another connection, follow these
steps:
1. Click Start and then click Network. In Network Explorer, click Network And
Sharing Center on the toolbar.
2. In Network And Sharing Center, click Manage Network Connections. In Network
Connections, right-click the connection and select Disconnect. Typically, only
remote access connections have a Disconnect option.
3. If you want to activate the connection later, right-click the connection in Network
Connections and select Connect.
Renaming Local Area Connections
Windows Server 2008 initially assigns default names for local area connections. In Net-
work Connections, you can rename the connections at any time by right-clicking the
connection, selecting Rename, and then typing a new connection name. If a computer
has multiple local area connections, proper naming can help you and others better
understand the uses of a particular connection.
Troubleshooting and Testing Network Settings
Windows Server 2008 includes many tools for troubleshooting and testing TCP/IP
connectivity. This section looks at automated diagnostics, basic tests that you should
perform whenever you install or modify a computer’s network settings, and techniques
for resolving diffi cult networking problems involving DHCP and DNS. The fi nal section
shows you how to perform detailed network diagnostics testing.
Diagnosing and Resolving Local Area Connection Problems
Occasionally network cables can get unplugged or the network adapter might experi-
ence a problem that temporarily prevents it from working. After you plug the cable back
in or solve the adapter problem, the connection should automatically reconnect. To
diagnose local area connection problems, follow these steps:
1. Click Start and then click Network. In Network Explorer, click Network And
Sharing Center on the toolbar.
Chapter 21
674 Chapter 21 Managing TCP/IP Networking
Please purchase PDF Split-Merge on www.verypdf.com to remove this watermark.
2. In Network And Sharing Center, click Manage Network Connections.
3. Right-click the connection you want to work with and select Diagnose.
Windows Network Diagnostics will then try to identify the problem. A list of possible
solutions is provided for identifi able confi guration problems. Some solutions provide
automated fi xes that you can execute by clicking the solution. Other solutions require
manual fi xes, such as might be required if you need to reset a network router or broad-
band modem. If your actions don’t fi x the problem, refer to other appropriate parts of
this troubleshooting section .
Diagnosing and Resolving Internet Connection Problems
Because of the many interdependencies between services, protocols, and confi guration
settings, troubleshooting network problems can be diffi cult. Fortunately, Windows
Server 2008 includes a powerful network diagnostics tool for pinpointing problems
that relate to the following:
General network connectivity problems
Internet service settings for e-mail, newsgroups, and proxies
Settings for modems, network clients, and network adapters
DNS, DHCP, and WINS confi guration
Default gateways and IP addresses
To diagnose Internet connection problems, follow these steps:
1. Click Start and then click Network. In Network Explorer, click Network And
Sharing Center on the toolbar.
2. Click Diagnose And Repair.
Windows Network Diagnostics will then try to identify the problem. If identifi able
confi guration problems exist, a list of possible solutions is provided. Some solutions
provide automated fi xes that you can execute by clicking the solution. Other solutions
require manual fi xes, such as might be required if you need to reset a network router
or broadband modem. If your actions don’t fi x the problem, refer to other appropriate
parts of this troubleshooting section.
Performing Basic Network Tests
Whenever you install a new computer or make confi guration changes to the computer’s
network settings, you should test the confi guration. The most basic TCP/IP test is to
use the PING command to test the computer’s connection to the network. PING is a
command-line command. To use it, type ping <host> at the command prompt, where
<host> is either the computer name or the IP address of the host computer you’re trying
to reach.
Troubleshooting and Testing Network Settings 675
Chapter 21
Please purchase PDF Split-Merge on www.verypdf.com to remove this watermark.
With Windows Server 2008, you can use the following methods to test the confi gura-
tion using PING:
Try to ping IP addresses
If the computer is confi gured correctly and the host
you’re trying to reach is accessible to the network, PING should receive a reply, as
long as pinging is allowed by the computer’s fi rewall. If PING can’t reach the host
or is blocked by a fi rewall, PING times out.
On domains that use WINS, try to ping NetBIOS computer names
If NetBIOS
computer names are resolved correctly by PING, the NetBIOS facilities, such as
WINS, are correctly confi gured for the computer.
On domains that use DNS, try to ping DNS host names
If fully qualifi ed DNS
host names are resolved correctly by PING, DNS name resolution is confi gured
properly.
You might also want to test network browsing for the computer. If the computer is a
member of a Windows Server 2008 domain and computer browsing is enabled through-
out the domain, log on to the computer and then use Windows Explorer or Network
Explorer to browse other computers in the domain. Afterward, log on to a different
computer in the domain and try to browse the computer you just confi gured. These
tests tell you if the DNS resolution is being handled properly in the local environment.
If you can’t browse, check the confi guration of the DNS services and protocols.
In some cases, discovering and sharing might be set to block discovery. You’ll need to
allow discovery to resolve this by following these steps:
1. Click Start and then click Network.
2. In Network Explorer, click Network And Sharing Center on the toolbar.
3. If Network Discovery is set to Off, expand the Sharing And Discovery panel using
the Expand button, click Turn On Network Discovery, and then click Apply to
turn on this feature.
Diagnosing and Resolving IP Addressing Problems
The current IP address settings of a computer can be obtained as discussed in “View-
ing Network Confi guration Information” on page 672. If a computer is having problems
accessing network resources or communicating with other computers, an IP addressing
problem might exist. Take a close look at the IP address currently assigned, as well as
other IP address settings, and use the following tips to help in your troubleshooting:
If the IPv4 address currently assigned to the computer is in the range 169.254.0.1
to 169.254.255.254, the computer is using Automatic Private IP Addressing
(APIPA). An automatic private IP address is assigned to a computer when it is
confi gured to use DHCP and its DHCP client cannot reach a DHCP server. When
using APIPA, Windows Server 2008 will automatically periodically check for
Chapter 21
676 Chapter 21 Managing TCP/IP Networking
Please purchase PDF Split-Merge on www.verypdf.com to remove this watermark.
a DHCP server to become available. If a computer doesn’t eventually obtain a
dynamic IP address, the network connection usually has a problem. Check the
network cable, and if necessary trace the cable back to the switch or hub into
which it connects.
If the IPv4 address and the subnet mask of the computer are currently set as
0.0.0.0, the network is either disconnected or someone attempted to use a static
IP address that duplicated another IP address already in use on the network. In
this case, you should access Network Connections and determine the state of the
connection. If the connection is disabled or disconnected, this should be shown.
Right-click the connection and select Enable or Diagnose as appropriate. If the
connection is already enabled, you will need to modify the IP address settings for
the connection.
If the IP address is dynamically assigned, make sure that another computer on
the network isn’t using the same IP address. You can do this by disconnecting
the network cable for the computer that you are working with and pinging the
IP address in question. If you receive a response from the PING test, you know
that another computer is using the IP address. This computer probably has an
improper static IP address or a reservation that isn’t set up properly.
If the IP address appears to be set correctly, check the subnet mask, gateway,
DNS, and WINS settings by comparing the network settings of the computer you
are troubleshooting with those of a computer that is known to have a good net-
work confi guration. One of the biggest problem areas is the subnet mask. When
subnetting is used, the subnet mask used in one area of the network might look
very similar to that of another area of the network. For example, the subnet mask
in one IPv4 area might be 255.255.255.240, and it might be 255.255.255.248 in
another IPv4 area.
When you are using static IP addressing, you can check the current IPv4 or IPv6 set-
tings by entering ipconfi g /all at a command prompt. The display of the ipconfi g /all
command includes IPv4/IPv6 addresses, default routers, and DNS servers for all
interfaces. You can also check IPv4 and IPv6 addressing separately. To check the
IPv4 addressing confi guration, enter netsh interface ipv4 show address. To check
IPv6 addressing, enter netsh interface ipv6 show address. To use Netsh to show
the confi guration of a remote computer use the -r RemoteComputerName command
line option. For example, to display the confi guration of the remote computer named
CORPSERVER26, you would enter netsh -r corpserver26 interface ipv4 show address.
To make changes to the confi guration of IP interfaces, use the netsh interface ipv4 set
interface and netsh interface ipv6 set interface commands. To add the IP addresses of
DNS servers, use the netsh interface ipv4 add dns and netsh interface ipv6 add dns
commands.
Troubleshooting and Testing Network Settings 677
Chapter 21
Please purchase PDF Split-Merge on www.verypdf.com to remove this watermark.
Diagnosing and Resolving Routing Problems
As part of troubleshooting, you can verify the reachability of local and remote destina-
tions. You can ping your default router by its IPv4 or IPv6 address. You can obtain the
local IPv4 address of your default router by entering netsh interface ipv4 show routes.
You can obtain the link-local IPv6 address of your default router by entering netsh
interface ipv6 show routes. Pinging the default router tests whether you can reach
local nodes and whether you can reach the default router, which forwards IP packets to
remote nodes.
When you ping the default IPv6 router, you must specify the zone identifi er (ID) for the
interface on which you want the ICMPv6 Echo Request messages to be sent. The zone
ID for the default router is listed when you enter the ipconfi g /all command.
If you are able to ping your default router, ping a remote destination by its IPv4 or IPv6
address. If you are unable to ping a remote destination by its IP address, there might
be a routing problem between your node and the destination node. Enter tracert -d
IPAddress to trace the routing path to the remote destination You use the -d command-
line option to speed up the response by preventing Tracert from performing a reverse
DNS query on every near-side router interface in the routing path.
The inability to reach a local or remote destination might be due to incorrect or missing
routes in the local IP routing table. To view the local IP routing table, enter the netsh
interface ipv4 show routes or netsh interface ipv6 show routes command. Use the
command output to verify that you have a route corresponding to your local subnet.
The route with the lowest metric is used fi rst. If you have multiple default routes with
the same lowest metric, you might need to modify your IP router confi guration so that
the default route with the lowest metric uses the interface that connects to the correct
network.
You can add a route to the IP routing table by using the netsh interface ipv4 add route
or netsh interface ipv6 add route command. To modify an existing route, use the netsh
interface ipv4 set route or the netsh interface ipv6 set route command. To remove an
existing route, use the netsh interface ipv4 delete route or netsh interface ipv6 delete
route command.
If you suspect a problem with router performance, use the pathping -d IPAddress com-
mand to trace the path to a destination and display information on packet losses for
each router in the path. You use the -d command-line option to speed up the response
by preventing Pathping from performing a reverse DNS query on every near-side router
interface in the routing path.
Chapter 21
678 Chapter 21 Managing TCP/IP Networking
Please purchase PDF Split-Merge on www.verypdf.com to remove this watermark.
The problem with reaching a destination node might be due to the confi guration of
Internet Protocol Security (IPSec) or packet fi ltering. Check for IPSec policies that have
been confi gured on the computer having the problem, on intermediate IPv6 routers, and
on the destination computer. On computers running Windows XP or later, IPSec is con-
fi gured using Windows Firewall With Advanced Security.
In many cases, packet fi ltering is confi gured to allow specifi c types of traffi c and discard
all others, or to discard specifi c types of traffi c and accept all others. Because of this, you
might be able to view Web pages on a Web server, but not ping the Web server by its
host name or IP address.
Each network connection confi gured on a computer can be enabled or disabled in
the Windows Firewall. When enabled, IPv4 and IPv6 drop incoming requests. Dur-
ing troublehshooting, you can disable the Windows Firewall for a specifi c IPv4 or IPv6
interface with the netsh interface ipv4 set interface interface=NameOrIndex
fi rewall=disabled and netsh interface ipv6 set interface interface=NameOrIndex
fi rewall=disabled commands. You can also completely turn off the Windows Firewall
with the netsh fi rewall set opmode disable command. Don’t forget to reenable the
fi rewall when you are done troubleshooting.
Releasing and Renewing DHCP Settings
DHCP servers can assign many network confi guration settings automatically, includ-
ing IP addresses, default gateways, primary and secondary DNS servers, primary and
secondary WINS servers, and more. When computers use dynamic addressing, they
are assigned a lease on a specifi c IP address. This lease is good for a specifi c time period
and must be renewed periodically. When the lease needs to be renewed, the computer
contacts the DHCP server that provided the lease. If the server is available, the lease is
renewed and a new lease period is granted. You can also renew leases manually as nec-
essary on individual computers or by using the DHCP server itself.
Problems that prevent network communications can occur during the lease assignment
and renewal process. If the server isn’t available and cannot be reached before a lease
expires, the IP address can become invalid. If this happens, the computer might use
the alternate IP address confi guration to set an alternate address, which in most cases
has settings that are inappropriate and prevent proper communications. To resolve this
problem, you’ll need to release and then renew the DHCP lease.
Another type of problem occurs when users move around to various offi ces and subnets
within the organization. While moving from location to location, their computers might
obtain DHCP settings from the wrong server. When the users return to their offi ces, the
computer might seem sluggish or perform incorrectly because of the settings assigned
by the DHCP server at another location. If this happens, you’ll need to release and then
renew the DHCP lease.
SIDE OUT
Checking IPSec policies and Windows Firewall
The problem with reaching a destination node might be due to the confi guration of
Internet Protocol Security (IPSec) or packet fi ltering. Check for IPSec policies that have
been confi gured on the computer having the problem, on intermediate IPv6 routers, and
on the destination computer. On computers running Windows XP or later, IPSec is con-
fi gured using Windows Firewall With Advanced Security.
In many cases, packet fi ltering is confi gured to allow specifi c types of traffi c and discard
all others, or to discard specifi c types of traffi c and accept all others. Because of this, you
might be able to view Web pages on a Web server, but not ping the Web server by its
host name or IP address.
Each network connection confi gured on a computer can be enabled or disabled in
the Windows Firewall. When enabled, IPv4 and IPv6 drop incoming requests. Dur-
ing troublehshooting, you can disable the Windows Firewall for a specifi c IPv4 or IPv6
interface with the netsh interface ipv4 set interface interface=NameOrIndex
fi rewall=disabled and netsh interface ipv6 set interface interface=NameOrIndex
fi rewall=disabled commands. You can also completely turn off the Windows Firewall
with the netsh fi rewall set opmode disable command. Don’t forget to reenable the
fi rewall when you are done troubleshooting.
Troubleshooting and Testing Network Settings 679
Chapter 21
Please purchase PDF Split-Merge on www.verypdf.com to remove this watermark.
You can use the graphical interface to release and renew DHCP leases by following
these steps:
1. Click Start and then click Network. In Network Explorer, click Network And
Sharing Center on the toolbar.
2. In Network And Sharing Center, click Manage Network Connections. In Network
Connections, right-click the connection you want to work with and then select
Diagnose.
3. After Windows Network Diagnostics tries to identify the problem, a list of
possible solutions is provided. If the computer has one or more dynamically
assigned IP addresses, one of the solutions should be Automatically Get New IP
Settings…. Click this option.
You can also follow these steps to use the IPCONFIG command to renew and release
settings:
1. Start an elevated command prompt.
2. To release the current settings for all network adapters, type ipconfi g /release at
the command line. Then renew the lease by typing ipconfi g /renew.
3. To renew a DHCP lease for all network adapters, type ipconfi g /renew at the
command line.
4. You can check the updated settings by typing ipconfi g /all at the command line.
Note
If a computer has multiple network adapters and you only want to work with one or a
subset of the adapters, specify all or part of the connection name after the ipconfi g
/renew or ipconfi g /release command. Use the asterisk as a wildcard to match any
characters in a connection’s name. For example, if you want to renew the lease for all
connections with names starting with Loc, type the command ipconfi g /renew Loc*. If
you want to release the settings for all connections containing the word Network, type
the command ipconfi g /release *Network*.
Diagnosing and Resolving Name Resolution Issues
When you can reach a destination using an IP address but not reach a host using a host
name, you might have a problem with host name resolution. Typically, name resolution
issues have to do with improper confi guration of the DNS client or problems with DNS
registration. You can use the following tasks to troubleshoot problems with DNS name
resolution:
Verify DNS confi guration
Note
If a computer has multiple network adapters and you only want to work with one or a
subset of the adapters, specify all or part of the connection name after the ipconfi g
/renew or ipconfi g /release command. Use the asterisk as a wildcard to match any
characters in a connection’s name. For example, if you want to renew the lease for all
connections with names starting with Loc, type the command ipconfi g /renew Loc*. If
you want to release the settings for all connections containing the word Network, type k
the command ipconfi g /release *Network*.
Chapter 21
680 Chapter 21 Managing TCP/IP Networking
Please purchase PDF Split-Merge on www.verypdf.com to remove this watermark.
Test DNS name resolution with the Ping tool
Use the Nslookup tool to view DNS server responses
Display and fl ush the DNS client resolver cache
On the computer having DNS name resolution problems, verify the following
information:
Host name
The primary DNS suffi x
DNS suffi x search list
Connection-specifi c DNS suffi xes
DNS servers
You can obtain this information by entering ipconfi g /all at a command prompt. To
obtain information about which DNS names should be registered in DNS, enter netsh
interface ip show dns.
Computers running Windows Vista and Windows Server 2008 support DNS traf-
fi c over IPv6. By default, IPv6 confi gures the well-known site-local addresses of DNS
servers at FEC0:0:0:FFFF::1, FEC0:0:0:FFFF::2, and FEC0:0:0:FFFF::3. To add the IPv6
addresses of your DNS servers, use the properties of the Internet Protocol Version 6
(TCP/IPv6) component in Network Connections or the netsh interface ipv6 add dns
command. To register the appropriate DNS names as IP address resource records with
DNS dynamic update, use the ipconfi g /registerdns command. Computers running
Windows XP or Windows Server 2003 do not support DNS traffi c over IPv6.
TCP/IP checks the DNS client resolver cache before sending DNS name queries. The
DNS resolver cache maintains a history of DNS lookups that have been performed
when a user accesses network resources using TCP/IP. This cache contains forward
lookups, which provide host name to IP address resolution, and reverse lookups, which
provide IP address to host name resolution. After a DNS entry is stored in the resolver
cache for a particular DNS host, the local computer no longer has to query external
servers for DNS information on that host. This enables the computer to resolve DNS
requests locally, providing a quicker response.
How long entries are stored in the resolver cache depends on the Time to Live (TTL)
value assigned to the record by the originating server. To view current records and see
the remaining TTL value for each record, type ipconfi g /displaydns in an elevated com-
mand prompt. These values are given as the number of seconds that a particular record
can remain in the cache before it expires. These values are continually being counted
down by the local computer. When the TTL value reaches zero, the record expires and
is removed from the resolver cache.
Occasionally, you’ll fi nd that you need to clear out the resolver cache to remove old
entries and enable computers to check for updated DNS entries before the normal
expiration and purging process takes place. Typically, this happens because server IP
Troubleshooting and Testing Network Settings 681
Chapter 21
Please purchase PDF Split-Merge on www.verypdf.com to remove this watermark.
addresses have changed and the current entries in the resolver cache point to the old
addresses rather than the new ones. Sometimes the resolver cache itself can get out of
sync, particularly when DHCP has been misconfi gured.
Note
Skilled administrators know that several weeks in advance of the actual change, they
should start to decrease the TTL values for DNS records that are going to be changed.
Typically, this means reducing the TTL from a number of days (or weeks) to a number
of hours, which allows for quicker propagation of the changes to computers that have
cached the related DNS records. After the change is completed, administrators should
restore the original TTL value to reduce renewal requests.
In most cases, you can resolve problems with the DNS resolver cache by either fl ushing
the cache or reregistering DNS. When you fl ush the resolver cache, all DNS entries are
cleared out of the cache and new entries are not created until the next time the com-
puter performs a DNS lookup on a particular host or IP address. When you reregister
DNS, Windows Server 2008 attempts to refresh all current DHCP leases and then per-
forms a lookup on each DNS entry in the resolver cache. By looking up each host or IP
address again, the entries are renewed and reregistered in the resolver cache. You’ll gen-
erally want to fl ush the cache completely and allow the computer to perform lookups
as needed. Reregister DNS only when you suspect problems with DHCP and the DNS
resolver cache.
You can test DNS name resolution by pinging a destination using its host name or fully
qualifi ed domain name (FQDN). If an incorrect IP address is shown, you can fl ush
the DNS resolver cache and use the Nslookup tool to determine the set of addresses
returned in the DNS Name Query Response message.
You can use the IPCONFIG command to fl ush and reregister entries in the DNS
resolver cache by following these steps:
1. Start an elevated command prompt.
2. To clear out the resolver cache, type ipconfi g /fl ushdns at the command line.
3. To renew DHCP leases and reregister DNS entries, type ipconfi g /registerdns at
the command line.
4. When the tasks are complete, you can check your work by typing ipconfi g
/displaydns at the command line.
To start Nslookup, enter Nslookup at a command prompt. At the Nslookup > prompt,
use the set d2 command to get detail information about DNS response messages.
Then, use Nslookup to look up the desired FQDN. Look for A and AAAA records in the
detailed display of the DNS response messages.
Note
Skilled administrators know that several weeks in advance of the actual change, they
should start to decrease the TTL values for DNS records that are going to be changed.
Typically, this means reducing the TTL from a number of days (or weeks) to a number
of hours, which allows for quicker propagation of the changes to computers that have
cached the related DNS records. After the change is completed, administrators should
restore the original TTL value to reduce renewal requests.
Chapter 21
682 Chapter 21 Managing TCP/IP Networking
Please purchase PDF Split-Merge on www.verypdf.com to remove this watermark.
With IPv6, the DNS client maintains a neighbor’s cache of recently resolved link-layer
addresses as well as a standard resolver cache. To display the current contents of the
neighbor cache, enter netsh interface ipv6 show neighbors. To fl ush the neighbor’s
cache, enter netsh interface ipv6 delete neighbors.
For IPv6, the DNS client also maintains a destination cache. The destination cache
stores next-hop IPv6 addresses for destinations. To display the current contents of the
destination cache, enter netsh interface ipv6 show destinationcache command. To
fl ush the destination cache, enter netsh interface ipv6 delete destinationcache.
Troubleshooting and Testing Network Settings 683
Chapter 21
Please purchase PDF Split-Merge on www.verypdf.com to remove this watermark.
Please purchase PDF Split-Merge on www.verypdf.com to remove this watermark.
M
ost Microsoft Windows networks should be confi gured to use Dynamic Host Con-
fi guration Protocol (DHCP). DHCP simplifi es administration and makes it easier
for users to get their computer on the organization’s network. How does DHCP do this?
DHCP is a protocol that allows client computers to start up and automatically receive an
Internet Protocol (IP) address and other related Transmission Control Protocol/Inter-
net Protocol (TCP/IP) settings such as the subnet mask, default gateway, Domain Name
System (DNS) server addresses, and Windows Internet Naming Service (WINS) server
addresses. With Windows Server 2008, DHCP servers can assign a dynamic IP version
4 (IPv4), IP version 6 (IPv6), or both addresses to any of the network interface cards
(NICs) on a computer.
DHCP Essentials
DHCP is a standards-based protocol that was originally defi ned by the Internet Engi-
neering Task Force (IETF) and based on the Bootstrap Protocol (BOOTP). It is defi ned
in Requests for Comments (RFCs) 3396 and 3442 and has been implemented on a
variety of operating systems including UNIX and Windows. Because DHCP is a client/
server protocol, there is a server component and a client component necessary to imple-
ment the protocol on a network. To make it easier to deploy DHCP in the enterprise, all
server editions of Windows Server 2008 include the DHCP Server service, which can be
installed to support DHCP, and all current versions of the Windows operating system
automatically install the DHCP Client service as part of TCP/IP.
A computer that uses dynamic IP addressing and confi guration is called a DHCP client.
When you boot a DHCP client, a 32-bit IPv4 address, a 128-bit IPv6 address, or both
can be retrieved from a pool of IP addresses defi ned for the network’s DHCP server.
It’s the job of the DHCP server to maintain a database about the IP addresses that are
available and the related confi guration information. When an IP address is given out
to a client, the client is said to have a lease on the IP address. The term “lease” is used
because the assignment generally is not permanent. The DHCP server sets the duration
of the lease when the lease is granted and can also change it later as necessary, such as
when the lease is renewed.
DHCP Essentials . . . . . . . . . . . . . . . . . . . . . . . . . . . . . . . . 685
DHCP Security Considerations . . . . . . . . . . . . . . . . . . . . 688
Planning DHCPv4 and DHCPv6 Implementations . . . . 689
Setting Up DHCP Servers . . . . . . . . . . . . . . . . . . . . . . . . 696
Configuring TCP/IP Options . . . . . . . . . . . . . . . . . . . . . . 717
Advanced DHCP Configuration and Maintenance . . . . 727
Setting Up DHCP Relay Agents . . . . . . . . . . . . . . . . . . . 737
CHAPTER 22
Managing DHCP
685
Please purchase PDF Split-Merge on www.verypdf.com to remove this watermark.
DHCP also provides a way to assign a lease on an address permanently. To do this, you
can create a reservation by specifying the IP address to reserve and the unique identifi er
of the computer that will hold the IP address. The reservation thereafter ensures that
the client computer with the specifi ed device address always gets the designated IP
address. With IPv4, you specify the necessary unique identifi er using the Media Access
Control (MAC) address of the network card. With IPv6, you specify the DHCP unique
identifi er for the DHCPv6 client and the identity association identifi er (IAID) being
used by the DHCPv6 client.
Note
MAC addresses are tied to the network interface card (NIC) of a computer. If you remove
a NIC or install an additional NIC on a computer, the MAC address of the new or addi-
tional card will be different from the address of the original NIC.
Consider DHCP for Non-DHCP Member Servers
You’ll fi nd that confi guring member servers to use DHCP and then assigning them a
reservation is an easy way to ensure that member servers have a fi xed IP address while
maintaining the fl exibility provided by DHCP. After the member servers are confi gured
for DHCP, they get all of their TCP/IP options from DHCP, including their IP addresses.
If you ever need to change their addressing, you can do this from within DHCP rather
than on each member server—and changing IP addressing and other TCP/IP options
in one location is much easier than having to do so in multiple locations. Keep in mind
that some server applications or roles might require a static IP address in order to work
properly.
Microsoft recommends that a single DHCP server service no more than 10,000 clients.
You defi ne a set of IP addresses that can be assigned to clients using a scope. A scope is
a pool of IPv4 or IPv6 addresses and related confi guration options. The IP addresses
set in a scope are contiguous and are associated with a specifi c subnet mask or network
prefi x length. To defi ne a subset of IP addresses within a scope that should not be used,
you can specify an exclusion. An exclusion defi nes a range of IP addresses that you can
exclude so that it isn’t assigned to client computers.
Windows Server 2008 supports integration of DHCP with dynamic DNS. When con-
fi gured, this ensures that the client’s DNS record is updated when it receives a new IP
address. To ensure that client names can be resolved to IP addresses, you should con-
fi gure integration of DHCP and DNS.
DHCP can be integrated with the Routing and Remote Access Service (RRAS). When
confi gured, dial-up networking or virtual private network (VPN) clients can log on to
the network remotely and use DHCP to confi gure their IP address and TCP/IP options.
Note
MAC addresses are tied to the network interface card (NIC) of a computer. If you remove
a NIC or install an additional NIC on a computer, the MAC address of the new or addi-
tional card will be different from the address of the original NIC.
Consider DHCP for Non-DHCP Member Servers
You’ll fi nd that confi guring member servers to use DHCP and then assigning them a
reservation is an easy way to ensure that member servers have a fi xed IP address while
maintaining the fl exibility provided by DHCP. After the member servers are confi gured
for DHCP, they get all of their TCP/IP options from DHCP, including their IP addresses.
If you ever need to change their addressing, you can do this from within DHCP rather
than on each member server—and changing IP addressing and other TCP/IP options
in one location is much easier than having to do so in multiple locations. Keep in mind
that some server applications or roles might require a static IP address in order to work
properly.
Chapter 22
686 Chapter 22 Managing DHCP
Please purchase PDF Split-Merge on www.verypdf.com to remove this watermark.