Tài liệu Project 2010 part I docx
Bạn đang xem bản rút gọn của tài liệu. Xem và tải ngay bản đầy đủ của tài liệu tại đây (6.16 MB, 82 trang )
Download free ebooks at bookboon.com
2
Stephen Moat, The Mouse Training Company
Project 2010 Introduction
Part I
Download free ebooks at bookboon.com
3
Project 2010 Introduction: Part I
© 2011 Stephen Moat, The Mouse Training Company & Ventus Publishing ApS
ISBN 978-87-7681-826-5
Download free ebooks at bookboon.com
Please click the advert
Project 2010 Introduction: Part I
4
Contents
Contents
1 e Basics 7
Guide information 8
e Project screen 10
Using the Quick Access toolbar 15
About ribbons 18
e File Tab 21
Help 31
e Autocorrect feature 33
About Smart Tags 35
2 Intro to Microso Project 37
What is Microso Project? 38
Starting Microso Project 45
Microso Project – Ribbon tabs 51
Download free ebooks at bookboon.com
Please click the advert
Project 2010 Introduction: Part I
5
Contents
3 Planning the project 55
e stages of project management 56
Dening the project 59
Project planning 61
Basic project tasks 63
Where to begin with Microso Project 65
e Calendar 71
Save the new project le 77
To see Section 4-7 download Project 2010 Introduction: Part II
4 Task entry and linking Part II
2010 new feature option Part II
Entering tasks Part II
Basic sheet usage Part II
Linking tasks Part II
Dening the summary tasks Part II
360°
thinking
.
© Deloitte & Touche LLP and affiliated entities.
Discover the truth at www.deloitte.ca/careers
Download free ebooks at bookboon.com
Please click the advert
Project 2010 Introduction: Part I
6
Contents
5 Resource management Part II
Resources Part II
View resources Part II
Editing resource information Part II
Overallocations Part II
Planned time scale (baselines) Part II
6 Implementation and tracking Part II
Using Gantt Charts Part II
e Timeline new feature Part II
Basic sorting, ltering and grouping Part II
Tracking Part II
7 Printing and reporting Part II
Print (backstage) Part II
Reports Part II
Free online Magazines
Click here to download
SpeakMagazines.com
Download free ebooks at bookboon.com
Project 2010 Introduction: Part I
7
The Basics
1 The Basics
By e End Of is Section You Will Be Able To Identify
• Title Bar
• Ribbons
• e Project window
• Ask a Question
Download free ebooks at bookboon.com
Project 2010 Introduction: Part I
8
The Basics
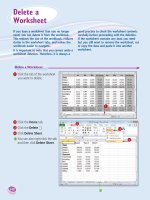
Guide information
Introduction
Project 2010 is a powerful application that allows you to plan, resource, manage and report on a project no matter how
large, it contains calculations, graphs. Project to web data and sharepoint information is available to be built in to the
project le so that the project can be managed across continents via the internet or intranet allowing the use of a central
pool of common resources to enable the project managers to eciently interact and plan through project diculties.
How To Use This Guide
is manual should be used as a point of reference following attendance of the introductory level Project 2010 training
course. It covers all the topics taught and aims to act as a support aid for any tasks carried out by the user aer the course.
e manual is divided into sections, each section covering an aspect of the introductory course. e table of contents lists
the page numbers of each section and the table of gures indicates the pages containing tables and diagrams.
Objectives
Sections begin with a list of objectives each with its own check box so that you can mark o those topics that you are
familiar with following the training.
Instructions
ose who have already used a Project le before may not need to read explanations on what each command does, but
would rather skip straight to the instructions to nd out how to do it. Look out for the arrow icon which precedes a list
of instructions.
Download free ebooks at bookboon.com
Project 2010 Introduction: Part I
9
The Basics
Keyboard
Keys are referred to throughout the manual in the following way:
ENTER – Denotes the return or enter key, DELETE – denotes the Delete key and so on.
Where a command requires two keys to be pressed, the manual displays this as follows:
CTRL + [P] – this means press the letter “p” while holding down the Control key.
Commands
When a command is referred to in the manual, the following distinctions have been made:
When Ribbon commands are referred to, the manual will refer you to the Ribbon –
E.G. “Choose home from the Ribbons and then B for bold”.
When dialog box options are referred to, the following style has been used for the text –
E.G.“In the Page Range section of the Print dialog, click the Current Page option”
Dialog box buttons are Emboldened – “Click OK to close the PRINT dialog and launch the print.”
Notes
Within each section, any items that need further explanation or Points for extra attention devoted to them are denoted
by shading. For example:
“Project will not let you close a le that you have not already saved changes to without prompting you to save.”
or
• “Project will not let you close a le that you have not already saved changes to without prompting you to
save.”
Download free ebooks at bookboon.com
Project 2010 Introduction: Part I
10
The Basics
The Project screen
WINDOW BORDER e box that surrounds the Project screen when it is not maximised is called the window border.
When the mouse is over the border, the pointer changes from a single to a double-headed arrow – clicking and dragging
with this shape allows the window to be resized.
TITLE BAR e coloured bar that appears at the top of the Project window. e title bar tells you which application
you are using and if the document you are in is maximised, it will also contain the name of the document. If the Project
window is not maximised, by positioning the mouse over the title bar and clicking and dragging, you can move the Project
window to a new location on the screen.
MAXIMISE BUTTON
When working in a document, the Project screen contains two windows, an application
window and a document window. You can maximise both windows to capitalise on the space you have on-screen. If you
would like the window that your Project application is in to ll up the whole screen, click the outermost maximise button.
You may nd that the document you are in can still be bigger – click the inner maximise button to ll the remaining
space within the Project application window.
MINIMISE BUTTON
is button is very useful if you need to temporarily switch from Project into another
application without closing Project down completely. Click the minimise button to shrink Project to an icon on the task
bar; you will then be able to view other icons and applications you may wish to Project. When you are nished and ready
to continue, click the Project icon from the task bar to resume. e innermost minimise button will minimise the current
document window.
RESTORE BUTTON
is button only appears when a window is maximised. A maximised window has no border
and you cannot see what is behind it. If you want to put the window back inside its border so that you can move and
size it, click the restore button.
CLOSE BUTTON
is button is used to close a window. If you click the close button for a document window you
close the document. e last button will close the Project application.
DIALOG BOX LAUNCHER
this button launches dialog boxes specic to the part of the ribbon you see them the
category will be named such as FONT, CLIPBOARD, etc
BACKSTAGE VIEW FILE RIBBON is the start of Project and has many important commands and option. Such as
Project settings, opening, saving, printing and closing les. is will be looked into much further later in the manual.
Project Window Components
Project 2010 appears as displayed below when a new Project le is created ere is a pane on the right called the Gantt
chart which displays the graphical representation of your project and on the le a table which allows you to enter the
information to build and plan your project, above these is a timeline giving you an quick view of how long your project
will run and above that you have the ribbons giving you access to all of the commands in project.
Download free ebooks at bookboon.com
Project 2010 Introduction: Part I
11
The Basics
Figure 1-1: The Project Window
To Activate A Button On e Ribbon
Mouse
i. Click the le mouse button on the required tool.
Dialog Box
To open a dialog box use the DIALOG BOX LAUNCHER when the dialog box is open, make a choice from
the various options and click OK in the dialog box. If you wish to change your mind and close the dialog box without
making a choice then click on CANCEL. e dialog box will close without any choice being applied. If you would like
help while the dialog box is open then click on the “?“ in the top right hand corner this will bring up a help window that
will display the relevant topics.
Download free ebooks at bookboon.com
Please click the advert
Project 2010 Introduction: Part I
12
The Basics
Figure 1-2: A Dialog Box
Increase your impact with MSM Executive Education
For more information, visit www.msm.nl or contact us at +31 43 38 70 808
or via
the globally networked management school
For more information, visit www.msm.nl or contact us at +31 43 38 70 808 or via
For almost 60 years Maastricht School of Management has been enhancing the management capacity
of professionals and organizations around the world through state-of-the-art management education.
Our broad range of Open Enrollment Executive Programs offers you a unique interactive, stimulating and
multicultural learning experience.
Be prepared for tomorrow’s management challenges and apply today.
Download free ebooks at bookboon.com
Project 2010 Introduction: Part I
13
The Basics
Groups
Look at a group type on the ribbon such as font and in the bottom right hand corner of that group you may see a small
box with an arrow, clicking this is the method to call up a dialog box as mentioned. Within the group clicking on a drop
down arrow will give access to a menu, any choice with three dots aer it as in “more tables…” is another way of opening
a dialog box.
Toolbars
ere are only two toolbars within the new version of Project 2010 there is the Quick Access toolbar seen here next to
the FILE tab, and there is the mini toolbar
Figure 1-3: Quick Access Toolbar
Quick Access Toolbar
By default there are only three buttons on the Quick Access toolbar but these can be edited and other regularly used
buttons can be placed there. Using the drop down menu next to the Quick Access toolbar will allow the customisation
of this toolbar adding your most oen used commands.
Mini Toolbar
Whenever text is selected within Project a small formatting toolbar will appear above the highlighted text it will disappear if
the mouse cursor is moved away from the toolbar and will reappear when the mouse cursor is moved over the highlighted
text again.
Figure 1-4: Mini Toolbar
Download free ebooks at bookboon.com
Project 2010 Introduction: Part I
14
The Basics
Status Bar
e Status bar, across the bottom of the screen, displays dierent information at dierent times. To the right is an indicator,
which will display which view you are currently in and there are quick options to see which views are available and to
change the view you are in E.G. Gantt chart, resource sheet, team planner etc
e Status bar information about the status of Project, if any particular lock keys are enabled on your keyboard, which
view is currently active, and more.
Figure 1-5: Status Bar
Task Pane
A task pane is a window that collects commonly used actions in one place. e task pane Generally enables you to quickly
create or modify a le, perform a search, or view the clipboard the task pane is not used as much in Project as the needs
of the application are dierent. It is a Web-style area that you can either, dock along the right or le edge of the window
or oat anywhere on the screen. It displays information, commands and controls for choosing options.
A task pane is displayed automatically when you perform certain tasks, for example when you choose Task Inspector from
the task, Ribbon, to inspect your project for problems.
Figure 1-6: Task Pane Showing Task Inspector
Download free ebooks at bookboon.com
Please click the advert
Project 2010 Introduction: Part I
15
The Basics
Using the Quick Access toolbar
In the previous lesson, we introduced the new layout changes to Project 2010. In this section, we will learn a little bit
more about each part of the new interface and how it works. is lesson will focus on features and customization options
available with the Quick Access toolbar, located in the upper le-hand corner of the screen:
Figure 1-7: Quick Access Buttons
Get “Bookboon’s Free Media Advice”
See the light!
The sooner you realize we are right,
the sooner your life will get better!
A bit over the top? Yes we know!
We are just that sure that we can make your
media activities more effective.
Download free ebooks at bookboon.com
Project 2010 Introduction: Part I
16
The Basics
About The Default Buttons
Access features three default commands in the Quick Access toolbar:
Save
Saves the most recent changes to the current database le.
Undo
e Undo command will revert most changes made in Project. For example, if you made a formatting change to a form
that you were not happy with, click the Undo button to go back one command.
Redo
Sometimes you may go too far with the Undo Button this button allows you to redo what you have undone. Or redo the
last action you performed.
ere is a small pull-down arrow beside the Undo button; click this to see a listing of the last few tasks that were performed.
Click any task in the list to undo all commands to that point.
Adding Buttons
As you become more familiar with Project you might nd it handy to have another command quickly available for use.
ough the command tabs and ribbon signicantly reduce the number of clicks it takes to do something, you might want
to have a particular command always available. Project allows you to add the command to the Quick Access toolbar.
Figure 1-8: Add A Command
For example, some of us have diculty with spelling. Fortunately, many programs (including Project) feature a spell
checking feature. In Project 2010, the spell checking feature is located in the Proong section of the Project command tab:
Download free ebooks at bookboon.com
Project 2010 Introduction: Part I
17
The Basics
To Add is Command To e Quick Access Toolbar,
mouse
i. Right-click the Spelling command and click ‘Add to Quick Access Toolbar:’
ii. e command (denoted by the small ‘ABC’ icon) will be placed in the Quick Access toolbar:
Figure 1-9: Right Click Menu
Figure 1-10: Button Added
Removing Buttons
If you no longer use a certain command or your Quick Access toolbar is getting a bit too lled with icons, you can remove
them easily at any time.
Figure 1-11: Right Click Remove
To Remove A Button
mouse
i. Right-click on any icon you no longer use and click Remove from Quick Access Toolbar:
Download free ebooks at bookboon.com
Please click the advert
Project 2010 Introduction: Part I
18
The Basics
About ribbons
One of the biggest changes in Project 2010 is the removal of menus. Instead of having a list of menu commands to choose
from (including a number of options that are greyed out and not Accessible), Project 2010 features a more intuitive control
system of tabs. Each tab contains a certain group of commands relevant only to the tab. e commands are listed in the
ribbon.
In the past, the Oce package made use of menus that contained a listing of commands. At their core, the command
tabs are essentially the same thing as menus but with a few big changes. For starters, the grouping of commands in tabs
is much more intuitive. e commands listed under each tab are also the only commands that are applicable to your
current view of the Project le.
Project 2010 takes this one step further with the addition of contextual tabs. e tab labelled format is a subset of the
Gantt Chart tools and appears only when you have selected view with the Gantt chart. ese tabs will contain even more
specic commands that can be used on a table being viewed and will only be visible when a table is being viewed.
Figure 1-12: Ribbon And Tabs
Find your next education here!
Click here
bookboon.com/blog/subsites/staford
Download free ebooks at bookboon.com
Project 2010 Introduction: Part I
19
The Basics
Consider the Task ribbon tab that is selected in the diagram above. Beneath the tab is a listing of all commands that are
performed most oen on the currently selected object, contained in what Microso refers to as the ‘ribbon’:
e ribbon was designed to allow access to all functionality of a tab at once. Also, the commands in the ribbon are only
the commands that are available for use at the time.
We will learn in this lesson how the ribbon works and some of the tools that are available.
Command Tabs
ere are two main types of ribbons: general (or command) and contextual. e general ribbons (and corresponding
tabs) are always visible when you are viewing a Project le in Project:
Along the top of the window are the command tabs:
Figure 1-13: Command Tabs
e command tabs listed here include many of the most common commands you will perform in Project. e Task ribbon
contains the majority of the most common tasks relating to your project. to switch views, formatting, and informational
tools for the tasks
If you want to make a new Project le, Save it or open an existing one, click the File tab and select what you wish to do.
e views tab gives you control of the many ways you may view your information in Project, Using tabs saves the need
of remembering which menu to choose.
Contextual Tabs
Figure 1-14: Contextual Tabs
Download free ebooks at bookboon.com
Project 2010 Introduction: Part I
20
The Basics
Contextual tabs appear only when a certain type of Project le object is selected (or brought into context). For example,
if you are looking at a Gantt chart and wish to format it or adjust it in any way then use the Gantt chart tools, format tab:
When using a command in the ribbon, simply click it with your mouse. e command will be performed, or the appropriate
tool or dialog box will appear to help you perform the task.
Further Button Options
When using many of the buttons on a Ribbon further options will be found when using the Drop down arrows (gure
1-9) say on the gridlines or Format buttons. Further options will appear.
Figure 1-15: Further Options
Download free ebooks at bookboon.com
Please click the advert
Project 2010 Introduction: Part I
21
The Basics
The File Tab
e File Tab (Backstage) from this you can open and close les, modify the Project program options, and close Project;
all by using the File Tab (Backstage). If you have used Project in the past, the File Tab (Backstage) is very similar in
functionality to the File menu (Project 2003) in previous versions. Or the Oce menu in oce 2007.
Figure 1-16: The File Tab
GOT-THE-ENERGY-TO-LEAD.COM
We believe that energy suppliers should be renewable, too. We are therefore looking for enthusiastic
new colleagues with plenty of ideas who want to join RWE in changing the world. Visit us online to find
out what we are offering and how we are working together to ensure the energy of the future.
Download free ebooks at bookboon.com
Project 2010 Introduction: Part I
22
The Basics
Let’s take a look at the commands in the File Tab (Backstage).
Save
Saves any modications you have made to the current database object.
Figure 1-17: Save As Dialog
Save As
Opens the save as window and allows you to save the currently open Project under another name. is is useful if you
want to perform a major revision or update to a particular Project le. (Figure 1-23)
Open
Opens a dialog box allowing you to search your computer or network for a le.
Download free ebooks at bookboon.com
Project 2010 Introduction: Part I
23
The Basics
Figure 1-18: Open Dialog
Figure 1-19: Print Options
Download free ebooks at bookboon.com
Please click the advert
Project 2010 Introduction: Part I
24
The Basics
Clicking on the print option in backstage oers a number of options
When in Print it allows the viewing of the data in its future printed form to allow changes to be made prior to it being
printed the data will appear a little like page layout in word
Print sends any open object and its data directly to the printer. is can be a dangerous option to choose if you have not
previously seen how the data will appear in printed form as this choice will give no options for allowing changes to layout
or to where it will be printed it sends to the default printer
Printer Properties opens the print dialog to allow the choosing of a printer and various other options such as the range
of data to be printed.
Settings is section allows you to the range of data to be printed you may only want specic pages to be printed or a
certain time period
Page setup allows the page setup dialog to be opened so you can change page size margins etc.
We will look deeper into printing at various stages within the manual.
Blank Project
At the Top of the window is a link to create a new Blank Project. Use this link to make your own Project from scratch.
Contact us to hear more
Who is your target group?
And how can we reach them?
At Bookboon, you can segment the exact right
audience for your advertising campaign.
Our eBooks offer in-book advertising spot to reach
the right candidate.
Download free ebooks at bookboon.com
Project 2010 Introduction: Part I
25
The Basics
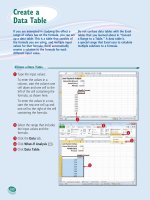
To Create New Blank Project
mouse
i. Click Blank Project to choose to create a new empty project le.
ii. Click Create to create the le.
Figure 1-20: Create New File
Available Templates
In the main part of the Project window are the accessible Template pane: Project has a number of templates built right into
the program. To access those click on the sample templates. e dierent categories of templates are from oce online and
will show those templates you can download from the internet, simply click a category to see the available template les.