Integrating PHP Projects with Jenkins doc
Bạn đang xem bản rút gọn của tài liệu. Xem và tải ngay bản đầy đủ của tài liệu tại đây (5.49 MB, 56 trang )
Integrating PHP Projects
with Jenkins
Sebastian Bergmann
Beijing
•
Cambridge
•
Farnham
•
Köln
•
Sebastopol
•
Tokyo
Integrating PHP Projects with Jenkins
by Sebastian Bergmann
Copyright © 2011 Sebastian Bergmann. All rights reserved.
Printed in the United States of America.
Published by O’Reilly Media, Inc., 1005 Gravenstein Highway North, Sebastopol, CA 95472.
O’Reilly books may be purchased for educational, business, or sales promotional use. Online editions
are also available for most titles (). For more information, contact our
corporate/institutional sales department: (800) 998-9938 or
Editor: Julie Steele
Production Editor: Jasmine Perez
Cover Designer: Karen Montgomery
Interior Designer: David Futato
Illustrator: Robert Romano
Nutshell Handbook, the Nutshell Handbook logo, and the O’Reilly logo are registered trademarks of
O’Reilly Media, Inc. Integrating PHP Projects with Jenkins, the image of starlings, and related trade dress
are trademarks of O’Reilly Media, Inc.
Many of the designations used by manufacturers and sellers to distinguish their products are claimed as
trademarks. Where those designations appear in this book, and O’Reilly Media, Inc. was aware of a
trademark claim, the designations have been printed in caps or initial caps.
While every precaution has been taken in the preparation of this book, the publisher and author assume
no responsibility for errors or omissions, or for damages resulting from the use of the information con-
tained herein.
ISBN: 978-1-449-30943-5
[LSI]
1315836072
Table of Contents
Preface . . . . . . . . . . . . . . . . . . . . . . . . . . . . . . . . . . . . . . . . . . . . . . . . . . . . . . . . . . . . . . . . . . . . . . v
1. Build Automation . . . . . . . . . . . . . . . . . . . . . . . . . . . . . . . . . . . . . . . . . . . . . . . . . . . . . . . 1
The Example Project 2
Our First Build Script 2
2. Setting Up Jenkins . . . . . . . . . . . . . . . . . . . . . . . . . . . . . . . . . . . . . . . . . . . . . . . . . . . . . . 5
Installing the PHP Quality Assurance Toolchain 5
Installing Jenkins 6
3. Continuous Integration . . . . . . . . . . . . . . . . . . . . . . . . . . . . . . . . . . . . . . . . . . . . . . . . . 11
Running Unit Tests During the Build 11
Creating a Jenkins Job 14
4. Continuous Inspection . . . . . . . . . . . . . . . . . . . . . . . . . . . . . . . . . . . . . . . . . . . . . . . . . . 21
API Documentation 21
Software Metrics 22
Duplicate Code 24
Coding Standard Violations 26
Result Aggregation 29
Complete Build Script 30
5. Automating the Automation . . . . . . . . . . . . . . . . . . . . . . . . . . . . . . . . . . . . . . . . . . . . . 33
PHP Project Wizard 33
Template for Jenkins Jobs for PHP Projects 35
6. Conclusion . . . . . . . . . . . . . . . . . . . . . . . . . . . . . . . . . . . . . . . . . . . . . . . . . . . . . . . . . . . . 37
Continuous Integration and Development Branches 37
Additional Testing 38
Continuous Deployment 40
iii
Bibliography . . . . . . . . . . . . . . . . . . . . . . . . . . . . . . . . . . . . . . . . . . . . . . . . . . . . . . . . . . . . . . . . 41
iv | Table of Contents
Preface
Why Continuous Integration?
Most web applications are changed and adapted frequently and quickly. Their envi-
ronment, for example the size and the behaviour of the user base, are constantly chang-
ing. What was sufficient yesterday can be insufficient today. Especially in a web envi-
ronment it is important to monitor and continuously improve the software quality not
only when developing, but also when maintaining the software. The practice of Con-
tinuous Integration is the solution of choice to achieve this goal.
Continuous Integration is a software development practice where members of a team
integrate their work frequently, usually each person integrates at least daily—leading to
multiple integrations per day. Each integration is verified by an automated build (in-
cluding test) to detect integration errors as quickly as possible.
—Martin Fowler
Continuous Integration reduces the amount of repetitive processes the developers need
to perform when building or deploying the software thus reducing the risks of late
discovery of defects, producing low-quality software, lack of project visibility as well
as lack of deployable software.
Why Jenkins?
At least as far as I know, Sebastian Nohn was the first to experiment with the continuous
integration of PHP projects. Back in 2006 he described on his blog how to use Apache
Ant and CruiseControl to set up a continuous build that invoked PHPUnit to run the
unit tests of a PHP project.
Soon thereafter, the developers of Mayflower GmbH started to build a quality assurance
platform for PHP projects that was based on CruiseControl. It not only ran unit tests
as part of the build loop but also static code analysis tools such as PHP_CodeSniffer to
collect software metrics over time.
This quality assurance platform gave Manuel Pichler the idea to start the phpUnder
Control open source project. This was a set of patches for CruiseControl (which could
v
not be customized or extended through plugins) that added out-of-the-box support for
PHP projects. phpUnderControl significantly lowered the barrier to entry for intro-
ducing continuous integration into a PHP project but since it was based on Cruise-
Control it was a nightmare from an operations point of view and not as customizable
and flexible as one would like.
The developers of Mayflower GmbH later refactored their quality assurance platform
for PHP projects into a tool that can be used with arbitrary continuous integration
servers. It was open-sourced under the name PHP_CodeBrowser.
When the Java community started to migrate from CruiseControl to more modern
continuous integration servers, I had a look at Hudson (as Jenkins was called back then)
and tried it together with the PHP quality assurance toolchain. I was pleasantly sur-
prised to find a product that was not only more convenient to use and more robust
(from an operations perspective) than CruiseControl but to also meet a vibrant devel-
opment community. Thanks to the plethora of plugins developed and maintained by
this community, Jenkins supports building and testing virtually any project, including
PHP projects.
The PHP community has developed a wide range of quality assurance tools since 2006.
Where Sebastian Nohn only ran PHPUnit tests with Apache Ant and CruiseControl, a
typical continuous integration setup for a PHP project today also includes the detection
of violations of a defined set of coding guidelines and the gathering of various software
metrics as well as the generation of API documentation, for instance.
Over the course of the last two years I have successfully set up continuous integration
environments that are based on Jenkins for our customers. These development teams
leverage Jenkins to monitor the various aspects of software quality throughout the
lifecycle of their projects. This enables them to create, maintain and extend sustainable
software of high quality with PHP. The result of this experience is a template for Jenkins
jobs for PHP projects that I have released as an open source project.
What's in This Book?
This book covers everything you need to know in order to use Jenkins for the contin-
uous integration of your PHP projects. Here is how the book is organized:
Chapter 1
In this chapter you will learn how to use Apache Ant to automate your build.
Chapter 2
This chapter explains how to set up Jenkins and install the PHP tools that are
required to continuously integrate a PHP project.
Chapter 3
This chapter shows how to create a job for a PHP project in Jenkins.
vi | Preface
Chapter 4
Building on the continuous integration environment that was set up in the previous
chapter, you will learn in this chapter how to add static code analysis tools to the
build for continuous inspection.
Chapter 5
This chapter shows how the automated build and continuous integration of a PHP
project can be simplified by using the PHP Project Wizard and the Template for
Jenkins Jobs for PHP Projects.
Chapter 6
This chapter concludes the book with a summary of the benefits of Continuous
Integration and Continuous Inspection while providing an outlook of what you
can implement in addition to the processes and techniques described in this book.
This book makes the assumption that the reader is familiar with the concept of Con-
tinuous Integration and the set of problems it aims to solve. [Duvall2007] and [Hum-
ble2010] are recommended basic and further reading, respectively, on this topic.
While this book explains how to install Jenkins and how to configure it for PHP jobs
it does not cover topics such as authentication, for instance, that are impartial to the
programming stack used. Furthermore, the assumption is made that Jenkins is installed
in a UNIX environment. For Jenkins-related topics not covered in this book the reader
is referred to [Smart2011].
The planning, execution, and automation of tests for the different layers and tiers of a
PHP-based web application is also outside the scope of this book. [Bergmann2011] is
an excellent resource on these matters.
Finding Out More
If you would like to find out more about Jenkins and PHP, and to get the latest updates,
visit this book's companion website at This is also where the
template for Jenkins jobs for PHP projects is maintained.
Conventions Used in This Book
The following typographical conventions are used in this book:
Italic
Indicates new terms, URLs, email addresses, filenames, and file extensions.
Constant width
Used for program listings, as well as within paragraphs to refer to program elements
such as variable or function names, databases, data types, environment variables,
statements, and keywords.
Preface | vii
Constant width bold
Shows commands or other text that should be typed literally by the user.
Constant width italic
Shows text that should be replaced with user-supplied values or by values deter-
mined by context.
This icon signifies a tip, suggestion, or general note.
This icon indicates a warning or caution.
Using Code Examples
This book is here to help you get your job done. In general, you may use the code in
this book in your programs and documentation. You do not need to contact us for
permission unless you’re reproducing a significant portion of the code. For example,
writing a program that uses several chunks of code from this book does not require
permission. Selling or distributing a CD-ROM of examples from O’Reilly books does
require permission. Answering a question by citing this book and quoting example
code does not require permission. Incorporating a significant amount of example code
from this book into your product’s documentation does require permission.
We appreciate, but do not require, attribution. An attribution usually includes the title,
author, publisher, and ISBN. For example: “ Integrating PHP Projects with Jenkins by
Sebastian Bergmann. Copyright 2011 Sebastian Bergmann, 978-1-449-30943-5.”
If you feel your use of code examples falls outside fair use or the permission given above,
feel free to contact us at
Safari® Books Online
Safari Books Online is an on-demand digital library that lets you easily
search over 7,500 technology and creative reference books and videos to
find the answers you need quickly.
With a subscription, you can read any page and watch any video from our library online.
Read books on your cell phone and mobile devices. Access new titles before they are
available for print, and get exclusive access to manuscripts in development and post
feedback for the authors. Copy and paste code samples, organize your favorites, down-
viii | Preface
load chapters, bookmark key sections, create notes, print out pages, and benefit from
tons of other time-saving features.
O’Reilly Media has uploaded this book to the Safari Books Online service. To have full
digital access to this book and others on similar topics from O’Reilly and other pub-
lishers, sign up for free at .
How to Contact Us
Please address comments and questions concerning this book to the publisher:
O’Reilly Media, Inc.
1005 Gravenstein Highway North
Sebastopol, CA 95472
800-998-9938 (in the United States or Canada)
707-829-0515 (international or local)
707-829-0104 (fax)
We have a web page for this book, where we list errata, examples, and any additional
information. You can access this page at:
/>To comment or ask technical questions about this book, send email to:
For more information about our books, courses, conferences, and news, see our website
at .
Find us on Facebook: />Follow us on Twitter: />Watch us on YouTube: />Acknowledgments
There are many wonderful people without whom this book would not have been pos-
sible: simply because there would have been no tools to write about. These people are
Kohsuke Kawaguchi (creator of Jenkins), Greg Sherwood (creator of PHP_CodeS-
niffer), Manuel Pichler (creator of PHP_Depend and PHPMD), Elger Thiele (creator of
PHP_CodeBrowser), and Volker Dusch who co-maintains the template for Jenkins jobs
for PHP projects.
Thank you to my technical reviewers. The feedback from Arne Blankerts, Stefan
Priebsch, and Volker Dusch was insightful as usual and really improved the book.
Thank you to Julie Steele and everyone at O’Reilly for supporting and encouraging this
book.
Preface | ix
CHAPTER 1
Build Automation
Continuous Integration requires a fully automated and reproducible build as well as
the use of a version control system to be effective. This book makes the assumption
that the reader is already familiar with a version control system such as Git.
In this chapter we discuss build automation, the practice of automating (scripting) the
various tasks that software developers need to perform in their daily routine. These
tasks usually include the compilation of source code into binary code and the running
of automated tests as well as the packaging and possibly even the deployment of the
resulting binaries (PEAR packages or PHAR archives, for instance).
Although PHP is an interpreted language and does not use an explicit compilation step
it is common to perform code generation or code transformation tasks during a build
nowadays. Scaffolding code generated by a framework or code generated by an object-
relational mapping tool as well as autoloader code are common use cases for such
generated code.
PHP allows registering a callback which is automatically invoked when
a class or interface is about to be used but has not been declared yet.
phpab is a tool that automatically generates the code for such a callback
by analysing the project's sourcecode.
A wide variety of build automation tools exists. I have worked with development teams
that were content with using simple shell scripts to automate their builds. I have also
seen GNU make, Apache Ant, Phing, Pake, Rake, and custom solutions being success-
fully used to automate the build of PHP projects. My personal preference is Apache
Ant and that is what we will use in the examples in this book.
It poses no problem if you happen to prefer another build automation
tool than Apache Ant. You will still be able to use Jenkins to continu-
ously integrate your PHP project.
1
The Example Project
Throughout this book we will use an example project that is hosted at http://github
.com/thePHPcc/bankaccount. This is what the project structure looks like:
.
├── build
│ ├── phpcs.xml
│ ├── phpmd.xml
│ ├── src_autoload.php.in
│ └── tests_autoload.php.in
├── build.xml
├── phpunit.xml.dist
├── src
│ ├── autoload.php
│ └──
└── tests
├── autoload.php
└──
• The build directory contains the XML configuration files for PHP_CodeSniffer
(phpcs.xml) and PHPMD (phpmd.xml) as well as customized templates for
phpab, the PHP Autoload Builder.
PHP_CodeSniffer and PHPMD are static analysis tools for PHP code and are cov-
ered in Chapter 4 where we discuss Continuous Inspection.
• build.xml is the Apache Ant build script that is used to build the project.
• phpunit.xml.dist is the PHPUnit configuration file for the project.
If phpunit.xml or phpunit.xml.dist (in that order) exist in the current
working directory and PHPUnit's configuration switch is not
used, the configuration for PHPUnit will be automatically read
from that file.
• src/autoload.php and tests/autoload.php contain the autoloader code for the appli-
cation and its test suite, respectively.
Our First Build Script
A task that can and should be automated in a build script (because it makes no sense
to perform such a task at runtime) is the generation of code for an autoloader. Exam-
ple 1-1 uses this task to show he essence of writing a build script for use with Ant.
Each project defines one or more targets. A target is a set of tasks you want to be executed.
When starting Ant, you can select which target(s) you want to have executed. When no
target is given, the project's default is used. [ ] A target can depend on other targets. [ ]
Ant resolves these dependencies. [ ] A task is a piece of code that can be executed.
— />2 | Chapter 1: Build Automation
Example 1-1. build.xml script that invokes phpab
<?xml version="1.0" encoding="UTF-8"?>
<project name="BankAccount" default="build">
<target name="build" depends="phpab"/>
<target name="phpab" description="Generate autoloader scripts">
<exec executable="phpab">
<arg value=" output" />
<arg path="${basedir}/src/autoload.php" />
<arg value=" template" />
<arg path="${basedir}/build/src_autoload.php.in" />
<arg path="${basedir}/src" />
</exec>
<exec executable="phpab">
<arg value=" output" />
<arg path="${basedir}/tests/autoload.php" />
<arg value=" template" />
<arg path="${basedir}/build/tests_autoload.php.in" />
<arg path="${basedir}/tests" />
</exec>
</target>
</project>
In the build script above, we first define a build target. This target does not perform
any task by itself but rather depends on other targets, so far only phpab. You can think
of this as a meta target that orchestrates other targets.
The phpab target uses the <exec> task to invoke the aforementioned PHP Autoload
Builder to generate the autoloader code. The two <exec> tasks are equivalent to calling
phpab on the command-line like so:
phpab output src/autoload.php template build/src_autoload.php.in src
phpab output tests/autoload.php template build/tests_autoload.php.in tests
Invoking Ant in the directory that holds our build.xml file will now run the build target
and its dependencies:
ant
Buildfile: /home/sb/bankaccount/build.xml
phpab:
[exec] Autoload file 'src/autoload.php' generated.
[exec]
[exec] Autoload file 'tests/autoload.php' generated.
[exec]
build:
BUILD SUCCESSFUL
Total time: 0 seconds
Our First Build Script | 3
A useful option for Ant is -projecthelp. It prints project help information based on the
description attribute of the target elements in the build.xml:
ant -projecthelp
Buildfile: /home/sb/bankaccount/build.xml
Main targets:
phpab Generate autoloader scripts
Default target: build
Targets that do not have a description attribute are considered private and are excluded
from the -projecthelp output.
4 | Chapter 1: Build Automation
CHAPTER 2
Setting Up Jenkins
Installing the PHP Quality Assurance Toolchain
All components and tools of the PHP quality assurance toolchain should be installed
using the PEAR Installer, the backbone of the PHP Extension and Application Repo-
sitory that provides a distribution system for PHP packages.
Depending on your OS distribution and/or your PHP environment, you
may need to install PEAR or update your existing PEAR installation
before you can proceed with the instructions in this chapter.
sudo pear upgrade PEAR usually suffices to upgrade an existing PEAR
installation. ex-
plains how to perform a fresh installation of PEAR.
The following two commands are all that is required to install the PHP quality assurance
toolchain using the PEAR Installer:
pear config-set auto_discover 1
pear install pear.phpqatools.org/phpqatools PHPDocumentor
After the installation you can find the source files for the installed packages inside your
local PEAR directory; the path is usually /usr/lib/php.
Here is an overview of what the tools we just installed are used for:
• PHPUnit is the de-facto standard for the unit testing of PHP code.
• PHP_CodeSniffer is the most commonly used tool for static analysis of PHP code.
It is typically used to detect violations of code formatting standards but also sup-
ports software metrics as well as the detection of potential defects.
• phpcpd (PHP Copy/Paste Detector) searches for duplicated code in a PHP project.
• PHP_Depend is a tool for static code analysis of PHP code that is inspired by JDe-
pend.
5
• phpmd (PHP Mess Detector) allows the definition of rules that operate on the raw
data collected by PHP_Depend.
• phploc measures the scope of a PHP project by, among other metrics, means of
different forms of the Lines of Code (LOC) software metric.
• PHP_CodeBrowser is a report generator that takes the XML output of the afore-
mentioned tools as well as the sourcecode of the project as its input.
• Although it is currently being replaced by more modern tools such as phpdox, we
will use PHPDocumentor for automated API documentation generation for PHP
code in this book.
In later chapters we will look at each of these tools individually and see how and why
they are useful in a continuous integration setup.
Installing Jenkins
The Jenkins project provides native packages for Windows, Debian, Ubuntu, Red Hat,
Fedora, CentOS, MacOS X, openSUSE, FreeBSD, OpenBSD, and Gentoo. Alterna-
tively, you can manually install Jenkins into a directory of your choice.
The following steps detail how Jenkins can be installed on a UNIX system into the /
usr/local/jenkins directory:
mkdir /usr/local/jenkins
cd /usr/local/jenkins
wget />Using the web application archive (WAR) from the URL above we install
an "older but stable" release of Jenkins.
The Jenkins developers produce a new release weekly to deliver bug
fixes and new features rapidly to users and plugin developers who need
them. But for more conservative users, it is preferable to stick to a release
line that changes less and only for important bug fixes, even if such a
release line lags behind in terms of features.
Please see the Jenkins wiki for more information about the different re-
lease lines.
We can now start up the Jenkins service:
export JENKINS_HOME=/usr/local/jenkins
java -jar jenkins.war
The web-based user interface of Jenkins is now available at http://localhost:8080/.
It is common to run Jenkins behind a reverse proxy. This can be achieved using Apache
HTTPD, for instance, by simply adding the following lines to your httpd.conf config-
uration file:
6 | Chapter 2: Setting Up Jenkins
ProxyRequests Off
<Proxy *>
Order deny,allow
Allow from all
</Proxy>
ProxyPass / http://127.0.0.1:8080/
ProxyPassReverse / http://127.0.0.1:8080/
ProxyMaxForwards 2
A configuration such as the above allows to restrict access to Jenkins by reusing existing
access control lists you may already have in place for your webserver.
In addition to the web-based user interface, Jenkins also provides a Command-line
interface which we can download like so:
wget http://localhost:8080/jnlpJars/jenkins-cli.jar
We can now install the plugins for Jenkins that are required to integrate PHP projects:
java -jar jenkins-cli.jar -s http://localhost:8080 install-plugin checkstyle
java -jar jenkins-cli.jar -s http://localhost:8080 install-plugin cloverphp
java -jar jenkins-cli.jar -s http://localhost:8080 install-plugin dry
java -jar jenkins-cli.jar -s http://localhost:8080 install-plugin htmlpublisher
java -jar jenkins-cli.jar -s http://localhost:8080 install-plugin jdepend
java -jar jenkins-cli.jar -s http://localhost:8080 install-plugin plot
java -jar jenkins-cli.jar -s http://localhost:8080 install-plugin pmd
java -jar jenkins-cli.jar -s http://localhost:8080 install-plugin violations
java -jar jenkins-cli.jar -s http://localhost:8080 install-plugin xunit
After starting up the Jenkins service for the first time it may take a few
minutes until it has loaded the plugin information from the project's
website. Until this information is available the installation of plugins
will not work.
Here is an overview of what the plugins we just installed will be used for:
• The Checkstyle plugin is used to process the XML logfiles in Checkstyle format
that PHP_CodeSniffer produces. Checkstyle is a tool that is commonly used in the
Java world to help developers adhere to coding standards.
• The Clover PHP plugin is used to process the XML logfiles in Clover format that
PHPUnit produces. Clover is a code coverage analysis tool that is commonly used
in the Java world.
• The DRY plugin is used to process the XML logfiles in PMD-CPD format that
phpcpd produces.
• The HTML Publisher plugin is used to publish the HTML files that are generated
by PHP_CodeBrowser and PHPDocumentor.
Installing Jenkins | 7
• The JDepend plugin is used to process the XML logfiles in JDepend format that
PHP_Depend produces. JDepend is a tool that is commonly used in the Java world
to generate design quality metrics.
• The Plot plugin is used to plot the information gathered by phploc.
• The PMD plugin is used to process the XML logfiles in PMD format that thre PHP
Mess Detector (PHPMD) produces. PMD is a tool that is commonly used in the
Java world to scan source code and detect potential problems such as possible dead
code, duplicate code, or overcomplicated expressions.
• The Violations plugin is used to generate a summary report of the violations found
by PHP_CodeSniffer, phpcpd, and PHPMD.
• The xUnit plugin is used to process the XML logfiles in JUnit format that PHPUnit
produces.
The following two plugins are not required to integrate PHP projects with Jenkins. The
Git plugin is required to interact with Git repositories and the Green Balls plugin cus-
tomizes Jenkins to use a green ball instead of a blue ball to signify a successful build.
java -jar jenkins-cli.jar -s http://localhost:8080 install-plugin git
java -jar jenkins-cli.jar -s http://localhost:8080 install-plugin greenballs
If you want to use Jenkins with a version control system other than Git
you will need to install the appropriate plugin instead of the aforemen-
tioned Git plugin.
Finally we schedule a restart of the Jenkins service for the changes to take effect:
java -jar jenkins-cli.jar -s http://localhost:8080 safe-restart
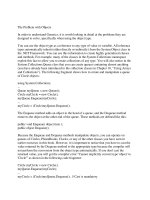
Figure 2-1 shows what Jenkins' dashboard looks like after the initial setup and config-
uration.
8 | Chapter 2: Setting Up Jenkins
Figure 2-1. Dashboard view after initial setup and configuration
Installing Jenkins | 9
CHAPTER 3
Continuous Integration
In this chapter we will expand our existing build.xml script for Ant to run unit tests
using PHPUnit and then create a Jenkins job for our PHP project.
Running Unit Tests During the Build
Instead of putting this information into the build.xml script for Ant, we follow the
concept of Separation of Concerns and use PHPUnit's configuration file feature to con-
figure the tests we want to run, the logfiles (JUnit XML for test results and Clover XML
for code coverage information) and reports (code coverage report in HTML format) we
want generated, and other settings such as the bootstrap script (our autoloader).
Example 3-1 shows the phpunit.xml.dist configuration file for our project.
Example 3-1. phpunit.xml.dist configuration file for PHPUnit
<?xml version="1.0" encoding="UTF-8"?>
<phpunit bootstrap="tests/autoload.php" backupGlobals="false"
backupStaticAttributes="false" strict="true" verbose="true">
<testsuite name="BankAccount">
<directory suffix="Test.php">tests/unit</directory>
</testsuite>
<logging>
<log type="coverage-clover" target="build/logs/clover.xml"/>
<log type="coverage-html" target="build/coverage" title="BankAccount"/>
<log type="junit" target="build/logs/junit.xml"/>
</logging>
<filter>
<whitelist addUncoveredFilesFromWhitelist="true">
<directory suffix=".php">src</directory>
<exclude>
<file>src/autoload.php</file>
</exclude>
</whitelist>
</filter>
</phpunit>
11
Invoking phpunit without any parameters in the project directory (where the phpu-
nit.xml.dist configuration file resides) will result in PHPUnit running the tests the way
we set it up in the configuration.
We can now add a target to our build.xml script that invokes PHPUnit to run our unit
tests. While we are at it, we add two other targets that handle cleaning up build artifacts
and preparing directories for build artifacts, respectively:
• The clean target is responsible for cleaning up (deleting) any artifacts that may
have been produced by a previous build. This target is a dependency of prepare
but invoking it manually is also useful sometimes.
• The prepare target invokes the clean target and then creates the directories to which
PHPUnit writes its logfiles and reports and (by means of the phpab target) generates
the autoloader code.
• The phpunit target invokes PHPUnit.
Example 3-2 shows how these three new targets are implemented. The implementation
of the phpab task remains the same as shown in Chapter 1 and is not repeated here.
Example 3-2. build.xml script that invokes PHPUnit
<?xml version="1.0" encoding="UTF-8"?>
<project name="BankAccount" default="build">
<target name="build" depends="prepare,phpunit"/>
<target name="clean" description="Cleanup build artifacts">
<delete dir="${basedir}/build/coverage"/>
<delete dir="${basedir}/build/logs"/>
</target>
<target name="prepare" depends="clean,phpab" description="Prepare for build">
<mkdir dir="${basedir}/build/coverage"/>
<mkdir dir="${basedir}/build/logs"/>
</target>
<target name="phpab" description="Generate autoloader scripts">
<! >
</target>
<target name="phpunit" description="Run unit tests with PHPUnit">
<exec executable="phpunit" failonerror="true"/>
</target>
</project>
Example 3-3 shows the output of running the build.xml script with Ant.
Example 3-3. Running the build.xml script
ant
Buildfile: /home/sb/bankaccount/build.xml
12 | Chapter 3: Continuous Integration
clean:
[delete] Deleting directory /home/sb/bankaccount/build/coverage
[delete] Deleting directory /home/sb/bankaccount/build/logs
phpab:
[exec] Autoload file '/home/sb/bankaccount/src/autoload.php' generated.
[exec]
[exec] Autoload file '/home/sb/bankaccount/tests/autoload.php' generated.
[exec]
prepare:
[mkdir] Created dir: /home/sb/bankaccount/build/coverage
[mkdir] Created dir: /home/sb/bankaccount/build/logs
phpunit:
[exec] PHPUnit 3.5.15 by Sebastian Bergmann.
[exec]
[exec]
[exec]
[exec] Time: 0 seconds, Memory: 9.50Mb
[exec]
[exec] OK (39 tests, 69 assertions)
[exec]
[exec] Writing code coverage data to XML file, this may take a moment.
[exec]
[exec] Generating code coverage report, this may take a moment.
[exec]
build:
BUILD SUCCESSFUL
Total time: 2 seconds
We should make sure that the PHP code does not contain an syntax errors before we
try to run the unit tests. The code below implements a target that uses Apache Ant's
<apply> task to invoke PHP's lint checker (php -l) for each source code file in the src
and tests directories. The <apply> task works like the <exec> task but can operate on
multiple files when provided with a <fileset>.
<target name="lint">
<apply executable="php" failonerror="true">
<arg value="-l" />
<fileset dir="${basedir}/src">
<include name="**/*.php" />
</fileset>
<fileset dir="${basedir}/tests">
<include name="**/*.php" />
</fileset>
</apply>
</target>
Now we have everything in place to create a job for our PHP project in Jenkins.
Running Unit Tests During the Build | 13