ADP6 Development Software pot
Bạn đang xem bản rút gọn của tài liệu. Xem và tải ngay bản đầy đủ của tài liệu tại đây (10.29 MB, 318 trang )
ADP6 Development Software
Reference Manual
MA00822 2005-11
English
Email:
Hotline:0902 189 622
www.dacovn.com
Foreword
Hitech Electronics, MA00822
ADP6 Reference Manual
Foreword
This manual is a description of ADP6, the configuration tool used to create
applications for the operator terminals in the PWS-series.
The manual assumes that the most recent versions of the system program (firmware)
and configuration tool are used.
The operator terminal can be connected to many types of automation equipment,
such as PLCs, servo and drives. In this document the expression “the controller” is
used as a general term for the connected equipment.
Hitech Electronics Corp. a subsidiary of Beijer Electronics AB, MA00822, 2005-11
All examples in this manual are only intended to improve understanding of the functionality and handling of
the equipment. Hitech Electronics cannot assume any liability if these examples are used in real applications.
In view of the wide range of applications for this software, users must acquire sufficient knowledge themselves in
order to ensure that it is correctly used in their specific application. Persons responsible for the application and
the equipment must themselves ensure that each application is in compliance with all relevant requirements,
standards and legislation in respect to configuration and safety.
Hitech Electronics Corp. will accept no liability for any damage incurred during the installation or use of this
equipment.
Hitech Electronics Corp. prohibits all modification, changes or conversion of the equipment.
Email:
Hotline:0902 189 622
www.dacovn.com
Contents
Hitech Electronics, MA00822I
Contents
1Installation 9
1.1 Installation Procedure 10
2Instructions 13
2.1 ADP6 Programming Environment 13
2.2 File Menu 14
2.2.1 New 14
2.2.2 Open and Close 15
2.2.3 Save and Save as 15
2.2.4 Print 15
2.2.5 Upload Application and Download Application From 16
2.2.6 Upload Recipes and Download Recipes 16
2.2.7 Reconstruct Source 17
2.2.8 Exit 17
2.3 Edit Menu 18
2.3.1 Duplicate 18
2.3.2 Find/Replace Address 19
2.3.3 Decompose Shape 22
2.3.4 Align and Make Same Size 23
2.3.5 Nudge and Layer 24
2.3.6 Group and Ungroup 24
2.3.7 Object Attributes 25
2.3.8 State/Text Management 26
2.4 View Menu 30
2.4.1 Whole Screen and Whole Screen With I/O Labels 30
2.4.2 Language 1-5 30
2.4.3 Zoom In, Normal and Zoom Out 31
2.4.4 Toolbars 31
2.5 Screen Menu 32
2.5.1 New Screen 32
2.5.2 Screen Manager 32
2.5.3 Close Screen 36
2.5.4 Cut/Copy/Delete Current Screen and Paste Screen 36
2.5.5 OPEN Macro, CLOSE Macro and CYCLIC Macro 36
2.5.6 Screen Properties 37
2.6 Draw Menu 44
2.6.1 Geometric Shapes 44
2.7 Object Menu 56
2.7.1 Creating Objects 56
2.7.2 Specifying Object Properties 57
2.7.3 Buttons 61
2.7.4 Numeric Entry 73
2.7.5 Character Entry 76
2.7.6 List 77
2.7.7 Drop Down List 79
2.7.8 Indicators 80
2.7.9 Numeric Display 85
2.7.10 Character Display 87
Email:
Hotline:0902 189 622
www.dacovn.com
Contents
IIHitech Electronics, MA00822
2.7.11 Message Display Objects 88
2.7.12 Bar Graph 95
2.7.13 Trend Graph 98
2.7.14 XY Chart 100
2.7.15 Panel Meters 103
2.7.16 Pie Graph 105
2.7.17 Dynamic Graphics 106
2.7.18 Historical Display 118
2.7.19 Alarm Display 126
2.7.20 Sub Macro 131
2.8 Library Menu 132
2.8.1 Bitmap Library 132
2.8.2 Font Library 134
2.8.3 Save as Shape 135
2.8.4 Shape Library Manager 135
2.8.5 Text Pool 136
2.9 Application Menu 138
2.9.1 Workstation Setup 138
2.9.2 Tag Table 142
2.9.3 Alarm Setup 143
2.9.4 Slide-out Menu 144
2.9.5 System Message 145
2.9.6 Macros 147
2.9.7 Compile 148
2.9.8 Download Application and Download Firmware and Application 149
2.9.9 File Protection 150
2.10 Tool Menu 150
2.10.1 Cross Reference 150
2.10.2 Off-line and On-line Simulation 153
2.10.3 View/Edit Recipes 154
2.11 Options Menu 155
2.11.1 Snap to Grid 155
2.11.2 Display Grid 155
2.11.3 Grid Attributes 155
2.11.4 Transmission Setup 155
2.11.5 Default Screen Background Style 156
2.11.6 Default Frame Styles 156
2.11.7 Default Text Styles 157
2.11.8 Numeric Keypad Setup 157
2.11.9 Editing Options 157
2.12 Window Menu 158
2.13 Help Menu 159
3 Recipes 161
3.1 Example 161
3.2 Recipe Operation Steps 162
3.3 Recipe Controlled by Controller 165
3.4 Recipe Controlled by Operator Terminal 168
Email:
Hotline:0902 189 622
www.dacovn.com
Contents
Hitech Electronics, MA00822III
4 Control and Status Block 171
4.1 Control Block 172
4.1.1 Screen Number Register 172
4.1.2 Command Flag Register 174
4.1.3 Logging Buffer Control Registers: LBCRs 176
4.1.4 RCPNO Number Register: RNR 179
4.1.5 General User Area Register 179
4.1.6 Determine the Control Block Size 179
4.2 Status Block 180
4.2.1 Screen Status Register 180
4.2.2 General Status Register 180
4.2.3 Logging Buffer Status Registers (LBSRs) 182
4.2.4 RCPNO Image Register 182
4.3 Recipe Register Block 183
4.3.1 Recipe Register Number - Enhanced Operator Terminals 183
4.3.2 Addressing Recipe Data - Enhanced Operator Terminals 184
4.4 Time Block 185
4.4.1 The Operator Terminal Writes to the Controller 185
4.4.2 The Controller Writes to the Operator Terminal 186
4.5 Read Cycle 186
5 Multi-Link: Normal Connection Port 187
5.1 Communication Parameters 188
5.2 Communication Efficiency 190
5.3 Important Notes 191
6 Ethernet Communication 193
6.1 Connection 193
6.2 IP Address Setup 193
6.3 Application Upload/Download over Ethernet 194
6.4 Communication with Ethernet-enabled controllers 196
6.5 Multi-Link - One Master and Multiple Slaves 197
6.6 Cross-Link over Ethernet (Data Sharing) 200
7 Multi-Channel Communication 205
7.1 Connection 205
7.2 Connection Setup 206
7.3 Read/Write Address Setup 210
Email:
Hotline:0902 189 622
www.dacovn.com
Contents
IVHitech Electronics, MA00822
8Macros 211
8.1 Macro Function 211
8.2 Macro Classifications 211
8.2.1 Application Macros 211
8.2.2 Screen Macros 211
8.2.3 ON/OFF Macros 212
8.2.4 Sub-Macros 212
8.3 Macro Commands 213
8.3.1 Arithmetic 215
8.3.2 Logical 215
8.3.3 Data transfer 216
8.3.4 Comparison 216
8.3.5 Flow Control 220
8.3.6 Data Conversion 221
8.3.7 Bit Setting 222
8.3.8 Others 222
8.4 Cautions 226
8.5 Internal Memory 226
9 Communication between Operator Terminal and Controller 227
9.1 Allen Bradley Micrologic 1000/1500 228
9.2 Allen Bradley PLC-5 230
9.3 Allen Bradley SLC-503/504 233
9.4 Allen Bradley IQ Master Servo Controller 236
9.5 ABB Comli (Slave Mode) 237
9.6 Computer (as Master/Slave/V2/Null) /Modbus Master 238
9.7 Delta DVP 239
9.8 Ero TFS/THS/LFS 240
9.9 Facon FB 241
9.10 Festo FPC 243
9.11 Fuji NB 244
9.12 GE Series 90 CCM 246
9.13 GE-Fanuc 90-SNP 247
9.14 Hitachi EC 249
9.15 Hitachi H/EH1 250
9.16 Hust CNC Controller 252
9.17 Idec Micro-3 253
9.18 Jetter Nano_B 255
9.19 Jetter Delta 256
9.20 Klockner Moeller PS 257
9.21 Koyo SA/TI 325/330 258
9.22 Koyo Direct DL/Koyo SU Series/TI435 260
Email:
Hotline:0902 189 622
www.dacovn.com
Contents
Hitech Electronics, MA00822V
9.23 LG Glofa GM6 262
9.24 LG K10/60H/200H 263
9.25 LG K200S 265
9.26 LG K300S 266
9.27 LG Master-K10S/K30S/60S/100S 267
9.28 Matsushita FP 268
9.29 Mirle DX 270
9.30 Mitsubishi FX 272
9.31 Mitsubishi A 274
9.32 Mitsubishi QnA 277
9.33 Modbus Slave 279
9.34 Modicon PC984 or Modbus (ASCII) or TSX Quantum 280
9.35 Omron C 282
9.36 Omron CS1 284
9.37 Omron CV 285
9.38 Parker 6K 286
9.39 Side Mida 20/20D 288
9.40 Siemens Simatic S5 290
9.41 Siemens Simatic S5 3964R 292
9.42 Siemens Simatic S7-200 PPI 293
9.43 Siemens Simatic S7-300 CP340 295
9.44 Siemens Simatic S7-300 via MPI port 296
9.45 Siemens Simatic S7-300 MPI-Cable 298
9.46 Siemens Simatic S7-300 HMI-Cable 300
9.47 Taian TP01 302
9.48 Taian TP02 303
9.49 Taian N2 305
9.50 Telemecanique TSX Micro 306
9.51 Toshiba M20/M40 308
9.52 Toshiba T1/T2 309
9.53 Unidriver UD70 311
9.54 Vigor M 312
9.55 Yokogawa FA-M3 314
10 Appendix A - ADP6 Features and Operator Terminal Models 317
Email:
Hotline:0902 189 622
www.dacovn.com
Contents
VIHitech Electronics, MA00822
Email:
Hotline:0902 189 622
www.dacovn.com
Installation
Hitech Electronics, MA008229
1 Installation
The basic ADP6 system requirements are as follows:
– PC - CPU 80586 or higher;
– Memory - 64 MB RAM or more;
– Hardware - 60 MB or more available hard drive space;
– Display - VGA or SVGA. Microsoft Windows with 256 colors or higher, and a
resolution of 800×600 or higher.
Since all the programs in the ADP6 suite have been compressed, one needs to
uncompress and install the software before using it.
The ADP6 software can be run under the following Windows operating sys-
tems:
–Windows 95
–Windows 98
–Windows ME
– Windows 2000
–Windows XP
The software is available from the following website or your local distributor.
www.hitechsite.com
Note also that not all features provided by ADP6 are available for every operator
terminal model.
For complete details of these ADP6 features and the applicable models, please
refer to Appendix A - ADP6 Features and Operator Terminal Models.
Email:
Hotline:0902 189 622
www.dacovn.com
Installation
10Hitech Electronics, MA00822
1.1 Installation Procedure
1. Start your computer in the Windows environment.
2. Click Start and select Run. When the Run dialog box appears on the screen,
select Browse to locate the installation program Setup.exe.
Running the ADP6 installation program “Setup.exe” in Windows
3. Click OK to start the installation.
ADP6 is preparing to install
4. Follow the instructions and specify the hard drive and directory where ADP6
is to be installed.
The destination hard drive and directory
Email:
Hotline:0902 189 622
www.dacovn.com
Installation
Hitech Electronics, MA0082211
5. Click Next to select the type of setup. Typi ca l is recommended for most users.
Compact installs the program with basic options. Custom allows users to indi-
vidually select the options to install and this is recommended for advanced users.
Selecting the type of setup
6. Click Next to begin the installation. If the Typ ical option is selected, the follow-
ing dialog box will appear on the screen.
ADP6 installation
7. After installation, the system will create the ADP6 icon automatically.
8. Once the installation is complete, the ADP6 software can be found in the
specified directory. To launch the ADP6 program, simply click the
ADP6 icon.
Email:
Hotline:0902 189 622
www.dacovn.com
Installation
12Hitech Electronics, MA00822
Email:
Hotline:0902 189 622
www.dacovn.com
Instructions
Hitech Electronics, MA0082213
2 Instructions
Microsoft Windows
TM
is undeniably the predominant PC operating environment
these days. ADP6 is designed to make full use of the Windows environment,
using a “What You See is What You Get” Approach. Users can immediately see the
objects they create on a PC screen with their specified attributes, such as font size,
color, object location, picture, scale, frame, and so on. What the user sees on the PC
screen will be the same as what is displayed on a operator terminal.
Furthermore, ADP6 utilizes the principles of object-oriented design to implement
drag-and-drop editing. Users can use a mouse to conveniently drag objects to
another location or change their shape and size as they wish.
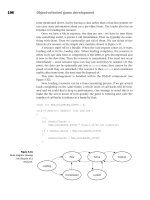
2.1ADP6 Programming Environment
The figure below illustrates the main menu bars and tool boxes in the ADP6
program environment.
ADP6 program environment overview
Title Bar
The Title Bar shows the name of the window and the directory where the current
application is found.
For example: C:\Program Files\ADP6\Project Files\Project1.V6F.
If an application file has not been saved, “Untitled” will be displayed in the Title Bar.
Menu Bar
There are 13 menus in the Menu Bar; they are File, Edit, View, Screen, Draw,
Object, Library, Application, Tool, Options, LadderPlus, Window and Help.
Tool Bar
Users can easily create an ADP6 project by clicking the icons on the Tool Bar.
This feature also helps new users to familiarize themselves with the software quickly
and easily.
Title Bar
Toolbars
Window Workspace
Toolboxes
Status Bar
Menu Bar
Email:
Hotline:0902 189 622
www.dacovn.com
Instructions
14Hitech Electronics, MA00822
Window Workspace
This is the area where the user designs a screen. The objects or data created in this
area will actually be displayed on the operator terminal screen.
In the following sections, we will talk about the function, application, and usage of
each of the commands and menus in much more detail.
2.2 File Menu
The main purpose of the File menu is to manage the files created by ADP6.
2.2.1 New
This command allows users to create a new application and specify its properties,
including Application Name, Panel/Terminal, Controller/PLC, Printer, Multilin-
gual Support, Control Block, Status Block, and so on.
To create a new application, select File/New. The New Application’s Properties
dialog box appears on the screen.
The New Application’s Properties dialog box
The following are the basic properties a user needs to set up for a new application:
–In the Application Name box, enter the application name.
–In the Panel/Terminal list, select a operator terminal model.
–In the Controller/PLC list, select the type of controller which the operator termi-
nal will communicate with.
Please see the sections Application Menu and Connection Tab for more details.
Email:
Hotline:0902 189 622
www.dacovn.com
Instructions
Hitech Electronics, MA0082215
2.2.2 Open and Close
Open opens an existing application.
Close closes the application.
2.2.3 Save and Save as
Selecting Save saves an existing application, replacing the previous copy with the new
copy.
Selecting Save As saves a new or existing application with a new name.
2.2.4 Print
An application file can be printed for the planning, management or storage.
Select File/Print and the Print Options dialog box appears on the screen.
The Print Options dialog box
There are three options available: Workstation Setup, Screen Overview, and Screen
Image.
Workstation Setup prints the operator terminal data, such as the controller type,
configuration setup, and the logging buffer details.
An example of the Workstation Setup print option
Note:
The Print option is not available for all operator terminal models: please refer to
Appendix A - ADP6 Features and Operator Terminal Models for complete details.
Email:
Hotline:0902 189 622
www.dacovn.com
Instructions
16Hitech Electronics, MA00822
Screen Overview prints a screen image with the controller location of each object.
An example of the Screen Overview print option
Screen Image prints a screen image without the controller locations.
An example of the Screen Image print option
Other options:
Copies: Specifies the number of copies to print.
Range: Only available for the Screen Overview and Screen Image options.
2.2.5 Upload Application and Download
Application From
Upload Application is used to upload an application from a operator terminal to a
PC and save the file as *.AF6.
Download Application From is used to download a program from a PC to a operator
terminal. The file format is *.AF6.
2.2.6 Upload Recipes and Download Recipes
Upload Recipes is used to upload recipes from the operator terminal to a PC. The
file will be saved as *.RCP.
Download Recipes is used to download recipes from a PC to a operator terminal.
The file format used is *.RCP.
Note:
These functions are not available for all operator terminal models: please refer to
Appendix A - ADP6 Features and Operator Terminal Models for complete details.
Email:
Hotline:0902 189 622
www.dacovn.com
Instructions
Hitech Electronics, MA0082217
2.2.7 Reconstruct Source
This function allows users to directly reconstruct the source file of an application by
uploading the application file from an operator terminal to a PC.
Reconstruct Source is used to reconstruct an uploaded application file from *.AA6
to *.V6F. The application will be displayed on a PC and the source file (*.V6F) can
be saved for the future editing and application.
In ADP6, an application downloaded to an operator terminal is “rebuildable”;
Reconstruct Source enables a user to directly reconstruct a source file of an uploaded
application on an operator terminal from *.AA6 to *.V6F.
Steps to reconstruct a source file from *.AA6 to *V6F:
(Assuming that an application has been uploaded on the operator terminal.)
1. On the operator terminal, select Upload Application. In ADP6, select File/
Upload Application. The operator terminal will upload the application to the
PC and the file will be saved as *.AF6.
2. Next, select File/Reconstruct Source and open the application file (*.C64 or
*.AA6). The application should appear on the PC and the user can save the
source file as *.V6F for future use.
2.2.8 Exit
Exit is used to close and exit ADP6.
If any changes have been made, the following dialog box will appear on the screen,
asking the user to save the changes or exit.
The Exit dialog box
Note:
This function is not available for all operator terminal models: please refer to
Appendix A - ADP6 Features and Operator Terminal Models for complete details.
Email:
Hotline:0902 189 622
www.dacovn.com
Instructions
18Hitech Electronics, MA00822
2.3 Edit Menu
The primary purposes of the Edit menu include the common editing functions for
ADP6 screen and objects. If a user does not open an image, all of the light-
colored items in the Edit menu are unavailable.
The user can click the icons on the tool bar to speed edit or quickly gain use of the
elements on the list by right-clicking with the mouse.
The following sections will explain the functions that are more specific to the
ADP6 software.
The Edit menu and the Edit toolbar
2.3.1 Duplicate
Allows a user to make multiple copies of an object and simultaneously increase the
corresponding addresses incrementally.
The Duplicate dialog box
Number of Copies
Columns: Specifies number of columns to duplicate.
Rows: Specifies the number of rows to duplicate.
Spacing
Horizontal: Specifies how many pixels to space duplicate ob-jects horizontally.
Vertical: Specifies how many pixels to space duplicate ob-jects vertically.
Email:
Hotline:0902 189 622
www.dacovn.com
Instructions
Hitech Electronics, MA0082219
Address Increment
X-Direction: The address of the same dynamic objects in-creases from left to right.
Y-Direction: The address of the same dynamic objects increases from top to bottom.
Duplicate
2.3.2 Find/Replace Address
The main function is to find or edit addresses in a created project and to replace the
found addresses.
The Find/Replace Address dialog box
Enter the address in the blank space or select from the drop-down list directly (e.g.
W100); then click the Find button to search. The Result tab displays a detailed list
according to the designated range and address.
The Result tab
Email:
Hotline:0902 189 622
www.dacovn.com
Instructions
20Hitech Electronics, MA00822
Use the Replace button to replace the address with a new one. The function of the
Replace button is to replace the objects’ addresses one by one; use Replace All to re-
place all of the objects’ address at one time.
The Replace tab
Example 1: Find Screen Address
Select Type/ Scre en to find the screen address.
Find Screen address
Range:
– Current screen: Only finds in the current open screen.
– All screens: Finds all the screens in the application program.
Option:
– Match whole word only: The findings match the entry address entirely. If this op-
tion is not selected, the initial findings match the entry address including partial
and entire matches.
– Open attribute dialog: To display an object’s attributes, double-click it in the list
on the Result tab. If this option is not selected, the object attributes dialog box is
unavailable.
Email:
Hotline:0902 189 622
www.dacovn.com
Instructions
Hitech Electronics, MA0082221
Example 2: Find Macro Address
Select Type/Macro to find the macro address.
Find Macro address
Range
– Current macro: Finds the current macro.
– Current screen macros: Finds the current image/screen macros.
– Sub-macros: Finds all sub-macros.
– All screens’ macros: Finds all image/screen macros.
– Application macros: Finds three types of macros in the Application menu.
– All macros: Finds all macros.
Option
– Match whole word only: The findings match the entry address entirely. If this op-
tion is not selected, the initial findings match the entry address including partial
and entire matches.
Email:
Hotline:0902 189 622
www.dacovn.com
Instructions
22Hitech Electronics, MA00822
2.3.3 Decompose Shape
This function is primarily used to decompose the graphics created using Shape in the
Draw command. Each decomposed graphic can be modified and edited.
Selecting Graph in Draw/Shape to edit
Selecting Edit/Decompose to modify each decomposed object
Email:
Hotline:0902 189 622
www.dacovn.com
Instructions
Hitech Electronics, MA0082223
2.3.4 Align and Make Same Size
These two functions are primarily used to align created objects or to make them the
same size, for example indicators, moving signs, message displays and lines. The fol-
lowing are the steps used for these two commands:
1. Select Shift and click on all objects which are to be aligned or made the same
size.
2. Click on the master object; the four corners of this master object should then be
shaded.
3. Select the command Align or Make Same Size to make the other objects aligned
with or made same size as the master object.
Email:
Hotline:0902 189 622
www.dacovn.com
Instructions
24Hitech Electronics, MA00822
2.3.5 Nudge and Layer
Nudge: Choose objects to slightly shift location and adjust towards the specified di-
rection.
Layer: If there are more than two objects, users can shift the objects’ layer positions
up and down.
The Layer/Bring to Next command sends the rectangle to the top.
The Layer/Send to Previous sends the rectangle to the bottom.
2.3.6 Group and Ungroup
If there are more than two graphics or objects on the screen to be edited; frame (by
using Shift + left-click) all objects to be grouped and then select Group. All of the
framed objects will be moved to the appointed position as a single unit.
Select Edit/Group to group the selected objects together.
Ungroup is used to ungroup the selected group of objects.
Email:
Hotline:0902 189 622
www.dacovn.com
Instructions
Hitech Electronics, MA0082225
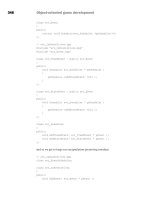
2.3.7 Object Attributes
You can edit the content of the objects or modify the data location and formats asso-
ciated with the controller.
Note that different objects (such as the push button, indicator, moving sign and mes-
sage display) have their own object attributes.
Click on the object and then select Edit/Object Attributes and the dialog box will
then be displayed on the screen. You can also double-click directly on the objects. For
properties not explained in this section, please refer to section Object Menu.
The ON/Off Button object attributes dialog box
The Moving Sign object attributes dialog box
Email:
Hotline:0902 189 622
www.dacovn.com