Digital Collage and Painting: Using Photoshop and Painter to Create Fine Art part 2
Bạn đang xem bản rút gọn của tài liệu. Xem và tải ngay bản đầy đủ của tài liệu tại đây (36.22 MB, 295 trang )
Painting in Painter™ 291
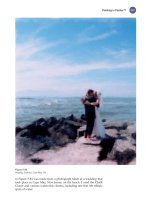
Figure 5-84
Wedding Embrace, Cape May, NJ
in Figure 5-84 was made from a photograph taken at a wedding that
took place in Cape May, New Jersey, on the beach. I used the Chalk
Cloner and various watercolor cloners, including one that left telltale
spots of water.
Digital Collage and Painting292
Figure 5-85
President’s House, McDaniel College
Painting in Painter™ 293
Don’t copy. Feel the forms.
Feel how much it swings,
how much it slants—these
are big factors. The more
factors you have, the
simpler will be your work.
— THOMAS EAKINS ,
in Thomas Eakins, by
Lloyd Goodrich (1987)
Sometimes you may fi nd yourself struggling with an image because
the software doesn’t seem capable of giving you what you had imag-
ined. This was the case with Figure 5-85 . The whites that I desired did
not seem pure enough in my digital painting. I tried painting and erasing,
but I simply wasn’t satisfi ed with the results. I printed the painting and
looked at it with dismay. I was right. The whites simply were not white
enough. I then took a real paintbrush and some opaque white watercolor
paint and literally stroked real paint onto my print. As that was drying,
I felt compelled to add a few details with real colored pencils. When the
print was dry I scanned it back into the computer and worked on it a little
more until I felt satisfi ed with this commission. The point to this story is
that you have to use the tools that are appropriate to your task. Feel free
to intermingle digital painting tools with real painting tools. You do not
need to be a purist about the tools. It is the art that is important, not the
tools that were used. Use what feels right. Follow your instincts.
Photocopy-Inspired Painting
Figure 5-86
Original photograph of
a priest character at a
Renaissance festival
Digital Collage and Painting294
The next example sprang from a conversation I had with an artist
friend, Ann Curtis. Ann is a wonderful artist and is known through-
out the United States for her work at Renaissance festivals, making
plaster body-cast sculptures. As most artists do, she also dabbles in
other media. She showed me a few portraits that she had done with
her colored pencils, working on black-and-white photocopies of pho-
tographs. They were lovely, but the poor quality of the photocopy
paper meant that her creations were not going to be very long lived
in archival terms. She was having such a good time with this process
that I thought I could show her how she could achieve similar results
digitally. The resulting prints would have a much higher archival
standard. For this project I decided to use a digital photograph that I
had taken at the local Renaissance festival.
Figure 5-87
Photocopy version of the
photograph
Desaturate the color photo
Copy the desaturated photo on a new layer
Use Color Dodge blend mode and combine those layers into a new
layer
Duplicate the combined layer
Apply a Curves adjustment to lighten the image
Duplicate the layer and apply Filter > Photocopy
Set the Photocopy layer to 78% opacity and set on the Multiply
blend mode
My fi rst task was to convert this color photograph to the look of a
black-and-white photocopy. When I thought about what a photocopy
looks like, I realized that lots of mid-tones and detail in highlights and
shadows are lost. I wanted to replicate that effect, so it would resem-
ble a real photocopy. Here are the steps that I used. I desaturated
the image, leaving a black-and-white rendition of the photograph.
That layer was copied and the Color Dodge blend mode was applied
to it. Those two layers were combined into another layer, labeled
“Combination.” By leaving the fi rst two layers, I reserved my ability
to go back into those layers later, if need be. The Combination layer
Choose only one
master—Nature.
— R
EMBRANDT ,
in Rembrandt Drawings,
by Paul Némo, as
translated by David
Macrae (1975)
Painting in Painter™ 295
was duplicated and a Curves adjustment was applied to it, lighten-
ing the image. That layer was duplicated and the Photocopy fi lter was
applied to it. This new layer was then set on the Multiply blend mode
and reduced to 78%.
Figure 5-88
Hand-colored version
Save
Flatten and save this fl attened version (under another name)
Using the fl attened version, create a new layer
Set the blend mode on the new layer to Color
This is a good point in the process to save your work. I saved both a full
layered version and a fl attened one. The next step is the fun, artis-
tic one. Create a new layer and set the blend mode on it to Color. This
Digital Collage and Painting296
is your hand-coloring layer. I selected colors from the color palette
and painted them onto this layer. You can be rather messy, loose, and
imprecise in this step. Figure 5-88 shows the completed Photoshop
piece. Figure 5-89 shows only the hand-painted layer set to Color
blend mode.
Figure 5-89
Hand-colored layer only
Painting in Painter™ 297
Bring fl attened colored version into Painter
File > Clone
Select all and delete
Figure 5-90
Image cloned in Painter and painted background added
Digital Collage and Painting298
Use the Chalk Cloner and Straight Cloner
Add a background using Artist Pastels and blend with Just Add Water
Mission accomplished! But, then I started thinking about what it
might look like if that completed Photoshop portrait were used as
the basis for a clone image in Painter. Figure 5-90 was made using the
Chalk Cloner and Straight Cloner. The blue background was painted
in with Artist Pastels and blended with Blender > Just Add Water.
Figure 5-91 was made with the same tools but with a difference at the
beginning of the cloning process. When the portrait was cloned, and the
clone was selected and deleted, the entire area was then fi lled with the tan
color. This simulated a piece of tan charcoal paper. My little experiment
yielded another way to make a photo-like illustration. In this case, it was a
portrait, but this same process could be used on other subject matter.
Figure 5-91
Painter version with solid
background
One touch of nature makes
the whole world kin.
— W
ILLIAM SHAKESPEARE ,
Troilus and Cressida
(1601)
Painting in Painter™ 299
Auto-Painting: Painting in a Hurry
Those engineers at Corel are wizards. They think of everything to
help the artist out. The next technique is super easy and quick. Since
Painter X they have included an Auto-Painting option. Here is a look
at how it works.
Figure 5-93
Selecting Auto-Painting
Figure 5-92
Horse racer and its clone
Select a photo and clone it, as explained earlier in this chapter. Turn
off Tracing Paper, creating a white layer on which to work.
In the Window menu, select Show Underpainting > Auto-Painting.
Select Smart Stroke Brushes from our choice of brushes. Within that
category, select the Acrylics Captured Bristle Brush variation. Your
choices continue with what type of mark to make in the Auto-Painting
and how large should the brush be. I have chosen Scribble Large with
a brush set at 10.4 pixels. Press the green arrow at the lower right of
the dialogue box to start the Auto-Painting. It will continue until you
click again to stop it.
Digital Collage and Painting300
This Auto-Painting Brush is a great way to create a fast underpaint-
ing. You can proceed further by lowering the size of the brush, for
more detail and handpainting directly onto the clone. I lowered the
brush size to 4.4 and then to 2.8 to refi ne more detail in some sections,
leaving the background area loose and painterly.
I then used the Straight Cloner with a small brush (3.6) and a very
light opacity ( 4%) in just a few spots, such as the jockey’s head and
reins. Use the Straight Cloner sparingly. You do not want the original
photo back, just a slight indication of critical details.
Figure 5-96
Proceeding with more detail
Figure 5-94
Selecting desired brushes
Figure 5-95
Resulting Auto-Painting
Painting in Painter™ 301
Smart Stroke Painting
Figure 5-97
Straight Clone added for a few
detailed touches
Figure 5-98
Smart Stroke Painting with
Smart Settings of Casablanca
photo
Another way to go with this tool is to check the box marked Smart
Stroke Painting, which follows the lines of the photograph and is less
random. Next, check the box marked Smart Settings. This is an auto-
matic feature that starts out with a large brush size and then decreases
in size, yielding more detail. It will “fi nish” the painting on its own.
This becomes a fabulous base for a painting.
With this giant head start, it is now easy to refi ne the image a bit,
using the Chalk Cloner. The goal is still to have a painterly looseness
with just a bit more defi nition where needed.
Digital Collage and Painting302
Continuing to use that Chalk Cloner, I decreased the brush size for
more detail on the people and various areas throughout the image. It
is like walking a tightrope to achieve the right balance between photo-
graphic detail and a loose painterly feel. You determine how loose or
tight the fi nished image will be.
The elements of design prevail whether you are photographing,
drawing, or painting. Composition, line, color, form, and directionality are
still the pillars of good design. A strong photo will be a good candi-
date for a painting.
I have used the Acrylics Captured Bristle from the Smart Stroke
Brushes for this example, but try another one from that grouping.
Experiment with the different kinds of marks you can make with the
Auto-Painting dialogue box. A ton of options are available to you. Try
them out.
Figure 5-100
Decreased brush size for more
detail
Figure 5-99
Adding Chalk Cloner
Painting in Painter™ 303
Figure 5-101
Finished digital painting of Casablanca Mosque, Morocco
Digital Collage and Painting304
Make Virtually Any Brush a Cloner
Although there are loads of cloner brushes, you can turn almost any
brush into a cloner. Here is a simple example.
Figure 5-102
Beginnings of oil painting
Figure 5-103
Match the direction of your
strokes to the subject matter
Select a photograph. Create a clone (File > Quick Clone), and then
decide what brush you would like to use from the literally hundreds
of variations. Ask yourself what treatment best suits the image. For
this photo of fringy looking pink poppies, I chose the category of Oils,
then the Thick Oil Bristle Brush. It is a smeary brush that displays the
tracks of stiff bristles and gives a shine and shadow to the brushwork.
Be sure to have the Brush Controls palette out. Here, I chose Dab
Type > Bristle Spray and Stroke Type > Single. Opacity was set at
100%. Under Cloning, I checked the Clone Color box so the program
would know to grab the color from the underlying photograph, not
the current selected color.
Painting in Painter™ 305
When you are working with a brush that yields an impasto or
thick paint feel, be sure to focus on the direction of the brush strokes
as you lay them down. They should make sense. Follow the con-
tour of the object you are painting. Random zig-zags, which most
folks are tempted to use to lay down color quickly, seldom creates
the type of look you ultimately desire. Notice how portions of the
stroke shine. In some areas of your work that may not be desirable.
If you try painting from a different direction, you may improve that
effect dramatically.
Illustrative Sketch Technique
Although this technique is not really a painting per se, it is a great
sketch effect that gives the feel of an intaglio, or etching, print. It is
especially good with photos that have a complicated area of detail.
I chose an image of a medieval German doorway.
Figure 5-104
Applying Sketch Effect
As usual, clone the image. Copy this new layer (Select All > Edit
> Copy > Paste in Place). On this new layer, use Effects > Surface
Control > Sketch. Our settings were Sensitivity, 3.49; Smoothing, 1.55;
Grain, 0.27; Threshold High, 23%; and Threshold Low, 100%. Watch
the preview window until you achieve the look you like.
Change the composite method to Overlay. You will notice the
lightened color and a gritty look, depending on your Sketch settings.
I liked the look but wanted to push it further.
Digital Collage and Painting306
Figure 5-106
Duplicate that layer
Figure 5-105
Overlay composite method
I duplicated the sketch layer by right clicking. When duplicated, it
retains the Overlay composite method for the newest layer. This inten-
sifi es that sketch effect and lightens the image more.
Painting in Painter™ 307
This image was now moving toward the look of an old etching, so I
intensifi ed it by changing the newest layer’s composite method to Gel.
Voilà ! This would look good printed on an off-white, rag-based paper
to further emphasize the etching (or intaglio) feel.
Painting Approach with Blenders
There are so many ways to paint in Painter, it would take several vol-
umes to catalog the possibilities. In the real art world, tools used to
blend can include water, turpentine, paper-shading stumps (tortil-
lions), and chamois. These tools can smear, blend, or water down a
painting effect. Painter has a variety of blending tools, and a few of
them can reach down from a new layer and pull up color information
to blend it, creating a painting effect. One of the best is the Just Add
Water blender.
Figure 5-107
Change composite method
to Gel
Figure 5-108
Blending layer created
In our example of windmills in the Netherlands, I created a new
blank layer above the canvas by clicking on the icon with stacks of lay-
ers at the bottom of the Layers palette. Click on the box that says Pick
Up Underlying Color. Next, select Blender Tools with the Just Add
Water variant. Proceed to stroke areas of the image on this new layer. If
you want to see what has been deposited on the new layer, shut off the
visibility of the canvas layer (as shown on the left of Figure 5-108 ).
Digital Collage and Painting308
Proceed to brush the blending tool throughout the image area, var-
ying the size and opacity of your brush as needed. In our example,
this approach worked well until I reached all the branches and twigs
of the overhanging tree. Blending here created a muddy mess.
Figure 5-109
Painterly rendering using a
blending tool
Figure 5-111
Three fi les open—pay close
attention
Figure 5-110
Additional layer for sky
To avoid the muddy mess that blending would create in the tree
branch areas, I created another new layer and painted that portion of
the image with the Real Round Bristle brush, found in the RealBristle™
Brushes category. I sampled colors from the original image to create
the colors with which I painted. I then dropped all the layers together,
joining them. I renamed this blender painting. By giving it a different
name, I retained the original image to archive and use further.
Painting in Painter™ 309
The next technique requires some attention to details. I cloned
the new fi le, Windmill Ptg. In addition to Windmill Ptg and its
clone, I also opened the original image, Windmills. When working
on the clone, you need to direct the software to the image source
that you want to use. I wanted the new painting for all the blend-
ing work I had done, but I also wanted the tree details from the
original image.
I switched back and forth from the Blender painting of the wind-
mills, as my source image, and the original image for the tree limbs
and branches. That allowed me to retain the painterly Blender paint-
ing and introduce the limbs into the image. I chose the Oil Brush
Cloner for a rough, creamy, and textural brush stroke. I could have
stopped here but instead added a colored canvas border and canvas
texture. I fl attened the image and gave it a new name.
Figure 5-112
Tree is cloned using a
textural brush, Oil Brush
Cloner
Figure 5-113
Coarse Cotton Canvas
selected and color of that
canvas
In the Paper Texture box, I selected Coarse Cotton Canvas. In the
color palette, I selected a beige color. This may seem a little puzzling,
but I then cloned my clone painting. I fi lled that new clone with the
beige color (Edit > Fill). I then used the Straight Cloner to clone in
Digital Collage and Painting310
the center of the painting that was recently saved. I left some border
showing (see Figure 5-113 ) and proceeded to paint toward the edges,
giving a textural brush look.
Figure 5-114
Adding Canvas texture
Figure 5-115
Close-up of brush work and
canvas texture
I would recommend experimenting with the Blender tools as paint-
ing tools, using this technique.
An interesting effect that can be achieved in Painter is to apply a
texture on top of a painting. Simply go to Effects > Surface Control >
Apply Surface Texture. You have many options. Paper Texture is one
of the options, and within that category you can determine where the
light is coming from and various qualities of the light. Here, I kept the
light effect subtle, at 6%. That allowed the brush strokes to still show
through.
Painting in Painter™ 311
Edges and Cloning
Figure 5-116
Completed Blender painting
Figure 5-117
Doctored original photo
Digital Collage and Painting312
As a photographer, you know that some images speak to you imme-
diately. Others take time to fl oat to the surface of possibilities. The
image shown in Figure 5-121 took a decade to be made. That long
ago, with a long lens and from far away, I took a photograph of a
Civil War re-enactor. I just liked how he was standing and waiting for
someone. I did not ask permission or get a release from him. I never
intended to use the image. The background was full of water cool-
ers, ice chests, fellow soldiers, pick-up trucks, and more. It was sim-
ply awful. Looking through my slides years later, I stumbled onto the
image of the soldier again. I decided to scan it into my computer and
delete the objectionable background elements in Photoshop. Armed
with that improved doctored image ( Figure 5-117 ), I returned to the
site of the annual re-enactment, where I had taken the original image.
Tens of thousands of re-enactors were present. How would I ever fi nd
this one man so I could give him his photograph and get him to sign
a release form? It was a long shot at best. I showed the photo around
in the re-enactors’ camp. Unbelievably, fellow re-enactors recognized
him and directed me to his unit. I found him, gave him his photo,
and secured a release from him. He was a needle in a haystack,
indeed, but found.
Figure 5-118
Enlarged canvas and clone
stamped backgr
ound
Duplicate the image
Use Filter > Stylize > Find Edges on the duplicate layer
Set the Find Edges layer to the Darken blend mode
Add a new layer and add more handcoloring, painting with the brush
tool and selecting the desired colors
Painting in Painter™ 313
Set the hand-colored layer to the Color blend mode
Enlarge the canvas (Image > Canvas Size)
Clone Stamp the image to expand the background
Select the clone-stamped area with a feathered lasso tool, and run a
Gaussian Blur fi lter on it to soften it
M y fi rst step in this photo illustration was to duplicate the layer. On
the new layer I applied the Stylize > Find Edges fi lter. The edges
were not sharp in the original image (due to the use of a long lens
with no tripod). Using the Find Edges fi lter provided more edge
defi nition. The Find Edges layer was set to the Darken blend mode.
This provided a black edge around the edges that had contrast.
Another layer was added and some handcoloring was applied to
it using the Color blend mode. For the photo illustration, I needed
more ground around our re-enactor. I expanded the canvas and
clone stamped more ground in place. Those areas were selected and
softened with the fi lter Gaussian Blur. I just wanted the color tones,
no detail.
Figure 5-119
Painter Clone
Open fl attened painting in Painter File > Clone
Use the Chalk Cloner, Van Gogh Cloner, and Oil Cloner
Add a new layer, set to the Gel blend mode, and paint in additional
color tones
I saved the image and opened it in Painter. The image was cloned
with a variety of cloners, including the Chalk Cloner, Van Gogh
Cloner, and Oil Cloner. I added additional layers and applied more
color directly to the clone. In most instances, the blend mode was set
to Gel.
Art is the lie that tells the
truth.
— PABLO PICASSO ,
in “Picasso Speaks,”
The Arts Magazine (May,
1923)
Digital Collage and Painting314
Use Blender brushes to blend the new paint into the previous version
Various Blender brushes were used to combine the clone and the over-
laying Gel layers.
The resulting illustration was achieved more than a decade after the
original slide image was made. The background had been simply hor-
rible and the image lacked sharpness. Despite those huge impediments,
a pleasing image was made using the digital artistic tools of a modern
era. Maybe we should go back through those old slide collections and
fi nd other candidates for revitalization using these techniques.
Figure 5-120
Layers are blended
Figure 5-121
Completed painting
Painting in Painter™ 315
Painterly Edge Effects
One of the techniques that I love to incorporate into my digital art-
work is the use of painterly edges. There are so many possibilities
and so many brushes. We will explore a few here. Feel free to mix and
match them as possible edge effects.
Figure 5-122
New layer fi lled with white and painted with the History brush in Photoshop
Open photo in Photoshop
Add a new layer and fi ll it with white
Use the History brush, with a rough brush type selected, to paint the
photo onto the white layer
There are just tons of edge effects that are available to you. Some
effects were discussed in Chapter 4. Edges are easily purchased in var-
ious third-party software packages. Many are really great. Let’s look
at how you can achieve painterly edge effects within Photoshop and
Painter.
Figure 5-122 was created solely in Photoshop. A new layer was
applied over the existing photograph and fi lled with white. The
irregular stroke was made using the History brush and selecting
scratchy wide brushes (located in the lower realms of the Brush
selections).
The kind of photography
I like to do, capturing the
moment, is very much like
that break in the clouds.
In a fl ash, a wonderful
picture seems to come out
of nowhere.
— ELLIOTT ERWITT ,
Between the Sexes (1994)
