Creating iPhone Apps with Cocoa Touch: The Mini Missing Manual pptx
Bạn đang xem bản rút gọn của tài liệu. Xem và tải ngay bản đầy đủ của tài liệu tại đây (1.54 MB, 150 trang )
Craig Hockenberry
Creating
iPhone Apps
with Cocoa
Touch
www.it-ebooks.info
Creating iPhone Apps with Cocoa Touch: The Mini Missing Manual
by Craig Hockenberry
Copyright © 2010 O’Reilly Media, Inc. All rights reserved.
Published by O’Reilly Media, Inc., 1005 Gravenstein Highway North,
Sebastopol, CA 95472.
O’Reilly Media books may be purchased for educational, business, or sales
promotional use. Online editions are also available for most titles: safari.
oreilly.com. For more information, contact our corporate/institutional
sales department: 800-998-9938 or
May 2010: First Edition.
The Missing Manual is a registered trademark of O’Reilly Media, Inc. The
Missing Manual logo, and “The book that should have been in the box”
are trademarks of O’Reilly Media, Inc. Many of the designations used by
manufacturers and sellers to distinguish their products are claimed as
trademarks. Where those designations appear in this book, and O’Reilly
Media is aware of a trademark claim, the designations are capitalized.
While every precaution has been taken in the preparation of this book,
the publisher assumes no responsibility for errors or omissions, or for
damages resulting from the use of the information contained in it.
ISBN: 9781449388409
www.it-ebooks.info
Table of Contents
Introduction v
Building Your First iPhone App 1
Getting the Tools 1
Installing Xcode 3
Getting the iPhone SDK 6
What Lies Ahead for the SDK? 11
Exploring Your New Tools 15
Every Flashlight Needs a Parts List 15
Some Assembly Required 21
Taking It for a Run on Your Mac 23
Revision Decision 26
The Power of Brackets 33
Objective-C: The Nuts and Bolts for Your iPhone App 34
The Land of Square Brackets 34
The Object of It All 36
Telling Your Objects to Do Things 37
Masses of Classes 39
Classes in Detail 40
The Methods Behind the Madness 45
Categorically Speaking 46
Implementation: The Brains Behind the Beauty 48
Creating New Classes 50
Managing Memory 53
Take a nil Pill 56
Autorelease with Ease 58
Properties and Dots 60
www.it-ebooks.info
Methods of Class 62
Initializing Objects 64
Deallocation Location 65
Loops: For Better or For Worse 66
Your Exceptional Code 67
Learn by Crashing 69
Selector Projector 73
Show Your id 75
Where to Go from Here 79
Developer Documentation 80
Learn To Be Lazy 84
Cocoa Touch: Putting Objective-C to Work 87
Get in Cocoa Touch 88
The Big Three: Models, Views, Controllers 89
Views 91
Models 91
Controllers 92
Value Objects 94
Let’s Get Primitive 95
Objectified 96
Collections 100
Copying in Depth 102
Property Lists 102
Mutable vs. Immutable 103
Make It Mutable 104
Protect Your Data 106
Delegation and Data Sources 107
Targets and Actions 110
User Interface: The Hard Way 112
User Interface: The Easy Way 119
Notifications 135
Singletons 139
Singletons as Globals 140
Where to Go from Here 142
The Language of Design 142
Colophon 143
www.it-ebooks.info
Introduction
Since the iTunes App Store’s launch in July 2008, developers have
submitted over 100,000 iPhone applications to the store, resulting
in over 3 billion downloads and climbing. Who wouldn’t want a
piece of that action?
Before the app store was launched, iPhone app development was
limited to the engineers at Apple headquarters in Cupertino, Cali-
formia. Now that Apple has released the developer tools to anyone
who wants to download them, thousands of developers have
discovered how easy and fun it is to write software for the iPhone.
If you’ve done any programming in C or a related language like
C++, Java, PHP, or Perl, you can learn to write iPhone apps in a
snap. Objective-C will feel wonderfully familiar, since its entire
infrastructure is based on standard C.
In iPhone App Development: The Mini Missing Manual, you’ll create
your first iPhone app right from the get-go, and get up to speed
fast on all of your tools—Cocoa Touch, Interface Builder, Xcode,
and Objective-C.
Tip: There’s more to producing your own app than just writing
the code. This eBook is ideal if the Cocoa Touch programming
interface is all you want help with. For the full story on creating
and selling a successful app—designing, programming, trouble-
shooting, submitting, and marketing—check out iPhone App
Development: The Missing Manual. It covers everything in this
Mini Manual, plus the entire lifecycle of an iPhone app.
www.it-ebooks.info
www.it-ebooks.info
CHAPTER 1
You have an idea that will lead to fame and fortune on the iTunes
App Store. You decide to write an iPhone app. The first and most
important task is for you to become comfortable with the tools
used to build your products. A Chinese proverb says, “the jour-
ney is the reward,” and this chapter is all about the journey. In the
upcoming pages, you’ll experience the entire application develop-
ment process, start to finish. You’ll learn how to set up the software
you need, and try your hand at building an app.
But what app? If you do a quick search of the App Store, you’ll
find no shortage of flashlights. For many aspiring developers, this
simple application is a rite of passage, so now’s your chance to join
this illustrious crowd. Once you see how easy it is to create your
own app, you’ll wonder why people pay 99¢ for them on iTunes!
Getting the Tools
You can’t build anything, including an iPhone app, without tools.
Luckily, you can find everything you need on your Mac, or down-
load it for free. Specifically, you need to download and install
Xcode development software and the iPhone Software Develop-
ment Kit (SDK) on your Mac. (And if you don’t have a Mac, see the
box on page 2.)
Building Your First
iPhone App
www.it-ebooks.info
2
CREATING IPHONE APPS WITH COCOA TOUCH: THE MINI MISSING MANUAL
Both the Mac and iPhone benefit from a rich set of technologies
that have stood the test of time. The iPhone SDK is built upon the
infrastructure created by NeXT in the 1980s. This company, found-
ed by Steve Jobs, created a revolutionary object-oriented operat-
ing system called NeXTSTEP. This influential system has evolved
into the OS X operating system in use today. As you learn more
about the iPhone, you’ll see that it has much in common with the
Mac.
Note: You see the NeXT legacy whenever you encounter an ob-
ject with the prefix “NS”. Those initials stand for NeXTSTEP.
UP TO SPEED
Get a Mac
If you’re going to create iPhone applications, you’re going to do it on
a Macintosh. Apple’s development tools don’t run on Windows or any
other operating system. Just as you can’t run Microsoft Visual Studio on
a Mac, you need a Mac to run the tools used to build your iPhone app.
They rely on features of the underlying system software.
If you don’t have a Mac, here are some hints to help you make the right
purchase:
• Buy a used machine. If you’re on a shoestring budget, check out
eBay or craigslist. Someone else’s old hardware will be perfectly
fine for iPhone development. The apps you’re going to create are
small and don’t need a lot of processor power to build and test.
The only caveat when buying older hardware is to make sure the
Mac has an Intel processor. The development tools don’t work
with older PowerPC processors.
—Continued
www.it-ebooks.info
3
CREATING IPHONE APPS WITH COCOA TOUCH: THE MINI MISSING MANUAL
• Add a Mac mini. Buying a new Mac mini is a great option if you
already have a display, keyboard, and other peripherals. You can
save quite a bit of money by just buying a new CPU and repurpos-
ing the devices you already own. If you’re a software developer,
you probably have this stuff already sitting around in a closet. And
if you’re developing for multiple platforms, it’s handy to put the
Mac mini behind a KVM switch so you can quickly shift between
machines.
• Go ahead and splurge. Apple makes some very sexy hardware. In
particular, the new laptops are hard to resist. If you’re looking for
excuses to justify the purchase, here’s some help:
Macs now use an Intel processor, which means you can run Windows
or any other x86-based operating system on your new machine. You
can boot into any operating system using Apple’s free Boot Camp util-
ity. Or you may find it easier to install third-party software like VMware
Fusion and to run other operating systems on a virtual machine within
Mac OS X.
Virtual machines are particularly handy when you need to see how
your iPhone product website appears in Internet Explorer. Just launch
the virtual machine, open the browser in Windows, and load the test
URL.
Finally, think of all the money you’re saving on development tools. If
you’re used to spending thousands of dollars on Visual Studio and
MSDN, it will come as a pleasant surprise to know that all of Apple’s
developer tools are free. Spend your dollars on the hardware instead
of the tools, and you’ll come out ahead.
Installing Xcode
Once you and your Mac are ready to go, it’s time to load your hard
drive with lots of new software. Apple supplies the Xcode develop-
ment tools free of charge, but doesn’t install them on every Mac,
since most consumers will never use them.
www.it-ebooks.info
4
CREATING IPHONE APPS WITH COCOA TOUCH: THE MINI MISSING MANUAL
Luckily, you can find the Xcode tools right on your Snow Leopard
installation disk. To run Xcode, Apple recommends you have an
Intel-based Mac running Leopard or Snow Leopard.
Note: You can install the iPhone SDK and other development
tools on Leopard, but the Snow Leopard tools reflect significant
improvements over the previous version. Working in the newest
version of Mac OS X assures you the latest and greatest features.
The following steps explain how to get the software onto your
hard drive where you can use it:
1. Pop the installation DVD into your Mac and double-click
its icon. In the Optional Installs folder, double-click the
Xcode.mpkg file.
When you double-click that file, the Xcode installation process
begins.
2. On the introductory screen, click Continue. When the license
agreement screen appears, click Continue and then click
Agree.
The license agreement is the same legalese you agree to when-
ever you install software. Read it if you’re into such things.
When you’re done, the next screen lets you choose what you
want to install, as shown in Figure 1-1.
www.it-ebooks.info
5
CREATING IPHONE APPS WITH COCOA TOUCH: THE MINI MISSING MANUAL
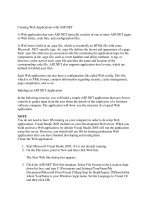
Figure 1-1: The Xcode installer starts out with the first four checkboxes
selected for you. Leave them that way. You can click each package name to
see what’s being installed: Besides the integrated development environment
(IDE) that you’d expect, you’ll also find tools for monitoring performance
and plenty of documentation.
3. On the Custom Install screen, make sure the first four check-
boxes are turned on, and then click Continue.
The installer copies all of the Xcode from the DVD onto your
hard drive. This process takes a few minutes.
4. The final screen prompts you to select an install location.
Make sure that it’s on the same disk where all your other ap-
plications are stored. Click Install to start the process.
Depending on your Mac’s speed, this process can take a few
hours. Get away from the computer and get some fresh air for
once.
www.it-ebooks.info
6
CREATING IPHONE APPS WITH COCOA TOUCH: THE MINI MISSING MANUAL
After everything is safely on your hard drive, you see this mes-
sage: “The installation was successful.”
5. Click Close to quit. You can safely eject the DVD at this point.
After the installation is complete, go to the Hard Drive➝ Developer➝
Applications folder on your hard drive, and check out your new
tools. This folder contains the applications and utilities you use to
develop both Mac and iPhone applications: The ones you’ll use the
most are Xcode and Interface Builder. The parent Developer folder
also has all of the accompanying developer frameworks, libraries,
and documentation.
The Xcode installation doesn’t include one thing—the iPhone SDK
that’s required to develop apps for your phone. For that, go on to
the next section.
Tip: Now that you have your tools, maintain them. Apple regu-
larly updates Xcode, so the version on your Snow Leopard DVD
will eventually become outdated. When major changes occur,
Apple will send an email reminding you to upgrade by visiting
the iPhone Dev Center, as described in the next section.
Getting the iPhone SDK
You have to join the iPhone Developer Program before Apple
lets you get your hands on the iPhone SDK. Your free member-
ship gives you access to the tools, documentation, and developer
forums via the iPhone Dev Center (Figure 1-2).
www.it-ebooks.info
7
CREATING IPHONE APPS WITH COCOA TOUCH: THE MINI MISSING MANUAL
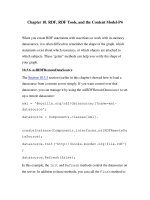
Figure 1-2: The iPhone Dev Center is your first and best resource as an
iPhone developer. You’ll use this site to download and update your iPhone
SDK, find sample code and documentation, connect with other iPhone
developers, and to prepare your product for sale on iTunes.
6. To sign up for an ADC membership, point your web browser
to Click the Register link
in the upper-right corner.
You access the iPhone Dev Center using an Apple ID. If you
have an iTunes account or have made a purchase from the
Apple Store, you already have one set up. Go ahead and use it
when you create your developer account and skip to step 8.
www.it-ebooks.info
8
CREATING IPHONE APPS WITH COCOA TOUCH: THE MINI MISSING MANUAL
Note: If you’ve been using your Apple ID for personal stuff like
iTunes and a MobileMe family photo gallery, you may want to
create a new Apple ID for your developer account. Having a
separate Apple ID used solely for business purposes can help
you avoid accounting and reporting issues.
7. If you’re setting up a new Apple ID, type your name, contact
information, and security questions for password retrieval.
8. Turn on the checkbox to accept the licensing agreement and
click Continue.
In a few minutes, Apple will send you an email to verify the
account.
9. Click the Email Verification link, and enter the code con-
tained in the message to complete the account setup.
Once you set up your account and log in, you see a lot of new
content available from the iPhone Dev Center. You have access to
great resources like the Getting Started Videos, Coding How-To’s,
and Sample Code. Right now, turn your attention to the download
for the iPhone SDK.
1. Click the Downloads link, and you see a selection of links at
the bottom of the page, as shown in Figure 1-3.
As new versions of the iPhone SDK are released, these links will
be updated. Pick the most recent release that matches your
version of Mac OS X. At the time of this writing, it’s “iPhone SDK
3.1.3 with Xcode 3.2.1”.
www.it-ebooks.info
9
CREATING IPHONE APPS WITH COCOA TOUCH: THE MINI MISSING MANUAL
The iPhone SDK is a large download: Its size can range from
several hundred megabytes to over 2 GB. Be patient as it
downloads from your web browser, is verified, and mounted.
It’s going to take a while.
Once it’s finished, you have a .dmg disk image in your Down-
loads folder and a new iPhone SDK disk on your desktop, as
shown in Figure 1-4.
Figure 1-3: You find the links to download the iPhone SDK toward the
bottom of the iPhone Dev Center page. The links in this picture are for ver-
sion 3.1.3, but these will change as Apple updates the SDK. You can click the
Read Me links to see what’s new in the release.
www.it-ebooks.info
10
CREATING IPHONE APPS WITH COCOA TOUCH: THE MINI MISSING MANUAL
Figure 1-4: After a successful download, this disk image appears on your
desktop. Its name, which will vary with each new release, will begin with
“iphone_sdk” followed by the version number and the ”.dmg”extension.
Launch the installer by clicking the box icon. The PDF file contains informa-
tion about the release that you can read while the installation takes place.
Once you have the iPhone SDK disk image, you can begin the
installation:
1. Double-click the “iPhone SDK” file to start the installation
process. It’s the brown and gold box icon.
2. Click Continue on the welcome and license agreement
screens. Click Agree to accept the license.
3. On the Install screen, click Continue to install the standard
packages, and then click Install to start the installation process.
www.it-ebooks.info
11
CREATING IPHONE APPS WITH COCOA TOUCH: THE MINI MISSING MANUAL
4. If required, enter your password so system files can be modi-
fied. It’s also a good idea to quit iTunes at this point to avoid
a dialog box that pauses the install.
Depending on your Mac’s speed and the size of the down-
load, the installation process can take anywhere from half an
hour to several hours. When the installation is finished, you’ll
see a green checkmark and can click Close to finish. You can
eject the iPhone SDK disk, but make sure to keep the .dmg file
around as a backup.
Note: As with Xcode, Apple updates the iPhone SDK regularly.
You’ll need to return to this iPhone Dev Center periodically to in-
stall the latest version of the SDK. Apple typically releases a new
version in conjunction with a new iPhone firmware release.
What Lies Ahead for the SDK?
The iPhone SDK is constantly evolving as bugs are fixed and new
features are added. You’ll want to update your development en-
vironment to keep up with the latest changes. Apple updates the
iPhone SDK in two different ways. The first, and simplest, is a main-
tenance release. These releases just fix bugs in the firmware and
don’t introduce any new features. In most cases, you won’t need to
make any changes to your application.
Apple provides maintenance releases of the SDK to developers
on the same day that it makes the firmware available to custom-
ers. These releases have a three-part version number like 2.2.1 and
3.1.3. As soon as you install the new firmware on your device, you
need to update the iPhone SDK so you can install and debug your
applications from Xcode. If you don’t, you’ll see warnings that the
tools don’t work with the device’s firmware version.
www.it-ebooks.info
12
CREATING IPHONE APPS WITH COCOA TOUCH: THE MINI MISSING MANUAL
When Apple makes more substantial firmware changes that
will affect developer software, either by adding new features or
changing existing ones, it posts a beta version of the iPhone SDK
on the iPhone Dev Center. Only developers who have paid to
join the iPhone Developer Program have access to these advance
releases. These betas are for major releases, such as 3.0 or 4.0, or
revisions like 3.1. Apple typically starts the beta release cycle three
or four months prior to a general public release. Once the cycle
starts, it puts out a new SDK (called Beta 1, Beta 2, and so on) every
couple of weeks. These beta releases usually also include a new
version of Xcode with improvements and support for the new
iPhone OS, along with new firmware.
With early access to the new SDK, you can build and run your ap-
plication with the new iPhone firmware. If you’ve been careful to
use only documented features and APIs, you shouldn’t have many
issues to deal with: Apple’s engineers are very good at maintaining
compatibility with published interfaces. You may see deprecation
warnings as you compile, but those are usually simple to fix. It’s
more likely that you’ll spend the beta test period learning about
new features and testing them out in your application.
There are a couple caveats to keep in mind when installing a beta
version of the iPhone SDK. First, you can’t use the beta tools to
submit an application to the App Store. Luckily, you can install
multiple versions of Xcode on your hard drive. To install the tools in
a separate location, follow these steps:
1. Quit the iPhone Simulator if it’s running.
If you skip this step, the installation process will hang indefi-
nitely, and you’ll need to quit the Installer and start over.
www.it-ebooks.info
13
CREATING IPHONE APPS WITH COCOA TOUCH: THE MINI MISSING MANUAL
2. Double-click the “iPhone SDK” icon in the disk image to start
the installation process. Agree to the licenses and choose a
destination hard drive.
You see a list of packages to install. In the second column, De-
veloper is set as the Location. You need to change the location
for the beta release.
3. Click Developer and then select Other from the pop-up
menu. See Figure 1-5.
A dialog box opens for you to select a folder.
4. Navigate to the root of your hard drive by selecting its name
from the list of DEVICES. Then click the New Folder button
and type DeveloperBeta. Click Create to create the folder.
5. Select Choose to use the DeveloperBeta folder for the instal-
lation.
After you return to the main installation window, you’ll see
DeveloperBeta as the Location.
6. To use the beta, launch Xcode and other tools from the new
Hard Drive➝DeveloperBeta➝Applications folder.
Now for the second caveat: the beta release is Apple Confidential
Information and is covered by a Non-Disclosure Agreement (NDA).
These big legal words mean that you can’t talk about it in public.
You can discuss the new SDK only on the Apple Developer Forums
(). You can connect with other develop-
ers who are doing the same thing you are: learning about a new
release by asking questions and sharing discoveries. Apple engi-
neers also contribute to the discussion.
www.it-ebooks.info
14
CREATING IPHONE APPS WITH COCOA TOUCH: THE MINI MISSING MANUAL
The NDA also means that you won’t find any books or other media
to help you understand the changes. The only information about
the beta release comes from Apple itself and is posted on the
iPhone Dev Center. Typically there’s a “What’s New” document,
release notes, and a list of API differences. Read each of these
documents fully: it’s a great way to pass the time when you’re wait-
ing for several gigabytes of SDK to download!
Another source of information is Apple’s annual developer con-
ference, WWDC. Beta releases often coincide with this weeklong
conference so everyone can discuss new features in detail. The
conference takes place during the summer in San Francisco: it’s a
great opportunity to meet your fellow developers and learn lots of
new things.
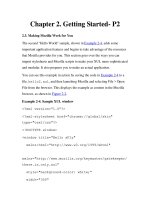
Figure 1-5: You can choose a custom installation location for the iPhone
SDK. Since you can’t use beta releases of the iPhone SDK to build your ap-
plication for the App Store, you’ll need to keep two versions of the tools on
your hard drive. During the install process, click the Developer folder icon
and select Other to choose the location for the beta version.
www.it-ebooks.info
15
CREATING IPHONE APPS WITH COCOA TOUCH: THE MINI MISSING MANUAL
Exploring Your New Tools
Your Mac is now set up to create iPhone applications, so you’re
ready to start making your first one. The best part is that you’re not
going to write any code. How can you develop without writing
code? It’s possible with the timesaving power of Xcode templates
and Interface Builder.
If you’re an experienced developer, this way of working can pres-
ent a challenge. If you’re used to working in Visual Studio, Eclipse,
or some other environment, your first encounter with Xcode can
be a bit daunting. Besides working on a new operating system,
you’re also going to be dealing with new project layouts, keyboard
shortcuts, and preferences. Don’t worry, all of the tools you’re used
to having are still there, it’s just a matter of time before you be-
come comfortable using Xcode’s version of them.
In this section, you’ll go through all of the phases of creating an
iPhone app, from creating a project file with Xcode to running it in
the iPhone Simulator. You’ll also take a peek at the Interface Builder
application that lets you modify the user interface.
Every Flashlight Needs a Parts List
The first phase of creating an iPhone app is setting up a Project file.
This file keeps track of the information Xcode uses to build your ap-
plication. It’s where you manage your source code, user interfaces,
frameworks, and libraries. Think of it as a parts list for your application.
1. In your Hard Drive➝Developer➝Applications folder, dou-
ble-click the Xcode icon to start the application. (It’s at the
bottom of the list.)
The tricky part is that Xcode isn’t in your normal Applications
folder. The installer puts it in the Developer➝Applications
folder. To make it easier to return to Xcode later, store the icon
in your Dock.
www.it-ebooks.info
16
CREATING IPHONE APPS WITH COCOA TOUCH: THE MINI MISSING MANUAL
2. In the Dock, Control-click the icon and choose
Options➝Keep in Dock.
From then on, you can launch Xcode by simply clicking the
Dock icon.
Once Xcode is running, you’ll see its Welcome window, as
shown in Figure 1-6.
Figure 1-6: The Xcode launch window. As you create new projects with
Xcode, you see them listed on the right. Click the “Create a new Xcode
project” button to start your first iPhone application. The “Getting started
with Xcode” button opens the documentation viewer and displays a helpful
overview of Xcode. The last button is a convenient link to the Dev Centers
for the Mac and iPhone.
Tip: If you close the Welcome window by accident, you can
reopen it by choosing Help➝Welcome to Xcode.
www.it-ebooks.info
17
CREATING IPHONE APPS WITH COCOA TOUCH: THE MINI MISSING MANUAL
3. Click the big “Create a new Xcode project” button.
The New Project window opens (Figure 1-7). In Xcode, a
template is a predefined set of source code files, libraries,
frameworks, and user interface elements that you use to create
different styles of applications.
Figure 1-7: The Xcode New Project window lists all of the templates you
can use to get a quick start. When you’re starting out with a new applica-
tion, select the template that best describes the style of user interface you
want. When selected, each template displays a short description. Some
templates even include options, like the one shown here to “Use Core Data
for storage”.
www.it-ebooks.info
18
CREATING IPHONE APPS WITH COCOA TOUCH: THE MINI MISSING MANUAL
4. Since you’re creating an iPhone application, under the
iPhone OS group in the upper-left corner, choose Applica-
tion and take a look at the available templates.
Your choices come in the following categories:
• Navigation-based Application. These applications have a
“drill-down” style interface, like the iPhone Mail application.
• OpenGL ES Application. Games that draw objects in a 3-D
space use this template.
• Tab Bar Application. This style of application uses a tab
bar at the bottom of the screen to switch views. Apple’s
iPod application is a great example of this user interface
style.
• Utility Application. These applications generally present a
simple interface, with a front view containing information
and a back view for configuring the information. The built-
in Weather app uses this metaphor.
• View- and Window-based Applications. Turn to these
templates when your application combines elements of
the previous four styles. Think of them as bare-bones tem-
plates that you can customize to your own needs.
For your Flashlight app, you’re going to use the Window-based
Application template. Since the application only uses a single
window, this basic template is all you need. A nice side effect
of using this customizable template is that it creates fewer files
for the project. In effect, you have a shorter, simpler parts list.
5. Click Window-based Application and then click Choose.
Leave the Use Core Data checkbox unchecked since a flash-
light doesn’t need a database.
A save file dialog box appears so you can indicate a name and
location for your project’s folder (Figure 1-8).
www.it-ebooks.info
19
CREATING IPHONE APPS WITH COCOA TOUCH: THE MINI MISSING MANUAL
Figure 1-8: For the Flashlight project, tell Xcode to create a folder named
Flashlight inside your Documents folder.
6. Type Flashlight for the project name, and choose the Docu-
ments folder from the bottom pop-up menu.
As shown in Figure 1-9, the folder you’ve just created in the
Finder contains everything you need to build your application,
including the main project file Flashlight.xcodeproj.
Figure 1-9: When you create a project with Xcode, it creates a folder
of files used to build your application. The most important one is the
.xcodeproj file—you can double-click this file to open the project in Xcode.
Also, since you’re creating a window-based app, Xcode starts you out with a
file called MainWindow.xib.
www.it-ebooks.info