C++ Programs to Accompany Programming Logic and Design pot
Bạn đang xem bản rút gọn của tài liệu. Xem và tải ngay bản đầy đủ của tài liệu tại đây (2.37 MB, 224 trang )
C++ Programs
to Accompany
Programming Logic
and Design
Jo Ann Smith
Australia • Brazil • Japan • Korea • Mexico • Singapore • Spain • United Kingdom • United States
C++ Programs to Accompany
Programming Logic and Design
Jo Ann Smith
Executive Editor: Marie Lee
Acquisitions Editor: Amy Jollymore
Managing Editor: Tricia Coia
Developmental Editor: Ann Shaffer
Editorial Assistant: Julia Leroux-Lindsey
Marketing Manager: Bryant Chrzan
Content Project Manager:
Matt Hutchinson
Art Director: Marissa Falco
Manufacturing Coordinator:
Julio Esperas
Proofreader: Suzanne Huizenga
Compositor: International Typesetting
and Composition
© 2010 Course Technology, Cengage Learning
ALL RIGHTS RESERVED. No part of this work covered by the copyright
herein may be reproduced, transmitted, stored or used in any form or by
any means graphic, electronic, or mechanical, including but not limited
to photocopying, recording, scanning, digitizing, taping, Web distribution,
information networks, or information storage and retrieval systems,
except as permitted under Section 107 or 108 of the 1976 United States
Copyright Act, without the prior written permission of the publisher.
For product information and technology assistance, contact us at
Cengage Learning Customer & Sales Support, 1-800-354-9706
For permission to use material from this text or product,
submit all requests online at www.cengage.com/permissions
Further permissions questions can be e-mailed to
ISBN-13: 978-0-324-78144-1
ISBN-10: 0-324-78144-X
Course Technology
20 Channel Center Street
Boston, MA 02210
USA
Cengage Learning is a leading provider of customized learning solutions
with office locations around the globe, including Singapore, the United
Kingdom, Australia, Mexico, Brazil, and Japan. Locate your local office at:
www.international.cengage.com/region
Cengage Learning products are represented in Canada by Nelson
Education, Ltd.
To learn more about Course Technology, visit
www.cengage.com/coursetechnology
To learn more about Cengage Learning, visit www.cengage.com
Purchase any of our products at your local college store or at our preferred
online store www.ichapters.com
Printed in the United States of America
1 2 3 4 5 6 7 14 13 12 11 10
iii
BRIEF CONTENTS
PREFACE xi
READ THIS BEFORE YOU BEGIN xiv
CHAPTER 1 AN INTRODUCTION TO C++ AND THE C++
PROGRAMMING ENVIRONMENT 1
CHAPTER 2 VARIABLES, OPERATORS, AND WRITING PROGRAMS USING
SEQUENTIAL STATEMENTS 11
CHAPTER 3 WRITING STRUCTURED C++ PROGRAMS 27
CHAPTER 4 WRITING PROGRAMS THAT MAKE DECISIONS 41
CHAPTER 5 WRITING PROGRAMS USING LOOPS 65
CHAPTER 6 USING ARRAYS IN C++ PROGRAMS 91
CHAPTER 7 USING FUNCTIONS IN C++ PROGRAMS 107
CHAPTER 8 WRITING CONTROL BREAK PROGRAMS 141
CHAPTER 9 SORTING DATA AND FILE INPUT/OUTPUT 159
CHAPTER 10 OBJECT ORIENTED C++ 177
INDEX 197
This page intentionally left blank
CONTENTS
PREFACE xi
READ THIS BEFORE YOU BEGIN xiv
CHAPTER 1 AN INTRODUCTION TO C++ AND THE C++
PROGRAMMING ENVIRONMENT 1
THE C++ PROGRAMMING LANGUAGE 2
AN INTRODUCTION TO OBJECT-ORIENTED TERMINOLOGY 2
THE STRUCTURE OF A C++ PROGRAM 4
THE C++ DEVELOPMENT CYCLE 5
Writing C++ Source Code 6
Compiling A C++ Program 6
Executing A C++ Program 8
Exercise 1-1: Understanding the C++ Compiler 8
Lab 1.1: Compiling and Executing A C++ Program 9
CHAPTER 2 VARIABLES, OPERATORS, AND WRITING PROGRAMS
USING SEQUENTIAL STATEMENTS 11
VARIABLES 12
Variable Names 12
C++ Data Types 13
Exercise 2-1: Using C++ Variables, Data Types, and Keywords 14
DECLARING AND INITIALIZING VARIABLES 14
Exercise 2-2: Declaring and Initializing C++ Variables 15
Lab 2-1: Declaring and Initializing C++ Variables 16
ARITHMETIC AND ASSIGNMENT OPERATORS 16
Arithmetic Operators 17
Assignment Operators and the Assignment Statement 18
Precedence and Associativity 19
Exercise 2-3: Understanding Operator Precedence and Associativity 20
Lab 2-2: Arithmetic and Assignment Operators 21
SEQUENTIAL STATEMENTS AND INTERACTIVE INPUT STATEMENTS 22
Exercise 2-4: Understanding Sequential Statements 24
Lab 2-3: Using Sequential Statements in a C++ Program 25
v
CONTENTS
CHAPTER 3 WRITING STRUCTURED C++ PROGRAMS 27
USING FLOWCHARTS AND PSEUDOCODE TO WRITE A C++ PROGRAM 28
Lab 3-1: Using Flowcharts and Pseudocode to Write a C++ Program 31
C++ COMMENTS 33
Lab 3-2: Commenting C++ Programs 35
WRITING A MODULAR PROGRAM IN C++ 35
Lab 3-3: Writing a Modular Program in C++ 40
CHAPTER 4 WRITING PROGRAMS THAT MAKE DECISIONS 41
BOOLEAN OPERATORS 42
Relational Operators 42
Logical Operators 43
Relational and Logical Operator Precedence and Associativity 44
COMPARING
STRINGS 46
DECISION STATEMENTS 48
The
if Statement 48
Exercise 4-1: Understanding
if Statements 50
Lab 4-1: Using
if Statements 51
The
if-else Statement 51
Exercise 4-2: Understanding
if-else Statements 52
Lab 4-2: Using
if-else Statements 54
Nested
if Statements 54
Exercise 4-3: Understanding Nested
if Statements 55
Lab 4-3: Using Nested
if Statements 56
The
switch Statement 57
Exercise 4-4: Using a
switch Statement 59
Lab 4-4: Using a
switch Statement 59
USING DECISION STATEMENTS TO MAKE MULTIPLE COMPARISONS 60
Using and Logic 61
Using or Logic 61
Exercise 4-5: Making Multiple Comparisons in Decision Statements 62
Lab 4-5: Making Multiple Comparisons in Decision Statements 63
CHAPTER 5 WRITING PROGRAMS USING LOOPS 65
THE INCREMENT (++) AND DECREMENT ( ) OPERATORS 66
Exercise 5-1: Using the Increment and Decrement Operators 67
WRITING A
WHILE LOOP IN C++ 68
Exercise 5-2: Using a
while Loop 69
Using a Counter to Control a Loop 70
Exercise 5-3: Using a Counter-Controlled
while Loop 71
Lab 5-1: Using a Counter-Controlled
while Loop 71
Using a Sentinel Value to Control a Loop 72
vi
CONTENTS
Exercise 5-4: Using a Sentinel Value to Control a while Loop 73
Lab 5-2: Using a Sentinel Value to Control a
while Loop 74
WRITING A
FOR LOOP IN C++ 74
Exercise 5-5: Using a
for Loop 76
Lab 5-3: Using a
for Loop 77
WRITING A
DO-WHILE LOOP IN C++ 77
Exercise 5-6: Using a
do-while Loop 78
Lab 5-4: Using a
do-while Loop 78
NESTING LOOPS 79
Exercise 5-7: Nesting Loops 81
Lab 5-5: Nesting Loops 82
ACCUMULATING TOTALS IN A LOOP 83
Exercise 5-8: Accumulating Totals in a Loop 85
Lab 5-6: Accumulating Totals in a Loop 86
USING A LOOP TO VALIDATE INPUT 87
Exercise 5-9: Validating User Input 88
Lab 5-7: Validating User Input 88
CHAPTER 6 USING ARRAYS IN C++ PROGRAMS 91
ARRAY BASICS 92
Declaring Arrays 92
Initializing Arrays 93
Accessing Array Elements 94
Staying Within the Bounds of an Array 95
Using Constants with Arrays 96
Exercise 6-1: Array Basics 96
Lab 6-1: Using Arrays 97
SEARCHING AN ARRAY FOR AN EXACT MATCH 97
Exercise 6-2: Searching an Array for an Exact Match 100
Lab 6-2: Searching an Array for an Exact Match 100
PARALLEL ARRAYS 101
Exercise 6-3: Parallel Arrays 104
Lab 6-3: Parallel Arrays 105
CHAPTER 7 USING FUNCTIONS IN C++ PROGRAMS 107
A SIMPLE C++ FUNCTION 108
Exercise 7-1: Writing Simple Functions 110
Lab 7-1: Writing Simple Functions 111
WRITING FUNCTIONS THAT REQUIRE A SINGLE PARAMETER 111
Exercise 7-2: Writing Functions that Require a Single Parameter 113
Lab 7-2: Writing Functions that Require a Single Parameter 114
vii
CONTENTS
WRITING FUNCTIONS THAT REQUIRE MULTIPLE PARAMETERS 114
Exercise 7-3: Writing Functions that Require Multiple Parameters 116
Lab 7-3: Writing Functions that Require Multiple Parameters 117
WRITING FUNCTIONS THAT RETURN A VALUE 117
Exercise 7-4: Writing Functions that Return a Value 119
Lab 7-4: Writing Functions that Return a Value 120
PASSING AN ARRAY AND AN ARRAY ELEMENT TO A FUNCTION 121
Exercise 7-5: Passing Arrays to Functions 124
Lab 7-5: Passing Arrays to Functions 125
PASSING ARGUMENTS BY REFERENCE AND BY ADDRESS 126
Pass by Reference 126
Pass by Address 128
Exercise 7-6: Pass by Reference and Pass by Address 132
Lab 7-6: Pass by Reference and Pass by Address 133
OVERLOADING FUNCTIONS 134
Exercise 7-7: Overloading Functions 136
Lab 7-7: Overloading Functions 137
USING C++ BUILT-IN FUNCTIONS 137
Exercise 7-8: Using C++’s Built-in Functions 138
Lab 7-8: Using C++’s Built-in Functions 139
CHAPTER 8 WRITING CONTROL BREAK PROGRAMS 141
ACCUMULATING TOTALS IN SINGLE-LEVEL CONTROL BREAK PROGRAMS 142
Exercise 8-1: Accumulating Totals in Single-Level Control Break Programs 148
Lab 8-1: Accumulating Totals in Single-Level Control Break Programs 148
MULTIPLE-LEVEL CONTROL BREAK PROGRAMS 150
Exercise 8-2: Multiple-Level Control Break Programs 156
Lab 8-2: Multiple-Level Control Break Programs 156
CHAPTER 9 SORTING DATA AND FILE INPUT/OUTPUT 159
SORTING DATA 160
SWAPPING DATA VALUES 160
Exercise 9-1: Swapping Values 161
Lab 9-1: Swapping Values 161
USING A BUBBLE SORT 162
The
main Function 166
The
fillarray Function 166
The
sortArray Function 167
The
displayArray Function 168
Exercise 9-2: Using a Bubble Sort 168
Lab 9-2: Using a Bubble Sort 169
viii
CONTENTS
FILE INPUT AND OUTPUT 169
Using Input and Output Classes 170
Opening a File for Reading 170
READING DATA FROM AN INPUT FILE 170
Reading Data Using a Loop and EOF 171
Opening a File for Writing 172
Writing Data to an Output File 172
Exercise 9-3: Opening Files and Performing File Input 174
Lab 9-3: Using an Input File 174
CHAPTER 10 OBJECT ORIENTED C++ 177
A PROGRAMMER-DEFINED CLASS 178
Creating a Programmer-Defined Class 178
Adding Attributes to a Class 180
Adding Methods to a Class 181
Exercise 10-1: Creating a Class in C++ 184
Lab 10-1: Creating a Class in C++ 185
REUSING C++ CLASSES 186
Defining a Derived Class 186
Using a Derived Class in a C++ Program 192
Exercise 10-1: Using Inheritance to Create a Derived Class in C++ 194
Lab 10-2: Using Inheritance to Create a Derived Class in C++ 194
INDEX 197
ix
This page intentionally left blank
PREFACE
C++ Programs to Accompany Programming Logic and Design (also known as C++ PAL)
is designed to provide students with an opportunity to write C++ programs as part of an
Introductory Programming Logic course. It is written to be a companion text to the student’s
primary text, Programming Logic and Design, Fifth Edition, by Joyce Farrell. This textbook
assumes no programming language experience and provides the beginning programmer with
a guide to writing structured programs and simple object-oriented programs using introduc-
tory elements of the popular C++ programming language. It is not intended to be a textbook
for a course in C++ programming. The writing is non-technical and emphasizes good program-
ming practices. The examples do not assume mathematical background beyond high school
math. Additionally, the examples illustrate one or two major points; they do not contain so
many features that students become lost following irrelevant and extraneous details.
The examples in C++ PAL are often examples presented in the primary textbook, Programming
Logic and Design, Fifth Edition. The following table shows the correlation between topics in the
two books.
xi
C++PAL Programming Logic and Design, Fifth Edition
Chapter 1: An Introduction to C++ and the C++ Chapter 1: An Overview of Computers and Logic
Programming Environment
Chapter 2: Variables, Operators, and Writing Programs Chapter 1: An Overview of Computers and Logic
Using Sequential Statements
Chapter 3: Writing Structured C++ Programs Chapter 2: Understanding Structure
Chapter 3: The Program Planning Process:
Documentation and Design
Chapter 4: Writing Programs that Make Decisions Chapter 4: Making Decisions
Chapter 5: Writing Programs Using Loops Chapter 5: Looping
Chapter 6: Using Arrays in C++ Programs Chapter 6: Arrays
Chapter 7: Using Functions in C++ Programs Chapter 7: Using Methods
Chapter 8: Writing Control Break Programs in C++ Chapter 8: Control Breaks
Chapter 9: Sorting Data and File Input/Output Chapter 9: Advanced Array Manipulation
Chapter 10: File Handling and Applications
(Comprehensive edition only)
Chapter 10: Object Oriented C++ Chapter 11: Object-oriented Programming
(Comprehensive edition only)
PREFACE
ORGANIZATION AND COVERAGE
C++ PAL provides students with a review of the programming concepts they are introduced
to in their primary textbook. It also shows them how to use C++ to transform their program
logic and design into working programs. The structure of a C++ program, how to compile and
run a C++ console program, and introductory object-oriented concepts are introduced in
Chapter 1. Chapter 2 discusses C++’s data types, variables, arithmetic and assignment opera-
tors, and using sequential statements to write a complete C++ program. In Chapter 3, stu-
dents learn how to transform pseudocode and flowcharts into C++ programs. Chapters 4 and
5 introduce students to writing C++ programs that make decisions and programs that use
looping constructs. Students learn to use C++ to develop more sophisticated programs that
include using arrays and passing parameters to functions in Chapters 6 and 7. In Chapter 8,
students learn to write control break programs. Sorting data items in an array and file input
and output is introduced in Chapter 9. Lastly, in Chapter 10, students learn about writing C++
programs that include programmer-defined classes.
This book combines text explanation of concepts and syntax along with pseudocode and
actual C++ code examples to provide students with the knowledge they need to imple-
ment their logic and program designs using the C++ programming language. This book is
written in a modular format and provides paper and pencil exercises as well as lab exer-
cises after each major topic is introduced. The exercises provide students with experi-
ence in reading and writing C++ code as well as modifying and debugging existing code.
In the labs, students are asked to complete partially pre-written C++ programs. Using
partially pre-written programs allows students to focus on individual concepts rather
than an entire program. The labs also allow students the opportunity to see their pro-
grams execute.
C++ PAL is unique because:
» It is written and designed to correspond to the topics in the primary textbook,
Programming Language and Design, Fifth Edition.
» The examples are everyday examples; no special knowledge of mathematics, accounting,
or other disciplines is assumed.
» It introduces students to introductory elements of the C++ programming language
rather than overwhelming beginning programmers with more detail than they are
prepared to use or understand.
» Text explanations are interspersed with pseudocode from the primary book, thus
reinforcing the importance of programming logic.
» Complex programs are built through the use of complete examples. Students see
how an application is built from start to finish instead of studying only segments
of programs.
xii
PREFACE
FEATURES OF THE TEXT
Every chapter in this book includes the following features. These features are both conducive
to learning in the classroom and enable students to learn the material at their own pace.
» Objectives: Each chapter begins with a list of objectives so the student knows the topics
that will be presented in the chapter. In addition to providing a quick reference to topics
covered, this feature provides a useful study aid.
» Figures and illustrations: This book has plenty of visuals, which provide the reader with
a more complete learning experience, rather than one that involves simply studying text.
» Notes: These notes provide additional information—for example, a common error to
watch out for.
» Exercises: Each section of each chapter includes meaningful paper and pencil exercises
that allow students to practice the skills and concepts they are learning in the section.
» Labs: Each section of each chapter includes meaningful lab work that allows students to
write and execute programs that implement their logic and program design.
ACKNOWLEDGMENTS
I would like to thank all of the people who helped to make this book possible, especially Ann
Shaffer, Developmental Editor, whose expertise and attention to detail have made this a better
textbook. She also provided encouragement, patience, humor, and flexibility when needed.
Thanks also to Tricia Coia, Managing Editor, for her help and encouragement. It is a pleasure
to work with these fine people who are dedicated to producing quality instructional materials.
I am grateful to the many reviewers who provided helpful and insightful comments during the
development of this book, including Matthew Alimagham, Spartanburg Community College;
Ruth Tucker Bogart, University of Phoenix – Online; Fred D’Angelo, Pima Community College;
and Robert Dollinger, University of Wisconsin – Stevens Point.
I am dedicating this book to all of the teachers I have had the honor to know.
Jo Ann Smith
xiii
»
NOTE
READ THIS BEFORE
YOU BEGIN
TO THE USER
DATA FILES
To complete most of the lab exercises, you will need data files that have been created for this
book. Your instructor will provide the data files to you. You also can obtain the files electroni-
cally from the Course Technology Web site by connecting to www.course.com, and then
searching for this book title.
You can use a computer in your school lab or your own computer to complete the lab exer-
cises in this book.
SOLUTIONS
Solutions to the Exercises and Labs are provided to instructors on the Course Technology
Web site at www.course.com. The solutions are password protected.
USING YOUR OWN COMPUTER
To use your own computer to complete the material in this textbook, you will need the
following:
» Computer with a 1.6 GHz or faster processor
» Operating System:
» Windows Vista
®
(x86 & x64) - all editions except Starter Edition
» Windows
®
XP (x86 & x64) with Service Pack 2 or later - all editions except
Starter Edition
» Windows Server
®
2003 (x86 & x64) with Service Pack 1 or later (all editions)
» Windows Server 2003 R2 (x86 and x64) or later (all editions)
» 384 MB of RAM or more (768 MB of RAM or more for Windows Vista)
» 2.2 GB of available hard-disk space
» 5400 RPM hard drive
» 1024 x 768 or higher-resolution display
» DVD-ROM Drive Is
This book was written using Microsoft Windows Vista and Quality Assurance tested using
Microsoft Windows Vista.
xiv
READ THIS BEFORE YOU BEGIN
UPDATING YOUR PATH ENVIRONMENT VARIABLE
» Setting the PATH variable allows you to use the compiler (cl) and execute your programs
without having to specify the full path for the command.
» To set the PATH permanently in Windows XP and Vista:
1. Open the Control Panel, and then double click System.
2. In Windows XP, select the Advanced Tab and then click the Environment
Variables button. In Windows Vista, click the Advanced system settings
link, click Continue in the User Account Control window, and then click the
Environment Variables button.
3. Look for “PATH” or “Path” in the User variables or System variables area. Select
PATH or Path, click Edit, and then edit the PATH variable by adding ;C:\Program
Files\Microsoft Visual Studio 9.0\vc\bin. If you are not sure where to add the
path, add it to the right end of the “PATH”. A typical PATH might look like this
C:\Windows;C:\Windows\Command;C:\Program Files\Microsoft Visual Studio
9.0.\vc\bin.
» Capitalization does not matter when you are setting the PATH variable. The PATH is a
series of folders separated by semi-colons (;). Windows searches for programs in the
PATH folders in order, from left to right.
» To find out the current value of your PATH, open a Command Prompt window, type:
path and then press Enter
» Once your PATH is set, you must execute the following command in a Command Prompt
window to set the environment variables for the Visual C++ compiler: type vcvars32 and
then press Enter
TO THE INSTRUCTOR
To complete some of the Exercises and Labs in this book, your students must use the data
files provided with this book. These files are available on the Course Technology Web site at
www.course.com. Follow the instructions in the Help file to copy the data files to your server
or standalone computer. You can view the Help file using a text editor such as WordPad or
Notepad. Once the files are copied, you may instruct your students to copy the files to their
own computers or workstations.
COURSE TECHNOLOGY DATA FILES
You are granted a license to copy the data files to any computer or computer network used by
individuals who have purchased this book.
xv
This page intentionally left blank
CHAPTER
AN INTRODUCTION
TO C++ AND THE
C++ PROGRAMMING
ENVIRONMENT
1
1
»
After studying this chapter, you will be able to:
Discuss the C++ programming language and its history
Explain introductory concepts and terminology used
in object-oriented programming
Recognize the structure of a C++ program
Complete the C++ development cycle, which includes
creating a source code file, compiling the source code,
and executing a C++ program
You should do the exercises and labs in this chapter only after you have finished Chapter 1 of
your book, Programming Logic and Design, Fifth Edition, by Joyce Farrell. This chapter intro-
duces the C++ programming language and its history. It explains some introductory object-
oriented concepts, and describes the process of compiling and executing a C++ program. You
begin writing C++ programs in Chapter 2 of this book.
THE C++ PROGRAMMING LANGUAGE
The C programming language was written in the early 1970s by Dennis Ritchie at AT&T Bell
Labs. C is an important programming language because it is both a high level and a low level
programming language. It is a high level language, which means that it is more English-like
and easier for programmers to use than a low level language. At the same time, it possesses
low level language capabilities that allow programmers to directly manipulate the underly-
ing computer hardware.
The C++ programming language was developed by Bjarne Stroustrup at AT&T Bell Labs in 1979
and inherited the wide-spread popularity of C. Because many programmers liked using the
powerful C programming language, it was an easy step to move on to the new C++ language.
What makes C++ especially useful for today’s programmers is that it is an object-oriented
programming language. The term object-oriented encompasses a number of concepts
explained later in this chapter and throughout this book. For now, all you need to know is that
an object-oriented programming language is modular in nature, allowing the programmer to
build a program from reusable parts of programs called classes.
AN INTRODUCTION TO OBJECT-ORIENTED
TERMINOLOGY
You must understand a few object-oriented concepts to be successful at reading and working
with C++ programs in this book. Note, however, that you will not learn enough to make you a
C++ programmer. You will have to take additional courses in C++ to become a C++ programmer.
This book teaches you only the basics.
To fully understand the term “object-oriented,” you need to know a little about procedural
programming. Procedural programming is a style of programming that is older than object-
oriented programming. Procedural programs consist of statements that the computer runs or
executes. Many of the statements make calls (a request to run or execute) to groups of other
statements that are known as procedures, modules, methods, or subroutines. Therefore, these
programs are known as “procedural” because they perform a sequence of procedures.
Procedural programming focuses on writing code that takes some data (for example, some
sales figures), performs a specific task using the data (for example, adding up the sales
figures), and then produces output (for example, a sales report). When people who use proce-
dural programs (the users) decide that they want their programs to do something slightly
different, a programmer revises the program code, taking great care not to introduce errors
into the logic of the program.
AN INTRODUCTION TO C++ AND THE C++ PROGRAMMING ENVIRONMENT
2
»
NOTE
Due to their power,
C and C++ have
been used in the
programming of
special effects for
action movies and
video games.
CHAPTER ONE
3
Today, we need computer programs that are more flexible and easier to revise. Object-oriented
programming languages, including C++, were introduced to meet this need. In object-oriented
programming, the programmer can focus on the data that he or she wants to manipulate,
rather than the individual lines of code required to manipulate that data (although those indi-
vidual lines still must be written eventually). An object-oriented program is made up of a
collection of interacting objects. An object represents something in the real world, such as a
car, an employee, a video game character, or an item in an inventory. An object includes (or
encapsulates) both the data related to the object and the tasks you can perform on that data.
The term behavior is sometimes used to refer to the tasks you can perform on an object’s
data. For example, the data for an inventory object might include a list of inventory items, the
number of each item in stock, the number of days each item has been in stock, and so on. The
behaviors of the inventory object might include calculations that add up the total number of
items in stock and calculations that determine the average amount of time each item remains
in inventory.
In object-oriented programming, the data items within an object are known collectively as
the object’s attributes. You can think of an attribute as one of the characteristics of an object,
such as its shape, its color, or its name. The tasks the object performs on that data are known
as the object’s methods. (You can also think of a method as an object’s behavior.) Because
methods are built into objects, when you create a C++ program, you don’t always have to
write line after line of code telling the program exactly how to manipulate the object’s data.
Instead, you can write a shorter line of code, known as a call, that passes a message to the
method indicating that you need it to do something.
For example, you can display dialog boxes, scroll bars, and buttons for a user of your program
to type in or click on simply by sending a message to an existing object because programmers
at Microsoft included these classes that you can use. At other times, you will be responsible
for creating your own classes and writing the code for the methods that are part of that class.
Whether you use existing, prewritten classes or create your own classes, one of your main
jobs as a C++ programmer is to communicate with the various objects in a program (and the
methods of those objects) by passing messages. Individual objects in a program can also pass
messages to other objects.
When programmers write an object-oriented program, they begin by creating a class. A class
can be thought of as a template for a group of similar objects. In a class, the programmer
specifies the data (attributes) and behaviors (methods) for all objects that belong to that class.
An object is sometimes referred to as an instance of a class, and the process of creating an
object is referred to as instantiation.
To understand the terms “class,” “instance,” and “instantiation,” it’s helpful to think of
them in terms of a real-world example—baking a chocolate cake. The recipe is similar to
a class and an actual cake is an object. If you wanted to, you could create many chocolate
cakes that are all based on the same recipe. For example, your mother’s birthday cake, your
sister’s anniversary cake, and the cake for your neighborhood bake sale all might be based
on a single recipe that contains the same data (ingredients) and methods (instructions). In
object-oriented programming, you can create as many objects as you need in your program
from the same class.
»
NOTE
The preceding
assumes you are
using classes that
someone else pre-
viously developed.
That programmer
must write code
that manipulates
the object’s data.
AN INTRODUCTION TO C++ AND THE C++ PROGRAMMING ENVIRONMENT
THE STRUCTURE OF A C++ PROGRAM
When a programmer learns a new programming language, the first program he or she tradi-
tionally writes is a Hello World program—a program that displays the message “Hello World”
on the screen. Creating this simple program illustrates that the language is capable of
instructing the computer to communicate with the “outside” world. The C++ version of the
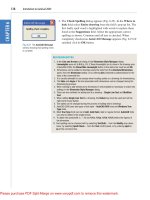
Hello World program is shown in Figure 1-1:
4
#include <iostream>
using namespace std;
int main()
{
cout << "Hello World" << endl;
return 0;
}
Figure 1-1 Hello World program
At this point, you’re not expected to understand all the code in Figure 1-1. Just notice that the
code begins with the preprocessor directive,
#include <iostream>. The C++ preprocessor
is a program that processes your C++ program before the compiler processes it. The
#include directive tells the compiler to include another file when the program is compiled.
This makes it easy for you to use code previously written by you or others in your programs
without having to recreate it. You will learn more about the Visual C++ compiler later in this
chapter. Following the
#include you see <iostream>, which is the name of a header file
you want to include in this program. The
iostream header file gives your program access to
what it needs to perform input and output in a C++ program. The name of the header file is
placed within angle brackets (
< >). The angle brackets tell the compiler to look for this file
in a directory that is specified by the compiler you are using. You will learn more about pre-
processor directives throughout this book.
The next line (
using namespace std;) instructs the compiler to use the std name-
space. You can think of a namespace as a container that holds various program elements.
The
std namespace contains everything C++ programs need to use the Standard C++
library. The Standard C++ library adds functionality to the C++ programming language.
For example, this program needs to use the
std namespace to have access to cout and
endl, which you see on the fifth line in Figure 1-1. Notice that this line ends with a semicolon
(
;). In fact, all C++ statements end with a semicolon. The reason the previous line,
#include <iostream>, does not end with a semicolon is that it is a preprocessor
directive, not a C++ statement.
On the third line you see the start of a function named
main. A function is a group of C++
statements that perform a specified task. This is a special function in a C++ program; the
main function is the first function that executes when any program runs. The programs in the
»
NOTE
Namespaces are a
relatively new addi-
tion to C++ and are
used primarily in
large programs. In
this book, the only
namespace you
will use is the
std
namespace.
»
NOTE
You can tell main is
a function because
of the parentheses;
all C++ function
names are followed
by parentheses.
CHAPTER ONE
first six chapters of this book will include only a main function. In later chapters you will be
able to include additional functions.
The first part of any function is its header. In Figure 1-1, the header for the
main function
begins with the
int keyword, followed by the function name, which is main. A keyword is
a special word that is reserved by C++ to have a special meaning. To understand the keyword
int you need to know that functions often send values back to a calling function (for exam-
ple, the result of a calculation), which can then be used elsewhere in the program. Another
way to say this is that functions sometimes return a value. In Figure 1-1, the keyword
int
indicates that the main function returns an integer. You will learn more about functions
returning values in Chapter 7 of this book.
The opening curly brace ( { ) on the fourth line of Figure 1-1 marks the beginning of the body
of the
main function and the closing curly brace ( } ) on the last line of Figure 1-1 marks the
end of the
main function. All the code within this pair of curly braces executes when the
main function executes. In Figure 1-1, there are two lines of code between the curly braces.
The first is:
cout << "Hello World" << endl;
This is the line that causes the words Hello World to appear on the user’s screen. This line
consists of multiple parts. The first part,
cout, is the name of an object that represents the
user’s screen. Next, you see
<< which is called the insertion or output operator. You
use
cout and << to output what follows, which in this example is the string constant
"Hello World". (The quotation marks will not appear on the screen, but they are neces-
sary to make the program work.) After
"Hello World" you see another << which causes
endl to be displayed (after Hello World) on the user’s screen. For now, think of endl as
a newline that causes the cursor to be positioned on the line after
Hello World. You will
learn more about
endl in Chapter 9 of this book. Note that the semicolon that ends the
cout << "Hello World" << endl; statement is required because it tells the compiler
that this is the end of the statement.
The next line of code is
return 0;. This statement instructs the compiler to return the value 0
from the main function. Remember, when you saw the header for the main function on
the third line of this program, you used the keyword
int to specify that the main function
returns an integer; 0 is the returned integer. Conventionally, when a program returns a 0,
it means “everything went well and the program is finished.”
Next, you learn about the C++ development cycle so that later in this chapter, you can
compile the Hello World program and execute it.
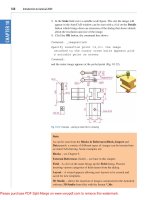
THE C++ DEVELOPMENT CYCLE
When you finish designing a program and writing the C++ code that implements your
design, you must compile and execute your program. This three-step process of writing code,
compiling code, and executing code is called the C++ development cycle. It is illustrated in
Figure 1-2.
5
»
NOTE
Don’t confuse the
last character in
endl, ‘l’ (el), with
the digit ‘1’ (one).
AN INTRODUCTION TO C++ AND THE C++ PROGRAMMING ENVIRONMENT
Let’s begin by learning about Step 1, writing the C++ source code.
WRITING C++ SOURCE CODE
As you learned in the previous section, you write a C++ program by creating a function
named
main that contains C++ statements. But what do you use to write the program, and
where do you save it?
One method you can use to write a C++ program is to use a text editor, such as the Windows
text editor, Notepad. You can use any text editor, but the steps in this book assume you are
using Notepad. To start Notepad, click the Start button, select Programs or All Programs,
select Accessories, and then select Notepad. Once Notepad starts, you simply type in your
C++ source code. Source code is the name used for the statements that make up a C++ pro-
gram. For example, the code shown earlier in Figure 1-1 is source code.
When you save the file that contains the source code, it is important to give the file a mean-
ingful name, and then add the extension
.cpp. For the Hello World program, an appropriate
name for the source code file is
HelloWorld.cpp. Of course, it is also important to
remember the location of the folder in which you choose to save your source code file.
You move on to Step 2 of the C++ development cycle after saving your source code file.
In Step 2, you compile the source code.
COMPILING A C++ PROGRAM
The Visual C++ compiler is named cl. It is a program that is responsible for a two-step process
that takes your source code and transforms it into object code and then links the object code to
create executable code.
Object code is code in computer-readable form that is linked with libraries to create an exe-
cutable file. Executable code is the 1s and 0s that a computer needs to execute a program.
6
Step 3
Execute the program
(MyProgram)
Step 1
Write C++ source code
(Notepad)
Step 2
Compile source code
(cl MyProgram.cpp)
Source code file
(MyProgram.cpp)
C++ Object Code
(MyProgram.obj)
And
C++ Executable
(MyProgram.exe)
Output
Figure 1-2 The C++ development cycle
»
NOTE
The Visual C++
compiler, cl, is
actually a compiler
and a linker.
CHAPTER ONE
7
The C++ compiler automatically saves the object code in a file. This file has the same name
as the source code file, but it has an
.obj extension rather than a .cpp extension.
The following steps show how to compile a source code file. These steps assume you have
already created and saved the
HelloWorld.cpp source code file.
1. Set your
PATH environment variable. Refer to “Read This Before You Begin” at the begin-
ning of this book for instructions on how to set the
PATH environment variable.
»
NOTE
The PATH environ-
ment variable tells
your operating
system which
directories on your
system contain
commands.
»
NOTE
At this point in your
programming
career, don’t expect
to understand the
contents of files
with an.obj or
.exe extension if
you open one using
a text editor such
as Notepad.
»
NOTE If you are working in a school computer lab, these steps might already have been performed for you. If you
do not know how to set the PATH, refer to the “Read This Before You Begin” section at the beginning of this book or ask
your instructor for further information.
2. Open a Command Prompt window. To do this in Windows XP, click the Start button, select
All Programs, select Accessories, and then select Command Prompt. In Vista, click the
Start button, select All Programs, select Accessories, and then select Command Prompt.
The cursor blinks to the right of the current file path. To compile your source code file, you
first have to change to the file path containing your source code file. To do this, type
cd
driveletter:\path
where driveletter is the drive containing your file, and path is
the path to the folder containing your file. For example, to gain access to a file stored in a
folder named Testing, which is in turn stored in a folder named My Program, which is
stored on the c: drive, you would type
cd c:\My Program\Testing. After you type the
command, press Enter. The cursor now blinks next to the file path for the folder contain-
ing your source code file.
3. Type the following command, which uses the C++ compiler ,
cl, to compile the program:
cl HelloWorld.cpp
If there are no syntax errors in your source code, a file named HelloWorld.obj and
a file named
HelloWorld.exe are created. You do not see anything special happen.
However, the files you just created contain the object code (
HelloWorld.obj) and exe-
cutable code (
HelloWorld.exe) for the Hello World program. If there are syntax errors,
you will see error messages on the screen; in that case, you need to go back to Notepad to
fix the errors, save the source code file again, and recompile until there are no syntax
errors remaining. Syntax errors are messages from the compiler that tell you what your
errors are and where they are located in your source code file. For example, omitting a
semicolon at the end of the statement
cout << "Hello World" << endl results
in a syntax error.
4. After the program is compiled, you can use the
dir command to display a directory listing
to see the files named
HelloWorld.obj and HelloWorld.exe. To execute the dir com-
mand, you type dir at the command prompt. For example, if your source code file is
located at c:\My Program\Testing, the command prompt and
dir command should look
like this: c:\My Program\Testing>
dir. The HelloWorld.obj and HelloWorld.exe files
should be in the same directory as the source code file
HelloWorld.cpp.
Step 3 in the development cycle is executing the C++ program. You’ll learn about
that next.
AN INTRODUCTION TO C++ AND THE C++ PROGRAMMING ENVIRONMENT
EXECUTING A C++ PROGRAM
To execute the Hello World program, do the following:
1. Open a Command Prompt window. To do this in Windows XP, click the Start button, select
All Programs, select Accessories, and then select Command Prompt. In Vista, click the
Start button, select All Programs, select Accessories, and then select Command Prompt.
Change to the file path containing your executable code file, if necessary, and then enter
the following command:
HelloWorld
2. When the program executes, the words Hello World appear in the Command Prompt
window.
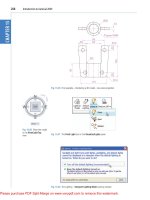
Figure 1-3 illustrates the steps involved in compiling
HelloWorld.cpp using the cl compiler,
executing the
dir command to verify that the files HelloWorld.obj and HelloWorld.exe
were created, and the output generated by executing the Hello World program.
8
»
NOTE
You must be in the
same directory that
contains the .exe
file when you exe-
cute the program.
Figure 1-3 Compiling and executing the Hello World program
EXERCISE 1-1: UNDERSTANDING THE C++ COMPILER
In this exercise, assume you have written a C++ program and stored your source code in a file
named
FirstCPlusPlusProgram.cpp. Answer the following questions:
1. What command would you use to compile the source code?
___________________________________________________________________________________________
2. What command would you use to execute the program?
___________________________________________________________________________________________