C sharp database programming
Bạn đang xem bản rút gọn của tài liệu. Xem và tải ngay bản đầy đủ của tài liệu tại đây (7.96 MB, 710 trang )
Mastering C# Database Programming
by Jason Price ISBN:0782141838
Sybex © 2003 (665 pages)
This guide will help you understand database programming as it
provides focused coverage of ADO and how it relates to C#, as well
as other complex topics including transactions, Windows forms, Web
Forms, XML, and Web Services.
Table of Contents
Mastering C# Database Programming
Introduction
Part 1 - Introduction to ADO.NET and Databases
Chapter 1
- Introduction to Database Programming with ADO.NET
Chapter 2
- Introduction to Databases
Chapter 3
- Introduction to Structured Query Language (SQL)
Chapter 4
- Introduction to Transact-SQL Programming
Chapter 5
- Overview of the ADO.NET Classes
Chapter 6
- Introducing Windows Applications and ADO.NET
Part 2 - Fundamental Database Programming with ADO.NET
Chapter 7
- Connecting to a Database
Chapter 8
- Executing Database Commands
Chapter 9
- Using DataReader Objects to Read Results
Chapter 10
- Using Dataset Objects to Store Data
Chapter 11
- Using DataSet Objects to Modify Data
Chapter 12
- Navigating and Modifying Related Data
Chapter 13
- Using DataView Objects
Part 3 - Advanced Database Programming with ADO.NET
Chapter 14
- Advanced Transaction Control
Chapter 15
- Introducing Web Applications—ASP.NET
Chapter 16
- Using SQL Server's XML Support
Chapter 17
- Web Services
Index
List of Figures
List of Tables
1
List of Listings
List of Sidebars
2
Mastering C# Database Programming
Jason Price
San Francisco London
Associate Publisher: Joel Fugazzotto
Acquisitions Editor: Denise Santoro-Lincoln
Developmental Editor: Tom Cirtin
Production Editor: Erica Yee
Technical Editor: Acey Bunch
Copyeditor: Laura Ryan
Compositor: Jill Niles
Graphic Illustrator: Jeff Wilson, Happenstance Type-O-Rama
Proofreaders: Emily Hsuan, Laurie O'Connell, Nancy Riddiough, Monique van den Berg
Indexer: Ted Laux
Book Designer: Maureen Forys, Happenstance Type-O-Rama
Cover Designer: Design Site
Cover Illustrator: Tania Kac, Design Site
Copyright © 2003 SYBEX Inc., 1151 Marina Village Parkway, Alameda, CA 94501.
World rights reserved. The author created reusable code in this publication expressly for
reuse by readers. Sybex grants readers limited permission to reuse the code found in this
publication or its accompanying CD-ROM so long as the author is attributed in any
application containing the reusable code and the code itself is never distributed, posted on
3
line by electronic transmission, sold, or commercially exploited as a stand-alone product.
Aside from this specific exception concerning reusable code, no part of this publication may
be stored in a retrieval system, transmitted, or reproduced in any way, including but not
limited to photocopy, photograph, magnetic, or other record, without the prior agreement
and written permission of the publisher.
Library of Congress Card Number: 2002116881
ISBN: 0-7821-4183-8
SYBEX and the SYBEX logo are either registered trademarks or trademarks of SYBEX Inc.
in the United States and/or other countries.
Mastering and the Mastering logo are trademarks of SYBEX Inc.
Screen reproductions produced with FullShot 99. FullShot 99 © 1991-1999 Inbit
Incorporated. All rights reserved. FullShot is a trademark of Inbit Incorporated.
Internet screen shot(s) using Microsoft Internet Explorer 6 reprinted by permission from
Microsoft Corporation.
TRADEMARKS: SYBEX has attempted throughout this book to distinguish proprietary
trademarks from descriptive terms by following the capitalization style used by the
manufacturer.
The author and publisher have made their best efforts to prepare this book, and the content is
based upon final release software whenever possible. Portions of the manuscript may be
based upon pre-release versions supplied by software manufacturer(s). The author and the
publisher make no representation or warranties of any kind with regard to the completeness
or accuracy of the contents herein and accept no liability of any kind including but not
limited to performance, merchantability, fitness for any particular purpose, or any losses or
damages of any kind caused or alleged to be caused directly or indirectly from this book.
Photographs and illustrations used in this book have been downloaded from publicly
accessible file archives and are used in this book for news reportage purposes only to
demonstrate the variety of graphics resources available via electronic access. Text and
images available over the Internet may be subject to copyright and other rights owned by
third parties. Online availability of text and images does not imply that they may be reused
without the permission of rights holders, although the Copyright Act does permit certain
unauthorized reuse as fair use under 17 U.S.C. Section 107.
Manufactured in the United States of America
10 9 8 7 6 5 4 3 2 1
4
Software License Agreement: Terms and Conditions
The media and/or any online materials accompanying this book that are available now or in
the future contain programs and/or text files (the "Software") to be used in connection with
the book. SYBEX hereby grants to you a license to use the Software, subject to the terms
that follow. Your purchase, acceptance, or use of the Software will constitute your
acceptance of such terms.
The Software compilation is the property of SYBEX unless otherwise indicated and is
protected by copyright to SYBEX or other copyright owner(s) as indicated in the media files
(the "Owner(s)"). You are hereby granted a single-user license to use the Software for your
personal, noncommercial use only. You may not reproduce, sell, distribute, publish,
circulate, or commercially exploit the Software, or any portion thereof, without the written
consent of SYBEX and the specific copyright owner(s) of any component software included
on this media.
In the event that the Software or components include specific license requirements or end-
user agreements, statements of condition, disclaimers, limitations or warranties ("End-User
License"), those End-User Licenses supersede the terms and conditions herein as to that
particular Software component. Your purchase, acceptance, or use of the Software will
constitute your acceptance of such End-User Licenses.
By purchase, use, or acceptance of the Software, you further agree to comply with all export
laws and regulations of the United States as such laws and regulations may exist from time
to time.
REUSABLE CODE IN THIS BOOK
The author(s) created reusable code in this publication expressly for reuse by readers. Sybex
grants readers limited permission to reuse the code found in this publication, its
accompanying CD-ROM or available for download from our website so long as the author
(s) are attributed in any application containing the reusable code and the code itself is never
distributed, posted online by electronic transmission, sold, or commercially exploited as a
stand-alone product.
SOFTWARE SUPPORT
Components of the supplemental Software and any offers associated with them may be
supported by the specific Owner(s) of that material, but they are not supported by SYBEX.
Information regarding any available support may be obtained from the Owner(s) using the
information provided in the appropriate read.me files or listed elsewhere on the media.
Should the manufacturer(s) or other Owner(s) cease to offer support or decline to honor any
offer, SYBEX bears no responsibility. This notice concerning support for the Software is
provided for your information only. SYBEX is not the agent or principal of the Owner(s),
and SYBEX is in no way responsible for providing any support for the Software, nor is it
5
liable or responsible for any support provided, or not provided, by the Owner(s).
WARRANTY
SYBEX warrants the enclosed media to be free of physical defects for a period of ninety
(90) days after purchase. The Software is not available from SYBEX in any other form or
media than that enclosed herein or posted to www.sybex.com. If you discover a defect in the
media during this warranty period, you may obtain a replacement of identical format at no
charge by sending the defective media, postage prepaid, with proof of purchase to:
SYBEX Inc.
Product Support Department
1151 Marina Village Parkway
Alameda, CA 94501
Web:
After the 90-day period, you can obtain replacement media of identical format by sending us
the defective disk, proof of purchase, and a check or money order for $10, payable to
SYBEX.
DISCLAIMER
SYBEX makes no warranty or representation, either expressed or implied, with respect to
the Software or its contents, quality, performance, merchantability, or fitness for a particular
purpose. In no event will SYBEX, its distributors, or dealers be liable to you or any other
party for direct, indirect, special, incidental, consequential, or other damages arising out of
the use of or inability to use the Software or its contents even if advised of the possibility of
such damage. In the event that the Software includes an online update feature, SYBEX
further disclaims any obligation to provide this feature for any specific duration other than
the initial posting.
The exclusion of implied warranties is not permitted by some states. Therefore, the above
exclusion may not apply to you. This warranty provides you with specific legal rights; there
may be other rights that you may have that vary from state to state. The pricing of the book
with the Software by SYBEX reflects the allocation of risk and limitations on liability
contained in this agreement of Terms and Conditions.
SHAREWARE DISTRIBUTION
This Software may contain various programs that are distributed as shareware. Copyright
laws apply to both shareware and ordinary commercial software, and the copyright Owner(s)
retains all rights. If you try a shareware program and continue using it, you are expected to
register it. Individual programs differ on details of trial periods, registration, and payment.
Please observe the requirements stated in appropriate files.
6
COPY PROTECTION
The Software in whole or in part may or may not be copy-protected or encrypted. However,
in all cases, reselling or redistributing these files without authorization is expressly forbidden
except as specifically provided for by the Owner(s) therein.
This book is dedicated to my late mother Patricia Anne Price and to my family. You're still
in my heart, even though you are far away.
Acknowledgments
Many thanks to all the great, hard-working people at Sybex-including Tom Cirtin, Denise
Santoro Lincoln, Laura Ryan, and Erica Yee.
Introduction
Welcome to Mastering C# .NET Database Programming! As you might already know, .
NET is poised to become the hot platform for the next wave of technology deployment. .
NET's strength is that it is built from the ground up to be used in a distributed environment-
in other words, an environment that consists of computers and devices connected via a
network.
Note The focus of this book is how you write C# programs that interact with a database. C#
uses ADO.NET to interact with a database; ADO.NET is the successor to ADO. In this
book, you'll learn the details of interacting with a SQL Server database. SQL Server is
Microsoft's premier database software.
Microsoft has pledged its commitment and resources to making .NET a pervasive
component of life in our technological society-ignore .NET at your own peril. The bottom
line is you need to learn .NET if you want to remain competitive in today's-and tomorrow's-
marketplace.
In a nutshell, .NET is a completely new framework for writing many types of applications.
The applications you can write using .NET include Windows applications and Web-based
applications. You can use .NET to develop systems composed of interconnected services
that communicate with each other over the Internet.
In addition, you can use .NET to create applications that run on devices such as handheld
computers and cellular phones. Although other languages allow you to develop such
applications, .NET was designed with the interconnected network in mind.
The .NET Framework consists of three primary components:
7
● Development Languages and Tools The development languages that enable you to
write .NET programs include C#, Visual Basic .NET (VB .NET), and Managed C+
+. Microsoft also has a Rapid Application Development (RAD) tool called Visual
Studio .NET (VS .NET) that allows you to develop programs in an integrated
development environment (IDE). You'll use C# and VS .NET in this book.
● Common Language Runtime (CLR) CLR manages your running code and
provides services such as memory management, thread management (which allows
you to perform multiple tasks in parallel), and remoting (which allows objects in
one application to communicate with objects in another application). The CLR also
enforces strict safety and accuracy of your executable code to ensure that no
tampering occurs.
● Framework Base Class Library The Framework Base Class Library is an
extensive collection of code written by Microsoft that you can use in your own
programs. For example, among many other functions, the Framework Base Class
Library contains code that allows you to develop Windows applications, access
directories and files on disk, interact with databases, and send and receive data
across a network.
Who Should Read This Book?
This book was written for programmers who already know C#. It contains everything you
need to know to master database programming with C#. No prior experience of databases is
assumed, but if you already have some knowledge of database software such as SQL Server
or Oracle, you'll be off to a running start.
Note If you don't know C#, I recommend the book Mastering Visual C# .NET from Sybex
(2002).
How to Use This Book
This book is divided into three parts. In Part 1, "Introduction to ADO.NET and Databases,"
you'll learn everything you need to know about databases. You'll also be introduced to ADO.
NET, which enables your C# programs to interact with a database. In
Part 2, "Fundamental
Database Programming with ADO.NET," you'll learn the C# programming with ADO.NET
from the ground up. In
Part 3, "Advanced Database Programming with ADO.NET," you'll
go beyond the basics to learn programming techniques needed by professional database
developers.
The following sections describe the chapters in detail.
Part 1: "Introduction to ADO.NET and Databases"
8
In Chapter 1, "Introduction to Database Programming with ADO.NET," you'll see how to
use ADO.NET in a C# program to interact with a database. You also learn about Microsoft's
RAD tool, Visual Studio .NET. Finally, you'll see how to use the extensive documentation
from Microsoft that comes with .NET and SQL Server.
In Chapter 2, "Introduction to Databases," you'll learn the details of what databases are and
how they are used to store information. You'll see the use of a SQL Server database named
Northwind. This database contains the information for the fictitious Northwind Company,
which sells food products. This database is one of the example databases that is typically
installed with SQL Server.
In Chapter 3, "Introduction to the Structured Query Language," you'll learn how to use the
Structured Query Language (SQL) to access a database. You'll see how you use SQL to
interact with the Northwind database, and how to retrieve and modify information stored in
that database.
In Chapter 4, "Introduction to Transact-SQL Programming," you'll be introduced to
programming with Microsoft's Transact-SQL. Transact-SQL enables you to write programs
that contain SQL statements, along with standard programming constructs such as variables,
conditional logic, loops, procedures, and functions.
In Chapter 5, "Overview of the ADO.NET Classes," you'll get an overview of the ADO.NET
classes. You'll also see a C# program that connects to a database, stores the rows locally,
disconnects from the database, and then reads the contents of those local rows while
disconnected from the database. This ability to store a local copy of rows retrieved from the
database is one of the main strengths of ADO.NET.
In Chapter 6, "Introducing Windows Applications and ADO.NET," you'll be introduced to
Windows applications. A Windows application takes advantage of displaying and using the
mouse and keyboard for input. Windows provides graphical items such as menus, text
boxes, and radio buttons so you can build a visual interface that will be easy to use. You'll
see how to build Windows applications that interact with the Northwind database.
Part 2: "Fundamental Database Programming with ADO.NET"
In Chapter 7, "Connecting to a Database," you'll learn the details on connecting to a
database. There are three Connection classes: SqlConnection, OleDbConnection, and
OdbcConnection. You use an object of the SqlConnection class to connect to a SQL Server
database. You use an object of the OleDbConnection class to connect to any database that
supports OLE DB (Object Linking and Embedding for Databases), such as Oracle or Access.
You use an object of the OdbcConnection class to connect to any database that supports
ODBC (Open Database Connectivity). Ultimately, all communication with a database is
done through a Connection object.
In Chapter 8, "Executing Database Commands," you'll learn the details on executing
9
database commands. You use a Command object to execute a SQL SELECT, INSERT,
UPDATE, or DELETE statement. You can also use a Command object to call a stored
procedure, or retrieve all the rows and columns from a specific table.
In Chapter 9, "Using DataReader Objects to Read Results," you'll see how to use a
DataReader object to read results returned from the database. You use a DataReader object
to read rows retrieved from the database using a Command object.
In Chapter 10, "Using DataSet Objects to Store Data," you'll learn how to use a DataSet
object to store results returned from the database. DataSet objects allow you to store a copy
of the tables and rows from the database, and you can work with that local copy while
disconnected from the database.
In Chapter 11, "Using DataSet Objects to Modify Data," you'll examine how to modify the
rows in a DataSet and then push those changes to the database via a DataAdapter.
In Chapter 12, "Navigating and Modifying Related Data," you'll delve into the details of
how you navigate related data in tables, make changes in that data in memory, and finally
push those changes to the database.
In Chapter 13, "Using DataView Objects," you'll see how to use DataView objects to filter
and sort rows. The advantage of a DataView is that you can bind it to a visual component in
a Windows or ASP.NET application.
Part 3: "Advanced Database Programming with ADO.NET"
In Chapter 14, "Advanced Transaction Control," you'll delve into advanced transaction
control using SQL Server and ADO.NET.
In Chapter 15, "Introducing Web Applications: ASP.NET," you'll learn the basics of ASP.
NET, and you'll see how to use Visual Studio .NET to create ASP.NET applications.
In Chapter 16, "Using SQL Server's XML Support," you'll learn about SQL Server's
extensive support for XML. You'll also see how to store XML in a C# program using
XmlDocument and XmlDataDocument objects.
In Chapter 17, "Web Services," you'll learn how to build a simple web service, which is a
software component that may be used across the Web. For example, you could build a eb
service that allows one company to send another company an order across the Web using
XML.
Downloading the Example Programs
10
Throughout this book, you'll see many example programs that illustrate the concepts
described in the text. These are marked with a listing number and title, such as the one
shown here:
LISTING 1.1: FIRSTEXAMPLE.CS
The filenames will correspond to the listing name: FirstExample.cs is the filename for
Listing 1.1. You can download a Zip file containing the programs from the Sybex Web site
at
www.sybex.com. You can use a program such as WinZip to extract the contents of the Zip
file.
When you unzip this file, one directory for each chapter will be created. Each directory will
contain the following sub-directories as required:
● programs Contains the C# programs.
● sql Contains SQL scripts.
● VS. NET projects Contains the Visual Studio .NET projects.
● xml Contains the XML files.
Note Not all chapters reference programs, sql scripts, etc., and therefore may not contain all
the previous sub-directories.
11
Part 1: Introduction to ADO.NET and
Databases
Chapter List
Chapter 1: Introduction to Database Programming with ADO.NET
Chapter 2: Introduction to Databases
Chapter 3: Introduction to Structured Query Language (SQL)
Chapter 4: Introduction to Transact-SQL Programming
Chapter 5: Overview of the ADO.NET Classes
Chapter 6: Introducing Windows Applications and ADO.NET
12
Chapter 1: Introduction to Database
Programming with ADO.NET
Overview
A Database is an organized collection of information that is divided into tables. Each table
is further divided into rows and columns; these columns store the actual information. You
access a database using Structured Query Language (SQL), which is a standard language
supported by most database software including SQL Server, Access, and Oracle.
In this chapter, you'll see a C# program that connects to a SQL Server database, retrieves
and displays the contents stored in the columns of a row from a table, and then disconnects
from the database. You'll also see programs that connect to Access and Oracle databases.
You'll also learn about Microsoft's rapid application development (RAD) tool, Visual
Studio .NET (VS .NET). VS .NET enables you to develop, run, and debug programs in an
integrated development environment. This environment uses all the great features of
Windows, such as the mouse and intuitive menus, and increases your productivity as a
programmer.
In the final sections of this chapter, you'll see how to use the extensive Microsoft
documentation that comes with the .NET Software Development Kit (SDK) and VS .NET.
You'll find this documentation invaluable as you become an expert with ADO.NET and C#.
You'll also learn how to use the SQL Server documentation.
Featured in this chapter:
● Obtaining the required software
● Developing your first ADO.NET program
● Connecting to Access and Oracle databases
● Introducing Visual Studio .NET
● Using the .NET documentation
● Using the SQL Server documentation
Obtaining the Required Software
13
Before you can develop C# programs, you'll need to install either the .NET Software
Development Kit (SDK) or VS .NET. You can download the .NET SDK at
http://msdn.
microsoft.com/downloads (search for the Microsoft .NET Framework Software
Development Kit). You can purchase a trial or full copy of VS .NET from Microsoft at http://
msdn.microsoft.com/vstudio.
To install the .NET SDK, run the executable file you downloaded and follow the instructions
on the screen to install it on your computer. To install VS .NET, run the setup.exe file on the
disk and follow the instructions on the screen.
You'll also need a copy of the SQL Server database software. At time of writing, you can
download a trial version of SQL Server from Microsoft at
You can also purchase a trial or full copy of SQL Server from Microsoft's Web site.
This book uses the Developer Edition of the SQL Server 2000 software and uses a database
named Northwind. This database contains the information for the fictitious Northwind
Company, which sells food products to customers. Northwind is one of the example
databases that you can install with SQL Server. Customer information in the Northwind
database is stored in a table named Customers; you'll see the use of this table in the example
program later in this chapter.
If you don't want to download or purchase a trial version of SQL Server, the .NET SDK (and
VS .NET) comes with a stand-alone desktop database server known as the Microsoft SQL
Server 2000 Desktop Engine (MSDE 2000). MSDE 2000 has a version of the Northwind
database that you can use instead of the SQL Server Northwind database-although you won't
get all of the graphical administration tools that come with SQL Server. If you're using the .
NET SDK and want to install MSDE 2000, select Start ➣ Microsoft .NET Framework SDK
➣ Samples and QuickStart Tutorials. If you're using VS .NET and want to install MSDE
2000, run the setup.exe program that you use to install VS .NET and select MSDE 2000 as a
new feature to install.
Note You can learn more about MSDE 2000 at />development/2000/msde2000.asp.
Developing Your First ADO.NET Program
In this section you'll plunge into ADO.NET programming and see a C# program that
performs the following tasks:
1. Connects to the SQL Server Northwind database
2. Retrieves a row from the Customers table
14
3. Displays the columns from the row
4. Closes the database connection
You'll be introduced to many concepts in this section that are fully explored in later chapters.
Don't be too concerned about all the details of the concepts at this stage; you'll learn those
details in the later chapters.
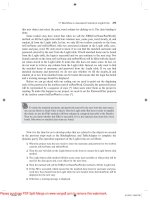
Listing 1.1 shows the example program, which is contained in the file FirstExample.cs.
Listing 1.1: FIRSTEXAMPLE.CS
/*
FirstExample.cs illustrates how to:
1. Connect to the SQL Server Northwind database.
2. Retrieve a row from the Customers table using
a SQL SELECT statement.
3. Display the columns from the row.
4. Close the database connection.
*/
using System;
using System.Data.SqlClient;
class FirstExample
{
public static void Main()
{
try
{
// step 1: create a SqlConnection object to connect to
the
// SQL Server Northwind database
SqlConnection mySqlConnection =
new SqlConnection(
"server=localhost;database=Northwind;uid=sa;pwd=sa"
);
// step 2: create a SqlCommand object
SqlCommand mySqlCommand = mySqlConnection.CreateCommand
();
// step 3: set the CommandText property of the
SqlCommand object to
// a SQL SELECT statement that retrieves a row from the
Customers table
mySqlCommand.CommandText =
15
"SELECT CustomerID, CompanyName, ContactName, Address
"+
"FROM Customers "+
"WHERE CustomerID = 'ALFKI'";
// step 4: open the database connection using the
// Open() method of the SqlConnection object
mySqlConnection.Open();
// step 5: create a SqlDataReader object and call the
ExecuteReader()
// method of the SqlCommand object to run the SELECT
statement
SqlDataReader mySqlDataReader = mySqlCommand.
ExecuteReader();
// step 6: read the row from the SqlDataReader object
using
// the Read() method
mySqlDataReader.Read();
// step 7: display the column values
Console.WriteLine("mySqlDataReader[\" CustomerID\"] = "+
mySqlDataReader["CustomerID"]);
Console.WriteLine("mySqlDataReader[\" CompanyName\"] =
"+
mySqlDataReader["CompanyName"]);
Console.WriteLine("mySqlDataReader[\" ContactName\"] =
"+
mySqlDataReader["ContactName"]);
Console.WriteLine("mySqlDataReader[\" Address\"] = "+
mySqlDataReader["Address"]);
// step 8: close the SqlDataReader object using the
Close() method
mySqlDataReader.Close();
// step 9: close the SqlConnection object using the
Close() method
mySqlConnection.Close();
}
catch (SqlException e)
{
Console.WriteLine("A SqlException was thrown");
Console.WriteLine("Number = "+ e.Number);
Console.WriteLine("Message = "+ e.Message);
Console.WriteLine("StackTrace:\n" + e.StackTrace);
}
}
}
16
Note You can download all the source files for the programs featured in this book from the
Sybex Web site at
www.sybex.com. You'll find instructions on downloading these files
in the introduction of this book. Once you've downloaded the files, you can follow
along with the examples without having to type in the program listings.
Let's go through the lines in FirstExample.cs. The first set of lines is a comment that
indicates what the program does:
/*
FirstExample.cs illustrates how to:
1. Connect to the SQL Server Northwind database.
2. Retrieve a row from the Customers table using
a SQL SELECT statement.
3. Display the columns from the row.
4. Close the database connection.
*/
The next two lines indicate the namespaces being referenced in the program with the using
statement:
using System;
using System.Data.SqlClient;
The System namespace is the root namespace and is referenced so that we can simply use
Console .WriteLine() calls in the program, rather than the fully qualified System.Console.
WriteLine() call. The System.Data.SqlClient namespace contains the ADO.NET classes for
use with SQL Server, including the SqlConnection, SqlCommand, and SqlDataReader
classes that are used later in the program. You'll be introduced to these classes shortly, and
you'll learn the full details of the ADO.NET classes as you progress through this book.
You handle exceptions that might be thrown in your code by placing the code within a try/
catch block. You'll notice that the nine steps are placed within a try/catch block in the Main
() method, with the catch block handling a SqlException object that might be thrown by the
code in the try block. You'll learn more about this later in the section "Handling Exceptions"
after I've discussed the nine steps in the following sections.
Step 1: Create a SqlConnection Object to Connect to the Database
You use an object of the SqlConnection class to connect to a SQL Server database. Step 1 in
the Main() method creates a SqlConnection object named mySqlConnection to connect to
the SQL Server Northwind database:
17
SqlConnection mySqlConnection =
new SqlConnection(
"server=localhost;database=Northwind;uid=sa;pwd=sa"
);
The string passed to the SqlConnection constructor is known as the connection string and
contains the following elements:
● server Specifies the name of the computer on which SQL Server is running-
localhost in this example; localhost is a common name that refers to the computer
on which your program runs. If your database is running on a computer other than
the one your program is running on, then you'll need to replace localhost with the
name of that computer.
● database Specifies the name of the database-Northwind in this example.
● uid Specifies the name of the database user account-sa in this example; sa is a
common database user account used by the database administrator (DBA). You can
use any database user account as long as it has access to the Northwind database.
● pwd Specifies the password for the user. The password for the sa user in my
database is also sa. You'll need to change pwd to the password for your sa account,
or whichever account you specified in uid.
You'll need to change the settings of some or all of the previous elements in your connection
string. You might need to speak with your DBA to get the various elements that make up
your connection string. Once you have the correct values, you should make the changes to
the connection string in your copy of FirstExample.cs.
Note A database administrator (DBA) is responsible for performing tasks such as installing
the database software, backing up the databases, and so on.
Step 2: Create a SqlCommand Object
Step 2 creates a SqlCommand object named mySqlCommand that is used later to send a
SELECT statement to the database for execution.
SqlCommand mySqlCommand = mySqlConnection.CreateCommand();
Step 3: Set the CommandText Property of the SqlCommand Object
You use SQL to work with the information stored in a database. SQL is an industry standard
language supported by SQL Server, Access, and Oracle. You use the SQL SELECT
statement for retrieving information from a database. You'll learn the basics of SQL in
Chapter 3, "Introduction to the Structured Query Language."
18
Step 3 sets the CommandText property of mySqlCommand created in the previous step to a
SELECT statement. This statement will retrieve the CustomerID, CompanyName,
ContactName, and Address columns from the row in the Customers table whose
CustomerID is ALFKI:
mySqlCommand.CommandText =
"SELECT CustomerID, CompanyName, ContactName, Address "+
"FROM Customers "+
"WHERE CustomerID = 'ALFKI'";
Step 4: Open the SqlConnection Object
Step 4 opens the database connection using the Open() method of the SqlConnection object
created in
step 1:
mySqlConnection.Open();
Once the connection to the database is open, you can send commands to the database for
execution.
Step 5: Run the SELECT Statement
You run the SELECT statement previously set in mySqlCommand by calling the
ExecuteReader() method. This method returns a SqlDataReader object that you then use to
read the row data returned by the SELECT statement.
Step 5 creates a SqlDataReader object and calls the ExecuteReader() method of
mySqlCommand object to run the SELECT statement:
SqlDataReader mySqlDataReader = mySqlCommand.ExecuteReader();
Step 6: Read the Row Using the SqlDataReader Object
Step 6 reads the row in mySqlDataReader using the Read() method:
mySqlDataReader.Read();
Step 7: Display the Column Values from the SqlDataReader Object
You can read the value for a column from mySqlDataReader by passing the name of the
column in square brackets. For example, mySqlDataReader["CustomerID"] returns the value
19
of the CustomerID column.
Step 7 displays the column values for the CustomerID, CompanyName, ContactName, and
Address column values:
Console.WriteLine("mySqlDataReader[\" CustomerID\"] = "+
mySqlDataReader["CustomerID"]);
Console.WriteLine("mySqlDataReader[\" CompanyName\"] = "+
mySqlDataReader["CompanyName"]);
Console.WriteLine("mySqlDataReader[\" ContactName\"] = "+
mySqlDataReader["ContactName"]);
Console.WriteLine("mySqlDataReader[\" Address\"] = "+
mySqlDataReader["Address"]);
Step 8: Close the SqlDataReader Object
When you're finished reading rows from a SqlDataReader object, close it using the Close()
method. Step 8 calls the Close() method for mySqlDataReader:
mySqlDataReader.Close();
Step 9: Close the SqlConnection Object
When you're finished accessing the database, close your SqlConnection object using the
Close() method. Step 9 calls the Close() method for mySqlConnection:
mySqlConnection.Close();
Handling Exceptions
You handle exceptions that might be thrown in your code by placing the code within a try/
catch block. You'll notice that the nine steps are placed within a try/catch block, with the
catch block handling a SqlException object that might be thrown by the code in the try
block. The SqlException class is specifically for use with code that accesses a SQL Server
database.
The following example shows how to structure a try/catch block:
try
{
/* code that might throw a SqlException */
}
catch (SqlException e)
{
Console.WriteLine("A SqlException was thrown");
20
Console.WriteLine("Number = "+ e.Number);
Console.WriteLine("Message = "+ e.Message);
Console.WriteLine("StackTrace:\n" + e.StackTrace);
}
The properties displayed in the catch block are as follows:
● Number The error number
● Message A string containing a description of the error
● StackTrace A string containing the name of the class and the method from which
the exception was thrown
The two most common examples of when a SqlException object is thrown are as follows:
● Your SqlConnection object is unable to connect to the database. If this happens, you
should check the connection string that specifies how to connect to your database.
● Your SELECT statement contains a mistake in the spelling of a table or column.
The following example output shows what happens when the SqlConnection object in
FirstExample.cs is unable to connect to the database because the database is currently down:
A SqlException was thrown
Number = -2
Message = Timeout expired. Possible reasons: the timeout
period elapsed prior
to completion of the operation, the server is not responding,
or the maximum pool size was exceeded.
Please see the documentation for further details.
StackTrace:
at System.Data.SqlClient.SqlConnection.Open()
at FirstExample.Main()
You can use the output from your catch block to determine the problem. If the database is
down, contact your DBA.
Note For brevity, the only program to use a try/catch block in this book is FirstExample.cs.
You should use try/catch blocks in your own programs to catch exceptions. For more
details on handling exceptions, I recommend the book Mastering Visual C# .NET from
Sybex (2002).
In the next section you'll see how to compile FirstExample.cs and run it.
21
Compiling and Running FirstExample.cs
You can compile the FirstExample.cs program using either the command-line tool that
comes with the .NET SDK or VS .NET. In this section, you'll see how to use the command-
line version of the compiler for FirstExample.cs program. Later in this chapter, in the section
"
Introducing Visual Studio .NET," you'll see how to use VS .NET to compile and run a
program.
You run the command-line version of the compiler by entering csc in the Command Prompt
tool, followed by the name of your program source file. For example, to compile
FirstExample.cs, you would enter the following command in the Command Prompt tool:
csc FirstExample.cs
If you want to follow along with the examples, start the Command Prompt tool by selecting
Start ➣ Programs ➣ Accessories ➣ Command Prompt.
Note If you're using Windows XP rather than Windows 2000, start the Command Prompt
tool by selecting Start ➣ All Programs ➣ Accessories ➣ Command Prompt.
Next, you need to change directories to where you copied the FirstExample.cs file. To do
this, you first enter the partition on your hard disk where you saved the file. For example,
let's say you saved the file in the ADO.NET\book\ch01\programs directory of the C partition
of your hard disk. To access the C partition, you enter the following line into the Command
Prompt tool and then you press the Enter key:
C:
Next, to move to the ADO.NET\book\ch01\programs directory, you enter cd followed by
ADO.NET\book\ch01\programs:
cd ADO.NET\book\ch01\programs
To compile FirstExample.cs using csc, you enter the following command:
csc FirstExample.cs
Notice that the name of the program source file follows csc; in this case, it's FirstExample.cs.
If you get an error when running csc, you'll need to add the directory where you installed the
SDK to your Path environment variable. The Path environment variable specifies a list of
directories that contain executable programs. Whenever you run a program from the
command prompt, the directories in the Path variable are searched for the program you want
to run. Your current directory is also searched. To set your Path environment variable, do the
22
following:
1. Select Start ➣ Settings ➣ Control Panel. Then double-click System and select the
Advanced tab.
2. Click the Environment Variables button and double-click Path from the system
variables area at the bottom.
3. Add the directory where you installed the SDK to your Path environment variable.
4. Click OK to save your change, and then click OK again on the next dialog.
5. Restart Command Prompt so that your change is picked up. You should then be able
to run csc successfully.
The compiler takes the FirstExample.cs file and compiles it into an executable file named
FirstExample.exe. The .exe file contains instructions that a computer can run, and the .exe
file extension indicates the file is an executable file.
You run an executable file using the Command Prompt tool by entering the name of that
executable file. For example, to run the FirstExample.exe file, you enter the following line in
the Command Prompt tool and then you press the Enter key:
FirstExample
When you run the program, you should see the following text displayed in your Command
Prompt window:
mySqlDataReader["CustomerID"] = ALFKI
mySqlDataReader["CompanyName"] = Alfreds Futterkiste
mySqlDataReader["ContactName"] = Maria Anders
mySqlDataReader["Address"] = Obere Str. 57
If you encounter an exception-such as your program can't connect to the database-you
should check the connection string set in step 1 of FirstExample.cs, and speak with your
DBA if necessary.
Connecting to Access and Oracle Databases
In this section you'll see examples of connecting to both an Access and an Oracle database.
To interact with either of these databases in your program, you use classes from the System.
Data.OleDb namespace. This namespace contains classes for use with databases that support
object linking and embedding for databases (OLE DB) such as Access or Oracle. You'll
23
learn more about the System.Data.OleDb namespace in Chapter 5, "Overview of the ADO.
NET Classes."
Connecting to an Access Database
You connect to an Access database using an OleDbConnection object-rather than a
SqlConnection object-with a connection string of the following format:
provider=Microsoft.Jet.OLEDB.4.0;data source=databaseFile
where databaseFile is the directory and filename of your Access database. Notice that you
specify the provider in the connection string, which is set to Microsoft.Jet.OLEDB.4.0.
The following example creates a string named connectionString with the appropriate format
to connect to the Access Northwind database stored in the Northwind.mdb file:
string connectionString =
"provider=Microsoft.Jet.OLEDB.4.0;" +
"data source=F:\\Program Files\\Microsoft
Office\\Office\\Samples\\Northwind.mdb";
Note Notice the use of two backslash characters in the data source part of the connection
string. The first backslash is used to specify that the second backslash is to be treated
literally; therefore \\ is treated as \ in the connection string. You'll need to locate the
Northwind.mdb file on your hard disk and set your connection string appropriately.
Assuming the System.Data.OleDb namespace has been imported, the following example
creates an OleDbConnection object, passing connectionString (set in the previous line of
code) to the constructor:
OleDbConnection myOleDbConnection =
new 01eDbConnection(connectionString);
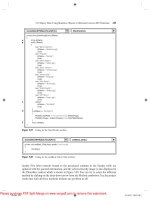
Listing 1.2 illustrates how to connect to the Northwind Access database using an
OleDbConnection object and retrieve a row from the Customers table. Notice that you use
an OleDbCommand and OleDbDataReader object to run a SQL statement and read the
returned results from an Access database.
Listing 1.2: OLEDBCONNECTIONACCESS.CS
/*
OleDbConnectionAccess.cs illustrates how to use an
OleDbConnection object to connect to an Access database
24
*/
using System;
using System.Data;
using System.Data.OleDb;
class OleDbConnectionAccess
{
public static void Main()
{
// formulate a string containing the details of the
// database connection
string connectionString =
"provider=Microsoft.Jet.OLEDB.4.0;" +
"data source=F:\\Program Files\\Microsoft
Office\\Office\\Samples\\Northwind.mdb";
// create an OleDbConnection object to connect to the
// database, passing the connection string to the
constructor
OleDbConnection myOleDbConnection =
new OleDbConnection(connectionString);
// create an OleDbCommand object
OleDbCommand myOleDbCommand = myOleDbConnection.
CreateCommand();
// set the CommandText property of the OleDbCommand
object to
// a SQL SELECT statement that retrieves a row from the
Customers table
myOleDbCommand.CommandText =
"SELECT CustomerID, CompanyName, ContactName, Address "+
"FROM Customers "+
"WHERE CustomerID = 'ALFKI'";
// open the database connection using the
// Open() method of the OleDbConnection object
myOleDbConnection.Open();
// create an OleDbDataReader object and call the
ExecuteReader()
// method of the OleDbCommand object to run the SELECT
statement
OleDbDataReader myOleDbDataReader = myOleDbCommand.
ExecuteReader();
// read the row from the OleDbDataReader object using
// the Read() method
myOleDbDataReader.Read();
25