(TIỂU LUẬN) NHẬP môn THỊ GIÁC máy TÍNH bài tập số 1 giả sử sử dụng camera sau
Bạn đang xem bản rút gọn của tài liệu. Xem và tải ngay bản đầy đủ của tài liệu tại đây (1.14 MB, 18 trang )
∞
ĐẠI HỌC QUỐC GIA THÀNH PHỐ HỒ CHÍ MINH
TRƯỜNG ĐẠI HỌC BÁCH KHOA KHOA CƠ KHÍ
NHẬP MƠN THỊ GIÁC MÁY TÍNH
BÀI TẬP SỐ 1
STT NHĨM : 5 – LỚP: L01
HỌC KÌ 1/2021-2022
Giảng viên : TS.Lê Đức Hạnh
Sinh viên thực hiện:
N
P
L
H
ĐỀ BÀI
1. Giả sử sử dụng camera sau:
a. Nếu Working Distance Maximum là 1129 cần chọn Focus Length ít nhất là bao nhiêu
? (2đ)
b. Camera cần nhìn vùng làm việc ít nhất 1500x1200mm , Feature cần quan sát có độ
lớn 0.5mm. Nếu Focus Length là 18mm. Cần setup working distance bao nhiêu ? (2đ)
2.
Lập trình UI cho giao diện sử dụng Opencv và CLR. Gồm:
- 1 nút nhấn để mở webcam. Hình webcam phải nằm trên picture box của UI. (2đ)
- 1 nút nhấn để save hình. Khi webcam đang mở lần lược save 4 hình với định dạng:
picture_mssv_xx.jpg với xx là số thứ tự. (2đ)
Lập trình mở webcam và lưu lại video (15 giây) trên webcam sử dụng Cmake để
compile (2đ)
3.
BÀI LÀM
Câu 1.
a.
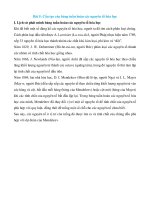
Ta tra thông số datasheet của máy ảnh acA2500-14gm-Basler ace có: (Link tra:
/>fbclid=IwAR1llO16StqDsHyNTeP3lbTSs5UMYm8Q8cea-2mO4-D2a_5GGwsDxIpQIQ)
Bên cạnh đó, ta có quan hệ hình học giữa các thơng số được thể hiện qua các hình dưới:
sin
sin
→ height = 0.744 width
Ta lại có:
(1)
vertical
(2)
Từ (1) và (2), có:
width = 868.21mm
height = 645.95mm
Ta có:
distance
focal length FOV = sensor size working
→
2
→ focal length = 7.45mm
b.
Ta có:
sensor resolution = 2
sensor size = pixel size sensor resolution =
10.56 (mm)
working distance =
( 2.2 2.2 ) 10 −3 ( 6000
4800
) = 13.20
Câu 2.
Đầu tiên ta cần thực hiện quy trình tiền xử lý: (Tham khảo Slide bài giảng của thầy Hạnh)
1. Tải và sử dụng Visual Studio 2017 và OpenCV 3.2.0
2. Tạo một dự án CLR trống ( CLR empty project)
3. Tiến hành thêm vào (add) và liên kết (link) các tệp tin, thư viện của OpenCV 3.2.0
4. Thêm vào Project một hệ giao diện UI bằng cách add new item vào project sau đó
chọn UI ->Windows Form.
5. Kiểm tra dự án đã sẵn sàng chưa bằng việc thực thi các hàm lệnh cơ bản. Ví dụ như #include
<thư viện>, hàm main(),… ; Nếu có lỗi thì debug. Nếu trơn tru thì ta sẵn sàng sử dụng.
Đây là thanh quản lý dự án của tác giả:
Trong bài tập này ta sẽ tạo giao diện có các công cụ lần lượt là:
Một nút nhất để mở webcam. Nút nhấn sẽ tên là button1 ( thay đổi tên nút nhấn tùy ý)
Một nút nhấn để lưu hình. Nút nhấn sẽ tên là button2 ( thay đổi tên nút nhấn tùy ý)
Một khung ảnh để hiển thị hình ảnh trên giao diện. Khung ảnh sẽ tên là picturebox1 ( thay
đổi tên khung ảnh tùy ý)
Sử dụng công cụ toolbox của Visual Studio để tiến hành thực hiện, ta trình bày như sau:
Ta tiến hành thiết lập code cho button1, tại đây ta sẽ xây dựng định nghĩa thêm 1 hàm mới để
tiến hành vẽ khung hình lên picturebox1.
(Tham khảo code của thầy Hạnh trong sách Thị Giác Máy cho Robotic của thầy)
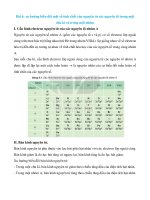
Ta thu được kết quả:
Ảnh tác giả chụp tại khu tự học lầu 3 H3 cơ sở 2 trường Bách Khoa
Tiếp theo ta tiến hành thiết lập mã cho nút nhấn 2, ta sẽ sử dụng vòng lặp for để thực hiện 4
lần chụp ảnh. Đồng thời ta sẽ xử lý chuỗi string theo yêu cầu của đề bài để đưa vào hàm
imwrite của OpenCV. Nhắc lại là “picture_mssv_xx.jpg”
Ta ấn nút nhấn 2.
Kiểm tra đường dẫn mà ta đã thiết lập để lưu:
Như vậy là ta đã hoàn thành.
Câu 3.
Vào Visual studio tạo file Cmake:
Sau khi tạo, sẽ xuất hiện 4 file gồm 1 file .cpp, 1file .h và 2 file txt:
Ta sẽ dùng file .cpp và txt để code.
Kết quả:
Lưu video:
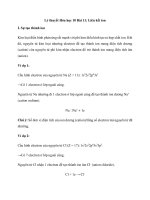
Build Cmake dùng Cmake GUI
Hàng đầu tiên là địa chỉ nơi chứ file của file cpp và txt
Hàng thứ 2 là nơi ta muốn build
Chọn Configue và chọn x64, sau đó ấn Finish
Sau đó chọn Generate
Sau đó vào thư mục build, chọn file sln. Chọn BAI3 làm Starup Project
Sau đó chạy chương trình
PHỤ LỤC CODE
2. Có 2 tệp thao tác code lần lượt là MyForm.cpp và MyForm.h
Code của tệp MyForm.cpp là:
#include "stdafx.h"
#include "MyForm.h"
using namespace System;
using namespace System::Windows::Forms;
[STAThreadAttribute]
void main()
{
Application::EnableVisualStyles();
Application::SetCompatibleTextRenderingDefault(false);
Project1::MyForm form;
Application::Run(% form);
}
Code của tệp MyForm.h là:
#pragma once
#include <opencv2/opencv.hpp>
#include <stdio.h>
#include <string>
using namespace std;
using namespace cv;
Mat edges;
namespace Project1 {
using namespace System;
using namespace
System::ComponentModel; using
namespace System::Collections; using
namespace System::Windows::Forms; using
namespace System::Data; using namespace
System::Drawing;
/
<summary>
/
Summary for MyForm
/
</summary>
public ref class MyForm : public System::Windows::Forms::Form
{
public:
MyForm(void)
{
InitializeComponent();
//
//TODO: Add the constructor code here
//
}
protected:
/
<summary>
/
Clean up any resources being used.
/
</summary>
~MyForm()
{
if (components)
{
delete components;
}
}
private: System::Windows::Forms::Button^ button1;
private: System::Windows::Forms::PictureBox^
pictureBox1;
private: System::Windows::Forms::Button^ button2;
private: System::Windows::Forms::SaveFileDialog^
saveFileDialog1;
protected:
private:
<summary>
Required designer variable.
</summary>
System::ComponentModel::Container ^components;
/
/
/
#pragma region Windows Form Designer generated code
/
<summary>
/
Required method for Designer support - do not
modify
/
the contents of this method with the code editor.
/
</summary>
void InitializeComponent(void)
{
this->button1 = (gcnew
System::Windows::Forms::Button()); this>pictureBox1 = (gcnew
System::Windows::Forms::PictureBox());
this->button2 = (gcnew
System::Windows::Forms::Button()); this>saveFileDialog1 = (gcnew
System::Windows::Forms::SaveFileDialog());
(cli::safe_cast<System::ComponentModel::ISupportInitialize^>( this>pictureBox1))->BeginInit();
this->SuspendLayout();
//
/
button1
/
this->button1->Location =
System::Drawing::Point(10, 19); this->button1>Name = L"button1";
this->button1->Size = System::Drawing::Size(120,
29);
this->button1->TabIndex = 0; this->button1>Text = L"button1"; this->button1>UseVisualStyleBackColor = true; this->button1>Click += gcnew
System::EventHandler(this, &MyForm::button1_Click);
//
/ pictureBox1
/
this->pictureBox1->Location =
System::Drawing::Point(12, 67); this->pictureBox1->Name =
L"pictureBox1"; this->pictureBox1->Size =
System::Drawing::Size(498, 410); this->pictureBox1>TabIndex = 1; this->pictureBox1>TabStop = false; this->pictureBox1>Click += gcnew
System::EventHandler(this, &MyForm::pictureBox1_Click);
//
/ button2
/
this->button2->Location =
System::Drawing::Point(392, 19); this->button2>Name = L"button2";
this->button2->Size = System::Drawing::Size(118,
29);
this->button2->TabIndex = 2; this->button2>Text = L"button2"; this->button2>UseVisualStyleBackColor = true; this->button2>Click += gcnew
System::EventHandler(this, &MyForm::button2_Click);
//
/ MyForm
/
this->AutoScaleDimensions =
System::Drawing::SizeF(8, 16); this>AutoScaleMode =
System::Windows::Forms::AutoScaleMode::Font;
this->ClientSize = System::Drawing::Size(522,
489);
this->Controls->Add(this->button2); this>Controls->Add(this->pictureBox1);
this->Controls->Add(this->button1);
this->Name = L"MyForm"; this->Text
= L"MyForm";
(cli::safe_cast<System::ComponentModel::ISupportInitialize^>( this>pictureBox1))->EndInit();
this->ResumeLayout(false);
}
#pragma endregion
private: System::Void button1_Click(System::Object^ sender,
System::EventArgs^ e) {
VideoCapture cap(0); // open the default camera
namedWindow("edges", 1);
for (;;)
{
Mat frame;
cap >> frame; // get a new frame from camera
cvtColor(frame, edges, CV_BGR2BGRA);
imshow("edges", edges);
DrawCVImage(pictureBox1, edges);
waitKey(30);
}
}
private: void DrawCVImage(System::Windows::Forms::Control^
control, cv::Mat& colorImage)
{
System::Drawing::Graphics^ graphics =
control->CreateGraphics();
System::IntPtr ptr(colorImage.ptr());
System::Drawing::Bitmap^ b;
b = gcnew System::Drawing::Bitmap(colorImage.cols,
colorImage.rows,
colorImage.step,
System::Drawing::Imaging::PixelFormat::Format32bppRgb, ptr);
System::Drawing::RectangleF rect(0, 0,
(float)control->Width, (float)control -> Height);
graphics->DrawImage(b, rect);
}
private: System::Void button2_Click(System::Object^
sender,
System::EventArgs^ e) {
std::string link = "C:/Users/doror/Desktop/Visual Studio
SAVE/NMTGMT/Save/";
std::string name = "picture_1910214_";
std::string STT;
std::string defined = ".jpg";
std::string path;
for (int i = 1; i < 5; i++)
{
STT = std::to_string(i);
path = link + name + STT + defined;
imwrite(path, edges);
}
}
private: System::Void pictureBox1_Click(System::Object^
System::EventArgs^ e) {
}
};
}
sender,
3. Có 3 tệp thao tác code lần lượt là BAI3.cpp, Cmakelist.txt, Cmakelist.txt (tên 2
cái cuối giống nhau, xem hình ở bài ba để thấy chi tiết)
Code của tệp BAI3.cpp là
#include "BAI3.h"
#include <opencv2/opencv.hpp>
#include <time.h>
using namespace std;
using namespace cv;
int main() {
Mat myImage;
time_t start, end;
time(&start);
namedWindow("Video Player");
VideoCapture cap(0);
int frame_width = static_cast<int>(cap.get(3)); int
frame_height = static_cast<int>(cap.get(4)); Size
frame_size(frame_width, frame_height);
int fps = 20;
VideoWriter output("video.avi", VideoWriter::fourcc('M', 'J', 'P', 'G'),
fps, frame_size);
if (!cap.isOpened()) {
cout << "No video stream detected" << endl;
system("pause");
return-1;
}
while (true)
{
cap >> myImage;
output.write(myImage);
if (myImage.empty()) {
break;
}
imshow("Video Player", myImage);
time(&end);
int key = waitKey(20);
if (key == 'q')
{
cout << "Key q key is pressed by the user.
Stopping the video" << endl;
break;
}
if (end - start == 15) break;
}
cap.release();
output.release();
destroyAllWindows();
return 0;
}
Code của tệp 1 Cmakelist.txt là :
cmake_minimum_required (VERSION 3.8)
project ("BAI3")
# Include sub-projects.
add_subdirectory ("BAI3")
Code của tệp 2 Cmakelist.txt là :
cmake_minimum_required (VERSION 3.8)
find_package(OpenCV REQUIRED)
include_directories( ${OpenCV_INCLUDE_DIRS})
# Add source to this project's executable.
add_executable (BAI3 "BAI3.cpp" "BAI3.h")
target_link_libraries( BAI3 ${OpenCV_LIBS} )
# TODO: Add tests and install targets if needed.