Raspberry Pi Home Automation with Arduino doc
Bạn đang xem bản rút gọn của tài liệu. Xem và tải ngay bản đầy đủ của tài liệu tại đây (5.96 MB, 176 trang )
www.it-ebooks.info
Raspberry Pi Home Automation
with Arduino
Automate your home with a set of exciting projects for
the Raspberry Pi!
Andrew K. Dennis
BIRMINGHAM - MUMBAI
www.it-ebooks.info
Raspberry Pi Home Automation with Arduino
Copyright © 2013 Packt Publishing
All rights reserved. No part of this book may be reproduced, stored in a retrieval
system, or transmitted in any form or by any means, without the prior written
permission of the publisher, except in the case of brief quotations embedded in
critical articles or reviews.
Every effort has been made in the preparation of this book to ensure the accuracy
of the information presented. However, the information contained in this book is
sold without warranty, either express or implied. Neither the author, nor Packt
Publishing, and its dealers and distributors will be held liable for any damages
caused or alleged to be caused directly or indirectly by this book.
Packt Publishing has endeavored to provide trademark information about all of the
companies and products mentioned in this book by the appropriate use of capitals.
However, Packt Publishing cannot guarantee the accuracy of this information.
First published: February 2013
Production Reference: 1290113
Published by Packt Publishing Ltd.
Livery Place
35 Livery Street
Birmingham B3 2PB, UK
ISBN 978-1-84969-586-2
www.packtpub.com
Cover Image by William Kewley ()
www.it-ebooks.info
Credits
Author
Andrew K. Dennis
Reviewer
Stefan Sjogelid
Acquisition Editor
Erol Staveley
Commissioning Editor
Ameya Sawant
Technical Editors
Veronica Fernandes
Worrell Lewis
Nitee Shetty
Project Coordinator
Joel Goveya
Proofreader
Stephen Swaney
Indexer
Hemangini Bari
Graphics
Valentina D'silva
Aditi Gajjar
Production Coordinator
Shantanu Zagade
Cover Work
Shantanu Zagade
www.it-ebooks.info
About the Author
Andrew K. Dennis is an R&D software developer at Prometheus Research.
Prometheus Research is a leading provider of integrated data management for
research and is the home of HTSQL, an open source navigational query language
for RDMS.
Andrew has a Diploma in Computing, a BS in Software Engineering, and is currently
studying for a second BS in Creative Computing in his spare time.
He has over 10 years experience working in the software industry in the UK, Canada,
and the USA. This experience includes e-learning courseware development, custom
CMS and LMS development, SCORM consultancy, web development in a variety
of languages, open source application development, blogging about the integration
of web technologies with electronics for home automation, and punching lots of
Cat5 cables.
His interests include web development, e-learning, 3D printing, Linux, the
Raspberry Pi and Arduino, open source projects, home automation and the use
of web technology in this sphere, amateur electronics, home networking, and
software engineering.
www.it-ebooks.info
Acknowledgement
I would like to thank my wife Megen for supporting me throughout this project and
putting up with the piles of electronics and computer hardware dotted around the
house. My parents, for their support with my interest in technology while growing
up and over the subsequent years.
The Cooking Hacks team, for their great new Raspberry Pi to Arduino Bridge shield
and the various contributors over on the Cooking Hacks forum for their insights.
The people at Prometheus Research, for making this a great and interesting place
to work. Partyka Chevrolet, for giving me some experience on the hardware side
of networking.
I would also like to thank Joel Goveya and Ameya Sawant at Packt Publishing for
their guidance throughout this process, and Stefan Sjogelid for his technical insights
and reviews.
www.it-ebooks.info
About the Reviewer
Stefan grew up in the 1980s with the C64 and the Amiga home computers. The
ambitious goal of the Raspberry Pi Foundation, bringing fun programming back
to today's youth, resonated strongly with Stefan who immediately ordered his
Raspberry Pi on the launch day itself. After much tinkering and learning a
great deal about the unique properties of the Pi, he launched the "PiLFS"
( website, which teaches readers
how to build their own GNU/Linux distribution and applications that are
particularly useful on the Raspberry Pi.
www.it-ebooks.info
www.PacktPub.com
Support les, eBooks, discount offers and more
You might want to visit www.PacktPub.com for support les and downloads related to
your book.
Did you know that Packt offers eBook versions of every book published, with PDF and
ePub les available? You can upgrade to the eBook version at www.PacktPub.com and
as a print book customer, you are entitled to a discount on the eBook copy. Get in touch
with us at for more details.
At www.PacktPub.com, you can also read a collection of free technical articles, sign up
for a range of free newsletters and receive exclusive discounts and offers on Packt books
and eBooks.
TM
Do you need instant solutions to your IT questions? PacktLib is Packt's online digital
book library. Here, you can access, read and search across Packt's entire library of books.
Why Subscribe?
• Fully searchable across every book published by Packt
• Copy and paste, print and bookmark content
• On demand and accessible via web browser
Free Access for Packt account holders
If you have an account with Packt at www.PacktPub.com, you can use this to access
PacktLib today and view nine entirely free books. Simply use your login credentials for
immediate access.
www.it-ebooks.info
www.it-ebooks.info
Table of Contents
Preface 1
Chapter 1: An Introduction to the Raspberry Pi, Arduino,
and Home Automation 7
What we will explore in this book 7
History and background of the
Raspberry Pi 8
Raspberry Pi hardware specications 9
Dimensions 10
3.5mm analog audio jack 10
Composite RCA port 10
Two USB 2.0 ports plus one micro USB 10
HDMI port 11
SD card port 11
256 MB/512 MB SDRAM shared with GPU 11
CPU 11
GPU 11
Ethernet port 12
GPIO pins 12
History and background of Arduino 12
Raspberry Pi to Arduino shield connection bridge 13
Shield specications 13
XBee socket 14
Power source selector 14
UART 14
Digital GPIO pins 14
Serial Peripheral Interface (SPI) pins 15
In Circuit Serial Programmer (ICSP) connector 15
Power pins 15
Analog inputs 15
Raspberry Pi GPIO connector 15
www.it-ebooks.info
Table of Contents
[ ii ]
Soldering 15
Writing software for the Arduino 16
What home automation is 17
A history of home automation 17
X10 – a standard is born 18
The dot.com boom and open source – a new set of technologies 19
Commercial products 20
Arrival of the Raspberry Pi 21
Summary 21
Chapter 2: Getting Started Part 1 – Setting up Your Raspberry Pi 23
The SD card – our Raspberry Pi's storage device 23
Pre-installed SD card versus a blank one 24
Setting up the SD card 24
Formatting our card 25
Formatting instructions for Windows 7 25
Formatting instructions for Mac OS X 26
Formatting instructions for Linux 27
BerryBoot – our tool for installing an operating system 28
Downloading the BerryBoot zip 28
Windows 28
Mac 28
Linux 29
Hooking up the Raspberry Pi 29
Downloading the right operating system 30
Installing Raspbian 31
Installation complete 34
Windows users 35
Mac and Linux users 36
Summary 37
Chapter 3: Getting Started Part 2 – Setting up Your
Raspberry Pi to Arduino Bridge Shield 39
Raspberry Pi to Arduino bridge shield 39
Checking which version of the Raspberry Pi we have 40
Setting up the Raspberry Pi to Arduino shield and LED 41
Installing the software 42
The Arduino IDE 42
A quick look at the language 43
arduPi – a library for our Raspberry Pi and Arduino shield 45
Installing arduPi 45
Leafpad – a text editor 46
www.it-ebooks.info
Table of Contents
[ iii ]
Blinking LED application 48
A guide to the code 49
Compiling and running our application 50
Summary 51
Chapter 4: Our First Project – A Basic Thermometer 53
Building a thermometer 54
Setting up our hardware 54
An introduction to resistors 55
Thermistor 55
10K Ohm resistor 56
Wires 56
Breadboard 56
Connecting our components 56
Software for our thermometer 58
Geany IDE 58
Installing the IDE 58
An introduction to Makeles 59
Thermometer code 61
Writing our application 61
Compiling and testing 68
What if it doesn't work 69
Up and running 70
Summary 70
Chapter 5: From Thermometer to Thermostat – Building upon
Our First Project 71
Safety rst 72
Introducing the thermostat 72
Setting up our hardware 73
Relays 74
Connecting the relay 74
Setting up our software 75
A program to test the relay 75
Installing screen 77
cURL 79
Thermostat code 79
Testing our thermostat and fan 85
Attaching the fan 86
Starting your thermostat application 86
Debugging problems 87
Summary 87
www.it-ebooks.info
Table of Contents
[ iv ]
Chapter 6: Temperature Storage – Setting up a Database to
Store Your Results 89
SQLite 89
Installing SQLite Version 3.x 90
Creating a database 91
A table to record our temperature 91
A table to record our rooms 92
Writing some SQL 92
Apache web server 94
Setting up a basic web server 94
WSGI 97
Setting up WSGI 98
Creating a Python application to write to our database 100
Conclusion 104
HTSQL 104
Download HTSQL 105
Conguring HTSQL 106
Testing our Arduino shield with our database 108
Summary 109
Chapter 7: Curtain Automation – Open and Close the
Curtains Based on the Ambient Light 111
Photoresistors 112
Motor shield and motors 112
Setting up the photoresistor 112
Wiring up the components 113
Testing the photoresistor with software 114
Debug 117
Setting up the motor shield 117
Wiring up the components 117
Curtain control application 119
Pulse Width Modulation 119
Threads 119
Writing our code 120
Debugging problems 125
Connecting to your blinds/curtains 125
Setting the timing 125
Attaching the hardware 126
Debugging problems 126
Summary 127
www.it-ebooks.info
Table of Contents
[ v ]
Chapter 8: Wrapping up 129
A brief review of what we have learned 130
Next steps 130
Prototyping Pi Plate 131
The wiringPi library 133
The Gertboard 134
Introduction to the Gertboard components 134
GPIO PCB expansion board 135
GPIO Pins 135
Motor controller 136
Open collector driver 136
Buffered I/O 136
Atmel ATmeg chip microcontroller 137
Convertors – analog to digital and digital to analog 137
Writing software for the Gertboard 137
Ideas for next step projects 138
Expanding the curtain automation tool to include temperature sensing 138
Changing the motor on the curtain automation project to a
stepper motor 139
Switching lights on with a photoresistor 139
Holiday lights from LEDs 139
The future of home automation 139
3D printing 139
RFID chips 140
EEG headsets 140
Summary 141
Appendix: References 143
Raspberry Pi 143
Raspberry Pi to Arduino bridge shield 144
Linux 144
Python 145
C/C++ 145
Arduino 145
SQL 146
HTSQL 146
Apache 146
Electronics 147
Packt Publishing titles 147
Home automation technology 147
www.it-ebooks.info
Table of Contents
[ vi ]
3D printing 148
EEG headsets 148
Miscellaneous resources 149
Index 151
www.it-ebooks.info
Preface
The world of home automation is an exciting eld that has exploded over the past
few years with many new technologies in both the commercial and open source
worlds. This book provides a gateway for those interested in learning more about
the topic and building their own projects.
With the introduction of the Raspberry Pi computer in 2012, a small and powerful
tool is now available to the home automation enthusiast, programmer, and electronic
hobbyist that allows them to augment their home with sensors and software.
Combining the Raspberry Pi with the power of the open source Arduino platform,
this book will walk you through several projects for building electronic sensors and
introduce you to software that will record this data for later use.
What this book covers
Chapter 1, An Introduction to the Raspberry Pi, Arduino, and Home Automation, introduces
you to the technologies used in this book and provides a background to the world
of home automation.
Chapter 2, Getting Started Part 1 – Setting up Your Raspberry Pi, teaches you about the
Raspberry Pi and how to set it up, ready to use on your projects.
Chapter 3, Getting Started Part 2 – Setting up Your Raspberry Pi to Arduino Bridge Shield,
provides you with a guide to setting up your Raspberry Pi to Arduino bridge
shield and downloading the necessary libraries.
Chapter 4, Our First Project – A Basic Thermometer, helps you to build a thermometer
and introduces you to a variety of electronic components.
www.it-ebooks.info
Preface
[ 2 ]
Chapter 5, From Thermometer to Thermostat – Building upon Our First Project, expands upon
our Thermometer project, turning it into a working thermostat that can switch relays
on and off.
Chapter 6, Temperature Storage – Setting up a Database to Store Your Results, explores
storing data output from your Thermostat, and then accessing it via a web browser.
Chapter 7, Curtain Automation – Open and Close the Curtains Based on the Ambient Light,
teaches you how to integrate motors into your projects for opening and closing
blinds and curtains, using the skills learned in previous chapters.
Chapter 8, Wrapping up, provides an overview of other technologies you can use in
your project and a look towards the future of home automation.
Appendix, References, lists a collection of links pointing you towards the resources used
in this book and other interesting information.
What you need for this book
For this book, you will need the following components and software:
• A computer running Mac OS X, Windows, or Linux
• A Raspberry Pi computer
• An SD card
• HDMI cable
• Access to an HDMI television or HDMI computer monitor
• A USB keyboard and mouse
• USB power supply for the Raspberry Pi
• Cooking Hacks Raspberry Pi to Arduino bridge shield
• Electronics breadboard
• 10K resistor
• Thermistor
• Photo resistor
• Jumper wires with male connectors
• An LED
• 9V DC motor
• 9V battery with connector for screw terminals
• Arduino Motorshield
• A soldering iron
• A desoldering iron/gun
www.it-ebooks.info
Preface
[ 3 ]
Other software required for the projects in this book will be downloaded from the
Internet with step-by-step instructions in the relevant chapters.
Who this book is for
This book is aimed towards the amateur home automation enthusiast who has
some basic skills in programming and is looking for some simple projects to
get started with. An in-depth knowledge of electronics is not required, and the
book provides a step-by-step guide to setting up components and software in
each chapter.
No prior knowledge of the Linux operating system or the Raspberry Pi is needed,
although exposure to these technologies will certainly be helpful.
Conventions
In this book, you will nd a number of styles of text that distinguish between
different kinds of information. Here are some examples of these styles, and an
explanation of their meaning.
Code words in text are shown as follows: "The previous program contains two
functions, void setup() and void loop()."
A block of code is set as follows:
void setup(void) {
printf("Starting up thermometer \n");
Wire.begin();
}
Any command-line input or output is written as follows:
mkdir arduPi
cd arduPi
New terms and important words are shown in bold. Words that you see on the
screen, in menus or dialog boxes for example, appear in the text like this: "Select
the Accessories option from the menu".
www.it-ebooks.info
Preface
[ 4 ]
Warnings or important notes appear in a box like this.
Tips and tricks appear like this.
Reader feedback
Feedback from our readers is always welcome. Let us know what you think about
this book—what you liked or may have disliked. Reader feedback is important for
us to develop titles that you really get the most out of.
To send us general feedback, simply send an e-mail to ,
and mention the book title via the subject of your message.
If there is a topic that you have expertise in and you are interested in either writing
or contributing to a book, see our author guide on www.packtpub.com/authors.
Customer support
Now that you are the proud owner of a Packt book, we have a number of things to
help you to get the most from your purchase.
Downloading the example code
You can download the example code les for all Packt books you have purchased
from your account at . If you purchased this book
elsewhere, you can visit and register to
have the les e-mailed directly to you.
www.it-ebooks.info
Preface
[ 5 ]
Errata
Although we have taken every care to ensure the accuracy of our content, mistakes
do happen. If you nd a mistake in one of our books—maybe a mistake in the text or
the code—we would be grateful if you would report this to us. By doing so, you can
save other readers from frustration and help us improve subsequent versions of this
book. If you nd any errata, please report them by visiting ktpub.
com/support, selecting your book, clicking on the errata submission form link, and
entering the details of your errata. Once your errata are veried, your submission
will be accepted and the errata will be uploaded on our website, or added to any list
of existing errata, under the Errata section of that title. Any existing errata can be
viewed by selecting your title from />Piracy
Piracy of copyright material on the Internet is an ongoing problem across all media.
At Packt, we take the protection of our copyright and licenses very seriously. If you
come across any illegal copies of our works, in any form, on the Internet, please
provide us with the location address or website name immediately so that we
can pursue a remedy.
Please contact us at with a link to the suspected
pirated material.
We appreciate your help in protecting our authors, and our ability to bring you
valuable content.
Questions
You can contact us at if you are having a problem with
any aspect of the book, and we will do our best to address it.
www.it-ebooks.info
www.it-ebooks.info
An Introduction to the
Raspberry Pi, Arduino, and
Home Automation
This chapter provides an introduction to the Raspberry Pi, Arduino, and the subject
of home automation.
We'll look at the history of the Raspberry Pi and how it came to be, as well as the
Arduino platform – an open source microcontroller that provides developers with a
means to interact with their surroundings, through a variety of sensors and motors.
Finally, we will wrap up the chapter by covering home automation and how
technologies such as the Raspberry Pi have put the ability to build complex
sensor based systems in the hands of the open source community.
Let's start by looking at what we will be covering in the coming chapters.
What we will explore in this book
We have a number of exciting projects ahead that will slowly introduce you to
home automation via the technologies of the Raspberry Pi and Arduino. These
projects include:
• Writing software to control hardware
• Building a thermometer using a thermistor
• Turning the thermometer into a thermostat using relays
• Controlling electric motors using a motor shield
• Writing software for storing sensor data generated by your projects
www.it-ebooks.info
An Introduction to the Raspberry Pi, Arduino, and Home Automation
[ 8 ]
By completing each chapter in the book, you will gain a basic knowledge of building
circuits and hardware for home automation projects. You will learn about writing
software to both control your projects and record the data generated by them.
Finally, we will look towards future projects you can build with your new skills.
Our next step is to learn a little about the background of the technologies we are
going to be using. We will start with the Raspberry Pi.
History and background of the
Raspberry Pi
From the rst vacuum tube computers, to the tape and punch card machines of the
'60s, and the rst microprocessor mainframes of the '70s, computing had very much
been the preserve of large businesses and university research departments. However,
by the late '70s, with the release of the Apple II and earlier seeds planted by such
technology as the TV Typewriter and Apple I, this was rapidly changing.
As the '80s rolled into view, the public saw low-cost home computers such as the ZX
Spectrum and Commodore 64 hit the mass market and subsequently give birth to a
whole generation of amateur programmers. By the '90s, these programmers, brought
up on tinkering with their home computers and writing BASIC, were heading into
academia and the computer industry, and helping to forge the dot.com boom with
game, web, open source, and business technologies.
The genesis of the Raspberry Pi is in many ways linked to this. A group of computer
scientists lead by Eben Upton at the University of Cambridge's Computer Laboratory
in 2006 struck upon the idea of producing a cheap educational micro-computer
geared towards the amateur computer enthusiast, budding students, and children.
The aim was to help to provide the skills to future Computer Science undergraduate
applicants that many of those applying in the '90s possessed, thanks to the home
computers of the '80s.
However it would be another two years before the project became viable, and not
until 2012 before the Raspberry Pi was being shipped out to the public.
The 2000s saw a huge growth in mobile computing technologies, a large segment
of this being driven by the mobile phone industry. By 2005, ARM – a British
manufacturer of CPU core components and a by-product of the '80s home computer
company Acorn, had grown to where 98 percent of mobile phones were using their
technology. This translated into around 1 billion CPU cores. ARM technology would
later end up being featured on the Raspberry Pi with the ARM ARM1176JZF-S
processor core being used.
www.it-ebooks.info
Chapter 1
[ 9 ]
During the same period, Ebon Upton designed several concepts for the Raspberry Pi
and by 2008, thanks to a by-product of the increasing penetration of mobile phone
technology, the cost of building a miniature, portable microcomputer with many of
the multimedia functions that the public were accustomed to was becoming viable.
Thus the Raspberry Pi foundation was formed and set about the task of developing
and manufacturing the Raspberry Pi computer.
By 2011, the rst Alpha models were being produced and tested, and the public
nally got to see what the Raspberry Pi was capable of.
Demos of Quake III Arena and full HD/1080p video showed that the tiny computer
could pack a big punch for low cost.
Finally in 2012, the Raspberry Pi was ready for public consumption. Two versions of
the Raspberry Pi were scheduled to be manufactured, namely models A and B, with
B being released rst.
The model A board which will not include an Ethernet port and will consume
considerably less power than the model B was given a price tag of $25.
The model B that includes an Ethernet port was given a target price of $35 USD
and manufacturing in China started. This would later be moved to the UK with
Sony taking over the process.
After several setbacks, including the wrong Ethernet port being attached to the
early batches and several compliance regulations having to be passed, the Raspberry
Pi was making its way into the hands of tech enthusiasts across the globe to a
great reception.
So what exactly does the Raspberry Pi Model B you're holding include?
Raspberry Pi hardware specications
We will briey go over some of the core components that make up the Raspberry Pi
to give you a better feel for what it is capable of.
The Raspberry Pi is built off the back of the Broadcom BCM2835. The BCM2835 is a
multimedia application processor geared towards mobile and embedded devices.
On top of this, several other components have been included to support USB, RCA,
and SD card storage.
www.it-ebooks.info
An Introduction to the Raspberry Pi, Arduino, and Home Automation
[ 10 ]
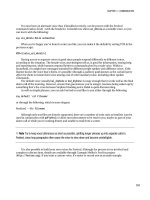
We will now look at some of the core-components of the Raspberry Pi board.
The following gure highlights some of these with a description of each provided:
GPIO Pins
CPU/GPU
SD card
port
Micro
USB
Power
USB
Ethernet
Audio
RCA
HDMI
Dimensions
The Raspberry Pi is a small device coming in at 85.60mm x 53.98mm x 17mm and
weighing only 45g. This makes it perfect for home automation, where a small device
can be placed in a case and mounted inside an electrical box, or replace an existing
thermostat device on a wall.
3.5mm analog audio jack
The 3.5mm analog audio jack allows you to connect headphones and speakers to the
Raspberry Pi. This is especially useful for audio and media player based projects.
Composite RCA port
You are probably familiar with the composite cables used to hook up your DVD
player to the TV. They usually come in the red, white, and yellow plug variety.
The Raspberry Pi has a port for attaching the yellow video cable from your TV
to it, allowing you to use your TV as a monitor.
Two USB 2.0 ports plus one micro USB
USB is one of the most common methods for connecting peripherals and storage
devices to a computer. The Raspberry Pi comes equipped with two of them, allowing
you to hook up a keyboard and mouse when you get started and a micro USB port
for powering your device.
www.it-ebooks.info