HỆ THỐNG CHARGE TRÊN XE TOYOTA
Bạn đang xem bản rút gọn của tài liệu. Xem và tải ngay bản đầy đủ của tài liệu tại đây (849.62 KB, 21 trang )
General
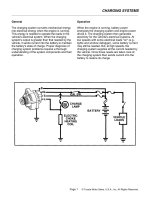
The charging system converts mechanical energy
into electrical energy when the engine is running.
This energy is needed to operate the loads in the
vehicle's electrical system. When the charging
system's output is greater than that needed by the
vehicle, it sends current into the battery to maintain
the battery's state of charge. Proper diagnosis of
charging system problems requires a thorough
understanding of the system components and their
operation.
Operation
When the engine is running, battery power
energizes the charging system and engine power
drives it. The charging system then generates
electricity for the vehicle's electrical systems. At
low speeds with some electrical loads "on" (e.g.,
lights and window defogger), some battery current
may still be needed. But, at high speeds, the
charging system supplies all the current needed by
the vehicle. Once those needs are taken care of,
the charging system then sends current into the
battery to restore its charge.
CHARGING SYSTEMS
Page 1 © Toyota Motor Sales, U.S.A., Inc. All Rights Reserved.
Toyota Charging Systems
Typical charging system components include:
IGNITION SWITCH
When the ignition switch is in the ON position,
battery current energizes the alternator.
ALTERNATOR
Mechanical energy is transferred from the engine
to the alternator by a grooved drive belt on a pulley
arrangement. Through electromagnetic induction,
the alternator changes this mechanical energy into
electrical energy. The alternating current
generated is converted into direct current by the
rectifier, a set of diodes which allow current to
pass in only one direction.
VOLTAGE REGULATOR
Without a regulator, the alternator will always
operate at its highest output. This may damage
certain components and overcharge the battery.
The regulator controls the alternator output to
prevent overcharging or undercharging. On older
models, this is a separate electromechanical
component which uses a coil and contact points to
open and close the circuit to the alternator. On
most models today, this is a built-in electronic
device.
BATTERY
The battery supplies current to energize the
alternator. During charging, the battery changes
electrical energy from the alternator into chemical
energy. The battery's active materials are restored.
The battery also acts as a "shock absorber" or
voltage stabilizer in the system to prevent damage
to sensitive components in the vehicle's electrical
system.
INDICATOR
The charging indicator device most commonly used
on Toyotas is a simple ON/OFF warning lamp. It is
normally off. It lights when the ignition is turned
"on" for a check of the lamp circuit. And, it lights
when the engine is running if the charging system
is undercharging. A voltmeter is used on current
Supra and Celica models to indicate system voltage
it is connected in parallel with the battery. An
ammeter in series with the battery was used on
older Toyotas.
FUSING
A fusible link as well as separate fuses are used
to protect
circuits in the charging system.
CHARGING SYSTEMS
Page 2 © Toyota Motor Sales, U.S.A., Inc. All Rights Reserved.
Alternator Construction
GENERAL
Two different types of alternators are used on
Toyota vehicles. A conventional alternator and
separate voltage regulator were used on all
Toyotas prior to 1979. A new compact, high-speed
alternator with a built-in IC regulator
is now used on most models. Both types of
alternators are rated according to current output.
Typical ratings range from 40 amps to 80 amps.
CONVENTIONAL ALTERNATOR
This type of alternator is currently used on some
1986 Tercel models, and all Toyotas prior to 1979.
CHARGING SYSTEMS
Page 3 © Toyota Motor Sales, U.S.A., Inc. All Rights Reserved.
TOYOTA COMPACT,
HIGH-SPEED ALTERNATOR
Beginning with the 1983 Camry, a compact, high-
speed alternator with a built-in IC regulator is used
on Toyota vehicles. Corolla models with the 4A-C
engine use a different alternator with an integral IC
regulator.
This new alternator is compact and lightweight. It
provides better performance, as well as improved
warning functions. If either the regulator sensor
(terminal "S") or the alternator output (terminal "B")
become disconnected, the warning lamp goes on.
It also provides better serviceability. The rectifier,
brush holder, and IC regulator are bolted onto the
end frame.
CHARGING SYSTEMS
Page 4 © Toyota Motor Sales, U.S.A., Inc. All Rights Reserved.
Alternator Terminals
Toyota's high-speed alternator has the following
terminals: "B", "IG", "S", "U', and "17".
When the ignition switch is "on," battery current is
supplied to the regulator through a wire connected
between the switch and terminal "IG". When the
alternator is charging, the charging current flows
through a large wire connected between terminal
"B" and the battery. At the same time, battery
voltage is monitored for the MIC regulator through
terminal "S". The regulator will increase or
decrease rotor field strength as needed. The
indicator lamp circuit is connected through terminal
"U'. If there is no output, the lamp will be lit. The
rotor field coil is connected to terminal "P, which is
accessible for testing purposes through a hole in
the alternator end frame.
Regulator
While engine speeds and electrical loads change,
the alternator's output must remain even - not too
much, nor too little.
The regulator controls alternator output by
increasing or decreasing the strength of the rotor's
magnetic field. It does so, by controlling the amount
of current from the battery to the rotor's field coil.
The electromechanical regulator does its job with a
magnetic coil and set of contact points. The IC
regulator does its job with diodes, transistors, and
other electronic components.
CHARGING SYSTEMS
Page 5 © Toyota Motor Sales, U.S.A., Inc. All Rights Reserved.
Alternator Operation
GENERAL
The operation of the Toyota compact, high-speed
alternator is shown in the following circuit
diagrams.
IGNITION ON, ENGINE STOPPED
CHARGING SYSTEMS
Page 6 © Toyota Motor Sales, U.S.A., Inc. All Rights Reserved.
CHARGING SYSTEMS
Page 7 © Toyota Motor Sales, U.S.A., Inc. All Rights Reserved.
CHARGING SYSTEMS
Page 8 © Toyota Motor Sales, U.S.A., Inc. All Rights Reserved.
Diagnosis and Testing
The charging system requires periodic inspection
and service. Specific problem symptoms, their
possible cause, and the service required are listed
in the chart below. The service actions require a
thorough visual inspection. Problems identified
must be corrected before proceeding with
electrical tests. These electrical tests include: an
alternator output test, charging circuit voltage-
drop tests, a voltage regulator (non-IC) test,
charging circuit relay (lamp, ignition, engine) tests,
and alternator bench tests.
PRECAUTIONS
• Make sure battery cables are connected to
correct terminals.
• Always disconnect battery cables (negative
first!) when the battery is given a quick charge.
• Never operate an alternator on an open circuit
(battery cables disconnected).
• Always follow specs for engine speed when
grounding terminal "F to bypass the regulator.
High speeds may cause excess output that could
damage components.
• Never ground alternator output terminal "B." It has
battery voltage present at all times, even with the
engine off.
• Do not perform continuity tests with a high-
voltage insulation resistance tester. This type of
ohmmeter could damage the alternator diodes.
CHARGING SYSTEMS
Page 9 © Toyota Motor Sales, U.S.A., Inc. All Rights Reserved.
VISUAL INSPECTION
A visual inspection should always be your first
step in checking the charging system. A number of
problems that would reduce charging performance
can be identified and corrected.
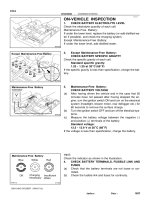
CHECK THE BATTERY
• Check for proper electrolyte level and state of
charge. When fully charged, specific gravity
should be between 1.25 and 1.27 at 80˚F
(26.7˚C).
• Check the battery terminals and cables. The
terminals should be free of corrosion and the
cable connections tight.
CHECK THE FUSES AND FUSIBLE LINK
• Check the fuses for continuity. These include the
Engine fuse (10A), Charge fuse (7.5A), and
Ignition fuse (7.5A).
• Check the fusible link for continuity.
INSPECT THE DRIVE BELT
• Check for belt separation, cracks, fraying, or
glazing. If necessary, replace the drive belt.
• Check the drive belt tension using the proper
tension gauge, Nippondenso BTG-20
Refer to the appropriate repair manual for proper
drive belt tension. "New" belts (used less than 5
minutes on a running engine) are installed with
greater tension than "used" belts. Tension specs
are different for different models.
INSPECT THE ALTERNATOR
• Check the wiring and connections. Replace any
damaged wires, tighten any loose connections.
• Check for abnormal noises. Squealing may
indicate drive belt or bearing problems. Defective
diodes can produce a whine or hissing noise
because of a pulsating magnetic field and
vibration.
CHECK THE WARNING LAMP CIRCUIT
• With the engine warm and all accessories off,
turn the ignition to ON. The warning lamp should
light.
• With the engine started and the ignition in RUN,
the warning lamp should be off.
• If the lamp does not operate as specified, check
the bulb and check the lamp circuit.
CHARGING SYSTEMS
Page 10 © Toyota Motor Sales, U.S.A., Inc. All Rights Reserved.
ALTERNATOR OUTPUT TEST
The alternator output test checks the ability of the
alternator to deliver its rated output of voltage and
current. This test should be performed whenever
an overcharging or undercharging problem is
suspected. Output current and voltage should
meet the specifications of the alternator. If not, the
alternator or regulator (IC or external) may require
replacement.
A Sun VAT-40 tester, similar testers, or a separate
voltmeter and ammeter can be used. Toyota repair
manuals detail the testing procedures with an
ammeter and voltmeter. Follow the manufacturer's
instructions when using special testers, although
most are operated similarly. The following steps
outline a typical procedure for performing the
alternator output test using a Sun VAT-40:
CHARGING SYSTEMS
Page 11 © Toyota Motor Sales, U.S.A., Inc. All Rights Reserved.
Charging Without Load
1. Prepare the tester:
• Rotate the Load Increase control to OFF,
• Check each meter's mechanical zero. Adjust, if
necessary.
• Connect the tester Load Leads to the battery
terminals; RED to positive, BLACK to negative.
• Set Volt Selector to INT 18V.
• Set Test Selector to #2 CHARGING.
• Adjust ammeter to read ZERO using the electrical
Zero Adjust control.
• Connect the clamp-on Amps Pickup around the
battery ground (-) cables.
2. Turn the ignition switch to "ON" (engine not
running) and read the amount of discharge on
the ammeter. This is a base reading for current
the alternator must supply for ignition and
accessories before it can provide current to
charge the battery.
NOTE: The reading should be about six amps.
3. Start the engine and adjust the speed to about
2000 rpm. Some models may require a different
speed setting.
4. After about 3-4 minutes, read the ammeter and
voltmeter. Add this ammeter reading and the
reading found in step 2 (engine not running).
NOTE: The total current should be less than 10
amps. If it is more, the alternator may still be
charging the battery. Once the battery is fully
charged, you should get specified results.
The voltage should be within the specs for the
alternator. This is usually between 13 and 15 volts.
Refer to the appropriate repair manual. If the
voltage is more than specified, replace the
regulator. If the voltage is less than specified,
ground the alternator field terminal "F" and check
the voltmeter reading. This bypasses the regulator,
so do not exceed the specified test speed. If the
reading is still less than specified, check the
alternator.
5. Remove ground from terminal "F."
Charging With Load
6. With the engine running at specified speed,
adjust the Load Increase control to obtain the
highest ammeter reading possible without
causing the voltage to drop lower than 12 volts.
7. Read the ammeter.
NOTE: The reading should be within 10% of the
alternator's rated output. If it is less, the alternator
requires further testing or replacement.
CHARGING SYSTEMS
Page 12 © Toyota Motor Sales, U.S.A., Inc. All Rights Reserved.
CHARGING SYSTEMS
Page 13 © Toyota Motor Sales, U.S.A., Inc. All Rights Reserved.
VOLTAGE-DROP TESTS
Voltage-drop testing can detect excessive
resistance in the charging system. These tests
determine the voltage drop in the alternator output
circuit. Both sides of the circuit should be checked
insulated side as well as ground side.
Excessive voltage drop caused by high resistance
in either of these circuits will reduce the available
charging current. Under heavy electrical loads, the
battery will discharge.
A Sun VAT-40 tester or a separate voltmeter can
be used. The following steps outline a typical
procedure for performing voltage-drop tests using
a voltmeter:
Output Circuit - Insulated Side
1. Connect the voltmeter positive lead to the
alternator's output terminal "B" and the
voltmeter's negative lead to the battery's
positive (+) terminal.
2. Start the engine and adjust the speed to
approximately 2000 rpm.
3. Read the voltmeter. The voltage drop should be
less than 0.2 volt. If it is more, locate and correct
the cause of the high resistance.
Output Circuit - Ground Side
1. Connect the voltmeter's negative lead to the
alternator's frame and the voltmeter's positive
lead to the battery's negative (-) terminal.
2. Start the engine and run at specified speed
(about 2000 rpm).
3. Read the voltmeter. The voltage drop should be
0.2 volt or less. If it is more, locate and correct
the cause of high resistance. Excessive
resistance is most likely caused by loose or
corroded connections.
CHARGING SYSTEMS
Page 14 © Toyota Motor Sales, U.S.A., Inc. All Rights Reserved.
CHARGING CIRCUIT RELAY TESTS
Various charging system layouts are used on
Toyota vehicles. The indicator lamp circuit may or
may not be controlled by a relay. Depending on the
model, when a relay is used, it may be a separate
lamp relay, the ignition main relay, or the engine
main relay. Each is checked using an ohmmeter.
Charge Lamp Relay
When used, the charge lamp relay is located on
the right cowl side of the vehicle. The following
steps are used to check this relay:
1. Check relay continuity.
• Connect the ohmmeter positive (+) lead to
terminal "4," the negative (-) lead to terminal "3."
Continuity (no resistance) should be indicated.
• Reverse the polarity of the ohmmeter leads. No
continuity (infinite resistance) should be indicated.
• Connect the ohmmeter leads between terminals 1
and "2." No continuity (infinite resistance) should
be indicated.
If the relay continuity is not as specified, replace
the relay.
2. Check relay operation.
• Apply battery voltage across terminals "3" and
"4."
NOTE: Make sure polarity is as shown.
• Connect the ohmmeter leads between terminals
“1” and "2." Continuity (no resistance) should be
indicated.
If relay operation is not as specified, replace the
relay.
CHARGING SYSTEMS
Page 15 © Toyota Motor Sales, U.S.A., Inc. All Rights Reserved.
Ignition Main Relay
The ignition main relay is located in the relay box
under the instrument panel. The following steps
are used to check this relay:
1. Check relay continuity.
• Connect the ohmmeter leads between terminals
“1” and "3." Continuity (no resistance) should be
indicated.
• Connect the ohmmeter leads between terminals
"2" and "4." No continuity (infinite resistance)
should be indicated.
If relay continuity is not as specified, replace the
relay.
2. Check relay operation.
• Apply battery voltage across terminals "l " and
"3."
• Connect the ohmmeter leads between terminals
"2" and 'A." Continuity (no resistance) should be
indicated.
If relay operation is not as specified, replace the
relay.
CHARGING SYSTEMS
Page 16 © Toyota Motor Sales, U.S.A., Inc. All Rights Reserved.
ALTERNATOR BENCH TESTS
If the on-vehicle checks have indicated that the
alternator is defective, it should be removed for
bench testing and replacement. Specific
procedures for removal, disassembly, inspection,
and assembly are noted in the appropriate repair
manuals. Only the electrical bench tests are
covered here.
• Always disconnect the battery ground (-) cable
before removing the alternator.
• Refer to the appropriate repair manual for test
specifications.
An ohmmeter is used for electrical bench tests on
the rotor, stator, and diode rectifier. The following
steps are typical:
Rotor Tests
• Check the rotor for an open circuit by measuring
for resistance between the slip rings. Some
resistance (less than 5 ohms) indicates
continuity. If there is no continuity (infinite
resistance), replace the rotor.
• Check the rotor for grounded circuits by
measuring for resistance between the rotor and
slip ring. Any amount of resistance indicates a
ground (continuity). The resistance should be
infinite ( 0 ohms ). If not, replace the rotor.
CHARGING SYSTEMS
Page 17 © Toyota Motor Sales, U.S.A., Inc. All Rights Reserved.
Diode Tests
Diodes can be checked with the alternator on the
vehicle using a scope. Scope testing can identify
open or shorted diodes, as well as problems in the
stator coils.
The scope patterns shown below include:
a) Normal alternator output;
b) one diode short-circuited;
c) two diodes of the same polarity short-circuited;
d) one diode open;
e) two diodes open;
f) one phase of the stator coil short-circuited;
g) one phase of the stator coil disconnected; and,
h) two phases of the stator coil short-circuited.
CHARGING SYSTEMS
Page 18 © Toyota Motor Sales, U.S.A., Inc. All Rights Reserved.
CHARGING SYSTEMS
Page 19 © Toyota Motor Sales, U.S.A., Inc. All Rights Reserved.
This brief self-test will help you measure your
understanding of The Charging System. The style
is the same as that used for A.S.E. certification
tests. Each incomplete statement or question is
followed by four suggested completions or
answers. In each case, select the one that best
completes the sentence or answers the question.
1. A regulator controls alternator output voltage by
regulating:
A. sine-wave voltage
B. battery voltage
C. field current
D. output current
2. In an alternator, alternating current is converted
to direct current by the:
A. stator
B. brushes
C. rectifier
D. regulator
3. If the charging system indicator lamp goes on
with the engine running, the cause may be loss
of voltage at terminal:
A. "IG"
B. "S"
C. "L"
D. "F
4. With the engine not running and the ignition ON,
the charge lamp should light. If it doesn't, this
may indicate a:
A. burned out bulb
B. grounded bulb
C. loose drive belt
D. overcharged battery
5. Which alternator terminal can be grounded for
test purposes?
A. "B"
B. "IG"
C. “S"
D. "F
6. When performing a visual inspection of the
charging system, the alternator drive belt should
be checked for proper tension.
Technician "A" says that new-belt tension
specs are higher than those for used belts.
Technician "B" says that the belt tension is
different for different Toyota models.
Who is right?
A. Only A
B. Only B
C. Both A and B
D. Neither A nor B
7. The amount of current the alternator must supply
or ignition and accessories is about:
A. four amps
B. six amps
C. eight amps
D. ten amps
8. In an alternator output test under load, the output
should be:
A. about 10 amps
B. about 30 amps
C. within 10% of rated output
D. within 20% of rated output
9. To check for excessive voltage drop on the
insulated side of the alternator's output circuit,
you would connect a voltmeter between the:
A. battery terminal and ignition switch
B. battery terminal and ground
C. battery terminal and alternator "S" terminal
D. battery terminal and alternator "B" terminal
10. High resistance in an alternator output circuit is
often caused by:
A. a discharged battery
B. a shorted diode
C. loose or corroded connections
D. a bad regulator
CHARGING SYSTEMS
Page 20 © Toyota Motor Sales, U.S.A., Inc. All Rights Reserved.
SELF-TEST ANSWERS
For the preceding self-test on The Charging
System, the following best complete the
sentence or answer the question. In cases where
you may disagree with the choice - or may simply
want to reinforce your understanding - please
review the appropriate workbook page or pages
noted.
1 . "C" - The regulator controls alternator output by
increasing or decreasing the amount of current
from the battery to the rotor field coil. (Page 5.)
2. "C" - The alternating current is changed into
direct current by the rectifier, a set of diodes
which allow current to pass in only one
direction. (Page 2.)
3. "B" - If either the regulator sensor (terminal "S")
or the alternator output (terminal "B") become
disconnected, the warning lamp goes on. (Page
4.)
4. "A" - If the warning lamp does not light, with the
ignition ON and the engine not running, the
possible causes include a blown fuse, burned
out lamp, loose connections, or faulty relay or
regulator. (Page 9.)
5. "D" - Terminal "F is the only terminal that can be
grounded. Never ground alternator output
terminal "B. It has battery voltage present at all
times, even with the engine off. (Page 9.)
6. "C" - A "new belt" is one that has been used for
less than 5 minutes. It is installed with more
tension than a used belt, because it will stretch
some during use. Methods of checking are
different for different models. (Page 10.)
7. "B" -The reading should be about six amps. This
is the amount of current the alternator must
supply for ignition and accessories. (Page 12.)
8. "C" - With the alternator operating at maximum
output, the reading should be within 10% of
rated output. (Page 12.)
9. "ID" - To check for the insulated circuit voltage
drop, connect the voltmeter leads to the
battery's (+) terminal and the alternator output
(B) terminal. (Page 14.)
10. "C" - Excessive resistance is most likely
caused by loose or corroded connections.
(Page 14.)
CHARGING SYSTEMS
Page 21 © Toyota Motor Sales, U.S.A., Inc. All Rights Reserved.
Taken with permission from the
Toyota Basic Electrical Course#622,