gene probes, principles and protocols
Bạn đang xem bản rút gọn của tài liệu. Xem và tải ngay bản đầy đủ của tài liệu tại đây (2.93 MB, 247 trang )
Methods in Molecular Biology
TM
HUMANA PRESS
HUMANA PRESS
Methods in Molecular Biology
TM
Gene Probes
Edited by
Marilena Aquino de Muro
Ralph Rapley
VOLUME 179
Principles and Protocols
Gene Probes
Edited by
Marilena Aquino de Muro
Ralph Rapley
Principles and Protocols
Target Format and Hybridization Conditions 1
1
Target Format and Hybridization Conditions
Alex Reid
1. Southern Blotting
1.1. Introduction
The isolation of specific regions within the genome of an organism is now
normally accomplished by polymerase chain reaction (PCR) amplification
using primers specific for the region in question. However, there are occasions
where this is not possible (loss of primer sites resulting in no amplification or if
there are no primers available). In these cases the detection of the sequence of
interest can be achieved by hybridization of a labeled probe to restricted
genomic DNA immobilized on a membrane by Southern blotting (1). Genomic
DNA is first digested by one or more restriction enzymes and the fragments
generated separated by gel electrophoresis. The amount of DNA to be applied
to the gel varies from application to application. In general 10 µg of human
genomic DNA is needed for the detection of a single copy gene when using
radioactively labeled probes and an overnight exposure to X-ray film. This
figure can be reduced if the target is either a repetitive element (e.g., ribosomal
DNA) or, if plasmid DNA or PCR products are run on the gel. Once the frag-
ments are separated on the gel the DNA is then denatured in situ and trans-
ferred by capillary transfer to either a nitrocellulose or nylon membrane. The
DNA fragments are then bound to the membrane, which can then be used in a
hybridization reaction.
1.2. Materials
1.2.1. Specific Materials
1. 3MM filter paper (Whatman), paper towels, glass or plastic tray and support (a
gel casting tray turned upside down), cling film.
1
From: Methods in Molecular Biology, vol. 179: Gene Probes: Principles and Protocols
Edited by: M. Aquino de Muro and R. Rapley © Humana Press Inc., Totowa, NJ
2 Reid
2. Hybond N membrane (Amersham Pharmacia Biotech).
3. Denaturing solution: 1.5 M NaCl, 0.5 M NaOH.
4. Neutralizing solution: 1.5 M NaCl, 0.5 M Tris-HCl, pH 7.2, 0.001 M EDTA.
5. 20× Saline sodium citrate (SSC): 3 M NaCl, 0.3 M Na
3
citrate.
6. UV transilluminator.
7. 100× Denhardt’s solution: 10 g of bovine serum albumin (BSA) fraction V, 10 g
of Ficoll 400, 10 g of polyvinylpyrrolidone (PVP) in 500 mL of distilled water.
Store at –20°C in 10 mL aliquots.
8. 10% (w/v) Sodium dodecyl sulfate (SDS).
9. 10 mg/mL sheared herring testis DNA. Store at –20°C.
1.2.2. Optional Materials
1. 0.25 M HCl.
2. 0.4 M NaOH and a solution of 0.1× SSC, 0.1% (w/v) SDS, and 0.2 M Tris-HCl,
pH 7.5.
3. Oven set at 80°C.
4. Vacuum blotting system (VacuGene system from Amersham Pharmacia
Biotech).
1.3. Method
1.3.1. Preparation of the Gel for Transfer
1. Electrophorese samples in an agarose gel (see Note 1) and transfer the gel to a
glass or plastic tray slightly larger than the gel.
2. If the fragments for analysis are large (>10 kb) the efficiency of transfer can be
increased by depurinating the DNA. Add 0.25 M HCl to the tray containing the
gel until the gel is just covered (see Note 2). Place on a rocking platform or
orbital shaker and agitate gently for 15–25 min at room temperature.
3. Remove the 0.25 M HCl, rinse the gel with distilled water and cover with dena-
turing solution. Return the tray to the rocker and shake for 30 min at room tem-
perature (or 15 min after the dye has returned to blue).
4. Remove the denaturing solution, rinse the gel with distilled water and cover with
neutralizing solution. Shake for 15 min at room temperature.
5. Repeat with fresh neutralizing solution.
6. Set up the capillary blot.
1.3.2. Setting Up the Capillary Blot
1. Half fill a glass or plastic tray of a suitable size with 20× SSC (see Note 3). Place
a support in the tray (the upturned casting tray in which the gel was cast). Cover
the support with a wick made from three sheets of 3MM paper. Allow the 20×
SSC to wet the wick and ensure there are no air bubbles trapped between the
sheets and the support (see Note 4).
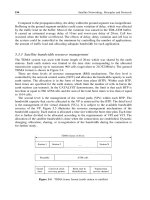
2. Carefully place the treated gel on the wick ensuring there are no air bubbles
Target Format and Hybridization Conditions 3
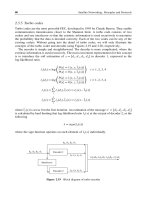
between the wick and the gel. Surround the gel with cling film (Fig. 1) to ensure
that transfer occurs through the gel and not around the sides.
3. Place the membrane onto the gel (see Note 5).
4. Wet two sheets of 3MM paper cut slightly larger than the membrane with 2× SSC
and place these (one at a time) on top of the membrane ensuring there are no
bubbles.
5. Place a dry sheet of 3MM paper on top of the wet ones. Repeat with another sheet
of 3MM paper.
6. Place a stack of paper towels 5–10 cm high on top of the 3MM paper and cover
with a glass plate. Put a 500-g weight on top of the glass plate.
7. Allow transfer to proceed for several hours (preferably overnight).
8. After blotting carefully dismantle the stack of paper towels, 3MM sheets, etc. to
expose the membrane. Before removing the membrane mark the edges of the gel
with a pencil (if desired the wells can also be marked).
9. Remove the membrane and rinse carefully in 2× SSC to remove any adhering
pieces of agarose.
10. Air-dry the membrane on a sheet of 3MM paper.
11. Fix the DNA to the membrane either by baking at 80°C for 2 h or by wrapping the
membrane in cling film and placing DNA side down on a UV transilluminator for
2–5 min (see Note 6).
1.4. Optional Methods for DNA Transfer
1.4.1. Bidirectional Transfer to Two Membranes
If required the DNA in a gel can simultaneously be transferred to two mem-
branes using the method of Smith and Summer (2). This method is of benefit if
many probes need to be hybridized to the DNA in a short space of time.
Figure 1. Schematic of a capillary Southern blot.
4 Reid
1. Prepare the gel for transfer as outlined in Subheading 1.3.
2. After the final neutralization step cover the gel in 10× SSC and shake for 30 min.
3. Wet two sheets of 3MM paper in 2× SSC. Place one on a flat clean surface.
4. Place a nylon membrane on top of the sheet of 3MM paper, ensuring there are no
air bubbles between the 3MM and the membrane.
5. Carefully place the gel on top of the membrane. Do not move the gel once it is in
contact with the membrane as transfer will start immediately.
6. Place the second membrane on top of the gel followed by the second wet sheet of
3MM paper, again making sure there are no air bubbles.
7. Pick up the “gel sandwich” and place onto a stack of paper towels. Cover the top
with a similar stack of towels. Place a sheet of glass on the top and weigh down as
before.
8. Allow transfer to proceed as before.
1.4.2. Vacuum Blotting
There are a number of alternative methods for DNA transfer from agarose
gels to membranes. One of the best of these in terms of simplicity and speed is
vacuum blotting. Here the DNA is literally sucked out of the gel onto the mem-
brane and the entire process can be carried out between 20 and 60 min. Using a
vacuum blotting system several gels can be blotted in a single day. The system
used in our laboratory is the VacuGene XL available from Amersham
Pharmacia Biotech.
1. Set up the vacuum blot apparatus ensuring there is a liquid trap between the pump
and the blotter.
2. Prewet the support screen with distilled water and place shiny side up in the
blotter.
3. Place a plastic mask on the support screen with a precut hole slightly smaller than
the gel to be blotted.
4. Position the membrane over the hole in the mask, ensuring there are no air bubbles
between the membrane and the support screen.
5. Carefully place the gel on top of the membrane, ensuring that there are no air
bubbles between the gel and the membrane and that the edges of the gel protrude
over the hole in the plastic mask.
6. Clamp the top of the blotting apparatus to the lower part containing the gel.
7. Switch on the vacuum pump and pour 0.25 M HCl into the apparatus so that it
covers the gel. Stabilize the vacuum at 50 mbar and leave for 4 min.
8. Remove the 0.25 M HCl by tilting the apparatus and sucking off the solution.
This can be achieved by having a “T” connector between the liquid trap and the
blotter, which can be opened and closed by means of a clip. Residual solutions
can be removed from the gel surface by wiping with a gloved finger or a dispos-
able pipet.
9. Pour in the denaturing solution until it covers the gel and leave for 3 min. Remove
as before.
Target Format and Hybridization Conditions 5
10. Cover the gel with neutralizing solution (1.0 M Tris-HCl, pH 5.0, 1.5 M NaCl,
0.001 M EDTA), leave for 3 min, and remove.
11. Cover the gel with 20× SSC and leave for 20–60 min (see Note 7). Make sure the
gel remains immersed during transfer.
12. Remove the 20× SSC and with the vacuum still applied peel the gel off the mem-
brane. Switch off the vacuum and remove the filter. Treat as before.
1.5. Hybridization Conditions
There are many different hybridization solutions in the literature. The one
detailed here is simple to make and gives low background with the Hybond N
nylon membranes. The hybridization can be carried out in either heat sealed
plastic bags that can withstand the necessary temperatures or in plastic boxes
with sealable lids.
1. Make up a prehybidization solution that contains final concentrations of 5× SSC,
5× Denhardt’s solution, and 0.5% SDS. Allow 125 µL of solution per cm
2
of
membrane. Place the prehybridization solution in a 50-mL tube and place in a
65°C water bath.
2. Boil enough herring testis DNA to give a final concentration of 100 µg/mL for 5
min and snap cool on ice. Add to the prehybridization solution.
3. Prewet the membrane to be hybridized in 5× SSC and place in an opened out
plastic bag (see Note 8). Close the bag over the filter and heat seal around the
edges as close to the gel as possible leaving the top open.
4. Pour in the prehybridization solution, squeeze out as much air as possible, and
seal the top of the bag with a heat sealer.
5. Place the bag between two sheets of glass and place in a shaking 65°C water bath.
Incubate for at least 30 min.
6. Denature the labeled probe by boiling for 5 min and snap cooling on ice. Cut one
corner off the hybridization bag and pipet the probe into the prehybridization
solution. Reseal the bag and incubate at 65°C in a shaking water bath overnight.
7. Prepare wash solutions (1–5 mL/cm
2
membrane) and preheat to 65°C.
8. At the end of the hybridization carefully cut one corner off the bag and pour the
hybridization solution into suitable container for disposal. Open the bag and
remove the membrane and place in a sealable plastic box.
9. Wash the membrane by incubating at 65°C in a shaking water bath in the follow-
ing solutions: 2× SSC, 0.1% SDS for 5 min (repeat), 1× SSC, 0.1% SDS for 15
min, 0.1× SSC, 0.1% SDS for 10 min (repeat) (see Note 9).
10. Remove the membrane from the last wash solution and drain the excess liquid
off. Wrap in cling film and expose to X-ray film (see Note 10). If the membrane
is to be reprobed it must be kept moist.
1.6. Probe Removal from Nylon Membranes
If the membrane needs to be hybridized with more than one probe the old
probe can be removed from nylon membranes (providing they have not dried
out) using the following procedure.
6 Reid
1. Place the membrane in a sealable plastic box. Cover the membrane with 0.4 M
NaOH and incubate at 45°C for 30 mins in a shaking water bath.
2. Pour off the NaOH solution and cover the membrane with 0.1× SSC, 0.1% SDS,
0.2 M Tris-HCl, pH 7.5. Incubate at 45°C for 15 min in a shaking water bath.
3. Wrap the membrane in cling film and expose to X-ray film to ensure the old
probe has been removed.
4. Filters can be stored wrapped in cling film at –20°C indefinitely.
1.7. Notes
1. For genomic DNA transfer use agarose (type I; low EEO from Sigma) as this
allows good transfer of the DNA out of the gel and is fairly cheap.
2. When the samples are loaded on the gel use a loading buffer containing 0.25%
(w/v) bromophenol blue. The depurination step can be monitored by the change
in color of the dye from blue to yellow. Once the dye has changed color leave the
gel for an additional 10 min.
3. An alternative transfer buffer is 20× SSPE: 3.6 M NaCl, 0.2 M sodium phosphate,
0.02 M EDTA, pH 7.7. However, 20× SSC is cheaper.
4. Air bubbles are easily removed by rolling a disposable pipet gently over the sur-
face. This method can be used at all stages of set up.
5. Small DNA fragments will start to transfer to the membrane immediately on con-
tact. Therefore, do not move the membrane once it establishes contact with the
gel. Nylon membranes do not require pre wetting before application to the gel. If
a nitrocellulose membrane is to be used float the membrane on the surface of a
tray filled with distilled water until it is completely wet. Carefully immerse the
membrane and leave for 5 min.
6. The optimum exposure time varies between transilluminators and can also change
with the age of the UV bulbs. To calibrate the transilluminator run a gel contain-
ing six lanes with 50 pg of λ DNA digested with HindIII in each lane. Blot the
DNA onto a membrane and cut the filter into six strips. Expose each strip for
varying lengths of time ranging from 30 s to 10 min. Hybridize these blots to λ
DNA and expose to X-ray film. The optimum exposure time can be determined
by the strip which gives the strongest signal.
7. Transfer times vary depending on the thickness and concentration of the gel, the
size of the fragments to be transferred, and the level of vacuum applied.
8. Several membranes can be hybridized in the same bag with little loss of signal.
9. If a radioactive probe is used the progress of the washes can be monitored using
a hand held counter. The membrane is ready for autoradiography when the counts
fall to near background on areas of the membrane containing no DNA. If in doubt
stop the washes early and expose to X-ray film. It is always possible to wash the
membrane further if the signal is too strong.
10. Exposure time vary depending on the amount of DNA run on the gel, the specific
activity and nature of the probe. A probe hybridizing to a single copy sequence
will require longer exposure time than one for a repetitive element. The optimum
exposure time will need to be determined for each experiment. In general, an
Target Format and Hybridization Conditions 7
overnight exposure should suffice for most applications. Exposure times can be
shortened by preflashing the X-ray film. To do this mount a flash gun on a sup-
port about 50 cm above the bench in the darkroom. Cover the lens of the flash
gun with several layers of paper to reduce the amount of light emitted. Take a
piece of X-ray film and place below the flash gun. Cover four fifths of the film
with a sheet of card and fire the flash gun. Move the sheet of card so that three fifths
of the film is exposed and fire the flash gun again. Repeat until the entire film is
exposed. Develop the film to determine the optimum flash time for the film/flash gun
combination. The required exposure does not alter the background of the film
whereas the next exposure does. Flashing the X-ray film in this way presensitizes
the film, thus reducing exposure times.
2. Slot/Dot Blots
2.1. Introduction
If large numbers of samples need to by hybridized to a probe that yields a
positive/negative result (such as species specific clones), this can be achieved
by dot or slot blotting. Using this technique DNA is applied directly to a mem-
brane and therefore no gel electrophoresis is required. Commercial manifolds
are available which can be attached to a vacuum source where the DNA is
applied to wells from which it is sucked onto the membrane in an ordered
array. Alternatively, the DNA can be pipetted directly onto the membrane using
a micropipet.
2.2. Materials
2.2.1. Specific Materials
1. 3MM filter paper (Whatman).
2. Hybond N membrane (Amersham Pharmacia Biotech).
3. Denaturing solution: 1.5 M NaCl, 0.5 M NaOH.
4. Neutralizing solution: 1.5 M NaCl, 0.5 M Tris-HCl, pH 7.2, 0.001 M EDTA.
5. 20× SSC: 3 M NaCl, 0.3 M Na
3
citrate.
6. UV transilluminator.
2.2.2. Optional Materials
1. Commercial dot/slot blot apparatus and vacuum source (e.g., Minifold Slotblotter
or Dotblotter by Schleicher & Schuell UK Ltd).
2.3. Method
1. Heat DNA samples to 95°C and snap-chill on ice. Add an equal volume of 20×
SSC.
2. Place a membrane on top of a sheet of 3MM paper.
3. Spot the samples onto the membrane prewetted in 10× SSC in 2-µL aliquots
8 Reid
allowing to dry between applications. Take care not to allow sample spots to
merge into each other. If a dot blot apparatus is used turn on the vacuum source
and pipet the samples into the wells of the apparatus.
4. Immerse the membrane in denaturing solution for 5 min.
5. Transfer to neutralizing solution for 1 min.
6. Dry and fix the DNA to the membrane as for Southern blots.
7. Hybridize to a labeled probe as for Southern blots.
3. Colony Blots
3.1. Introduction
Isolation of specific sequences from DNA libraries cloned in either bacte-
riophage or plasmids can be achieved by plating the library out on agar plates
and taking colony lifts from the agar plates. The membranes can then by used
in a hybridization reaction using a suitable probe.
3.2. Materials
3.2.1. Specific Materials
1. Hybond N nylon membranes (Amersham Pharmacia Biotech) of the desired
diameter (slightly less the diameter of the agar plates the colonies are grown on).
2. 3MM filter paper (Whatman).
3. Sterile needle and blunt-ended forceps.
4. Denaturing solution: 1.5 M NaCl, 0.5 M NaOH.
5. Neutralizing solution: 1.5 M NaCl, 0.5 M Tris-HCl, pH 7.2, 0.001 M EDTA.
6. 20× SSC: 3 M NaCl, 0.3 M Na
3
citrate.
7. UV transilluminator.
3.2.2. Optional Materials
1. 10% (w/v) SDS.
2. Oven set at 80°C.
3.3. Method
1. Plate out the bacterial cells or bacteriophage on agar plates and incubate over-
night (see Note 1). Cool to 4°C for at least 30 min.
2. Bend the membrane into a U shape. Place the bottom of the U in contact with the
surface of the agar plate and gently fold down so the entire membrane is in con-
tact with the agar plate. Do not move the filter once it is in contact with the
surface of the plate as this will result in smearing.
3. Mark the orientation of the membrane with respect to the plate by making three
asymmetric holes with a sterile needle. These can be used for orientation of the
filter after hybridization.
4. Remove the membrane after 30–60 s with a pair of blunt-ended forceps.
Target Format and Hybridization Conditions 9
5. Place the membrane face up on a sheet of 3MM paper.
6. A repeat lift can be made from the plate if desired.
7. Once all of the plates have been blotted the DNA is liberated from the colonies
by placing the membranes colony side uppermost up on a stack of 3MM paper
saturated with denaturing solution (see Note 2). Leave for 2–5 min.
8. Transfer the membranes (colony side up) to a stack of 3MM paper soaked in
neutralizing solution for 3 min.
9. Wash the membranes in 2x SSC with agitation for 2 min to remove cell debris.
10. Place the membranes DNA side up on a pad of dry 3MM paper and allow to dry.
11. Crosslink the DNA to the membrane and hybridize as for Southern blots.
3.4. Notes
1. The colonies should not be allowed to grow too large as they may merge into one
another. Aim for a colony density of approx 200 per 83-mm diameter plate. Pre-
cooling the plates to 4°C prevents the colonies from smearing when blotted and
lowers the amount of agar that adheres to the membrane.
2. The stack of 3MM paper should be moist, but not soaking as this will cause the
colonies to diffuse. An optional lysis step can be included before denaturing the
DNA by placing the filters on a stack of 3MM paper soaked in 10% SDS for 1–3
min.
4. Northern Blots
4.1. Introduction
RNA must be run on agarose gels under denaturing conditions. Two com-
mon methods can be used to achieve this. The glyoxal–dimethyl sulfoxide
(DMSO) method and the formaldehyde/formamide method. The latter method
is slightly easier and is described here. When working with RNA all glassware
should be baked at 180°C overnight and all solutions made up containing 0.2%
(v/v) diethylpyrocarbonate (DEPC) and then autoclaved to remove contami-
nating RNAases. It should be noted that Tris solutions cannot be DEPC-treated
and that Tris stock solutions should be made up with DEPC treated water. The
Tris stock for RNA work should be taken from a separate container from nor-
mal laboratory stocks and should be weighed out only by shaking the Tris out
of the container (never use a spatula).
4.2. Specific Materials
1. DEPC for treating all solutions to be used. Caution: DEPC is a very dangerous
substance and care must be exercised when handling it. Once autoclaved there is
no further hazard.
2. 10× MOPS buffer: 0.2 M 3-[N-Morpholino] propanesulfonic acid, 0.5 M Na
acetate, pH 7.0; 0.01 M EDTA.
3. Formaldehyde: 37% Solution, 12.3 M, pH >4.0.
10 Reid
4. Formamide (deionized).
5. 3MM filter paper (Whatman), paper towels, glass or plastic tray and support (a
gel casting tray turned upside down), cling film.
6. Hybond N membrane (Amersham Pharmacia Biotech).
7. Denaturing solution: 1.5 M NaCl, 0.5 M NaOH.
8. Neutralizing solution: 1.5 M NaCl, 0.5 M Tris-HCl, pH 7.2, 0.001 M EDTA.
9. 20× SSC: 3 M NaCl, 0.3 M Na
3
citrate.
10. UV transilluminator.
11. 100× Denhardt’s solution: 10 g of BSA fraction V, 10 g of Ficoll 400, 10 g of
PVP in 500 mL of distilled water. Store at –20°C in 10 mL aliquots.
12. 10% (w/v) SDS.
13. 10 mg/mL sheared herring testis DNA. Store at –20°C.
4.3. Method
1. Prepare the Northern gel by dissolving 3 g of agarose in 250 mL of DEPC treated
water. Cool to 55°C and add 17.5 mL formaldehyde and 30 mL 10× MOPS buffer
(both preheated to 55°C. Cast the gel in an appropriately sized tray in a fume
hood.
2. Before loading the samples prerun the gel at 5 V/cm for 5 min in 1× MOPS
buffer.
3. Prepare the RNA samples (see Note 1) for electrophoresis by adding the follow-
ing to the RNA sample: 5.5 µL of formaldehyde, 15 µL of formamide, 1.5 µL of
10× MOPS buffer and distilled water to a final volume of 30 µL.
4. Denature the sample at 55°C for 15 min and add 3 µL of loading buffer (50%
glycerol, 0.25% bromophenol blue in DEPC-treated water). Load onto gel and
run (see Note 2).
5. Place the gel in a tray and cover with DEPC-treated distilled water. Incubate with
gentle agitation for 15 min.
6. Remove the water and replace with 10× SSC and shake for 15 min; repeat once.
7. Set up the capillary blot as described for Southern blotting.
8. After transfer is complete dismantle the Northern blot, remove the filter and air-
dry. Do not rinse the filter as for Southern blots. Fix the RNA to the membrane by
UV crosslinking or baking at 80°C as for Southern blots.
9. Hybridize membrane using the same conditions as for Southern blots.
4.4. Notes
1. The success of any experiments involving RNA depends on the quality of the
RNA! The most reliable method to extract RNA from tissue samples is to use a
commercially available kit.
2. If possible, recirculate the running buffer.
Target Format and Hybridization Conditions 11
References
1. Southern, E. M. (1975) Detection of specific sequences among DNA fragments
separated by gel electrophoresis. J. Mol. Biol. 98, 503–517.
2. Smith, G. E. and Summers, M. D. (1980) The bidirectional transfer of DNA and
RNA to nitrocellulose or diazobenzyloxymethyl-paper. Ann. Biochem. 109,
123–132.
End Labeling Procedures 13
13
From: Methods in Molecular Biology, vol. 179: Gene Probes: Principles and Protocols
Edited by: M. Aquino de Muro and R. Rapley © Humana Press Inc., Totowa, NJ
2
End Labeling Procedures
An Overview
Elena Hilario
1. Introduction
The purpose of this chapter is to give an overview of the different end label-
ing procedures. These protocols have been standardized and optimized by sev-
eral biotechnology companies and are available in kits. Unless your laboratory
is involved in producing large quantities of many different probes (e.g., micro-
grams of each probe), it is unpractical, and perhaps more expensive, to set up
your own protocol. However, a good understanding of the type of probe, the
location of the label (3'-, 5'-end or distributed all along the molecule), and the
number of labeled nucleotides incorporated should be considered when plan-
ning an experiment.
2. Label Location
2.1. 3'-End Labeling
The efficiency of labeling the 3'-end of a DNA molecule depends on the
type of enzyme used, the type of DNA molecule (single- or double-stranded),
and the length of the 3'-end (recessed, blunt end, or protruding).
DNA polymerase I Klenow fragment (exo
-
) fills in the 3'-recessed ends of
restriction fragments in the presence of radiolabeled nucleotides (1). The num-
ber of labeled molecules will depend on the type of labeled nucleotide added
and the sequence of the complementary strand. Blunt end fragments can also
be labeled by replacing the unlabeled 3'-end nucleotide by a labeled molecule.
14 Hilario
Klenow fragment does not label 3'-protruding ends efficiently. Labeling with
Klenow fragment is an appropriate method for producing DNA size markers.
Bacteriophage T4 DNA polymerase synthesizes DNA on a 5'–3' direction.
The enzyme also has exonuclease activity 3'–5' but not on the 5'–3' direction.
Two steps are involved in labeling probes with bacteriophage T4 DNA poly-
merase (2) : a replacement reaction using the 3'–5' exonuclease activity of the
enzyme in the absence of dNTPs to generate 3'-protruding ends, and then fill-
ing in the ends with a mixture of unlabeled and labeled dNTPs. The resulting
labeled fragment can be further digested with endonucleases and generate a
mixture of probes of different sizes. Alternatively, the 3'-protruding tails of
double-stranded DNA, previously digested with endonucleases, are regener-
ated by the bacteriophage T4 DNA polymerase in the presence of all four
dNTPs (including the desired labeled dNTP). In the presence of dNTPs, T4
DNA polymerase 3'–5' exonuclease activity is inhibited and the polymerase
activity predominates. However, caution should be taken to avoid long incuba-
tions, as the dNTPs could be exhausted, and the 3'–5' exonuclease activity of
T4 DNA polymerase will resume and degrade double-stranded DNA as well as
single-stranded DNA. Keep in mind that T4 DNA polymerase has a higher rate
of 3'–5' exonuclease activity on single-stranded DNA than on double-stranded
DNA. The replacement method can be difficult to control; therefore, filling in
previously endonuclease digested DNA with 3'- or 5'-protruding ends in the
presence of dNTPs is the best alternative when using bacteriophage T4 DNA
polymerase for labeling DNA.
Terminal deoxynucleotidyl transferase (TdT) is a template independent
DNA polymerase that incorporates dNTPs to the 3'-OH end of single- or
double-stranded DNA, and RNA in an irreversible manner (3). This enzyme is
used for the production of synthetic homo- or heteropolymers (4), for incorpo-
rating a homopolymeric tail to any type of DNA 3'-end (3,5–8), and for incor-
porating a single nucleotide analog such as [α-
32
P]cordycepin-5'- triphosphate
(Promega) (6,9) or digoxigenin-11-ddUTP (Roche Molecular Biochemicals)
(10). Terminal dideoxynucletidyl transferase labels 3'-protruding ends more
efficiently than blunt ends or 3'-recessed ends. The incorporation of dA or dT
residues is more favorable than incorporating dC or dG. The type of method
chosen for incorporating labeled nucleotides to the 3'-end of a DNA molecule
depends on the required probe sensitivity and specificity. The 3'-end tailing
reaction synthesizes highly sensitive probes owing to the addition of several
labeled molecules, but the specificity decreases owing to unspecific binding of
the added nucleotide tail. This inconvenience can be solved by changing the
stringency conditions. If probe specificity is the priority, 3'-end labeling of the
DNA molecule should be performed.
End Labeling Procedures 15
2.2. 5'-End Labeling
There are three ways of labeling DNA molecules at the 5'-end: enzymatic,
chemical, or combined methods. A brief description of each method is given.
2.2.1. Enzymatic Methods
The bacteriophage T4 polynucleotide kinase catalyzes two reactions:
forward and exchange. In the forward reaction, the enzyme transfers the γ phos-
phate of [γ-
32
P]ATP to the 5'-hydroxy group of a DNA molecule (oligonucleo-
tides or nucleoside 3'-monophosphates) or RNA, previously dephosphorylated
with alkaline phosphatase. In the exchange reaction, T4 polynucleotide kinase
transfers the 5'-terminal phosphate group of the DNA molecule to ADP. Then,
the enzyme transfers the γ phosphate of [γ-
32
P]ATP to the 5'-hydroxy group of
a DNA molecule. The forward and the exchange reactions depend on the
amount of ATP available (13,14). The wild-type bacteriophage T4 polynucle-
otide kinase has 3'-phosphatase activity (11); however, this unwanted property
has been engineered and a mutant T4 polynucleotide kinase 3'-phosphatase
minus enzyme is now available (MBI Fermentas, Roche Molecular
Biochemicals) (12). T4 polynucleotide kinase preferentially labels protruding
5'-ends over blunt ends or recessed 5'-ends, but in the presence of
polyethylenglycol 8000 the reaction conditions for labeling blunt ends or
recessed 5'-ends can improve (13). Precaution should be taken in avoiding
ammonium and phosphate ions during any purification procedure, as T4 poly-
nucleotide kinase is strongly inhibited by these ions (13,14).
2.2.2. Chemical Methods
This approach is suitable for synthetic oligonucleotides with a modified 5'-
end. Terminal amino function is incorporated to the 5'-end after synthesizing
the oligonucleotide by adding a phosphoroamidite group. After cleavage from
the synthesis support and activation, a digoxigenin molecule is covalently
linked (Roche Molecular Biochemicals) (15). Large quantities of oligonucle-
otide can be labeled per reaction. The 3'-end remains undisturbed and available
for primer extension.
2.2.3. Combined Method
Two methods have been developed by Promega to incorporate nonradioac-
tive labels to the 5'- or/and 3'-end of unmodified or modified oligonucleotides.
The T4 polynucleotide kinase incorporates a thiophosphate from adenosine-5'-
O-(3-thiotriphosphate) to an unmodified oligonucleotide. Then, the activated
thiol group of the oligonucleotide reacts with a maleimide modified hapten
(fluorescein or biotin), leaving the 3'-end of the molecule unaltered
16 Hilario
(FluoroAmpJ T4 Kinase System, Promega). The alternative method generates
alkaline phosphatase conjugates at the 5'- or 3'-end of unmodified or amino
modified oligonucleotides (LIGHTSMITH
®
II System, Promega Corp.). If the
starting oligonucleotide is not modified, terminal dideoxynucleotidyl trans-
ferase incorporates an amino modified ATP to the 3'-end before the activation
and conjugation of the enzyme hapten.
3. Purification of Labeled Probes
Radiolabeled probes are usually not purified after synthesis; however, if the
incorporation yield is low, removing the unincorporated label might help to
avoid a high background noise.
There are four methods to purify labeled probes: spin column chromatogra-
phy, membrane filtration, adsorption to silica gel membranes, and ethanol pre-
cipitation. Gel size exclusion properties in spin column chromatography are
not the same as in flow-dependent fractionation. In spin column chromatogra-
phy, g force applied to the column and the centrifugation time are important
factors during the exclusion process. Using prepacked and equilibrated col-
umns prevents dilution of the applied sample. Reproducibility during purifica-
tion is achieved with commercially prepacked columns (e.g., Amersham
Pharmacia, Roche Molecular Biochemicals). Specific resins are used for par-
ticular purification procedures such as buffer exchange and desalting, and
removal of excess primers or free nucleotides.
Membrane filtration is a fast and reliable way of removing excess label,
exchanging buffers, and concentrating a sample. Microcentrifuge devices are
commercially available with different cut off ranges (e.g., Microcon
®
,
Millipore). This method is appropriate to remove primers, linkers, labeled
nucleotides and desalting samples; however, modifying enzymes are usually
retained together with the labeled DNA molecule. Therefore, membrane filtra-
tion is recommended mainly for chemical labeling methods.
Adsorption of DNA molecules of certain size ranges to silica-gel membrane
occurs at high ionic strength and is eluted at lower ionic strength (Qiagen,
Germany). No ethanol precipitation is required. Silica-gel membranes
assembled on spin columns overcome the problems associated with silica-gel
slurries (low yields, slurry carried over with eluted DNA, etc.). Free labeled
nucleotides, modifying enzymes, reaction buffers, and other components of
the labeling reaction mixtures are easily removed by this method. Recovery of
oligonucleotides (17–40 bases long) and double- or single-stranded DNA frag-
ments up to 10 kb long is feasible. This is the most efficient way to clean up
any modification reaction.
Ethanol precipitation with ammonium or sodium acetate can be performed
for most labeling procedures (13,14); however, for Digoxigenin-labeled probes,
End Labeling Procedures 17
lithium chloride (final concentration 0.4 M) should be used instead of sodium
acetate. Oligonucleotides and low concentration of labeled probes are easily
precipitated with carrier molecules such as glycogen (final concentration 0.4
mg/µL). Alkaline conjugates and fluorescein- or biotin-labeled probes require
a combination of spin column chromatography and ethanol precipitation. The
storage temperature for most probes is –20°C, or temporarily 4°C. Specific
storing buffers are recommended for each method, and special care should be
taken regarding pH conditions, light exposure, stabilizers (e.g., glycerol), and
half-life of the probe. Storing the synthesized probe in small aliquots prevents
degradation by repeated freeze–thaw cycles, and the possibility of accidental
cross contamination with other probes.
References
1. Derbyshire, V., Freemont, P. S., Sanderson, M. R., Beese, L., Friedman, J. M.,
Joyce, C. M., and Steitz, T. A. (1988) Genetic and crystallographic studies of the
3',5'-exonucleolytic site of DNA polymerase I. Science 240, 199–201.
2. Challberg, M. D. and Englund, P. T. (1980) Specific labeling of 3' termini with T4
DNA polymerase. Methods Enzymol. 65, 39–43.
3. Deng, G. and Wu, R. (1983) Terminal transferase: use of the tailing of DNA and
for in vitro mutagenesis. Methods Enzymol. 100, 96–115.
4. Chang, L. M. and Bollum, F. J. (1986) Molecular biology of terminal transferase.
CRC Crit. Rev. Biochem. 21, 27–52.
5. Eschenfeldt, W. H., Puskas, R. S., and Berger, S. L. (1987) Homopolymeric tail-
ing. Methods Enzymol. 152, 337–342.
6. Tu, C. and Cohen, S. (1980) 3'-End labeling of DNA with [α-
32
P]cordycepin
5'-triphosphate. Gene 10, 177–183.
7. Vincent, C., Tchen, P., Cohen-Solal, M., and Kourilsky, P. (1982) Synthesis of
8-(2-4-dinitrophenyl 2-6 aminohexyl) amino-adenosine 5' triphosphate: biologi-
cal properties and potential uses. Nucleic Acids Res. 10, 6787–6796.
8. Kumar, A., Tchen, P., Roullet, F., and Cohen, J. (1988) Non radioactive labeling
of synthetic oligonucleotide probes with terminal deoxynucleotidyl transferase.
Anal. Biochem. 169, 376–382.
9. Brown, T. A., ed. (1998) Molecular Biology Labfax, I. Recombinant DNA, 2nd
edit., Academic Press, San Diego.
10. Schmitz, G. G., Walter, T., Seibl, R., and Kessler, C. (1991) Nonradioactive
labeling of oligonucleotides in vitro with the hapten digoxigenin by tailing with
terminal transferase. Anal. Biochem. 192, 222–231.
11. Cameron, V. and Uhlenbeck, O. C. (1977) 3'-Phosphatase activity in T4 poly-
nucleotide kinase. Biochemistry 16, 5120–5126.
12. Cameron, V., Soltis, D., and Uhlenbeck, O. C. (1978) Polynucleotide kinase from
a T4 mutant which lacks the 3' phosphatase activity. Nucleic Acids Res. 5,
825–833.
13. Sambrook, J., Fritch, E. F., and Maniatis, T. (1989) Molecular Cloning: A Labo-
18 Hilario
ratory Manual, 2nd edit., Cold Spring Harbor Laboratory, Cold Spring Harbor,
New York.
14. Ausubel, F. M., Brent, R., Kingston, R. E., Moore, D. D., Seidman, J. G., Smith,
J. A., and Struhl, K., eds. (1994) Current Protocols in Molecular Biology. John
Wiley & Sons, New York.
15. Zischler, H., Nanda, I., Schafer, R., Schmid, M., and Epplen, J. T. (1989)
Digoxigenated oligonucleotide probes specific for simple repeats in DNA finger-
printing and hybridization in situ. Hum. Genet. 82, 227–233.
Photobiotin Labeling 19
19
From: Methods in Molecular Biology, vol. 179: Gene Probes: Principles and Protocols
Edited by: M. Aquino de Muro and R. Rapley © Humana Press Inc., Totowa, NJ
3
Photobiotin Labeling
Elena Hilario
1. Introduction
Biotin is a small vitamin found in tissue and blood and is synthesized by
intestinal bacteria. Biotin functions as a prosthetic group for several carboxy-
lases and as a CO
2
carrier. The molecule consists of a ring system covalently
linked to the enzyme by a valerate side chain acting as a flexible arm. Avidin
and streptavidin are two proteins that strongly bind biotin. Avidins are tet-
rameric proteins; each subunit has a molecular mass of 13,000–16,000 Da.
Avidin is found in chicken egg whites, and a lower affinity variant is found in
the yolk. Streptavidin is found in the fungus Streptomyces avidinii. Although
the dissociation constant of avidin for biotin is higher than that of streptavidin
for biotin (10-
15
M and 10-
14
M, respectively), the nonspecific adsorption of
streptavidin to nucleic acids and negatively charged cell membranes is pre-
ferred over avidin. This is due to the low isoelectric point of streptavidin (pI 5–
6), compared to pI 10 for avidin. The binding characteristics and stability of
avidin–biotin and streptavidin–biotin complexes have been extensively ex-
plored and applied to develop numerous methods in immunology and molecu-
lar biology.
There are three methods for labeling DNA molecules with biotin: chemical,
enzymatic, and photolabeling reactions. The type of method to be used depends
on the amount of DNA available and the number of biotin molecules to be
incorporated. Several commercial kits are available for DNA biotinylation. The
cis-platinum Chem-Link reagent (Kreatech Biotechnology, B.V., The Nether-
lands) binds to the N7 position of guanosine and adenosine bases at 85°C,
forming a stable biotin–Pt complex. This chemical reaction might denature
and fragment the target DNA; however, this method is suitable for blot hybrid-
20 Hilario
ization. Biotin hydrazide (five carbon atoms in space arm) and Biocytin-
hydrazide (10 carbon atoms in space arm) (Pierce, Perstorp Biotec) label
cytosine residues in DNA and RNA via a bisulfite-catalyzed transamination
reaction (1). Biotin analogs of dTTP with long spacer arms (16 carbon atoms)
can be used for incorporating biotin enzymatically: by 3' end-labeling with
terminal transferase and biotin-16-ddUTP, or by replacing dTTP with biotin-
16-dUTP in nick translation, random priming, or polymerase chain reaction
(PCR) amplifications. All the methods described (except PCR biotin labeling)
require considerable amounts of starting DNA substrate, which must be free of
any oligonucleotides, buffers, enzymes, additives, etc. Forster and co-workers
first described the method to synthesize photobiotin acetate and bind it to
nucleic acids. A molecule of photobiotin is formed by a biotin molecule bound
to a linker arm of nine carbons with a positively charged tertiary amino group
at the center and a photoreactive arylazide group. The reaction takes place un-
der strong visible light or under ultraviolet light. The arylazide molecule is
converted to an extremely reactive arylnitrene group that binds with the nucleic
acid; however, the nature of the linkages is unknown. The spacer arm is long
enough to allow the interaction of biotin and streptavidin without interfer-
ence (2).
What is the advantage of using photobiotin over the chemical or enzymatic
biotin labeling methods? Photobiotinylation is a simple method for labeling
DNA because the reaction occurs in water and is terminated by mild alkalin-
ization. Although ultraviolet light is used to photoactivate the molecule, the
DNA damage is minimum. It does not interfere in hybridizing the biotinylated
probe to the target DNA molecules in any further protocol, including delicate
procedures such as subtraction hybridization (3,4).
Photobiotin acetate can be synthesized in the laboratory (5); however, it is
also available from Pierce Chemical (Rockford, IL) and Sigma-Aldrich (St.
Louis, MO).
2. Materials
1. 1 mg of photobiotin acetate.
2. Insect vials with flat bottom, without caps.
3. Scintillation vials without caps and a styrofoam floating boat.
4. Tray with ice water.
5. Darkroom with red safety light (e.g., KODAK safety light filter GBX2).
6. UV transilluminator lamp (MacroVue UV-25 transilluminator 302 nm Hoefer,
set in HIGH 254 nm, 9000 µW/cm
2
).
7. 1 M Tris, pH 9.0.
8. Tris–EDTA-saturated n-butanol:10 mM Tris-HCl, pH 8.0, 1 mM EDTA.
9. 5 M Potassium acetate, pH 7.0.
Photobiotin Labeling 21
10. Isopropanol.
11. 70% Ethanol.
12. Appropriate final resuspension buffer at pH 7.5–8.0.
13. 1% Agarose gel for DNA electrophoresis.
3. Method: Photobiotin Labeling
Steps 1–7 must be done in a darkroom, with a red safety light.
1. Prepare a 1 µg/µL stock solution of photobiotin acetate in deionized water. Store
in a desiccator, at –20°C, protected from light. The solution is stable for about 6
mo and should be bright orange when fresh (see Note 1).
2. Add 50 µL of photobiotin solution to the 50-µL sample of sized sheared DNA
(~1 µg/µL in deionized water). Mix very well.
3. Assemble a “thermus device” by inserting an insect vial inside a scintillation vial
with ice water. Transfer the sample to the bottom of the insect vial.
4. Place the insect/scintillation vials in a floating boat on the ice water tray.
5. Place the icy water tray under the UV transilluminator lamp (see Note 2). The
distance between the bottom of the insect vial to the surface of the transillumina-
tor should be 10 cm.
6. Irradiate the sample for 30 min. Mix the solution by gently tapping the vial every
5 or 10 min to have a uniform exposure to UV light. After 30 min the mixture
turns orange-brown.
7. Stop the reaction by adding 10 µL of 1 M Tris-HCl, pH 9.0.
8. Extract the unreacted photobiotin with an equal volume of Tris–EDTA-saturated
n-butanol, 3× or until organic phase is clear.
9. Precipitate the sample with 1/10th of the volume of 5 M potassium acetate, pH
7.0, and 1 volume of isopropanol and store at –20°C overnight. Centrifuge the
sample in a microcentrifuge at maximum speed for 20 min. The color of the small
pellet should be orange-brown. Wash 2× with 500 µL 70% ethanol, and centri-
fuge again. Dry the pellet protected from direct light. Resuspend the pellet in 30
µL of the appropriate resuspension buffer at pH 7.5–8.0 (see Note 3). If neces-
sary, heat up the sample at 65°C for 5 min for complete resuspension. Vortex-
mix briefly and centrifuge to collect all the sample. The approximate
concentration should be 1 µg/µL.
10. Run 5 µL of biotinylated sample, and 5 µL of nonbiotinylated DNA in a 1%
agarose gel. The biotinylated sample should run slower than the unlabeled DNA.
A minimum amount of sample might stay inside the well. A recovery of 70–75%
of biotinylated DNA is expected for this procedure. Store the biotinylated DNA
sample at –20°C. Avoid freeze–thaw cycles by storing appropriate aliquots of the
probe. The biotinylated DNA is stable for up to a year (see Note 4).
22 Hilario
4. Notes
1. Photobiotinylation is a simple technique to label DNA. The photochemical reac-
tion takes place in an aqueous phase, which simplifies the recovery of the labeled
DNA. Attention must be taken in storing the photobiotin solutions at –20°C in
the dark, and try to use up the whole stock within 6–12 mo. Ordering the smallest
quantity available from the supplier company is preferred.
2. McInnes and colleagues recommend a white light lamp instead of ultraviolet light
(5). Ten to twenty minutes are enough to complete the labeling reaction.
Examples of commercial lamps available are: I-Line Multi-Vapor
®
Lamp (Gen-
eral Electric 10687 325W or 43817 400W), or sun lamps (GE Model RSM 250
W).
3. The chemical composition of the final resuspension buffer varies according
to the protocol requiring the biotinylated DNA. High concentrations of NaCl up to 1
M or detergents such as dodecyl sodium sulfate (0.1%) have no effect on
the labeled DNA. The type of buffer used is not critical, as long as it is within pH 7–
8.5.
4. To avoid incomplete labeling of your DNA sample, do not scale up the labeling
reaction volume. If more than 50 µg of DNA need to be labeled, prepare as many
vials containing 50 µL each, as needed.
5. General comment: The most convenient retrieving molecule to capture the
biotinylated DNA is streptavidin. Streptavidin is usually linked to a reporter
enzyme such as alkaline phosphatase which produces a detectable colored prod-
uct in standard methods for Southern and Northern blot analysis. Other ways to
capture streptavidin–biotinylated DNA complexes from aqueous solutions are
columns coupled with streptavidin or avidin, or phenol–chloroform extractions.
References
1. Reisfield, A., Rosenberg, J. M., Bayer, E. A., and Wilchek, M. (1987) Nonradio-
active hybridization probes prepared by the reaction of Biotin-Hydrazide with
DNA. Biochem. Biophys. Res. Commun. 142, 519–526.
2. Forster, A. C., McInnes, J. L., Skingle, D. C., and Symons, R. H. (1985) Nonra-
dioactive hybridization probes prepared by the chemical labeling of DNA and
RNA with a novel reagent, photobiotin. Nucleic Acids Res. 13, 745–761.
3. Sun, T-P., Goodman, H. M., and Ausubel, F. M. (1992) Cloning the Arabidopsis
GA1 locus by genomic subtraction. Plant Cell 4, 119–128.
4. Straus, D. and Ausubel, F. M. (1990) Genomic subtraction for cloning DNA cor-
responding to deletion mutations. Proc. Natl. Acad. Sci. USA 87, 1889–1893.
5. McInnes, J. L., Forster, A. C., Skingle, D. C., and Symons, R. H. (1990) Prepara-
tion and uses of photobiotin. Methods Enzymol. 184, 588–600.
Nick Translation 23
23
From: Methods in Molecular Biology, vol. 179: Gene Probes: Principles and Protocols
Edited by: M. Aquino de Muro and R. Rapley © Humana Press Inc., Totowa, NJ
4
Nick Translation
Alex Reid
1. Introduction
Nick translation was the first method devised for the in vitro labeling of
DNA (1). During the reaction the DNA to be labeled is nicked by DNase I
yielding a free 3' hydroxyl end. DNA polymerase I then adds a new nucleotide
to this end. The 5'–3' exonuclease activity of the polymerase then moves the
“nick” along the strand in the 3' direction. The addition of a radioactively
labeled nucleotide to the reaction results in probes that can be used in hybrid-
ization reactions to DNA immobilized on Southern blots, colony lifts, etc.
2. Materials
2.1 Specific Materials
1. Nick Translation System (Promega), including enzyme mix, unlabeled dNTP
solutions, reaction buffer (10×), stop solution and nuclease free water.
2. [α-
32
P]dNTP (normally dCTP) at 3000 Ci/mmol; 10 µCi/µL. Important: Radio-
actively labeled material should be only handled in a designated laboratory fol-
lowing safety guidelines. Work should be carried out behind Perspex screens and
all solid and liquid waste disposed in designated containers.
3. Sephadex G-50, equilibrated in 1× TE buffer (10 mM Tris-HCl, pH 8.0, 1 mM
EDTA).
4. Glass wool.
2.2 Optional Materials
1. 0.2 M EDTA, pH 8.0.
2. 0.5 M Sodium phosphate, pH 6.8 (see Note 1).
3. Whatman DE 81 2.3-cm circular filters, scintillation counter. These are only
required if the percentage incorporation of label is needed to be known.
24 Reid
3. Method
1. Place kit components (except enzyme mix which should be kept at –20°C until
required) at room temperature until thawed and transfer to ice.
2. On ice add the following to a sterile 1.5-mL of centrifuge tube, 10 µL nucleotide
mix (see Note 2), 5 µL of 10× nick translation buffer, 1 µg of DNA, 70 µCi of
[α-
32
P] dCTP, 5 µL of nick translation enzyme mix (see Note 3), nuclease-free
water to a final volume of 50 µL.
3. Incubate at 15°C for 60 min (see Note 4).
4. Add 5 µL of stop solution.
5. To calculate the percentage incorporation of radioactivity and the specific activ-
ity of the probe remove 1 µL of the reaction and add 99 µL of 0.2 M EDTA, pH
8.0. Spot 3 µL of the dilution onto two Whatman DE81 2.3-cm circular filters.
Dry the filters under a desk lamp for 5 min. Wash one filter in 50 mL 0.5 M
sodium phosphate, pH 6.8, twice for 5 min each and dry the filter under the desk
lamp for 5 mins. Place the filters in scintillation vials and read on the tritium
channel (see Note 5).
6. The unincorporated nucleotides can be separated from the reaction by centrifug-
ing the reaction through a Sephadex G-50 column.
7. Plug the bottom of a 1-mL syringe with sterile glass wool to the 0.1-mL mark.
This is best done by packing the glass wool down with the syringe barrel.
8. Fill the syringe to the top with Sephadex G-50 equilibrated in 1× TE buffer. Place
the syringe in a 15-mL disposable tube and centrifuge at 1600g for 4 min in a
swinging bucket rotor. The resin should pack down to the 0.9-mL mark on the
syringe. If not add more Sephadex G-50 and recentrifuge. Add 100µL 1× TE
buffer to the top of the column and centrifuge as before. Transfer the column to a
fresh 15-mL centrifuge tube.
9. Add 45 µL of 1× TE buffer to the nick translation reaction to bring the volume up
to 100 µL and add to the top of the column. Centrifuge the column at 1600g for 4
min and discard the column in the radioactive waste.
10. Transfer the elutate to a 1.5-mL Safe-Lock Eppendorf tube. Discard the centri-
fuge tube in the radioactive waste.
11. It is advisable to use labeled probes immediately as the radioactive decay will
damage the DNA over extended periods of time. If the probe is needed at a later
date they can be stored at –20°C in a lead pot.
12. Before use in a hybridization reaction denature the labeled DNA by heating to
95–100°C for 5 min and chill on ice to prevent renaturation. The use of a Safe-
Lock Eppendorf tube will prevent the cap opening during heating.
4. Notes
1. 0.5 M Sodium phosphate, pH 6.8: 47.25 g of NaH
2
PO
4
, 22.35 g of Na
2
HPO
4
in 1
L of distilled water.
2. The unlabeled nucleotide mix is prepared by combining equal volumes of the
three dNTPs that are not labeled, for example, dATP, dGTP and dTTP if the
labeled nucleotide to be used is [α
-32
P]dCTP.
Nick Translation 25
3. Although no details of the enzymes present in the Promega kit are given standard
reaction conditions contain pancreatic DNase I (10 ng/mL) and 2.5 U of E. coli
DNA polymerase I.
4. At temperatures higher than 20°C there will be a significant quantity of
“snapback” DNA produced by the E. coli DNA polymerase I where the enzyme
starts copying the newly synthesized strand instead of the template DNA.
5. This method detects the Cerenkov radiation produced by the decay of
32
P and
does not give an absolute number of counts. The readings are however, propor-
tional from sample to sample. The percent incorporation can be calculated by
dividing the counts from the washed filter by the counts from the unwashed filter
and multiplying by 100. The percentage incorporation should be above 60%. The
specific activity of the probe is obtained by dividing the number of counts on the
washed filter by the amount of DNA added to the labeling reaction and multiply-
ing by 33.3 (3 µL of a 1:100 dilution) and the multiplying by 55 (the reaction
volume). Specific activity is expressed as cpm/µg and a good reaction will yield
around 10
8
cpm/µg. Although it is not essential to measure the percent incorpora-
tion and specific activity of probes before their use, it does enable the monitoring
of reactions from one experiment to another.
References
1. Kelly, R. B., Cozzarelli, N. R., Deutscher, M. P., Lehman, I. R., and Kornberg, A.
(1970) Enzymatic synthesis of deoxyribonucleic acid. XXXII. Replication of
duplex deoxyribonucleic acid by polymerase at a single strand break. J. Biol.
Chem. 245, 39–43.