wayne a. thorp - analyzing supply & demand using point & figure charts
Bạn đang xem bản rút gọn của tài liệu. Xem và tải ngay bản đầy đủ của tài liệu tại đây (3.98 MB, 5 trang )
AAII Journal/August 2000 25
TECHNICAL ANALYSIS
One of the basic principles of economics is the law of supply and demand.
It states that when there are more buyers than there are sellers of a given
good, the price should rise. Likewise, when there are more sellers than
buyers, the price should fall. In this technical analysis article, we focus on a
type of chart that attempts to capture the battle between supply and demand:
the point and figure chart.
Point and figure charts have been in use for over 100 years, yet they exist
in relative obscurity compared to bar charts and candlesticks. Their useful-
ness lies in their ability to filter out market “noise”—short-term price fluctua-
tions that occur during longer, more established trends. They differ from the
more conventional charts in that they ignore the passage of time and do not
take trading volume into account—they are only affected by price move-
ments.
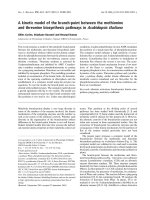
Figure 1 is an example of a point and figure chart for Cisco Systems,
which covers daily price movements for the period from January 4, 1999,
through April 31, 1999. Immediately, you should see some significant
differences from other charts. First, the chart is made up of columns of X’s
and O’s. X’s represent rising prices while O’s represent falling prices. Put
another way, X’s represent demand and O’s supply. The movement from
columns of X’s to O’s and back again creates patterns that you may use to
make buy and sell decisions.
There are two key items you need to address before you can begin creating
your own point and figure charts—the box size and reversal amount.
The box size is based on the scale you wish to use for a particular security
or index and it represents the value given to each box (X or O) on the chart.
It is the minimum price change needed to continue the trend—i.e., to add an
X to the top of the column of X’s (or the minimum price decrease needed to
add an O to the bottom of a column of O’s). The reason that this is even an
issue is because a reversal of $3 for a $10 stock is more dramatic, on a
different scale, than a $3 reversal on a $100 stock. Furthermore, since point
and figure charts are used to filter out “noise” in the market, you will want
to be sure that you are filtering out just enough to eliminate momentary
price reversals, yet at the same time allow enough through so you can
identify when a significant reversal is taking place.
As you use point and figure charts, you may find that different box sizes
work better for your trading style or for a particular security. However, box
sizes have traditionally been broken down into the following levels:
Share Price Box Size
Below $5 $0.25
Between $5 and $20 $0.50
Between $20 and $100 $1.00
Over $100 $2.00
How you move from one column to another is key to your analysis of
point and figure charts. The way in which you move to a new column is
By Wayne A. Thorp
The usefulness of
point and figure
charts lies in their
ability to filter out
short-term price
fluctuations that
occur during longer,
more established
trends. They differ
from the more
conventional charts
in that they are only
affected by price
movements.
Wayne A. Thorp is assistant financial analyst of AAII.
ANALYZING SUPPLY AND DEMAND
USING POINT AND FIGURE CHARTS
26 AAII Journal/August 2000
TECHNICAL ANALYSIS
called the “reversal method.” The
reversal amount determines how
many boxes the price must reverse
course in order to move to a new
column and switch from X’s to O’s
or O’s to X’s. While this can be left
to the individual creating the chart,
the typical reversal is the “three
box” reversal, because it is thought
to eliminate spurious price fluctua-
tions and focus on only “significant”
price movements.
If a stock were trading below $5,
it would take a price move (up or
down) of $0.75 to generate a three-
box reversal. Based on the table on
page 25, the box size for such a
stock is $0.25; a three-box reversal
would take three $0.25 price moves
to necessitate a shift to a new
column of either X’s or O’s. The
same principle applies no matter the
box size.
Having established the parameters
for the essential elements of a point
and figure chart, you must last look
at exactly which price(s) you will
use to plot your point and figure
chart. “Purists” typically use the
high and low prices for the period
(day, week, month, etc.), while
others may focus strictly on a single
price such as the close. Depending
on the price(s) you use, you may get
different results.
You may wish to
experiment to find
the technique that
works best for you.
A key concept to
remember when
creating point and
figure charts is that
you remain in the
same column of
X’s or O’s as long
as prices continue
to rise or fall,
respectively. In
other words, if the
chart was in a
column of X’s and
prices were rising,
you would ask
yourself each day
whether the price
rose one full box
or more. You
would find this out
by looking at the
high price for the
day—again we are only concerned
with the high and low prices, not
the open or close. If the price did
rise at least one box, let’s say from
$50 to $51, you would add an X to
FIGURE 1. POINT AND FIGURE CHART FOR CISCO SYSTEMS (1/4/99 TO 4/31/99)
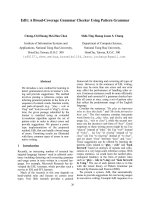
FIGURE 2. CREATING A POINT AND FIGURE CHART
AAII Journal/August 2000 27
TECHNICAL ANALYSIS
the column in the $51 box ($1 per
box, according to the table). At that
point, you are done for the day. Be
aware that as long as the price rises
by at least one box, you do not care
about what it did on the downside.
In other words, if the high price for
the day was $51 but the low price
was $40, you would still only plot
the one-box increase. You are only
interested in one direction per
period.
If, however, the next day the price
did not rise by at least one box ($3),
you must then decide whether the
price reversed down by three or
more boxes. In this case, was the
low price for the day at least $48
($51 – $3)? If it was not—let’s say
the low price was $49—you are
done for the day, not having plotted
any price movement. This is unlike
bar charts that will still plot a bar,
even if prices do not move. When
the price does finally reverse by
three or more boxes—let’s say the
low was $47—you shift one column
to the right and begin plotting a
column of O’s.
Figure 2 illustrates the process in
action, using real price data for
Cisco Systems from 6/1/00 through
6/27/00. The figures in bold indicate
price reversals that generated a
move to a new column on the chart.
HOW TO USE POINT & FIGURE
Now that we have gone through
the process of creating a point and
figure chart, the next step is to
understand how to use this chart as
part of your investment decision-
making process. The main use of
point and figure analysis involves
trendline and chart patterns.
Trendlines are useful when exam-
ining any type of chart because they
allow you to determine those price
levels where buyers are willing to
support a security by buying, as well
as those areas where sellers depress
the price by selling. With point and
figure charts, drawing trendlines is
easier than with other charts because
much of the subjectivity is elimi-
nated.
There are four different types of
trendlines you can use with point
and figure charts:
· Bullish support,
· Bullish resistance,
· Bearish support, and
· Bearish resistance.
The bullish support
line is used to identify
those stocks that are in
an uptrend, and to
alert you to potential
reversals in an uptrend.
As a rule of thumb,
you should not buy
stocks that are trading
below their bullish
support lines. To begin
drawing the bullish
support line, you first
look for a long column
of O’s, which indicates
the stock has seen a
“significant” drop in
price. Once you have
located such a column,
place a “+” sign
directly under the
lowest O in the
column. From there you move to the
right and up one box, adding
another “+” and repeat the process
until you end up with a line that
looks similar to the one that appears
in Figure 3. As you can see, the line
runs at a 45-degree angle and those
stocks trading above this line are
considered to be in a bullish trend.
The chart shows that the price
followed the bullish support line
from $30 up to $46, at which point
the sellers took control as the price
penetrated the line at $39, as
indicated by the shaded box in the
figure. When such a penetration
takes place, you can reasonably
assume that the upward trend has
ended.
The bullish resistance line is
constructed in a similar manner as
the bullish support line, but its
usefulness lies in alerting you to
those price levels where stocks
should meet selling pressure. To
draw a bullish resistance line, you
look for a “wall” of O’s—typically
a downward move in the price from
which it begins to bottom out.
Looking again at Figure 3, such a
formation is at the far-left of the
chart. Moving one column to the
FIGURE 3. POINT AND FIGURE CHART TRENDLINES
28 AAII Journal/August 2000
TECHNICAL ANALYSIS
right of this wall, you can begin
constructing the bullish resistance
line by placing a “+” at the top of
the column of X’s, then moving up
and over one box, adding another
“+” and repeating. The bullish
support and resistance lines serve to
form a trading channel.
Bearish resistance lines are the
reciprocal of bullish support lines. In
Figure 3, you can see that you begin
drawing the bearish resistance line
in the column of X’s prior to the
column of O’s that penetrates the
bullish support line. Connecting the
boxes diagonally downward, you
create a line that is parallel to the
bullish support line. Stocks trading
below the bearish resistance line are
viewed as being in a bearish trend
and you can expect prices to meet
strong resistance as they near this
boundary.
Lastly, the bearish support line is
the reciprocal of the bullish resis-
tance line. To begin drawing this
line, look for the first “wall” of X’s
to the left of the bearish resistance
line. The line that is formed by
placing a “+” at the bottom of the
column of X’s and moving diago-
nally downward can be used as a
guide, telling you where to expect
downward moving prices to meet
resistance. In other words, prices
would receive support at or near this
line. Similar to the bullish lines, the
bearish support and bearish resis-
tance lines form a trading channel
through which the stock can be
expected to trade.
TYPICAL PATTERNS
One of the main objectives of
technical and chart analysis is to
identify trends in price and/or
volume that may be used to predict
future price movements. Some of the
more popular and frequently occur-
ring chart patterns are double tops
and bottoms, as well as bullish and
bearish triangles.
The double top and double bottom
are two of the most common chart
patterns that appear in most charts,
especially point and figure. Figure 4
shows a double-top formation.
Looking at the figure, you can see
that this formation contains two
columns of X’s separated by a
column of O’s. The first column of
X’s was created as buyers bid up
the price from $32 to $36, at which
point demand dried up. The next
move is to a column of O’s, as
sellers forced the price back down to
$33. Here the price had fallen
enough to spur interest once again,
providing support at this level.
Finally, there is a move to another
column of X’s as buyers re-enter the
market and again drive the price
back to $36. At this point, several
things could happen. First, the price
could again meet resistance and
reverse course. Alternatively, buyers
could continue bidding up the price,
pushing the price past $36. As the
figure shows, if the price rises above
$36, this is viewed as a bullish
signal and a potential buy.
The double bottom is simply the
double top turned upside down, and
is shown in Figure 5. Here the
formation is made up of two
columns of O’s separated by a
single column of X’s. In the first
column of O’s, there are more
sellers than there are buyers and the
price falls to the equilibrium point
between buyers and sellers. Here,
the price falls from $37 to $33, at
which point the price finds support
and reverses to a column of X’s. In
the column of X’s, buyers bid up the
price to $36 until their demand was
satisfied. The price meets resistance,
forms a top, and falls once again.
Once the price reaches $33, again it
can take one of two courses—it
could either reverse or continue its
FIGURE 4. POINT AND FIGURE CHART DOUBLE-TOP PATTERN
FIGURE 5. POINT AND FIGURE CHART DOUBLE-BOTTOM PATTERN
AAII Journal/August 2000 29
TECHNICAL ANALYSIS
downward trek. If the price falls
below $33, this would be a bearish
sell signal.
Another typical point and figure
pattern is triangles, both bearish and
bullish. The hallmark of any
triangle pattern is that, as prices
fluctuate, higher lows and lower
highs are created. Figure 6 illus-
trates a bullish triangle pattern. As
you can see, as you move to the
right, the highs become lower and
the lows higher as the height of
each column gets smaller and
smaller. At this point, you have no
idea which way the price may go if
it were to break out of the forma-
tion, meaning you must wait for the
pattern to be confirmed before
entering your trade. As it plays out
in Figure 6, the bullish triangle
forms a double top at $36 and
generates a buy signal when the
price crosses above $36 and breaks
out of the triangle pattern. If the
price were to reverse itself, however,
you should still pay close attention,
because there is the possibility of a
double bottom forming—a potential
sell signal.
Figure 7 shows a bearish triangle,
which looks the same as a bullish
triangle except for the fact that the
price breaks out to the downside.
Here, it is the formation of the
double bottom at $34 that signals
the potential formation of a bearish
triangle. The signal is confirmed
when the price falls below $33.
Of course, there are many varia-
tions on the patterns shown here.
Overall, the formation of a
triangle, with its series of lower
lows and higher highs, signals the
potential that prices will ‘break
out.” The formation of a double top
or double bottom gives an indica-
tion of the direction of the
breakout.
CONCLUSION
Point and figure charts are an
interesting way of examining the
basic economic principle of supply
and demand. By eliminating the
time element from the chart, you
are left to focus strictly on price
movements. By using reversal
methods such as the three-point
reversal, you are also able to filter
out the market noise that can
sometimes generate false informa-
tion regarding trend reversals.
Taking point and figure analysis
one step further, some relatively
basic principles, such as trendlines
as well as pattern formations such
as tops, bottoms, and triangles, can
be helpful in gauging buy and sell
decisions. F
FIGURE 6. POINT AND FIGURE BULLISH TRIANGLE PATTERN
$40
$39
$38
$37
$36
$35
$34
$33
$32
$31
$30
$29
FIGURE 7. POINT AND FIGURE BEARISH TRIANGLE PATTERN
$40
$39
$38
$37
$36
$35
$34
$33
$32