hlsl and pixel shaders for xaml developers
Bạn đang xem bản rút gọn của tài liệu. Xem và tải ngay bản đầy đủ của tài liệu tại đây (5.55 MB, 83 trang )
www.it-ebooks.info
O’Reilly Media, Inc. 4/5/2012
1
Shader 101
It seems an obvious question to ask at the beginning of an HLSL and shader book; what
exactly is a shader? It’s a small program or algorithm written explicitly to run on a
computer Graphics Processing Unit (GPU). It provides a way for developers to extend
the rendering capabilities of the GPU. Any program that works closely with graphics will
benefit from using shaders. The video game industry spins off custom shaders by the
thousands, they are as vital to game projects as business entity classes are to line of
business applications. Nothing prohibits business programmers from experimenting with
shaders in their line of business (LOB) applications, in fact recent trends in user interface
(UI) design and information visualization cry out for shader use.
Because shaders run at the kernel level of the GPU they are automatically parallelized by
the GPU hardware and are extremely fast at manipulating graphic output. Typically, the
GPU can process shaders several orders of magnitude faster than if the shader code is run
on a CPU.
Why XAML developers should learn HLSL?
If you are a XAML developer, I’ll wager you’ve heard about pixel shaders. In fact, you
may be using some of these effects in your application already. WPF introduced the
DropShadowEffect and BlurEffect in .NET 3.5 SP1 and both of these classes take
advantage of pixel shaders. Silverlight added pixel shaders in Silverlight 3. The Windows
Phone team disappointed developers by dropping support for shaders before the final
release of their hardware. Microsoft had good reason to ditch phone shaders as they
caused a significant drag on performance , but their loss is still lamentable, To make up
for that setback the Silverlight 5 release includes support for XNA models and shaders.
This is awesome news as it means that you can mix XNA and Silverlight 5 together in the
same application and that gives you access to another essential shader type; the Vertex
shader.
XNA is a Microsoft framework that facilitates game development on
the PC, the Xbox 360, and Windows Phone 7. It give you access to the
power of DirectX without having to leave the comfort of your favorite
1
www.it-ebooks.info
O’Reilly Media, Inc. 4/5/2012
.NET programming languages. To learn more about XNA get a copy of
Learning XNA 4.0 by Aaron Reed from:
As a XAML developer, do you need to write your own shaders? No, not really, you may
spend your entire career without ever using a shader. Even if you use a shader you may
never have the need to write your own as there are free shader effects included in
Microsoft Expression Blend and also in the .NET framework. While it’s nice to have
these prebuilt effects, they represent only a fraction of the possibilities discovered by
graphics programmers. Microsoft is not in the shader business, at least not directly. A
core part of their business is building flexible programming languages and frameworks.
The DirectX team follows this path and provides several shader programming languages
for custom development. So if you have an idea for an interesting effect or want to
modify an existing effect you’ll need to write a custom shader. When you cross that
threshold and decide to build a custom shader, you have some learning ahead of you. You
need to learn a new programming language called HLSL.
I’ve started using the term XAML development in the last year.
Extensible Application Markup Language (XAML) is the core markup
for Windows Presentation Foundation, Microsoft Surface, Silverlight
and Windows Phone applications. There are differences between these
technologies but they all share a common markup in XAML. Even the
new Metro application framework for Windows 8 uses XAML as its
primary markup implementation. I find that WPF and Silverlight
developers have more in common with one other than they have
differences. Since there is so much overlap in skills between these
XAML based systems I think XAML developer is a suitable umbrella
term that symbolizes this commonality.
The Tale of the Shader
To understand the history behind shaders we need to go back a few decades and look
inside the mind of George Lucas. Thirty years ago, George had produced the first movies
in his highly successful Star Wars series. These first movies relied on using miniaturized
models and special camera rigs to generate the futuristic effects. Lucas could already see
the limitations of this camera based system and he figured that generating his models in
software would be a better approach. Therefore, he established a software division at
LucasFilm and hired a team of smart people to build a graphics rendering system.
Eventually the software division he created was sold off and became Pixar.
The engineers hired by Lucas took their responsibilities seriously and were soon
generating 3-D objects within software. But these computer generated models failed
when spliced into the live action as they suffered from a lack of realism. The problem is
that a raw 3D object looks stark and unnatural to the movie viewer, and won’t blend with
the rest of the movie scene. In other words, it will be painfully obvious that there is a
computer-generated item up on the big screen. In the quest to solve this problem an
engineer named Rob Cook decided to write a ‘shading’ processor to help make the items
look more realistic. His idea was to have software analyze the 3D object and the
surrounding scene and determine where the shadows fell and light reflected onto the
model. Then the shader engine could modify the film output to imitate the real world
placement of the artificial artifact. To be fair, there were existing shade tools available
2
www.it-ebooks.info
O’Reilly Media, Inc. 4/5/2012
but they were primitive and inflexible. Rob’s breakthrough idea was to make a scriptable
pipeline of graphic operations. These operations were customizable and easy to string
together to create a complex effect. These “shaders” eventually became part of an
infamous graphics program called Renderman, which remains the primary rendering tool
used for every Pixar movie. While you may not be familiar with the Renderman name
you certainly have seen the output from this phenomenal program in movies like Toy
Story 3.
Pixar has an informative section devoted to Renderman on their website at
The beginnings of this shader revolution started back in the early 1980’s and ran on
specialized hardware. But the computer industry is never idle. By the late nineties 3D
graphics accelerator cards started to show up in high end PCs. It wasn’t long before card
manufacturers figured out how to combine 2D and 3D circuits into a single chip and the
modern Graphics Processor Unit (GPU) was born. At this same time, the GPU
manufacturers came up with their own innovative idea real-time rendering which
allows processing of 3D scenes while the application is running. Prior to this
breakthrough, the rendering was performed off-line. The burgeoning game development
industry embraced this graphics advance with enthusiasm and soon 3D frameworks like
OpenGL and Microsoft Direct3D were attracting followers. This is the point in the story
where HLSL enters the picture.
HLSL and DirectX
In the early days of GPUs, the 3D features were implemented as embedded code within
the video card chips. These Fixed Functions, as they were known, were not very
customizable and so chipmakers added new features by retooling the chips and throwing
hardware at the problem. At some point Microsoft decided this was solvable with
software and devised an assembly language approach to address the problem. This
worked and made custom shaders possible but you needed developers who could work in
assembly language. Assembly language is notoriously complex and hard to read, for
example here is a small sample of shader assembly code for your reading pleasure.
Example 1-1. Shader written in Assembly Language
[c-objdump]
; A simple pixel shader
; Use the ps 2.0 instruction set and registers
ps_2_0
;
; Declare a sampler for the s0 register
dcl_2d s0
; Declare t0 to use 2D texture coordinates
dcl t0.xy
; sample the texture into the r1 register
texld r1, t0, s0
; move r1 to the output register
mov oC0, r1
3
www.it-ebooks.info
O’Reilly Media, Inc. 4/5/2012
DirectX 8.0 was the first version to include programmable shaders. It
first appeared in 2000 and included the assembly level APIs.
Working in assembly takes a special breed of programmer and they are in short supply.
NVidia and Microsoft saw this as an opportunity to bolster the PC graphics market and
collaborated to create a more accessible shader language. NVidia named their language
Cg while Microsoft chose the name High Level Shader Language (HLSL) for their
version. Cg and HLSL have virtually identical syntax; they are branded differently for
each company. Both languages compile shaders for DirectX. Cg has the additional
benefit of compiling shaders for the OpenGL framework.
The Open Graphics Library, AKA OpenGL, is an open source, cross
platform 2D/3D graphics API.
These higher level languages are based on the C language (in fact the name Cg stands for
C for Graphics) and use curly braces, semicolons and other familiar C styled syntax.
HLSL also brings high-level concepts like functions, expressions, named variables and
statements to the shader programmer. HLSL debuted in DirectX 9.0 in 2002 and has seen
steady updates since its release.
Let’s contrast the assembly language shown in Example 1-1 with the equivalent code in
HLSL.
Example 1-2. Shader written in HLSL
[C#]
sampler2D ourImage;
float4 main(float2 locationInSource : TEXCOORD) : COLOR
{
return tex2D( ourImage , locationInSource.xy);
}
Here, the first line is declaring a variable name ourImage which is the input into the
shader. The next line defines a function called main that takes a single parameter and
returns a value. That return value is vital, as it is the output of the pixel shader. That
float4 represents the RGBA values that are assigned to the pixel shown on the screen.
This is about the simplest pixel shader imaginable. Trust me, there are more details
ahead. This is a preliminary look at shader code; there are detailed discussions of HLSL
syntax throughout the remainder of this book.
This is the first HLSL example in the book but it should be obvious to
anyone with a modicum of programming experience that the HLSL
version is easier to read and understand than the assembly language
version.
Understanding the Graphics Pipeline
HLSL is the shader programming language for Direct3D, which is a part of Microsoft’s
DirectX API. Appendix A contains a detailed account of Direct3D and the graphics-
4
www.it-ebooks.info
O’Reilly Media, Inc. 4/5/2012
programming pipeline. What follows is a simplified account of the important parts of the
shader workflow.
To understand pixel shaders in the XAML world requires a quick look at how they work
in their original Direct3D world. Building a 3D object starts with defining a model. In
DirectX, a model (aka mesh) is a mathematical representation of a 3D object. These
meshes are defined as arrays of vertexes. This vertex map becomes the initial input into
the rendering pipeline.
If you studied geometry, you've seen the term vertex. In solid
geometry, a vertex represents a point where three planes meet.
In the DirectX realm, a vertex is more than a 3D point however. It
represents a 3D location so it must have x, y and z coordinate
information. Vertices may also be defined with color, texture, and
lighting characteristics.
The 3D model is not viewable on screen without conversion. Currently the two most
popular conversion techniques are ray tracing and rasterization. Rasterization is
widespread on modern GPUs because it is fast, which enables high frame rates – a must
for computer games.
As I mentioned before, the DirectX graphics pipeline is complex, but for illustration
purposes, I’ll whittle it down to these few components:
Figure 1-1. Three DirectX pipeline components
DirectX injects two other important components into this pipeline. Between the model
and the rasterizer lives the vertex shader. Vertex shaders are algorithms that transform the
vertex information stored in the model before handoff to the rasterizer.
Figure 1-2. The vertex shader in the pipeline
Vertex shaders get the first opportunity to change the initial model. Vertex Shaders
simply change the values of the data, so that a vertex emerges with a different texture,
5
www.it-ebooks.info
O’Reilly Media, Inc. 4/5/2012
different color, or a different position in space. Vertex shaders are a popular way to
distort the original shape and are used to apply the first lighting pass to the object. The
output of this stage is passed to the rasterizer. At this point in the pipeline the rasterized
data is ready for the computer display. This is where the pixel shader, if there is one, goes
to work.
Figure 1-3. The pixel shader in the pipeline
The pixel shader examines each rasterized pixel, applies the shader algorithm, and
outputs the final color value. They are frequently used to blend additional textures with
the original raster image. They excel at color modification and image distortion. If you
want to apply a subtle leather texture to an image the pixel shader is your tool.
XAML and Shaders
Now that you’ve learned the fundamentals of the DirectX pipeline you’re ready to take a
closer look at how Silverlight and WPF use shaders. Let’s examine what happens in the
WPF world first. In WPF, the underlying graphics engine is DirectX. That means that
even on a simple business form consisting of a few text controls the screen output travels
through the DirectX pipeline. The very same pipeline described above. WPF takes your
XAML UI tree and works its magic on it, instantiating the elements, configuring bindings
and performing other essential tasks. Once it has the UI ready it passes it off to DirectX
which rasterizes the image as described earlier. Here’s what the process looked like in the
first release of WPF.
Figure 1-4. The .NET 3.5 render process
As you can see, there were no vertex or pixel shaders available. It took another couple
years for Microsoft to add shaders to the mix. Pixel shaders appeared in .NET 3.5 in 2007
and now the process looks like this.
6
www.it-ebooks.info
O’Reilly Media, Inc. 4/5/2012
Figure 1-5. .NET 4.0 adds pixel shader to the render process
Notice how the end of this pipeline is identical to the 3D model pipeline cited earlier. As
you can see the input data for a pixel shader is the output from the rasterizer. It really
doesn’t matter to the shader whether that information is a rasterized version of a complex
3D shape or the output from a XAML visual tree. The shader works the same way for
both, since it is only 2D information at this point.
You might notice that there are no Vertex shaders in the WPF pipeline. That’s not an
omission on my part. Vertex shaders are not available to WPF and there are no plans to
add them to WPF. The likely reason for this oversight was the release of XNA,
Microsoft’s managed game development platform. XNA has a tight relationship with
DirectX/Direct3D and treats 3D and models nearly the same as native DirectX.
Don’t be too sad over the loss of vertex shader, pixel shaders are still a powerful
technique and can create a variety of useful effects. In fact, since current PC hardware is
so powerful, game developers often prefer using pixel shaders for lighting calculations, a
job that use to be handled by vertex shaders.
Silverlight is similar to WPF in many respects when it comes to shaders. Silverlight
supports pixel shaders like WPF. It doesn’t support vertex shaders directly. Instead, it
uses XNA integration for 3D rendering. The Silverlight team chose to embrace the XNA
framework and integrate it into their specifications rather than write their own 3D engine.
If you are an experienced XNA developer, you should have no problem adapting to the
Silverlight version.
In Silverlight, pixel shaders are always executed on the CPU. In fact, the rasterizer also
runs on the CPU.
WPF, on the other hand, runs the shaders on the GPU, falling back to CPU only in rare
cases. Because Silverlight uses the CPU, you might worry about performance. You may
suspect that Silverlight is slower when processing shaders and you’d be correct.
Silverlight mitigates some of the performance woes by running shaders on multiple cores
(when available) and by using the CPUs fast SSE instruction set. Yes, Silverlight shaders
are slower than their WPF counterparts. When it comes to pixel manipulation, Silverlight
shaders are still the fastest option though, beating other venues like WriteableBitmap by a
substantial margin. If you want to see the performance ramifications for yourself, René
Schulte has an illuminating Silverlight performance demo that you should check out
when you have the time.
Summary
Pixel shaders have revolutionized the computer graphics industry. The powerful special
effects and digital landscapes shown in modern movies and games would not be possible
7
www.it-ebooks.info
O’Reilly Media, Inc. 4/5/2012
8
without them. Adobe Photoshop and other designer applications are jammed with effects
that are implemented with pixel shaders. They are a magnificent way to create your own
custom effects. Granted, the HLSL syntax is a bit cumbersome and difficult to understand
at first, but it’s worth learning. Once you master HLSL, you can create shaders for
DirectX, XNA, WPF, Silverlight and Windows 8 Metro. In the next chapter, I’ll show
you how to create your first XAML shader project. By the end of this book, you’ll be
able to add the title “HLSL ninja” to your resume.
www.it-ebooks.info
O’Reilly Media, Inc. 4/5/2012
2
Getting Started
In this chapter, you get your first look at using shaders in an XAML application. Using
the prebuilt shaders in .NET is a snap. It's not much harder than using a drag and drop UI
designer. You will also get a miniature tutorial on creating a simple custom shader.
Setting up your development computer
If you are a .NET developer, you know a lot about managed code and the .NET
framework libraries. If Microsoft statistics are accurate, you write your code in either C#
or Visual Basic. Moreover, if you are like me, you are a Visual Studio junkie, spending
countless hours living inside the Visual Studio environment. Given these facts and the
possibility that you are also an experienced XAML developer it's likely that you already
have your computer ready to create HLSL shaders. But I'm going to be methodical and
show you what you need to make sure your development computer is set up correctly.
Silverlight development
One thing you can say about the Silverlight team; they produce high quality releases on a
tight schedule. Silverlight 5 is the newest version available at this time. It requires a
Visual Studio 2010 installation in order to build a Silverlight 5 project. If you are cheap,
all you need is a copy of the free Visual Web Developer 2010 Express edition
( to be ready to create Silverlight applications. If
you have access to your corporate credit card, buy Visual Studio 2010 pro, premium or
ultimate. You get a lot more tools in these editions and they are indispensable for real
world development. To be fair though, there is nothing in the more expensive editions
that makes HLSL development any easier.
Since Silverlight 5 shipped after Visual Studio 2010 you need to visit
and install the Silverlight 5 tools and SDK
before you are completely ready to start coding.
WPF development
To get the most out of your shader code use the .NET 4.0 version of WPF. That's because
4.0 supports a more recent shader specification (PS_3_0) and that gives you more shader
1
www.it-ebooks.info
O’Reilly Media, Inc. 4/5/2012
power. For the skinflints in the audience, look at the Visual C# 2010 Express
( or Visual Basic 2010 Express
( editions. Both express editions are fully capable of creating
WPF applications and incorporating your shader code. Just like with Silverlight 5, you
can use the commercial editions of Visual Studio for development
(
The Visual Studio install takes about an hour. I suspect most readers have gone through
the installation process many times so I'll assume you know what you are doing and don't
need step by step instructions.
Expression Blend 4
I highly recommend that XAML developers learn Expression Blend
( ). It contains dozens of tools that simplify XAML UI
development and it is a perfect companion for Visual Studio. For the shader developer, it
is useful for two reasons. First, it ships with nice set of prebuilt shader effects. Second, it
provides a preview feature, making it easy to see the effect without having to run the
application first.
Installing Blend is a ten-minute exercise. Download the installer from the Microsoft site
and follow the prompts.
Choosing a Shader Compiler
Your HLSL shader source code is just text, any text editor will suffice for code creation.
Before you can use the shader it must be compiled into a binary file and added the GPU
during runtime. Thus, you need a compiler.
DirectX Compiler
Visual Studio is such a powerhouse that many assume it has compilers for any
programming language, but neither Visual Studio 2010 nor Expression Blend 4 includes
a shader compiler. There is good news on the horizon though; the next version of Visual
Studio has some remarkable 3D editors, and it will have a shader compiler. In the
meantime, you need to find a compiler before you can continue.
Since HLSL is a part of DirectX you can use the FXC.exe compiler in the DirectX SDK.
FXC.exe is a small file; it's less than 200KB in size. Regrettably, the FXC compiler is
only available as part of the SDK and that SDK is a monster, using up over one gigabyte
of your hard drive space.
I use the FXC compiler for some of the examples in this book. If you want to follow
along you can find the DirectX SDK at
WPF Build Task
The good folks on the WPF team have a few open source projects on Codeplex
( ). If you snoop around their Codeplex site you'll find a shader
build task that doesn't require having the DirectX SDK installed
( Here's what is does. If it is installed it
enhances the normal MSBuild build process. It looks for any files with an .fx extension
within your WPF project. It compiles the source in that .fx file into a binary file (*.ps). It
has two exasperating limitations however; it not available for Silverlight projects and it
doesn't compile to the newer PS_3_0 specifications.
2
www.it-ebooks.info
O’Reilly Media, Inc. 4/5/2012
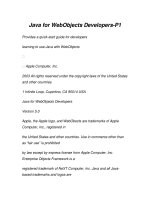
Shazzam Shader Editor
Shazzam Shader Editor is a free stand-alone tool for writing XAML shaders. If you
install Shazzam, you don't need to install the massive DirectX SDK as it has its own
compiler. It contains an HLSL code editor that has intellisense and code completion. That
might not seem like a big deal; until you learn that Visual Studio doesn't have intellisense
for HLSL files. Earlier in this chapter I mentioned the effect preview feature in
Expression Blend. Shazzam does Blend one better, featuring a spate of preview,
animation and comparison features. Shazzam has been available for the last four years
and has thousands of users around the world. It's the recommend shader tool in nearly
every Silverlight book on the market.
I have to tell you, in the interest of full disclosure, I'm the primary developer for
Shazzam. Of course I think it's the best tool available for learning XAML specific HLSL.
I encourage you to download a free copy from and see for
yourself. I use Shazzam extensively throughout this book, so be sure and read Chapter 6
to learn more about the tool.
Figure 2-1. Shazzam Shader Editor IDE
To install Shazzam, download the installer from shazzam-tool.com and follow the
prompts. The install takes less than a minute on most computers.
3
www.it-ebooks.info
O’Reilly Media, Inc. 4/5/2012
Other Tools to Consider
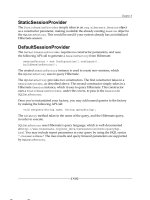
FX Composer
NVidia has a stake in the shader community and have a number of developer tools. One
of their more impressive applications is the FX Composer tool. It is aimed squarely at the
game development community and has tons of remarkable features. It boasts a shader
debugger, supports easy importation of 3D models, has a particle system generator, test
harness and many other cool enhancements.
Figure 2-2. NVidia FX Composer IDE
It's an impressive tool but I find it overkill for creating pixel shaders for Silverlight or
WPF. You can find it on the NVidia site at .
NShader
NShader ( is a Visual Studio extension, which provides
syntax highlighting for assorted shader languages including HLSL, Cg and GLSL. If you
write HLSL in Visual Studio, you may find this tool useful. It's strangely incomplete
though and misses some obvious HLSL functions like sampler2D().
Visual Studio Next
The next version of Visual Studio, code name Visual Studio 11, is available in a
developer preview. I've looked at the 3D tools and I'm impressed. Download a free copy
of the developer preview ( to see what's coming.
4
www.it-ebooks.info
O’Reilly Media, Inc. 4/5/2012
A First Shader Project
Traditionally the first application in most programming books is the ubiquitous "hello
world" application. Boring! I'll have none of that dreary code in this book. The cynical
reader will point out that writing text to the screen with a shader is nearly impossible but
let's not go there. I need a graphical demo that shows a shader in action, but also is
graphical in nature. With that in mind I decided to make the first project an image
transition application.
I want to say a couple words about terminology before going any
further. The terms shader and effect are pervasive and often used
interchangeably. On the .NET side of the aisle, the common term is
effect. Examine the UIElement class and you'll see that it has an Effect
dependency property. Tour the class libraries and you'll discover the
prebuilt DropShadowEffect and BlurEffect classes tucked amidst the
other familiar XAML types. In addition, there is the ShaderEffect base
class, which is used when creating your own custom effects.
On the HLSL side of the house the word effect has special meaning; in
this realm you can think of an effect as a shader package containing
multiples shaders targeting different hardware. The shader is the actual
algorithm run on the GPU. To summarize, when you write a custom
effect you create a .NET effect class and an HLSL shader.
Using prebuilt effects
Silverlight and WPF have two built-in effects: dropshadow and blur. These effects are
applicable to any UIElement, which includes any element in the visual tree. When an
effect is applied to an element it affects the element and all of its children elements. In
our first project, you'll place the effect on an Image element.
To begin, open your Visual Studio edition and choose File→New Project from the menu
bar (or press Ctrl-Shift-N). The New Project dialog opens, offering a number of options,
as shown in Figure 2-3.
5
www.it-ebooks.info
O’Reilly Media, Inc. 4/5/2012
Figure 2-3. The New Project dialog
Select the Silverlight Application template. Enter a name of your choosing and click OK.
Visual Studio will start creating a Silverlight application for you.
The New Silverlight Application dialog box will appear, asking whether you want to host
the application in a new Web site (Figure 2-4). For simple Silverlight applications, I
rarely create a host Web Project so I recommend unselecting that check box. Leave the
other options set to their defaults for now and click OK.
6
www.it-ebooks.info
O’Reilly Media, Inc. 4/5/2012
Figure 2-4. New Silverlight Application dialog
Use the Project→Add Existing Item menu bar to add a couple image files to the project.
Next, open the MainPage.xaml file and modify the following values on the UserControl
element.
[XML]
d:DesignHeight="600" d:DesignWidth="800"
Setting the DesignHeight and DesignWidth properties make it easier to see the images on
the Visual Studio designer.
Add the following XAML to the MainPage.xaml file.
Example 2-1. Add Images and Slider XAML
[C#]
<Grid x:Name="LayoutRoot"
Background="White">
<Grid.RowDefinitions>
<RowDefinition Height='380' />
<RowDefinition Height='40' />
</Grid.RowDefinitions>
<! set the Source to a valid path in your project >
<Image x:Name='StartImage'
Source='garden1.jpg'
Width='500'
7
www.it-ebooks.info
O’Reilly Media, Inc. 4/5/2012
Opacity='1'></Image>
<! set the Source to a valid path in your project >
<Image x:Name='EndImage'
Source='garden2.jpg'
Width='480'
Opacity='0'></Image>
<Slider x:Name='TransitionSlider'
Grid.Row='1'
Width ='500' />
</Grid>
The XAML in Example 2-1 creates two Image elements, one superimposed over the
other. The width of the EndImage is smaller than the StartImage to accentuate the
transition. There is also a Slider element, located at the bottom of the grid, which is used
to control the transition amount.
Here is what the UI looks like at this stage.
Figure 2-5. Transition project, phase 1
In the next phase you will add a couple lines of code to fade between the two images
when the slider is moved. Start by adding a ValueChanged event handler to the existing
XAML. Experienced XAML developers know that Visual Studio shows a New Event
Handler prompt (Figure 2-6) when adding event attributes in the XAML editor. Pressing
Tab at the prompt stubs in the correct attributes value and writes an event procedure in
the code behind.
8
www.it-ebooks.info
O’Reilly Media, Inc. 4/5/2012
Figure 2-6. The Insert New Event Handler prompt
When you are done, your XAML for the slider should look like Example 2-2.
Example 2-2. ValueChanged event text
[XML]
<Slider x:Name='TransitionSlider'
Grid.Row='1'
Width='500'
ValueChanged='TransitionSlider_ValueChanged' />
Press F7 to switch to the code behind view and add the following code to the C# file.
Example 2-3. The TransitionSlider_ValueChanged event code
[C#]
private void TransitionSlider_ValueChanged(object sender,
RoutedPropertyChangedEventArgs<double> e) {
// transition the images
var max = TransitionSlider.Maximum;
EndImage.Opacity = e.NewValue / max;
StartImage.Opacity = 1 - EndImage.Opacity;
}
As you can see, this code changes the opacity of the two Image elements. Opacity accepts
a value between 0.0 and 1.0 so the code uses a calculation to normalize the current slider
value to that range.
[C#]
e.NewValue / max
The last line ensures that when StartImage.Opacity is at 0.0, the EndImage.Opacity is set
to 1.0 and vice versa.
[C#]
StartImage.Opacity = 1 - EndImage.Opacity;
Run the application and drag the slider to change the value. The first image gradually
disappears as the second image fades into view.
Adding Effects
To make the transition more interesting you can apply a BlurEffect during the fade-in and
fade-out. The BlurEffect is nice choice for your first look at a built-in effect. It's one of
the built-in effects, it's available for Silverlight and WPF, and is quite simple to use.
There are different types of blur effects used in the graphics industry (motion blur, zoom
blur, Gaussian blur). The BlurEffect class is one of the simplest implementations,
9
www.it-ebooks.info
O’Reilly Media, Inc. 4/5/2012
providing a uniform unfocused look to the affected pixels. If you've ever looked through
a frosted translucent screen, you've seen the effect.
The BlurEffect uses a simplistic blur algorithm, which is effective but
slower than other potential blur implementations. A custom BoxBlur or
optimized Gaussian Blur outperforms the built-in WPF blur.
Each UIElement has an Effect property. In this project, the potential candidates for the
effect are the UserControl, Grid, Slider and the two Image elements. When you apply an
effect to a parent element, like the Grid, it affects all the children elements. Each element
can have only one effect set directly in its Effect property but can inherit other effects
from its parents. Imagine applying a BlurEffect to the parent Grid (LayoutRoot) and an
InvertColorEffect to StartImage. StartImage would have both effects applied while
EndImage would only show the blur effect.
The BlurEffect has one interesting property: Radius. You can think of Radius as the
strength of the blur effect. The higher the Radius value the fuzzier the output.
Here's how to add a BlurEffect in XAML.
Example 2-4. Add BlurEffect in XAML
[XML]
<Image x:Name='StartImage'
Source='garden1.jpg'
Width='500'
Opacity='1'>
<Image.Effect>
<BlurEffect
Radius='20' />
</Image.Effect>
</Image>
Of course, you can apply the effect in the code behind too.
Example 2-5. Add BlurEffect in code
[C#]
var blur = new System.Windows.Media.Effects.BlurEffect();
blur.Radius = 20;
StartImage.Effect = blur;
Now that the effect is applied, run the application. The UI should look similar to Figure
2-7.
10
www.it-ebooks.info
O’Reilly Media, Inc. 4/5/2012
Figure 2-7. Image element with blur effect
Are you ready to add the blur effect to the transition? Begin by setting the Radius value
to zero for the existing blur effect. Then add a blur to the EndImage (Example 2-6).
Example 2-6. Blur effect for both images
[XML]
<Image x:Name='StartImage'
Source='garden1.jpg'
Width='500'
Opacity='1'>
<Image.Effect>
<BlurEffect x:Name='StartImageBlur'
Radius='0' />
</Image.Effect>
</Image>
<Image x:Name='EndImage'
Source='garden2.jpg'
Width='480'
Opacity='0'>
<Image.Effect>
<BlurEffect x:Name='EndImageBlur'
Radius='0' />
</Image.Effect>
</Image>
11
www.it-ebooks.info
O’Reilly Media, Inc. 4/5/2012
Next, write some code to apply the blur gradually as the opacity level changes. Modify
the ValueChanged event handler as follows:
Example 2-7. Value Changed event procedure code
[C#]
// transition the images
var max = TransitionSlider.Maximum;
EndImage.Opacity = e.NewValue / max;
StartImage.Opacity = 1 - EndImage.Opacity;
// opacity is between 0.0 and 1.0
// we want a max blur radius of 20 so will multiply
// by 20
StartImageBlur.Radius = EndImage.Opacity * 20;
EndImageBlur.Radius = StartImage.Opacity * 20;
The project is finished. Run the application and watch the transition. As the first image
fades away it gets more blurry while the second image fades in and snaps into focus. Nice
effect! (pun intended). I'll show you how to create a custom effect soon, but first a word
about performance.
Debrief
I have a few quibbles with this code, for one, the performance might be improved by
consolidating the effects. There are two blur effects applied to an overlapped area of the
screen. If you are seeing perf issues during testing this is an area worthy of further
research. To consolidate, you could remove the image effects, wrap the two Images
inside another container and apply the blur to the parent container. You can't use the
current grid (LayoutRoot), because the blur would alter all children including the slider
element. The solution is to add another grid and place the images in the new grid. You'd
have to change the transition code too.
Custom Shader
Now that you have some rudimentary experience working with a prebuilt effect, it's time
to consider writing a custom one. Custom shaders are necessary when an existing effect
doesn't do what you need. Let's say you read an article describing a faster blur algorithm
and you decide to alter the BlurEffect to use the newer algorithm. If you wait for
Microsoft to release a new version, who knows how long you'll have to wait. In this
situation, you are better off writing your own effect.
For your first custom shader I picked a simple color modification effect. The shader code
is childishly simple, just to give you an overview of the custom shader process. I promise
there are more details coming as you read deeper into this book.
There are a few common steps necessary in creating a custom shader.
• Create a text file containing your HLSL code
• Compile the HLSL into a binary file
• Add the binary shader file to a XAML project and mark as project resource
• Create a .NET wrapper class to expose the shader to your project
12
www.it-ebooks.info
O’Reilly Media, Inc. 4/5/2012
• Compile the project
• Instantiate your shader and assign to an element Effect property
Create a Shader Algorithm
Crafting a custom shader starts by creating a text file and adding some HLSL code.
Example 2-8 shows how to write a simple InvertColor shader.
Example 2-8. HLSL code for InvertColor shader
[C#]
sampler2D InputTexture;
flo n(float2 TEXCOORD) : COLOR { at4 mai uv :
float4 color = tex2D( InputTexture, uv );
float4 invertedColor = float4(color.a - color.rgb, color.a);
return invertedColor;
}
There is not much code in this example, but it's sufficient to reverse the color on every
pixel in the input stream.
The first line declares the input source, InputTexture, for the shader.
[C#]
sampler2D InputTexture;
In your sample application, this InputTexture corresponds to pixels contained in the
Image elements. Next is a function declaration.
[C#]
float4 main(float2 uv : TEXCOORD) : COLOR {
As you can see the function is named main and returns a float4 value. That float4
represents the color value for the modified pixel, which is destined for the computer
screen. You can think of a float4 as containing four values corresponding to the color
values (red, green, blue, alpha). The next two lines sample a pixel from the input source
and calculate the new output color, which is stored in the invertedColor variable.
[C#]
float4 color = tex2D( InputTexture, uv );
float4 invertedColor = float4(color.a - color.rgb, color.a);
Finally, the inverted color is returned from the function call.
[C#]
return invertedColor;
Compile the HLSL Code
Next, it is necessary to compile the InvertColor shader code into a binary file. By
convention, this binary file ends with a .ps extension. There are a number of ways to
compile shader source code. For this first walkthrough, you will use the FXC.EXE
compiler that ships with the DirectX SDK. If you have the SDK installed you can open a
DirectX command prompt from the Windows Start menu as shown in Figure 2-8.
13
www.it-ebooks.info
O’Reilly Media, Inc. 4/5/2012
Figure 2-8. The DirectX Command prompt on the Start menu
At the DirectX prompt run the FXC compiler with this entry.
fxc /T ps_2_0 /E main /Fo output.ps invertcolor.txt
The compiler takes the code in the invertcolor.txt file and compiles it into the output.ps
file. There are various switches specified that tell the compiler to use the main function as
the shader entry point and to compile with the ps_2_0 shader specification.
Be forewarned, FXE is finicky about encoding types for the input file, it prefers ASCII
and doesn't like Unicode encoded text files.
Add to Visual Studio XAML Project
The next step in the process is to add the ps file to a XAML project. Be sure and set the
Build Action for the file to Resource as shown in Figure 2-9 .
14
www.it-ebooks.info
O’Reilly Media, Inc. 4/5/2012
Figure 2-9. Set the Build Action property to Resource
Create a .NET wrapper class
To use a pixel shader you need a way for .NET code to interact with it. The prescribed
means to accomplish this is to write a wrapper class. The class derives from the
ShaderEffect base class and exposes dependency properties to manipulate shader
15
www.it-ebooks.info
O’Reilly Media, Inc. 4/5/2012
properties. The simple InvertColor shader doesn't provide any shader properties so the
example wrapper class will be small.
Add a class to the project and insert the following code.
Example 2-9. InvertColorEffect wrapper class
[C#]
public class InvertColorEffect : ShaderEffect
{
private PixelShader pixelShader = new PixelShader();
public InvertColorEffect() {
pixelShader.UriSource =
new Uri("/Ch02_CustomEffect;component/output.ps", UriKind.Relative);
this.PixelShader = pixelShader;
this.UpdateShaderValue(InputProperty);
}
public static readonly DependencyProperty InputProperty =
ShaderEffect.RegisterPixelShaderSamplerProperty("Input",
typeof(InvertColorEffect), 0);
// represents the InputSource for the shader
public Brush Input {
get {
return ((Brush)(this.GetValue(InputProperty)));
}
set {
this.SetValue(InputProperty, value);
}
}
}
You may recall that the .NET wrapper must instruct Silverlight or WPF to load the binary
resource. In WPF, the binary is loaded into the GPU, in Silverlight it's loaded into the
virtualized GPU. You can see the loader code in the constructor.
[C#]
pixelShader.UriSource =
new Uri("/Ch02_CustomEffect;component/output.ps",
UriKind.Relative);
There is also a single dependency property name InputProperty. This property
represents the input into the shader. In other words, it's the data provided by the
rasterizer. The dependency property follows the XAML convention and looks like you
would expect; with one small difference.
[C#]
public static readonly DependencyProperty InputProperty =
ShaderEffect.RegisterPixelShaderSamplerProperty("Input",
typeof(InvertColorEffect), 0);
16
www.it-ebooks.info