Pentaho Reporting 3.5 for Java Developers- P2
Bạn đang xem bản rút gọn của tài liệu. Xem và tải ngay bản đầy đủ của tài liệu tại đây (1.46 MB, 50 trang )
Chapter 2
[
33
]
The report canvas, shown in the center of the previous screenshot, is where you
dene the look of your report. Note that at this point you haven't decided if the
report will be rendered as PDF, RTF, or Excel. In fact, any report denition can be
rendered in all of those formats. Therefore, at this point, you do not have to worry
about that.
The report canvas contains a set of bands that together make up a report. Bands
include the Report Header and Report Footer, individual Group Header and Group
Footer bands, as well as a Details band that is rendered for each row of data. Reports
may also contain a page header and footer.
To the left of the canvas is a palette where you can choose the various report elements
you would like to include in your report, such as labels, elds, and graphics. You can
drag-and-drop these report elements into the various sections of the report canvas.
To the right of the canvas is the Structure tab and Data tab. Below these tabs, the
details of the currently selected structure or data item are displayed. The Master
Report structure tree includes details about every report object displayed on the
report canvas, while the report data tree includes details about the report's data
source information, parameters, and functions.
Below the canvas is an optional messages panel that displays help, warning, and
error messages that help you understand what might be wrong with your report.
An example message might be an undened eld warning.
You can hide any of the panels around the canvas by changing their visibility within
the Window menu. This can help manage your screen while designing reports.
You'll now begin to create a very basic report with the Report Designer.
This material is copyright and is licensed for the sole use by David Martone on 16th September 2009
710 South Avenue West, , Westfield, , 07090Please purchase PDF Split-Merge on www.verypdf.com to remove this watermark.
Pentaho Reporting Client and Enterprise Examples
[
34
]
Creating and conguring your rst
data source
First, you need to dene a dataset that you want to report on. To keep things simple,
this example will have you enter some example data into a table dataset. Click on the
Data tab on the righthand side of Report Designer. Now, right-click on the Data Sets
tree item and select Table. The following dialog will appear:
Click the add query image button, and then enter the Name as
default
for the table.
This name will be referenced in your report as the main source of data. Click the
add column image button to add a third column. Double-click and edit the column
headers to be Library Name, Library Description, and Library Size. Double-click
on the Library Size column header table cell and select
java.lang.Integer
as
the data type for this column. Enter the following data into the table cells, clicking
the add row image button to add additional rows of data. An empty report titled
chapter2_tabledata.prpt
is available with this book, in order to avoid the need
to type this data.
Library Name Library Description Library Size
LibBase
Library containing common functions 121745
LibLoader
Loading and caching library 122900
LibSerializer
Java serialization utility library 25689
LibRepository
Hierarchical storage library 63655
LibXml
XML utility library 72896
LibFormula
Implementation of OpenFormula 368263
LibFonts
Font utility library 248320
LibDocBundle
ZIP bundle library 71186
LibFormat
String formatting library 69464
Report Engine Core
Base report engine 3375047
Report Engine Extensions
Group of common extensions 92335
This material is copyright and is licensed for the sole use by David Martone on 16th September 2009
710 South Avenue West, , Westfield, , 07090Please purchase PDF Split-Merge on www.verypdf.com to remove this watermark.
Chapter 2
[
35
]
The library sizes shown here may vary between releases of
Pentaho Reporting, so they might not actually match the
current size of the JAR les.
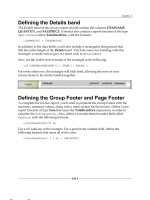
Once you've entered data in your table, the Table Datasource Editor dialog should
look similar to this:
Now click the OK button. You should see the expanded Data Sets tree with
the three new columns, as shown in the following screenshot:
Report layout
With the dataset dened, it's now time to build a very simple report. In this report,
you'll include a report title, column headings, and a details band for the reporting
libraries. You will also include a summary section displaying the total number of
libraries, as well as the sum of their sizes.
This material is copyright and is licensed for the sole use by David Martone on 16th September 2009
710 South Avenue West, , Westfield, , 07090Please purchase PDF Split-Merge on www.verypdf.com to remove this watermark.
Pentaho Reporting Client and Enterprise Examples
[
36
]
Creating the report title
From the palette on the left, drag a Label report element over to the upper left of
the report's Report Header. Edit the label by either double-clicking directly on it, or
by selecting the value property on the right side in the Attributes tab panel. Enter
Pentaho Report Engine Library Report as the title of the report. Also, adjust the font
and size of this label. Making sure you have the label selected, change the font size in
the top toolbar from 10pt to 16pt. Also, select the bold font option. At this point, you
may need to resize the label to display the entire report title. Move the mouse to the
bottom right of the label and drag the label to accommodate the size of the title.
Creating column headings
Below the report title, add three more labels that will represent the column headings
for the details data. The three labels should be Library Name, Library Description,
and Library Size. You may want to enable Snap Guides, which renders a rectangle
around the labels, making it easier to view their alignments. To do this, select the
View | Guides | Snap option in the main menu.
Also, add a horizontal-line report element below the labels to distinguish the header
row from the data. You may adjust the line width and color by editing the stroke
and text-color style attributes of the line in the Style tab panel appearing on
the right side of the window.
This material is copyright and is licensed for the sole use by David Martone on 16th September 2009
710 South Avenue West, , Westfield, , 07090Please purchase PDF Split-Merge on www.verypdf.com to remove this watermark.
Chapter 2
[
37
]
Populating the details band
The details band of the report will repeat itself for each row of data, provided by
the dataset in the report. The example dataset includes eleven libraries, so there
will be eleven individual rows represented by the objects placed in the details band.
To place the dataset elds in the details band, select the Data tab, and then
drag-and-drop the Library Name, Library Description, and Library Size elds
into the details band, resizing them appropriately to t the report.
This material is copyright and is licensed for the sole use by David Martone on 16th September 2009
710 South Avenue West, , Westfield, , 07090Please purchase PDF Split-Merge on www.verypdf.com to remove this watermark.
Pentaho Reporting Client and Enterprise Examples
[
38
]
Creating a report summary
As the nal step in completing the report, add a summary section that includes the
total number of libraries in the report, along with a total of space needed for all the
libraries. First, place a line element at the top of the Report Footer band. Also,
place two labels—Library Count: and Total Library Size:—close to the right side
of the report.
It's now time to create the functions necessary to calculate the total number of
libraries and their size. Click on the Data tab and right-click on the Functions item
in the tree. Click the Add Function… menu item. Select the Count (Running)
function within the Running functions group and click Add. Name the function
Library Count. Also add a Sum (Running) function, which is located in the Running
functions group. Name the function Total Library Size. Set the Field Name to
Library Size.
Finally, drag-and-drop the Library Count and Total Library Size functions into
the Report Footer band. Feel free to adjust the style of these labels and elds.
Previewing and saving your report
The Report Designer allows you to preview your report by clicking on the Preview
icon in the toolbar above the canvas. Alternatively, you may preview the report in
various output formats by clicking on the menu File | Preview As. Take a look at
the example report to make sure all elds appear and render appropriately.
This material is copyright and is licensed for the sole use by David Martone on 16th September 2009
710 South Avenue West, , Westfield, , 07090Please purchase PDF Split-Merge on www.verypdf.com to remove this watermark.
Chapter 2
[
39
]
Once you are satised with the look of your report, save the report for later access
by the Swing and J2EE examples. Go to File | Save As, and save this report as
chapter2/data/chapter2_report.prpt
, in order to access it later.
The
prpt
le generated by the Report Designer is similar to OpenOfce.orgs's
OpenDocument format. This le is a ZIP bundle that includes a main report XML
le, along with other supporting les, including any necessary images, data source
information, sub-reports, and more. If you are interested in viewing the contents of
the le, use your favorite unzip utility and extract the included les.
You've successfully built your rst report with Pentaho Reporting! Now you'll need
a place to execute your report. For non-developers, Pentaho provides an open source
business intelligence reporting server, discussed in the last chapter of this book. The
next two examples demonstrate embedding your report into a custom Swing and
J2EE application.
This material is copyright and is licensed for the sole use by David Martone on 16th September 2009
710 South Avenue West, , Westfield, , 07090Please purchase PDF Split-Merge on www.verypdf.com to remove this watermark.
Pentaho Reporting Client and Enterprise Examples
[
40
]
Embedding your report in a Swing
application
You're now going to leave the world of what-you-see-is-what-you-get report
building and enter Java land. This example includes dening a simple Swing
application that will include Pentaho Reporting's Swing preview dialog,
affectionately named
PreviewDialog
. The example application will simply render
a report. With the help of the
PreviewDialog
helper widget, you'll be able to save
the report in a variety of formats, along with being able to preview and print right
from the application.
Setting up the Swing example application
The rst step in building the application is to dene a Swing application shell.
This example shell is an extremely simple Swing application that is only a few
lines of Java code. You'll start adding to it once you've got the initial application
dened and once it is successfully compiled. In the chapter2 directory, create two
new subdirectories called
src
and
lib
. The
src
subdirectory will contain the
entire example source, and the
lib
subdirectory will contain all the necessary JAR
dependencies. Create the le
Chapter2SwingApp.java
in the
src
directory with
the following Java code:
import java.awt.*;
import java.awt.event.*;
import javax.swing.*;
public class Chapter2SwingApp extends JFrame {
// constructor which displays the simple
// application shell
public Chapter2SwingApp() {
super("Chapter 2");
// exit the JVM when the window is closed
this.addWindowStateListener(new WindowAdapter() {
public void windowClosed(WindowEvent e) {
System.exit(0);
}
});
// display a preview and exit button in the
// main window of the example application.
add(new JLabel("Chapter 2 Swing Application"));
JPanel buttonPanel = new JPanel();
JButton previewButton = new JButton("Preview");
This material is copyright and is licensed for the sole use by David Martone on 16th September 2009
710 South Avenue West, , Westfield, , 07090Please purchase PDF Split-Merge on www.verypdf.com to remove this watermark.
Chapter 2
[
41
]
JButton exitButton = new JButton("Exit");
buttonPanel.add(previewButton);
buttonPanel.add(exitButton);
add(buttonPanel, BorderLayout.SOUTH);
previewButton.addActionListener(new ActionListener() {
public void actionPerformed(ActionEvent e) {
onPreview();
}
});
exitButton.addActionListener(new ActionListener() {
public void actionPerformed(ActionEvent e) {
System.exit(0);
}
});
}
// The onPreview method is called when the preview
// button is pressed
public void onPreview() {
// TODO: Load Report and Launch the Preview Dialog
}
// the main method is the entry point into our application
public static void main(String args[]) {
// TODO: Initialize the Reporting Engine
Chapter2SwingApp app = new Chapter2SwingApp();
app.pack();
app.setVisible(true);
}
}
For now, the code contains two TODO comments where Pentaho Reporting Engine
integration code will go. To compile and run this application, you'll need to dene a
simple Ant
build.xml
le, located in the
chapter2
folder. This le includes all the
necessary targets and classpath entries for building the complete Swing application.
<?xml version="1.0" encoding="UTF-8"?>
<project name="Chapter 2 Examples" default="run">
<path id="classpath">
<fileset dir="lib">
<include name="*.jar" />
</fileset>
This material is copyright and is licensed for the sole use by David Martone on 16th September 2009
710 South Avenue West, , Westfield, , 07090Please purchase PDF Split-Merge on www.verypdf.com to remove this watermark.
Pentaho Reporting Client and Enterprise Examples
[
42
]
</path>
<path id="runtime_classpath">
<fileset dir="lib">
<include name="*.jar" />
</fileset>
<dirset dir="classes"/>
</path>
<target name="clean">
<delete dir="classes"/>
</target>
<target name="compile">
<mkdir dir="classes"/>
<javac classpathref="classpath" destdir="classes"
fork="true" srcdir="src"/>
</target>
<target name="run" depends="compile">
<java fork="true" classpathref="runtime_classpath"
classname="Chapter2SwingApp"/>
</target>
</project>
The rst Ant build target,
clean
, clears out the compiled class les from the
classes
directory. The second Ant build target,
compile
, generates the class les and
places them in the
classes
directory. The nal Ant build target,
run
, executes the
Chapter2SwingApp
Java application.
You've now set up the Java application shell and build script. Verify that you can run
the Swing application by typing
ant
in the
chapter2
project directory. You should
see a window appear with a Preview and an Exit Button.
This material is copyright and is licensed for the sole use by David Martone on 16th September 2009
710 South Avenue West, , Westfield, , 07090Please purchase PDF Split-Merge on www.verypdf.com to remove this watermark.
Chapter 2
[
43
]
Incorporating Pentaho Reporting into the
application
As the rst step towards integrating Pentaho Reporting into your example application,
you need to copy the necessary reporting engine JAR les. These JAR les are already
a part of the Pentaho Report Designer located in the designer's
lib
directory. You
simply need to copy them into the
chapter2/lib
directory. Each JAR le appears
with a version number in the Report Designer. Because the version numbers may vary,
they are not included in this list. Following is the list of the JAR les that you must
copy into
chapter2/lib
for the examples to compile and run successfully:
•
commons-logging-api.jar
•
itext.jar
•
poi.jar
•
libbase.jar
•
libdocbundle.jar
•
libfonts.jar
•
libformat.jar
•
libformula.jar
•
libloader.jar
•
librepository.jar
•
libserializer.jar
•
libxml.jar
•
pentaho-reporting-engine-classic-core.jar
•
pentaho-reporting-engine-classic-extensions.jar
In addition to the eleven libraries discussed in the rst chapter, you must also
include three external libraries. Pentaho Reporting uses Apache Commons Logging
for logging, iText for rendering PDF documents, and POI for rendering Excel
documents. Additional libraries are required when working with charts and other
extensions to the reporting engine.
This material is copyright and is licensed for the sole use by David Martone on 16th September 2009
710 South Avenue West, , Westfield, , 07090Please purchase PDF Split-Merge on www.verypdf.com to remove this watermark.
Pentaho Reporting Client and Enterprise Examples
[
44
]
Now that the JAR les have been copied, you can begin writing the
necessary integration code, embedding Pentaho Reporting into your sample
Chapter2SwingApp.java
source le. First, start off by initializing the reporting
engine within the application's main method:
public static void main (String args[]) {
// TODO: Initialize the Reporting Engine
ClassicEngineBoot.getInstance().start();
Chapter2SwingApp app = new Chapter2SwingApp();
This single line of code allows the Pentaho Reporting Engine to boot up. The boot
up process includes loading system fonts and initializing the engine, based on
conguration properties. In this rst example, you do not need to adjust any of the
default initialization behavior of the engine. In future chapters, you'll explore the
startup process in more detail. To compile, you must also add the following import
to the beginning of the le:
import org.pentaho.reporting.engine.classic.core.ClassicEngineBoot;
You are now ready to write the code to render the report using the reporting engine's
Swing
PreviewDialog
helper widget. There are two steps to this process, loading the
report and launching the preview dialog. First, add the following lines to the preview
button's
ActionListener.handleAction()
method to load the report denition:
public void handleAction() {
// TODO: Load Report and Launch the Preview Dialog
try {
// load report definition
ResourceManager manager = new ResourceManager();
manager.registerDefaults();
Resource res = manager.createDirectly(
new URL("file:data/chapter2_report.prpt"),
MasterReport.class);
MasterReport report = (MasterReport) res.getResource();
To load the report, use LibLoader's
ResourceManager
to generate a
MasterReport
object. The
ResourceManager.createDirectly()
API call may throw a
ResourceException
, if the resource is not available or fails to load. In addition
to this code, you must also add the following Java imports:
import java.net.URL;
import org.pentaho.reporting.engine.classic.core.MasterReport;
import org.pentaho.reporting.libraries.resourceloader.Resource;
import org.pentaho.reporting.libraries.resourceloader.ResourceManager;
This material is copyright and is licensed for the sole use by David Martone on 16th September 2009
710 South Avenue West, , Westfield, , 07090Please purchase PDF Split-Merge on www.verypdf.com to remove this watermark.
Chapter 2
[
45
]
Now that the report is loaded, you can launch the preview dialog:
// launch the preview dialog
final PreviewDialog preview = new PreviewDialog(report);
preview.addWindowListener(new WindowAdapter() {
public void windowClosing (final WindowEvent event) {
preview.setVisible(false);
}
});
preview.pack();
preview.setVisible(true);
The only parameter provided to the preview dialog is the
MasterReport
object.
The
setVisible(true)
call renders the dialog on screen.
The following import must also be added:
import org.pentaho.reporting.engine.classic.core.modules.gui.base.
PreviewDialog;
To nish the
onPreview()
method, you need to handle the exceptions thrown
by the three sections you just wrote. The two types of exceptions thrown,
ResourceException
, which is thrown when loading the report, and the
IOException
,
which may be thrown when parsing the URL string, both need to be caught:
} catch (ResourceException e) {
e.printStackTrace();
} catch (IOException e) {
e.printStackTrace();
}
}
The following two imports must be added to complete the
handleAction()
method:
import java.io.IOException;
import org.pentaho.reporting.libraries.resourceloader.
ResourceException;
In this example application, any thrown exceptions are printed to standard error.
In production applications that you build, you may want to present the error in a
dialog, or handle the exception differently.
This material is copyright and is licensed for the sole use by David Martone on 16th September 2009
710 South Avenue West, , Westfield, , 07090Please purchase PDF Split-Merge on www.verypdf.com to remove this watermark.
Pentaho Reporting Client and Enterprise Examples
[
46
]
With this nal set of code, you've now completed the rst example of embedding
Pentaho Reporting into a Swing application. In just 19 lines of code and 8 imports,
you've added reporting capabilities to your application! Run the
ant
command
again and see the results:
You can now see a preview of the report in your Swing application. From the
preview dialog, you can export the report to the HTML, Excel, PDF, RTF, or CSV
format by clicking on the Export menu. Or you can click the print icon to send the
report directly to the printer. Here are a few example screenshots of rendered
output formats:
This material is copyright and is licensed for the sole use by David Martone on 16th September 2009
710 South Avenue West, , Westfield, , 07090Please purchase PDF Split-Merge on www.verypdf.com to remove this watermark.
Chapter 2
[
47
]
Embedding your report in an enterprise
web application
To take this example one step further, the following steps demonstrate how to embed
your report into a simple Tomcat J2EE application.
Setting up the example Tomcat application
To begin, you must dene your Tomcat web application. This includes building a
Web Application Archive (WAR). The rst step is to create a few directories in the
existing
chapter2
example project. Create the following directories:
•
war
•
war/WEB-INF
•
war/WEB-INF/lib
This material is copyright and is licensed for the sole use by David Martone on 16th September 2009
710 South Avenue West, , Westfield, , 07090Please purchase PDF Split-Merge on www.verypdf.com to remove this watermark.
Pentaho Reporting Client and Enterprise Examples
[
48
]
Once you've dened those directories, you need to dene a
web.xml
le in the
war/WEB-INF
directory as follows:
<?xml version="1.0" encoding="UTF-8"?>
<web-app>
</web-app>
This le will eventually include a very basic reporting servlet.
You also need to dene an
index.html
le in the
war
directory:
<html>
<body>
<h1>Example Application</h1>
<p>This is an example application demonstrating how to embed Pentaho
Reporting into your web application.</p>
</body>
</html>
Now, you need to update the project's Ant
build.xml
le with additional properties
and a
war
target. First, add the following property and update the classpath
reference with a pointer to the
servlet-api.jar
le, necessary for compiling the
servlet class:
<property name="tomcat.home" value="c:/apache-tomcat-5.5.25"/>
<path id="classpath">
<fileset dir="lib">
<include name="*.jar" />
</fileset>
<fileset file="${tomcat.home}/common/lib/servlet-api.jar"/>
</path>
Make sure to replace the example
tomcat.home
value with the reference to your
Tomcat installation location. Also, add the following
war
and
start_tomcat
targets
at the end of the le:
<target name="war" depends="compile">
<delete file="chapter2.war"/>
<war basedir="war" destfile="chapter2.war" webxml="war/WEB-
INF/web.xml">
<classes dir="classes"/>
<zipfileset dir="data" prefix="data"/>
<zipfileset dir="lib" prefix="WEB-INF/lib"/>
</war>
<delete dir="${tomcat.home}/webapps/chapter2"/>
<delete file="${tomcat.home}/webapps/chapter2.war"/>
<copy file="chapter2.war" todir="${tomcat.home}/webapps"/>
This material is copyright and is licensed for the sole use by David Martone on 16th September 2009
710 South Avenue West, , Westfield, , 07090Please purchase PDF Split-Merge on www.verypdf.com to remove this watermark.
Chapter 2
[
49
]
</target>
<target name="start_tomcat" depends="war">
<exec timeout="1000" dir="${tomcat.home}/bin"
executable="${tomcat.home}/bin/shutdown.bat"/>
<sleep seconds="2"/>
<exec dir="${tomcat.home}/bin"
executable="${tomcat.home}/bin/startup.bat"/>
</target>
Now, run the
ant war
command from the command line. The
war
target clears out
the existing
chapter2
web application and deploys a new project. To restart your
Tomcat server, run
ant start_tomcat
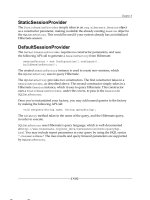
. Once you've started the server, you should
be able to visit
http://localhost:8080/chapter2/
and see the following screen:
Incorporating Pentaho Reporting into the
web application
Now that you have a basic web application congured, you can start writing code.
Start off by writing a simple servlet that serves up reports based on user requests.
Begin with the skeleton of an
HttpServlet
. Place the following code into
Chapter2Servlet.java
, located in the project's
src
directory:
import java.io.IOException;
import javax.servlet.*;
import javax.servlet.http.*;
public class Chapter2Servlet extends HttpServlet {
// servlet initialization method
public void init(ServletConfig config) throws
This material is copyright and is licensed for the sole use by David Martone on 16th September 2009
710 South Avenue West, , Westfield, , 07090Please purchase PDF Split-Merge on www.verypdf.com to remove this watermark.
Pentaho Reporting Client and Enterprise Examples
[
50
]
ServletException {
super.init(config);
// TODO: Initialize the Reporting Engine
}
// the doGet method handles all the requests
// received by this servlet
public void doGet(HttpServletRequest request, HttpServletResponse
response)
throws ServletException, IOException {
// TODO: Handle Pentaho Report Request
}
// the doPost method simply calls the doGet method
public void doPost(HttpServletRequest request, HttpServletResponse
response)
throws ServletException, IOException {
doGet(request, response);
}
}
Now that you have a baseline
HttpServlet
to work with, you can start to add the
necessary initialization and service code to generate a report. Add the following code
to the
init()
method of the
Chapter2Servlet
class. Notice that this is identical to
the initialization code seen earlier in the Swing example application.
public void init(ServletConfig config) throws ServletException {
super.init(config);
// TODO: Initialize the Reporting Engine
ClassicEngineBoot.getInstance().start();
}
Now, you'll add the necessary code to the
doGet()
method for serving up PDF les.
The following two steps are similar to the two steps in the Swing client example
code. First, load the report denition from disk:
// TODO: Handle Pentaho Report Request
try {
// load report definition
ResourceManager manager = new ResourceManager();
manager.registerDefaults();
String reportPath = "file:" +
this.getServletContext().getRealPath("data/chapter2_report.prpt");
Resource res = manager.createDirectly(new URL(reportPath),
MasterReport.class);
MasterReport report = (MasterReport) res.getResource();
This material is copyright and is licensed for the sole use by David Martone on 16th September 2009
710 South Avenue West, , Westfield, , 07090Please purchase PDF Split-Merge on www.verypdf.com to remove this watermark.
Chapter 2
[
51
]
Notice that the only difference between the Swing example code and the servlet code
is the use of a
ServletContext
object to locate the report denition. Now that you've
loaded the report, you need to generate and return the PDF to the requesting client:
// render the pdf
response.setContentType("application/pdf");
PdfReportUtil.createPDF(report, response.getOutputStream());
This step is the signicant difference between the Swing and the servlet example.
In the Swing example, a print preview dialog is rendered. On the other hand, in
the servlet example, a direct call is made into the
PdfReportUtil
to write the PDF
to the
HttpServletResponse
object's
OutputStream
. Notice that before writing
the binary data, the response's content type is set to
application/pdf
. This noties
the browser that the server is transferring a PDF le to the client.
The nal change to the
doGet()
method is catching any potential exceptions
being thrown:
} catch (ResourceException e) {
e.printStackTrace();
}
In writing your enterprise applications, you should handle the exceptions
appropriately. Now that you've completed the
doGet()
method, you need to make
sure and include the necessary Java imports:
import java.net.URL;
import org.pentaho.reporting.engine.classic.core.MasterReport;
import org.pentaho.reporting.engine.classic.core.ClassicEngineBoot;
import org.pentaho.reporting.engine.classic.core.modules.output.
pageable.pdf.PdfReportUtil;
import org.pentaho.reporting.libraries.resourceloader.Resource;
import org.pentaho.reporting.libraries.resourceloader.
ResourceException;
import org.pentaho.reporting.libraries.resourceloader.ResourceManager;
Most of these imports were included in the Swing client example. You've now
successfully built a complete servlet that generates a Pentaho Report in PDF format.
In just a few short lines of code, you can generate a report!
This material is copyright and is licensed for the sole use by David Martone on 16th September 2009
710 South Avenue West, , Westfield, , 07090Please purchase PDF Split-Merge on www.verypdf.com to remove this watermark.
Pentaho Reporting Client and Enterprise Examples
[
52
]
Once you've completed updating the servlet code, you need to update the
web.xml
and
index.html
to serve the report. Add the following XML to the
web-app
parent
element in the
web.xml
le. This makes sure that the servlet gets initialized and
mapped to the correct URL.
<servlet>
<servlet-name>Chapter2Servlet</servlet-name>
<servlet-class>Chapter2Servlet</servlet-class>
</servlet>
<servlet-mapping>
<servlet-name>Chapter2Servlet</servlet-name>
<url-pattern>/report</url-pattern>
</servlet-mapping>
The nal update involves providing a link to the report from the
index.html
le.
Right below the
</p>
tag, add the following HTML:
<a href="report">Generate PDF Report</a>
You are now ready to deploy the fully functional example
chapter2
web
application. Run the
ant start_tomcat
target command, which stops Tomcat,
builds a new WAR, and then restarts Tomcat. You should now be able to visit
http://localhost:8080/chapter2/
and view the example PDF!
This material is copyright and is licensed for the sole use by David Martone on 16th September 2009
710 South Avenue West, , Westfield, , 07090Please purchase PDF Split-Merge on www.verypdf.com to remove this watermark.