tutorial 2 opencv for android setup windows
Bạn đang xem bản rút gọn của tài liệu. Xem và tải ngay bản đầy đủ của tài liệu tại đây (190.75 KB, 9 trang )
1
Tutorial on Using OpenCV for Android Projects
EE368 Digital Image Processing, Spring 2012
Windows Version
Introduction
In this tutorial, we will learn how to install OpenCV for Android on your computer and how to
build Android applications using OpenCV functions. The tutorial is split into two parts. In the
first part, we will explain how to download and install the OpenCV library onto your computer.
Then, in the second part, we will explain how to build an application that draws different types
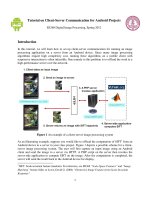
of feature keypoints directly in the video viewfinder of the Android device, as shown in Figure 1.
Figure 1. Android application drawing MSER feature keypoints on a viewfinder frame.
Demo video:
Please note that this tutorial assumes that you have successfully completed the other Android
tutorial for EE368, “Tutorial on Using Android for Image Processing Projects”, which explains
how to install the Java JDK, the Android SDK, and the Eclipse IDE. You will need to have
already installed all the software tools mentioned in that other tutorial before moving onto this
tutorial.
Estimated time to complete this tutorial: 3 hours
2
Part I: Installing OpenCV for Android
1
Downloading and Installing Cygwin
Cygwin allows us to execute Linux commands on Windows, which is required for building
the OpenCV library.
1. We need to install Cygwin on a Windows account without spaces in the name. For
example, if your account name is “John Doe”, this will cause problems for the subsequent
steps. In that case, create a new account named “JohnDoe” (without spaces) and run all
the following steps on the new account.
2. Download the latest installer file from this website:
3. Run the downloaded installer file “setup.exe”.
4. Choose “Install from Internet”.
5. Choose an install location without spaces in the path; we recommend:
C:\\cygwin
6. Choose a location to store the installation files; we recommend:
C:\\cygwin\\local_packages
7. Choose “Direct Connection” and pick a download site. We found the following site gives
a fast response:
8. When asked to choose which packages to install, click the looped arrow symbol next
to “All” until the option for every package changes to “Install”, as shown in Figure 2.
Then, click “Next”.
Figure 2. Selecting packages to install for Cygwin.
1
Parts of this tutorial borrow explanations from the OpenCV website (opencv.willowgarage.com/wiki/Android).
3
9. Make sure “Select required packages” is checked. Now, all the packages will be
downloaded and installed. This process can take a while, maybe 1 hour or more.
10. Choose to create a shortcut to the Cygwin terminal on your desktop.
11. Some useful tips about working with Cygwin are available here:
Downloading and Installing Tortoise SVN
We need a program that allows us to easily check out SVN repositories. Tortoise SVN is a
program that integrates nicely into the Windows shell, so you can simply right click and
execute SVN commands from the popup menu. If you already use another SVN tool, feel
free to skip installation of Tortoise SVN.
1. Download the program from this website:
2. Install Tortoise SVN on your computer. You may need to restart your computer.
Downloading and Installing Android NDK
The Android NDK enables us to compile and run native C/C++ code on Android.
1. Download “android-ndk-r4-windows-crystax-4.zip” from this website:
2. Unzip the downloaded file to the current user’s home directory for Cygwin, for example:
C:\\cygwin\\home\\JohnDoe\\android-ndk-r4-crystax
Unzipping the NDK contents to any other folder can cause problems later on.
Downloading and Installing Apache Ant
We need Apache Ant to help us build certain Java programs.
1. Download the zip file from this website:
2. Unzip the downloaded file to a convenient location; we recommend:
C:\\apache-ant-1.8.3
Downloading and Installing OpenCV
Now, we are ready to download and install the OpenCV library.
1. SVN check out revision 4826 of the OpenCV package from this location:
Check out into a convenient location; we recommend:
C:\\cygwin\\home\\JohnDoe\\opencv
4
2. Make sure important programs are in the PATH.
a. Find the user’s startup “.bashrc” file, located (for example) in
C:\\cygwin\\home\\JohnDoe. Add the following lines to “.bashrc”:
export NDK=/home/JohnDoe/android-ndk-r4-crystax
export SDK=”/cygdrive/c/Program Files (x86)/Android/android-sdk”
export ANT_HOME=/cygdrive/c/apache-ant-1.8.3
export OPCV=/home/JohnDoe/opencv
export JAVA_HOME=”/cygdrive/c/Program Files/Java/jdk1.6.0_24”
export PATH=/usr/local/bin:/usr/bin:$NDK:$SDK/tools:
$SDK/platform-tools:$ANT_HOME/bin:$JAVA_HOME/bin
Be sure to change the locations above to match the folders where you placed
Android NDK, Android SDK, Ant, OpenCV, and Java JDK.
b. Open a Cygwin terminal and execute this command:
source .bashrc
c. Execute these commands in the Cygwin terminal and verify they give the desired
outputs:
which make
/usr/bin/make
which cmake
/usr/bin/cmake
printenv NDK
/home/JohnDoe/android-ndk-r4-crystax
printenv SDK
/cygdrive/c/Program Files (x86)/Android/android-sdk
printenv ANT
/cygdrive/c/apache-ant-1.8.3
printenv OPCV
/home/JohnDoe/opencv
printenv JAVA_HOME
/cygdrive/c/Program Files/Java/jdk1.7.0_03
printenv PATH
PATH should contain the following folders:
Android NDK, Android SDK, Ant, OpenCV, Java JDK
If the above variables are not set correctly, you will most likely encounter errors
in the subsequent parts of the tutorial. Please fix the issues before moving on.
3. Build the OpenCV library.
a. Execute these commands in the Cygwin terminal:
cd $OPCV/android
mkdir build
cd build
cmake
b. Open the file “android-opencv.mk” in the folder “$OPCV/android/build”.
Remove the following expression from line 17:
$(OPENCV_ROOT)/modules/index.rst/include
This expression causes a compilation error if included.
5
c. Type the following in the Cygwin terminal to compile the OpenCV libraries:
make
This compilation can take a while, maybe 30 minutes or more.
4. Build the Java Native Interface (JNI) to the OpenCV library.
a. Type the following in the Cygwin terminal:
cd $OPCV/android/android-jni
make
make
b. In the “$OPCV/android/android-jni” folder, create a new file “project_create.bat”
and put the following line into the file:
android update project name android-opencv path .\
copy project.properties default.properties
c. In a regular Windows terminal, enter the following commands:
cd c:\\cygwin\\home\\JohnDoe\\opencv\\android\\android-jni
project_create.bat
You can alternatively double-click “project_create.bat”.
d. Back in the Cygwin terminal, in the “android-jni” folder, execute the following
commands:
ant debug
______________________________________________________________________________
Part II: Developing an OpenCV Camera Application
Building the Default Camera Application
First, we will build and run the default camera application included in the OpenCV package.
This application will demonstrate how to extract feature keypoints supported by OpenCV
from viewfinder frames captured through the phone’s camera and then overlay these
keypoints in the viewfinder.
1. Type the following in the Cygwin terminal:
cd $OPCV/android/apps/CVCamera
sh build.sh
2. If a “local.env.mk” file was not created in the “CVCamera” folder in the previous step,
manually create a new “local.env.mk” file with the following lines:
OPENCV_CONFIG= / /build/android-opencv.mk
ANDROID_NDK_ROOT=$(HOME)/android-ndk-r4-crystax
ARM_TARGETS="armeabi armeabi-v7a"
3. Type the following in the Cygwin terminal:
make
6
4. In the “CVCamera” folder, create a new file “project_create.bat” and put the following
line into the file:
android update project name cvcamera path .\
copy project.properties default.properties
5. In a regular Windows terminal, enter the following commands:
cd c:\\cygwin\\home\\JohnDoe\\opencv\\android\\apps\\CVCamera
project_create.bat
You can alternatively double-click “project_create.bat”.
6. Make sure your device is connected to your computer. Back in the Cygwin terminal, in
the “CVCamera” folder, execute the following commands:
ant debug
ant debug install
Assuming no errors occurred in the above steps, an application called “CVCamera” should
have been installed to your Android device. Try opening the application and switching
between the different feature keypoints (FAST, STAR, SURF).
More information about the different keypoint types can be found in the OpenCV
documentation:
A discussion list covering OpenCV for Android can be found here:
Building Our Improved Camera Application
Next, we will make some improvements to the previous camera application. Specifically, we
will address the following issues:
• In the default application, the keypoints drawn in the viewfinder are sometimes a little
hard to see against the background.
• In the default application, the keypoints are all drawn at the same scale, giving no
indication of the true underlying scale, which is important to know for multi-scale
detectors like SURF.
• In the default application, the popular Maximally Stable Extremal Region (MSER) is not
included.
All three issues are fixed in our improved camera application:
• We enhance the visibility of the keypoints against a cluttered background by drawing
yellow-on-black keypoints.
• We resize each keypoint according to its true underlying scale for multi-scale detectors
like SURF.
• We add MSER keypoints as a new option to the three other types (FAST, STAR, SURF).
MSER actually runs a lot faster than SURF.
7
Here are the steps to build the new CVCamera applications.
1. Download the following zip file:
2. Copy the enclosed “CVCamera_MSER” folder to the “android/apps” folder.
3. In a regular Windows terminal, enter the following commands:
cd c:\\cygwin\\home\\JohnDoe\\opencv\\android\\apps\\CVCamera_MSER
project_create.bat
You can alternatively double-click “project_create.bat”.
4. In a Cygwin terminal, execute these commands:
cd $OPCV/android/apps/CVCamera_MSER
make clean
make V=0
ant clean
ant debug
ant debug install
When the new CVCamera application runs, you have the options shown in Figure 3.
Choosing “MSER” yields the type of keypoints shown in Figure 1.
Figure 3. Menu for choosing between different types of feature keypoints.
8
Using Eclipse to Compile NDK Applications
Using the command line to compile and link the NDK applications can become tedious after
a while. Fortunately, there is a way to integrate the compilation and linking process into
Eclipse. After we perform the integration, each time a C/C++ source file in the project
changes, Eclipse will perform compilation and linking on our behalf.
Here are the required steps for integration.
1. Import “Android JNI” project into Eclipse.
a. Open Eclipse. Choose File > New Project > Android > Android Project.
b. Choose “Create project from existing source” and Browse for the full path to the
“Android OpenCV JNI” project, for example:
<PATH_TO_CYGWIN>/home/JohnDoe/opencv/android/android-jni
c. Make sure the project name is “OpenCV” and the build target is “Android 2.1” or
“Android 2.2”. Click Finish.
d. Choose Project > Properties. Click on Java Compiler. Make sure “Enable project
specific settings” is selected. Then, make sure the “Compiler compliance levels”
is at least 1.6. Accept any warnings about rebuilding the project.
2. Import “CVCamera_MSER” project into Eclipse.
a. Import the “CVCamera_MSER” project into Eclipse following the same type of
instructions as in Step 1. Be sure to use the full path to the “CVCamera_MSER”
project, for example:
<PATH_TO_CYGWIN>/home/JohnDoe/opencv/android/apps/CVCamera_MSER
b. Choose Project > Properties. Click on Project References. Make sure the OpenCV
project is checked.
c. Choose Project > Properties. Click on Builders. Click New. Choose Program.
d. In the Main tab, enter the following information and then click Apply.
i. Name: Native Builder
ii. Location: c:\cygwin\bin\bash.exe
iii. Working Directory: c:\cygwin\bin
iv. Arguments: login -c “source .bashrc &&
cd /home/JohnDoe/opencv/android/apps/CVCamera_MSER &&
make V=0”
e. In the Refresh tab, execute the following steps and then click Apply.
i. Make sure “Refresh resources upon completion” is checked.
ii. Select “Specify resources”.
iii. Make sure “Recursively include sub-folders” is checked.
iv. Click on Specify Resources, make sure (only) “CVCamera_MSER/libs” is
checked, and click Finish.
9
f. In the Build Options tab, execute the following steps and then click Apply.
i. Make sure “After a Clean” is checked.
ii. Make sure “During manual builds” is checked.
iii. Make sure “During auto builds” is checked.
iv. Make sure “During a Clean” is not checked.
v. Click on Specify Resources, make sure (only) “CVCamera_MSER/jni” is
checked, and click Finish.
g. Try adding a comment to one of the “.cpp” files in the “jni” folder and save the
changes. Eclipse should automatically invoke the compilation and linking process
and then take the place of Ant in packaging everything into an “.apk” file.