Toyota camry 2006 2011 2AZ FE exhaust hệ thống khí xả xe toyota camry 2AZ FE đời 2006 2011
Bạn đang xem bản rút gọn của tài liệu. Xem và tải ngay bản đầy đủ của tài liệu tại đây (315.5 KB, 5 trang )
2AZ-FE EXHAUST – EXHAUST PIPE
EX–1
EX
ENGINE2AZ-FE EXHAUST
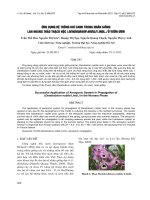
EXHAUST PIPE
COMPONENTS
REAR EXHAUST PIPE NO. 1
SUPPORT BRACKET
EXHAUST PIPE
SUPPORT NO. 4
EXHAUST PIPE SUPPORT NO. 4
43 (438, 32)
43 (438, 32)
44 (449, 32)
33 (337, 24)
33 (337, 24)
GASKET
GASKET
GASKET
43 (438, 32)
EXHAUST PIPE
SUPPORT NO. 4
EXHAUST PIPE
SUPPORT NO. 4
EXHAUST PIPE
SUPPORT NO. 4
EXHAUST PIPE
SUPPORT NO. 4
EXHAUST PIPE
SUPPORT NO. 4
Non-reusable part
N*m (kgf*cm, ft.*lbf) : Specified torque
43 (438, 32)
CENTER EXHAUST PIPE ASSEMBLY
FRONT EXHAUST PIPE ASSEMBLY
TAIL PIPE ASSEMBLY
TAIL PIPE ASSEMBLY
HEATED OXYGEN SENSOR
FRONT EXHAUST PIPE NO. 1
SUPPORT BRACKET
A135662E01
EX–2
2AZ-FE EXHAUST – EXHAUST PIPE
EX
REMOVAL
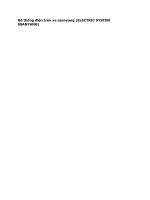
1. REMOVE TAIL PIPE ASSEMBLY
(a) Remove the 2 nuts and tail pipe assembly.
(b) Remove the gasket from the center exhaust pipe.
2. REMOVE CENTER EXHAUST PIPE ASSEMBLY
(a) Remove the 2 bolts, 2 nuts and center exhaust pipe
assembly.
(b) Remove the gasket from the front exhaust pipe.
A135689E01
A135690E01
2AZ-FE EXHAUST – EXHAUST PIPE
EX–3
EX
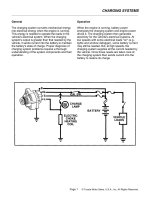
3. REMOVE FRONT EXHAUST PIPE ASSEMBLY
(a) Remove the 2 nuts.
(b) Remove the 2 nuts, front exhaust pipe No. 1 support
bracket and front exhaust pipe assembly.
(c) Remove the gasket from the exhaust manifold.
4. REMOVE HEATED OXYGEN SENSOR (See page EC-
24)
5. REMOVE REAR EXHAUST PIPE NO. 1 SUPPORT
BRACKET
(a) Remove the 2 bolts and rear support bracket.
INSTALLATION
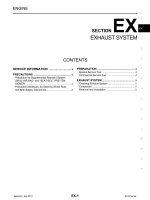
1. INSTALL REAR EXHAUST PIPE NO. 1 SUPPORT
BRACKET
(a) Install the rear support bracket with the 2 bolts.
Torque: 33 N*m (337 kgf*cm, 24 ft.*lbf)
NOTICE:
Be sure to install the bracket in the correct
direction.
2. INSTALL HEATED OXYGEN SENSOR (See page EC-
24)
3. INSTALL FRONT EXHAUST PIPE ASSEMBLY
(a) Install a new gasket onto the front exhaust pipe
assembly.
A135691
Bracket
A132948E01
Pipe Assembly Front
Bracket
A060823E04
EX–4
2AZ-FE EXHAUST – EXHAUST PIPE
EX
(b) Install the front exhaust pipe assembly with the 2
nuts.
Torque: 43 N*m (438 kgf*cm, 32 ft.*lbf)
(c) Install the front exhaust pipe No. 1 support bracket
with the 2 nuts .
Torque: 33 N*m (337 kgf*cm, 24 ft.*lbf)
4. INSTALL CENTER EXHAUST PIPE ASSEMBLY
(a) Install a new gasket onto the front exhaust pipe.
(b) Install the center exhaust pipe assembly with the 2
bolts and 2 nuts.
A135691
A135690E01
2AZ-FE EXHAUST – EXHAUST PIPE
EX–5
EX
Torque: 43 N*m (438 kgf*cm, 32 ft.*lbf)
5. INSTALL TAIL PIPE ASSEMBLY
(a) Install a new gasket onto the tail pipe assembly.
(b) Install the tail pipe assembly with the 2 nuts.
Torque: 43 N*m (438 kgf*cm, 32 ft.*lbf)
6. CHECK FOR EXHAUST GAS LEAKS
If gas is leaking, tighten the areas necessary to stop the
leak. Replace the damaged parts as necessary.
A135689E01