Toyota camry 2006 2011 exterior hệ thống ngoại thất trên toyota camry đời 2006 2011
Bạn đang xem bản rút gọn của tài liệu. Xem và tải ngay bản đầy đủ của tài liệu tại đây (6.77 MB, 86 trang )
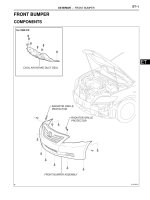
EXTERIOR – FRONT BUMPER
ET–1
ET
BODYEXTERIOR
FRONT BUMPER
COMPONENTS
COOL AIR INTAKE DUCT SEAL
FRONT BUMPER ASSEMBLY
for 2GR-FE:
RADIATOR GRILLE
PROTECTOR
RADIATOR GRILLE
PROTECTOR
B137228E01
ET–2
EXTERIOR – FRONT BUMPER
ET
FOG LIGHT
ASSEMBLY LH
FOG LIGHT
ASSEMBLY RH
FRONT BUMPER EXTENSION
MOUNTING BRACKET
FRONT BUMPER
HOLE COVER LH
FRONT BUMPER
HOLE COVER RH
FRONT BUMPER
LOWER COVER
FRONT BUMPER
UPPER RETAINER
HOOD TO FRONT
END PANEL SEAL
LOWER RADIATOR GRILLE
RADIATOR GRILLE
RADIATOR GRILLE
EMBLEM
FRONT BUMPER
HOLE COVER LH
FRONT BUMPER
HOLE COVER RH
with Fog light:
with Bracket:
with Cover:
B137744E01
EXTERIOR – FRONT BUMPER
ET–3
ET
with Front Spoiler:
FRONT BUMPER
EXTENSION LH
FRONT BUMPER
EXTENSION RH
FRONT SPOILER
B137745E01
ET–4
EXTERIOR – FRONT BUMPER
ET
REMOVAL
1. REMOVE COOL AIR INTAKE DUCT SEAL (for 2GR-
FE)
(a) Remove the 7 clips and cool air intake duct seal.
FRONT BUMPER
ENERGY ABSORBER
FRONT BUMPER REINFORCEMENT
SUB-ASSEMBLY
FRONT BUMPER
SIDE RETAINER LH
FRONT BUMPER
SIDE RETAINER RH
N*m (kgf*cm, ft.*lbf)
: Specified torque
34 (347, 25)
34 (347, 25)
B137743E01
B138886
EXTERIOR – FRONT BUMPER
ET–5
ET
2. REMOVE FRONT BUMPER ASSEMBLY (w/o Fog
Light)
(a) Put protective tape around the front bumper
assembly.
(b) Using a screwdriver, turn the pin 90 degrees and
remove the pin hold clip.
HINT:
Use the same procedures for the RH side and LH
side.
(c) Remove the 8 screws, 2 clips, 2 radiator grille
protectors and bolt.
(d) Disengage the 2 claws and disconnect the front
bumper assembly as shown in the illustration.
HINT:
Use the same procedures for the RH side and LH
side.
(e) Remove the front bumper assembly.
Protective Tape
B140157E01
90q
B138884E01
B140155
B140158
ET–6
EXTERIOR – FRONT BUMPER
ET
3. REMOVE FRONT BUMPER ASSEMBLY (w/ Fog
Light)
(a) Put protective tape around the front bumper
assembly.
(b) Using a screwdriver, turn the pin 90 degrees and
remove the pin hold clip.
HINT:
Use the same procedures for the RH side and LH
side.
(c) Remove the 8 screws, 2 clips, 2 radiator grille
protectors and bolt.
(d) Disengage the 2 claws and disconnect the front
bumper assembly as shown in the illustration.
HINT:
Use the same procedures for the RH side and LH
side.
(e) Disconnect each connector, and then remove the
front bumper assembly.
Protective Tape
B138887E01
90q
B138884E01
B137230
B137231
EXTERIOR – FRONT BUMPER
ET–7
ET
DISASSEMBLY
1. REMOVE FOG LIGHT ASSEMBLY LH (w/ Fog Light)
(See page LI-79)
2. REMOVE FOG LIGHT ASSEMBLY RH (w/ Fog Light)
3. REMOVE FRONT SPOILER (w/ Front Spoiler)
(a) Remove the 2 screws and 25 clips.
(b) Disengage the 17 claws and remove the front
spoiler.
4. REMOVE FRONT BUMPER EXTENSION LH (w/ Front
Spoiler)
(a) Remove the 2 nuts and front bumper extension LH.
5. REMOVE FRONT BUMPER EXTENSION RH (w/ Front
Spoiler)
6. REMOVE FRONT BUMPER EXTENSION MOUNTING
BRACKET (w/ Bracket)
(a) Remove the 2 screws.
B137739
B137753
B137741E01
ET–8
EXTERIOR – FRONT BUMPER
ET
(b) Disengage the 2 claws and remove the front
bumper extension mounting bracket.
7. REMOVE FRONT BUMPER LOWER COVER (w/
Cover)
(a) Disengage the 2 claws and remove the front
bumper lower cover.
8. REMOVE FRONT BUMPER HOLE COVER LH (w/o
Fog Light)
(a) Disengage the 5 claws and remove the front
bumper hole cover LH.
9. REMOVE FRONT BUMPER HOLE COVER RH (w/o
Fog Light)
10. REMOVE FRONT BUMPER HOLE COVER LH (w/ Fog
Light)
(a) Disengage the 5 claws and remove the front
bumper hole cover LH.
11. REMOVE FRONT BUMPER HOLE COVER RH (w/ Fog
Light)
12. REMOVE LOWER RADIATOR GRILLE
(a) Disengage the 14 claws and remove the lower
radiator grille.
B137730
B137732
B137733
B137731
EXTERIOR – FRONT BUMPER
ET–9
ET
13. REMOVE RADIATOR GRILLE
(a) Remove the 2 screws.
(b) Disengage the 16 claws and remove the radiator
grille.
14. REMOVE HOOD TO FRONT END PANEL SEAL
(a) Remove the 10 clips and hood to front end panel
seal.
15. REMOVE FRONT BUMPER UPPER RETAINER
(a) Remove the 3 clips and front bumper upper retainer.
16. REMOVE RADIATOR GRILLE EMBLEM
(a) Disengage the 4 claws and remove the radiator
grille emblem.
17. REMOVE FRONT BUMPER ENERGY ABSORBER
(a) Remove the front bumper energy absorber from the
front bumper reinforcement sub-assembly.
B137232
B137233
B137234
B137235
B137728
ET–10
EXTERIOR – FRONT BUMPER
ET
18. REMOVE FRONT BUMPER REINFORCEMENT SUB-
ASSEMBLY
(a) Disengage each clamp.
(b) Remove the 6 bolts and front bumper reinforcement
sub-assembly.
19. REMOVE FRONT BUMPER SIDE RETAINER LH
(a) Remove the screw.
(b) Disengage the claw and remove the front bumper
side retainer LH.
20. REMOVE FRONT BUMPER SIDE RETAINER RH
REASSEMBLY
1. INSTALL FRONT BUMPER SIDE RETAINER LH
(a) Engage the claw and install the front bumper side
retainer LH.
(b) Install the screw.
2. INSTALL FRONT BUMPER SIDE RETAINER RH
3. INSTALL FRONT BUMPER REINFORCEMENT SUB-
ASSEMBLY
(a) Install the front bumper reinforcement sub-assembly
with the 6 bolts.
Torque: 34 N*m (347 kgf*cm, 25 ft.*lbf)
(b) Engage each clamp.
4. INSTALL FRONT BUMPER ENERGY ABSORBER
(a) Install the front bumper energy absorber to the front
bumper reinforcement sub-assembly.
Clamp
B137729E01
B137727
B137727
Clamp
B137729E01
B137728
EXTERIOR – FRONT BUMPER
ET–11
ET
5. INSTALL RADIATOR GRILLE EMBLEM
(a) Engage the 4 claws and install the radiator grille
emblem.
6. INSTALL FRONT BUMPER UPPER RETAINER
(a) Install the front bumper upper retainer with the 3
clips.
7. INSTALL HOOD TO FRONT END PANEL SEAL
(a) Apply new double-sided tape to the hood to front
end panel seal.
(b) Remove the release paper from the hood to front
end panel seal.
(c) Install the hood to front end panel seal with the 10
clips.
8. INSTALL RADIATOR GRILLE
(a) Engage the 16 claws and install the radiator grille.
(b) Install the 2 screws.
9. INSTALL LOWER RADIATOR GRILLE
(a) Engage the 14 claws and install the lower radiator
grille.
B137235
B137234
B137233
B137232
B137731
ET–12
EXTERIOR – FRONT BUMPER
ET
10. INSTALL FRONT BUMPER HOLE COVER LH (w/o
Fog Light)
(a) Engage the 5 claws and install the front bumper
hole cover LH.
11. INSTALL FRONT BUMPER HOLE COVER RH (w/o
Fog Light)
12. INSTALL FRONT BUMPER HOLE COVER LH (w/ Fog
Light)
(a) Engage the 5 claws and install the front bumper
hole cover LH.
13. INSTALL FRONT BUMPER HOLE COVER RH (w/ Fog
Light)
14. INSTALL FRONT BUMPER LOWER COVER (w/
Cover)
(a) Engage the 2 claws and install the front bumper
lower cover.
15. INSTALL FRONT BUMPER EXTENSION MOUNTING
BRACKET (w/ Bracket)
(a) Engage the 2 claws and install the front bumper
extension mounting bracket.
(b) Install the 2 screws.
16. INSTALL FRONT BUMPER EXTENSION LH (w/ Front
Spoiler)
(a) Install the front bumper extension LH with the 2
nuts.
17. INSTALL FRONT BUMPER EXTENSION RH (w/ Front
Spoiler)
B137732
B137733
B137730
B137741E01
B137753
EXTERIOR – FRONT BUMPER
ET–13
ET
18. INSTALL FRONT SPOILER (w/ Front Spoiler)
(a) Engage the 17 claws and install the front spoiler.
(b) Install the 25 clips and 2 screws.
19. INSTALL FOG LIGHT ASSEMBLY LH (w/ Fog Light)
(See page LI-82)
20. INSTALL FOG LIGHT ASSEMBLY RH (w/ Fog Light)
INSTALLATION
1. INSTALL FRONT BUMPER ASSEMBLY (w/o Fog
Light)
(a) Engage each claw.
(b) Install the front bumper assembly with the 8 screws,
2 clips, 2 radiator grille protectors and bolt.
B137739
B140155
ET–14
EXTERIOR – FRONT BUMPER
ET
(c) Install the pin hold clip.
HINT:
Use the same procedures for the RH side and LH
side.
2. INSTALL FRONT BUMPER ASSEMBLY (w/ Fog Light)
(a) Connect each connector.
(b) Engage each claw.
(c) Install the front bumper assembly with the 8 screws,
2 clips, 2 radiator grille protectors and bolt.
(d) Install the pin hold clip.
HINT:
Use the same procedures for the RH side and LH
side.
3. INSTALL COOL AIR INTAKE DUCT SEAL (for 2GR-
FE)
(a) Install the cool air intake duct seal with the 7 clips.
4. VEHICLE PREPARATION FOR FOG LIGHT AIMING
(w/ Fog Light) (See page LI-79)
5. PREPARATION FOR FOG LIGHT AIMING (w/ Fog
Light) (See page LI-80)
6. INSPECT FOG LIGHT AIMING (w/ Fog Light) (See
page LI-81)
7. ADJUST FOG LIGHT AIMING (w/ Fog Light) (See
page LI-82)
B137229
B137230
B137229
B138886
EXTERIOR – REAR BUMPER
ET–15
ET
BODYEXTERIOR
REAR BUMPER
COMPONENTS
REAR BUMPER ASSEMBLY
REAR BUMPER ASSEMBLY
with Rear Lower Spoiler:
CLIP
CLIP
NUT
REAR FLOOR BOARD
B137224E01
ET–16
EXTERIOR – REAR BUMPER
ET
REAR BUMPER BAR
REAR BUMPER ENERGY ABSORBER
REAR BUMPER PAD
REAR BUMPER PLATE LH
REAR BUMPER PLATE RH
REAR BUMPER REINFORCEMENT
SUB-ASSEMBLY
REAR BUMPER
SIDE RETAINER LH
REAR BUMPER
SIDE RETAINER RH
REAR BUMPER
SIDE SUPPORT LH
REAR BUMPER
SIDE SUPPORT RH
WHEEL HOUSE REINFORCEMENT LH
WHEEL HOUSE REINFORCEMENT RH
68 (693, 50)
N*m (kgf*cm, ft.*lbf)
: Specified torque
68 (693, 50)
REAR BUMPER PAD
B137225E01
EXTERIOR – REAR BUMPER
ET–17
ET
REMOVAL
1. REMOVE REAR BUMPER ASSEMBLY (w/o Rear
Lower Spoiler)
(a) Put protective tape around the rear bumper
assembly.
(b) Using a screwdriver, open the 2 rear bumper plates.
HINT:
Tape the screwdriver tip before use.
with Rear Lower Spoiler:
REAR BUMPER
EXTENSION LH
REAR BUMPER
EXTENSION RH
REAR LOWER SPOILER
B140152E01
Protective Tape
B137211E01
B137212
ET–18
EXTERIOR – REAR BUMPER
ET
(c) Remove the 6 screws and 2 clips.
(d) Disengage the 12 claws and disconnect the rear
bumper assembly as shown in the illustration.
HINT:
Use the same procedures for the RH side and LH
side.
(e) Remove the rear bumper assembly.
2. REMOVE REAR FLOOR BOARD (w/ Rear Lower
Spoiler)
(a) Remove the 4 screws, 2 clips, 3 nuts and rear floor
board.
3. REMOVE REAR BUMPER ASSEMBLY (w/ Rear Lower
Spoiler)
(a) Put protective tape around the rear bumper
assembly.
B137214
B137215
Clip
Nut
B138885E01
Protective Tape
B146330E01
EXTERIOR – REAR BUMPER
ET–19
ET
(b) Using a screwdriver, open the 2 rear bumper plates.
HINT:
Tape the screwdriver tip before use.
(c) Remove the 6 screws.
(d) Disengage the 12 claws and disconnect the rear
bumper assembly as shown in the illustration.
HINT:
Use the same procedures for the RH side and LH
side.
(e) Remove the rear bumper assembly.
B146331
B140154
B146332
ET–20
EXTERIOR – REAR BUMPER
ET
DISASSEMBLY
1. REMOVE REAR LOWER SPOILER (w/ Rear Lower
Spoiler)
(a) Remove the 2 screws, 4 nuts and 16 clips.
(b) Disengage the 16 claws and remove the rear lower
spoiler.
2. REMOVE REAR BUMPER EXTENSION LH (w/ Rear
Lower Spoiler)
(a) Remove the 2 nuts and rear bumper extension LH.
3. REMOVE REAR BUMPER EXTENSION RH (w/ Rear
Lower Spoiler)
4. REMOVE REAR BUMPER PLATE LH
5. REMOVE REAR BUMPER PLATE RH
6. REMOVE REAR BUMPER PAD
(a) Remove the rear bumper pad.
HINT:
Use the same procedures for the RH side and LH
side.
B137223
B137222
B146333
EXTERIOR – REAR BUMPER
ET–21
ET
7. REMOVE REAR BUMPER SIDE SUPPORT LH
(a) Remove the 2 screws.
(b) Disengage the 3 claws and remove the rear bumper
side support LH.
8. REMOVE REAR BUMPER SIDE SUPPORT RH
9. REMOVE REAR BUMPER SIDE RETAINER LH
(a) Remove the 2 screws.
(b) Disengage the 3 claws and remove the rear bumper
side retainer LH.
10. REMOVE REAR BUMPER SIDE RETAINER RH
11. REMOVE WHEEL HOUSE REINFORCEMENT LH
(a) Remove the nut and wheel house reinforcement LH.
12. REMOVE WHEEL HOUSE REINFORCEMENT RH
13. REMOVE REAR BUMPER ENERGY ABSORBER
(a) Remove the 4 bolts.
(b) Disengage the 4 claws and remove the rear bumper
energy absorber.
14. REMOVE REAR BUMPER BAR
(a) Remove the rear bumper bar from the rear bumper
energy absorber.
B137219
B137220
B137221
B137216
B137218
ET–22
EXTERIOR – REAR BUMPER
ET
15. REMOVE REAR BUMPER REINFORCEMENT SUB-
ASSEMBLY
(a) Remove the 6 nuts and rear bumper reinforcement
sub-assembly.
REASSEMBLY
1. INSTALL REAR BUMPER REINFORCEMENT SUB-
ASSEMBLY
(a) Install the rear bumper reinforcement sub-assembly
with the 6 nuts.
Torque: 68 N*m (693 kgf*cm, 50 ft.*lbf)
2. INSTALL REAR BUMPER BAR
(a) Install the rear bumper bar on the rear bumper
energy absorber.
3. INSTALL REAR BUMPER ENERGY ABSORBER
(a) Engage the 4 claws and install the rear bumper
energy absorber.
(b) Install the 4 bolts.
4. INSTALL WHEEL HOUSE REINFORCEMENT LH
(a) Install the wheel house reinforcement LH with the
nut.
5. INSTALL WHEEL HOUSE REINFORCEMENT RH
B137217
B137217
B137218
B137216
B137221
EXTERIOR – REAR BUMPER
ET–23
ET
6. INSTALL REAR BUMPER SIDE RETAINER LH
(a) Engage the 3 claws and install the rear bumper side
retainer LH.
(b) Install the 2 screws.
7. INSTALL REAR BUMPER SIDE RETAINER RH
8. INSTALL REAR BUMPER SIDE SUPPORT LH
(a) Engage the 3 claws and install the rear bumper side
support LH.
(b) Install the 2 screws.
9. INSTALL REAR BUMPER SIDE SUPPORT RH
10. INSTALL REAR BUMPER PAD
(a) Apply new double-sided tape to the rear bumper
pad.
(b) Remove the release paper from the rear bumper
pad.
(c) Install the rear bumper pad.
HINT:
Use the same procedures for the RH side and LH
side.
11. INSTALL REAR BUMPER PLATE LH
12. INSTALL REAR BUMPER PLATE RH
13. INSTALL REAR BUMPER EXTENSION LH (w/ Rear
Lower Spoiler)
(a) Install the rear bumper extension LH with the 2 nuts.
14. INSTALL REAR BUMPER EXTENSION RH (w/ Rear
Lower Spoiler)
B137220
B137219
B146333
B137222
ET–24
EXTERIOR – REAR BUMPER
ET
15. INSTALL REAR LOWER SPOILER (w/ Rear Lower
Spoiler)
(a) Engage the 16 claws and install the rear lower
spoiler.
(b) Install the 16 clips, 4 nuts and 2 screws.
INSTALLATION
1. INSTALL REAR BUMPER ASSEMBLY (w/o Rear
Lower Spoiler)
(a) Engage each claw.
(b) Install the rear bumper assembly with the 6 screws
and 2 clips.
(c) Install the 2 rear bumper plates.
2. INSTALL REAR BUMPER ASSEMBLY (w/ Rear Lower
Spoiler)
(a) Engage each claw.
(b) Install the rear bumper assembly with the 6 screws.
B137223
B137214
B137213
B140154
EXTERIOR – REAR BUMPER
ET–25
ET
(c) Install the 2 rear bumper plates.
3. INSTALL REAR FLOOR BOARD (w/ Rear Lower
Spoiler)
(a) Install the rear floor board with the 3 nuts, 2 clips
and 4 screws.
B147905
Clip
Nut
B138885E01