Daewoo matiz 2000 2013 manual transaxle drive axle hệ thống truyền lực trên xe matiz đời 2000 2013
Bạn đang xem bản rút gọn của tài liệu. Xem và tải ngay bản đầy đủ của tài liệu tại đây (399.24 KB, 13 trang )
DAEWOO M-150 BL2
SECTION 3B
MANUAL TRANSAXLE DRIVE AXLE
TABLE OF CONTENTS
Description and Operation 3B-2. . . . . . . . . . . . . . . . . .
Front Drive Axle 3B-2. . . . . . . . . . . . . . . . . . . . . . . . . . .
Component Locator 3B-3. . . . . . . . . . . . . . . . . . . . . . . .
Drive Axle Assembly 3B-3. . . . . . . . . . . . . . . . . . . . . . .
Diagnostic Information and Procedures 3B-4. . . . .
Diagnosis 3B-4. . . . . . . . . . . . . . . . . . . . . . . . . . . . . . . .
Repair Instructions 3B-5. . . . . . . . . . . . . . . . . . . . . . . . .
On-Vehicle Service 3B-5. . . . . . . . . . . . . . . . . . . . . . . . . .
Drive Axle Assembly 3B-5. . . . . . . . . . . . . . . . . . . . . . .
Unit Repair 3B-9. . . . . . . . . . . . . . . . . . . . . . . . . . . . . . . . .
Inner Joint 3B-9. . . . . . . . . . . . . . . . . . . . . . . . . . . . . . . .
Outer Joint 3B-10. . . . . . . . . . . . . . . . . . . . . . . . . . . . . .
Specifications 3B-12. . . . . . . . . . . . . . . . . . . . . . . . . . . .
General Specifications 3B-12. . . . . . . . . . . . . . . . . . . .
Fastener Tightening Specifications 3B-12. . . . . . . . . .
Special Tools and Equipment 3B-13. . . . . . . . . . . . . .
Special Tools Table 3B-13. . . . . . . . . . . . . . . . . . . . . . .
3B –2 MANUAL TRANSAXLE DRIVE AXLE
DAEWOO M-150 BL2
DESCRIPTION AND OPERATION
FRONT DRIVE AXLE
Drive axles are flexible shaft assemblies that transmit a
rotational force from the transaxle to the front wheel as-
semblies. Each axle assembly consists of an inner
constant-velocity joint and an outer constant-velocity
joint connected to an axle shaft. The inner joint is com-
pletely flexible and has the ability to move in and out.
The outer joint is also flexible, but it cannot move in and
out.
The drive axles use a Rzeppa–style joint on the out-
board side and a Tripot–style joint on the inboard side.
MANUAL TRANSAXLE DRIVE AXLE 3B–3
DAEWOO M-150 BL2
COMPONENT LOCATOR
DRIVE AXLE ASSEMBLY
D104B401
1. Outer Joint (Rzeppa)
2. Outer Large Boot Clamp
3. Outer Boot
4. Outer Small Boot Clamp
5. Drive Axle Shaft
6. Inner Small Boot Clamp
7. Inner Boot
8. Inner Large Boot Clamp
9. Inner Joint (Tripot)
10. Inner Joint Housing
3B –4 MANUAL TRANSAXLE DRIVE AXLE
DAEWOO M-150 BL2
DIAGNOSTIC INFORMATION AND PROCEDURES
Condition Probable Cause Correction
Noise S Bent drive axle shaft. S Replace drive axle.
S Worn the spline of drive axle shaft or joint
shaft.
S Replace drive axle.
S Worn joint by grease leakage. S Replace drive axle.
Steering Wheel S Bent drive axle shaft. S Replace drive axle.
Vibration
S Worn the spline of drive axle shaft or joint
shaft.
S Replace drive axle.
Car Lead / Pull S Worn joint by grease leakage. S Replace drive axle.
Boot Leak S Poor assembly of boot clamp. S Replace boot clamp.
S Torn boot. S Replace Boot.
MANUAL TRANSAXLE DRIVE AXLE 3B–5
DAEWOO M-150 BL2
REPAIR INSTRUCTIONS
ON–VEHICLE SERVICE
D106B506
DRIVE AXLE ASSEMBLY
Tool Required
KM–507–B Tie Rod End Joint Remover
Removal Procedure
1. Remove the drive axle shaft nut.
D Fix the hub not to rotate by pressing the brake ped-
al.
D Loosen the caulking (1).
D Remove the nut (2).
D Discard the nut.
D Remove the washer (3).
D103B505
2. Remove the wheels. Refer to Section 2E, Tires and
Wheels.
3. Remove the transaxle under cover.
D Remove the bolts (1).
D Remove the under cover (2).
D104B501
4. Drain the transaxle fluid through the drain plug.
5. Remove the stabilizer bar. Refer to Section 2C, Front
Suspension.
6. Separate the control arm ball joint and the tie rod end
from the knuckle. Refer to Section 6D, Manual Steer-
ing gear and Section 2C, Front Suspension.
a. Control arm ball joint bolt.
b. Tie rod end joint castellated nut.
Notice: Use only the recommended tool for separating
the tie rod from the knuckle/strut assembly. Failure to
use the recommended tool may cause damage to the
knuckle/strut assembly or the tie rod end.
3B –6 MANUAL TRANSAXLE DRIVE AXLE
DAEWOO M-150 BL2
D104B502
7. Pull the drive axle shaft (1) from the wheel hub.
Important: Support the unfastened end of the drive
axle. Do not allow the drive axle to dangle freely from the
transaxle for any length of time after it has been re-
moved from the wheel hub.
D104B503
8. Remove the drive axle from the transaxle.
D Insert a flathead screwdriver between the trans-
axle case and the drive axle joint case (1).
D Remove the drive axle (2).
Important: Cap the transaxle drive opening after the
drive axle has been removed to keep any contamination
out.
D104B504
Inspection Procedure
1. Inspect for worn or damaged spline of drive axle (1).
2. Inspect for a leaking boot (2).
3. Inspect for a bent shaft (3).
D14B502A
Installation Procedure
1. Clean the transaxle seal.
2. Install the drive axle into the transaxle.
3. Install the wheel hub onto the drive axle shaft.
4. Mount the knuckle onto the control arm ball joint.
MANUAL TRANSAXLE DRIVE AXLE 3B–7
DAEWOO M-150 BL2
D14B505B
5. Install the control arm ball joint bolt.
Tighten
Tighten the control arm ball joint bolt to 50–70 NSm
(36–52 lb-ft).
a. Control arm ball joint bolt
6. Install the tie rod into the knuckle and install the tie
rod end joint castellated nut.
Tighten
Tighten the tie rod end joint castellated nut to 30–55
NSm (21–41 lb-ft).
b. Tie rod end joint castellated nut.
D14B506A
33–53 NSm
40–50 NSm
7. Install the stabilizer bar.
Tighten
D Tighten the stabilizer bar mounting bolts 33–53
NSm (24–39 lb-ft).
D Tighten the stabilizer bar castellated nut to 40–50
NSm (30–36 lb-ft).
a. Stabilizer bar mounting bolt.
b. Stabilizer bar castellated nut.
D14B507A
8. Install the drive axle shaft nut.
Tighten
Tighten the drive axle shaft nut to 210 NSm (155 lb-ft)
Notice: Always use a new nut. Always peen the
caulking nut with a punch and a hammer until the nut
is locked into place on the wheel hub.
9. Install the wheels. Refer to Section 2E, Tires and
wheels.
D13BB520A
10. Refill the transaxle fluid to the proper level.
D Tighten the drain plug to 25-30 NSm (18-22 lb-ft)
(a).
D Remove the oil level plug (1).
D Refill recommended fluid to the proper level.
D Tighten the oil level plug to 36-54 NSm (26–40 lb-
ft) (b).
Classification 75W–85 (GL–4)
Capacity 2.1L (2.21 gt)
3B –8 MANUAL TRANSAXLE DRIVE AXLE
DAEWOO M-150 BL2
35–55 NSm
D13B521A
11. Install the transaxle under cover.
Tighten
Tighten the transaxle under cover bolts to 35–55
NSm (25–41 lb-ft)
MANUAL TRANSAXLE DRIVE AXLE 3B–9
DAEWOO M-150 BL2
UNIT REPAIR
D104B701
INNER JOINT (TRANSAXLE SIDE)
Tool Required
J–35566 Boot Clamp Pliers
Disassembly Procedure
1. Remove the drive axle. Refer to “Drive Axle Assem-
bly” in this section.
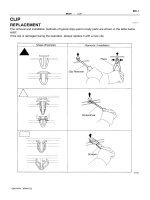
2. Remove the clamps on the joint boot.
D Remove the boot clamp (large) using the boot
clamp pliers J–35566 (1).
D Remove the boot clamp (small) (2).
D104B702
3. Remove the joint housing from boot.
a. Boot.
b. Joint housing.
D104B703
4. Degrease the joint assembly.
5. Remove the tripot joint.
D Remove the circlip (1).
D Remove the tripot joint (2).
3B –10 MANUAL TRANSAXLE DRIVE AXLE
DAEWOO M-150 BL2
D104B704
6. Remove the drive axle shaft boot.
D104B705
Assembly Procedure
1. Install in the reverse order of removal.
2. Fill the joint housing with recommended grease when
installing.
Capacity 90–100 g (3.2–3.5 ounces)
Notice: Always use the recommended grease. If not,
joint and boot can be damaged.
Important: Always use new clamps.
Inspection Procedure
1. Inspect the operation of joint.
2. Inspect for a leaking boot through the clamp side.
D104B706
OUTER JOINT (WHEEL SIDE)
Disassembly Procedure
1. Remove the drive axle. Refer to “Drive Axle Assem-
bly” in this section.
2. Remove the clamps on the joint boot.
D Remove the boot clamps (1,2).
D104B707
3. Degrease the joint assembly.
4. Remove the joint assembly.
D Widen the circlip (1).
D Remove the joint assembly while widening the cir-
clip (2).
MANUAL TRANSAXLE DRIVE AXLE 3B–11
DAEWOO M-150 BL2
D104B704
5. Remove the drive axle shaft boot.
D104B708
Assembly Procedure
1. Install in the reverse order of removal.
2. Install the joint assembly.
D Pre–install the joint assembly by pushing to the
drive axle shaft to widen the circlip.
D Keep the circlip widened (1).
D Push the joint assembly to the drive axle shaft (2).
D104B709
3. Fill the joint housing with recommended grease when
installing.
Capacity 80–90 g (2.8–3.2 ounces)
Notice: Always use the recommended grease. If not,
joint and boot can be damaged.
Important: Always use new clamps.
D104B710
Inspection Procedure
1. Inspect the operation of joint.
2. Inspect for a leaking boot through the clamp side.
Important: Do not disassemble the outer joint assem-
bly. Parts are match fit and can not be serviced sepa-
rately. Improper reassembly will adversely affect both
performance and safety.
3B –12 MANUAL TRANSAXLE DRIVE AXLE
DAEWOO M-150 BL2
SPECIFICATIONS
GENERAL SPECIFICATIONS
Application Description Unit Standard Limit
Inner – Tripot Joint –
Type
Outer – Rzeppa Joint –
Right mm (in.) 553.5(21.79) –
Length
Left mm (in.) 386.5(15.22) –
Drive Axle
Shaft Diameter mm (in.) 22 (0.87) –
Inner g (ounce)
90 – 100
(3.2 – 3.5)
–
Grease Capacity
Outer g (ounce)
80 – 90
(2.8 – 3.2)
–
FASTENER TIGHTENING SPECIFICATIONS
Application NSm Lb-Ft Lb-In
Control Arm Ball Joint Bolt 50 – 70 36 – 52 –
Tie Rod End Joint castellated Nut 30 – 55 21 – 41 –
Stabilizer Bar Bolt 33 – 53 24 – 39 –
Stabilizer Bar Castellated Nut 40 – 50 30 – 36 –
Drive Axle Shaft Nut 210 155 –
Wheel Nut 90 – 110 66 – 81 –
Transaxle Under Cover Bolt 35 – 55 25 – 41 –
Oil Drain Plug 25 – 30 18 – 22 –
Oil Level Plug 36 – 54 26 – 40 –
MANUAL TRANSAXLE DRIVE AXLE 3B–13
DAEWOO M-150 BL2
SPECIAL TOOLS AND EQUIPMENT
SPECIAL TOOLS TABLE
D104B101
KM–507–B
Tie Rod End
Joint Remover
D105B101
J–35566
Boot Clamp Pliers