SAP2000 FEATURES
Bạn đang xem bản rút gọn của tài liệu. Xem và tải ngay bản đầy đủ của tài liệu tại đây (2.21 MB, 194 trang )
SAP2000 FEATURES
Overview
SAP2000 Features
Technology
Modeling
Analysis
- Buckling
- Large Displacements
- Frequency Domain
- Nonlinear Material
Behavior
Design
Data Exchange
Applications
Bridges
Steel Framed Structures
Concrete Framed
Structures
Light Gauge
Construction
Staged Construction
Offshore Structures
Post Tensioning
INTEGRATED SOFTWARE FOR STRUCTURAL
ANALYSIS & DESIGN
Version: 10
Supported Operating Systems: Windows 2000, Windows NT,
Windows XP
The SAP name has been synonymous with State-of-the-art analytical
methods since its introduction over 30 years ago. SAP2000 follows in
the same tradition featuring a very sophisticated, intuitive and versatile
user interface powered by an unmatched analysis engine and design
tools for engineers working on transportation, industrial, public works,
sports, and other facilities.
From its 3D object based graphical modeling environment, to the wide
variety of analysis and design options completely integrated across one
powerful user interface, SAP2000 has proven to be the most
integrated, productive and practical general purpose structural program
on the market today.
This intuitive interface allows you to create structural models rapidly
and intuitively without long learning curve delays. Now you can harness
the power of SAP2000 for all of your analysis and design tasks,
including small day-to-day problems. Complex Models can be
generated and meshed with powerful Templates built into the interface.
The Advanced Analytical Techniques allow for Step-by-Step Large
Deformation Analysis, Multiple P-Delta, Eigen and Ritz Analyses, Cable
Analysis, Tension or Compression Only Analysis, Buckling Analysis,
Blast Analysis, Fast Nonlinear Analysis for Dampers, Base Isolators
and Support Plasticity, Energy Methods for Drift Control and Segmental
Construction Analysis.
Bridge Designers can use SAP2000 Bridge Templates for generating
Bridge Models, Automated Bridge Live Load Analysis and Design,
Bridge Base Isolation, Bridge Construction Sequence Analysis, Large
Deformation Cable Supported Bridge Analysis and Pushover Analysis.
SAP2000 is for everyone! SAP2000 is for every project! From a simple
small 2D static frame analysis to a large complex 3D nonlinear dynamic
analysis, SAP2000 is the answer to all structural analysis and design
needs.
SAP2000 FEATURES
SAP2000 is available in three different levels: Basic (B), Plus (P) and Advanced (A). A letter in
parenthesis following a feature identifies the version(s) that are associated with it.
MODELING (A, P, B)
• Object Based Graphical Interface
• Model Templates with Auto Meshing
• Frame, Cable and Tendon Members
• Area (Shell) and Solid Objects with Internal Meshing
• Editing with Move, Merge, Mirror and Replicate
• Accurate Dimensioning with Guidelines and Snapping
• Auto Edge Constraints for Mismatched Shell Meshes
• Quick Draw Options for Object Creation
• Support for Multiple Coordinate Systems
• Powerful Grouping and Selection Options
• Automatic Generation of Code Defined Lateral Wind and Seismic Loads
• Transfer of Loads from Area Objects to Framing Systems
ANALYSIS
• Static Analysis with Frame and Shell Objects (A, P, B)
• Multiple Solvers for Analysis Optimization (A, P, B)
• Response Spectrum Analysis with Eigen or Ritz Vectors (A, P, B)
• P-Delta Analysis (A, P, B)
• Generalized Joint Constraints including Rigid Bodies and Diaphragms (A, P, B)
• Applied Force and Displacement Loading (A, P, B)
• Gravity, Pressure and Thermal Loading (A, P, B)
• Post Tensioning in Frame, Area and Solid Objects (A, P, B)
• Layered Shell Element (A, P, B)
• Plane, Asolid and Solid Objects (A, P)
• Dynamic Time History Analysis, including Multiple Base Excitation (A, P)
• Frequency Domain Analysis - Power Spectral Density (A, P)
• Moving Loads (A, P) (requires Bridge Module)
• Nonlinear Frame Hinges for Axial, Flexural, Shear & Torsional Behavior (A)
• Nonlinear Static Pushover Analysis (A)
• Viscous Dampers (A)
• Base Isolators (A)
• Gap Object for Structural Pounding (A)
• Nonlinear Time History Analysis with the Wilson FNA or Direct Integration Methods (A)
DISPLAY
• 3D Perspective Graphical Displays (A, P, B)
• Static Deformed and Mode Shapes (A, P, B)
• Display of User Defined and Automated Loads (A, P, B)
• Animation of Model (A, P, B)
• Force Diagrams and Stress Contours (A, P, B)
• Tabular Display of Model Input & Output (A, P, B)
• Graphical Section Cut Definitions for Forces and Stresses (A, P, B)
• OpenGL Viewer (A, P, B)
• Analysis Case Tree Display (A, P, B)
• Graphic Display of Displacement and Force Time History Records (A, P)
• Time History AVI files (A, P)
• Lane Loading and Influence Surface Displays (A, P) (requires Bridge Module)
• Nonlinear Force-Deformation Plots (A)
DESIGN (A, P, B)
• Steel Frame Design for Numerous Domestic & International Codes
• Concrete Frame Design for Numerous Codes
• Aluminum Frame Design for AA Codes
• Cold-Formed Steel Frame Design for AISI Codes
• Design for Static and Dynamic Loads
• Member Selection and Optimization
BRIDGE DESIGN MODULE (Requires Plus or Higher)
• Layout Line Definition using Bearings and Stations
• Moving Loads with 3D Influence Surfaces
• Cross Section Generation using Parametric Templates
• AASHTO, LFD & LRFD Codes
• Straight and Curved Girder Design with Post Tensioning
STAGED CONSTRUCTION MODULE (Requires Advanced)
• Sequencing Allowing Adding or Removing Objects/Loads/Supports
• Time Dependent Creep, Shrinkage, Aging and Steel Relaxation
• Explicitly Model Time Dependent Effects using Tendon Objects
OFFSHORE/WAVE MODULE (Requires Advanced)
• Wave Load Generator
• API Steel Frame Design with Punching Shear Checks
• Simplified Fatigue Analysis based on API Criteria
SAP2000 BRIDGE MODULE (Requires Plus or Higher)
SAP2000 is available in three different levels: Basic (B), Plus (P) and Advanced (A). A letter in
parenthesis following a feature identifies the version(s) that are associated with it.
PARAMETRIC BRIDGE MODELING
• Bridge Wizard with Step by Step Guidance to Create a Bridge Model
• Parametric Bridge Model Templates
• Quick Definition of Highway Layout Lines using Horizontal & Vertical Curves
• Super Elevations and Skews
• Parametric Cross Sections including Concrete Box Girders and Steel Composites
• Cross Sections May Vary Along Bridge Length
• Parametric Post Tensioning Tendon Layout for Box Girders
• Abutments with User Defined Support Conditions
• Bents with Single or Multiple Columns
• Hinges
• Layered Shell Element
• Lane Definition using Highway Layout or Frame Objects
• Automatic Application of Lane Loads to Bridge
• Predefined Vehicle and Train Loads
BRIDGE DESIGN OPTIONS
• Moving Loads with 3D Influence Surface
• Moving Loads with Multi-Step Analysis
• Lane Width Effects
• P/T Concrete Box Girder Design
• Composite Steel Deck Bridge Design
• Straight & Curved Girder Design
• AASHTO, LFD & LRFD and BS 5400-2 Codes
• Dynamic Effects of Moving Loads
BRIDGE RESULTS & OUTPUT
• Influence Lines and Surfaces
• Forces and Stresses (with Correspondence) Along and Across Bridge
• Displacement Plots
• Graphical and Tabulated Outputs
ADVANCED ANALYSIS OPTIONS (Requires Advanced)
• Segmental Construction Analysis (requires Staged Construction Module)
• Include the Effects of Creep, Shrinkage, Relaxation, and Anchorage Slip
• Pushover Analysis using Fiber Models
• Bridge Base Isolation and Dampers
• Explicitly Model Contact Across Gaps
• Nonlinear Large Displacement Cable Analysis
• Line and Surface Multi-Linear Springs (P-y curves)
• High Frequency Blast Dynamics using Wilson FNA
• Nonlinear Dynamic Analysis & Buckling Analysis
• Multi-Support Seismic Excitation
• Animated Views of Moving Loads
SAP2000 STEEL FRAME DESIGN CAPABILITIES
SAP2000 is available in three different levels: Basic (B), Plus (P) and Advanced (A). A letter
in parenthesis following a feature identifies the version(s) that are associated with it.
MODELING & DESIGNING STEEL FRAMES
• Integrated Object Based Steel Frame Models
• Lateral Displacement & Period Control
• Automatic Generation of Code Defined Lateral Wind and Seismic Loads
• Automatic Transfer of Vertical Loads from Floor Decks to Framing Systems
• Steel Frames Interacting with Complex 2D and 3D Shear Walls
STEEL FRAME DESIGN FEATURES
• Fully Integrated Steel Frame Design
• Automatic Member Sizing - No Preliminary Design Required
• Virtual Work Based Optimization for Lateral Deflections
• Grouping of Members for Member Sizing
• AISC-ASD & LRFD, AASHTO, UBC, API, British, Canadian, Italian, Indian and Euro Codes
• Design for Static and Dynamic Loads
• Code Dependent or User Defined Loading Combinations
• Automatic Calculation of K-Factors & P-Delta Effects
• Integrated Graphical Section Designer for Composite & Built-up Sections
• Interactive Options for Design and Review
• Design for Effects of Torsion
STEEL SEISMIC FRAME DESIGN FEATURES
• Response Spectrum and Time History Based Structural Dynamics
• Seismic Requirements for Special Moment-Resisting Frames
• Design of Intermediate/Special Moment-Resisting Frames
• Interactive Evaluation of Floor Diaphragm Shears Using Section Cuts
STEEL FRAME DESIGN OUTPUT FEATURES
• Controlling Steel Member Sizes
• Color Coded Controlling Steel Stress Ratios
STEEL DETAILING FEATURES
• IFC
• CIS/2
• TEKLA
• ProSteel 3D
• Steel Detailing Neutral File (SDNF)
• FrameWorks Plus
ADVANCED FEATURES FOR STEEL STRUCTURES
• Effects of Construction Sequence Loading (A)
• Automated Effects of Panel-Zone Deformations On Lateral Displacement
• Eccentricities Due to Changes in Member Dimensions
• Analytical Effects of Member Centerline Offsets In 3D
• Effects Of Beam-Column Partial Fixity
• Three-Dimensional Pushover Analysis (A)
• Buildings/Bridges With Base Isolation and Dampers (A)
• Element-Based P-Delta Effects for Local Buckling Instabilities (A)
SAP2000 CONCRETE FRAME DESIGN CAPABILITIES
SAP2000 is available in three different levels: Basic (B), Plus (P) and Advanced (A). A letter in
parenthesis following a feature identifies the version(s) that are associated with it.
MODELING & DESIGNING CONCRETE FRAMES
• Integrated Object Based Concrete Models
• Special Modeling of Concrete Frame Systems
• Cracked Properties - Property Modification Factors
• Automatic Generation of Code Defined Lateral Wind and Seismic Loads
• Automatic Transfer of Vertical Loads to Framing Systems
CONCRETE FRAME DESIGN FEATURES
• Fully Integrated Concrete Frame Design
• ACI, UBC, AASHTO, British, Canadian, New Zealand, Indian, Italian, Korean, Mexican and
Euro Codes
• Design for Static and Dynamic Loads
• Grouping for Design Envelopes
• Automatic and User Defined Loading Combinations
• Designed for Biaxial-Moment/Axial-Load Interaction & Shear
• Automatic Calculation of Moment Magnification Factors
• Magnification Over-ride Option with the Evaluation of P-Delta Effects
• Integrated Graphical Section Designer for Complex Concrete Sections
• Automated Generation of Biaxial-Moment/Axial-Load Interaction Diagrams
• Interactive Options for Design and Review
• Design for Effects of Torsion
CONCRETE SEISMIC FRAME DESIGN FEATURE
• Structural Dynamics - Response Spectrum and Time History Analysis Seismic
• Design of Intermediate/Special Moment-Resisting Frames
• Seismic Check of Beam/Column Joints
• Seismic Check for Strong-Column/Weak-Beam Design
• Interactive Evaluation of Concrete Floor Diaphragm Shears Using Section Cuts
CONCRETE SECTION DESIGNER FEATURES
• Integrated Graphical Section Designer for Creating Complex Concrete Sections
• Rectangular, Circular or Cross Section of any Arbitrary Geometry
• Powerful Graphical Interface for Locating Reinforcement
• Calculates Section Properties and Biaxial Moment, Load Interaction Cures
• Calculated Section Moment-Curvature Relationships
CONCRETE FRAME DESIGN OUTPUT FEATURES
• Biaxial-Moment/Axial-Load Interaction Diagrams
• Longitudinal Reinforcing Requirements at User Defined Stations
• Shear reinforcing requirements at User Defined Stations
• Graphical Displays of Reinforcing Layouts
• Design for Static and Dynamic Loads
• Automatic and User Defined Loading Combinations
• Reinforcing Steel Intensity Diagrams for Concrete Shells
ADVANCED FEATURES FOR CONCRETE STRUCTURES
• Effects of Construction Sequence Loading (A)
• Effects of Time dependent Creep & Shrinkage (A)
• Automated Effects of Panel-Zone Deformations On Lateral Drift
• Meshing Techniques for Shear Walls and Floors
• Models Using Edge Constraints
• Eccentricities Due to Changes in Member Dimensions
• Analytical Effects of Member Centerline Offsets In 3D
• Three-Dimensional Pushover Analysis (A)
• Buildings/Bridges With Base Isolation and Dampers (A)
• Element-Based P-Delta Effects for Local Instabilities (A)
SAP2000 COLD-FORMED STEEL DESIGN CAPABILITIES
SAP2000 is available in three different levels: Basic (B), Plus (P) and Advanced (A). A letter
in parenthesis following a feature identifies the version(s) that are associated with it.
MODELING & DESIGNING COLD-FORMED STEEL FRAMES
• Integrated Object Based Cold-Formed Steel Frame Models
• Lateral Displacement & Period Control
• Automatic Generation of Code Defined Lateral Wind and Seismic Loads
• Transfer of Vertical Loads from Area Objects to Framing Systems
• Cold-Formed Steel Frames Interacting with Complex 2D and 3D Shear Walls
COLD-FORMED STEEL FRAME DESIGN FEATURES
• Fully Integrated Cold-Formed Steel Frame Design
• Virtual Work Based Optimization for Lateral Deflections
• AISI-ASD and AISI-LRFD Codes
• Design for Static and Dynamic Loads
• Code Dependent or User Defined Loading Combinations
• Automatic Calculation of K-Factors & P-Delta Effects
• Integrated Graphical Section Designer for Composite & Built-up Sections
• Interactive Options for Design and Review
• Design for Effects of Torsion
COLD-FORMED STEEL SEISMIC FRAME DESIGN FEATURES
• Response Spectrum and Time History Based Structural Dynamics
COLD-FORMED STEEL FRAME DESIGN OUTPUT FEATURES
• Color Coded Controlling Cold-Formed Steel Stress Ratios
COLD-FORMED STEEL DETAILING FEATURES
• IFC
• CIS/2
POWER FEATURES FOR COLD-FORMED STEEL STRUCTURES
• Eccentricities Due to Changes in Member Dimensions
• Analytical Effects of Member Centerline Offsets In 3D
• Effects Of Beam-Column Partial Fixity
• Element-Based P-Delta Effects for Local Buckling Instabilities
SAP2000 Staged Construction Module (Requires Advanced)
SAP2000 is available in three different levels: Basic (B), Plus (P) and Advanced (A). A letter
in parenthesis following a feature identifies the version(s) that are associated with it.
SAP2000 STAGED CONSTRUCTION ANALYSIS AND DESIGN CAPABILITIES
STAGED CONSTRUCTION MODELING
• Integrated Object Based Bridge or Building Models
• Model Templates with Auto Meshing
• Frame, Cable, Tendon, Shell and Solid Object Libraries
• Powerful Grouping and Selection Options
• Gravity, Pressure and Thermal Loading
• Automatic Generation of Code Defined Wind and Seismic Loads
• Line and Surface Multi-Linear Springs (P-y curves)
• Straight & Curved Girders (requires Bridge Module)
• Any Combination of Static and Dynamic Analyses, including Time History
• Post Tensioning
STAGED CONSTRUCTION ANALYSIS
• Staged Construction Sequencing allowing Adding or Removing Objects
• Staged Construction Sequencing allowing Adding or Removing Loads
• Staged Construction Sequencing allowing Adding or Removing Supports
• Time Dependent Concrete Age Effects
• Time Dependent Creep and Shrinkage
• Time Dependent Prestressing Steel Relaxation
• Explicitly Model Time Dependent Effects using Tendon Objects
• P-Delta Analysis
• P/T Concrete Box Girder Design (requires Bridge Module)
• Nonlinear Large Displacement Cable Analysis
STAGED CONSTRUCTION DESIGN
• Integrated Steel and Concrete Frame Design
• AASHTO, LFD & LRFD Codes
• ACI, UBC, British, Canadian, New Zealand, Indian, Italian, Korean, Mexican and Euro
Concrete Codes
• AISC-ASD & LRFD, UBC, API, British, Canadian, Italian, Indian and Euro Steel Codes
• Integrated Graphical Section Designer for Complex Concrete Sections
STAGED CONSTRUCTION RESULTS & OUTPUT
• 3D Perspective Graphical Displays
• Multiple Views with Different Stages Displayed
• Force Diagrams and Stress Contours
• Displacement Plots
• Tabular Display of Model Input & Output
• Analysis Case Tree
SAP2000 OFFSHORE/WAVE MODULE (Requires Advanced)
SAP2000 is available in three different levels: Basic (B), Plus (P) and Advanced (A). A letter
in parenthesis following a feature identifies the version(s) that are associated with it.
SAP2000 OFFSHORE ANALYSIS AND DESIGN CAPABILITIES
OFFSHORE MODELING
• Integrated Object Based Models
• Wave Load Generator
• Frame, Cable, Tendon, Shell and Solid Object Libraries
• Auto Edge Constraints for Mismatched Shell Meshes
• Wind Loading on Open Structures
• Line and Surface Multi-Linear Springs (P-y curves)
• Gravity, Pressure and Thermal Loading
• Any Combination of Static and Dynamic Analyses
OFFSHORE ANALYSIS & DESIGN
• API Simplified Fatigue Analysis
• API Punching Shear Checks
• Applied Displacement Loading
• Multiple Base Excitation
• Nonlinear Hinges
• Nonlinear Time History Analysis
• API Steel Frame Design
• Integrated Graphical Section Designer for Built-up Sections
OFFSHORE RESULTS & OUTPUT
• 3D Perspective Graphical Displays
• Graphical Wave Plots
• Tabular Display of Wave Data
• Force Diagrams and Stress Contours
• Reinforcing Steel Intensity Diagrams for Concrete Shells
• Displacement Plots
SAP2000 POST TENSIONING ANALYSIS
& DESIGN CAPABILITIES
SAP2000 is available in three different levels: Basic (B), Plus (P) and Advanced (A). A letter
in parenthesis following a feature identifies the version(s) that are associated with it.
POST TENSIONING MODELING
• Integrated Object Based Models
• Tendons in Frame, Shell and Solid Objects
• Layered Shell Element
• Tendon Layout can be Arbitrary
• Straight and Curved Girders
• Parametric Tendon Layout for Box Girders (requires Bridge Module)
• Gravity, Pressure and Thermal Loading
• Moving Loads (requires Bridge Module)
• Any Combination of Static and Dynamic Analyses
POST TENSIONING ANALYSIS & DESIGN
• P/T Concrete Box Girder Design (requires Bridge Module)
• Creep, Shrinkage, Relaxation, Anchorage Slip & Elastic Shortening Losses (requires
Staged Construction Module)
• Integrated Steel and Concrete Frame Design
• Explicitly Model Contact across Expansion Joint (requires Advanced)
• Response Spectrum Analysis
• P-Delta Analysis
• Integrated Graphical Section Designer for Complex Concrete Sections
POST TENSIONING RESULTS & OUTPUT
• Planar and 3D Graphical Displays
• Tendon Layout Displays
• Force Diagrams and Stress Contours
• Graphical Section Cut Definitions for Forces and Stresses
• Reinforcing Steel Intensity Diagrams for Concrete Shells
• Displacement Plots
• Tabular Display of Model Input & Output
Introduction
Twenty-six example problems have been prepared to demonstrate how to use the various SAP2000
commands and features. The problems may help improve your understanding of the sequence for
using the commands and how the commands relate to one another during the modeling process
. The
following table identifies the problem name and structure type being modeled, the features involved
in the model, and some of the key commands used to complete the model. The list of commands is
intended to help you locate an example(s) that demonstrates use of a command. The listed
commands are not the only commands used in the problem.
Problem Name
and
Structure Type
Features Demonstrated Command Usage Demonstrated
A
Concrete Wall
and Steel Frame
Grid lines
Divide frames
Frame releases
Steel Design
Assign > Area > Automatic Area Mesh
Assign > Frame Loads > Point
Assign > Frame/Cable/Tendon > Releases/Partial
Fixity
Assign > Frame/Cable/Tendon > Frame Sections
Assign > Frame/Cable/Tendon Loads > Distributed
Assign > Joint Loads > Forces
Define > Area Sections
Define > Combinations
Define > Coordinate Systems/Grids
Define > Load Cases
Define > Materials
Design > Steel Frame Design > View/Revise
Overwrites
Display > Show Forces/Stresses > Joint
Draw > Quick Draw Area
Edit > Divide Frames
File > New Model > 2D Frames - Portal
Options > Preferences > Steel Frame Design
B
Concrete Wall
Groups
Section Cuts
Load Combinations
Linear Replication
Assign > Assign to Groups
Assign > Joint Loads > Forces
Define > Area Sections
Define > Combinations
Define > Load Cases
Define > Materials
Display > Analysis Results Tables
Edit > Replicate - Linear
File > New Model > Wall - Shear Wall
C
Truss Frame
Diaphragm
Constraint
Design Optimization
Automatic Area
Mesh
Mode Shapes
New Model (not
Assign > Area > Automatic Area Mesh
Assign > Area Loads > Uniform (Shell)
Assign > Frame/Cable/Tendon > Frame Sections
Assign > Joint > Constraints
Assign > Joint > Restraints
Define > Analysis Cases - Modal
Define > Area Sections
from template, started
from scratch)
Linear Replication
Mirror Replication
Radial Replication
Steel Design
Define > Coordinate Systems/Grids
Define > Frame Sections
Define > Load Cases
Define > Materials
Design > Steel Frame Design > Display Design Info
Design > Steel Frame Design > Start Design/Check
of Structure
Design > Steel Frame Design > Verify All Members
Passed
Design > Steel Frame Design > Verify Analysis vs
Design Sections
Draw > Draw Frame/Cable/Tendon
Draw > Draw Rectangular Area
Edit > Divide Frames
Edit > Replicate - Linear
Edit > Replicate - Mirror
Edit > Replicate - Radial
File > New Model > Blank
Options > Preferences > Dimensions/Tolerances
Options > Preferences > Steel Frame Design
Start Animation
D
Inclined Support
Radial Replication
Rotated Support
Assign > Frame/Cable/Tendon > Frame Sections
Assign > Joint > Local Axes
Assign > Joint > Restraints
Assign > Joint Loads > Forces
Define > Materials
Display > Show Forces/Stresses > Joint
Edit > Replicate - Radial
File > New Model > Beam
E
Cables in
Tension
Draw Special Joint
Geometric
Nonlinear P-Delta
Move
Assign > Joint > Restraints
Assign > Joint Loads > Forces
Define > Analysis Cases - Nonlinear, P-Delta
Define > Frame Sections
Define > Load Cases
Define > Materials
Draw > Draw Frame/Cable/Tendon
Draw > Draw Special Joint
Edit > Move
File > New Model > Grid Only
View > Show Grid, None
F
Wall Resisting
Hydrostatic
Pressure
Hydrostatic Loading
Joint Patterns
Assign > Area Loads > Surface Pressure (All)
Assign > Joint > Restraints
Assign > Joint Patterns
Define > Joint Patterns
Define > Materials
File > New Model > Wall - Shear Wall
G
Frame with
Support
Displacement
New Model from
Template
Support
Displacement
Assign > Frame/Cable/Tendon > Frame Sections
Assign > Joint Loads > Displacements
Define > Materials
Display > Show Forces/Stresses > Joint
File > New Model > 2D Frames - Portal
Options > Preferences > Dimensions/Tolerances
H
Reinforced
Concrete Beam
Concrete Design
New Model From
Template
Assign > Frame/Cable/Tendon > Frame Sections
Assign > Frame/Cable/Tendon Loads > Distributed
Define > Frame Sections
Define > Load Cases
Define > Materials
Design > Concrete Frame Design > Display Design
Info
Design > Concrete Frame Design > Select Design
Combos
Design > Concrete Frame Design > Start Design/
Check of Structure
File > New Model > Beam
I
Prestressed
Concrete Beam
Response
Combinations
Output Stations
Prestressing
Assign > Frame/Cable/Tendon > Output Stations
Assign > Frame/Cable/Tendon > Frame Sections
Assign > Frame/Cable/Tendon Loads > Distributed
Define > Combinations
Define > Frame Sections
Define > Load Cases
Define > Materials
Display > Show Forces/Stresses >
Frame/Cable/Tendon
Draw > Frame/Cable/Tendons - Tendon
File > New Model > Beam
J
Beam on Elastic
Foundation
Divide Frames
Response
Combinations
Springs
Assign > Frame/Cable/Tendon > Frame Sections
Assign > Joint > Masses
Assign > Joint > Springs
Assign > Joint Loads > Forces
Define > Frame Sections
Define > Load Cases
Define > Materials
Display > Show Forces/Stresses>
Frame/Cable/Tendon
Edit > Divide Frames
File > New Model > Beam
Options > Preferences > Dimensions/Tolerances
K
Steel Moment
Frame
New Model From
Template
Steel Design
Unbraced Length
Ratio
Assign > Frame/Cable/Tendon > Frame Sections
Assign > Frame/Cable/Tendon Loads > Distributed
Assign > Joint Loads > Forces
Define > Load Cases
Define > Materials
Design > Steel Frame Design > Start Design/Check
of Structure
Design > Steel Frame Design > View/Revise
Overwrites
Display > Show Tables
File > New Model > 2D Frames - Portal
L
Periodic
Loading
Mode Shapes
Modal Time History
Analysis (Periodic)
Assign > Frame/Cable/Tendon > Frame Sections
Assign > Joint Loads > Forces
Define > Analysis Cases - Time History, Periodic
Define > Frame Sections
Define > Functions > Time History
Define > Materials
Display > Show Plot Functions
File > New Model > 2D Frames - Portal
M
Flat Plate in the
X-Y Plane with
a Twist
Mesh Area Objects
Trick Problem
Assign > Joint Restraints
Assign > Joint Loads > Forces
Define > Area Sections
Define > Materials
Display > Show Forces/Stresses > Joint
Draw > Draw Rectangular Area
Edit > Mesh Areas
File > New Model >
Grid Only
N
Frame Shear
Wall
Intersection
Diaphragm
Constraint
Groups
Section Cuts
Assign > Assign to Groups
Assign > Frame/Cable/Tendon > Frame Sections
Assign > Joint > Constraints
Assign > Joint > Restraints
Assign > Joint Loads > Forces
Define > Analysis Cases - Modal, Nonlinear, Time
History
Define > Area Sections
Define > Frame Sections
Define > Materials
Define > Section Cuts
Display > Show Tables
Draw > Quick Draw Area
File > New Model > 2D Frames - Portal
Options > Preferences > Dimensions/Tolerances
O
Isolated
Building
Nonlinear Time
History Analysis
Base (Seismic)
Isolation
Diaphragm
Constraint
Ritz Vectors
Dynamic Analysis
Mode Shapes
Link Elements
Modal Nonlinear
Time History Analysis
Assign > Area > Sections
Assign > Area Loads > Uniform (All)
Assign > Frame/Cable/Tendon > Frame Sections
Assign > Joint > Constraints
Define > Analysis Cases - Buckling
Define > Area Sections
Define > Functions > Time History
Define > Link/Support Properties
Define > Load Cases
Define > Materials
Display > Show Tables
Display > Show Plot Functions
Draw > Draw 1 Joint Link
Draw > Draw Frame/Cable/Tendon
Draw > Quick Draw Area
Edit > Replicate - Linear
File > New Model > 3D Frame - Open Frame
Building
P
Critical
Buckling Load
Buckling Analysis
P-Delta
Assign > Frame/Cable/Tendon Loads > Points
Assign > Frame/Cable/Tendon > Automatic Frame
Subdivide
Assign > Joint > Restraints
Assign > Joint Loads > Forces
Define > Analysis Cases - Nonlinear, P-Delta
Define > Frame Sections
Define > Load Cases
Define > Materials
File > New Model > Grid Only
Q
Three Frames
Concrete Moment
Frame
Create Time History
Video
Dynamic Analysis
Mode Shapes
New Model From
Template
Link Elements
Nonlinear Time
History Analysis
Assign > Joint > Masses
Assign > Joint > Restraints
Assign > Joint Loads > Forces
Define > Analysis Cases - Modal, Nonlinear, Time
History
Define > Frame Sections
Define > Functions > Time History
Define > Link/Support Properties - Damper
Define > Link/Support Properties - Rubber Isolator
Define > Materials
Draw > Draw 1 Joint Link
Draw > Draw 2 Joint Link Element
Draw > Quick Draw Frame/Cable/Tendon
File > Create Video > Multi-Step Animation Video
File > New Model >- 2D Frames - Portal
Start Animation
R
Bridge with
Moving Load
Divide Frames
Bridge Loads
Output Stations
Assign > Frame/Cable/Tendon > Output Stations
Assign > Joint > Restraints
Define > Analysis Cases - Moving Load
Define > Bridge Loads > Bridge Responses
Define > Bridge Loads > Lanes
Define > Bridge Loads > Vehicle Classes
Define > Bridge Loads > Vehicles
Define > Frame Sections
Define > Materials
Display > Show Forces/Stresses >
Frame/Cable/Tendon
Display > Show Influence Lines
Edit > Divide Frames
Edit > Move
File > New Model > 2D Frames - Portal
S
Finite Element
Model of Steel
Beam with Web
Opening
Change Labels
Section Cuts
Mesh Areas
New Model (From
Scratch, Not From
Template)
Stress Contours For
Shells
Assign > Assign to Groups
Assign > Joint > Restraints
Assign > Joint Loads > Forces
Define > Area Sections
Define > Materials
Define > Section Cuts
Display > Show Tables
Display > Show Forces/Stresses > Shell
Draw > Draw Rectangular Area
Edit > Change Labels
Edit > Mesh Areas
Edit > Replicate - Linear
File > New Model > Grid Only
View > Set 2D View
View > Set Limits
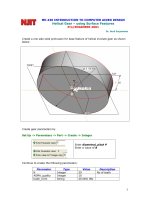
T
Domed
Cylindrical
Structure
New Model From
Template
Add To Model from
Template
Edit > Add to Model from Template
File > New Model > Shells - Cylinder
File > New Model > Shells - Dome
U
Barrel Vaulted
Structure
Add To Model From
Template
Response
Combinations
New Model From
Template
Assign > Area Loads > Uniform (Shell)
Assign > Joint > Restraints
Define > Combinations
Define > Load Cases
Define > Materials
Draw > Draw Quad Area
Edit > Add to Model from Template
Edit > Mesh Areas
Edit > Move
Edit > Replicate - Mirror
File > New Model > Shells - Barrel Shell
File > New Model > Wall - Shear Wall
View > Set 2D View
View > Set Limits
View > Show All
View > Show Grid
View > Show Selection Only
V
Temperature
Loading
Grid Lines
Temperature
Loading
Assign > Frame/Cable/Tendon > Frame Sections
Assign > Frame/Cable/Tendon Loads >
Temperature
Assign > Joint > Restraints
Define > Coordinate Systems/Grids
Define > Load Cases
Define > Materials
Display > Show Forces/Stresses > Joint
File > New Model > 2D Frames - Portal
W
Simple Beam
with Trapezoidal
Loads
Divide Frames
Trapezoidal Loads
(Distributed Loads)
Assign > Frame/Cable/Tendon > Frame Sections
Assign > Frame/Cable/Tendon Loads > Point
Assign > Frame/Cable/Tendon Loads > Distributed
Define > Load Cases
Define > Materials
Edit > Divide Frames
File > New Model > Beam
X
Through Truss
Bridge
Divide Frames
Grid Lines
Linear Replication
Steel Design
Assign > Area Loads > Uniform (Shell)
Assign > Frame/Cable/Tendon > Frame Sections
Define > Area Sections
Define > Coordinate Systems/Grids
Define > Frame Sections
Define > Load Cases
Define > Materials
Design > Steel Frame Design > Start Design/Check
of Structures
Draw > Quick Draw Area Element
Draw > Quick Draw Braces
Draw > Quick Draw Frame/Cable/Tendon
Edit > Divide Frames
Edit > Move
Edit > Replicate - Linear
File > New Model > 2D Frames - Vertical Truss
Options > Preferences > Steel Frame Design
Y
Response
Spectrum
Analysis for
Single Degree of
Freedom System
Draw Special Joint
Dynamic Analysis
Mode Shapes
Response
Spectrum Analysis
Assign > Joint > Masses
Assign > Joint > Springs
Define > Analysis Cases - Response Spectrum
Define > Functions > Response Spectrum
Display > Show Forces/Stresses > Joints
Draw > Draw Special Joint
File > New Model > Grid Only
Z
Response
Spectrum
Analysis
Diaphragm
Constraint
Dynamic Analysis
Grid Lines
Mesh Areas
Mode Shapes
New Model From
Template
Linear Replication
Response
Spectrum Analysis
Assign > Frame/Cable/Tendon > Frame Sections
Assign > Joint > Constraints
Assign > Joint > Masses
Assign > Joint > Restraints
Define > Analysis Cases - Response Spectrum
Define > Area Sections
Define > Coordinate Systems/Grids
Define > Frame Sections
Define > Functions > Response Spectrum
Define > Materials
Draw > Draw Rectangular Area
Draw > Quick Draw Area Element
Draw > Quick Draw Frame/Cable/Tendon
Edit > Mesh Areas
Edit > Replicate - Linear
File > New Model > 3D Frame - Open Frame
Building
CSI Solution Demonstrates Use of These Features
Grid lines
Divide frames
Frame releases
Steel Design
Problem A Solution
1.
Click the
File menu > New Model
command to access the
New Model
form.
Pa
g
e 1 of 13Problem A
1/14/2007mk:
@
MSITStore:C:\Pro
g
ram%20Files\Com
p
uters%20and%20Structures\SAP2000%2
2.
Click the drop-down list to set the units to .
3.
Click the 2D Frames button
to access the 2D Frames form. In that form:
Select
Portal
in the
2D Frame Type
drop-down list.
Type
5
in the
Number of Stories
edit box.
Type
4
in the
Number of Bays
edit box.
Type
13
in the
Story Height
edit box.
Type
25
in the
Bay Width
edit box.
Click the OK button.
4. Click the “X” in the top right-hand corner of the 3-D View window to close that view.
5. Click the
Set Display Options
toolbar button
(or click the
View menu > Set Display Options
command) to access the
Display Options for Active Window
form. In that form:
Check the
Labels
box in the
Joints
area.
Check the
Labels
box in the
Frames/Cables/Tendons
area.
Click the
OK
button.
6. Select column objects 18, 19, 20, 23, 24 and 25 and beam objects 38, 39, 40, 43, 44 and 45. Press
the delete key on the keyboard to delete those objects.
Note:
Objects can be selected by clicking on each one individually, “windowing” over them, using
the Intersecting Line Select Mode
, or using the
Select menu > Select > Labels
command.
7. Click the
Define menu > Coordinate Systems/Grids
command to access the
Coordinate/Grid
Systems
form.
8. Click on GLOBAL in the
Systems
list box to highlight it (select it), and then click the
Modify/Show
System
button to access the
Define Grid Data
form. In that form:
Check the
Glue to Grid Lines
box in the right middle of the form.
In the
X Grid Data
area, click in the
Ordinate
cell for
Grid ID
x5 (it should read 50 now). Type
53
in the edit box.
In the
Z Grid Data
area, click in the
Ordinate
cell for
Grid ID
z1 (it should read 0 now). Type -
1 in the edit box.
Click the
OK
button on the
Define Grid Data
form and the
Coordinate/Grid Systems
form.
9. Click the
Refresh Window
button to refresh the drawing.
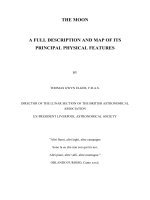
10. Select beams 41 and 42.
11. Click the
Edit menu > Divide Frames
command to access the
Divide Selected Frames
form.
12.
Fill in the form as shown in the figure and click the OK button.
Pa
g
e 2 of 13Problem A
1/14/2007mk:
@
MSITStore:C:\Pro
g
ram%20Files\Com
p
uters%20and%20Structures\SAP2000%2
13. Click the drop-down list in the status bar to change the units to .
14. Click the
Define menu > Materials
command to access the
Define Materials
form.
15. Click on STEEL in the
Materials
area to highlight it (select it), and then click the
Modify/Show
Material
button to access the
Material Property Data
form. In that form:
Type
0
in the
Mass per Unit Volume
edit box.
Type
0
in the
Weight per Unit Volume
edit box.
Type
29500
in the
Modulus of Elasticity
edit box.
Type
.3
in the
Poisson’s Ratio
edit box, if it is not already entered.
Type
0
in the
Coeff of Thermal Expansion
edit box.
Type
36
in the
Minimum Yield Stress, Fy
edit box, if it is not already entered.
Type
58
in the
Minimum Tensile Stress, Fu
edit box.
Click the
OK
button.
16. Click on CONC in the
Materials
area to highlight it (select it), and then click the
Modify/Show
Material
button to access the
Material Property Data
form. In that form:
Type
4000
in the
Modulus of Elasticity
edit box.
Type
.22
in the
Poisson’s Ratio
edit box
Click the
OK
button to accept these values and the other values on the form.
17. Click the
OK button to close the Define Materials form.
18. Click the drop-down list in the status bar to change the units to .
19. Click the
Define menu > Materials command to access the Define Materials form.
20. Click on CONC in the
Materials
area to highlight it (select it), and then click the
Modify/Show
Material
button to access the
Material Property Data
form. In that form:
Verify
0.15
is displayed in the
Weight per Unit Volume
edit box.
Click the
OK
buttons on the
Material Property Data
form and the
Define Materials
form.
21. Click the
Define menu > Frame Sections
command to access the
Frame Properties
form.
Pa
g
e 3 of 13Problem A
1/14/2007mk:
@
MSITStore:C:\Pro
g
ram%20Files\Com
p
uters%20and%20Structures\SAP2000%2
22. In the
Choose Property Type to Add
area, click the drop-down list that reads
Import I/Wide Flange
,
highlight the
Import I/Wide Flange
item, and then click on the
Add New Property
button.
23. If the
Section Property File
form appears, locate the Sections.pro file, which should be stored in the
same directory as the SAP2000 program files. Highlight Sections.pro and click the
Open
button.
24. A form appears with a list of all wide flange sections in the database. In that form:
Scroll down and click on the W16X36 section.
Click the
OK
button on the form and on the next form to return to the
Frame Properties
form.
25. In the
Choose Property Type to Add
area, click the drop-down list that reads
Import I/Wide Flange
,
highlight the
Import Box/Tube
item, and then click on the
Add New Property
button.
26. A form appears with a list of all structural tube sections in the database. In that form:
Scroll up/down and click on the TS6X6X1/4 section.
Click the
OK
button on the
database
form, the
Box/Tube Section
form, and the
Frame
Properties
form to exit all of forms.
27. Click the
Define menu > Area Sections
command to access the
Area Sections
form.
28. In the
Select Section Type to Add
drop-down list, click
Shell
; then click the
Add New Section
button
to access the
Shell Section Data form. In that form:
Type
WALL
in the
Section Name
edit box.
Verify that the
Shell - Thin
option is selected in the
Type
area.
In the
Thickness
area type
.6667
in both the
Membrane
and the
Bending
edit boxes.
Click the
OK
button.
29. Click the
OK
button to close the
Area Sections
form.
30. Verify that the
Snap to Points and Grid Intersections
button is depressed.
31. Click the
Draw Frame/Cable/Tendon Element
button
or select the
Draw menu > Draw
Frame/Cable/Tendon
command to access the
Properties of Object
form. In that form:
Click in the
Property
cell to display a drop-down list. Scroll up/down and click on the
TS6X6X1/4 section to assign it to the line objects that you will draw.
In the
Moment Releases
drop-down list, click on Pinned.
32. Draw the first brace object as follows:
Place the mouse pointer on joint 19. When the text box reading “Point” appears, click the left
mouse button once.
Move the mouse pointer to joint 31. When the text box reading “Point” appears, click the left
mouse button once.
Press the Enter key on the keyboard.
33. Click on joint 25 and then joint 31, and press the Enter key to draw the second brace element.
34. Click on joint 20 and then joint 32, and press the Enter key to draw the third brace element.
Pa
g
e 4 of 13Problem A
1/14/2007mk:
@
MSITStore:C:\Pro
g
ram%20Files\Com
p
uters%20and%20Structures\SAP2000%2
35. Click on joint 26 and then joint 32, and press the Enter key to draw the fourth and final brace
element.
36. Click the
Set Select Mode
button to exit Draw mode and enter Select mode.
37. Select all of the beams except for the braced frame beams (i.e., select beams 26 through 37 and do
not select beams 46 through 49). The Intersecting Line Selection option could be useful for this.
Note:
To use the Intersecting Line Selection option, click the
Select Using Intersecting Line button
. Then click the left mouse button at the top of one beam bay, and while holding down the left
mouse button, drag the mouse to the bottom of the beam bay. A “rubberband line” will appear and
all objects that this “rubberband line” passes through will be selected. Release the left mouse
button to make the selection.
38. Click the
Assign menu > Frame/Cable/Tendon > Releases/Partial Fixity
command to access the
Assign Frame Releases
form. In that form, check both the
Start
and the
End
boxes for Moment 33
(Major) and then click the
OK
button.
39. Select beam objects 46 and 48.
40. Click the
Assign menu > Frame/Cable/Tendon > Releases/Partial Fixity
command to access the
Assign Frame Releases
form. In that form, check the
Start
box for Moment 33 (Major) and then click
the
OK
button.
41. Select beam objects 47 and 49.
42. Click the
Assign menu > Frame/Cable/Tendon > Releases/Partial Fixity command to access the
Assign Frame Releases
form. In that form, check the
End
box for Moment 33 (Major) and then click
the
OK
button.
43. Click the
Define menu > Load Cases command to access the Define Loads form. In that form:
Type
LL
in the
Load Name
edit box.
Select
Live
from the
Type
drop-down list.
Type
0
in the
Self Weight Multiplier
edit box.
Click the
Add New Load
button.
Type
EQ
in the
Load Name
edit box.
Select
Quake
from the
Type
drop-down list.
Select
None
from the
Auto Lateral Load
drop-down list.
Click the
Add New Load
button.
Click the
OK
button.
44. Click the
Define menu > Combinations
command to access the
Define Response Combinations
form. In that form:
Click the
Add New Combo
button to access the
Response Combination Data
form. In that
form:
{ Type
ALL
in the
Response Combination Name
edit box.
{ Select
Linear Add
from the
Combination Type
drop-down list if it is not already
selected.
{ If not already set, select the
DEAD
load case in the
Case Name
drop-down list and
Pa
g
e 5 of 13Problem A
1/14/2007mk:
@
MSITStore:C:\Pro
g
ram%20Files\Com
p
uters%20and%20Structures\SAP2000%2