Oreilly Photoshop CS5 The Missing Manual_4 pot
Bạn đang xem bản rút gọn của tài liệu. Xem và tải ngay bản đầy đủ của tài liệu tại đây (2.82 MB, 78 trang )
371
:
Quick Fixer-Uppers
9. Turn on the “Save as defaults” checkbox and then click OK.
Since the settings listed here are good for almost every color correction, you
can tell Photoshop to use them as its defaults. That way you don’t have to reset
all this stuff every time you use one of the auto correctors or a Levels or Curves
adjustment (both discussed later in this chapter).
10. Close the Adjustments panel and throw away the Adjustment layer.
To close the Adjustments panel, click the dark gray bar at the top of the panel.
Since you created the Adjustment layer just to get at the target color settings,
you can throw it away by selecting it in your Layers panel and then pressing
Delete (Backspace on a PC).
Once you’ve set your target colors, you’re ready to start using the correction methods
discussed in the next few sections.
Tip: A handy way to get rid of distractions so you can focus on fixing your image is to go up to the Ap-
plication bar at the top of your screen (see page 14), click the Screen Mode icon, and choose Full Screen
Mode With Menu Bar. You can also press the F key repeatedly to cycle through the screen modes.
Fixing Color
If your image looks flat (like it has no contrast) or has a noticeable color cast, give the
following methods a spin. And if your image is in pretty good shape to begin with,
the following tools can fix its color in no time flat:
• Auto Color. If your image has a noticeable color cast (everything looks a little
green, say), this command can help. When you run it, Photoshop hunts down
the shadows, highlights, and midtones in your image and changes their color
values to the target colors you set earlier. You can also use this command to
tone down oversaturated images, where all the colors look too intense. To run
it, choose Image➝Auto Color or press Shift-�-B (Shift+Ctrl+B on a PC). This
command works only on images that are in RGB mode, so if the menu item is
grayed out, choose Image➝Mode➝RGB Color first.
Tip: You can run Auto Color nondestructively as an Adjustment layer by following steps 1–2 in the previ-
ous section. If you’d kept the Adjustment layer hanging around when you finished setting your target
colors, you would have applied the Auto Color adjustment to your image.
• Variations. Besides using a Variations adjustment to add color to black-and-
white images (page 355), you can also use it to fix color (see Figure 9-2). Choose
Image➝Adjustments➝Variations and then click one of the six previews—More
Green, More Yellow, and so on—that represent various changes in color bal-
ance, contrast, and saturation (your current pick appears in the middle). Your
372
P CS: T M M
Quick Fixer-Uppers
clicks have a cumulative effect: Each time you click the More Red preview, for
example, Photoshop adds more red to your image. As you click the previews,
Photoshop updates all the images. To adjust the brightness, click either the
lighter or darker preview on the right side of the dialog box as many times as
you need to get the lighting you want.
Tip: In Photoshop CS5, the Variations adjustment doesn’t work in 64-bit mode, so don’t panic if you
can’t find it. The fix is to switch to 32-bit mode (see the box on page 6) and then it’ll reappear in the
Image➝Adjustments menu.
Since you can’t use Variations as an Adjustment layer (meaning it’ll affect your
original image), it’s a darn good idea to duplicate your original layer by press-
ing �-J (Ctrl+J on a PC) before you apply this adjustment. Better yet, select the
image layer and then choose Filter➝“Convert for Smart Filters” so the adjust-
ment runs on its own layer instead (this method also creates an automatic layer
mask!). See page 634 for more on using Smart Filters.
Figure 9-2:
A Variations adjustment is a
very visual way to fix your
image, though it works only
on 8-bit images (see the box
on page 45). Click one of
the six color previews on the
left side of the dialog box
as a starting point and then
use the Fine to Coarse slider
to change the intensity of
the adjustment (Fine lowers
the intensity and Coarse in-
creases it, which makes you
wonder why the slider isn’t
named Intensity instead).
Moving the slider one tick
mark doubles the strength
of the adjustment.
If you choose Shadows or
Highlights and then turn on
the Show Clipping checkbox,
Photoshop indicates the
clipped areas of your image
(page 385) with funky neon
colors (they won’t show up
in the printed version of the
image).
373
:
Quick Fixer-Uppers
• Color Balance. This adjustment changes the overall mixture of colors in your
image or selection by shifting the highlights, midtones, and shadows to opposite
sides of the color wheel (see page 486 for a quick lesson on color theory). It’s
also handy for adding color to a black-and-white image (page 357) or for fixing
a problem area (like a dull sky) fast.
The only drawback to Color Balance is that you have to know which color you
want to shift your image toward (which is why color theory comes in handy).
That said, Photoshop gives you sliders to adjust, making Color Balance fairly
easy to play with (see Figure 9-3). Because it’s available as an Adjustment layer,
it’s nondestructive and you can use the layer mask that tags along with it to limit
the adjustment to certain parts of your image (see page 113 for more on masks).
Photoshop gives you lots of ways to summon the Color Balance controls:
Figure 9-3:
A Color Balance
Adjustment layer
can zap a color cast
instantly. Dragging
the top and bottom
sliders toward Cyan
and Blue and the
middle slider toward
Magenta to introduce
a little red gets rid of
the nasty yellow cast
shown at left.
Incidentally, PDFPen
is a really handy
program that lets you
fill in and sign PDF
forms; if you use a
Mac, visit www.
smileonmymac.
com to learn more
about it.
374
P CS: T M M
Quick Fixer-Uppers
Note: To preserve your image’s brightness values, be sure to leave the Adjustments panel’s Preserve
Luminosity checkbox turned on.
— Choose Color Balance from the Adjustments panel (click the button that
looks like a scale).
— Click the half-black/half-white circle at the bottom of your Layers panel
and then choose Color Balance from the pop-up menu.
— Choose Image➝Adjustments➝Color Balance or press �-B (Ctrl+B on a
PC) to make Photoshop apply Color Balance to the currently active layer
(your original image) without creating an Adjustment layer.
• Photo Filter. To add a tint to your image, you can add a Photo Filter Adjust-
ment layer to warm it up with a golden tint or cool it off with a bluish tint. If
your image has a color cast, you can neutralize it by adding the opposite color
(again, a little color theory comes in handy here). Though it’s much safer to run
Photo Filter as an Adjustment layer, you can also run it (gasp) directly on your
image by choosing Image➝Adjustments➝Photo Filter. See page 352 for more
about Photo Filter.
Tip: You don’t have to apply these adjustments to your whole image. If you make a selection ahead of
time, the adjustment affects only the selected area. And if the adjustment is available as an Adjustment
layer, you can use the included layer mask to keep the layer from affecting areas that don’t need adjusting.
For adjustments that aren’t available as Adjustment layers, you can duplicate your original layer, run the
adjustment on it, and then add a layer mask (page 114).
poWeR USeRS’ CLINIC
Fixing Colored Edge Fringe
If you see a slight blue or purple fringe loitering around
the edges of near-black objects in your image, you’ve got
a dreaded edge halo (page 172). They’re especially no-
ticeable when the object is on a white background. For
example, if you take a picture of a white clock face, you
may see a purplish or bluish tinge around the edges of the
numbers and hands. Fortunately, you can use the Gaussian
Blur filter to get rid of the tinge, though there’s a trick to it.
Flip to page 445 for the step-by-step scoop.
Fixing Lighting
Unless you’re carting around your own light kit with your camera, you’re totally
dependent on ambient light, which is less than perfect on a good day. Nevertheless,
Photoshop has several tools that can help fix almost any lighting problem:
375
:
Quick Fixer-Uppers
• Auto Tone. This adjustment (called Auto Levels in CS3 and earlier) brightens
your image, adding a bit more contrast. Auto Tone resets both the black and the
white pixels to the target values you set earlier in this chapter—see page 368. (It’s
essentially the same as clicking the Auto button in either a Levels or Curves ad-
justment—or at least it was until you changed the algorithm back on page 369!)
If your image needs a little lighting boost, this adjustment can get it done. You
can apply it to the current layer by pressing Shift-�-L (Shift+Ctrl+L on a PC).
Better yet, you can run Auto Tone as an Adjustment layer. Click the Levels or
Curves button in the Adjustments panel—or click the half-black/half-white circle
button at the bottom of your Layers panel and choose Levels or Curves—and
then Option-click (Alt-click) the Auto button. Choose the Enhance Per Chan-
nel Contrast algorithm and then click OK.
• Auto Contrast. This adjustment is an automatic version of the Brightness/
Contrast adjustment discussed on page 376. It increases the contrast in your
image by lightening and darkening pixels. It doesn’t adjust channels individu-
ally, so if your image has a color cast, it’ll still have one after you make this
adjustment. And if your image is flat to begin with, it’ll still be flat afterwards.
But if you have a decent amount of contrast, this adjustment can boost it a lit-
tle. To run Auto Contrast on the currently active layer, press Option-Shift-�-L
(Alt+Shift+Ctrl+L on a PC).
To run it as an Adjustment layer, click the Adjustments panel’s Levels button
or click the half-black/half-white circle at the bottom of the Layers panel and
choose Levels. In the dialog box that opens, Option-click (Alt-click) the Auto
button. Choose the Enhance Monochromatic Contrast algorithm and then click
OK.
• Shadows/Highlights. If you need to quickly lighten the shadows or darken the
highlights in your image, this tool can do an amazing job in no time flat. It’s
discussed in detail on page 377.
• Equalize. This adjustment evens out your pixels’ brightness by turning the light-
est ones white (or the color you’ve set as your target white—see page 368) and
the darkest ones black (or your target black). It’s handy when some areas of your
photo are decently lit. It’s not available as an Adjustment layer, so you’ll definite-
ly want to duplicate your original layer by pressing �-J (Ctrl+J on a PC) before
you run this adjustment. To apply it, choose Image➝Adjustments➝Equalize.
Be careful when you run Equalize, as it can make your image look washed out
by lightening it too much. But if you keep your wits and immediately choose
Edit➝Fade, you can lessen its effect by choosing Luminosity from the Blending
pop-up menu (so it affects only the lightness values, not the color values) and
lowering the opacity to about 50 percent, as shown in Figure 9-4 (bottom).
376
P CS: T M M
Quick Fixer-Uppers
Figure 9-4:
Top: Here’s the origi-
nal image (left) and
the equalized version
(right). As you can
see, the lighting in the
image on the right
has been evened out,
but it’s also com-
pletely washed out.
Bottom: After reduc-
ing the adjustment
with the Edit➝Fade
command, the results
are more visually
pleasing.
• Dodge and Burn tools. These tools are useful when you need to lighten or
darken detailed areas of your image by hand, and back in CS4 they were both
redesigned so they’re not as harmful to your image as they used to be (especially
on skin tones). For example, you can use the Burn tool to selectively darken
your subject’s eyes and the Dodge tool to lighten deep wrinkles. But unless you
duplicate your original layer first, there’s no way to use these tools nondestruc-
tively. Luckily, there’s a trick that lets you use the Brush tool so it behaves like
the Dodge and Burn tools. Flip over to Chapter 10 (page 447) for step-by-step
instructions.
Brightness/Contrast Adjustment layers
These Adjustment layers do exactly what you’d think: They brighten your image or
increase the contrast in it—or both. In days of old, these adjustments didn’t work
worth a darn because they adjusted your whole image by the same amount, which
usually resulted in nice-looking shadows but blown-out highlights. Thankfully,
Brightness/Contrast got a much-needed overhaul back in CS3 so now it’s a use-
ful tool, especially on black-and-white images. (Just be sure to leave its Use Legacy
checkbox turned off, or it’ll behave like it used to!)
377
:
Quick Fixer-Uppers
You can choose Brightness/Contrast from your Adjustments panel (its button looks
like a sun) or by clicking the half-black/half-white circle at the bottom of your Layers
panel and choosing Brightness/Contrast from the pop-up menu. In your Adjust-
ments panel, drag the Brightness slider to the left to darken your image or to the
right to brighten it as shown in Figure 9-5. If you want to increase your image’s con-
trast, drag the Contrast slider to the right. To decrease it, drag the slider to the left
and watch as your image becomes flatter than a pancake (tonally speaking!).
Figure 9-5:
The revamped
Brightness/Contrast
Adjustment layers do
a much better job of
adjusting the lighting
in your image than
they used to. But
since the brightening
focuses mainly on the
highlights (it leaves the
shadows alone for the
most part), you need
to be careful that they
don’t get too light. For
a quick lighting fix,
though, this adjustment
does a fantastic job.
Shadows/Highlights adjustments
The most useful of all the quick-fix adjustments is Shadows/Highlights. If your
camera’s flash didn’t fire and your subject is way too dark, this command can bring
your photo back to life by analyzing each pixel and then adjusting it according to
the lightness values of neighboring pixels. This is a big deal because even the much
lauded Levels and Curves adjust lightness values equally among all pixels, whether
they need it or not.
You can apply this adjustment by choosing Image➝Adjustments➝Shadows/
Highlights, but because it’s destructive, you may want to duplicate your image layer
first (or better yet, convert it for Smart Filters as described in the steps below). At
first you see just two sliders in the dialog box that appears: Shadows and Highlights.
Because Photoshop assumes you want to lighten the shadows—and you usually
do—it automatically sets the Shadows slider to 35 percent (it leaves the Highlights
slider set to 0 percent). To get the most out of this adjustment, you need to turn on
the Show More Options checkbox at the bottom of the dialog box (the following
numbered list explains all your options).
378
P CS: T M M
Quick Fixer-Uppers
Note: In previous versions of Photoshop, the Shadows slider was automatically set to 50 percent, which
is way too much. Thankfully, Adobe decided to lower the factory setting to 35 percent in CS5. (See? They
really do listen to customer feedback!)
Here’s how to lighten overly dark shadows in your image using a Shadows/Highlights
adjustment:
1. Select the image layer and choose Filter➝“Convert for Smart Filters”.
Since the Shadows/Highlights adjustment is destructive (it’s not available as an
Adjustment layer), it’ll affect your original image. To use it nondestructively,
you can either duplicate the layer first by pressing �-J (Ctrl+J on a PC) or con-
vert it for Smart Filters. The second method forces Photoshop to make the ad-
justment on a separate layer as if you had run a Smart Filter (see page 634). Both
methods let you hide parts of your image with a mask, though the Smart Filter
method won’t bloat your file’s size as much as duplicating the layer.
2. Choose Image➝Adjustments➝Shadows/Highlights.
In the Shadows/Highlights dialog box that appears, turn on the Show More
Options checkbox (circled in Figure 9-6) so you can see all the settings.
Figure 9-6:
Left: Here’s an image
before (top) and
after (bottom) using
the Shadows/High-
lights adjustment.
Right: Turning on
Show More Options
(circled) gives you a
slew of sliders. When
you click OK to close
the dialog box, you’ll
see the adjustment
happen on its own
layer (shown here
at bottom right). By
painting with black
within the mask that
comes from running
Shadows/Highlights
as a Smart Filter, you
can protect certain
parts of your image
from the effect.
Click to
edit mask
Double-click name to reopen Shadow/Highlight dialog box
379
:
Quick Fixer-Uppers
3. Set the Shadows section’s Amount slider to between 20 and 35 percent.
That’s really as high as you want to go, or you’ll start to see noise (graininess)
in your image.
4. Leave the Shadows section’s Tonal Width slider set to 50 percent.
This slider lets you control which shadows Photoshop adjusts. If you lower this
number, the program changes only the darkest shadows; if you raise it, Photo-
shop changes a wider range of shadows. The factory setting of 50 percent usually
works fine, but you may want to lower it if your image looks grainy.
5. Increase the Shadows section’s Radius slider to between 250 and 300 pixels.
Since the Shadows/Highlights adjustment works by looking at the brightness
values of neighboring pixels, you can use this setting to determine how big that
neighborhood is. Pump this baby up to make Photoshop analyze more pixels.
Tip: If your shadows are okay but your highlights need darkening, apply these same settings to the
Highlight portion of the dialog box instead of the Shadows portion (they work the same way). Just be sure
to set the Shadows section’s Amount slider to 0 percent to turn that section off if you don’t need to use it.
6. In the Adjustments section at the southern end of the dialog box, set the Color
Correction field to 0.
Lowering this setting keeps Photoshop from shifting your colors and introduc-
ing funky pinks into skin tones.
7. Leave the Adjustments section’s Midtone Contrast setting at 0.
Photoshop makes dark pixels a little darker and light pixels a little lighter to
increase contrast. Since the whole point of a Shadows/Highlights adjustment is
usually to lighten shadows, increasing this setting pretty much cancels out what
you’re trying to accomplish. To avoid that conflict, leave this slider set to 0.
Note: If you need more contrast in your image, you can always add a Curves Adjustment layer (as de-
scribed later in this chapter) and change its blend mode to Luminosity—which affects only pixel brightness
(page 302)—so you won’t risk a color shift.
8. In the Adjustments section, leave the Black Clip and White Clip fields set to
0.01 percent.
Leaving these fields alone keeps your light and dark pixels from getting clipped
(forced to pure white or black). Page 385 has the full story on clipping.
9. Click the Save As Defaults button.
Photoshop saves your settings so you don’t have to reset everything the next
time you use this adjustment.
380
P CS: T M M
Quick Fixer-Uppers
10. Click OK to close the Shadows/Highlights dialog box.
In the Layers panel, you’ll see a new layer called Smart Filters above the Shadows/
Highlights adjustment (Figure 9-6), indicating that Photoshop ran the adjust-
ment as a Smart Filter instead of applying it to your original image.
11. If necessary, hide the adjustment from a portion of your image by painting
within the mask that came with the Smart Filter.
When you click the Smart Filter mask’s thumbnail to select it, Photoshop puts a
tiny black border around it. Press B to grab the Brush tool, press D to set your
color chips to black and white, and then press X until black hops on top. Mouse
over to your image and paint the areas you don’t want adjusted. Pretty cool,
huh? You can think of this technique as Smart Shadows.
12. For a quick before-and-after comparison, turn the Smart Filters layer’s
visibility eye off and on.
As Figure 9-6 shows, this adjustment does a bang-up job of lightening shadows
without introducing a funky color cast. To get even better results, you can run the
Shadows/Highlights adjustment on the Lightness channel in Lab mode. It sounds
really difficult, but it’s not. Just follow these steps:
1. Duplicate your original layer by pressing �-J (Ctrl+J on a PC).
For reasons known only to the Lords of Adobe, you can’t run the Shadows/
Highlights adjustment on one channel if your original layer has been converted
to a Smart Object to run the adjustment as a Smart Filter. So to keep this adjust-
ment from running in Super Destructo mode, you’ve got to duplicate the layer
first. Bummer!
2. Switch to Lab mode temporarily.
Choose Image➝Mode➝Lab Color. (It doesn’t matter whether you were origi-
nally in RGB or CMYK mode; as you know from Chapter 2, page 46, you’ll usually
be in RGB mode.) When Photoshop asks if you want to flatten layers, click
Don’t Flatten. If you’ve got any Smart Objects in your document, it’ll also ask if
you want to rasterize them; in that case, click Don’t Rasterize.
3. Select the Lightness channel.
Open your Channels panel by choosing Window➝Channels and click once to
select the Lightness channel. As you learned back in Chapter 5 (page 198), one
of the great things about Lab mode is that it separates your image’s light info
from its color info. Since you want to lighten the shadows without shifting col-
or, you can run the Shadows/Highlights adjustment on the Lightness channel,
which makes the adjustment work noticeably better.
381
:
Correcting Images in
Camera Raw
4. Choose Image➝Adjustments➝Shadows/Highlights.
Turn on the Show More Options checkbox and enter the following settings:
Shadows Amount 20 percent; Shadows Tonal Width 50 percent; Shadows Radius
275 pixels. Click OK when you’re finished.
5. Switch back to RGB (or CMYK) mode.
Choose Image➝Mode➝RGB (or CMYK) to go back to the color mode you
started out in.
6. To see before and after versions of your image, turn the duplicate layer’s
visibility off and on.
Sure, this method takes two extra steps, but the results are well worth it. And re-
member, if you need to adjust the highlights instead of the shadows, you can use
the same magic numbers in the Highlights section—just be sure to set the Shadows
section Amount slider to zero.
Note: In Photoshop CS5, you’ll spot a new item lurking in the Image➝Adjustments menu: HDR Toning.
It has to do with creating High Dynamic Range imagery, which you’ll learn all about on page 414.
poWeR USeRS’ CLINIC
Fixing Lighting with Blend Modes
If your image is still too dark or too light after you run a
Shadows/Highlights adjustment, you can fix it with blend
modes. The technique is described in step-by-step glory
back on page 118, but it’s so important that it deserves a
mention here, too.
To darken your image, create an empty Adjustment layer
by clicking the half black/half white circle at the bottom of
the Layers panel and choosing Levels (it’s the first one in
the list that doesn’t actually do anything to your image).
Then change the new Levels Adjustment layer’s blend
mode to Multiply using the pop-up menu at the top of the
Layers panel. Finally, using the layer mask that automati-
cally tags along with every Adjustment layer, paint with a
black brush to hide the darkened bits from areas that don’t
need darkening.
To lighten your image, add another empty Adjustment lay-
er and change its blend mode to Screen. Use the provided
layer mask to hide the light bits if you need to.
If your image needs to be darker or lighter still, you can
duplicate the empty Adjustment layer. To reduce the effect
of the darkening or lightening layer, lower its opacity using
the field at the top of the Layers panel.
Correcting Images in Camera Raw
As you learned in Chapter 2, Camera Raw is a powerful plug-in that lets you correct
the color and lighting of images shot in Raw format, as well as JPEGs and TIFFs.
Since most of the settings in Camera Raw are slider-based, it’s hands down the easi-
est place to fix your images (that’s why this section comes before the ones covering
Levels and Curves, which are, truth be told, 100 times more confusing).
382
P CS: T M M
Correcting Images in
Camera Raw
The adjustments you make in Camera Raw are also nondestructive; instead of ap-
plying them to your image, Camera Raw keeps track of them in a list it stores within
the image or in a file called Sidecar XMP (could that name be more cryptic?). Simply
put, you can undo anything you’ve done in Camera Raw whenever you want.
Tip: You can zoom in/out of the Camera Raw preview window just like you can in Photoshop (press
�-+/– or Ctrl-+/– on a PC). To move around within your image, press and hold the space bar as you drag
with your mouse. You can see a preview of your image by turning on the Preview option at the top right
of the window or by pressing the P key.
The Camera Raw plug-in is covered in several places throughout this book; here’s a
handy cheat sheet:
• Learning more about the Raw format (page 57)
• Opening files in Camera Raw (page 234)
• Cropping and straightening in Camera Raw (page 233)
• Going grayscale in Camera Raw (page 329)
• Editing multiple files in Camera Raw (see the box on page 422)
• Removing dust spots in Camera Raw (page 428)
• Fixing red eye with Camera Raw (page 455)
• Sharpening in Camera Raw (page 480)
In this section, you’ll learn how to use various sliders in Camera Raw to fix both
color and lighting, plus you’ll pick up some tricks to make your images leap off the
page with color. And when you’re finished adjusting your image in Camera Raw, you
can use the buttons at the bottom of the Camera Raw window to do the following:
• Click Save Images to convert, rename, or relocate your file(s)—or any combina-
tion of those options—so you don’t overwrite the original(s).
• Click Open Images to apply the changes you’ve made and open the image in
Photoshop, or Shift-click this button to open it as a Smart Object (page 54) in
Photoshop.
• Click Cancel to bail out of Camera Raw without saving or applying changes.
• Click Done to apply the changes (which you can edit the next time you open the
image in Camera Raw) and exit the Camera Raw window.
If you use Camera Raw’s adjustments in the order they’re presented in this section
(which is also the order they appear in the Camera Raw window—how handy!),
you’ll be amazed at the results.
383
:
Correcting Images in
Camera Raw
Changing White Balance
When you set the white balance, you’re telling Camera Raw which color the light in
your image should be. As you might suspect, changing the light’s color changes all
the colors in your image, as shown in Figure 9-7. Because each light source gives off
its own special color cast—whether it’s a light bulb (Tungsten), fluorescent light, a
cloudy sky, and so on—most digital cameras let you adjust the white balance based
on the current source (though you may have to dig out your owner’s manual to find
where that setting lives).
Figure 9-7:
Here’s an image
with each of Camera
Raw’s White Balance
presets applied to
it. As you can see,
changing the white
balance makes a big
difference! Cycling
through the list of
presets is a great
way to experiment
with color because
it’s so darned easy
and it opens your
eyes to more color
possibilities. After all,
this color-correction
mumbo jumbo is
purely subjective; the
color that’s closest to
the original may not
always look great or
suit your taste. It’s all
about what looks best
to you!
Fluorescent Flash Custom
Cloudy Shade Tungsten
As shot Auto Daylight
Note: Want to follow along? Visit this book’s Missing CD page at www.missingmanuals.com/cds and
download the practice file Armadillo.zip.
384
P CS: T M M
Correcting Images in
Camera Raw
One of the big advantages of shooting in Raw format is that if you get the white bal-
ance wrong in your camera, you can always reset it using Camera Raw. For example,
if you’re shooting in an office using a white balance of Fluorescent and then walk
outside and shoot in the courtyard, the light’s color will be off in the outdoor images.
Another advantage is that Raw files store more color info than JPEGs because they’re
not compressed (which is why Raw files are so much bigger). The point is that if you
can shoot in Raw, you should.
Note: Raw files are like raw cookie ingredients: Before you mix and roll cookie dough into balls and bake
it, you’ve got all kinds of flexibility; you can change the ingredients, add nuts or chocolate chips, and form
the cookies into interesting shapes. A JPEG, on the other hand, is like a baked cookie; there’s very little
you can do to it because it’s already cooked. Sure you can add a topping or two, but it’s much less flexible
than the raw (pun intended!) ingredients.
In Camera Raw, you can change the white balance by using the presets in the Basic
tab’s White Balance pop-up menu. Or you can set it manually (and maybe more ac-
curately) using Camera Raw’s White Balance tool (see Figure 9-8). Press I to grab the
tool (which looks like an eyedropper) and then mouse over to your image and click
an area that should be white or light gray. Just keep clickin’ till the image looks right,
and then adjust the Temperature and Tint sliders until you get the color you want.
Figure 9-8:
When you’re using
the White Balance
tool, be careful
not to click a white
reflection, like the
one on the Lone
Star bottle here. For
more accurate color,
click an area that’s
really supposed to be
white (or light gray),
like this armadillo’s
underbelly. If you
can’t seem to get
the color quite right,
tweak the Tempera-
ture slider; dragging
it to the right warms
up your image and
dragging it to the left
cools it off. Use the
Tint slider to adjust
the balance of green
and magenta.
385
:
Correcting Images in
Camera Raw
Note: You don’t have as much flexibility when resetting the white balance of JPEGs or TIFFs because
those file formats have already been processed a bit by the camera or scanner that captured them—the
only presets Camera Raw gives you are As Shot and Auto. Nevertheless, you can still tweak it by adjusting
the Temperature and Tint sliders (doing so changes the White Balance menu to Custom).
Fixing Exposure
The next group of sliders in Camera Raw’s Basic tab lets you adjust your image’s
exposure and contrast (the difference between light and dark pixels). Exposure is
determined by how much light your camera’s sensor captures. As you learned on
page 368, each image consists of three categories of color: highlights, midtones, and
shadows. Problems can arise in one of those categories or all three; luckily, you can
fix them all in Camera Raw as the following list explains. If you’re not up to fiddling
with these six sliders, you can make Camera Raw adjust the image for you by click-
ing the word Auto above the Exposure slider. But you’ll get better results if you adjust
the following settings by hand:
Note: If you’d like to follow along, visit this book’s Missing CD page at www.missingmanuals.com/cds
and download the practice file Keywest.zip.
• Exposure. Drag this slider to the right to lighten your image or to the left to
darken it. Be careful not to drag it too far either way or you’ll start to lose details.
For that reason, it’s a good idea to turn on Camera Raw’s clipping warnings
(they look like triangles and are shown at the top right of Figure 9-9) so you can
see if you’re destroying details. (Press U to turn on the shadow clipping warning
and O—that’s the letter o, not the number zero—to turn on the highlight clip-
ping warning.) It’s okay to lose a few details because you can bring them back
with the very next setting.
Tip: If you’re not a fan of the highlight clipping warnings and don’t want to see them all the time, you can
temporarily see clipped highlights by Option-dragging (Alt-dragging on a PC) the Exposure slider to the
right. Your image preview turns black and the clipped areas appear in bright colors as you drag.
• Recovery. This aptly named slider recovers lost details in overexposed high-
lights. If you drag it to the right, you can make the red clipping warnings in your
image disappear and get some details back in those areas. If you can’t get rid of
all the red, drag the Exposure slider a little ways to the left.
• Fill Light. This setting is like a digital fill flash (an additional flash that you aim
at shadows when you’re taking a photo): it lightens the shadowy areas of your
image but leaves the highlights alone. Don’t get carried away with this adjust-
ment; if you lighten the shadows too much, you’ll end up with an image so
evenly lit that it looks boring and flat.
386
P CS: T M M
Correcting Images in
Camera Raw
• Blacks. To darken your image’s shadows, drag this slider slightly to the right.
You’ll get a bit of a contrast boost, too, though it’s best not to go much past 6 (if
at all). If you do, the details in your shadowy areas disappear into a big ol’ black
hole. You can turn on the shadow clipping warning by clicking the triangle at
the top left of the histogram (also shown in Figure 9-9) or pressing U. From then
on, Camera Raw highlights any clipped areas in blue.
Tip: Just like with the highlight clipping warnings, you can temporarily see clipped shadows (while leaving
the shadow clipping warning off) by Option-dragging (Alt-dragging on a PC) the Blacks slider to the right.
Your image preview turns white, and the clipped areas appear in bright colors as you drag.
• Brightness. You can use this slider to adjust the midtones in your image. If you
darkened the image by dragging the Exposure setting to the left, drag this one
to the right to brighten it back up.
• Contrast. Drag this slider to the right to increase your image’s contrast (the
difference between light and dark pixels) or to the left to decrease it. Increasing
contrast makes the light pixels in your image lighter and the dark pixels darker.
Figure 9-9:
When you turn on
the highlight clipping
warning by clicking its
icon (top right), areas
that are losing details—
like this woman’s hand
and her glass—turn
bright red. The farther
you drag the Exposure
slider to the right,
the more red areas
you see. Don’t let this
worry you too much
because the Recovery
slider can bring back
most (if not all) of the
lost details.
A little known fact
is that both clipping
warnings appear
black if no pixels are
being clipped; how-
ever, if the shadow
clipping triangle turns
blue or the highlight
clipping triangle turns
red, some clipping has
occurred.
Shadow clipping Highlight clipping
387
:
Correcting Images in
Camera Raw
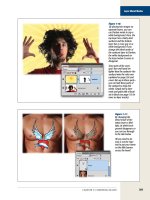
Making Colors Pop
If you want to intensify your image’s colors, give the next three sliders in Camera
Raw’s Basic tab a tug:
• Clarity. This slider boosts contrast in the midtones, increasing the depth so
your image looks clearer. You’d be hard-pressed to find an image that wouldn’t
benefit from dragging this slider almost all the way to the right.
• Vibrance. Use this slider to intensify colors without altering skin tones (it has
more of an effect on bright colors and less on light colors, like skin tones). If
you’ve got people in your image, this is the adjustment to use (see Figure 9-10).
• Saturation. Intensifies all the colors in your image, including skin tones. Don’t
use it on people pictures unless you like fluorescent skin.
Figure 9-10:
As you can see, Camera Raw can
greatly improve the color and light
in your image. The original, under-
exposed image is on top and the
end result is on the bottom. That’s
an impressive result from just drag-
ging a few sliders back and forth!
Tip: To reset any slider in Camera Raw back to its original setting, simply double-click the slider.
388
P CS: T M M
Correcting Images in
Camera Raw
Camera Raw’s Adjustment Brush
The Adjustment Brush lets you selectively adjust certain areas of your images by
painting them (see Figure 9-11). When you activate the Adjustment Brush by press-
ing K, you see a host of adjustments appear on the right side of the Camera Raw
window. They’re the same adjustments you’ve learned about so far, along with an
extra one called Color that lets you paint a tint onto your image.
Figure 9-11:
See the dotted line around
the brush cursor? It indi-
cates the feather amount,
which softens the edge of
your adjustment to make
it blend in with the rest of
the image. The solid line
indicates the brush size,
and the crosshair lets you
know where you’re apply-
ing the adjustment.
The Flow slider (near the
bottom of the window
on the right) controls the
strength of the adjust-
ment, and the Density
slider (just below it) con-
trols the transparency of
your brushstroke (think of
it as the brush’s opacity).
To use the Adjustment brush, choose the type of adjustment you want to make us-
ing the sliders on the right, mouse over to your image, and then paint to apply the
adjustment. A little green pushpin appears to mark the area you adjusted (though
on a PC it looks more white than green); press V to show or hide the pin(s). Behind
the scenes, Camera Raw creates a mask that hides the rest of your image so you can
continue to tweak the adjustment sliders even after you’ve finished painting. Camera
Raw updates the area you painted to reflect those changes.
You can click the little + and – signs on either end of the adjustment sliders to
strengthen or lessen the adjustment (respectively) by a preset amount (.5 on Expo-
sure, whose scale ranges from –4 to +4, and 25 on most other sliders, which range
from –100 to +100 [though Brightness ranges from –200 to + 200]). If you want to
389
:
Correcting Images in
Camera Raw
see the mask, turn on the Show Mask checkbox beneath the sliders or press Y. You
can change the color of the mask’s overlay by clicking the little white square to the
right of the Show Mask checkbox and then choosing a new color from the resulting
Color Picker. Turn on the Auto Mask checkbox to limit your adjustment to brush-
strokes that fall on similar-colored areas.
To undo part of the mask, turn on the Erase radio button near the top of the window
and then paint that area of your image to remove the adjustment. Likewise, to add to
the mask, turn on the Add radio button and then paint your image. To apply a new
adjustment to an existing mask, turn on the New radio button. To select the mask,
click the pushpin. And if you want to delete the mask, click its pushpin and then
press Delete (Backspace on a PC).
Camera Raw’s Graduated Filters
The Graduated Filter tool lets you apply adjustments much like a real graduated
filter you screw onto the end of your camera lens (the filter is a thin piece of glass
that fades from gray to white so it darkens overly bright parts of the scene you’re
shooting). When you select this tool by clicking its button at the top of the Camera
Raw window (it’s circled in Figure 9-12) or pressing G, you get the same set of ad-
justments you do with the Adjustment Brush (though there’s no erase mode). The
difference is that, with the Graduated Filter tool, you apply them by dragging rather
than painting, as shown in Figure 9-12. This adjustment is great for fixing over-
exposed skies because Photoshop gradually applies it across the full width or height
of your image in the direction you drag.
Behind the scenes, this tool creates a gradient mask (page 287), which restricts the
adjustment to specific parts of your image. You can continue to make adjustments
using the sliders at the right of the window even after you’ve used the tool, and use
the little + and – signs on either end of the sliders to strengthen or lessen the adjust-
ment, respectively. To draw a perfectly vertical or horizontal mask, press and hold
the Shift key as you drag.
More Fun with Camera Raw
As you can see, the Camera Raw plug-in is crazy powerful and each new version is
bursting with new features. You can use it to adjust Curves (page 406), softly darken
the edges of your image (called vignetting; see page 656 to learn how to add a dark
vignette with a filter in Photoshop), and much more. Camera Raw deserves a whole
book all to itself, and there are plenty of ‘em out there. When you’re ready to learn
more, pick up Getting Started with Camera Raw, Second Edition by Ben Long (Peach-
pit Press, 2009), a great guide for beginners. Or check out Real World Camera Raw
with Adobe Photoshop CS4 (Peachpit Press, 2008) by Jeff Schewe and Bruce Fraser. If
you’d rather learn by watching a video, check out Ben Willmore’s Mastering Camera
Raw DVD available at www.digitalmastery.com.
390
P CS: T M M
Using Levels
Using Levels
The adjustments you’ve seen so far are okay when you’re starting out with Photo-
shop, and they’re darn handy when you’re pressed for time. But to become a real
pixel wrangler, you’ve got to kick it up a notch and learn to use Levels and Curves.
With a single Levels adjustment, you can fix lighting problems, increase contrast,
and—in some cases—balance the color in your image. (If you’ve got serious color
problems, you need to use Curves; skip ahead to page 406 to learn how.) Levels
adjustments change the intensity levels—hence the tool’s name—of your shadows,
midtones, and highlights. They’re a very visual and intuitive way to improve your
images. And because they’re available as an Adjustment layer (yay!), they’re non-
destructive and won’t harm your original image.
In this section, you’ll learn how to use Levels adjustments in a few different ways so
you can pick the one you like best. But, first, you need to get up close and personal
with the mighty histogram, your secret decoder ring for interpreting problems in
your images.
Figure 9-12:
You can use the
Graduated Filter tool
to darken and inten-
sify this sky gradually.
The horizontal dotted
line that runs through
the green dot repre-
sents the start of the
mask, and the similar
line running through
the red dot represents
the end. To delete the
mask, click the red
dot and then press
Delete (Backspace on
a PC).
To move the midpoint
of the mask (where
the adjustment begins
to fade), drag the red
dot up or down.
Histograms: Mountains of Information
A histogram (Figure 9-13) is a visual representation—a collection of bar graphs,
to be specific—of the info contained in your image. Once you learn how to read it,
you’ll gain an immensely valuable understanding of why your image looks the way
391
:
Using Levels
it does. More importantly, you’ll learn how to tweak the histogram itself or, more
commonly, other tools—all of which lets you use the histogram’s changing readout
to monitor the vibrancy of your image. It sounds complicated, but once you watch it
in action, you’ll see it’s actually pretty straightforward…and tremendously powerful.
Photoshop automatically displays an editable histogram when you create either a
Levels (page 390) or Curves (page 406) Adjustment layer. You can also summon one
by choosing Window➝Histogram to open the Histogram panel shown in Figure 9-13.
Figure 9-13:
Photoshop gives you three different ways to view the histogram
(each of which is listed in the Histogram panel’s menu): Expanded
View (top), honkin’ big All Channels View (bottom), Compact View
(not shown).
In All Channels View (bottom), you can see your image’s individual
channels in their respective colors by choosing “Show Channels in
Color” from the panel’s menu. (In this figure, the channels appear
in black.) You can also control how the histogram looks by using the
Channel pop-up menu at the top of the Histogram panel. Choosing
RGB turns the histogram black (top), and choosing Colors puts it in
full color (bottom). You can choose the other options (Red, Green,
and Blue) to see info in just those channels.
The cached data warning triangle (labeled) means that the histo-
gram’s info isn’t based on the current version of your image (the
cache is part of your computer’s memory). You’ll see this warning
periodically when you’re editing large files (it’s Photoshop’s way
of redrawing the histogram more quickly). Just click the triangle
to make Photoshop update the histogram; clicking the Uncached
Refresh button at the top right does the same thing.
Close panel
Panel menu
Panel
dock
Uncached refresh
Cached data
warning
392
P CS: T M M
Using Levels
The histogram looks like a mountain range, which is a perfectly fine way to think
about it (more on that metaphor in a moment). Its width represents your image’s
tonal range—the range of colors between the darkest and lightest pixels—on a scale
of 0 to 255. Pure black (0) is on the far left and pure white (255) is on the far right. All
told, the histogram measures 256 values. If that number sounds familiar, it should—
it’s the same 256-value range you learned about back in Chapter 2 (page 46), which
represents the minute gradations between a total absence of light (black) and full-on
illumination (white). The histogram’s height at any particular spot represents how
many pixels are at that particular level of brightness. Using the mountain analogy, a
noticeable cluster of tall and wide mountains means that particular brightness range
makes up a good chunk of your image. Short or super-skinny mountains mean that
brightness range doesn’t appear much. And a big, flat prairie means there are few
or no pixels in that range. A glance at the histogram, in other words, can tell you
whether you’ve got a good balance of light and dark pixels, whether the shadows or
highlights are getting clipped (page 386), whether the image is over- or underex-
posed (see Figure 9-14), and whether it’s been adjusted before.
Figure 9-14:
The histograms in the
bottom row can help
tell you whether an
image is underex-
posed (left), has a
good balance of color
(middle), or is overex-
posed (right).
Note: The histogram’s width is also referred to as the image’s dynamic range. You’ll learn more about it
in the High Dynamic Range (HDR) section later in this chapter (see page 414).
Here are a few tips for understanding your histogram:
• An extremely jagged mountain range means your color info is unbalanced. Your
image may contain a decent amount of some colors but very little of others.
393
:
Using Levels
• A narrow mountain range means you’ve got a narrow tonal range and little
difference between the darkest and lightest pixels. Your whole image probably
looks rather flat and lacks both details and contrast.
• If you see a sharp spike at the left of the histogram, your shadows have probably
been clipped (by the camera or scanner). If the spike is at the right end of the
histogram, your highlights may have been clipped instead.
• If the mountain range is bunched up against the left side (toward black, a.k.a
0) with a vast prairie on the right, your image is underexposed (too dark); see
Figure 9-14, left.
• If the mountain range is snug against the right side (toward white, a.k.a 255)
with a vast prairie on the left, your image is overexposed (too light); see Figure
9-14, right.
• An image that has a good balance of light and dark colors has a wide mountain
range—one that spans the entire width of the histogram—that’s fairly tall and
pretty uniform in height. Basically, you want your histograms to look like the
older, eroded Appalachians (Figure 9-14, middle) instead of the newer, super-
jagged peaks of the Himalayas (Figure 9-14, right).
• If your histogram looks like a comb—with a bunch of gaps between spikes (see
Figure 9-16)—it’s either a really lousy scan or the image was adjusted at some
point in the past. Anytime you shift the brightness values of pixels, you intro-
duce gaps.
All this histogram and correction business is subjective; if your histogram looks ter-
rible but the image looks great to you, that’s fine—in the end, that’s all that matters.
Thankfully, you can fix a lot of the problems listed above using the correction meth-
ods discussed in this chapter. You can smooth the height of the histogram’s moun-
tains to balance color and widen the mountain range to expand your tonal range
and increase contrast. And by keeping the Histogram panel open, you can see before
and after histograms of any adjustment whose dialog box has a preview check-
box (Shadows/Highlights, Color Balance, Variations, and so on). If you choose RGB
from the Channel pop-up menu at the top of the Histogram panel, you see the origi-
nal histogram in light gray and the new one in black.
If the whole histogram concept is clear as mud, don’t fret—it’ll make more sense
once you start using Levels. If you’ve got a little free time, you can use the Dodge and
Burn tools to help you understand the relationship between what you see in your
image and how the histogram looks. With an image and the Histogram panel open,
use the Dodge and Burn tools on different areas of your image (be sure to set the
tools’ Exposure fields to about 20 percent). Use the Dodge tool to lighten dark areas
and see how the histogram changes, and then use the Burn tool to darken light areas
and see how that affects it. With a little experimentation, you can get a clearer idea
of what your histograms are telling you.
394
P CS: T M M
Using Levels
Tip: Many digital cameras can also show you a histogram, though you may have to root through your
owner’s manual to learn how to turn it on. Once you get comfy with histograms, you can use them to see
whether the shot you’re about to take will have good exposure.
poWeR USeRS’ CLINIC
Histogram Statistics
If you choose Expanded View or All Channels View from
the Histogram panel’s menu, you’ll see a bunch of cryptic
info below the histogram. The most useful thing that ap-
pears is the Source pop-up menu, which lets you see the
histogram of your whole image, a selected layer, or an ad-
justment composite. If your document contains Adjustment
layers, that last option displays a histogram based on the
selected Adjustment layer and all the layers below it. (See
page 77 for more on Adjustment layers.)
The stuff that appears below the Source menu is pretty
heady, but here’s the gist of what each item means:
• Mean represents the average intensity value of the
pixels in your image.
• Standard Deviation (abbreviated as Std. Dev.)
shows how widely the intensity values vary.
• Median is the midpoint of the intensity values.
• Pixels tells you how many pixels Photoshop ana-
lyzed to generate the histogram.
• Cache Level shows the current image cache Photo-
shop used to make the histogram. When this number
is higher than 1, Photoshop is basing the histogram
on a representative sampling of pixels in your im-
age rather than on all of them. You can click the
Uncached Refresh button (shown in Figure 9-13) to
make the program redraw the histogram based on
the actual image.
If you position your cursor over the histogram (or drag
across part of it), you also see values for the following:
• Level displays the intensity level of the area beneath
your cursor.
• Count shows the total number of pixels that are at
the intensity level beneath your cursor.
• Percentile indicates the cumulative number of pixels
at or below the level beneath your cursor, expressed
as a percentage of all the pixels in your image.
Math geeks, bless their hearts, love this kind of stuff.
The Levels Sliders
Now that you know how to read histograms, you’re ready to make a Levels adjust-
ment, which lets you use a set of three sliders to reshape and expand the information
in your histogram. You can create a Levels Adjustment layer by clicking the Levels
button in the Adjustments panel (it looks like a tiny histogram) or clicking the half-
black/half-white circle at the bottom of the Layers panel and choosing Levels from
the resulting list. Either way, Photoshop displays a black histogram in the Adjust-
ments panel, as shown in Figure 9-15.
395
:
Using Levels
Figure 9-15:
The simplest way to apply a Levels adjustment is by
using the Input Levels sliders circled here. You’ll also
find a slew of presets in the Levels pop-up menu at the
very top of the panel. Feel free to give them a spin to
see what they do and how they change your histogram.
You can also add a Levels adjustment by
pressing �-L (Ctr+L on a PC) or by choosing
Image➝Adjustments➝Levels, though in both cases the
adjustment happens on your original image instead of
on an Adjustment layer. Yikes!
Levels preset menu
Refresh
histogram
Shadows
Panel menu
Midtones Highlights
As shown in Figure 9-15, the black slider at the far left of the histogram represents the
shadows in your image. It starts out at 0, the numeric value for pure black. The white
slider on the far right, which represents highlights, starts out at 255—pure white.
To give your image the greatest tonal range and contrast, move the shadows and
highlights sliders so they point to wherever your histogram’s values begin to slope
upward (at the foot of your mountains, so to speak). In other words, if there’s a gap
between the shadows slider and the beginning of the histogram, drag that slider to
the right. If there’s a gap between the highlights slider and the right end of the histo-
gram, drag the slider to the left. Figure 9-16 should make all this repositioning stuff
crystal clear.
When you move the sliders, Photoshop adjusts the tonal values in your image ac-
cordingly. For example, if you drag the highlights slider inward to 183, Photoshop
changes all the pixels in your image that were originally at 183 or higher to 255 (pure
white). Translation: They get brighter (see Figure 9-16). Similarly, if you move the
shadows slider inward to 7, Photoshop darkens all the pixels with a brightness level
of 7 or lower to 0 (pure black). The pixel levels in between get redistributed, too,
boosting your image’s overall contrast by increasing its tonal range (widening your
mountain range).
The gray slider in the middle (midtones) lets you brighten or darken the image by
changing the intensity of the middle range of grays (check out the box on page 406
to learn why you’re dealing with grays instead of color). Drag it to the left to lighten
your image or to the right to darken it. Because the gray slider focuses on the mid-
tones, it won’t make your highlights too light or your shadows too dark—unless you
go hog wild and drag it all the way left or right!