Oreilly Photoshop CS5 The Missing Manual_5 pot
Bạn đang xem bản rút gọn của tài liệu. Xem và tải ngay bản đầy đủ của tài liệu tại đây (2.81 MB, 78 trang )
449
: :
Skin Softeners
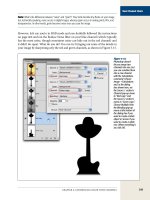
Figure 10-16:
Top: A quick way to
create a layer you
can use for your
faux dodging and
burning is to use the
New Layer dialog
box; press �-Shift-N
(Ctrl+Shift+N on a
PC) to call it up. Set
the Mode menu to
Soft Light and then
turn on the “Fill with
Soft-Light-neutral
color (50% gray)”
checkbox and click
OK.
Bottom: When you
use faux dodge and
burn, your subject
retains his character
but his wrinkles aren’t
so distracting. Notice
how much brighter
his eyes are, too. The
whites were dodged
and the darker rim
of color around the
outer edge of each
iris was burned.
Here’s how to do some faux dodging and burning:
1. Open your image and, in your Layers panel, Option-click (Alt-click on a PC)
the “Create a new layer” button.
In the resulting dialog box, name your new layer Dodge Burn, choose Soft Light
from the Mode pop-up menu, turn on the “Fill with Soft-Light-neutral color
(50% gray)” checkbox, and then click OK. Sure, you could create a new layer,
use the Edit➝Fill command to fill it with gray, and then change its Mode set-
ting, but this way is faster.
450
P CS: T M M
Show-Stopping Eyes
2. Press B to grab the Brush tool and set its opacity to 10–20 percent.
To touch up your image gradually, lower the brush’s opacity to something be-
tween 10 and 20 percent. Yes, the retouching takes longer, but you can dodge
and burn little by little, which is better than doing too much at once.
3. Set your foreground color chip to white for dodging.
Take a peek at the color chips at the bottom of your Tools panel. Press D to set
them to black and white and then press X to flip-flop them so white is on top.
4. Mouse over to your image and paint across the dark wrinkles.
To lighten just the shadowy parts of the wrinkles, you need to use a small brush
(or else you’ll lighten areas that don’t need to be lightened). It’s also helpful to
zoom way in on your image when you’re doing detailed work like this. You can
zoom in or out by pressing � (Ctrl on a PC) and the + or – key. Photoshop gives
you a pixel-grid view when you zoom in more than 500 percent (see page 61).
5. Swap color chips so that your foreground color is black and then paint light
areas that you need to burn (darken).
If the wrinkles are so deep that they cause highlights, you can darken those a
little. In Figure 10-16 the edge of each iris was also darkened to make the man’s
eyes look brighter.
6. Lower the Dodge Burn layer’s opacity slightly.
If you’ve overdone the changes a bit, you can lower the layer’s opacity.
7. Save your document as a PSD file in case you ever need to go back and alter it.
Show-Stopping Eyes
One of the simplest yet most impressive eye-enhancing techniques is waiting for you
over in Chapter 11. Just as you can selectively blur an image, you can also selectively
sharpen it. Hop on over to page 472 to see how to use sharpening to make eyes really
pop. Here in this section, you’ll learn how to enhance and whiten eyes, fix red eye
a bazillion different ways, and even get the scoop on fixing your furry friends’ eyes.
Enhancing Eyes
A quick and painless way to make eyes stand out and look sultry is to lighten them
by changing their blend mode to Screen. This technique enhances the iris and
brightens the white bits at the same time, as Figure 10-17 shows. To achieve this ef-
fect without duplicating the original layer (which increases your file’s size), just use
an empty Adjustment layer.
451
: :
Show-Stopping Eyes
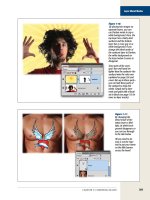
Figure 10-17:
If you use an empty
Adjustment layer set
to Screen mode, you
can add a whole new
dimension to your
subject’s eyes. (The
original image is at
left and the adjusted
image is on the right.)
The cool thing about
this technique is that
it enhances the iris
and the white part
simultaneously.
Here’s how to quickly enhance eyes:
1. Pop open a photo and add an empty Adjustment layer.
Click the half-black/half-white circle at the bottom of the Layers panel and
choose Levels from the menu. When the Adjustments panel opens, click the
double arrows at its top right or the dark gray bar at the top of the panel to close
it (you don’t need to actually make a levels adjustment).
2. Set the Adjustment layer’s blend mode to Screen.
At the top left of the Layers panel, use the pop-up menu to change the blend
mode to Screen. When you do, Photoshop makes your whole photo way too
light, but don’t panic—you’ll fix it in the next step.
3. Fill the Adjustment layer’s mask with black.
Peek in your Layers panel and make sure the Adjustment layer’s mask is selected
(it should have a tiny black outline around it). To hide the over-lightening that
happened in the previous step, choose Edit➝Fill, pick Black from the Use pop-
up menu, and then click OK.
4. Grab the Brush tool and set the foreground color chip to white.
Press B to grab the Brush tool and then glance at the color chips at the bottom
of the Tools panel. If white’s on top, you’re good to go; if it’s not, press D to set
the chips to black and white and then press X until white is on top. Now you’re
ready to paint a hole through the mask so the lightening will show through only
on your subject’s eyes.
452
P CS: T M M
Show-Stopping Eyes
5. Paint the eye area.
Mouse over to your image and paint the eyeballs. If you mess up, just press X to
flip-flop the color chips and paint with black.
6. Duplicate the Adjustment layer.
Once you’ve got the mask just right, you can intensify the effect by duplicating
the Adjustment layer. Press �-J (Ctrl+J on a PC) to duplicate the layer and lower
the duplicate’s opacity to about 50 percent.
7. Save the image as a PSD file.
Ta-da! This technique makes a galactic difference, and your subject’s eyes will pop
off the page.
Fixing Red Eye
One of the most annoying things about taking photos with a flash is the creepy red
eyes it can give your subjects. Photoshop’s Red Eye tool does a good job on most
cases of red eye, though sometimes you’ll encounter a really stubborn case that just
refuses to go away. That’s why it’s good to have a few tricks up your sleeve, including
stealing pupils from another channel, using the Color Replacement tool, creating
a Hue/Saturation Adjustment layer, or fixing ’em in Camera Raw. This section ex-
plains all those options.
The Red Eye tool
Oh, man, if only all of Photoshop’s tools were as easy to use as this one! The Red
Eye tool is part of the Healing Brush toolset (it looks like an eye with a plus sign
next to it). Just grab the tool, mouse over to your document, and draw a box around
the eye, as shown in Figure 10-18, top. As soon as you let go of your mouse button,
Photoshop hunts for the red inside the box and makes it black. That’s all there is to it!
Tip: If this tool doesn’t zap the red-eye completely on the first attempt, try pressing ⌘-Z (Ctrl+Z on a
PC) to undo it and increase the Pupil Size and Darken Amount settings in the Options bar and then have
another go at it.
453
: :
Show-Stopping Eyes
Figure 10-18:
Contrary to what you
might think, it’s better to
draw a box around the
whole eyeball rather than
just around the pupil.
For some odd reason,
the smaller the box, the
less effective the Red Eye
tool is.
WoRKARoUNd WoRKSHop
Stealing Pupils from Channels
Why bother with all this red-eye fixing mumbo jumbo
when you’ve got perfectly good black pupils in your Chan-
nels panel? (Since Photoshop doesn’t display channels in
color, the pupils aren’t red.) There’s certainly no law saying
you can’t pop into your image’s channels and snatch the
pupils from there. Here’s how to do it:
1. Open your Channels panel by clicking its icon
in the panel dock (page 188) or by choosing
Window➝Channels. Then stroll through the chan-
nels by clicking each one or by pressing �-3, 4, 5
(Ctrl+3, 4, 5) to find the channel where the pupils are
darkest (it’s most likely the Green channel). If you’re
in CMYK mode, you’ve got one extra channel to look
at, which you can see by pressing �-6 (Ctrl+6).
2. Grab the Elliptical Marquee tool (page 139) and draw
a selection that’s slightly larger than the pupil in one
eye. Then press and hold the Shift key to draw a se-
lection around the other pupil.
3. Ctrl-click (right-click) in one of the selections (it
doesn’t matter which one) and choose Feather from
the resulting shortcut menu. In the resulting dialog
box, enter 1 in the Feather Radius field and then click
OK.
4. Copy the pupils by pressing �-C (Ctrl+C on a PC) and
then turn the composite channel (page 189) back on
by pressing �-2 (Ctrl-2).
5. Open your Layers panel and create a new layer for
the pupils: Click the “Create a new layer” button at
the bottom of the panel, name the layer New Pupils,
and then place it above the photo layer.
6. Paste the pupils onto the new layer by pressing �-V
(Ctrl+V). Poof—you’re done! Your subject should look
much less demonic now.
454
P CS: T M M
Show-Stopping Eyes
The Color Replacement tool
Another option for getting rid of super-stubborn red eye is the Color Replacement
tool. If you choose black as your foreground color chip, you can use this tool to re-
place the red with black. But because this tool is destructive (and because there’s no
way of knowing what kind of job it’ll do), it’s best to select the eyes and jump them
onto their own layer first. Here’s what you do:
1. Select the eyes and copy them onto another layer.
Using the Lasso tool (page 162), draw a rough selection around both eyes (grab
the whole eye, not just the pupil) and then press �-J (Ctr+J on a PC) to jump the
eyes onto their own layer. That way, if this technique goes south, you can toss
this layer and start over.
2. Select the Color Replacement tool from the Tools panel.
It’s hiding in the Brush toolset, and it looks like a brush with a tiny curved arrow
pointing to a black square (the square is supposed to represent your foreground
color chip). You can press Shift-B repeatedly to cycle through this toolset.
3. Set your foreground color chip to black.
Press D to set your color chips to black and white, and then press X until black
hops on top. Alternatively, you can set the new color by Option-clicking (Alt-
clicking on a PC) an eyelash or other black part of the eye.
4. In the Options bar, set the Mode field to Hue, the Limits field to Contiguous,
and the Tolerance field to around 30 percent.
Choosing the Hue blend mode means you’re replacing color without altering
its brightness (for more on blend modes, see page 289). The Contiguous setting
tells Photoshop to replace only the red pixels that are clustered in one spot and
not separated by other colors. The Tolerance setting determines how picky the
tool is: lower numbers make the tool pickier; higher numbers result in a color-
replacing free-for-all.
5. Paint the red away.
You’ll want to use a small brush for this maneuver. Press the left bracket key ([)
to cycle down in brush size, and the right bracket key (]) to cycle up, or Ctrl-
Option-drag (Alt+right-click+drag on a PC) to the left or right to decrease or
increase your brush size. When you’ve got a size that looks good, mouse over to
the pupils and paint over the red, being careful to touch only the red with your
cursor’s crosshair.
455
: :
Show-Stopping Eyes
6. When you’re finished painting, use the Eraser tool or a layer mask to clean up
the area just outside the pupil, if necessary.
If you end up with a little black outside the pupil, you can use the Eraser tool
(see Appendix D, online at www.missingmanuals.com/cds) to fix it because
you’ll erase to the original layer below. Press E to select the Eraser and carefully
paint away any extra black pixels. You can also add a layer mask to the eye layer
and paint with black to hide the excess black.
7. Save your document as a PSD file and call it a day.
Hue/Saturation Adjustment layers
Yet another option for fixing red eye is to zap the red with a Hue/Saturation Adjust-
ment layer, which you learned about in Chapter 8. Select the red eyes with the Lasso
tool, click the half-black/half-white circle at the bottom of your Layers panel, and
then choose Hue/Saturation from the pop-up menu. When the Adjustments panel
opens, adjust the sliders until the red eye leaves the building.
The Sponge tool
As a last resort, you can use the Sponge tool to desaturate (remove) color from the
pupils. The Sponge tool looks—not surprisingly—like a sponge, and it’s part of the
Dodge toolset. Though you can use this tool to desaturate or saturate an image, it’s
set to desaturate (which is what you want when you’re zapping red eye) until you
change it. After you grab the Sponge tool, head up to the Options bar and change
the Flow field to 100 percent or you’ll be painting for days (it’s set at 50 percent
originally). Finally, mouse over to your image and paint over the red area repeat-
edly until it turns almost black. This technique takes a while, but it’s guaranteed to
work…eventually.
Fixing red eye in Camera Raw
Camera Raw’s Red Eye Removal tool looks and works the same as Photoshop’s. It’s
handy to have this ability in Camera Raw because, if you’re shooting in Raw format
and you don’t need to do any other editing in Photoshop, you don’t have switch
programs just to fix red eyes. After you open an image in Camera Raw (see page
234), press E to grab the Red Eye Removal tool. Then simply draw a box around the
eyeball, as shown in Figure 10-19, and let go of your mouse button.
456
P CS: T M M
Show-Stopping Eyes
Figure 10-19:
When you’re finished using
the Red Eye tool in Camera
Raw, you’ll see a black-and-
white circle around the pupil,
letting you know that Raw
made the red-eye fix. Just
switch to another tool and the
box disappears. Click Done to
save your changes and close
the Camera Raw window.
Fixing Animal White Eye
Okay, technically animals aren’t people—though to some folks (your author includ-
ed) they might as well be. Our furry friends have a version of red eye, too; it’s called
white eye, and it can ruin their photos, too. Actually, white eye is more challenging to
fix than red eye because there aren’t any pixels in the eye left to work with—the pupils
turn solid white. The Red Eye tool won’t work because the pupils aren’t red, and the
Color Replacement tool won’t work because there’s no color to replace. The solution
is to select the pupil and fill it with black, and then add a couple of well-placed glints
(tiny light reflections) to make the new pupils look real (see Figure 10-20).
457
: :
Show-Stopping Eyes
Figure 10-20:
Selecting the blown-
out pupils (top),
adding some black
paint, and topping it
off with two flicks of a
white brush to add a
glint transforms Miss
Abbey from devil dog
to angel in minutes.
Here’s how to fix your furry friend’s eyes:
1. Open the image and select the white pupils.
Since you’re selecting by color, you can use either the Magic Wand or the Quick
Selection tool: Just click one pupil and then Shift-click the other. You can also
select them with the Elliptical Marquee: Draw a selection around the first pupil
and then press and hold Shift while you draw a circle around the second pupil.
While you’re holding the mouse button down, you can press and hold the space
bar to move the selection around as you’re drawing it.
2. Feather the selection with Refine Edge.
Once you’ve got marching ants, click the Option bar’s Refine Edge button bar
and make sure the resulting dialog box’s Feather field is set to one pixel and the
Smooth field is set to one (otherwise the edges will be too soft). To make sure
you get all the white bits, you might expand your selection by 10 to 20 percent
or so by dragging the Contract/Expand slider to the right. When you’re finished
tweaking your selection, click OK.
458
P CS: T M M
Show-Stopping Eyes
Note: Remember, the settings in the Refine Edge dialog box are sticky—they reflect the last settings you
used. So take a second to make sure they’re all set to zero except for the ones mentioned here.
3. Create a new layer named New Pupils.
Click the “Create a new layer” button at the bottom of the Layers panel, name
the layer, and make sure it’s at the top of the layers stack.
4. Fill the selection with black.
To recreate the lost pupil, press D to set your color chips to black and white and
then press X until black is on top. Next, press Option-Delete (Alt+Backspace
on a PC) to fill your selection with black. If the color doesn’t seem to reach
the edges of your selection (which can happen if you feathered or smoothed
your edges a little too much in step 2), fill it again by pressing Option-Delete
(Alt+Backspace). Once you’ve filled the pupils with color, you can get rid of the
marching ants by pressing �-D (Ctrl+D) to deselect.
5. Create another new layer and name it Glint.
You’ll want to soften the glints you’re about to create by lowering layer opacity,
so you need to put the glints on their own layer.
6. Grab the Brush tool and set your foreground color chip to white.
Press X to flip-flop color chips and, with a very small brush (10 pixels or so),
click once in the left eye to add a glint to mimic the way light reflects off eyes
(every eye has one). Next, click in the exact same spot in the right eye to add a
sister glint. Then lower the glint layer’s opacity to about 75 percent.
7. Save your document as a PSD file.
Pat yourself on the back for salvaging such a great shot of your pet.
459
The Art of Sharpening
Y
ou know the saying “Last but not least”? Well, that definitely applies to
sharpening—a digital attempt to improve your image’s focus—since it’s gen-
erally the last thing you do before sending your precious images off to the
printer. Sharpening is muy importante: It brings out details and makes your image
really pop. But it’s also one of the least understood processes in Photoshop. In ad-
dition to teaching you how to sharpen, this chapter also gives you some guidelines
about when and how much sharpening to apply, so you’re not just guessing.
In case you’re wondering which of your photos need sharpening, the answer is pretty
much all of ’em. If your image came from a digital camera or a scanner, it needs
sharpening. Why? In his comprehensive book on sharpening, Real World Image
Sharpening with Adobe Photoshop CS2 (Peachpit Press, 2006), the late Bruce Fraser
explains that images get softened (their pixels lose their hard edges) when cameras
and scanners capture light and turn it into pixels. Then, those images get softened
even more when they’re printed. Even if you create an image from scratch in Photo-
shop, the same deterioration occurs if you shrink it. To combat all these problems,
you need to spend a little quality sharpening time with your images.
While Photoshop is pretty darned good at sharpening, it’s not magic—it can’t take
an out-of-focus image and make it tack sharp (photographer slang for super-duper
sharp, derived from the phrase “sharp as a tack”). One of the few ways you can pro-
duce well-focused photos is to shoot using a tripod (to keep your camera stable) and
a remote (so you don’t move your camera when you press the shutter button), and
use a lens (or camera body) that includes an image stabilizer. The program doesn’t
have a magical “make my blurry picture sharp” button, though maybe Photoshop
460
P CS: T M M
What Is Sharpening?
CS25 will. What Photoshop can do is take an in-focus image and make it nice and
crisp. But before you start sharpening, it’s important to understand how the whole
process works.
Note: You can save a slightly blurry image by using the Emboss filter. Flip to page 652 for the scoop.
What Is Sharpening?
Sharpening an image is similar to sharpening a kitchen knife. In both instances,
you’re refining (emphasizing) the edges. On a knife, it’s easy to identify the edge. In
a digital image, it’s a little more challenging: the edges are the areas where different-
colored pixels meet (see Figure 11-1).
Figure 11-1:
Left: You can easily
spot the edges in this
image because its
contrast is pretty high.
Right: In this before-
and-after close-up
of the Chihuahua’s
antlers—who does
that to their pet?—see
how the edges are
emphasized after
some overzealous
sharpening (bottom)?
The weird white glow
around the antlers is
the dreaded sharpen-
ing halo.
Unsharpened
Oversharpened
461
:
Basic Sharpening
When you sharpen an image—whether in Photoshop, Camera Raw (page 480), or
a darkroom—you exaggerate the edges in the image by increasing their contrast.
Where two colors meet, you make the light pixels a little lighter and the dark pixels a
little darker. Though it may sound similar to increasing the overall contrast of your
image, it’s not. When you run one of Photoshop’s sharpen filters, the program ana-
lyzes your image and increases the contrast only in spots it thinks are edges (and, as
you’ll learn later on you have some control over what Photoshop considers an edge).
Sharpening is a bit of an art: If you don’t sharpen enough (or at all), your image
looks unnaturally soft and slightly blurred; if you sharpen too much, you get a nasty
sharpening halo, a white gap between light and dark pixels as shown in Figure 11-1
(bottom right). But if you sharpen just the right amount, no one will notice the
sharpening—they’ll just know that your image looks really good.
One of the downsides to sharpening is that it also emphasizes any kind of noise—
graininess or color specks—in your image. One way around that problem is to get
rid of the noise before you sharpen, or at least have a go at reducing it (see the box
on page 462 for tips).
Now that you know what sharpening does, you’re ready to give it a whirl in Photo-
shop. The next few pages focus on basic sharpening techniques; more advanced
methods are discussed later in this chapter.
Basic Sharpening
After you’ve retouched your image (Chapters 8, 9, and 10) and resized it (Chapter 6), it’s
time to sharpen. If you’ve ever peeked inside the Filter menu at the top of your screen,
you’ve probably noticed a whole set of filters devoted to sharpening. They include:
• Sharpen, Sharpen Edges, Sharpen More. When you run any of these filters,
you leave the sharpening up to Photoshop (scary!). Each filter analyzes your
image, tries to find the edges, and creates a relatively narrow sharpening halo
(see Figure 11-1, bottom). However, none of these filters gives you an ounce of
control, which is why you should forget they’re even there and stick with the
next two filters instead.
• Smart Sharpen. When you see three little dots (…) next to a menu item, it
means there’s a dialog box headed your way (and when it comes to sharpening,
that’s good!). Luckily, this filter has those dots. Smart Sharpen lets you control
how much sharpening happens in your image’s shadows and highlights and lets
you pick which kind of mathematical voodoo Photoshop uses to do the sharp-
ening. Page 466 discusses this filter in detail.
• Unsharp Mask. This filter has been the gold standard sharpening method for
years because, until the Smart Sharpen filter came along in Photoshop CS2, Un-
sharp Mask was the only one that gave you dialog box–level control over how it
worked. Most folks still prefer this method because it’s easy to use and quick (it
runs faster than the Smart Sharpen filter). Page 463 has the lowdown.
462
P CS: T M M
Basic Sharpening
No matter which filter you choose, sharpening is a destructive process, so it’s a good
idea to protect your image by following these guidelines:
• Resize your image first. Make sharpening your last step before you print an
image or post it on the Web—in other words, after you’ve retouched and resized
it. Because pixel size depends on an image’s resolution (page 44) and sharpen-
ing has different effects on different-sized pixels, it’s important to sharpen the
image after you make it the size you want.
Up to Speed
Keeping the Noise Down
It’s best to reduce or get rid of any noise in your image
before you sharpen it, or you’ll end up sharpening the
noise along with the edges. Photoshop gives you a variety
of noise-reducing filters: they’re discussed starting on page
644. All of them work by reducing the amount of contrast
between different-colored pixels. (This process is exactly
the opposite of sharpening, which is why removing noise
also reduces sharpness!) The aptly named Reduce Noise
filter is the best of the bunch because it gives you far more
control than the others.
Because all filters run on the currently active layer (mean-
ing they affect your original image), be sure to convert your
image to a Smart Object first so the filter itself runs on its
own layer (see page 124). Choose Filter➝Noise➝Reduce
Noise and, in the resulting dialog box, you can adjust the
following settings:
• Strength. If you’ve got a lot of grayscale noise—
luminance or brightness noise that looks like grains
or splotches—or color noise that looks like little specks
of color in your image, you can increase this setting
to make Photoshop reduce it in every color channel.
This setting ranges from 1 to 10; it’s set to 6 unless
you change it.
• Preserve Details. You can increase this setting to
protect the detailed areas of your image, but if you
do, Photoshop can’t reduce as much grayscale noise.
For best results, tweak this setting along with the
Strength setting and find a balance between the two.
• Reduce Color Noise. If you’ve got colored specks in
your image, try increasing this setting so Photoshop
erases even more of the little buggers.
• Sharpen Details. Because every noise-reducing fil-
ter blurs your overall image, this option lets you bring
back some of the sharpness. However, resist the urge
to use it and go with one of the other sharpening
methods described in this chapter instead.
• Remove JPEG Artifacts. If you’re dealing with an
image that’s gotten blocky because it was saved as
a low-quality JPEG, turn on this checkbox and Photo-
shop tries to reduce that Lego look.
• Advanced. This setting lets you tweak each color
channel individually (for more on channels, see
Chapter 5). So if the noise is in just one or two color
channels (noise is notoriously bad in the blue chan-
nel), turn on this option and tweak each channel’s
settings individually. (Because Reduce Noise can
make your image blurry, it’s better to adjust as few
channels as possible.)
Once you’re finished modifying these settings, press OK to
run the filter and then toggle the filter layer’s visibility off
and on (page 82) to see how much effect the filter really
had. (You can preview the effect on your image by pressing
P while the filter’s dialog box is open.) You can also use the
Smart Filter’s included layer mask (page 634) to restrict the
filter’s effects to certain parts of the image if you need to.
And if you determine that the filter didn’t help one darn bit,
run—don’t walk!—over to Chapter 19 to find a third-party,
noise-reduction plug-in that can. Or, if buying a plug-in isn’t
in your budget, flip to page 214 to learn how to sharpen
individual channels which lets you bypass the noise-riddled
channel altogether.
You may now proceed with sharpening your image.
463
:
Basic Sharpening
• Get rid of any noise first. If you see any funky color specks or grains that
shouldn’t be in your image, get rid of them before you sharpen or they’ll look
even worse. The box on page 462 tells you how.
• Sharpen your image on a duplicate layer or run it as a Smart Filter. Before
you run a sharpening filter, select the image layer and duplicate it by pressing
�-J (Ctrl+J on a PC). That way, you can toggle the sharpened layer’s visibility
on and off (page 82) to see before and after versions of your image. You can also
restrict the sharpening to certain areas by adding a layer mask (page 114) to the
sharpened layer and reducing the opacity of the sharpened layer (page 92) if the
effect is too strong (page 470 has tips for sharpening a multilayered file). Better
yet, convert your image layer for Smart Filters so Photoshop does the sharpen-
ing on its own layer and includes a layer mask for you automatically; page 634
has the details.
• Change the sharpening layer’s blend mode to Luminosity. Because you’re
about to make Photoshop lighten and darken a whole lot of pixels, you risk
having the colors in your image shift. However, if you change the sharpening
layer’s blend mode to Luminosity, the sharpening affects only the brightness of
the pixels, not their color. If you use the Smart Filter method described on page
466, change the filter layer’s blend mode to Luminosity instead. This little trick
does virtually the same thing as changing the color mode to Lab (page 420) and
then sharpening the Lightness channel, but it’s a whole lot faster!
• Sharpen your image a little bit, multiple times. It’s better to apply too little
sharpening and run the sharpening filter again than to apply too much sharp-
ening all at once. Sharpening your image gradually gives you more control; just
use your History panel or press �-Z (Ctrl+Z on a PC) to undo the last sharpen-
ing round if you go too far.
In the following pages, you’ll learn various ways to sharpen, starting with the most
popular method: the Unsharp Mask filter.
Sharpening with the Unsharp Mask
This filter is the favored sharpening method of many, but its name is rather confusing—it
sounds like it does just the opposite of sharpen. The odd name came from a tech-
nique used in darkrooms, which involves using a blurred (or “unsharp”) version of
an image to produce a sharper one. In Photoshop, the Unsharp Mask filter studies
each pixel, looks at the contrast of nearby pixels, and decides whether they’re differ-
ent enough to be considered an edge (you control how picky the filter is using the
Threshold setting, shown in Figure 11-2 and discussed below). If the answer is yes,
Photoshop alters the pixel to increase the contrast of that edge. The basic process is
simple: Photoshop lightens the light pixels and darkens the dark pixels.
464
P CS: T M M
Basic Sharpening
Figure 11-2:
Before the Smart Sharpen filter came along, Unsharp Mask
was the only sharpening method in Photoshop that gave you
any level of control. Because it’s so quick and easy to use, it’s
still the preferred method today. To bail out of the Unsharp
Mask dialog box (shown here) without doing anything, click
the Cancel button or press Esc.
The Unsharp Mask filter’s effects look a little stronger onscreen
than they do when you print the image. That’s because the
pixels on your screen are much bigger than the ones your
printer prints. So to get a printed image that’s nice and crisp,
make your onscreen image look a little too sharp.
Here are the settings you can adjust in the Unsharp Mask dialog box:
• Amount. This setting, which controls the sharpening intensity, ranges from 1
percent to 500 percent. The higher the setting, the lighter Photoshop makes the
light pixels and the darker it makes the dark pixels. If you set it to 500 percent,
Photoshop makes all the light pixels near edges pure white and all the dark ones
pure black, giving your image a sharpening halo you can see from outer space.
For best results, keep this setting between 50 percent and 150 percent (you can
find other magic numbers on page 466).
• Radius. This setting controls the width of the sharpening halo or, rather, how
many pixels on either side of the edge pixels Photoshop analyzes and changes.
Changing this setting alters your sharpening preview thumbnail (shown in Fig-
ure 11-2), so it’s a good idea to adjust it first. Typically, when you increase this
setting, you need to reduce the Amount setting to avoid creating a Grand Canyon–
sized sharpening halo. For best results, never set the Radius higher than 4.
• Threshold. This setting lets you control how different neighboring pixels have
to be before Photoshop considers them an edge. Oddly enough, Threshold
works the opposite of how you might expect: Setting it to 0 sharpens every pixel
in your image! For best results, keep this setting between 3 and 20 (it ranges
from 0 to 255).
465
:
Basic Sharpening
Here’s how to use the Unsharp Mask filter nondestructively:
1. Convert your image to a Smart Object.
This filter is destructive, but instead of duplicating your image layer (which
adds to your document’s file size), you can run it as a Smart Filter instead.
Choose Filter➝Convert for Smart Filters and Photoshop places a tiny Smart
Object badge at the bottom right of your image’s thumbnail (page 125).
2. Choose Filter➝Sharpen➝Unsharp Mask.
In the resulting dialog box (see Figure 11-2), tweak the settings to your lik-
ing. In the next few pages, you’ll find some recommended values that you can
memorize for later use, but, for right now, just adjust the settings so the image
in the preview thumbnail looks good to you. Click OK when you’re finished to
close the dialog box and you’ll see another layer named Unsharp Mask appear
in the Layers panel.
Tip: Anytime you see a preview thumbnail in a dialog box (like the one shown in Figure 11-2), you
can click it and hold your mouse button down to see a before version of your image (in this case, the
unsharpened version). You can also drag to move the preview around or click the little + and – buttons
below the preview to zoom in or out. You can also use keyboard shortcuts: �-click (Ctrl-click) to zoom in,
and Option-click (Alt-click) to zoom out.
3. Change the filter’s blending options to Luminosity.
Click the tiny icon to the right of the Unsharp Mask layer to open the filter’s
blending options. Change the Mode pop-up menu to Luminosity and then click
OK to close the dialog box.
Sit back and marvel at your new Photoshop sharpening prowess! If necessary, you
can always use the Smart Filter’s mask (the big white thumbnail beneath your image
layer) to hide the sharpening from areas that don’t need it. Smart Filters and their
masks are covered in detail in Chapter 15.
How much to sharpen?
Some images need more sharpening than others. For example, you don’t need to
sharpen a portrait as much as you do a photo of Times Square because they have
different amounts of detail (the Times Square photo is super busy and has lots of
hard lines). If you sharpen the portrait too much, you see pores and blemishes with
enough details to haunt your next power nap!
466
P CS: T M M
Basic Sharpening
Photoshop guru Scott Kelby came up with some especially effective values to use in
the Unsharp Mask dialog box and published them in The Adobe Photoshop CS4 Book
for Digital Photographers (New Riders Press, 2009). With his blessing, here they are:
• Sharpening soft stuff: If you’re sharpening images of flowers, puppies, babies
and other soft, fluffy subjects (stuff that often blends into its background), you
don’t want to apply much sharpening at all. For extremely soft sharpening, try
setting the Amount to 150 percent, the Radius to 1, and the Threshold to 10.
• Sharpening portraits: While close-up portraits need a bit more sharpening
than the items mentioned above, you don’t want to sharpen them as much as
something hard like a building with lots of straight lines and angles. To sharpen
portraits enough to make their subject’s eyes stand out, try setting the Amount
to 75 percent, the Radius to 2, and the Threshold to 3.
• Sharpening objects, landscapes, and animals: This stuff tends to be a little
harder and contain more details (sharp angles, fur, and so on) than portraits,
so it needs a moderate amount of sharpening. Try setting the Amount to 120
percent, the Radius to 1, and the Threshold to 3.
Note: These numbers are merely guidelines—they’re not absolute rules. Experiment with your own im-
ages and printer to see which settings give you the best results.
• Maximum sharpening: For photos of cars or of buildings (which are chock-full
of hard lines, angles, and details) or for photos that are a little out of focus, try
entering an Amount of 65 percent, a Radius of 4, and a Threshold of 3.
• Sharpening anything: For everyday sharpening, regardless of what’s in your
image, enter an Amount of 85 percent, a Radius of 1, and a Threshold of 4, and
then call it a day.
• Sharpening for the Web: If you’ve resized an image so it’s small enough to post
on the Web (see page 247), it needs more sharpening because downsizing often
makes an image appear softer. Set the Amount to 200 percent, the Radius to 3,
and the Threshold to 0.
The Smart Sharpen Filter
The Smart Sharpen filter (Figure 11-3) gives you a lot more options than Unsharp
Mask, so it offers you a slightly better chance of saving an out-of-focus image. This
filter also lets you save your favorite sharpening settings as presets, which is handy.
The downside? It’s not nearly as easy to use as Unsharp Mask and it takes longer to
run. Like Unsharp Mask, this filter is destructive, so be sure to make a copy of the
layer you’re sharpening first (or run it as a Smart Filter, as described on page 634).
Then run this filter by choosing Filter➝Sharpen➝Smart Sharpen.
467
:
Basic Sharpening
Figure 11-3:
Here you see the
option-riddled Smart
Sharpen dialog box in
basic mode.
poWeR USeRS’ CLINIC
Fading Filters
You may feel that this chapter is jumping the gun a little
bit by covering sharpening filters because there’s a whole
chapter on filters headed your way (Chapter 15). However,
some of the things you can do with filters—like fading a
filter you’ve applied—are too dad-gummed useful to wait
until then!
If you run a filter (or an image adjustment, for that matter)
and the effect is a little too strong, you have one shot at
lowering the filter’s opacity to lessen its effect. You can also
change its blend mode (page 289). However, Photoshop
only lets you do this right after you run the filter, so it’s
super easy to miss your chance. (If you didn’t duplicate the
original layer before running the filter or if you didn’t run it
as a Smart Filter, this fix is your saving grace.)
After you run the filter and before you do or click anything
else, head up to the Edit menu and choose “Fade [name
of the last filter you ran]”. (If you click another button or
select another tool, Photoshop grays out the Fade option
and you’re out of luck.) In the resulting Fade dialog box,
enter a percentage in the Opacity field to let Photoshop
know how much you want to fade the filter. For example,
if you think the filter is twice as strong as you need, enter
50 to reduce its effect by half. (If you click OK and then
change your mind, you can select Edit➝“Fade [name of fil-
ter]” again and enter a new number. The Edit menu’s Fade
option remains clickable until you run another command
or use another tool.
The Fade dialog box also has a Mode pop-up menu that
lets you change the filter’s blend mode to adjust how the
sharpened pixels blend with the original ones. Changing
this setting to Luminosity has the same effect as running
the filter on a duplicate layer and setting that layer’s blend
mode to Luminosity. When you press OK, Photoshop less-
ens the filter’s effect by the percent you entered.
468
P CS: T M M
Basic Sharpening
In the resulting dialog box, you’ll be assaulted with options that include Amount and
Radius (discussed in the previous section—page 464), plus:
• Remove. This menu is where you pick which kind of blurs you want Photoshop
to remove—or, more accurately, reduce. Your choices are:
— Gaussian Blur. Think of this as the basic mode; it’s the one that the Un-
sharp Mask filter uses.
— Lens Blur. Pick this setting if your image has a lot of details or noise.
— Motion Blur. If your image is blurry because the camera or subject moved,
use this setting to make Photoshop try to fix it, as shown in Figure 11-4.
Since choosing Gaussian Blur basically makes this filter work like Unsharp
Mask (in which case you could just use Unsharp Mask instead) and you use Mo-
tion Blur only when your picture is blurry, go with Lens Blur for most photos.
• Angle. If you choose Motion Blur from the Remove menu, use this dial to set
the angle of the blur currently marring your image. For example, if you have
a square image and the subject is moving diagonally across the shot from the
lower-left corner to the upper-right corner, set this field to 45 degrees.
• More Accurate. If you turn on this checkbox, Photoshop thinks long and hard
before it does any sharpening. With this setting turned on, you’ll get more pre-
cise results though the sharpening won’t be as strong. Since turning on this op-
tion makes the filter take longer to run, you’ll want to leave it off if you have a
slow computer or if you’re working with a huge file. If, on the other hand, you
buy a new computer every time you upgrade your copy of Photoshop, you can
turn it on and leave it on.
If you turn on the Advanced radio button at the top of the dialog box, Photoshop
adds three tabs to the settings section. Besides the settings just listed, which appear
on the Sharpen tab, you get Shadow and Highlight tabs, as shown in Figure 11-5.
These two tabs, which have the same settings, let you control the following:
• Fade Amount lets you reduce the amount of sharpening Photoshop applies to
your image’s highlights or shadows, depending on which tab you’re on. So, for
example, if you enter 100 in the Sharpen tab’s Amount field but want Photoshop
to do a bit less sharpening in the shadows, click the Shadow tab and enter a
Fade Amount of 25 percent or so. If you want no sharpening to happen in the
shadows, enter 100 percent. (This setting is similar to the Fade command you
learned about in the box on page 467.)
469
:
Basic Sharpening
Figure 11-4:
The Smart Sharpen dialog
box’s “Remove: Motion
Blur” setting can only do
so much, as you can see in
these before (top) and after
(bottom) images.
If you click the preview and
hold down your mouse but-
ton, your cursor turns into
a little hand (circled) that
lets you move your image
around and see the original
version.
To remove motion blur
in just one area of your
image (say, the cat in your
subject’s lap twitched its
ear right when you took the
picture), your best bet is to
select that area and copy
it to its own layer before
you run the Smart Sharpen
filter. Just select it using the
tools discussed in Chapter
4 and then jump it onto
its own layer by pressing
⌘-J (Ctrl+J on a PC). Make
sure you’ve selected the
layer that needs correct-
ing and then run the filter.
Then, if you need to, add a
layer mask (page 114) to
hide portions of the newly
unblurred layer.
• Tonal Width lets you control which highlights and shadows Photoshop sharpens.
It starts out at 50 percent, meaning the shadows get sharpened evenly through-
out their tonal range. If you enter a lower number, Photoshop sharpens only
the lightest highlights or the darkest shadows (depending on which tab you’re
on); if you enter a higher number, Photoshop sharpens all the highlights or all
the shadows. Unless you’ve increased the Fade Amount, this setting doesn’t do
a darn thing.
470
P CS: T M M
Basic Sharpening
Figure 11-5:
If you turn on the Smart
Sharpen filter’s advanced
options, you can adjust
how much sharpening
Photoshop does in both
the shadows (left) and
the highlights (right).
You don’t get this kind of
control with the Unsharp
Mask filter.
Note: If you pop into Advanced mode and tweak the Highlight and Shadow tabs’ settings and then go
back into Basic mode, the changes you made in Advanced mode still affect the filter, so it’s a good idea
to reset all the Smart Sharpen settings by Option-clicking (Alt on a PC) the Cancel button to change it to
Reset (clicking the Reset button takes you back to Basic mode). Or, when you switch into Advanced mode,
make a mental note to stay there.
• Radius lets you control how many pixels Photoshop analyzes to figure out
whether it thinks a pixel is in a highlight or a shadow. In other words, this set-
ting controls how wide an area Photoshop sharpens in either highlights or
shadows (depending on which tab you’re on). Like the Tonal Width setting,
Radius doesn’t do anything unless you adjust the Fade Amount first.
Tip: See the tiny disk and trash can icons in the Smart Sharpen dialog box to the right of the Settings
pop-up menu? These buttons let you save or throw away custom settings. If you click the disk button to
save your current settings and give ’em a name, Photoshop adds them to the Settings pop-up menu for
easy access later. If you want to throw a custom setting away, choose it from the Settings pop-up menu
and then click the trash can button.
Sharpening Layered Files
When you run a sharpening filter, it affects only the current layer—there’s no way to
make it affect all the layers in your document. So what happens if your image is on
more than one layer? (Say you’ve combined several images [Chapter 7] and added
several Adjustment layers [page 77].) The solution is to merge all those layers into a
brand-new one you can sharpen, as shown in Figure 11-6.
471
:
Basic Sharpening
Figure 11-6:
If you need to sharpen
a multilayered docu-
ment, first you’ll want to
combine all the layers into
a single, sharpenable one
by Option-clicking (Alt-
clicking) Merge Visible.
Otherwise, you’ll drive
yourself crazy trying to
figure out exactly which
layer needs sharpening!
Here’s how:
1. Open a layered file and select the topmost layer.
Since the sharpening layer needs to be on top of your layers stack, select the top-
most layer; that way, the new sharpening layer appears above it, which is exactly
where you want it (see Figure 11-6, left).
2. Make sure you’ve turned on the visibility eyes (page 82) of the layers you want
to merge.
3. Open the Layers panel’s menu by clicking the upper-right part of the Layers
panel (circled in Figure 11-6, left) and then Option-click (Alt-click on a PC)
the Merge Visible menu item.
If you simply click Merge Visible, Photoshop compacts all your layers into one.
But by Option-clicking (Alt-clicking) the Merge Visible option, you tell Photo-
shop to compact all your layers onto a completely new layer at the top of your
layers stack (circled in Figure 11-6, right). You can also press �-Shift-Option-E
(Ctrl+Shift+Alt+E) to do the same thing.
Now you can sharpen the new layer using any of the methods described in the previ-
ous pages.
Tip: When you have a multilayered file, it’s a good idea to name your layers so you know what’s what.
Just double-click the new layer’s name and type in a descriptive name like Sharpen. Organizing your
layers into groups is another great option, as explained on page 105.
472
P CS: T M M
Basic Sharpening
Sharpening Part of an Image
Sometimes, you need to sharpen only a portion of an image. If you’ve followed the
advice sprinkled throughout this chapter—sharpening a Smart Object or merging
several layers into a layer specifically for sharpening—you’re more than halfway
there. If you go the Smart Filter route, you automatically get a layer mask (flip ahead
to page 635 to see one in action).
If you merged several layers into one, you just need to add and edit a layer mask. For
example, one of the most useful portrait retouching techniques you’ll ever learn is to
accentuate your subject’s eyes and lips, as shown in Figure 11-7.
Figure 11-7:
Left: When you sharpen a
duplicate layer, you can
add a layer mask that
reveals the sharpening
only in certain areas of the
image. Here you can see
what a difference the eye
and lip sharpening makes
(check out, for example,
the details visible on the
girl’s sharpened lips).
Right: You can also lessen
the intensity of the sharp-
ening by lowering the
sharpening layer’s opacity.
You’re probably realizing
that there are many ways
to do things in Photoshop,
and that applies to sharp-
ening, too. Even though
you learned the newer
method of sharpening
with a Smart Filter back on
page 466, it’s still handy to
know how to sharpen part
of a duplicate layer, too.
473
:
Basic Sharpening
Here’s how to sharpen only certain areas, leaving the rest of your image unscathed:
1. Create a duplicate layer to use for sharpening and change its blend mode to
Luminosity.
If you’re dealing with a single-layer file, select the original layer and then press
�-J (Ctrl+J on a PC) to duplicate it. If you’ve got a multilayered file, combine
your layers into a single sharpening layer as explained in the previous section
(page 471). Use the pop-up menu at the top of the Layers panel to change its
blend mode to Luminosity and, if you’d like, double-click the new layer’s name
and rename it Sharpen.
2. With the new layer selected, choose Filter➝Sharpen➝Unsharp Mask.
Enter an Amount of 120 percent, a Radius of 2, and a Threshold of 3. These
numbers are rather arbitrary; the goal is to severely oversharpen your image so
you can scale back the effect.
3. Run the Unsharp Mask filter two more times.
Have a little faith, will ya? You’ll reduce this extreme oversharpening in a minute.
To run the filter again, press �-F (Ctrl+F on a PC) or choose Filter➝Unsharp
Mask (the last filter you ran always shows up at the top of the Filter menu).
4. Add a solid black layer mask to the sharpened layer.
At the bottom of your Layers panel, Option-click (Alt-click on a PC) the circle-
within-a-square icon to add a layer mask filled with black, which hides the
sharpened layer. (Recall from page 114 that, in the realm of layer masks, black
conceals.)
5. Grab the Brush tool and set your foreground color chip to white.
Press B to activate the Brush tool and take a peek at the bottom of the Tools
panel. If the foreground color chip (page 24) is white, you’re good to go. If it’s
not, press D to return the color chips to the factory setting of black and white
and then press X to flip-flop the chips.
6. Mouse over to your image and paint your subject’s irises.
When you’re doing detail work like this, it’s helpful to zoom in on the image by
pressing �-+ (Ctrl-+ on a PC) a few times. You also need to adjust your brush
size: Press the left bracket key ([) to make your brush smaller and the right
bracket key (]) to make it bigger. Be sure to paint only the iris of each eye. If you
mess up and reveal too much of the sharpening layer, don’t panic; just press X to
flip-flop color chips so you’re painting with black and then paint over that area
to hide the sharpening.
Tip: You can also drag to change your brush size by holding Ctrl-Option as you drag left or right with your
mouse (on a PC, Alt+right-click and drag).