Cutting Tool Technology Industrial Handbook by Graham T Smith_2 pptx
Bạn đang xem bản rút gọn của tài liệu. Xem và tải ngay bản đầy đủ của tài liệu tại đây (1.16 MB, 9 trang )
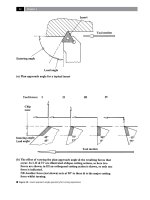
Figure 20. Insert approach angle geometry for turning operations.
Chapter
entering angle of 45° and lead angle of 45° is utilised,
giving rise to equal axial and radial component forces.
In ‘case II’ , the entering angle has changed to 75° and
lead angle is now 15°, these altered angles change the
component forces, with an increase in the axial force
while reducing the radial force. In ‘case III’ , an or
-
thogonal cutting action occurs, with only a 90° enter-
ing angle (i.e. the lead angle reduces to zero), showing
a large increase in the axial force component at the
expense of the radial force component which is now
zero
10
. In ‘case IV’ , an oblique cutting action has re-
turned (i.e. as in ‘cases I and II’), but here the entering
angle has changed to -15°, with the lead angle 75°, this
produces a large axial component force, but the radial
component force direction has now reversed. is last
tool plan approach angle geometry (i.e. ‘case IV’), is
similar to the geometry of a light turning and facing
tool, allowing cylindrical and facing operations to be
usefully undertaken – but the tool’s point is somewhat
weaker that the others, with the tool points becoming
of increased strength from right to le. erefore, in
‘case I’ , for a given feedrate and constant D
OC
, the cut
length/area is greater than the other ‘cases’ shown and
with this geometry, it enables the tool to be employed
for heavy roughing cuts. Returning to ‘case III’ , if this
tool is utilised for nish turning brittle-based work-
piece materials, then upon approaching the exit from a
cut, if the diameter is not supported by a larger shoul-
der diameter, then the axial component force /pressure,
will be likely to cause edge break-out (i.e. sometimes
termed ‘edge frittering’), below the machined surface
diameter at this corner (i.e. potentially scrapping the
machined part). In mitigation for this orthogonal cut-
ting tool geometry, if longer slender workpieces re-
quire cylindrical turning along their length, then with
the radial force component equating to zero, it does
not create signicant ‘push-o ’ and allows the part to
be successfully machined
11
.
A single-point turning geometry is subject to very
complex interactions and, as one geometric feature is
modied such as changing the entering angle, or in-
10 In all of these cases, it is assumed – for simplicity – that there is
no nose radius/chamfer on the tool and it is innitely sharp.
11 In order to minimise the eects of the radial force component
when cylindrically turning long slender workpieces with ‘Case
I and II’ tool geometries, the use of a programmable steady,
or a ‘balanced turning operation’ (i.e. utilising twin separately
programmable turrets on a turning centre, with tools situ-
ated virtually opposite each other running parallel during the
turning operation – see Fig. 41), will reduce this ‘push-o ’.
creasing the tool’s nose radius, this will inuence other
factors, which in turn could have a great impact on the:
type of machined surface nish produced, expected
tool life and the overall power consumption during the
operation. In fact, the main factors that inuence the
application of tooling for a specic turning operation
are:
I. Workpiece material – machinability, condition
(i.e. internal/external), mechanical and physical
properties, etc.,
II. Workpiece design – shape, dimensions and ma-
chining allowance,
III. Limitations – accuracy and precision require-
ments, surface texture/integrity, etc.,
IV. Machine tool – type, power, its condition and
specications,
V. Stability – loop stiness/rigidity (i.e. from the
cutting edge to its foundations),
VI. Set-up –
tool accessibility, workpiece clamping
and toolholding, tool changing,
VII. Tool programme – the correct/specied tool
and its tool osets, etc.,
VIII. Performance – cutting data, anticipated tool-life
and economics,
IX. Quality – tool delivery system and service.
In order to gain an insight into the complex and im-
portant decisions that have to be made when select-
ing tooling for the optimum production of either part
batch sizes, or for continuous production runs, then
the following section has been incorporated.
.. Cutting Toolholder/Insert
Selection
When deciding upon the correct selection of a tool-
holder/cutting insert for a given application, a range
of diverse factors must be considered, as indicated in
Fig. 21. As can be seen by the diagram (Fig. 21) and
associated text and captions, there are many other
variables that need to be considered prior to selection
of the optimum toolholder/insert. Generally, the xed
conditions cannot be modied, but by ‘juggling’ with
the variable conditions it is possible to accomplish the
best compromise toolholder/insert geometry, to opti-
mise these cutting conditions for the manufacture of
a specic workpiece and its intended production re-
quirements. Whenever toolholders and cutting inserts
are required for a specic manufacturing process, it
is important to view the tooling selection procedure
as a logical progression, in order to optimise the best
Turning and Chip-breaking Technology
Figure 21. The factors that must be considered prior to commencing a turning operation, when
utilising indexable inserts
.
Chapter
possible tools/inserts for the job in hand. Perhaps the
following selection strategy for a ‘start point’ in choice
and application of turning tools, can be undertaken
according by the following step-by-step approach:
Start Point
→ Edge clamping
system,
↓
Toolholder size
and type,
↓
Insert shape,
↓
Insert size,
↓
Nose radius,
↓
Insert type,
↓
Tool material,
↓
Cutting data
→
Final Tool-
holder and
Insert Selection
Edge Clamping System
Initially, the tool holder clamping system should be
selected to provide optimum performance in dier-
ent applications over a wide range of workpiece geom-
etries. e type of machining operation and to a lesser
extent, the workpiece size determines tool holder se-
lection. For example, roughing-out operations on big
components will make considerably dierent demands,
to that of nishing passes on small components.
NB
Pin, clamp and lever are just three of the insert
clamping systems available – consultation with the
tool suppliers at this point might be benecial.
Toolholder Size and Type
Once the clamping system has been selected, the size
and type of toolholder must be determined, with its
selection being inuenced by: feed directions (i.e. see
Fig. 22 for turning insert shapes and feed directions),
size of cuts, workpiece and toolholder situated in the
machine for accessibility requirements. e work-
piece’s shape plays a decisive role if surface contouring
is necessary, this is particularly relevant for machining
part access, as a toolholder is dened by its: eective
entering and point angles
12
, together with the insert’s
shape (see Fig. 22).
Toolholders should be the largest possible size for
the turning centre’s tool turret, this requirement is vi-
tal, as it reduces the ‘tool overhang ratio’ – providing
rigidity and integrity to stabilise the insert’s cutting
edge.
NB Appendix 1a shows the ISO ‘Code Key’ – for Ex-
ternal Toolholders.
Appendix 1b
shows the ISO ‘Code Key’ – for Solid
Boring Bars.
Appendix 1c
shows the ISO ‘Code Key’ – for Car-
tridges.
Insert Shape
e insert shape should be selected relative to the en-
tering angle needed for the tool’s accessibility, or ver-
satility. Here, the largest suitable point angle should
be chosen for strength and economy (see Fig. 23). In
Fig. 23, is illustrated a practical example of how chang-
ing only one variable – insert geometry (shape) – can
inuence an insert’s turning application. e shape
of an insert will determine its inherent weakness, or
strength, which is of particular relevance if rough-
turning operations are necessary. Furthermore, insert
shape will inuence whether it is prone to vibration, or
not and its predictable tool life. Hence, if one is con-
cerned about vibrations of either the tool, workpiece,
or both, then a weaker insert such as a light turning
and facing geometry with less cutting edge length ex-
posed in-cut, might be more suitable. Variable condi-
tions such as the selection of insert’s geometric shape
can aect other machining parameters and, this is
valid for other insert factors, so a compromise will al-
ways occur in any machining application.
12 Eective entering angles (κ
1
) must be carefully selected when
the operation involves proling, or copying. e maximum
proling angle (β) is recommended for each tool type – if
‘workpiece fouling’ is to be avoided.
NB κ
1 =
κ
+
β
(for plunging into a surface), whereas κ
1 =
κ
– β
(for
ramping-out of a surface), κ
1 =
κ
(β = 0°) for cylindrical turn-
ing, Where: eective entering angle (κ
1
), entering angle (κ),
maximum in-copy angle (β). Always select the smallest enter-
ing angle that the part geometry will allow.
Turning and Chip-breaking Technology
Figure 22. Tool paths in nish turning operations. [Courtesy of Sandvik Coromant].
Chapter
NB Appendix 1d shows the ISO ‘Code Key’ – for In-
dexable Inserts.
Insert Size
An indexable insert size is directly related to the tool-
holder selected for the operation, with the entering
angle and insert shape having previously been estab-
lished. Only the matching-shaped insert can be tted
into the seat of a particular toolholder, as its shape
and size are predetermined by the seating dimensions.
In roughing-out operations, the largest cutting depth
for a given toolholder, will inuence the insert size.
For any insert, the eective cutting length has to be
determined (see Fig. 20b), as the entering angle will
inuence the size of the insert selected. If the eective
cutting edge length is less than the depth of cut (D
OC
),
a larger insert should be chosen, or the D
OC
should
be reduced. Sometimes in more demanding turning
operations, a thicker insert – of the same geometric
shape – gives extra reliability.
Figure 23. Selecting indexable inserts for turning operations. [Courtesy of Stellram].
Turning and Chip-breaking Technology
Nose Radius
Of particular relevance in any turning operation is the
insert’s tool nose radius (r
ε
– see Fig. 17), as it is the key
factor with regard to:
•
inherent strength in roughing operations,
•
the resulting surface texture from nishing opera-
tions.
Further, the size of the nose radius aects vibrational
tendencies (see Fig. 23) and in certain instances, the
feedrates. e nose radius is the transition between the
major and minor cutting edges, which determines the
strength, or weakness of the point angle (see Figs. 16a
and 17), therefore it is an imperative factor to get right.
In general, roughing-out should be undertaken with
the largest possible nose radius, as it is the strongest
tool point (see Fig. 23). Further, a larger tool nose ra-
dius permits higher feedrates, although it is important
to monitor any possible vibrational tendencies. Later
in the relevant section, more will be said on the inu-
ence that the insert’s tool nose radius plays in the nal
machined surface texture, but it is worth mentioning
here that the feedrate for roughing operations should
be set to approximately half the size of the nose radius
utilised. e size of the nose radius has an aect on the
power consumed in turning in conjunction with the
material’s yield strength and chip-forming ability, par-
ticularly in rough-turning operations. e maximum
material removal rate (MMR) can be obtained by a
combination of high feedrate, together with a moder-
ate cutting speed, with other limiting factors, such as
depth of cut (D
OC
), tool’s nose radius, under consider-
ation. Oen, the machine tool’s power (P) availability
c
an sometimes be a limiting factor when mmR is the
requirement and, in such circumstances the cutting
speed is usually lowered somewhat. For a given nose
radius and cutting insert geometry, the power can be
derived, to ensure that the machine tool will be able
t
o cope with this pre-selected mmR, in the following
manner:
Machine tool’s power requirement (P):
P =
tangential force (F
T
) x cutting speed (V
C
)
P =
F
T
× V
C
P = k
C
× A × V
C
∴ P = k
C
× f × a
P
× V
C
(kW)
Where:
f =
feed/rev (mm/rev)
a
P
= depth of cut (mm)
Cutting speed (V
C
)
V
C
= πDN/1000 (m/min)
Where:
D =
workpiece diameter (mm)
N =
workpiece rotational speed (rpm)
Specic cutting force (k
C
):
k
C
= F
T
/A (N/mm
2
)
Where:
A =
cutting area (mm
2
)
For example, for nishing operations, with the nose
radius in combination with the feedrate (i.e. pre-se-
lected), this will aect the surface texture and part ac-
curacy, in the following manner:
Machined surface texture (Rt):
(Rt, this parameter being: maximum prole height)
Rt =
f
2
/8 × r
ε
x 1000 (µm)
Where:
f
2
= feedrate per revolution (mm/rev)
r
ε
= nose radius (mm)
NB e surface texture parameter ‘Rt’ ,
can be con-
verted into other surface texture parameters – as nec-
essary.
By utilising either: larger turning insert tool nose ra-
dius, ‘wiper insert’ (yet to be discussed), a more posi-
tive plan approach angle, or in certain circumstances,
a higher cutting speed, the surface texture can be im-
proved. In general, the coordination of the tool’s nose
radius and the pre-selected feedrate in nishing op-
erations, indicates that the feed should be kept below
a certain level to achieve an acceptable machined sur-
face texture value.
Insert Type
e cutting insert type is for the most part determined
by the previously selected geometry – see Appendix 1d
for the selection of indexable inserts. In reality, vari-
ous cutting conditions and workpiece materials make
dierent demands on the insert’s cutting edge. For ex-
ample, when machining hardened steel parts, this will
be completely dierent from that to the machining of
aluminium components.
48 Chapter 2
Once the insert shape has been established in con-
nection with its plan approach angle together with the
nose radius dimension, this just leaves the type of ge-
ometry to be found. In this instance, the type of insert
geometry refers to the ‘working area’ (i.e. nominally
found by its depth of cut and feedrate – more will be
said concerning this topic later, when ‘chip-breaking
envelopes’ will be discussed). Additional factors can
inuence the type of cutting geometry choice, such
as: machine tool’s condition, its power, the stability of
the workpiece-tool-machine set-up, other factors that
could aect geometry selection include: whether con-
tinuous, or intermittent cutting occurs, any tendency
toward vibration while machining. Turning operations
can be separated into a number of ‘working areas’ , be
-
ing based upon the removal of workpiece material and
the generation of accurate machined component di-
mensions, in combination with specic surface texture
requirements – as shown in Table 3.
When establishing an insert type, the feedrate
and depth of cut should be identied with one of the
‘working ranges’ (i.e. from Table 3), as the various in-
sert types to be chosen relate to this chart. It should
be borne in mind that the most suitable ‘working area’
selected, will vary, in combination with such factors as
the insert’s: size, shape and nose radius.
Tool Material
e penultimate evaluation to be made concerning
tooling decision-making is the choice of insert mate-
rial, or combination of materials that constitute the
cutter’s tool edge. Today, manufacturers of tooling
have a strategy for continuous improvement with varia-
tions in both tool matrices and coatings being consid-
erable. Not only are cutting tool material research and
development an on-going intensive activity, but their
application for wider ranges of machining applica-
tions are being considerably enhanced. A brief review
of just some of the current tool materials and coatings
have been previously mentioned in Section 1.2, with
the main range of cutting tool materials being: ce-
mented carbides, coated cemented carbides, ceramics,
cermets, cubic boron nitride, polycrystalline diamond
and monolithic (i.e. natural) diamond.
NB
A good ‘start-point’ for most machining opera-
tions, is to consider coated carbides initially, then if
these grades prove unsatisfactory, for whatever reason,
select one of the other materials – perhaps aer con-
sultation with a cutting tool manufacturer, or aer a
machinability testing procedure.
Cutting Data
Once all of the physical, metallurgical and geometrical
factors for the cutting tool have been established for
the machining operation, then it is necessary to set, or
calculate the cutting data – oen these criteria can be
found from tooling manufacturers recommendations
and cutting data tables. Certain variable factors such as
feedrate should have already been made, allowing the
cutting speed to be calculated, from the well-known
expression (below):
V
C
= πDN/1000 (m min
–1
)
Where:
V
C
= cutting speed (m min
–1
)
D = Workpiece diameter (mm)
13
N = rotational speed (rpm)
13 In the case of drilling, reaming and tapping operations, it is
the diameter of the cutting tool that is used in the calculation.
For any other internal machining operations – such as in bor-
ing, it is the initial hole diameter that is employed in the cut-
ting speed calculation.
Table 3.
Typical working areas for external turning opera-
tions
Type of machining
operation:
Feedrate (f): Depth of cut
(D
OC
):
Extreme nishing 0.05 to 0.15 0.25 to 2.0
Finishing 0.1 to 0.3 0.5 to 2.0
Light roughing 0.2 to 0.5 2.0 to 4.0
Roughing 0.4 to 1.0 4.0 to 10.0
Heavy roughing >1.0 6.0 to 20
Extremely heavy roughing >0.7 8 to 20
(mm) (mm)
[Courtesy of Sandvik (UK) Ltd]
.
Turning and Chip-breaking Technology
Once again, manufacturers data tables are oen useful
‘starting-points’ for estimating the initial cutting pa-
rameter information. Considerable care must be taken
if the material has either a high work-hardening ten-
dency, or intrinsic bulk (i.e. workpiece material) hard-
ness, as this can inuence the numerical data selected.
Moreover, the plan approach angle also has an eect
on the numerical value for the parameter, for example,
oblique machining allows a higher value than for or-
thogonal machining.
2.2 History of Machine Tool
Development and Some
Pioneers in Metal Cutting
.. Concise Historical Perspective
of the Development of Machine
Tools
Toward the end of the 1700’s, any high-quality machin-
ing at the time meant tolerances of 0.1mm being con-
sidered as ‘ultra-precision’ , with this level of tolerance
having steadily improved from the beginning of the
Industrial Revolution. Pioneers in machine tool devel-
opment such as John Wilkinson (1774), developed the
rst boring machine, this being capable of generating
a bored hole of 1270 mm in diameter, with a error of
about 1 mm. A contemporary of Wilkinson, namely
Henry Maudslay (1771–1831), invented many preci-
sion machine tools, but he was particularly noted for
the design and development of the rst engine lathe.
Slightly later, Sir Joseph Whitworth (1803–1887), de-
veloped the rst modern-day Vee-form screwthread
and nut (i.e. 55° included angle – ‘Whitworth thread’),
thereby enabling precision feed-motion to be achieved
via suitable gear trains on such machine tools. ese
early fundamental advances in machine design, al-
lowed others and in particular, Joseph R. Brown
(1852) to design the ‘dividing engine’. is newly-de-
veloped equipment, allowed precision engraving of
the hand dials on machine tool axes, enhancing them
with much better machinist’s judgment in both rotary
and linear control, in combination with consistent
repeatability by the skilled operative. Shortly aer
these developments, Eli Whitney produced the origi-
nal milling machine, which was rened still further
by the Cincinnati Screw and Tap Company in 1884.
is ‘Cincinnati machine’ was a direct forerunner of
today’s manual controlled knee-type milling machine
tools. Of particular note was the ergonomic grouping
of the controls centrally for a more ecient hand con-
trol by the skilled operator. At this time the machine
tool still utilised the Vee-form screw thread, with the
Acme-form (ie having the ability to take-up backlash)
still someway o development.
Steady development and renement of a range
of machine tools continued into the the rst half of
the 20
th
century until the next major ‘milestone’ oc-
curred. is signicant development was the ‘modern’
numerically-controlled (NC) machine. Around the late
1940’s, the ‘recirculating ballscrew’
14
was designed so
that it could take-up backlash in both directions of
rotation for machine tool axes. ese early ‘ballscrews’
were tted to a converted Cincinnati Milling Machine
Company’s ‘Hydro-Tel’ die-sinking machine tool,
at MIT (Massachusetts Institute of Technology).
is military research-funded project having been
commissioned by the United States Air force – who
required complex free-form aeronautical parts to be
automatically machined for the latest aircra. is
research was undertaken by MIT, in association with
‘Cincinnati’ and the Parsons Tool Company. e
binary-coded punched-paper tape, controlled the
simultaneous machine tool axes using alpha-numeri-
cal characters (ie the forerunner of today’s programs
using ‘G- and M-coded’ CNC controllers), through a
14 Who, when and where ‘recirculating ballscrew’ design and
development took place is open to some debate. As propo-
nents in the UK say it was Alfred Herbert and Sons, whereas
in the United States, the Parsons Tool Company are oen
quoted as the originators. However, what is not in question,
is that with its unique ‘Gothic’ arch’ (i.e. Ogival geometry),
having point contacts between the screw and the adjacent re-
circulating balls, allows the assembly to be pre-loaded in-situ,
thereby eliminating any appreciable backlash allowing accu-
rate control of these axes.
NB e previous Acme taper thread (i.e. 29° included angle)
tted to ‘conventional’ machine tools had an eciency of
no better that 40% – with backlash present, whereas today’s
hardened ‘ballscrews’ have eciencies of ~90%, coupled to
an impressive rigidity (~900 N µm
–1
) and minimal ‘stick-slip’ ,
therefore minimising the so-called ‘ballscrew wind-up’ due to
the action of torque-eects in combination with the cutting
forces.
Chapter

