Real World Adobe InDesign CS4- P5 pptx
Bạn đang xem bản rút gọn của tài liệu. Xem và tải ngay bản đầy đủ của tài liệu tại đây (1.07 MB, 30 trang )
area capable of enclosing the selection. e selection handles on
the bounding box also correspond to the points on the proxy in the
Transform panel.
You can also select everything on the current spread by choosing
Select All from the Edit menu (or pressing Command/Ctrl-A) while
using either selection tool.
e Direct Selection Tool. As we noted in “Using the Tools Panel” in
Chapter 1, “Workspace,” when you click an object using the Direct
Selection tool, InDesign displays the points on the object’s path—
whether it’s a line or a frame. You can also use the Direct Selection
tool to select objects nested inside other objects (see “Selecting Inside
Objects,” below). e most common example is selecting a picture
inside a graphic frame—the frame and the picture are two separate
objects in InDesign, and you can use the Direct Selection tool to
select the frame (by clicking on its edge) or the picture (by clicking
anywhere inside the frame).
You can drag a selection marquee using the Direct Selection tool,
too, just as you can with the Selection tool—InDesign selects the
points on the objects within the selection, even if they’re in more
When you select an object using
the Selection tool, InDesign displays
the objects’s selection handles and
bounding box.
When you select an object using
the Direct Selection tool, InDesign
displays the points on the path(s)
of the object.
Selection handles
Bounding box
When you drag a selection rectangle
around an object or objects…
…InDesign selects all of the objects
that the selection rectangle touches.
e proxy in the Transform
panel and Control panel
represents the selection
handles of the selected
object.
Proxy
-
Selecting Objects
Real_World_Adobe_InDesign_CS4b.pdf 121Real_World_Adobe_InDesign_CS4b.pdf 121 08/04/2009 05:54:18 p.m.08/04/2009 05:54:18 p.m.
.
than one object. To select all the points on a line or frame, hold down
Option/Alt while you click the path with the Direct Selection tool.
Deselecting. To deselect all selected objects, click an uninhabited
area of the page or pasteboard, or, better yet, press Command-Shi-
A/Ctrl-Shi-A. We’ve developed this keyboard shortcut into some-
thing of a nervous tic; there are so many times you need to make
sure everything is deselected. For example, when you create a new
color, InDesign applies that color to whatever you have selected. If
you don’t want this, you’d better deselect everything rst!
Sometimes, you have to select an object that’s behind another object.
You might, for example, need to select and edit a background graphic
behind a text frame. Do you need to drag the text frame out of the
way? Or hide the layer containing the text frame? ere’s a better
way: Click the Selection tool on the object on top of the stack, then
press Command/Ctrl and click again. InDesign selects the next
object in the stack. Each successive click selects the next object down
in the stack (see Figure 2-25). If you click too far, you can move back
up the stack by Command-Option/Ctrl-Alt-clicking.
Select ing
rough Objects
e rst click selects the object on
top of the stack of objects…
Want to select an object
that’s behind other objects?
You don’t need to drag
objects out of the way.
Instead, hold down
Command/Ctrl and click
the Selection tool above the
object you want to select. …but each subsequent click selects the
next object in the stack.
Text frame selected Background graphic selected
-
Selecting rough
Objects
When overlapping objects are exactly or nearly the same in size,
it can be dicult to see which object in a stack is selected. Don’t
start dragging objects out of the way—look for clues. e color of
the selection handles, the state of the Fill and Stroke buttons in the
Toolbox, and the Stroke panel all provide information that can help
you determine which object is selected.
InDesign also has menu items and keyboard shortcuts for select-
ing objects on your page. e menu items live in the Select sub-
menu, under the Object menu, but we only use them if we forget
Keyboard Selections
Real_World_Adobe_InDesign_CS4b.pdf 122Real_World_Adobe_InDesign_CS4b.pdf 122 08/04/2009 05:54:18 p.m.08/04/2009 05:54:18 p.m.
the keyboard shortcuts (below). Note that these features dier from
the click-through method; Command/Ctrl-click selects through
an object to one directly beneath it. e Select features select from
among all the objects on a spread. For example, if you have four
small frames, one in each corner of a page (whether they’re overlap-
ping or not), you can select among them with these shortcuts.
To select the topmost object beneath the surrent selection, based
on the stacking order on the page (see “Stacking Objects,” later
in this chapter) press Command-Option-Shi-] / Ctrl-Alt-Shi-]
or choose First Object Above from the Select submenu.
To select the object behind the currently selected object in a stack
of objects, press Command-Option-[ / Ctrl-Alt-[ or choose Next
Object Below from the Select submenu. Pressing the keyboard
shortcut again once you reach the bottom of the stack will select
the topmost object.
To select the object above the currently selected object in a stack
of objects, press Command-Option-] / Ctrl-Alt-] or choose Next
Object Above from the Select submenu.
To select the bottommost object below the selected object, press
Command-Option-Shi-[ / Ctrl-Alt-Shi-[ or choose Last
Object Below from the Select submenu.
Sometimes, you need to select an object that you’ve pasted inside
another object, or to select an object inside a group. e Direct Selec-
tion tool, as you might expect, is the tool you’ll usually use to do this,
and the process is called “subselection.” (When Ole selects an object
that’s inside another object, he actually says the object is “subse-
lected.” David, who felt subselected through much of his childhood,
prefers the term “select-challenged.”)
It’s important to note that InDesign treats groups and page items
that happen to contain other items in the same way. You don’t have
to ungroup a group, or remove objects from their containing object
to select and edit them—you can select them, and then work with
them just as you would any other object. To select an object inside
another object, you can use any of the following approaches.
With the Selection tool selected, double-click the grouped object.
InDesign switches to the Direct Selection tool and selects the
object (see Figure 2-26).
Select ing
Inside Objects
Real_World_Adobe_InDesign_CS4b.pdf 123Real_World_Adobe_InDesign_CS4b.pdf 123 08/04/2009 05:54:18 p.m.08/04/2009 05:54:18 p.m.
.
Select the Direct Selection tool, hold down Option/Alt, and click
the element that you want to edit.
Select the group or containing object with the Selection tool,
then choose Content from the Select submenu of the Context
menu. is selects an object. If necessary, choose Next Object or
Previous Object from the Select submenu of the Context menu
until the object you want is selected.
Select the group or containing object with the Selection tool,
then click the Select Content button in the Control panel. If nec-
essary, click the Select Next Object and Select Previous Object
buttons until the object you want is selected (see Figure 2-27).
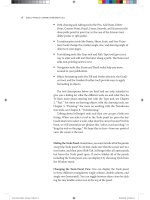
Guides
InDesign can display four types of guides: margin guides, column
guides, ruler guides, and Smart Guides. Guides are nonprinting
guidelines you can use for positioning objects on the pages and
pasteboard of an InDesign publication. Margin guides appear inside
the page margins for a particular page. Column guides are actually
pairs of guides that move as a unit. e space between the two guides
making up the column guide is the gutter, or column spacing. is
built-in spacing makes these guides good for—you guessed it—set-
ting up columns. A ruler guide is a horizontal or vertical guideline
you can use as an aid to aligning or positioning page items. A Smart
Guide is a guide that temporarily appears on page to help you posi-
tion an object while you place or move it.
You use guides to mark a position on the page or pasteboard. e
most important thing about guides is not just that they give you a
visual reference for aligning objects to a specic location, but that
Click the group with the Selection
tool to select the group, or…
…double-click one of the objects in the
group. is switches to with the Direct
Selection tool and selects the object.
-
Subselecting Objects
Inside Groups
Real_World_Adobe_InDesign_CS4b.pdf 124Real_World_Adobe_InDesign_CS4b.pdf 124 08/04/2009 05:54:18 p.m.08/04/2009 05:54:18 p.m.
they can exert a “pull” on objects you’re moving or creating. To turn
on that “pull,” choose Snap to Guides from the from the Grids &
Guides submenu of the View menu. When this option is on (it’s on by
default), and you drag an object within a certain distance of a guide,
InDesign snaps the object to the guide.
is is one of our favorite psychocybernetic illusions—as an object
snaps to a guide, your nervous system tells you that your hand can
feel the “snap” as you drag the mouse. Turning on Snap to Guides
-
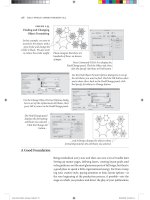
Control Panel
Selection Buttons
Click the Select Content
button again to select an
object inside the group.
We’ve pasted a group of star
polygons inside this circle.
Select Container
Select Container
Select Previous
Select Next
At any point, you can click the
Select Container or Select Content
button to move the selection up or
down in the hierarchy of objects
inside the circle.
Click the Select Content
button to select the
group within the circle.
Click Select Next
Object in Group or
Previous Object in
Group to select other
objects in the group.
Real_World_Adobe_InDesign_CS4b.pdf 125Real_World_Adobe_InDesign_CS4b.pdf 125 08/04/2009 05:54:18 p.m.08/04/2009 05:54:18 p.m.
.
can’t physically aect the movement of your mouse, of course, but
the illusion is very useful.
When you want to drag an object freely, without having it snap to
any guides it encounters on its path across the publication window,
turn Snap to Guides o. Do not try to align an object to a guide while
Snap to Guides is turned o, however—there aren’t enough pixels
available on your screen to allow you to do a good job of this at any
but the highest magnications (see Figure 2-28).
Objects do not snap to guides when guides are hidden. is
includes guides that are on a hidden layer. However, they do snap to
guides that are invisible due to being in Preview mode.
Also, on the Mac OS, you can disable Snap to Guides temporar-
ily by holding down the Control key while you’re dragging—unless
Smart Guides is enabled (see “Smart Guides,” later in this chapter).
When InDesign’s Snap to Guides
feature is turned o, it’s easy to think
that you’ve gotten an object into
perfect alignment with a guide…
…but zooming in will oen show you
that you’ve missed the guide. Turning
on Snap to Guides can help.
-
Don’t Trust Your Screen
Tired of looking at all of the guides? To hide all guides, choose Hide
Guides from the Grids & Guides submenu of the View menu (press
Command-;/Ctrl-;). To display the guides again, choose Show Guides
(or press the keyboard shortcut again).
You can also make guides disappear by changing the view thresh-
old (see Figure 2-29). For the document grid, baseline grid, margin
guides, and column guides, you set the view threshold using the
Grids panel of the Preferences dialog box (see Chapter 1, “Work-
space”). For individual ruler guides, use the View reshold eld in
the Ruler Guides dialog box (select a guide and choose Ruler Guides
from the Layout menu or the Context menu).
While column guides are very similar to ruler guides, they have an
important distinction: they can aect text ow. When you click the
text place icon in a column created by column guides, InDesign ows
Hiding and
Displaying Guides
Adjusting
Column Guides
Real_World_Adobe_InDesign_CS4b.pdf 126Real_World_Adobe_InDesign_CS4b.pdf 126 08/04/2009 05:54:19 p.m.08/04/2009 05:54:19 p.m.
the text into the column. By contrast, ruler guides have no eect on
text ow. For more on owing text, see Chapter 3, “Text.”
e method you use to adjust the position of column guides
depends on what you’re trying to do. If you’re trying to divide the
area inside the page margins into equal columns, select the page and
enter a new value in the Number eld in the Columns section of the
Margins and Columns dialog box (from the Layout menu).
If, on the other hand, you’re trying to get columns of unequal
width, you can start by adding evenly-spaced column guides, and
then adjust each one by dragging them to the le or right on the page
(see Figure 2-30). You might have to unlock the column guides rst;
see “Locking and Unlocking Column Guides,” below.
You can’t adjust the distance between the column guides (the
“gutter”) by dragging—instead, you’ll have to go to the Margins and
Columns dialog box. To change the gutter width, enter a new value
in the Gutter eld (see Figure 2-31). When you open the Margins
and Columns dialog box aer you’ve set up a custom column guide
Now you see ’em… …now you don’t.
e View reshold of these
ruler guides is set to 100%…
…the View reshold
of these ruler guides is
set to the default: 5%.
-
Guide View reshold
When the column guide
reaches the position you
want, stop dragging and
release the mouse button.
Unlock the column guides (if
necessary), then position the
Selection tool over a column
guide and drag.
When you create columns
of unequal width, InDesign
displays “Custom” in the
Number eld of the Margins
and Columns dialog box.
-
Creating Columns of
Unequal Width
Real_World_Adobe_InDesign_CS4b.pdf 127Real_World_Adobe_InDesign_CS4b.pdf 127 08/04/2009 05:54:19 p.m.08/04/2009 05:54:19 p.m.
.
arrangement, InDesign displays “Custom” in the Number eld. Do
not enter a number in this eld, or InDesign will move your column
guides so that they again evenly divide the space between the mar-
gins. If you change the gutter width without touching the Number
eld, InDesign leaves your column guides in their original positions,
but changes the space inside each guide.
You should also bear in mind that text frames can, by themselves
contain multiple columns of equal width, independent of the Mar-
gins and Columns setting. For more on this topic, see Chapter 3,
“Text.” Sometimes it’s easier to work with a single multi-column text
frame than with multiple single-column text frames.
You can lock and unlock column guides, just as you can ruler guides.
To lock the column guides, choose Lock Column Guides from the
Grids & Guides submenu of the View menu; to unlock the guides,
choose Unlock Column Guides.
To create a new ruler guide, position the cursor over one of the rulers
(for a horizontal ruler guide, move the cursor to the vertical ruler; for
a vertical ruler guide, use the horizontal ruler), then click-and-drag.
As you drag, InDesign creates a new ruler guide at the location of the
cursor. When you’ve positioned the ruler guide where you want it,
stop dragging (see Figure 2-32). Hold down the Shi key while drag-
ging a guide to make it snap to the nearest increment in the ruler.
Ruler guides can spread across a single page or the entire paste-
board. If you let go of the mouse button while the cursor is over the
page, you get a page guide; if the cursor is over the pasteboard, you
get a pasteboard guide. You can hold down Command/Ctrl as you
drag the guide to force the guide to cross the whole pasteboard. To
adjust this type of ruler guide, drag the guide on the pasteboard or
Locking and Unlocking
Column Guides
Creating a New
Ruler Guide
Default gutter
width of 1 pica.
Note that the
gutter is resized
evenly around its
center point.
Choose Margins and Columns from the
Layout menu, then enter a new value in
the Gutter eld. Click the OK button to
close the dialog box.
-
Adjusting Gutter Width
Real_World_Adobe_InDesign_CS4b.pdf 128Real_World_Adobe_InDesign_CS4b.pdf 128 08/04/2009 05:54:19 p.m.08/04/2009 05:54:19 p.m.
with the Command/Ctrl key held down—if you drag it on a page or
without the modier key, InDesign will limit the guide to that page.
You can also double-click a ruler to create a new ruler guide—
InDesign creates a guide at the point at which you clicked. While this
sounds appealing, we actually nd it quite dicult to double-click
exactly where we want the guide to be; it’s oen more precise to drag.
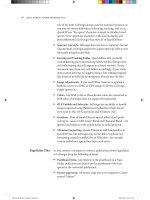
Want to add a regular grid of ruler guides to your page? Try the
Create Guides option on the Layout menu (see Figure 2-33). e
options in the Create Guides dialog box are pretty straightforward—
enter the number of rows and columns you want, and enter the dis-
tance you want between the rows and columns. You can also choose
to create the guides within the page margins, which is a nice touch.
In addition, you can choose to remove all existing ruler guides from
the page as you create the new guides.
You can snap a guide to any control handle of an object. To do this,
select the object with the Selection or Direct Selection tool, and then
drag a guide out and drag the cursor on top of any side or corner
Using Create Guides
Snapping Guides
to Objects
Position the cursor over a
ruler, then hold down the
mouse button…
…and drag. As you
drag, a ruler guide
follows the cursor.
When the ruler
guide reaches the
position you want,
stop dragging.
Drag a ruler guide on a page to limit
the guide to that page…
…or drag the cursor outside the
spread (or hold down Command/
Ctrl) to create a guide that crosses
pages in the spread.
To make a ruler guide snap
to the tick marks on the
ruler, hold down Shi as you
drag the ruler guide.
-
Creating a Ruler Guide
Real_World_Adobe_InDesign_CS4b.pdf 129Real_World_Adobe_InDesign_CS4b.pdf 129 08/04/2009 05:54:19 p.m.08/04/2009 05:54:19 p.m.
.
handle—the guide will snap to the handle. You can even snap a
guide to a point along a bézier curve.
Another way to position ruler guides around a selected object is to
use the AddGuides script—one of the sample scripts that come with
InDesign. Run the script by double-clicking the script name in the
Scripts panel. e script displays a dialog box you can use to set the
positions of the ruler guides (see Figure 2-34). Click the OK button,
and InDesign adds guides around the selected object or objects. is
script is especially useful when you’re setting up a publication for use
with InDesign’s layout adjustment features.
To select a ruler guide, click on the guide using one of the selection
tools, or drag a selection rectangle over the guide. is diers from
PageMaker and QuarkXPress, where you cannot select a ruler guide
as you would any other object. You can select multiple ruler guides
at once by dragging a selection rectangle (a marquee) over them or
Shi-clicking on each guide. If the selection marquee touches an
object, InDesign selects the object—you cannot select both ruler
guides and objects in the same selection. When a ruler guide is
selected, it displays in the layer color of the layer it’s on.
Adding Ruler Guides
Around an Object
Selecting Ruler Guides
-
Using Create Guides
Choose Create
Guides from the
Layout menu.
InDesign displays the
Create Guides dialog box.
Fill in guide options.
InDesign creates a
grid of guides.
Real_World_Adobe_InDesign_CS4b.pdf 130Real_World_Adobe_InDesign_CS4b.pdf 130 08/04/2009 05:54:19 p.m.08/04/2009 05:54:19 p.m.
You can also select all the guides on a spread with a keyboard
shortcut: Command-Option-G/Ctrl-Alt-G.
To change the location of a ruler guide, do one of the following.
Drag the guide (using the Selection or Direct Selection tool).
Select the ruler guide and then enter a new position in the X
eld (for a vertical guide) or in the Y eld (for a horizontal guide)
of the Transform panel or Control panel.
Select the guide and press an arrow key to “nudge” the guide one
direction or another.
You can also select more than one ruler guide at a time, and use
the techniques above to move them, as a unit, to a new location (see
Figure 2-35).
Editing Ruler Guides
Select an object.
Run the script. Choose
the locations of the
guides you want
to add and click the
OK button.
InDesign adds guides
at the locations you
specied.
-
Add Guides Script
Drag a selection
rectangle over the
guides you want
to move.
InDesign selects
all of the guides
touched by the
rectangle.
Drag the guides. Stop dragging
when the guides
reach the location
you want.
-
Moving Multiple Guides
Real_World_Adobe_InDesign_CS4b.pdf 131Real_World_Adobe_InDesign_CS4b.pdf 131 08/04/2009 05:54:19 p.m.08/04/2009 05:54:19 p.m.
.
You can assign a ruler guide to a layer as you would any other selected
object—drag the Proxy that appears in the Layers panel up or down,
then drop it on the layer to which you want to send the guide (see
Figure 2-36). e guide will appear on top of other objects. To move
the guides behind other objects on the layer, turn on the Guides in
Back option in the Guides & Pasteboard panel of the Preferences
dialog box.
When you create a ruler guide, InDesign applies the default guide
color (specied in the Guides & Pasteboard panel of the Preferences
dialog box) and a default view threshold (usually 5%) to the guide,
but you can change these options if you want (see Figure 2-37).
1. Select the ruler guide (or guides).
2. Choose Ruler Guides from the Layout menu or the context
menu to display the Ruler Guides dialog box.
Moving a Ruler Guide
to a Specic Layer
Setting Guide Options
ese guides are on the
“text” layer and are selected.
Drag the selection proxy
(representing the guides)
to another layer.
At this point, the guides
appear to be in front of the
text—guides always come to
the front when selected.
e guides are actually
behind the text, as you can
see when we deselect them.
-
Guides and Layers
Enter a view threshold percentage.
Choose a color from
this pop-up menu.
Select a guide, then choose
Ruler Guides from
the context menu or
the Layout menu.
-
Setting Guide Options
Real_World_Adobe_InDesign_CS4b.pdf 132Real_World_Adobe_InDesign_CS4b.pdf 132 08/04/2009 05:54:20 p.m.08/04/2009 05:54:20 p.m.
3. Choose one of InDesign’s preset colors from the Color pop-up
menu, or (if you’re really nicky) select Custom to create a
custom guide color.
4. You can also change the view threshold of the selected ruler
guide by entering a new value in the View reshold eld. e
percentage you enter is the percentage magnication at and
above which you want the ruler guide to appear. Enter 5% to
make the guide visible at all magnications. If you change this
to 100%, the guide will be visible at 100-percent view or higher
(closer), but will be invisible at anything less than 100-percent
view.
5. Click the OK button to close the Ruler Guides dialog box.
InDesign displays the guide (or guides) in the color you chose.
Why would you want to assign dierent colors to guides? Guides
are such useful tools that we nd we use lots of them. Color coding
guides for dierent tasks makes it easier for us to see what’s going on.
One set of guides, for example, might be used for aligning captions in
one illustration; another set might be used in a dierent illustration.
Applying colors, changing view thresholds, and assigning guides to
layers helps control the way that InDesign draws the guides in the
publication window.
Note that guides always take on the layer selection color of their
layer when they’re selected.
To lock the position of a selected ruler guide, choose Lock Position
from the Object menu (or press Command-L/Ctrl-L), or display the
Context menu and choose Lock Position. Once you’ve locked the
position of a ruler guide, you can change the color of the guide, move
the guide to another layer, change its view threshold, or copy the
guide, but you can’t change its position.
To unlock the guide, select the guide and choose Unlock Position
from the Object menu, or choose Unlock Position from the Context
menu. Of course, you can also lock the position of guides by locking
the layer containing the guides.
To lock all guides, press Command-Option-;/Ctrl-Alt-; (or choose
Lock Guides from the Grids & Guides submenu of the View menu
or the Context menu). When you do this, you’re locking more than
guide position—you won’t be able to select a guide until you choose
Unlock Guides (from the Grids & Guides submenu of the View menu
or from the Context menu) or press the keyboard shortcut again.
Locking Ruler Guides
Real_World_Adobe_InDesign_CS4b.pdf 133Real_World_Adobe_InDesign_CS4b.pdf 133 08/04/2009 05:54:20 p.m.08/04/2009 05:54:20 p.m.
.
To delete a ruler guide (or guides), select the guide (or guides) and
press the Delete key. Trying to drag the guide onto a ruler or out
of the publication window (the technique used in PageMaker and
QuarkXPress) simply scrolls your view of the publication window.
So don’t bother dragging the guide; just press Delete.
If you need to delete all the guides on a spread, you have two
options. You can select all the guides on a spread by pressing Com-
mand-Option-G/Ctrl-Alt-G, then delete them by pressing Delete. Or
you can right-click (or Control-click with a one-button mouse) on a
guide and choose Delete All Guides from the Context menu.
You can also copy selected ruler guides and paste them into other
spreads or publications. When you paste, the guides appear in the
positions they occupied in the original spread (that is, they’re not
pasted into the center of the publication window as page objects are),
provided the page sizes are the same (see Figure 2-38). If the page
sizes are not the same, InDesign gets as close to the original positions
as it can.
But wait! It gets better! You can use InDesign’s Step and Repeat
feature to duplicate ruler guides. For more on Step and Repeat, see
Chapter 9, “Transforming.” is is a great way to create custom grids,
though the Document Grid feature (see below) is even better.
Deleting Ruler Guides
Copying Ruler Guides
Select the guides you want to copy,
then press Command-C/Ctrl-C to
copy the guides to the Clipboard.
Turn to another page and press
Command-V/Ctrl-V to paste the
guides. e duplicate guides appear
in the same position on the page as
the original guides.
-
Copying Ruler Guides
When you’re dragging objects around your page, trying to line them
up in just the right position, it’s sure nice to get a little help. Smart
Cursors and Smart Guides to the rescue! e Smart Cursors feature
displays measurements alongside your cursor whenever you create a
frame (even when placing an image) move an object, or transform it
(resize, scale, or skew it; see Figure 2-39).
Smart Guides
and Cursors
Real_World_Adobe_InDesign_CS4b.pdf 134Real_World_Adobe_InDesign_CS4b.pdf 134 08/04/2009 05:54:20 p.m.08/04/2009 05:54:20 p.m.
e Smart Guides feature displays temporary guides as you drag
objects around your page (see Figure 2-40). For example, if you drag
an object so that its le edge aligns with the le edge of another
object on your page, a smart guide suddenly appears, indicating the
relationship. Smart guides act as though the Snap to Grid feature is
always on, so if you see a smart guide, you can let go of the mouse
button condent that the object you were dragging has snapped to
the proper alignment.
Note that smart guides only pay attention to objects on the same
spread, and only those you can see in the document window. So, if
you zoom in so that you can only see objects on the lower half of
your page, the Smart Guides feature ignores objects on the top half.
Similarly, it ignores objects on hidden layers.
Smart Guides also treats the center of each page as an object—as
you drag an object, smart guides will appear when it’s horizontally
or vertically centered on the page. Curiously, these guides are a dif-
ferent color than normal smart guides; they match the color of your
margin guides.
Smart Spacing. Not only does Smart Guides pay attention to align-
ing objects along their edges or centers (so you can quickly center two
For more on scaling,
rotating, and so on, see
Chapter 9, “Transforming.”
Smart Spacing guide
with double arrowheads
displays when spacing
between objects is equal.
Smart guide indicates that
the right edge of the object
we’re dragging is aligned
with the right edge of the
object below it.
-
Smart Cursors
-
Smart Guides
When resizing When rotating
Real_World_Adobe_InDesign_CS4b.pdf 135Real_World_Adobe_InDesign_CS4b.pdf 135 08/04/2009 05:54:20 p.m.08/04/2009 05:54:20 p.m.
.
frames, for example), it also watches the amount of space between
objects. For example, if you have three objects on a page and start
dragging the second one, you’ll see smart guides appear when the
space between the rst two objects is equivalent to the space between
the second two. ese “Smart Spacing” guides have small arrow-
heads on them.
Smart Transformations. Smart Guides also watches for simi-
lar transformations—what Adobe calls “Smart Dimensions.” For
instance, let’s say you have an object rotated on your page. en you
select another object and start rotating it (we discuss the Rotation
tool and other ways to transform objects in Chapter 9, “Transform-
ing”). Smart Dimensions sees the rst rotated object and snaps to the
same rotation value. Curiously, this works even if the other object is
on another page (as long as you’re zoomed out
Smart Preferences. Like so many other features in InDesign, you can
customize several aspects of Smart Guides so that it better works
for you. First, if you don’t like the default lime-green color, you can
change that in the Guides & Pasteboard pane of the Preferences
dialog box (press Command/Ctrl-K).
In the same place, you’ll nd four checkboxes: Align to Object
Center, Align to Object Edges, Smart Dimensions, Smart Spacing.
e rst two control what parts of objects InDesign takes into con-
sideration when displaying smart guides. Note that even if you turn
o Align to Object Center, objects will still align to the horizontal
and vertical centerpoint of each page.
e second two checkboxes enable or disable Smart Dimensions
and Smart Space, as described above.
Disabling Smart Guides. As cool as the Smart Guides feature is, it
oen just drives us batty, kicking in at times we just don’t want it
to. Fortunately, you can enable or disable it with a quick Command/
Ctrl-U. (Or you can do it the slow way and choose Smart Guides
from the Grids & Guides submenu, under the View menu.)
Grids
InDesign can display two dierent grids: the document grid and the
baseline grid. Both grids are arrangements of guidelines spaced a
specied distance apart. (Note that the baseline grid is not truly a
grid, as it has no vertical guidelines.) You’ll nd the settings for both
Real_World_Adobe_InDesign_CS4b.pdf 136Real_World_Adobe_InDesign_CS4b.pdf 136 08/04/2009 05:54:20 p.m.08/04/2009 05:54:20 p.m.
grids in the Grids Preferences dialog box, as described in Chapter 1,
“Workspace.”
To display a grid, choose the corresponding option (Show Docu-
ment Grid or Show Baseline Grid) from the Grids & Guides sub-
menu of the View menu, or from the Context menu (when nothing is
selected, and when a tool other than the Type tool is active). You can
also hide or show the document grid by pressing Command-’/Ctrl-’.
If the magnication of the current publication window is below
the view threshold of the baseline grid (again, this setting is in the
Grids Preferences dialog box), you’ll have to zoom in to see the grid
(see Figure 2-41).
You can set the magnication at
(and above) which the baseline
grid becomes visible using the
View reshold eld in the Grids
Preferences dialog box.
If you’ve chosen Show Baseline
Grid, but the baseline grid has
not appeared…
…it’s because you haven’t zoomed in
enough to cross the view threshold.
Once you do, you’ll see the grid.
-
Setting the View
reshold of the
Baseline Grid
As we mentioned earlier, the grids aren’t very useful without the
relevant “snap.” e regular Snap to Guides option (from the Grids &
Guides submenu of the View menu) aects the baseline grid guides
when they’re visible, but not the document grid—you’ll need to use
the Snap to Document Grid feature (on the Grids & Guides submenu
of the View menu) for that. In fact, when the Snap to Document Grid
option is turned on, objects snap to the document grid even when
the grid is not visible. (David likes this because the document grid is
useful for aligning objects but distracting to his eye.)
Normally, only frames and lines snap to the baseline grid, but the
feature’s name implies that you can also snap the baselines of text to
these guides—a very useful typesetting feature. We discuss working
with text leading grids and the baseline grid in Chapter 4, “Type.”
Real_World_Adobe_InDesign_CS4b.pdf 137Real_World_Adobe_InDesign_CS4b.pdf 137 08/04/2009 05:54:20 p.m.08/04/2009 05:54:20 p.m.
.
Stacking Objects
Page items on an InDesign page can be arranged in front of or behind
each other. You can imagine that every object exists on an invisible
plane that it cannot share with other objects, if you like. ese planes
can be shued to place one object above another, or behind another.
Simple stacking isn’t the only way to control the front-to-back
order of objects on a page—layers are another, and usually better,
method (we cover layers in the next section). Arranging objects on
a single layer, however, is very similar to tasks we perform every day
as we stack and sort physical objects (our lives, for example, seem to
revolve around stacks of paper).
Each layer in InDesign has its own stacking order and you can
move an object to the front, or send an object to the back of the layer
it occupies (see Figure 2-42). To bring an object to the front, Choose
Bring to Front from the Arrange submenu (under the Object menu or
the context menu). Or you can press Command-Shi-] / Ctrl-Shi-].
To bring an object to the front,
select the object…
…and then press Command-
Shi-] or Ctrl-Shi-]. InDesign
brings the object to the front.
To send an object to the back of the
current layer, select the object…
…and then press Command-
Shi-[ or Ctrl-Shi-[.
Note that bringing an object
to the front or sending it
to the back only changes
its position in the stacking
order of the current layer.
Objects on other layers can
still appear in front of objects
brought to the front; objects
on layers behind the current
layer will still appear behind
objects sent to the back.
-
Bring to Front and
Send to Back
Real_World_Adobe_InDesign_CS4b.pdf 138Real_World_Adobe_InDesign_CS4b.pdf 138 08/04/2009 05:54:21 p.m.08/04/2009 05:54:21 p.m.
To send an object to the back, choose Send to Back from the Arrange
submenu. Alternately, you can press Command-Shi-[ / Ctrl-Shi-[.
You can also choose to bring objects closer to the front or send
them farther to the back in the stacking order of objects on a layer
(see Figure 2-43). To bring an object closer to the front (in front of the
next higher object in the stacking order), choose Bring Forward from
the Arrange submenu (under the Object menu or the context menu)
or press Command-] / Ctrl-]. To send an object backward, choose
Send Backward or press Command-[ / Ctrl-[.
In QuarkXPress, text wrap is aected by the stacking order of objects
on the page. If a text box is above a wrapped object, the text avoids
the text wrap area; if it’s behind/below the wrapped object, the text
ignores the text wrap. While there is nothing inherently logical or
intuitively obvious about this behavior, many people have gotten
used to it.
To make InDesign behave this way, turn on the Text Wrap Only
Aects Text Beneath option in the Composition panel of the Prefer-
ences dialog box. Once you’ve done this, the stacking order of objects
on the page will have an eect on text wrap (see Figure 2-44).
For more on working with text wrap, see Chapter 6, “Where Text
Meets Graphics.”
Text Wrap and
Stacking Order
Select an object.
Note that the stacking
order includes all
of the objects on the
layer containing the
object you’re moving.
If the next object in
the stacking order does
not intersect the object
you’re moving, you
won’t see any change
on your screen.
Press the shortcut
again to move the
object farther back
in the layer’s
stacking order.
You can also press
Command-] or
Ctrl-] to move the
object forward.
Press Command-[ or Ctrl-[
to send the object backward.
-
Bring Forward
and Send Backward
Real_World_Adobe_InDesign_CS4b.pdf 139Real_World_Adobe_InDesign_CS4b.pdf 139 08/04/2009 05:54:21 p.m.08/04/2009 05:54:21 p.m.
.
Layers
InDesign’s layers are transparent planes on which you place page
items. You’ve probably heard that layers are a way to organize your
publication (that’s what all the marketing materials say, aer all). But
there’s far more to InDesign’s layers than just organization—layers
give you control over what parts of your publication display and
print, and whether they can be edited or not.
InDesign’s layers have a few characteristics you should understand
before you start using them. First, layers aect an entire document—
not individual pages or page spreads. Next, layers created in one
document do not aect layers in another document. As far as we can
tell, there’s no technical limit to the number of layers you can have in
a publication; it’s possible to make hundreds or more of them if you
have enough memory. But just because you can do that doesn’t mean
that you should. Too many layers can make a publication dicult to
manage.
Layers are especially useful when you’re working with pages
containing slow-drawing graphics, when your publication features
Layers Basics
-
Stacking Order
and Text Wrap
When the Text Wrap
Only Aects Text Beneath
option is o, the text wrap
aects all text frames,
regardless of their position
in the stacking order.
When the option is o, the
text wrap does not aect
text frames in front of the
wrapped object.
e text frame is in front of
the wrapped object.
Note that you can also pre-
vent a text wrap from aect-
ing a text frame by turning
on the Ignore Text Wrap
option in the Text Frame
Options dialog box.
Real_World_Adobe_InDesign_CS4b.pdf 140Real_World_Adobe_InDesign_CS4b.pdf 140 08/04/2009 05:54:21 p.m.08/04/2009 05:54:21 p.m.
complicated stacks of objects, or when you want to add a nonprint-
ing layer of comments or instructions to a publication. Layers are
also helpful when you want to create “conditional” layers containing
diering text or graphics (you could create multiple versions of the
publication in dierent languages, for example, and store all of the
versions in a single publication).
You use the Layers panel to create, edit, rearrange, and delete layers
(see Figure 2-45). To display the Layers panel, choose Layers from
the Window menu (or press F7). If you’re familiar with the Layers
palettes found in Illustrator and PageMaker (and, to a more limited
extent, Photoshop or QuarkXPress), you’ll be right at home with the
InDesign Layers panel. e Layers panel is chock full o’ features; let’s
look at them one at a time.
New Layer. To create a new layer, click the New Layer button at the
bottom of the panel or select New Layer from the Layers panel menu
(see Figure 2-46). InDesign normally adds new layers at the top of
the Layers panel, but you can tell the program to add the layer imme-
diately beneath the currently-selected layer by holding down Com-
mand-Option/Ctrl-Alt as you click the New Layer button.
If you want to name the layer (we think you should) or change
any other options, hold down the Option/Alt key when you click this
button to display the New Layer dialog box. (You can also get to this
dialog box by double-clicking the layer aer creating it.) We cover
the controls in this dialog box in “Layer Options,” below.
e Layers Panel
Selection proxy
Target (active) layer
Layer names
Show Layer icon
Lock Layer icon
Hidden layer
New Layer button
Delete Layer button
Unlocked layer
Layer selection color
InDesign reduces the
height of the list items
in the Layers palette.
…choose Small
Panel Rows from the
Layers panel menu.
To reduce the
amount of vertical
space taken up by
the Layers panel…
-
Layers Panel
Real_World_Adobe_InDesign_CS4b.pdf 141Real_World_Adobe_InDesign_CS4b.pdf 141 08/04/2009 05:54:21 p.m.08/04/2009 05:54:21 p.m.
.
Delete Layer. Click the Delete Layer button to delete the selected layer
or layers (to select more than one layer, hold down Command/Ctrl
as you click each layer). If the layer you have selected contains objects,
InDesign warns you that deleting the layer will delete the objects.
Show/Hide column. When you see an “eye” icon in the le-most
column of the Layers panel, the layer is visible. When there’s no icon
in this column, all of the objects on the layer are hidden (invisible).
Click once in this column to change from one state to another. You
can’t select or edit objects on hidden layers, and objects on hidden
layers don’t print.
Oen, you want to hide all the layers in a publication except one.
It’s easy: hold down Option/Alt as you click in that layer’s Show/Hide
column (or choose Hide Others from the Layers panel menu). Click-
ing again in the column while holding down Option/Alt will show
all layers, which is equivalent to choosing Show All Layers from the
Layers panel menu (see Figure 2-47).
Click the New Layer button. InDesign adds a new layer.
Or choose New
Layer from the
Layers panel
menu (or Option/
Alt-click the New
Layer button)
Enter a name for the layer
(optional, but a good idea).
Set other layer options.
Choose a layer color
from the pop-up menu.
Click the OK button, and
InDesign adds the new
layer to the Layers palette.
-
Creating a Layer
Real_World_Adobe_InDesign_CS4b.pdf 142Real_World_Adobe_InDesign_CS4b.pdf 142 08/04/2009 05:54:21 p.m.08/04/2009 05:54:21 p.m.
Lock/Unlock column. Click in the second column to lock a layer.
InDesign displays the “lock” icon (a pencil with a red line through it)
in that column. To unlock the layer, click the icon.
You can’t select objects on locked layers (so you can’t move or
format them, either), and you can’t assign objects to locked layers.
When you want to lock all of the layers in a publication except one,
hold down Option/Alt and click in the lock/unlock column (or
choose Lock Others from the Layers panel menu). To unlock every
layer, hold down Option/Alt and click the lock/unlock column (this
is the same as choosing Unlock All Layers from the panel menu).
Target layer icon. e target layer icon (it looks like a little fountain
pen nib) shows you which layer is the “target layer”—the layer on
which InDesign will place any objects you create, import, or paste.
Making a layer the target layer does not assign any currently selected
objects to that layer.
Selection Proxy. When you select an object on your page, InDesign
highlights the name of the layer containing the object and sets that
layer as the target layer. In addition, InDesign displays a small square
to the right of the layer name. is square is the Selection Proxy,
which represents the layer or layers containing the selected objects
(just as the proxy in the Transform panel “stands in” for the bound-
ing box of the selection). To move objects from one layer to another,
drag the Selection Proxy to another layer (see Figure 2-48).
While this method of moving objects from one layer to another
makes it dicult to accidentally move objects, it also makes it di-
cult to move objects from multiple layers to a single layer. To accom-
plish this, you’ll have to make multiple trips up and down the Layers
panel, selecting and moving the proxy for each layer in the selection.
Note that you can also copy an object from one layer to another
by holding down Option/Alt and dragging the Selection proxy. Plus,
you can even move objects to a locked or hidden layer—to do this,
press Command/Ctrl as you drag the selection proxy to the layer.
To copy objects as you move them to a hidden or locked layer, hold
down Command-Option/Ctrl-Alt as you drag.
Point at the layer’s
Visibility icon, hold
down Option/Alt…
…and click. InDesign
hides all of the other
layers.
Press Option/Alt and
click again to make the
layers visible.
To hide all but one layer,
follow these steps.
-
Showing and Hiding
Other Layers
Real_World_Adobe_InDesign_CS4b.pdf 143Real_World_Adobe_InDesign_CS4b.pdf 143 08/04/2009 05:54:22 p.m.08/04/2009 05:54:22 p.m.
.
Here’s a quick rundown of each of the controls in the New Layer and
Layer Options dialog boxes.
Layer name. InDesign assigns a default name to each layer you create,
but we think it’s better to enter a layer name that means something
in the context of your publication. It’s far easier to remember that the
enormous, slow drawing image of grazing Herefords is on the layer
you’ve named “Big Slow Cows” than it is to remember that you’ve
placed the image on the layer named “Layer 51.”
Layer color. Each layer has its own color that helps you see which
objects are on which layers. When Show Frame Edges (in the View
menu) is turned on, InDesign uses the layer color for the outlines of
frames and other objects. When you select an object, its selection
handles appear in the selection color of that layer. If you don’t pick
a color yourself, the program picks one for you automatically. To
change a color later, either double-click a layer in the Layers panel, or
Layer Options
is object is on the layer
named “D layer.”
Move the cursor over
the selection proxy
representing the object.
Drag the selection
proxy to another layer.
Drop the selection
proxy. InDesign moves
the object to the layer.
Object is now on the
layer named “A layer.”
-
Moving an Object
to a Layer
Real_World_Adobe_InDesign_CS4b.pdf 144Real_World_Adobe_InDesign_CS4b.pdf 144 08/04/2009 05:54:22 p.m.08/04/2009 05:54:22 p.m.
select a layer and choose Layer Options from the Layers panel menu.
We have never felt the need to change a layer’s selection color in an
actual project, but it’s nice to know that you can.
Show Layer. Should the layer be visible, or hidden? is option per-
forms the same task as the show/hide column in the Layers panel.
Lock Layer. Should the layer be locked or unlocked? is option per-
forms the same task as the lock/unlock column.
Show Guides. Remember that you can put ruler guides on layers. But
should those guides be visible or hidden? If you want to hide just this
layer’s guides, turn o the Show Guides option.
Lock Guides. Should the guides on this layer be locked or unlocked?
By default they’re unlocked; turn this option on to lock ’em.
Suppress Text Wrap When Layer is Hidden. People complained to
high heaven because InDesign 2 couldn’t turn o the text wrap on
objects that were on hidden layers. Fortunately, now you can. is is
helpful if you’re trying out a number of dierent designs, each on its
own layer. As you hide a layer, you don’t want its graphics to aect
the other layers!
Paste Remembers Layers. is option doesn’t appear in the Layer
Options dialog box; rather it’s in the Layers panel menu. e Paste
Remembers Layers option takes care of a question: “If I copy objects
from several layers and then paste, where should the pasted objects
end up?” Should they be placed on the target layer (in a stack corre-
sponding to their layer order)? Or should they be placed on the layers
they originally came from?
We think you’ll turn this option on and leave it on. If you do this,
you’ll be able to copy layers between publications. To do this, select
objects on dierent layers in one publication, then copy them, and
then switch to another publication and paste. When you paste, the
layers will appear in the publication’s Layers panel.
If layers with the same names already exist in the publication,
InDesign moves the incoming objects to the corresponding layers,
which is why you might want to turn the Paste Remembers Layers
option o. If you don’t, and if the layer stacking order is not the same
as it was in the publication you copied the objects out of, the appear-
ance of the pasted objects might change.
Real_World_Adobe_InDesign_CS4b.pdf 145Real_World_Adobe_InDesign_CS4b.pdf 145 08/04/2009 05:54:22 p.m.08/04/2009 05:54:22 p.m.