Real World Adobe InDesign CS4- P16 pptx
Bạn đang xem bản rút gọn của tài liệu. Xem và tải ngay bản đầy đủ của tài liệu tại đây (856.54 KB, 30 trang )
gets too close to the top or bottom of the text frame, the anchored
object might extend past the frame’s top or bottom edge. If you don’t
want this to happen, turn this option on.
Prevent Manual Positioning. As we noted earlier, turning on the
Prevent Manual Positioning checkbox is exactly the same as choos-
ing Lock Position from the Object menu. It’s just a good way to
ensure that your anchored objects don’t get accidentally moved.
Seeing Markers. Once you’ve set up an anchored object, you may
not remember where, exactly, the anchor marker is located. Choose
Show Hidden Characters from the Type menu, and you’ll see a little
anchor marker symbol in the story—it’s a light blue yen character (¥).
Similarly, if you open Story Editor, you can see a black anchor symbol
at that location. But perhaps the most useful indicator appears when
you choose Show Text reads from the View menu—select the text
frame or the anchored object with the Selection tool and you’ll see a
dashed line connecting the two.
You can wrap text around inline or anchored objects. is feature
comes with three big caveats. First, only the story in which the object
is anchored is aected. Text in other frames ignores anchored objects.
Second, if you anchor an object inside a table cell, text wrap is com-
pletely ignored. Finally, only the lines following the line containing
an anchored object are aected by the object’s text wrap. e line
containing the anchored object ignores the text wrap.
Drop Cap Wrap. One of the most frustrating aspects of drop caps
is that there is no way to tell InDesign to wrap the subsequent text
around them. You can fake it by putting the drop cap character in a
separate text frame, or by converting the character to outlines, but
then the drop cap wouldn’t travel with the text, right?
Enter inline frames. As David rst documented in his book with
Anne-Marie Concepción, Adobe InDesign Breakthroughs, you can
place a drop cap character in a separate frame, paste it at the end of
the paragraph before the paragraph in which it’s supposed to appear
(you can put the frame in a blank paragraph when the drop cap
appears at the beginning of the story), and then adjust the text wrap
boundaries with the Direct Selection tool to get the eect you want
(see Figure 6-55).
Ole notes that this is a heck of a lot of work to go through to achieve
a design eect that is both ugly and makes your text harder to read
(as varying the starting position of successive text lines always does).
Text Wrap and Inline
and Anchored Objects
Real_World_Adobe_InDesign_CS4b.pdf 451Real_World_Adobe_InDesign_CS4b.pdf 451 08/04/2009 05:55:25 p.m.08/04/2009 05:55:25 p.m.
.
Further, he notes in his irritating, pedantic fashion, there’s a reason
that the drop caps in beautiful old books always place the ornamen-
tal drop cap in a rectangular frame—to avoid this very temptation.
Earlier, we mentioned that inline frames are the best way to create
hanging side heads (such as the one loitering to the le of this para-
graph), but we were telling only half of the story. By experimenting
on ourselves (as any good pair of mad scientists should), we’ve found
that the best approach to hanging side heads is to create inline frames
by copying, pasting, and then converting them to anchored objects.
We did this because we found that changes in InDesign between
CS and CS2 made it much more dicult to control the vertical posi-
tion of inline frames—which, in turn, made managing our hanging
side heads a bit of a challenge. e good news is that anchored objects
oer a level of precision that inline frames just can’t match. We found
a set of anchored object settings that worked well with our hang-
ing side heads, and then created a script to apply the changes to our
chapters.
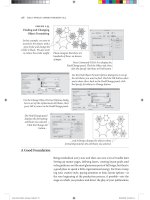
We set up the hanging side heads—most of which were already
inline graphics—as shown in Figure 6-56. e horizontal location of
the top le corner of the hanging side head is set to the le edge of the
text frame, and the vertical location is 13 points above the baseline
of the line of text containing the anchor (our leading grid is based on
13 point increments).
Anchored Object
Recipe: Hanging
Side Heads
-
Wrapping Around an
Anchored Drop Cap
e original paragraph
with a drop cap
Cut the drop cap, remove the drop cap
formatting from the paragraph, and
then paste the drop cap into a new text
frame. Choose Fit Frame to Content,
then use the Selection tool to cut the
drop cap frame and paste it into the line
before the paragraph.
Choose Wrap Around Bounding Box in
the Text Wrap panel, increase the wrap
a few points (so you can see them) and
then use the Direct Selection tool to cre-
ate a custom wrap.
Real_World_Adobe_InDesign_CS4b.pdf 452Real_World_Adobe_InDesign_CS4b.pdf 452 08/04/2009 05:55:25 p.m.08/04/2009 05:55:25 p.m.
-
Hanging Side Heads as
Anchored Objects
We allow manual positioning because we
need to be able to adjust the height of the
frame as we add or delete text.
e vertical location of the side head
is 13 points above the baseline of the
line of text containing the anchor.
e horizontal location of the top le
corner of the side head is set to the le
edge of the text frame (that’s what the
zero in the X Oset eld means).
We want the frame to remain within the vertical bounds of the
text frame, and we allow manual positioning (because we need to be
able to adjust the height of the frame as we add or delete text).
Object Styles
e sidebars in your magazine have a twenty percent cyan ll and a
so drop shadow. How many thousand times must you apply that
same ll and shadow before you go mad and throw someone else’s
computer out the window? (You wouldn’t throw your own out the
window; your favorite games are there.) One solution would be to
keep an example object in a library (see Chapter 1, “Workspace”) or
a snippet (see Chapter 7, “Import and Export”). A more exible and
powerful solution is to create an object style.
Object styles are just like paragraph and character styles, except
that they apply to objects instead of text. An object style is basically
just a bunch of object formatting with a name. You can apply that
style to a frame or path on your page and all the appropriate for-
matting is applied. If you later change the denition of the style, the
change immediately ripples through to all the objects tagged with
that style.
To create an object style, hold down Option/Alt and click the New
Object Style button at the bottom of the Object Styles panel (press
Creating
Object Styles
Real_World_Adobe_InDesign_CS4b.pdf 453Real_World_Adobe_InDesign_CS4b.pdf 453 08/04/2009 05:55:26 p.m.08/04/2009 05:55:26 p.m.
.
Command-F7/Ctrl-F7 to display the panel if it is not already visible).
If you have an object selected, the new object style takes on the for-
matting attributes of the object. If you don’t have anything selected
on the page, then the object style takes on the default formatting of
the document, and you will have to dene the style from scratch. We
strongly urge you to use the “create style by example” approach, as
shown in Figure 6-57).
e New Object Style dialog box consists of 10 panels (count ’em!),
including Fill, Stroke, Transparency, and Anchored Object Options.
You can turn the checkbox next to each panel on or o. On means
“apply this formatting as part of the style.” O means “ignore this
formatting.” at is, if you turn o the Fill checkbox, it doesn’t mean
that the ll should be set to None; it means that this object style has
no eect on the ll of objects.
You can create one object style that applies only a specic text
wrap to an object, and a dierent style that applies only a stroke and
a drop shadow. If you draw a frame and apply the rst style, only
the text wrap would be applied. en you can apply the second style,
changing only the stroke and drop shadow. At this point, the object
is tagged with the second style, not the rst, which means that if you
redene the rst object style, this object will not be updated.
Note that you can press Tab to jump to the list of panels, and
then press the up and down arrow keys on your keyboard to move
among them. You can also Option/Alt-click on a checkbox to toggle
the other categories: Option/Alt-click on an “on” checkbox to turn
all the others o, and vice versa.
Style Settings. At the bottom of the General panel of the New Object
Style dialog box is a list of Style Settings. You can use this as a sum-
mary of settings the object style will apply. But to be honest, we never
use this. It’s just easier to use the shortcuts to ip through each panel.
If you do use it, you should Option/Alt-click on the little triangles so
that they fully expand. (Otherwise, you have to click over and over
again, which is annoying.)
Keyboard Shortcuts. You can assign a keyboard shortcut to an
object style in the General panel. Like keyboard shortcuts for para-
graph styles and character styles, the shortcut must use the numeric
keypad keys (make sure that Num Lock is on), not normal numbers,
characters, or function keys.
Basing One Object Style on Another. You can also choose another
object style from the Based On pop-up menu in the General panel
Real_World_Adobe_InDesign_CS4b.pdf 454Real_World_Adobe_InDesign_CS4b.pdf 454 08/04/2009 05:55:26 p.m.08/04/2009 05:55:26 p.m.
-
Creating an
Object Style
1. Select an object that has
the formatting attributes
you want to assign to the
object style.
2. Hold down Option/Alt
and click the New Object
Style button.
3. Make any changes you
want in the panels of the
New Object Style dialog box.
Turn o sections to prevent
the style from aecting
the corresponding object
properties.
In this example, we chose
to associate a paragraph
style and text frame baseline
oset with the object style,
so the text inside the objects
was aected, too.
You can also apply
transparency eects to
Object, Fill, Stroke, or Text
inside an object style.
4. Click OK, and InDesign
adds the new object style to
the list of available styles.
5. Select an object or objects
and apply the style, and
you’ll see that the formatting
attributes of the original
object are applied to the
selected objects.
to create a “parent/child” relationship between styles. If you change
the denition of the based on (“parent”) style, that change is passed
along to this style, too—provided that the child style didn’t already
override the parent style’s formatting.
Real_World_Adobe_InDesign_CS4b.pdf 455Real_World_Adobe_InDesign_CS4b.pdf 455 08/04/2009 05:55:26 p.m.08/04/2009 05:55:26 p.m.
.
To clear the formatting in an object style that diers from its
parent style, click the Reset to Base button. is makes the attributes
of the style identical to those of the parent style.
Every new document you create contains three initial object styles:
None, Basic Graphics Frame, and Basic Text Frame. (ey’re listed
in the panel with brackets so you know that they’re special and can’t
be deleted.) When you create a path or an empty frame (one with
an “X” through it), the None style is applied—that is, no style at all.
When you make a text or graphics frame, the relevant style is applied.
You can redene these styles (see “Editing Object Styles,” later in
this section), and once you create new object styles, you can even tell
InDesign to use those as your defaults instead.
For example, you might need to create a bunch of similarly-for-
matted text frames. You could change the Default Text Frame Style
to one with the appropriate formatting, draw the frames, and then
restore the original settings to the default style. To change the default
text frame style, choose a style from the Default Text Frame Style
submenu in the Object Styles panel menu. (Or the Default Graphics
Frame Style submenu to change that default.)
Actually, it’s even easier than that: See the little icons to the right
of the default styles in the panel? Just drag one of them to the style
you want to set as the default (see Figure 6-58). Alternatively, you
can deselect everything and then select a style. In general, this sets
the default graphics frame style; but when you have the Type tool
selected, this sets the default text frame style.
e Default Styles
-
Setting a Default
Object Style
Drag the default icon (for either the
graphics frame or text frame) to a
new object style.
e object style you drop the icon
on becomes the default object style
for the corresponding frame type.
You can apply an object style in any of several ways.
Select an object or series of objects and click the object style
name in the Object Styles panel (or choose it from the object
style pop-up menu in the Control panel).
Applying Object Styles
Real_World_Adobe_InDesign_CS4b.pdf 456Real_World_Adobe_InDesign_CS4b.pdf 456 08/04/2009 05:55:26 p.m.08/04/2009 05:55:26 p.m.
Drag an object style name from the Object Styles panel and drop
it on an object (the object need not be selected).
Select an object, then press Command-Return/Ctrl-Enter to
invoke the Quick Apply feature, and then type a few characters
of the style name (see “Quick Apply,” later in this chapter).
Note that if you have a lot of object styles, you can rearrange them
in the panel by dragging them up or down. To reset them to alpha-
betical order, choose Sort by Name from the panel menu.
Clearing Local Formatting. Just as you can apply local text format-
ting to text over a paragraph or character style, you can apply local
object formatting over an object style. You might apply an object
style that lls a frame with cyan, and then manually override that to
make the frame yellow. To remove all of the local overrides, click the
Clear Overrides button in the Object Styles panel (or choosing the
feature of the same name from the panel menu). Or you can Option/
Alt-click on the style name to reset it and remove all overrides.
ere’s another “clear” button in the panel: Clear Attributes Not
Dened by Style. Clicking this button (or choosing it from the panel
menu) is the same as applying the None object style and then reap-
plying the style. InDesign sets all the object formatting that isn’t
described in the style denition (all of the panels without check-
marks next to them) to equal what you’d get with the None style.
Breaking the Link. As we mentioned earlier, applying an object style
creates a link between the object and the style. To convert the format-
ting applied by the object style to local formatting and break the link
between the object and the style, choose Break Link to Style from
the Object Styles panel menu. e object’s appearance won’t change,
but future changes to the style denition have no eect on the object.
ere are a whole mess o’ ways to edit an object style.
Double-click the style name in the Object Styles panel. If an
object is selected on the page when you do this, the style will be
applied to it.
Right-click (or Control-click until you come to your senses and
buy a two-button mouse) the style name in the Object Styles
panel and choose Edit. is has the advantage of not applying
the style to any selected objects.
Editing Object Styles
Real_World_Adobe_InDesign_CS4b.pdf 457Real_World_Adobe_InDesign_CS4b.pdf 457 08/04/2009 05:55:26 p.m.08/04/2009 05:55:26 p.m.
.
Select an object that has the style applied to it and then choose
Style Options from the object style pop-up menu in the Control
panel (this pop-up menu sits to the le of pop-up menu that lists
the object styles).
Press Command-Return/Ctrl-Enter to bring up Quick Apply,
type enough of the style name so that it is highlighted, and then
press Command-Return/Ctrl-Enter again.
Change the formatting of an object that is already tagged with
the style, and then choose Redene Style from the Object Styles
panel menu. is updates the style denition to match the cur-
rent formatting of the selected object.
To delete an object style, select the style in the Object Styles panel
and click the Delete Style button, or drag the style name on top of
the button. If the style is in use (if any objects are tagged with it),
InDesign asks you which style it should apply in its place. If you
choose None, you also have the option to Preserve Formatting.
When this checkbox is on, objects that were tagged with the style
will still appear the same, but all the formatting will be converted to
local formatting. If you turn o Preserve Formatting, the objects will
be completely cleared of formatting: no ll, stroke, and so on.
How can you move your carefully-constructed object styles from one
document to another? One easy way is to copy any object tagged with
the style and then paste it into the target document—the style comes
with it and you can then delete the object if you want.
If you want to import a bunch of styles, it may be easier to choose
Load Object Styles from the Object Style panel menu. InDesign asks
you to select another InDesign document, and then asks you which
object styles you want to import from it. If there are object styles
that have the same name in the two documents, you have a choice
whether to use the incoming denition or to rename the style.
Placing Text on a Path
InDesign can place text on a path, as well as place text inside a path
(which is what a text frame is, aer all). Once you’ve added text to a
path, you can select the text just as you would select any other text—
select the Type tool and drag it through the characters you want to
Deleting Object Styles
Importing
Object Styles
Real_World_Adobe_InDesign_CS4b.pdf 458Real_World_Adobe_InDesign_CS4b.pdf 458 08/04/2009 05:55:26 p.m.08/04/2009 05:55:26 p.m.
select, or click the Type tool in the text and use keyboard shortcuts.
To select the path, use the Selection tool or Direct Selection tool.
To attach text to a path, follow these steps (see Figure 6-59).
1. Select the Path Type tool.
2. Move the tool over a path. e cursor changes to indicate that
InDesign is ready to place text on the path.
3. Click the tool on the path. InDesign places the cursor on the
path. e position of the cursor depends on the document’s
default paragraph alignment (if the default alignment is le, for
example, the cursor will appear at the start of the path). Instead
of clicking, you can drag the tool along the path to dene the
area of the path you want to ll with text.
If InDesign cannot t all of the text onto the path, the extra
text is stored as overset text.
4. Add text to the path just as you would add text to a text
frame—by typing, pasting text from the Clipboard, or import-
ing text from a text le. is creates a new kind of object—not a
text frame, not a path, but a blending of the two we’ll refer to as
a “path text object” from here on out.
Once you’ve attached text to a path, you can change its position
on the path by dragging the Start Indicator or the End Indicator (see
Figure 6-60), or change its orientation relative to the path using the
Center/Flip Direction Indicator (see Figure 6-61).
Like text frames, path text objects feature an in port and an out
port you can use to link the text to other text containers (text frames
or other text path objects). You can even link text from a path text
object to the interior of the path text object. InDesign does not apply
paragraph rules to text in path text objects.
You can control both the baseline position of text on a path and the
relationship of the text to the shape of the path. To do this, select
a path text object (or some of the text on a path) and then choose
Options from the Type on a Path submenu of the Type menu (or
Context menu). InDesign displays the Type on a Path Options dialog
box (see Figure 6-62).
Eect. Do the character shapes distort in some way, or do they
remain unchanged? at’s the question you’re answering when you
make a choice from the Eect pop-up menu (see Figure 6-63). What,
exactly, do these oddly named options do?
Type on a Path Options
Real_World_Adobe_InDesign_CS4b.pdf 459Real_World_Adobe_InDesign_CS4b.pdf 459 08/04/2009 05:55:26 p.m.08/04/2009 05:55:26 p.m.
.
Select the Type on a Path tool.
Position the tool above a path.
Enter, paste, or place some text.
Use the Type on a
Path tool to select
and format the text.
InDesign displays
this cursor when the
Type on a Path tool
is ready to add text
to a path.
-
Adding Text to a Path
Select the Selection tool and
position the cursor above the
Start indicator…
…and drag the
indicator along
the path.
InDesign repositions
the text on the path.
…or the End
indicator…
-
Changing the Position
of Text on a Path
Rainbow rotates the center point of each baseline to match the
angle of the path at the location of the character.
Skew skews the horizontal axis of the character to match the
angle of the path at the location of the character, but leaves the
vertical axis of the character unchanged.
3D Ribbon skews the vertical axis of each character to match the
angle of the path at the location of the character, but leaves the
character’s horizontal axis unchanged.
Real_World_Adobe_InDesign_CS4b.pdf 460Real_World_Adobe_InDesign_CS4b.pdf 460 08/04/2009 05:55:27 p.m.08/04/2009 05:55:27 p.m.
Select the object using the
Selection tool…
…then choose Options from the Type on
a Path submenu of the Type menu.
InDesign displays the
Type on a Path Options
dialog box.
Drag the dialog box out of
the way (if necessary) and
turn on the Preview option
so that you can see the
eect of the changes you
make in the dialog box.
-
Path Type Options
Select the Selection tool and
position the cursor above
the Flip indicator…
…and drag
the indicator to
the other side of
the path.
InDesign ips the
text on the path.
-
Flipping Text on a Path
Stair Step aligns the center point of each character’s baseline to
match the angle of the path at the location of the character, but
does not rotate the character.
Gravity rotates the center of the baseline of each character to
match the angle of the path at the character, skews the hori-
zontal axis of the character to match that angle, and skews the
vertical axis of each character around the geometric center point
of the path.
Real_World_Adobe_InDesign_CS4b.pdf 461Real_World_Adobe_InDesign_CS4b.pdf 461 08/04/2009 05:55:27 p.m.08/04/2009 05:55:27 p.m.
.
-
Path Type Eects
Gravity is a combination
of Rainbow and Skew—it
rotates the characters
around the path and skews
the horizontal axis of each
character.
Stair Step moves the
characters along the path,
but does not skew or rotate
the characters to match
the path.
3D Ribbon skews the vertical
axis of each character to
match the angle of the path,
but leaves the character’s
horizontal axis unchanged.
Skew skews the horizontal
axis of each character to
match the angle of the
path, but leaves the
vertical axis of the
character unchanged.
Rainbow rotates the
characters around the
path.
Flip. You’ve probably noticed that path text follows the direction of
the path—the rst character of the text typically appears at (or, if
you’ve dragged the Path Type tool, nearest) the rst point in the path.
Given this, you’d think that you could select the path and choose
Reverse Path from the Options menu to make the text read from the
opposite end of the path. But you can’t (not without rst removing
the text from the path, anyway). To do what you’re trying to do, turn
on the Flip option (see Figure 6-64).
Align. ese options control the way the text aligns to the path itself.
Choose Ascender to align the top of the capital letters in the text
(more or less) to the path, or choose Descender to position the bot-
toms of the characters on the path. Choose Center to align the text to
the path at a point that’s half of the height of the capital characters in
the font, or choose Baseline to align the baseline of the characters to
the path (see Figure 6-65).
Real_World_Adobe_InDesign_CS4b.pdf 462Real_World_Adobe_InDesign_CS4b.pdf 462 08/04/2009 05:55:27 p.m.08/04/2009 05:55:27 p.m.
-
Another Way to Flip
Text on a Path
Turn on the Flip option,
and InDesign ips the text
across the path.
Display the Type on a Path
Options dialog box and turn
on the Flip option.
Select a path text object.
-
Align Options
Baseline aligns the baseline
of the characters to the
path.
Center aligns the text to
the path at a point that’s
half of the height of the
characters.
Descender positions the
characters’ descenders
on the path.
Ascender aligns the top of
the capital letters in the
text to the path.
To Path. e options on the To Path pop-up menu control the way
that the text aligns to the stroke of the path. Choose Top to place the
alignment point (whatever it was you chose from the Align pop-up
menu) of the text at the top of the stroke; or Bottom to place it at the
bottom of the stroke; or Center to align the alignment point of the
text with the center of the path (see Figure 6-66). For more precise
control of the text position, use baseline shi.
Real_World_Adobe_InDesign_CS4b.pdf 463Real_World_Adobe_InDesign_CS4b.pdf 463 08/04/2009 05:55:27 p.m.08/04/2009 05:55:27 p.m.
.
Center aligns the text to the
center of the path (using
the Align option to deter-
mine which part of the text
to align).
Bottom aligns the text to
the bottom of the stroke.
-
To Path Options
Top aligns the text to the
top of the stroke.
Spacing. e Spacing eld (and attached pop-up menu) control the
spacing of text around curves in the path. Enter a value (in points) in
this eld to tighten or loosen character spacing around curves (see
Figure 6-67). Note that this setting has no eect on the kerning or
tracking of text on straight line segments.
To remove the text from a path type object and convert the object
back into a “normal” path, you need to do more than simply delete
the text characters. If you do this, the object remains a path type
object. Instead, select the path (or some of the text on the path) and
choose Delete Type on a Path from the Type on a Path submenu (of
the Type menu or Context menu).
Removing Type
from a Path
-
Spacing
…and InDesign adjusts the
spacing of text on curved
line segments.
Enter a value in the
Spacing eld…
Real_World_Adobe_InDesign_CS4b.pdf 464Real_World_Adobe_InDesign_CS4b.pdf 464 08/04/2009 05:55:28 p.m.08/04/2009 05:55:28 p.m.
-
Quick Apply
1. Select an object and
press Command-Return/
Ctrl-Enter.
2. InDesign displays
the Quick Apply panel.
3. Start typing. As you type,
InDesign matches the
characters you type with
style names. You can press
the up or down arrow keys
to select from the list.
4. When you see that InDesign has
selected the style you want to apply,
press Return/Enter.
5. InDesign hides Quick Apply
and applies the style to the
selection (in this case, we’ve
applied a paragraph style to a
text frame).
Quick Apply
ere are some InDesign features that make a huge dierence in the
way that we work, but seem, in some ways, very small. ey don’t
take long to describe, and, once you’re used to them, you barely have
to think about them. Take unlimited undo, for example—it’s hard to
imagine doing without it, but you hardly notice it. It just works. e
same is true for the Quick Apply feature, which feels to us as if it’s
become part of our autonomous nervous systems (see Figure 6-68).
Quick Apply gives you a way to apply character, paragraph, object,
table, or cell styles. It also lets you select menu items, run scripts, and
insert text variables. So what? You can already do all these things
with panels, keyboard shortcuts, and the menus themselves. e
trouble is that these methods cost something. Panels use up precious
screen real estate. Keyboard shortcuts are limited by available keys
and by our overstressed memories. And using menus to do anything
expends a precious commodity—human patience.
Quick Apply takes up no space on screen when it’s not in use,
requires that you remember only one shortcut, and doesn’t require
you to drag a cursor around.
Real_World_Adobe_InDesign_CS4b.pdf 465Real_World_Adobe_InDesign_CS4b.pdf 465 08/04/2009 05:55:28 p.m.08/04/2009 05:55:28 p.m.
.
Press Command-Return/Ctrl-Enter to display the Quick Apply
window. is window (which acts like a oating pane) normally
appears in the center of your screen, but you can drag it anywhere
you want and it’ll show up there the next time you open it.
e Quick Apply window displays dierent information depend-
ing on what is selected; if you have an object selected, it will display
things like menu items, object styles, and paragraph styles. If your
cursor is in text, it won’t show you object styles.
Once the Quick Apply window is open, type a few letters of the
style, variable, or feature name. InDesign displays a list of all near
matches. For example, if you type “place”, InDesign displays “Edit
menu > Paste in Place,” “File Menu > Place,” and any paragraph
styles that might have the word “place” in them. You can use the
up and down arrow keys to scroll through the list. Once the style or
feature you want is selected, you can:
Press Return/Enter to apply the style to the selection. is closes
the Quick Apply panel; to apply the style and leave the panel
open, press Shi-Return/Shi-Enter.
Press Command-Return/Ctrl-Enter to edit a selected paragraph,
character, table, cell, or object style.
Press Option-Return/Alt-Enter to apply the style and override
any local formatting. (If you’re applying a paragraph style and
want to override all formatting, including character styles, press
Option-Shi-Return/Alt-Shi-Enter.)
Press Escape to close the panel without applying a style.
Quick Apply is very clever in how it matches what you type to the
list of available style names. For example, if you have a style named
“Heading 3” you can just type “h3” or even just “3” (if you have more
than one style with the number three in it, they’ll all appear).
Customizing Quick Apply. e only problem with the Quick Apply
window is that it oen oers too many styles, variables, or menu
items to choose from. Fortunately, you can add or remove items
from its list by selecting from the panel menu (see Figure 6-69). For
example, if you never want to see menu items in the Quick Apply
list, then select Include Menu Items from the panel menu to turn o
its checkmark. If you want Quick Apply to include all your scripts,
select Include Scripts.
You can also lter the items by typing a code at the beginning of
the Quick Apply text. For example, you can type “p:note” to limit
Real_World_Adobe_InDesign_CS4b.pdf 466Real_World_Adobe_InDesign_CS4b.pdf 466 08/04/2009 05:55:28 p.m.08/04/2009 05:55:28 p.m.
the search to paragraph styles that have the word “note” in them.
Similarly, typing “c:” at the beginning limits to character styles, “m:”
limits to menu commands, and so on. e panel menu displays the
codes next in case you can’t remember them.
Alternate Reality
What wonders—or horrors—exist in this weird place, where the
boundary between text and graphics breaks down? Where magic
works, and previously immutable laws of physics no longer apply?
We have been there, reader, and, as it turns out, we have discovered
new and useful techniques that can be put to immediate use in the
“normal” world.
-
Customizing
Quick Apply
You can also limit the items in the list by
using codes. Here, the list is limited to
scripts (s:) that are similar to “grid.” (Why
does InDesign display all of the scripts
that contain the character “G”? We have
no idea.)
You can control which items are listed in
the Quick Apply panel using the panel
menu. By choosing Include Scripts, we can
run scripts using Quick Apply.
Real_World_Adobe_InDesign_CS4b.pdf 467Real_World_Adobe_InDesign_CS4b.pdf 467 08/04/2009 05:55:28 p.m.08/04/2009 05:55:28 p.m.
Someday you’ll need to do something that’s beyond the drawing
and typesetting capabilities of InDesign. You’ll need to edit large
amounts of text, adjust bitmap images, render 3-D objects, or create
Web pages. Other applications do these things better than InDesign
does. But you can add the les you create in other applications to
your InDesign publication. And you can export InDesign pages for
use in other page-layout and drawing programs.
at’s what this chapter is all about: importing les from disk,
controlling the way that they appear in your document, and export-
ing your document (or pieces of it). For the most part, our discus-
sion of importing focuses on graphics because we cover importing
text in Chapter 3, “Text.” Note that you won’t nd an exploration of
InDesign’s XML import and export features here; we’ll cover that in
Chapter 14, “XML.”
Importing and
Exporting
7
Real_World_Adobe_InDesign_CS4b.pdf 468Real_World_Adobe_InDesign_CS4b.pdf 468 08/04/2009 05:55:28 p.m.08/04/2009 05:55:28 p.m.
Importing
InDesign oers three ways to bring les from other applications into
your publications. Here are your options:
Place the le. e Place feature (in the File menu) is the most
common method for getting les onto your pages. When you
place one or more les, InDesign creates a link to the le on disk.
In the case of graphics, InDesign stores only a low-resolution,
“proxy” (or “preview”) image in the publication. When you print,
InDesign uses the high-resolution version of the graphic from
the le on your disk. You can link to text les, or not, depending
on the setting of the Create Links when Placing Text and Spread-
sheet Files option in the File Handling pane of the Preferences
dialog box. We’ll discuss managing links later in this chapter.
Copy and paste. e most obvious, simplest, and least reliable
method of getting information from another application is to
copy it out of the application and paste it into InDesign. While
this technique can work reasonably well for small amounts of
text, it can spell disaster for graphics and images created in other
programs. We don’t mean to imply that you should never use
copy and paste, just that you should approach it with caution.
You shouldn’t, for example, copy an image out of Photoshop
and paste it into InDesign. is actually embeds the pixels into
InDesign in an unpleasant (and we think unsanitary) way that
is likely to result in headaches down the road. If you want to
embed an image, place it normally and then see “Linking and
Embedding” later in this chapter.
A good reason to use copy and paste, however, appears when
you’re working with Illustrator or FreeHand: When you copy
paths out of these programs and paste them into InDesign, you
get editable InDesign paths. Actually, in Illustrator, this only
works if you have turned on the AICB setting in Illustrator’s
Preferences dialog box (it’s obscure, but just look around for
something called AICB)—otherwise you just get an embedded,
uneditable PDF le when you paste.
Drag and drop. As we mentioned in Chapter 2, “Page Layout,”
you can drag objects out of one InDesign publication and drop
them into another. You can drag les from your desktop (the
Mac OS Finder or the Windows Explorer) and drop them into
your InDesign publication window. is is essentially the same
as importing the les using the Place command (except that you
Real_World_Adobe_InDesign_CS4b.pdf 469Real_World_Adobe_InDesign_CS4b.pdf 469 08/04/2009 05:55:28 p.m.08/04/2009 05:55:28 p.m.
.
won’t be able to set import options for the les, as you can if you
place them). Even better, dragging from the desktop is a great
way to import more than one le at a time (you can even drag a
whole folder full of images into your document, if you want).
You can also drag one or more images from Adobe Bridge
into your InDesign page to import them.
Or you can drag objects from some other programs
(Illustrator comes to mind) and drop them into InDesign.
is, in general, is the same as copying and pasting, and
comes with the same cautions.
Note that you can also open QuarkXPress and PageMaker les—
that’s covered in Chapter 2, “Page Layout.”
Placing Anything
To get a graphic le into an InDesign publication, follow these steps
(see Figure 7-1).
1. Before you leap to the Place command on the File menu, take a
second to think about where you want the graphic to appear.
Do you want the graphic to ll an existing frame? If so, select
the frame.
Do you want the graphic to appear as an inline frame in a
text frame? If so, select the Text tool and click it inside the
text frame.
Do you want to place the graphic in a new frame? If so, press
Command-Shi-A/Ctrl-Shi-A to deselect everything before
placing the graphic.
2. Press Command-D/Ctrl-D (or choose Place from the File menu).
e Place dialog box appears.
3. Locate and select one or more les. You can control certain
import options for some le formats. To view the available
import options, turn on the Show Import Options checkbox.
4. If you have a frame selected, and want to place the le inside
the frame, make sure you turn on the Replace Selected Item
checkbox. If you don’t want to replace the selection (perhaps you
forgot to deselect all before selecting Place), turn this option o.
Real_World_Adobe_InDesign_CS4b.pdf 470Real_World_Adobe_InDesign_CS4b.pdf 470 08/04/2009 05:55:29 p.m.08/04/2009 05:55:29 p.m.
When you position the
place icon over an existing
frame, InDesign changes
the appearance of the icon
to indicate that clicking the
icon will place the le inside
the frame.
When you position the place
icon near a ruler guide or
grid line, InDesign changes
the appearance of the place
icon to show that clicking or
dragging the icon will “snap”
the incoming graphic to the
guide or grid.
-
Placing a Graphic
Without First
Making a Frame
5. Click the Open button. If you turned on the Show Import
Options checkbox, InDesign displays the Import Options
dialog box, which looks slightly dierent depending on the le
type you’ve selected. In many cases, the options are grayed out
because they aren’t relevant (the clipping path option is grayed
out when there is no clipping path embedded in the le, for
example). Make any changes you want (or can) in this dialog box
and then click the OK button (we discuss the import options for
each le type in “Working with Images,” later in this chapter).
InDesign places the graphic on the page, creating
a frame that is exactly the size of the graphic.
Click the graphic
place icon on
the page or
pasteboard.
InDesign displays
a graphic “place”
cursor along with
a thumbnail of the
image.
Choose Place from the File
menu (or press Command-D/
Ctrl-D). InDesign displays
the Place dialog box. Locate
and select a le, then click
the Open button.
…to place the graphic
inside the frame.
You can also click the place
icon on an existing frame…
…InDesign places the graphic inside a frame that’s the width and height
you dene by dragging, scaling the image proportionally to t the frame
If you drag the place icon as you place a graphic…
Real_World_Adobe_InDesign_CS4b.pdf 471Real_World_Adobe_InDesign_CS4b.pdf 471 08/04/2009 05:55:29 p.m.08/04/2009 05:55:29 p.m.
.
What happens aer you click OK depends on the choice you made
in Step 1. If you had a frame selected, and turned on the Replace
Selected Item option, the graphic appears inside that frame. If you
had an active text insertion point in a text frame, and if you turned
on the Replace Selected Item option, InDesign places the graphic into
the text frame (at the location of the cursor) as an inline graphic.
If you deselected everything before placing, or if you turned o the
Replace Selected Item option, InDesign displays the place icon (some
folks call this the “place gun”). Click the place icon on a page or on
the pasteboard, and InDesign imports the le you selected and posi-
tions the upper-le corner of the le at the point at which you clicked
the place icon.
Instead of clicking, you can drag the place icon. is produces a
frame that’s the width and height you dene by dragging. In earlier
versions of InDesign, this would not scale the graphic itself, but in
CS4 it does: e frame is constrained to the height/width ratio of the
image and the nal image ts the frame size exactly. If you don’t like
the proportional constraint, hold the Shi key down while dragging.
To place the graphic inside an existing, empty frame, click the
place icon in the frame. is frame doesn’t have to be a graphic frame,
and it doesn’t have to be selected.
To place the graphic inside a frame that already has an image in
it, hold down Option/Alt while clicking with the place cursor. is
is the same as rst selecting that frame and turning on the Replace
Selected Item in the Place dialog box (but is useful when you have
forgotten to select the frame rst, or when you need to replace mul-
tiple graphics (see “Placing Multiple Files,” below).
If you accidentally placed the graphic inside a frame, don’t panic.
Remember that Command-Z/Ctrl-Z will “undo” the action and
display the place icon again, ready to place the graphic somewhere
else. At this point, you can cancel the Place operation by pressing
Command-Z/Ctrl-Z again, or by clicking the place icon on any tool
in the Tools panel.
If you need to import two or more images or text les at the same time,
why bother opening the Place dialog box multiple times? Instead, the
Place dialog box lets you select more than one item in a folder at a
time and import them all at once. To select more than one item in
the dialog box, Shi-click (to select contiguous items) or Command/
Ctrl-click (to select discontiguous les).
Be careful about the state of the Show Import Options checkbox
in the Place dialog box. If it’s turned on when you click Open (or
e Place Icon
Placing Multiple Files
Real_World_Adobe_InDesign_CS4b.pdf 472Real_World_Adobe_InDesign_CS4b.pdf 472 08/04/2009 05:55:29 p.m.08/04/2009 05:55:29 p.m.
you Shi-click Open, which is the same as turning on the checkbox),
you’ll be rewarded with an Import Options dialog box for each le
you’ve imported—kind of a pain if you’re importing 20 images.
Aer you click Open (or click OK in the Import Options dialog
box), InDesign loads all the les into the place cursor, showing you a
thumbnail of the rst one along with a number that shows the total
number of les loaded. You can rotate through the loaded les by
pressing the le or right (or up and down) arrows on your keyboard.
If you decide you want to “throw away” one of the les (remove it
from the Place cursor), press Esc.
Of course, you can also import a bunch of images at the same
time by dragging them all in from Adobe Bridge, the Mac OS Finder,
or Windows Explorer. In that case, InDesign also loads all the les
into a Place cursor.
Once the place cursor is loaded with multiple les, you can:
Click in an empty frame to place the current image there.
Click where there are no frames to create a frame and import the
image.
Option/Alt click on a frame that contains an image to replace it
with the new one.
Here’s one more option you have when you have more than one
image loaded in the Place cursor: You can Command-Shi-click/
Ctrl-Shi-click to create a “contact sheet” grid the size of your page
(you typically would want to click in the upper-le corner of the
page). Or, you can Command-Shi-drag/Ctrl-Shi-drag to change
the size of the grid.
While you’re dragging the mouse, you can let go of the keyboard
modier keys and use that hand to press the up or down arrows on
your keyboard to add or remove rows in the grid; the le and right
arrows on the keyboard adjust the number of columns in the grid. If
you hold down the Shi key while pressing those keys (which usually
requires a third arm or a spouse or your nose), you can adjust the
space between the columns or rows. We’re not saying we like this
(insane) user interface; we’re just describing how it works.
About Graphic File Formats
InDesign can import a range of graphic le formats, including
Adobe Illustrator (AI) and Adobe Photoshop (PSD) formats, TIFF
Contact Sheets
Real_World_Adobe_InDesign_CS4b.pdf 473Real_World_Adobe_InDesign_CS4b.pdf 473 08/04/2009 05:55:29 p.m.08/04/2009 05:55:29 p.m.
.
images, JPEG images, GIF images, and EPS les. It can even import
other InDesign les themselves as graphics. From InDesign’s point
of view, there are certain limitations and advantages to each.
Just to refresh everyone’s memory, here are a few quick deni-
tions, rules, and exceptions regarding graphic le formats. ere are
three fundamental graphics le format types:
Bitmap (or “raster”) les store pictures as matrices (rows and
columns) of squares known as pixels, with each pixel having a
particular gray or color value (also known as a gray depth, color
depth, or bit depth). Bitmap les are typically created by image
editing programs such as Adobe Photoshop. TIFF, JPEG, BMP,
and GIF are all bitmap graphic le formats.
Vector les contain sets of instructions for drawing graphic
objects—typically geometric shapes, such as lines, ellipses,
polygons, rectangles, and arcs. e drawing instructions say,
“Start this line at this point and draw to that point”; or, “is is a
polygon made up of these line segments.”
Hybrids can contain both vector and bitmap graphics. Adobe
Illustrator, PDF, EPS, and WMF (Windows metale) formats
are all examples of metales. (Adobe Photoshop les look like
hybrids, as they can also contain a combination of vector and
raster graphics, but InDesign rasterizes any visible Photoshop
vector data so we don’t count it as a true hybrid.) Metales don’t
have to contain both vector and bitmap objects. Oen these le
contain only an image, or only vector artwork.
We could talk about the pros and cons of various graphic le formats
all day, but deciding which le format is best for you comes down
to two things: what works in your particular workow and which
features you need.
Before we launch into which formats you should use, let’s rst talk
about a few formats we think you should not use: PICT, WMF, BMP.
BMP les were intended to be viewed onscreen, in Windows—not
printed. WMF is a le format for saving commands written in the
Windows Graphic Device Interface (or GDI)—the language Win-
dows uses to draw objects onscreen (or print to non-PostScript print-
ers). PICT is based on QuickDraw, the native drawing language of
the Macintosh. e process of printing any of these on a PostScript
printer isn’t perfect, which means that what you see on your screen
may not be what you get from your printer.
Which File
Format to Use?
Real_World_Adobe_InDesign_CS4b.pdf 474Real_World_Adobe_InDesign_CS4b.pdf 474 08/04/2009 05:55:29 p.m.08/04/2009 05:55:29 p.m.
We also discourage using EPS and DCS les, unless you have a
very good reason to do so, which is rare. Most people who think they
need to use these formats are surprised to learn that AI, PDF, or PSD
are better formats (see below).
Vector and Hybrid Artwork. Vector artwork is pretty straightfor-
ward. We usually import Adobe Illustrator les as native AI les,
because they’re essentially PDF les. Note that you must enable the
Create PDF Compatible File checkbox when saving an AI le, or else
InDesign can’t read it—technically, InDesign is reading the PDF
inside the AI le. We save vector graphics from other programs (such
as FreeHand) as PDF or EPS.
We tend to avoid EPS when we can for a couple of reasons. First,
PDF les can be viewed and edited by a wider array of programs. It
can also support transparency and works beautifully with InDesign.
In general, while EPS will always be with us, it’s an old, crotchety
format that we avoid at social gatherings.
Raster Artwork. When it comes to saving bitmapped images from
Photoshop, you have to be careful, because Photoshop les can con-
tain so much more than simple image data. A Photoshop le can con-
tain images, layers, transparency, vector artwork, and text objects.
e native Photoshop (PSD) format is the closest thing to a one-size-
ts-all solution, so we tend to save in that format and import the PSD
directly into InDesign. However, PSD has its limitations.
InDesign can read spot colors, duotones, and transparency from
PSD les, but it can’t read vector or text layers. Well, it can read them,
but the vector or text layers become rasterized (turned into a bitmap).
Instead, we recommend saving as PDF when you have vector or text
layers. However, for technical reasons we barely understand, Photo-
shop won’t let you save a le that has both spot color channels and
background transparency as a PDF le. Also, InDesign can’t handle
PSD les when they’re in Photoshop’s Multichannel mode—you’ll
have to use DCS les for that.
If all this has your head spinning, check out Table 7-1, which Matt
Phillips (an Adobe soware engineer extraordinaire and nice guy to
boot) created.
Other options for raster images include TIFF and JPEG (some-
times shortened to JPG). TIFF has a long and venerable history, and
we still use it quite oen (virtually all the images in this book were
saved in the TIFF format). It supports images with layers and even
transparency, though—like PSD—it does not support vector objects.
e cool thing about TIFF is that you can save a layered, transparent
Real_World_Adobe_InDesign_CS4b.pdf 475Real_World_Adobe_InDesign_CS4b.pdf 475 08/04/2009 05:55:29 p.m.08/04/2009 05:55:29 p.m.