Adobe Dreamweaver CS3 Unleashed- P4 docx
Bạn đang xem bản rút gọn của tài liệu. Xem và tải ngay bản đầy đủ của tài liệu tại đây (660.01 KB, 50 trang )
You'll also notice in Figure 2.65 that the Snippets panel is organized into two halves. The top half includes a
preview of the code snippet selected within the categorized list of snippets in the bottom half. HTML snippets
are usually shown in a design view (showing what the HTML looks like in the browser), whereas JavaScript
and other code snippets are shown in Code view so that you can see the actual code. Inserting a snippet is
merely a matter of selecting the appropriate snippet and either dragging it into the code environment or
choosing the snippet and clicking the Insert button located in the bottom left of the Snippets panel.
Creating your own snippet is just as easy but slightly more involved. To create your own snippet, follow
these steps:
1.
Create a new folder for your snippet by right-clicking (Control+click) in the Snippets window and
choosing New Folder. Give the snippet folder a descriptive name, remembering that other developers
might want to use your snippets, too. If the folder is created in the "wrong" place, you can drag it to
the level you want. I'll call my new folder Table Row Rollover.
2.
Right-click (Control+click) the folder and choose New Snippet from the context menu. Alternatively,
you may have already written the snippet code in the page—if so, highlight the code you want to use
as the snippet and right-click (Control+click) to choose Create New Snippet from the pop-up menu.
3.
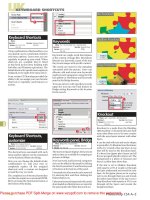
You will then be presented with the Snippet dialog box. Fill in the snippet name and description. If you
have highlighted existing code, the code box will already be filled in. I'll add the following HTML code to
the Insert code text box:
Code View:
<table>
<tr onmouseover="this.style.backgroundColor='#cccccc';"
onmouseout="this.style.backgroundColor='#ffffff';">
<td align="center" width="125"><a href="#">Home</a></td>
</tr>
<tr onmouseover="this.style.backgroundColor='#cccccc';"
onmouseout="this.style.backgroundColor='#ffffff';">
<td align="center" width="125"><a href="#">HelpDesk</a></td>
</tr>
<tr onmouseover="this.style.backgroundColor='#cccccc';"
onmouseout="this.style.backgroundColor='#ffffff';">
<td align="center" width="125"><a href="#">Company Directory</a></td>
</tr>
<tr onmouseover="this.style.backgroundColor='#cccccc';"
onmouseout="this.style.backgroundColor='#ffffff';">
<td align="center" width="125"><a href="#">Employee Store</a></td>
</tr>
<tr onmouseover="this.style.backgroundColor='#cccccc';"
onmouseout="this.style.backgroundColor='#ffffff';">
<td align="center" width="125"><a href="#">Admin</a></td>
</tr>
</table>
This code will effectively create a new table complete with rows, that, when the user's mouse rolls over
them, changes the background color to a gray color. If you don't feel like typing all this code in
yourself, you can open the SampleSnippetCode.html file that I've included for you within the Assets
folder of the chapter downloads.
4.
If you want the code to flow around a selected object, such as an image or table cell, select the Wrap
Selection option, specifying which part of the code goes before the object and which after the object. If
the code is a standalone block, choose the Insert Block option. I'll choose Insert Block. The completed
Snippet dialog box should resemble Figure 2.66.
Figure 2.66. Create the new snippet within the Snippet dialog box.
[View full size image]
5.
When you've finished editing the Snippet dialog, click OK. The new snippet will appear within its folder
and the Preview pane will display the HTML.
To use the snippet, drag the snippet into the code environment and choose Preview in Browser or press F12
(Option+F12) to test the results.
Editing, moving, and deleting snippets are also a snap. To edit a snippet, right-click (Control+click) the
snippet and choose Edit from the context menu. The Snippet dialog appears, and you can edit the code or
change the description. To move snippets into other folders, drag them to the folder you want. To delete a
snippet or its respective folder, right-click (Control+click) the snippet (or folder) and choose Delete.
Summary
As you have seen, building web pages in Dreamweaver is extremely intuitive and quick to pick up. Flanked
by key panels and inspectors, building web pages in Dreamweaver is merely a matter of dragging and
dropping objects onto the development environment and formatting attributes using the Property inspector,
the Tag Inspector, and so on. This introductory chapter opened a new world to some important features
within Dreamweaver and should serve as a foundation for future development. In the next few chapters,
we'll step away from development for a bit and discuss one of the most important topics as it relates to
Dreamweaver—site management.
Chapter 3. Dreamweaver Site Management
IN THIS CHAPTER
The Importance of Defining Sites in Dreamweaver
Defining a New Site in Dreamweaver
Managing a Website in Dreamweaver
Advanced Site Management Options
In the previous chapter, you learned how to build a simple web page within Dreamweaver. Some of the
more notable concepts that you learned were page formatting, handling images, and linking. Although it
seems obvious that Dreamweaver's sole purpose is to create web pages, any web page editor can provide a
developer with this functionality. What makes Dreamweaver truly unique and powerful at the same time are
features and functionality built in to its framework for managing your web pages, and more importantly,
your websites.
Site management, you ask? Arguably the most important aspect of Dreamweaver, regardless of version, is
site management—the process of administering websites within the framework of Dreamweaver. Site
management affords developers many benefits, including, but not limited to, the capability to
Change website links across an entire site.
Check for and fix broken links across an entire website.
Establish a connection and upload files to a remote web hosting provider.
Work with site maps.
As you will see throughout this chapter, by simply establishing a reference (defining a site) between
Dreamweaver and the files on your computer, Dreamweaver greatly expands its feature set to include
functionality to help you manage your web pages and websites.
You can work with the examples in this chapter by downloading the files from
www.dreamweaverunleashed.com. You'll want to save the files for Chapter 3 in an easy-to-find location. I'll
place mine in C:\VectaCorp\Chapter03\. For this chapter, six files (index.html, aboutus.html,
companydirectory.html, solutions.html, support.html, and contactus.html) have been included for
you.
The Importance of Defining Sites in Dreamweaver
As I briefly highlighted in the introductory paragraph of this chapter, site management—beginning with
defining a site—presents numerous benefits to a developer. But you still may be asking yourself, "Why do I
need to manage a site within Dreamweaver? I can manage my site within the file browser included with my
operating system." To a certain extent this is true. However, the significance and importance of managing a
site within Dreamweaver's framework goes far beyond simple drag and drop to include the following
beneficial features:
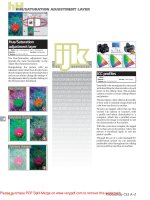
A clean method of organizing content and assets— Managing a site within Dreamweaver begins
with defining a site (discussed in the next section). After you've defined a site, Dreamweaver cleanly
organizes your files within the Files panel. As you can see, from the predefined sample site in Figure
3.1, the Files panel can organize assets, images, and at the root of the directory, web pages.
Additionally, your defined site might include media files, scripts, Dreamweaver templates, and more.
Figure 3.1. The Files panel cleanly organizes files.
Note
It's important to mention that a certain level of effort is required by you in terms of document
structuring. Although Dreamweaver will automatically create some folders for you (_notes,
Templates, and Library), you're responsible for creating the rest.
In the previous chapter, we didn't define a site. Instead, we had to navigate the entire directory
structure to work with our files. By defining a site, Dreamweaver conveniently isolates the folder
referenced when the site was defined.
A site cache, which guarantees link integrity— After you've defined a site, a reference is
established between Dreamweaver and the files on your computer. Dreamweaver then takes a
snapshot of those files and caches them. The cache acts as a digital memory of sorts for the files that
Dreamweaver needs to work with. Because Dreamweaver now remembers the organizational, link, and
path makeup of your files, if changes are made that break that structure, Dreamweaver automatically
detects the changes, alerts you of them, and then fixes them, if you so choose.
A built-in FTP client— One of the most common questions asked by beginning developers is "Once
I've finished developing my web pages in Dreamweaver, how do I upload them to my web hosting
provider so that everyone can see them?" The answer to this question is simple. Dreamweaver
provides a built in File Transfer Protocol (FTP) client that you can use to easily drag and drop files from
your local computer (the computer that you do your work on) to the remote computer (the computer
that everyone can access to see your web pages).
A quick method for "getting" and "putting" files— Even easier than dragging and dropping your
files from the local computer to the remote computer is the concept of Get and Put. After you've
established a connection to your remote computer using the built-in FTP client, retrieving files from
the remote computer is as easy as clicking the Get button. Alternatively, you can easily send files to
the remote computer by clicking the Put button.
A centralized client for managing files within teams— As we'll explore in Part III, "Team
Collaboration and Task Automation," Dreamweaver's support for working within teams is unparalleled.
Facilitated by a defined site, collaborative teams can manage sites in Dreamweaver through a variety
of channels, including Check In/Check Out, Design Notes, site reports, source control programs such
as Microsoft's Visual SourceSafe, WebDAV, and Adobe Contribute.
The ability to build site maps— One of the most underappreciated features built in to Dreamweaver
is the capability to build and maintain visual site maps. In fact, the benefit to creating site maps in
Dreamweaver goes far beyond the simplicities of a static visual diagram by allowing you to manage
links and filenames directly from the site map layout and even print out the final layout for future
reference.
The capability to generate site reports— From an organizational management perspective,
defining a site within Dreamweaver provides the capability to generate site reports. Workflow statistics
in terms of files that are checked out and recently modified can be generated. Additionally, you can
create HTML reports that include analysis of various accessibility and usability flaws within your web
pages or website.
A site synchronization utility— Quite possibly my favorite feature, site synchronization is the
process of synchronizing multiple local copies of your site with one remote copy. As Figure 3.2
illustrates, you can sync files between your local home computer and your remote server. Then, when
you go to work, you can synchronize your server with your local work computer. This ensures that
you're consistently working on the most up-to-date files and prevents file overlaps.
Figure 3.2. Use the site synchronization features built in to Dreamweaver to synchronize
your files between multiple computers running Dreamweaver and the version of your site on
your remote server.
The capability to work with templates and library items— Covered in more depth in Chapter 14,
"Working with Templates," and Chapter 15, "Working with Library Items," templates and library items
are managed, added, and edited via a defined site. Without a defined site, these added features are
unusable.
As you can see from the list I've provided, there are numerous benefits to site management in
Dreamweaver. Although these benefits won't appear obvious at first glance, they will become apparent as
you gain experience working with Dreamweaver site management throughout this chapter and the
remainder of the book.
Chapter 3. Dreamweaver Site Management
IN THIS CHAPTER
The Importance of Defining Sites in Dreamweaver
Defining a New Site in Dreamweaver
Managing a Website in Dreamweaver
Advanced Site Management Options
In the previous chapter, you learned how to build a simple web page within Dreamweaver. Some of the
more notable concepts that you learned were page formatting, handling images, and linking. Although it
seems obvious that Dreamweaver's sole purpose is to create web pages, any web page editor can provide a
developer with this functionality. What makes Dreamweaver truly unique and powerful at the same time are
features and functionality built in to its framework for managing your web pages, and more importantly,
your websites.
Site management, you ask? Arguably the most important aspect of Dreamweaver, regardless of version, is
site management—the process of administering websites within the framework of Dreamweaver. Site
management affords developers many benefits, including, but not limited to, the capability to
Change website links across an entire site.
Check for and fix broken links across an entire website.
Establish a connection and upload files to a remote web hosting provider.
Work with site maps.
As you will see throughout this chapter, by simply establishing a reference (defining a site) between
Dreamweaver and the files on your computer, Dreamweaver greatly expands its feature set to include
functionality to help you manage your web pages and websites.
You can work with the examples in this chapter by downloading the files from
www.dreamweaverunleashed.com. You'll want to save the files for Chapter 3 in an easy-to-find location. I'll
place mine in C:\VectaCorp\Chapter03\. For this chapter, six files (index.html, aboutus.html,
companydirectory.html, solutions.html, support.html, and contactus.html) have been included for
you.
The Importance of Defining Sites in Dreamweaver
As I briefly highlighted in the introductory paragraph of this chapter, site management—beginning with
defining a site—presents numerous benefits to a developer. But you still may be asking yourself, "Why do I
need to manage a site within Dreamweaver? I can manage my site within the file browser included with my
operating system." To a certain extent this is true. However, the significance and importance of managing a
site within Dreamweaver's framework goes far beyond simple drag and drop to include the following
beneficial features:
A clean method of organizing content and assets— Managing a site within Dreamweaver begins
with defining a site (discussed in the next section). After you've defined a site, Dreamweaver cleanly
organizes your files within the Files panel. As you can see, from the predefined sample site in Figure
3.1, the Files panel can organize assets, images, and at the root of the directory, web pages.
Additionally, your defined site might include media files, scripts, Dreamweaver templates, and more.
Figure 3.1. The Files panel cleanly organizes files.
Note
It's important to mention that a certain level of effort is required by you in terms of document
structuring. Although Dreamweaver will automatically create some folders for you (_notes,
Templates, and Library), you're responsible for creating the rest.
In the previous chapter, we didn't define a site. Instead, we had to navigate the entire directory
structure to work with our files. By defining a site, Dreamweaver conveniently isolates the folder
referenced when the site was defined.
A site cache, which guarantees link integrity— After you've defined a site, a reference is
established between Dreamweaver and the files on your computer. Dreamweaver then takes a
snapshot of those files and caches them. The cache acts as a digital memory of sorts for the files that
Dreamweaver needs to work with. Because Dreamweaver now remembers the organizational, link, and
path makeup of your files, if changes are made that break that structure, Dreamweaver automatically
detects the changes, alerts you of them, and then fixes them, if you so choose.
A built-in FTP client— One of the most common questions asked by beginning developers is "Once
I've finished developing my web pages in Dreamweaver, how do I upload them to my web hosting
provider so that everyone can see them?" The answer to this question is simple. Dreamweaver
provides a built in File Transfer Protocol (FTP) client that you can use to easily drag and drop files from
your local computer (the computer that you do your work on) to the remote computer (the computer
that everyone can access to see your web pages).
A quick method for "getting" and "putting" files— Even easier than dragging and dropping your
files from the local computer to the remote computer is the concept of Get and Put. After you've
established a connection to your remote computer using the built-in FTP client, retrieving files from
the remote computer is as easy as clicking the Get button. Alternatively, you can easily send files to
the remote computer by clicking the Put button.
A centralized client for managing files within teams— As we'll explore in Part III, "Team
Collaboration and Task Automation," Dreamweaver's support for working within teams is unparalleled.
Facilitated by a defined site, collaborative teams can manage sites in Dreamweaver through a variety
of channels, including Check In/Check Out, Design Notes, site reports, source control programs such
as Microsoft's Visual SourceSafe, WebDAV, and Adobe Contribute.
The ability to build site maps— One of the most underappreciated features built in to Dreamweaver
is the capability to build and maintain visual site maps. In fact, the benefit to creating site maps in
Dreamweaver goes far beyond the simplicities of a static visual diagram by allowing you to manage
links and filenames directly from the site map layout and even print out the final layout for future
reference.
The capability to generate site reports— From an organizational management perspective,
defining a site within Dreamweaver provides the capability to generate site reports. Workflow statistics
in terms of files that are checked out and recently modified can be generated. Additionally, you can
create HTML reports that include analysis of various accessibility and usability flaws within your web
pages or website.
A site synchronization utility— Quite possibly my favorite feature, site synchronization is the
process of synchronizing multiple local copies of your site with one remote copy. As Figure 3.2
illustrates, you can sync files between your local home computer and your remote server. Then, when
you go to work, you can synchronize your server with your local work computer. This ensures that
you're consistently working on the most up-to-date files and prevents file overlaps.
Figure 3.2. Use the site synchronization features built in to Dreamweaver to synchronize
your files between multiple computers running Dreamweaver and the version of your site on
your remote server.
The capability to work with templates and library items— Covered in more depth in Chapter 14,
"Working with Templates," and Chapter 15, "Working with Library Items," templates and library items
are managed, added, and edited via a defined site. Without a defined site, these added features are
unusable.
As you can see from the list I've provided, there are numerous benefits to site management in
Dreamweaver. Although these benefits won't appear obvious at first glance, they will become apparent as
you gain experience working with Dreamweaver site management throughout this chapter and the
remainder of the book.
Defining a New Site in Dreamweaver
Site management in Dreamweaver begins with defining a site. When you define a site in Dreamweaver,
you're essentially establishing a reference between Dreamweaver and the files on your computer.
Dreamweaver then takes a digital snapshot of the files in your project folder and caches them. By caching
the files, Dreamweaver can automatically detect if changes are made to image paths, links, and so on and
can automatically fix them for you. We'll get to all this as we progress through the chapter. For now, just
keep in mind that everything begins with defining a new site. You can begin the process of defining a site by
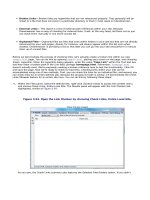
selecting Manage Sites from the Site menu. The Manage Sites dialog box will appear similar to Figure 3.3.
Figure 3.3. The Manage Sites dialog box allows you to create new sites or edit existing ones.
As you can see from Figure 3.3, the Manage Sites dialog box includes various buttons, each constituting
specific functionality. That functionality is outlined next:
New— Selecting this option opens a submenu that allows you to choose from either Site or FTP & RDS
Server options. For our examples, we'll use the Site option from this submenu. In Chapter 24,
"Working with Dynamic Data," we'll review the FTP & RDS Server option in more detail.
Edit— Choose this option to edit a site that's already been defined. Selecting this option opens the
Site Definition for <site name> dialog box.
Duplicate— Allows you to duplicate a site and its configured settings. This option is useful if you've
preconfigured numerous options (FTP host, username, password, and so on) and would like to reuse
them on a new site.
Remove— Permanently deletes a site from Dreamweaver. It's important to note that choosing this
option removes only the reference to files on the computer, not the files themselves.
Export— Use this option when migrating sites to another computer with a fresh installation of
Dreamweaver. This option creates an .STE file that can be backed up and later imported on the new
Dreamweaver installation using the Import button.
Import— Use this option to import backed up sites (.STE files) into the Manage Sites dialog box.
Help— Choosing this option opens the Dreamweaver Help window with the Manage Sites dialog box
indexed.
Done— Closes the Manage Sites dialog box.
Now that you have an idea as to how the Manage Sites dialog box works and the functionality it
encapsulates, let's actually create a new site. Choose the Site option from the New button's submenu. The
Site Definition window will appear similar to Figure 3.4.
Figure 3.4. The Site Definition window features a wizard that guides you through the process of
defining a new site.
[View full size image]
As you can see from Figure 3.4, the Site Definition window is split into two tabs: Basic and Advanced
options. The next section aims to shed some light on each.
The Site Definition Window
With the Site Definition window open, you can use either the Basic or Advanced tab to define a new site;
however, the options provided within each tab are dramatically different. If you're a beginning Web
developer who doesn't understand the myriad of terms and acronyms, then the Basic tab, which guides you
through an easy-to-understand wizard, is probably for you. If, however, you're a seasoned veteran who
wants fine control over your site management experience, the Advanced tab should be the selection you'll
pick. Don't worry if you're unsure of which one best suits your needs, we'll walk through both options
starting with the Basic tab.
You'll notice that when the Site Definition window opens for the first time, it defaults to the Basic tab. The
Basic tab provides an easy-to-use and easy-to-understand wizard that gently guides you through the site
definition process. As you can see from Figure 3.4, the first window that appears simply asks you for the site
name. By defining a site, we're creating only a reference between Dreamweaver and the files on the
computer so that Dreamweaver can help you manage those files better than the operating system could.
The name you enter here is merely a unique name for that reference, nothing more. I'll enter Vecta_Corp.
Below the name option you'll find a text box that refers to the URL of your site. If the site you're defining
contains a valid HTTP address (for example, enter that here. In the long
run, entering the HTTP address for your website helps Dreamweaver manage site root relative links and
absolute links (those that refer to your website) through its link checker. After you've finished entering these
values, click Next.
Clicking Next causes the second dialog box of the Basic wizard to appear. Within this dialog box, you'll
choose either to work with a server technology or not. Although we'll be working with server technologies in
Part V, "Dynamic Web Page Development," for now, we'll choose the option button titled No, I Do Not Want
to Use a Server Technology, and click Next.
Clicking Next again opens the third part of the Basic wizard (see Figure 3.5).
Figure 3.5. The third window allows you to set a path to the files on your local computer.
[View full size image]
As I mentioned earlier, the practice of defining a site is the process of establishing a reference between
Dreamweaver and the files on your local computer. In this screen you essentially tell Dreamweaver where
those files are located. You'll want to choose the option Edit Local Copies on My Machine, Then Upload to
Server When Ready. Next, use the folder icon to browse to the folder where your files are located. If you've
been working out of the same location I have, your text box should have the path
C:\VectaCorp\Chapter03\ (Macintosh: HD/VectaCorp/Chapter03/) populated. You don't have to use the
same path I do, but it is recommended so that we're on the same page (no pun intended) throughout the
book.
Note
The second option button allows you to work with files directly off the network. Assuming your
organization's web server physically resides on the network and you don't feel the need to test your
work before uploading to the web server, go ahead and check this option. Then point the path to the
location of the files on the web server. I don't recommend this kind of editing for anyone except an
advanced user, as one mistake can lead to a completely nonfunctional site.
After you've configured the dialog box, click Next. Assuming you're not using a server technology (in which
case, the submenu skips over Testing Files and goes directly to Sharing Files), the fourth part of the Basic
window appears as in Figure 3.6.
Figure 3.6. The fourth part of the Basic window allows you to set the properties, including path
and connection options to the remote computer.
[View full size image]
Now that you've set the path to the files on your local computer, it's time to set the path and connection
settings to the remote server. Remember, Dreamweaver's built in FTP client will allow you to transfer files
between your local computer and the remote computer (typically a web server that can be accessed by the
general public). For this reason, you'll want to configure this screen by selecting an option from the Remote
Server menu by choosing one of the following:
None— Choose None if you don't want to use the built-in FTP client to upload files to a remote
computer. Using this option assumes that you're defining a site purely for the site management
features in Dreamweaver and not for the FTP capabilities.
FTP— The most common option, FTP allows you to configure connection and login properties to a
remote computer. After the connection and login properties have been established, you can use
Dreamweaver's built-in FTP client to transfer files between your local computer and the remote
computer.
Local/Network— Assuming your web server is accessible on your organization's network, you'd want
to choose this option to configure the path to the folder that contains the files (residing on the web
server within your network).
WebDAV— Short for Web-based Distributed Authoring and Versioning, WebDAV allows teams to
collaboratively edit and manage files on remote web servers. WebDAV includes numerous versioning
and control features such as file locking, which prevents multiple authors from overwriting each other's
changes, as well as remote file management, versioning, and so on.
RDS— If you've configured ColdFusion as your server technology of choice, you can use the RDS
option to easily and more intuitively connect to the ColdFusion application server. This is discussed
with more detail in Part V, "Dynamic Web Page Development."
Microsoft Visual SourceSafe Database— Microsoft's Visual SourceSafe is a versatile source control
and version program that relies on a self-contained database for the management of files within
teams. Select this option and configure the settings when working with SourceSafe instances. This
feature is discussed in much more detail in Chapter 11, "Building Dreamweaver Websites Within
Teams."
Although we could easily get away with choosing None for most of our examples, it would defeat the
purpose of learning about one of the more important features built in to Dreamweaver: the FTP client. For
this reason, I'll choose FTP. However, unless you've purchased web space from a third-party web-hosting
company, you may want to choose None and rereference the FTP sections of this chapter when you can
follow along with your own settings.
After you've selected the FTP option from the Access menu, the screen will tailor itself to allow you to
configure path and connection details for your remote computer, similar to Figure 3.7.
Figure 3.7. The FTP option allows you to set a remote path and connection information.
[View full size image]
As you can see from Figure 3.7, the screen outlines the following options:
Hostname— Enter the physical path of the remote computer here. I'll enter www.vectacorp.com.
Hostname Folder— If you're working within a specific folder on the remote computer, enter that
here. In my case, my web-hosting provider places web files in a folder called webroot/vc. Because
that's the case, I'll enter that here. You'll need to check with your web-hosting provider's
documentation to find out if they require a hostname folder.
FTP Login— Enter your login name here.
FTP Password— Enter your password here.
Save— If you don't want to type your password every time you want to transfer files to the remote
computer, choose this check box.
Use Secure FTP— Secure File Transfer Protocol (SFTP) is the newest standard for transferring files
between local and remote computers securely. Whereas normal FTP transfers your data in an
unencrypted format, SFTP encrypts data using DES, TripleDES, Blowfish, RSA, and similar encryption
algorithms. But don't think you can just select this option to begin using SFTP; SFTP relies on third-
party software running on the web server to facilitate the secure interaction between the local and
remote computers. You'll need to check with your web-hosting provider's documentation to find out if
they support SFTP. If they do, it's to your benefit to take advantage of it.
Test Connection— After you've configured the options on this screen, click this button to test the
connection. If everything goes well, you should receive a dialog box stating that the connection to the
web server succeeded. If the connection doesn't succeed, however, review your settings. Typical
issues include the inputting the wrong hostname, a bad username, or even a forgotten password.
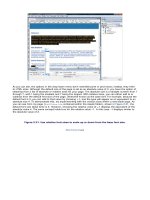
Figure 3.8 shows a typical configured screen. In my case, it relates to the Vecta Corp project.
Figure 3.8. Configure the properties to your remote computer so that you can transfer files back
and forth using FTP.
[View full size image]
Note
In this example I've defined FTP settings for the Vecta Corp project. Because there's no practical way
for me to share my FTP information to all of the readers of this book, you'll be on your own to find a
web-hosting provider for the examples in this chapter.
After you've configured the screen, click Next. The fifth part of the Basic wizard appears, similar to Figure
3.9.
Figure 3.9. Configure this dialog box to enable Dreamweaver's built-in source control features.
[View full size image]
As you may have guessed from reviewing this dialog, Dreamweaver's built-in source control features can be
configured here. We'll be exploring this functionality with more detail in Chapter 11, so for now click the
option button titled No, Do Not Enable Check In and Check Out and click Next.
Finally, the sixth dialog box appears, allowing you to review the settings that you've made within the wizard.
If you see errors, click the Back button until you get to the dialog that contains the problems. If everything
looks good, choose Done. When you click Done, Dreamweaver scans the folder and file structure of your
local files, caches them, and then adds the site reference within the Manage Sites dialog.
To begin working with your newly defined site, choose Done to close the Manage Sites dialog. You probably
noticed a sentence in the summary dialog that reads Your Site Can Be Further Configured Using the
Advanced Tab. The next few sections provide a detailed look at the Advanced tab's features. To open your
site and use the Advanced tab, select your site from the Manage Sites dialog box (you can open the Manage
Sites dialog box by choosing the Manage Sites option from the Site menu) and choose Edit. After the Site
Definition for Vecta Corp dialog reappears, choose the Advanced tab. The screen will resemble Figure 3.10.
Figure 3.10. The Advanced interface features various configurable categories.
[View full size image]
As you can see from Figure 3.10, the Advanced interface is separated into the following configurable
categories:
Local Info
Remote Info
Testing Server
Cloaking
Design Notes
Site Map Layout
File View Columns
Contribute
Templates
Spry
Let's review each.
The Local Info Category
Similar to the first two dialog boxes within the Basic wizard, the Local Info category, also shown in Figure
3.10, enables you to configure the following information:
Site name— Creates a name for your defined site. Remember, this is merely a name for the reference
made between Dreamweaver and the files on your local computer.
Local root folder— Add the path to the files on your local computer here.
Default images folder— You can set a default images folder when you have two or more defined
sites that share a common images folder. This prevents you from having to make duplicate image
folders for multiple defined sites.
Links relative to— If you want to change the relative path of the links you create to other pages in
the site, select a Links Relative To option. By default, Dreamweaver creates links using document-
relative paths. You could select the Site root option to change the path setting for the entire site to
use Site root relative paths as discussed in detail in the previous chapter. If you select the Site root
option, make sure you specify the HTTP address in the next option. I recommend leaving this setting
as it is.
HTTP address— Specify the complete web address to your site here (for example,
www.vectacorp.com/vc/). This allows Dreamweaver to verify links to absolute URLs. Dreamweaver
also uses this address to make sure site root-relative links work on the remote server, which may have
a different site root. For instance, I keep my Vecta Corp files within a folder called vc/ on the remote
web server. So when I reference www.vectacorp.com, I have a redirect that automatically takes me to
www.vectacorp.com/vc/ because all my files are contained within this vc/ folder. If I'm working with
site-root relative paths, it's crucial that the full path www.vectacorp.com/vc/ is added within the HTTP
address. Otherwise, Dreamweaver assumes that the site root is / as opposed to vc/ and would
produce broken references when establishing paths to pages, images, and media elements within my
site. If you're using Document relative paths as I'm doing, setting this text box is purely optional.
Case-sensitive links— Enabling this check box guarantees that Dreamweaver checks case when
checking links throughout your site.
Cache— Ensure that this option is selected so that Dreamweaver can take a snapshot of your folder
and file structure. You'd want to disable this check box only when your folder and file structure is so
massive that having Dreamweaver cache your files each time you make a change produces sluggish
results. Instances like this will be extremely rare because you'd be looking at sites with hundreds, if
not thousands, of pages.
Because we've already configured most of these options within the Basic tab, I'll leave the configuration
alone and move directly to the Remote Info category.
The Remote Info Category
Similar to the Remote Configuration screen within the Basic tab, the Remote Info category, shown in Figure
3.11, allows you to further configure remote computer options such as firewall settings, passive FTP, and the
like—essentially advanced options that Dreamweaver doesn't bother you with in the Basic wizard.
Figure 3.11. Use the Remote Info category within the Advanced tab to configure further options
such as firewall settings, passive FTP, and more.
[View full size image]
A detailed list of features and functionality is listed here:
Access— Choose from a list of access methods from this menu. These options include None, FTP,
Local/Network, WebDAV, RDS, and Microsoft Visual SourceSafe. In most scenarios you'll use the FTP
option. When this option is selected, the options listed next are present.
Note
As we progress through the book, we'll discuss the other options within the Access list. For
instance, in Chapter 11, "Building Dreamweaver Websites Within Teams," we'll discuss both the
WebDAV and SourceSafe options. Similarly, in Chapter 21, "Working with Server-Side
Technologies," we'll discuss the Local/Network option.
FTP host— Enter the FTP path to the remote computer here. In most cases you would simply use the
URL of the site as the web host. If you're pointing directly to an FTP server, an IP address might be
used instead.
Host directory— If you're working within a folder on the remote computer, enter that here. Again,
my web-hosting provider places all web pages within a webroot folder. Additionally, because I host
many websites on the same server, I create additional folders within the webroot. For the Vecta Corp
project, I created a folder within the webroot folder called vc/. Because this is the case, my host
directory becomes webroot/vc/.
Login— Enter the login name for your remote computer here.
Password— Enter the password for your remote computer here.
Use passive FTP— By default, Dreamweaver uses what is known as Active FTP. Simply put, Active
FTP allows the remote server to configure FTP access to it. Passive FTP, on the other hand, is a more
secure form of data transfer in which the flow of data is set up and initiated by Dreamweaver's FTP
client rather than by the remote server. As a general rule, most organizations that are behind a
firewall prefer passive FTP because they only recognize input from the outside in response to user
requests that were sent out requesting the input. The use of passive FTP ensures all data flow
initiation comes from inside the network rather than from the outside.
Use IPv6 transfer mode— Internet Protocol version 6 (IPv6) is a network layer protocol designed to
succeed IPv4, the current version of the Internet Protocol, for general use on the Internet. If you are
using an IPv6-enabled FTP server, check this box.
Use firewall— Choose this option if you connect to the remote server from behind a firewall.
Firewall Settings— If you've checked the Use Firewall check box, your next step will be to configure
firewall settings. Clicking this button launches the Site category within the Preferences dialog. We'll
discuss these options in more detail in the next chapter.
Use Secure FTP (SFTP)— As I mentioned earlier, files are transferred from the local and remote
computer in a nonencrypted format. If your remote computer has SFTP software installed, you can
check this option to use a secure, encrypted format in Secure FTP instead of the normal, less-secure
FTP option.
Server Compatibility— Select this option to further maximize the compatibility between