Lập trình .net 4.0 và visual studio 2010 part 45 pot
Bạn đang xem bản rút gọn của tài liệu. Xem và tải ngay bản đầy đủ của tài liệu tại đây (386.65 KB, 11 trang )
CHAPTER 13 ASP.NET MVC
302
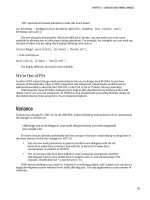
Figure 13-5. How MVC separates URLs
Returning Views
In the first example, you returned a view that matched the action name (Index). Views don’t necessarily
have to match the URL, although it is not a bad idea because it makes your intention clearer and reduces
how much code you have to write.
If you wanted to return the Index view you just created when the user navigates to an arbitrary
address such as ~/Film/IWillAlsoReturnIndex, you can do this with the following code:
public ActionResult IWillAlsoReturnIndex()
{
ViewData["Message"] = "I am using Index view";
return View("Index");
}
ViewData and TempData
So what is this ViewData thing you just used? You can think of ViewData as a place to store objects that
you will use in your view. For example, you might store a Film class in ViewData and then bind to its
properties. The syntax used to access items from ViewData is similar to working with ViewState.
Many developers don’t like using ViewData because it is not strongly typed and involves some
tedious casting operations when working with objects. My recommendation would be to avoid using it
as much as possible. You will shortly look at a better way of binding data to a page.
Related to ViewData is TempData. TempData is very similar except data added to it will be saved for only
one post. TempData can be useful for storing and displaying items such as error messages that you don’t
want to maintain between posts. TempData is another controversial area that some developers dislike
because they feel it is not in keeping with MVC’s ideals.
Displaying a List of Data
You will now create a page to display a list of all the films. You need to add this functionality to the
controller.
1. Open the file ~/Controllers/FilmController.cs.
2. Add the following code at the top of the class to get an instance of the FilmRepository:
BobsMoviesMVC.Models.IFilmRepository filmRepository;
public FilmController()
{
filmRepository = new BobsMoviesMVC.Models.FilmRepository();
}
CHAPTER 13 ASP.NET MVC
303
3. You might think there are easier ways of doing this (and you would be right), but this sets you
up nicely for testing the application. Now add the following action to retrieve a list of all the
films:
public ActionResult All()
{
return View(filmRepository.GetAll());
}
4. Right-click the ~/Views/Film directory and select Add New View. Name the view All and click
OK (ASP.NET MVC does have some nice functionality to automate creation of CRUD operations
such as list and edit forms, which you will look at shortly).
5. Replace the Content2 Content tag with the following code:
<asp:Content ID="Content2" ContentPlaceHolderID="MainContent" runat="server">
<a href="<%= "Create/" %>">Create</a>
<br /><br />
<%
foreach (Chapter13.BobsMoviesMVC.Models.Film Film in
(IEnumerable<Chapter13.BobsMoviesMVC.Models.Film>)Model)
{
%>
<a href="<%= "Detail/" + Film.FilmID %>">
<%= Film.Title %>
</a>
<%= Html.ActionLink("[Edit]", "Edit", new { id = Film.FilmID })%>
<%= Html.ActionLink("[Edit JSON]", "EditJSON", new {id=Film.FilmID})%>
<%= Html.ActionLink("[Delete]", "Delete", new {id=Film.FilmID})%>
<br />
<%
}
%>
</asp:Content>
6. Press F5 to run your application.
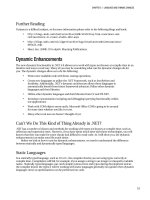
7. Click the Example 2All Films link. You should see a list of film hyperlinks like those shown in
Figure 13-6.
CHAPTER 13 ASP.NET MVC
304
Figure 13-6. List of movies
Have We Gone Back to 1998?
I think you will agree that the code in this view looks a bit unpleasant when compared with ASP.NET.
Readers who have worked with classic ASP are probably scratching their heads asking whether we have
gone back in time. Well, personally I don’t find ASP.NET MVC code as readable as ASP.NET, either, but
ASP.NET MVC does give you full control over the rendered HTML. (ASP.NET 4.0 does have some
improvements in this areasee Chapter 10.) ASP.NET MVC can create smaller, quicker web pages that
can better meet web site standards and accessibility requirements.
In ASP.NET MVC, sometimes it is necessary to embed code as in the previous examples, but there
are also HtmlHelper classes that can make writing the views more readable. Let’s take a look at these next
by creating a simple detail page to display more information about each movie.
Creating a Detail Page
Users of your site will probably want to know more than just the title of a film so you can create a page
they can click through to display more detailed film information.
When creating views, there are two types you can create:
• Standard/looseley typed views
• Strongly typed views
CHAPTER 13 ASP.NET MVC
305
You will create a loosely typed view first to show the basic concepts:
1. Right-click the ~/Views/Film/ folder and click Add View.
2. Enter the name Detail.
3. Replace the Content2 tag with the following code:
<asp:Content ID="Content2" ContentPlaceHolderID="MainContent" runat="server">
<%= ViewData["Title"] %> <br /> <br />
Description: <br />
<input type="text" value='<%= ViewData["Description"] %>' style='width:300px' /> <br
/>
Length: <br />
<%= Html.TextBox("Length") %> <br />
</asp:Content>
4. Open the Films controller and enter the following code:
public ActionResult Detail(int ID)
{
Models.Film Film = filmRepository.GetFilm(ID);
ViewData["Title"] = Film.Title;
ViewData["Description"] = Film.Description;
ViewData["Length"] = Film.Length.ToString();
return View();
}
5. Press F5 to run the application.
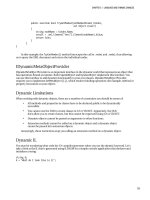
6. Click the Example 3Film Detail link. You should now see a page similar to Figure 13-7.
Let's run through again what happened when you clicked a film. The URL probably looked
something like this: http://localhost:51857/Film/Detail/1.
1. Request is made by user.
2. MVC knows request is intended for the FilmController and Detail action.
3. Request sent to following method:
public ActionResult Detail(int ID)
4. The number at the end of the URL (1) was then mapped to the parameter ID in the action:
public ActionResult Detail(int ID)
5. The ActionDetail method then retrieved the film matching this ID from the model and passed
it into the ViewData collection.
6. View is returned.
CHAPTER 13 ASP.NET MVC
306
Figure 13-7. Film detail
Microsoft folks are no fools (most of the time) and knew that displaying an item with an ID
parameter was a very common thing to do so by default. If you specify a parameter called ID in your
function, it will automatically be mapped to the last value in the URL.
HtmlHelper Methods
In the last example, you used a number of different ways of constructing HTML on the page. You will
now take a closer look at them.
In the ~/Film/Detail.aspx view, you used a number of different methods to render HTML elements:
• Writing into the HTML directly (which offers the greatest flexibility and allows you to
construct the HTML exactly as you wish):
<input type="text" value='<%= ViewData["Description"] %>' style='width:300px' />
• Using HtmlHelper methods:
<%= Html.TextBox("Length") %> <br />
• You can also use HtmlHelperMethodswith property initializers:
<%= Html.TextBox("txtDateShowing", ViewData["DateShowing"], new { Style =
"width:300px" })%> <br />
CHAPTER 13 ASP.NET MVC
307
It is your choice of which method to use, although I believe that HtmlHelper methods look a bit
neater and are easier to use. A very commonly used HtmlHelper is ActionLink. ActionLink can be used to
render a hyperlink, and I would argue is a bit more readable than embedding code in an href tag.
The following code will render a hyperlink labelled “All films” to the film controller ViewAll action:
<%= Html.ActionLink("All Films", "All", "Film") %>
This results in the following HTML:
<a href=”/Film/All/>All Films</a>
Sometimes it is necessary to pass parameters into a link, and for this you can use the following
syntax:
<%= Html.ActionLink("Film Detail", "Detail", new {Controller="Film", id = 1 })%>
This will render the following:
<a href=”/Film/Detail/1>Film Detail</a>
Strongly Typed Views
The second type of view you can create is called a
strongly typed view
. Strongly typed views offer a
number of advantages over standard views:
• You don't have to go through the laborious process of setting properties in ViewData.
Values can instead be retrieved from ViewData.Model.
• Intellisense.
• Type safety.
• No unnecessary casting between types in ViewData.
• Compile time checks.
So why wouldn’t you use strongly typed views?
Creating a Strongly Typed View
You will use a strongly typed view to create an edit page for the movies:
1. Right-click the Views/Film folder.
2. Click Add, then select View.
3. Call the view Edit.
4. Check the box that says Create a strongly-typed view, and on the drop down menu select
Chapter13.BobsMoviesMVC.Models.Film.
CHAPTER 13 ASP.NET MVC
308
5. In the View content drop-down menu, select the Edit option to have Visual Studio create a basic
edit template for you. Click Add.
6. Open ~/Controllers/FilmController.cs.
7. Add two Edit methods (one for loading the view and one for handling the submission of data):
[AcceptVerbs("GET")]
public ActionResult Edit(int ID)
{
return View(filmRepository.GetFilm(ID));
}
[AcceptVerbs("POST")]
public ActionResult Edit(BobsMoviesMVC.Models.Film Film)
{
if (Film.IsValid() == true)
{
filmRepository.Update(Film);
return RedirectToAction("All");
}
else
{
foreach (BobsMoviesMVC.Models.Error error in Film.GetErrors())
{
ModelState.AddModelError(error.Property, error.Description);
}
return View(filmRepository.GetFilm(Film.FilmID));
}
}
8. Press F5 to run the application.
9. Click the Example 4Edit Strongly Typed link (this is hard-wired to take you to a specific film).
10. Delete the title of the film and click Submit. You should see a screen similar to Figure 13-8.
CHAPTER 13 ASP.NET MVC
309
Figure 13-8. ASP.NET MVC validation
Note that MVC will not allow you to save a film with a blank title (because of the validation rules
created earlier). Enter a new title, click Save, and note that you were redirected back to the All Films page
with the updated data.
Whew, we covered a lot here:
• You created two actions with the same name that were differentiated by GET and POST
attributes (covered in the next section).
• You did not allow a user to save a film with no title because you utilized the Film.IsValid
method on the film class. If the film was not valid, you then displayed the returned error
messages to the user by using the ModelState.AddModelError(error.Property,
error.Description) method.
Because you have two Edit ActionResults, you used an attribute to tell ASP.NET MVC to use one
method when the page is loaded (AcceptVerbs["GET"]) and another when the user submits data
(AcceptVerbs["POST"]).
The AcceptVerbs attribute refers to the method in the HTTP protocol that is used when the browser
communicates with the server. The use of the AcceptVerbs attribute can assist with making the code a bit
neater, but some developers might prefer having a load and edit controller action instead.
CHAPTER 13 ASP.NET MVC
310
Creating an Add New and Delete Functionality
Let’s finish off the skeleton administration interface by adding the facility for users to create new movies
and delete existing movies:
1. Right-click View folder.
2. Click AddView. Call it Create.
3. Select to create a strongly typed view and select BobsMoviesMVC.Models.Film as the View data
class.
4. Select Create as the View content.
5. Open ~/Views/Film/Create.aspx. Remove the FilmID field code:
<p>
<label for="ID">ID:</label>
<%= Html.TextBox("ID") %>
<%= Html.ValidationMessage("ID", "*") %>
</p>
6. Open ~/Controllers/Film/FilmController.cs.
7. Add the following code to handle the create and delete actions:
[AcceptVerbs("GET")]
public ActionResult Create()
{
return View();
}
[AcceptVerbs("POST")]
public ActionResult Create(BobsMoviesMVC.Models.Film film)
{
filmRepository.Add(film);
return RedirectToAction("All");
}
public ActionResult Delete(int ID)
{
filmRepository.Delete(ID);
return RedirectToAction("All");
}
CAUTION
In a real-life application, be very careful with creating a delete method like this. I am
taking shortcuts to avoid tedious steps. It is bad practice for methods that modify data to be activated
by a
GET methodimagine if a search engine crawled your site and accidently deleted data!
8. Press F5 to run the application.
9. Click the Example 2All Films link. You should now be able to delete movies by clicking the Delete
link and create new movies by clicking the Create link.
CHAPTER 13 ASP.NET MVC
311
Accepting Data from Users
In the previous example, you let ASP.NET MVC infer how to bind the submitted data back to the model.
However, what if you did not want users to be able to alter all the properties of Film? For example in the
previous page you exposed the ID property? There are a couple of methods to restrict this:
Specify individual properties
You can specify the individual form elements that you will accept in your controller methods (make sure
that the name of the variable matches the name of the form element that is getting submitted) in your
edit method. MVC will then bind these properties accordingly:
[AcceptVerbs("POST")]
public ActionResult Edit(string Title, string Description)
{
return RedirectToAction("All");
}
Form Collection
Instead of binding to a strongly typed object, you can work with the raw form submission like this:
[AcceptVerbs("POST")]
public ActionResult Edit(FormCollection FormValues)
{
String Title="" + FormValues["Title"] ;
return RedirectToAction("All");
}
Bind Attributes
Bind attributes allow you to specify a white-and-black list of form elements to accept and reject. The
following will only allow the Title property to be modified. ID and Description will be null if requested:
public ActionResult Edit(
[Bind(Include = "Title",Exclude="ID, Description")]BobsMoviesMVC.Models.Film Film
)
CREATE A CUSTOM BINDER
You can also create your own binder methods to work with data. For more information on this please refer to the
following:
CHAPTER 13 ASP.NET MVC
312
Attributes
You have already utilized a number of attributes such as AcceptVerbs and Bind. Attributes extend
ASP.NET MVC’s functionality and you can even create your own. Let’s take a quick look at some
important attributes.
AcceptVerbs
You have already used the AcceptVerbs attribute to distinguish between load and update methods in the
Film controller.
OutputCache
OutputCache is perhaps one of the most useful attributes to reduce load on the server. If your data is
changing infrequently, consider using OutputCache. The duration is specified in minutes. To use it,
simply add above your action method:
[OutputCache(Duration = 20, VaryByParam = "None")]
public ActionResult News()
{
return View();
}
Authorization
Another important attribute is Authorization. It is used in conjunction with the standaed security
providers and allows you to restrict access to a function. The standard template ASP.NET MVC project
shows you how to use this. To use it, simply add above your method as follows:
[Authorize(Roles="Admin")]
public ActionResult All()
{
return View(filmRepository.GetAll());
}
ASP.NET MVC and JavaScript
ASP.NET MVC is very much set up for easy integration with popular JavaScript frameworks such as
jQuery. For more information on jQuery, please refer to Chapter 12.
You will create a new edit page that utilizes the jQuery libraries to send the contents of a form to the
edit controller. To do this, you will format the data as JSON. JSON stands for JavaScript Object Notation
and is a very lightweight format to pass around simple classes and properties.
In the film example, a film class formatted as JSON might look something like this:
{ID:"1",Title:"Kung Fu Panda"}