Adobe Photoshop 6.0- P6 ppsx
Bạn đang xem bản rút gọn của tài liệu. Xem và tải ngay bản đầy đủ của tài liệu tại đây (782.9 KB, 30 trang )
169
ADOBE PHOTOSHOP 6.0
Classroom in a Book
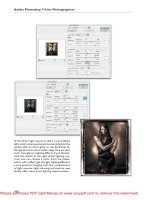
5 In the Layers palette, click the eye icon next to the Color Balance layer to hide and show
the layer. You’ll see the difference between the adjusted colors and the original colors.
6 Choose File > Save.
Note: When you double-click an adjustment layer in the Layers palette, the corresponding
Layer Style dialog box appears, where you can edit the values of the adjustment layer.
Replacing colors in an image
With the Replace Color command, you can create temporary masks based on specific
colors and then replace these colors. Masks let you isolate an area of an image, so that
changes affect just the selected area and not the rest of the image. Options in the Replace
Color command’s dialog box allow you to adjust the hue, saturation, and lightness
components of the selection. Hue is color, saturation is the purity of the color, and
lightness is how much white or black is in the image.
You’ll use the Replace Color command to change the color of the orange tarp in the
gondola at the lower right corner of the image. The Replace Color command is not
available in ImageReady.
1 In the Layers palette, select the Background.
Adjusting color balance
Every color adjustment affects the overall color balance in your image. You have numerous ways to achieve
similar effects, so determining which adjustment is appropriate depends on the image and on the desired
effect.
It helps to keep a diagram of the color wheel on hand if you’re new to adjusting color components. You can
use the color wheel to predict how a change in one color component affects other colors and also how changes
translate between RGB and CMYK color models. For example, you can decrease the amount of any color in
an image by increasing the amount of its opposite on the color wheel—and vice versa. Similarly, you can
increase and decrease a color by adjusting the two adjacent colors on the wheel, or even by adjusting the two
colors adjacent to its opposite.
For example, in a CMYK image you can decrease magenta by decreasing either the amount of magenta or
its proportion (by adding cyan and yellow). You can even combine these two corrections, minimizing their
effect on overall lightness. In an RGB image, you can decrease magenta by removing red and blue or by
adding green. All of these adjustments result in an overall color balance containing less magenta.
–From Adobe Photoshop 6.0 online Help
LESSON 6
170
Photo Retouching
2 Select the zoom tool ( ), and click once on the tarp to zoom in on it.
3 Select the rectangular marquee tool, and draw a selection around the tarp. Don’t worry
about making a perfect selection, but be sure to include all of the tarp.
4 Choose Image > Adjust > Replace Color to open the Replace Color dialog box.
By default, the Selection area of the Replace Color dialog box displays a black rectangle,
representing the current selection.
You will now use the eyedropper tool to select the area of color that will be masked and
replaced with a new color. Three eyedropper tools are displayed in the Replace Color
dialog box.
A. Select single color B. Add to selection
C. Subtract from selection
The first eyedropper tool ( ) selects a single color, the eyedropper-plus tool ( ) is used
to add colors to a selection, and the eyedropper-minus tool ( ) is used to subtract colors
from a selection.
A
B
C
171
ADOBE PHOTOSHOP 6.0
Classroom in a Book
5 Select the eyedropper tool in the Replace Color dialog box, and click once on the
orange tarp to select it.
6 Then select the eyedropper-plus tool, and click and drag over the other areas of the tarp
until the entire tarp is highlighted in white in the dialog box.
7 Adjust the tolerance level of the mask by moving the Fuzziness slider to 61.
Fuzziness controls the degree to which related colors are included in the mask.
8 Select the eyedropper-minus tool ( ) and click in the black area around the selection
in the Replace Color dialog box to remove any white.
9 In the Transform area of the Replace Color dialog box, drag the Hue slider to +160, the
Saturation slider to –20, and the Lightness slider to –40.
The color of the tarp is replaced with the new hue, saturation, and lightness.
10 Click OK to apply the changes.
11 Double-click the hand tool ( ) to fit the image on-screen.
12 Choose Select > Deselect.
13 Choose File > Save.
Adjusting saturation with the sponge tool
Now you’ll saturate the color of the gondolas in the foreground using the sponge tool.
When you change the saturation of a color, you adjust its strength or purity. The sponge
tool is useful in letting you make subtle saturation changes to specific areas of an image.
1 Select the sponge tool ( ), hidden under the dodge tool ( ).
ImageReady also has a sponge tool hidden under the clone stamp tool ( ).
LESSON 6
172
Photo Retouching
2 In the tool options bar, choose Saturate from the Mode menu. To set the intensity of
the saturation effect, enter 90 in the Pressure text box.
3 Click the arrow to display the Brush pop-up palette, and select a large, feathered brush
from the second row of the Brushes palette.
4 Drag the sponge back and forth over the gondolas to saturate their color. The more you
drag over an area, the more saturated the color becomes.
Original Result
Adjusting lightness with the dodge tool
Next you’ll use the dodge tool to lighten the highlights along the gondola’s hull and
exaggerate the reflection of the water there. The dodge tool is based on the traditional
photographer’s method of holding back light during an exposure to lighten an area of
the image.
1 Select the dodge tool ( ) hidden under the sponge tool ( ).
ImageReady also has a dodge tool hidden under the clone stamp tool ( ).
173
ADOBE PHOTOSHOP 6.0
Classroom in a Book
2 In the tool options bar, choose Highlights from the Range menu, and enter 50 in the
Exposure text box.
3 Select a medium, feathered brush from the second row of the Brush pop-up palette.
4 Drag the dodge tool back and forth over the gondola’s hull to bring out its highlights.
Original Result
Removing unwanted objects
You can remove unwanted objects from a photograph. Using the clone stamp tool, you
can remove an object or area by “cloning” an area of the image over the area you want to
eliminate.
You’ll eliminate the small boat near the center of the image by painting over it with a copy
of the water.
1 Select the zoom tool ( ); then click the small boat to magnify that part of the image.
2 Select the clone stamp tool ( ).
LESSON 6
174
Photo Retouching
3 In the tool options bar, make sure that the Aligned option is deselected. In the Brush
pop-up palette, choose a medium-size brush from the second row.
Note: The Aligned option allows you to apply the entire sampled area, regardless of how many
times you stop and resume painting. If Aligned is deselected, the sampled area is applied from
the initial sampling point each time you stop and resume painting.
4 Center the clone stamp tool over the water between the large gondola and the post to
its right. Then hold down Alt (Windows) or Option (Mac OS), and click to sample or
copy that part of the image. Make sure that the area you sample will blend well with the
area around the object you are removing.
Clicking to sample image Dragging to paint over image
5 Click or drag the clone stamp tool over the boat to paint over it with a copy of the water
you just sampled. Notice the cross hair that follows your cursor as you paint; it represents
the point from which the clone stamp tool is cloning.
6 Double-click the hand tool to fit the image on-screen.
7 Choose File > Save.
Replacing part of an image
Because the sky is fairly drab and overcast in this photograph, you’ll replace it with a more
interesting sky from another file. You’ll begin by selecting the current sky.
1 Select the magic wand tool ( ).
2 In the tool options bar, enter 16 in the Tolerance text box.
3 Using the magic wand tool, click to select part of the sky. Then hold down Shift and
click the rest of the sky to select it.
4 Choose File > Open and open the file Clouds.psd from the Lessons/Lesson06 folder.
175
ADOBE PHOTOSHOP 6.0
Classroom in a Book
5 Choose Select > All, and choose Edit > Copy to copy the selection to the Clipboard.
Close the Clouds.psd file.
6 In the 06Start.psd file, choose Edit > Paste Into to paste the clouds into the current
selection.
Notice that a new layer has been added to the Layers palette.
Note: ImageReady does not have a Paste Into command. To replicate the effect, select the sky
as shown in step 3, and delete it. Open the Clouds.psd file, and copy it as in steps 4 and 5.
Then choose Edit > Paste, and move the cloud layer beneath the boat layer.
7 Select the move tool ( ), and drag the clouds into the position you want.
Sky selected Clouds pasted into sky Clouds moved into position
Now you’ll change the clouds’ opacity to make them blend better with the rest of
the image.
8 With the clouds layer still selected, adjust the Opacity in the Layers palette. Either use
the slider bar or type any number from 01 (1%) to 100 (100%) in the Opacity text box
(we used 55%).
9 Choose File > Save.
Opacity set to 55% Result
LESSON 6
176
Photo Retouching
Now you’ll flatten the image into a single layer so that you can apply the Unsharp Mask
filter, the final step in retouching the photo. Because you may want to return to a version
of the file with all its layers intact, you will use the Save As command to save the flattened
file with a new name.
10 Choose Layer > Flatten Image.
11 Choose File > Save As. In the dialog box, type a new filename, and click Save.
Applying the Unsharp Mask filter
The last step you take when retouching a photo is to apply the Unsharp Mask filter, which
adjusts the contrast of the edge detail and creates the illusion of a more focused image.
1 Choose Filter > Sharpen > Unsharp Mask.
2 In the Unsharp Mask dialog box, make sure that the Preview option is selected so that
you can view the effect before you apply it. The preview will show in either the Unsharp
Mask dialog box thumbnail or your document window. To get a better view, you can place
the pointer within the preview window and drag to see different parts of the image. You
can also change the magnification of the preview image with the plus and minus buttons
located below the window.
3 Drag the Amount slider until the image is as sharp as you want (we used 60%).
4 Drag the Radius slider to determine the number of pixels surrounding the edge pixels
that affects the sharpening. The higher the resolution, the higher the Radius setting
should be. Since our image is only 72 dpi, we used a Radius of 0.5 pixel.
Note: For high-resolution images, a Radius between 1 and 2 is recommended.
177
ADOBE PHOTOSHOP 6.0
Classroom in a Book
5 If you desire, you can adjust the Threshold slider. This determines how different the
sharpened pixels must be from the surrounding area before they are considered edge
pixels and subsequently sharpened by the Unsharp Mask filter. The default Threshold
value of 0 sharpens all pixels in the image.
6 Click OK to apply the Unsharp Mask filter.
For complete information on the Unsharp Mask filter, see “Sharpening the image” in
Adobe Photoshop 6.0 online Help.
Saving the image for four-color printing
Before you save a Photoshop file for use in a four-color publication, you must change the
image to CMYK color mode so that it will be printed correctly in four-color process inks.
You can use the Mode command to change the image’s color mode.
For complete information on color modes, see “Converting between color modes” in
Adobe Photoshop 6.0 online Help.
You can perform these tasks in Photoshop only. ImageReady does not have printing
capability. It uses only one color mode, RGB, for on-screen display.
1 Choose Image > Mode > CMYK Color.
You can now save the file in the correct format required for Adobe PageMaker and your
publication. Because PageMaker uses the Tagged-Image File Format (TIFF) for images
that will be printed in process or CMYK colors, you will save the photo as a TIFF file.
Sharpening the image
Unsharp masking, or USM, is a traditional film compositing technique used to sharpen edges in an image.
The Unsharp Mask filter corrects blurring introduced during photographing, scanning, resampling, or
printing. It is useful for images intended for both print and online.
The Unsharp Mask filter locates pixels that differ from surrounding pixels by the threshold you specify and
increases the pixels’ contrast by the amount you specify. In addition, you specify the radius of the region to
which each pixel is compared.
The effects of the Unsharp Mask filter are far more pronounced on-screen than in high-resolution output.
If your final destination is print, experiment to determine what dialog box settings work best for your image.
–From Adobe Photoshop 6.0 online Help
LESSON 6
178
Photo Retouching
2 Choose File > Save As.
3 In the Save As dialog box, choose TIFF from the Format menu.
4 Click Save.
5 In the TIFF Options dialog box, select the correct Byte Order for your system and
click OK.
The image is now fully retouched, saved, and ready for placement in the PageMaker
layout.
On your own: Painting with the art history brush
In Photoshop, you can simulate the texture of painting with different colors and artistic
styles using the art history brush tool. The art history brush paints with stylized strokes,
using the source data from a specified history state or snapshot. The brush works well
with realistic images to let you create painterly, impressionistic effects. Try out different
settings to see the variety of effects you can create in the same image. (ImageReady does
not have an art history brush.)
1 Choose File > Open, and open the image you want to paint.
2 Choose File > Save As, rename the file, and save it, to retain a copy of your original
image for future use.
3 For a variety of visual effects, experiment with applying filters or filling the image with
a solid color before painting with the art history brush tool. For example, add a layer to
the image, fill it with white, and then use the art history brush tool to paint.
reserving an extensive body of
work assembled by a team of
photographers from 1991 to
1995, The Architecture of Italy CD-ROM
disc is a compilation of more than three
hundred sumptuous photographs. With cross-
referenced text provided for each photo-
graph, this collection can be used as a
resource for many endeavors. Much more
than a "digital coffee-table book, "you are
free to modify, rent, lease, distribute, or
create derivative works based upon the
original images found in this collection.
Included in this collection are St. Mark's
Cathedral in Venice; the Tower and Baptistry
at Pisa; the Colliseum, the Forum, the
Vatican, and highlights from the Vatican
Museum in Rome; the Duomo, the Medici
Palace, the Ponte Vecchio, and the Gates of
Heaven in Florence. More than 75 superb
architectural examples, which have received
little recognition, have also been included.
Gina Antonelli is known for her works on
Italian fine art, as well as several previous
photographic publications: "Italy's Best
Loved Gardens," the series "Italian Tradition
in Color and Form" (Dress; Cuisine; Archi-
tecture; Pastimes), and two editions of the
book "Italian Traditional Patterns." In
addition to completing the Rome and Naples
photography assignment, photographer and
art historian Tomas Panini assembled and
edited the explanatory notes for the 300
photographs. Photographer Anton Harris,
having apprenticed at Maria Guerra Atelier
in Paris for seven years, contributed his own
unique insights to the Venice and Rome
assignments. In 1984 Mr. Anton Harris won
the Paris Exhibition Prize for his Design
Study photographic series, consisting of
three books.
179
ADOBE PHOTOSHOP 6.0
Classroom in a Book
4 In the History palette, click the icon of the state or snapshot to use as the source for the
art history brush tool. A brush icon appears next to the source history state.
You can select any history state to be your source by clicking in the left column, and if
you’re not satisfied with an effect, you can return to a previous state or the snapshot by
clicking the state thumbnail.
5 Select the art history brush tool ( ) hidden under the history brush tool ( ).
6 In the tool options bar, select a brush from the Brush pop-up palette. For interesting
effects, try using a texture, noncircular, or custom brush. The brush corresponds to the
size of individual paint strokes, not the total area covered by the paint.
7 Drag in the image to paint.
When you’ve practiced painting with the brush to see how it works, experiment with the
settings to create various effects:
• Control the shape of the paint stroke by choosing an option from the Style pop-up
menu in the tool options bar.
• Try out different blending modes using the Mode pop-up menu, and vary the opacity.
For information on setting tool options, see “Painting” in Adobe Photoshop 6.0
online Help.
• Vary how much the paint color changes from the color in the source state or
snapshot by adjusting the Fidelity. The lower the fidelity, the more the color will
vary from the source.
LESSON 6
180
Photo Retouching
• Set the area covered by the paint strokes using the Area option. Try increasing the
size to enlarge the covered area and increase the number of strokes.
• Control the distance between brush marks using the Spacing option. Type a number or
use the slider to enter a value that is a percentage of the brush diameter.
• Select a small brush to maintain the image integrity and reveal the brush stroke. The
larger the brush you use, the greater the distortion will be to the image.
If you are using a pressure-sensitive tablet, select either of the following Brush Dynamics
options:
• Size to have increased pressure result in a larger area covered by the paint. Note that Size
refers to the area of coverage, not the brush size.
• Opacity to have increased pressure result in more opaque paint.
181
ADOBE PHOTOSHOP 6.0
Classroom in a Book
Review questions
1 What does resolution mean?
2 How can you use the crop tool in photo retouching?
3 How can you adjust the tonal range of an image?
4 How can you correct a color cast in a photograph?
5 What is saturation, and how can you adjust it?
6 Why would you use the Unsharp Mask filter on a photo?
Review answers
1 The term resolution refers to the number of pixels that describe an image and establish
its detail. The three different types of resolution include image resolution, measured in
pixels per inch (ppi); monitor resolution, measured in dots per inch (dpi); and printer or
output resolution, measured in ink dots per inch.
2 You can use the crop tool to trim, scale, and straighten an image.
3 You can use the black and white triangles below the Levels command histogram to
control where the darkest and lightest points in the image begin and thus extend its
tonal range.
4 In Photoshop, you can correct a color cast with a Color Balance adjustment layer.
The adjustment layer lets you change the color of the image as many times as you like
without permanently affecting the original pixel values.
5 Saturation is the strength or purity of color in an image. You can increase the
saturation in a specific area of an image with the sponge tool.
6 The Unsharp Mask filter adjusts the contrast of the edge detail and creates the illusion
of a more focused image.
7 Basic Pen Tool Techniques
The pen tool draws precise straight or
curved lines called paths. You can use
the pen tool as a drawing tool or as a
selection tool. When used as a selection
tool, the pen tool always draws smooth,
anti-aliased outlines. These paths are
an excellent alternative to using the
standard selection tools for creating
intricate selections.
LESSON 7
186
Basic Pen Tool Techniques
In this lesson, you’ll learn how to do the following:
• Practice drawing straight and curved paths using the pen tool.
• Save paths.
• Fill and stroke paths.
• Edit paths using the path editing tools.
• Convert a path to a selection.
• Convert a selection to a path.
This lesson will take about 50 minutes to complete. The lesson is designed to be done in
Adobe Photoshop. Adobe ImageReady does not have a pen tool and does not support
paths.
If needed, remove the previous lesson folder from your hard drive, and copy the Lesson07
folder onto it. As you work on this lesson, you’ll overwrite the start files. If you need to
restore the start files, copy them from the Adobe Photoshop Classroom in a Book CD.
Note: Windows users need to unlock the lesson files before using them. For information,
see “Copying the Classroom in a Book files” on page 3.
Getting started
You’ll start the lesson by viewing a copy of the finished image that you’ll create. Then
you’ll open a series of template files that guide you through the process of creating straight
paths, curved paths, and paths that are a combination of both. In addition, you’ll learn
how to add points to a path, how to subtract points from a path, and how to convert a
straight line to a curve and vice versa. After you’ve practiced drawing and editing paths
using the templates, you’ll open an image of the cat mask and practice making selections
using the pen tool.
Before beginning this lesson, restore the default application settings for Adobe
Photoshop. See “Restoring default preferences” on page 4.
1 Start Adobe Photoshop.
If a notice appears asking whether you want to customize your color settings, click No.
2 Choose File > Open, and open the file 07End.psd from the Lessons/Lesson07 folder on
your hard drive.
187
ADOBE PHOTOSHOP 6.0
Classroom in a Book
3 When you have finished viewing the file, either leave it open for reference or close it
without saving changes.
For an illustration of the finished artwork for this lesson, see the gallery at the
beginning of the color section.
Now you’ll open the first template for drawing straight paths.
4 Choose File > Open and open the file Straight.psd from the Lessons/Lesson07 folder.
5 If desired, select the zoom tool ( ), and drag over the image to magnify the view.
Drawing paths with the pen tool
The pen tool draws straight and curved lines called paths. A path is any line or shape you
draw using the pen, magnetic pen, or freeform pen tool. Of these tools, the pen tool draws
paths with the greatest precision; the magnetic pen and freeform pen tools let you draw
paths as if you were drawing with a pencil on paper.
Paths can be open or closed. Open paths have two distinct endpoints. Closed paths are
continuous; for example, a circle is a closed path. The type of path you draw affects how
it can be selected and adjusted. Paths that have not been filled or stroked do not print
when you print your artwork. (This is because paths are vector objects that contain no
pixels, unlike the bitmap shapes drawn by the pencil and other painting tools.)
1 Select the pen tool ( ).
Press P on the keyboard to select the pen tool. Continue to press Shift+P to toggle between
the pen and freeform pen tools.
LESSON 7
188
Basic Pen Tool Techniques
2 In the tool options bar, make sure the Create new work path ( ) and the Auto
Add/Delete options are selected. For this lesson, the Rubber Band option should not be
selected.
3 Click the Paths palette tab to bring the palette to the front of its group.
The Paths palette displays thumbnail previews of the paths you draw.
A. Path thumbnail B. Fills path with
foreground color C. Strokes path with
foreground color D. Loads path as a
selection E. Makes work path from
selection F. Creates new path
Drawing straight paths
Straight paths are created by clicking the mouse button. The first time you click, you set
a starting point for a path. Each time thereafter that you click, a straight line is drawn
between the previous point and the current point.
Click to set a starting Click again to draw
point. a straight line.
A B C D E F
A
B
A
B
189
ADOBE PHOTOSHOP 6.0
Classroom in a Book
1 Using the pen tool, position the pointer on point A in the template and click the pen
tool. Then click point B to create a straight-line path.
As you draw paths, a temporary storage area named Work Path appears in the Paths
palette to keep track of the paths you draw.
You’ll also notice that once you start using the pen tool, the tool options bar changes to a
slightly different set of options. The Add to shape area option ( ) should be selected for
this lesson.
2 End the path in the image by clicking the pen tool ( ) in the toolbox.
The points that connect paths are called anchor points. You can drag individual anchor
points to edit segments of a path, or you can select all the anchor points to select the
entire path.
You’ll learn more about anchor points later in this lesson.
3 In the Paths palette, double-click the Work Path to open the Save Path dialog box. Enter
Straight lines in the Name text box, and click OK to rename the path.
The path is renamed, and remains selected in the Paths palette.
LESSON 7
190
Basic Pen Tool Techniques
You must save a work path to avoid losing its contents. If you deselect the work path
without saving and then start drawing again, a new work path will replace the first one.
Moving and adjusting paths
You use the direct selection tool to select and adjust an anchor point, a path segment,
or an entire path.
1 Select the direct selection tool ( ) hidden under the path component selection tool ( ).
To select the direct selection tool, press A. You can also select the direct selection tool when
the pen tool is active by holding down Ctrl (Windows) or Command (Mac OS).
About anchor points, direction lines, and direction points
A path consists of one or more straight or curved segments. Anchor points mark the endpoints of the path
segments. On curved segments, each selected anchor point displays one or two direction lines, ending in
direction points. The positions of direction lines and points determine the size and shape of a curved segment.
Moving these elements reshapes the curves in a path.
A path can be closed, with no beginning or end (for example, a circle), or open, with distinct endpoints
(for example, a wavy line).
Smooth curves are connected by anchor points called smooth points. Sharply curved paths are connected by
corner points.
When you move a direction line on a smooth point, the curved segments on both sides of the point adjust
simultaneously. In comparison, when you move a direction line on a corner point, only the curve on the same
side of the point as the direction line is adjusted.
–From Adobe Photoshop 6.0 online Help
191
ADOBE PHOTOSHOP 6.0
Classroom in a Book
2 Click the path in the window to select it, and then move the path by dragging anywhere
on the path using the direct selection tool.
Selecting a path Moving a path
3 To adjust the angle or length of the path, drag one of the anchor points with the direct
selection tool.
Adjusting the path angle Adjusting the path length
4 Select the pen tool.
5 To begin the next path, hold the pointer over point C. Click point C with the pen tool.
Notice that an x appears in the pen tool pointer to indicate that you are starting a new
path.
A
B
A
B
A
B
A
B
A
B
A
B
LESSON 7
192
Basic Pen Tool Techniques
6 Click point D to draw a path between the two points.
7 End the path using either of the following methods:
• Click the pen tool in the toolbox.
• Hold down Ctrl (Windows) or Command (Mac OS), and click away from the path.
Holding down Ctrl/Command while the pen tool is active selects the direct selection tool.
8 Click point E to begin the next path. Then hold down Shift and click points F, G, H,
and I. Holding down Shift as you click subsequent points constrains the path to a
45° angle.
If you make a mistake while you’re drawing, choose Edit > Undo to undo the last anchor
point. Then click with the pen tool to continue.
9 End the path using one of the methods you’ve learned.
When a path contains more than one segment, you can drag individual anchor points to
adjust individual segments of the path. You can also select all of the anchor points in a
path to edit the entire path.
10 Select the direct selection tool ( ).
C
D
C
D
E
F
G
H
I
193
ADOBE PHOTOSHOP 6.0
Classroom in a Book
11 Try dragging individual anchor points to move segments of the zigzag path you
just drew.
12 To select an entire path, Alt-click (Windows) or Option-click (Mac OS) with the
direct selection tool. When an entire path is selected, all the anchor points are solid.
Dragging individual points Alt/Option-clicking to select
entire path
13 Drag the path to move the entire path; then choose Edit > Undo to undo the move.
Creating closed paths
Next you’ll draw a closed path. Creating a closed path differs from creating an open path
in the way that you end the path.
1 Select the pen tool ( ).
2 Click point J to begin the path; then click point K and point L.
When you position the pointer over the starting point to end the path, a small circle
appears with the pen tool to indicate that the path will be closed when you click.
Circle indicating path will be closed, and result
3 To close the path, position the pointer over the starting point (point J), and click.
Closing the path ends the path. In contrast, to end an open path you must click the pen
tool in the toolbox or Ctrl/Command-click away from the path.
E
F
G
H
I
E
F
G
H
I
J
LK
J
LK
LESSON 7
194
Basic Pen Tool Techniques
If desired, practice drawing another closed path using the star shape on the template
as a guide.
At this point, all of the paths you’ve drawn appear in the Straight Lines work path in the
Paths palette. Each individual path on the Straight Lines path is called a subpath.
You can convert any path you have drawn into a selection and combine this selection with
others. (You’ll try this later.) You can also convert selection borders into paths and
fine-tune them.
Painting paths
Painting paths adds pixels that appear when you print an image. Filling paints a closed
path with color, an image, or a pattern. Stroking paints color along the path. To fill or
stroke a path, you must first select it.
1 Click the Swatches palette tab to bring the palette forward. Click a swatch to select a
foreground color to use to paint the path.
2 Select the direct selection tool ( ).
3 In the image window, click the zigzag line with the direct selection tool to select it.
Then choose Stroke Subpath from the Paths palette menu.
4 In the Stroke Subpath dialog box, choose Airbrush from the Tool menu, and click OK.
The path is stroked with the current airbrush settings.
Choosing the Stroke Subpath command Airbrush tool Result
Note: You can select a painting tool and set attributes before you select the tool in the Stroke
Subpath dialog box.
Now try filling one of the paths.
5 In the Swatches palette, click a swatch to select a different foreground color for the fill.
195
ADOBE PHOTOSHOP 6.0
Classroom in a Book
6 Click the triangular closed path with the direct selection tool. Then choose Fill Subpath
from the Paths palette menu. The Fill Subpath dialog box appears.
7 In the Fill Subpath dialog box, click OK to accept the defaults.
The triangular path is filled with the foreground color.
Using the Fill Subpath command Result
to fill a closed subpath
8 To hide the paths, click below the pathnames in the blank area of the Paths palette.
9 Choose File > Close, and do not save changes.
Drawing curved paths
Curved paths are created by clicking and dragging. The first time you click and drag,
you set a starting point for the curved path and also determine the direction of the curve.
As you continue to drag, a curved path is drawn between the previous point and the
current point.
J
LK
LESSON 7
196
Basic Pen Tool Techniques
As you drag the pen tool, Photoshop draws direction lines and direction points from the
anchor point. Direction lines and points are used to edit the shape of curves and to change
the direction of curves. You’ll edit paths using the direction lines and direction points
after you practice drawing curved paths.
Direction lines and points setting
the curve direction
A. Curved line segment B. Direction point
C. Direction line D. Selected anchor point
E. Unselected anchor point
Like unpainted paths, direction lines and points do not print when you print your
artwork because they are vector objects that contain no pixels.
1 Choose File > Open, and open the file Curves.psd from the Lessons/Lesson07 folder.
2 Select the pen tool ( ).
3 Click on point A of the first curve. Hold down the mouse button, and drag from point
A toward the red dot. Then release the mouse button.
4 To complete the first curve of the path, drag from point B to the red dot. If you make a
mistake while you’re drawing, choose Edit > Undo New Anchor Point to undo the last
point you drew. Then continue drawing the path.
Position pointer on point A and drag to draw a curve. Drag again to complete the curve.
E
A
B
D
C
A
B
A
B
A
B
A
B