Photoshop CS3 for Screen Printers- P6 pdf
Bạn đang xem bản rút gọn của tài liệu. Xem và tải ngay bản đầy đủ của tài liệu tại đây (1009.86 KB, 30 trang )
]
Tip:
Depending on what you’re copying, the system could seem to hang for a
minute, especially if you are running low on RAM or copying a large amount
of data. Be patient!
Edit>Paste and Edit>Paste Into
Pasting is done after a selection has been cut or copied to the clipboard.
Pasting is putting what’s in memory and stored on the clipboard into the
active file. The Paste command pastes the selection into another part of
the image or into a new image as a new layer. The Paste Into command
pastes a selection into another part of the image or into a new image as a
new layer, and the destination’s selection border is converted into a layer
mask. You can then decide if you want to apply the mask or discard it.
Understand that when a selection is cut or copied from a file of a spe-
cific resolution and then pasted into a file or image that is of another
resolution, the pasted selection will look a little out of scale. If you are
cutting, copying, and pasting under these circumstances, make sure you
resize the image first so that the pasted image will fit appropriately into
the new one.
After completing the paste action, choose Edit>Purge>Clipboard to
remove the selection from the clipboard, especially if the data or image
pasted is quite large. Keeping an unnecessary amount of data stored on
the clipboard when it isn’t needed can slow down the computer and cause
your next cut or copy to be placed on the virtual RAM portion of the hard
drive. Retrieving information from the hard drive instead of RAM takes
quite a bit longer and can cause unnecessary slowdowns.
]
Tip:
Dragging a selection to a new file or image or another area of the same
image can be done instead of using the C ut, Co py, and Paste commands.
Dragging saves system resources since the clipboard isn’t used in the mo ve.
126 Part II / Creating Artwork and Logos
Edit>Clear
The Clear command enables you to delete a selection without placing
that selection on the clipboard. It’s similar to the Cut command. Make
sure that if there are multiple layers in an image, you’ve selected the
layer you want to work with from the Layers palette.
Edit>Check Spelling
The Check Spelling command checks the spelling in a document. You’ll
only be able to check spelling for words that you input using the type
tools; you won’t be able to check the spelling on a file that has been flat
-
tened or saved as a JPEG or GIF or anything similar. Use this command
after you’ve added text and are still working on the type layer itself.
Experimenting with Brushes
You’ll use brushes a lot with Photoshop. Brushes can be configured when
using many of the tools, including the standard Brush, Healing Brush,
Art History Brush, Pencil, History Brush, Eraser, Dodge, Smudge,
Sharpen, Blur, Clone Stamp, Patch, and more. You’ve already been intro-
duced to the Brushes palette, appending or replacing brush libraries, and
viewing the brushes, but you have yet to really apply those techniques
using a brush. In the following sections, we get our hands dirty and do
some painting!
The Brush Tool
The Brush tool is used for painting with the foreground color onto a layer
or selection. You can use the Brush tool to brush over parts of an image
that need tweaking, add an airbrush quality to an image, or paint any area
with color.
Chapter 7 / Getting Creative 127
Some uses for the brushes include:
n
To paint with sampled pixels from an image or pattern to cover up
flaws in photographs or artwork
n
To change a regular photograph into another style of art by brushing
with stylized strokes such as watercolor, sponge, oil, pastel, chalk,
and others
n
To airbrush or spatter paint onto an image for use as graffiti, to
soften the edges of an image, to create artwork for motorcycle gas
tanks, trucks, or similar work, or to create caricatures
n
To write using a calligraphic brush for artwork that will be printed for
invitations or other special events
n
To add noise to an image for the purpose of covering up flaws in the
image itself or to make the image easier to print
n
To accent edges, add texture, or distort an area of an image
n
To erase any part of an image using any eraser tool
n
Tosmudgeorfocusinonanareaofanimage
n
Tocloneanareaofanimage
Thus, using brushes is necessary when performing many common tasks.
In the following example, you can experiment with applying some of the
brushes while using various tools. While working, think about how you
could incorporate this into your own fields.
Project 7-2: Using the Brush Tool
Perform this exercise to become familiar with using brushes:
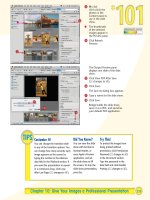
1. Open a new document with a white background, RGB Color,and
the default preset size.
2. Click on the foreground color, and choose a bright color that will
show well against the white background.
3. Select the Brush tool from the toolbox.
4. From the options bar, click on the down arrow next to Brush to open
the pop-up palette and show the brush presets. From the additional
options, choose Reset Brushes, as shown in Figure 7-6. Click OK
when prompted.
128 Part II / Creating Artwork and Logos
5. From the pop-up palette, click the right arrow and select Large List.
Now, locate and double-click Airbrush Soft Round 17.
6. Click and drag the brush across the new canvas to apply the paint.
Try to write something in cursive to get a graffiti look from this tool.
7. From the options bar and the pop-up palette, change the size of the
brush to 65 by selecting Airbrush Soft Round 65, and apply the
brush again. The larger the number, the larger the brush.
]
Tip:
Use this tool to soften hard edges of a photograph or airbrush out flaws in
an image.
8. From the options bar, open the pop-up palette by clicking on the
down arrow.
9. From the additional options, choose Reset Brushes. Click OK when
prompted.
Chapter 7 / Getting Creative 129
Figure 7-6: Working
with brushes
10. Double-click on a different brush. Draw with the new brush on the
canvas.
11. Experiment with other brushes. Change the Opacity setting in the
options bar, the Flow setting, and the Mode setting.
Project 7-3: Using the Brush and Zoom Tools to Enhance a Logo
Continue from the last exercise or begin here to enhance a logo that has
already been created or submitted.
1. Open the file Pawsable_Paradise.psd from the Chapter 7 folder on
the companion CD.
2. Use the Zoom tool to zoom in on the dog and cat at the bottom of the
picture, as shown in Figure 7-7.
]
Tip:
Notice in this image that the area that’s zoomed into is shown in the Naviga
-
tor palette.
130 Part II / Creating Artwork and Logos
Figure 7-7: Zoom in to work with brushes more easily.
3. ClickontheEyedropper tool in the toolbox and click on the dark
blue lettering above the animals to pick up that color and change the
foreground color to this blue.
4. Click the Brush tool and double-click the SoftRound9pixels
brush.
5. Use this brush to add color to the dog’s collar, and then zoom back
out to see the result. Figure 7-8 shows an example.
6. From the Brush presets in the options bar, choose the Grass brush
and add some grass underneath the animals.
7. Leave this file open; we’ll use the History Brush tool shortly.
You’ll use the brushes from the options bar quite often. As you work
through the book, you also learn to incorporate opacity and fill for effect.
For now, think of all of the artwork you can touch up using the Brush tool
just in its default state!
Chapter 7 / Getting Creative 131
Figure 7-8: Touching up an image with brushes
The Pencil Tool
The Pencil tool is used just like the Brush tool. However, instead of
drawing soft brushstrokes or designs, it is used to draw hard-edged
straight or freehand lines. Drawing with the Pencil tool is a freehand
action; if you want straight lines, hold down the Shift key before drawing.
To draw lines using the Pencil tool (use the Pawsable_Paradise.psd
file again):
1. Select the Pencil tool from the toolbox.
2. Select a foreground color using the Eyedropper tool to match a
color in the file specifically or by choosing a color from the Color
Picker. I’ll choose to match the blue in the lines that make up the
outline.
3. Choose a brush from the options bar and configure its settings.
IchosetheHardRound9pixelsbrush.
4. Click once and hold down the mouse where you’d like the first line
to begin.
5. Hold down the Shif t key and drag the mouse to draw a straight line.
Let up on both the Shift key and the mouse when finished.
6. Repeat steps 4 and 5 to draw the remaining straight lines.
7. To draw a line freehand, do not hold down the Shift key while
dragging.
Figure 7-8 shows how lines can be added to the Pawsable_Para
-
dise.psd file. Leave this file as is and don’t save it yet; you’ll use it
in the next project.
Experiment a little more with the Pencil tool, and see what happens
when you hold down the mouse button and continue drawing without let
-
ting up on it. Also, spend some time with different opacities and blends.
You can also use View>Rulers to place rulers on the screen for assis
-
tance in drawing measured widths and distances. As with any tool that
offers the Brush pop-up palette in the options bar, the Pencil tool can be
configured as desired.
.
Note:
When drawing with the Pencil and Brush tools, the lines are drawn on
the active layer. Consider working on a copy so that the original file is
unchanged.
132 Part II / Creating Artwork and Logos
The History Brush
The History Brush tool can be used to remove what you’ve painted on a
layer using the Pencil and Brush tools in the previous section. We use
this brush now to remove what you’ve added thus far to the
Pawsable_Paradise.psd file.
Project 7-4: Using the History Brush
To experiment with the History Brush tool and learn to remove previ
-
ously applied modifications, use the Pawsable_Paradise file you edited in
Project 7-3 (it should still be open):
1. Select the History Brush tool from the toolbox. You can also choose
this tool by pressing Y on the keyboard (or Shift+Y if it’s currently
hidden).
2. From the options bar, select the brush size that you used when draw-
ing lines in the last exercise—this was probably the Hard Round 9
pixels brush.
3. Verify that Opacity is at 100 percent and blending mode is Normal.
4. Drag the mouse over the lines that you drew with the Pencil tool.
They’ll disappear. This is because the History Brush removes what
you’ve previously painted on the file’s layer. (Technically, it uses the
original layer or image as the “source” and reverts to that state.)
5. Change Opacity to 50 percent, and change the brush to one of the
airbrushes.
6. Drag the mouse over the collar previously filled in with color or over
the grass that you added earlier.
The History Brush will work as long as the file is open. The History
Brush won’t work if you close and save the file as a JPEG, GIF, or other
compressed file, or if you flatten the layers of the image before saving.
Make sure you’ve applied this brush as needed before closing the file.
Chapter 7 / Getting Creative 133
The Art History Brush
The Art History Brush allows you to paint over a picture or design with a
brush to give it an artistic or stylized look and feel. By using different tol
-
erance options, paint styles, and brush sizes, you can simulate texture as
well. In order to use the Art History Brush, you have to choose a point in
time from the History palette to use as the specified history state or
source data. (This is similar to the History Brush, except the source data
state must be manually selected.)
Project 7-5: Using the Art History Brush
To use the Art History Brush tool:
1. Open a file to apply the Art History Brush to. The Sunflower.psd
file is a good choice if you don’t have one, and is located in the Chap-
ter 7 folder on the companion CD. This is the file I use in this
example.
2. Choose Window>History to open the History palette if it isn’t
already on the workspace. Feel free to dock the palette.
3. Select the Art History Brush from the toolbox.
4. From the Brush palette available from the options bar, load the Dry
Media Brushes from the additional options. Click OK when
prompted.
5. Choose the Permanent Marker Medium Tip from the available
brushes.
6. MakesurethemodeissettoNormal and that Opacity is at 100 per
-
cent. Set the style to Tight Short.
7. Change the Area setting to 50 px. This will increase the painting
area. Set Tolerance to 5 percent. (A lower tolerance lets you paint
more strokes; a higher tolerance limits the strokes. A lower toler
-
ance will let you see the effect more quickly.)
8. From the History palette, verify that Art History Brush appears in
the small window in the History palette. If it does not, click to the
left of the thumbnail in the History palette to change it.
9. Drag the mouse slowly over the sunflower picture, starting with the
sunflowers themselves and working outward in a circular pattern.
134 Part II / Creating Artwork and Logos
]
Tip:
Depending on how much RAM and other system resources you have, it
might seem like the Art History Brush stops working o ccasio nally. This is not
the case; it’s just that you’re making changes faster than the c omputer c an
apply them. Let go of the mouse, let the computer catch up, and then click
and drag again if this happens.
10. Experiment with other opacities, modes, styles, areas, and toler
-
ances to see how these changes affect the image. Keep in mind that
these changes are pixel-based and differ dramatically from one image
to another.
You might not use the Art History Brush very often as a screen printer,
but you might as a graphic artist in another field. Understanding what’s
available is half the battle though, and you might come across a client
someday who wants you to create a watercolor, oil painting, pastel, chalk,
or charcoal rendition of their artwork or photograph. Figure 7-9 shows
how the above example turned out with my Art History Brush
application.
Chapter 7 / Getting Creative 135
Figure 7-9: Using the Art History Brush
6
Caution!
As you’ll soon find out, screen printing artwork that has had special effects
applied or effects such as the Art History Brush will be more d ifficult than
screen printing images that do not have these effects applied. These to ols
are best used in our industry to repair or c orrec t flaws, o r to make flaws in
the image less noticeable.
Using Color and Design Wisely
Since we’re on the subject of being creative, creating artwork from
scratch, using the basic tools, and generally getting started with the
whole idea of doing things artistically using Photoshop, it is certainly a
good time to talk about creating artwork that’s easy to print using a
screen printing press. If you are new to screen printing, you’ll want to
simplify the print process as much as possible by designing artwork that
is uncomplicated and easy to work with. If you’ve been printing for some
time, you probably already know what’s easy to print and what isn’t, as
well as your equipment’s limitations.
]
Tip:
Of course, you’ll always have to give the client what they want, but you’ll
also discover quite quickly what you c an’t do. You’re not going to be able to
print an award-winning photorealistic design o n a two-station manual press
or if you only have an inkjet printer with no PostScript capabilities. If that’s
the case, you’ll have to create spot color prints exclusively and contract out
all of your process color jobs. Keep this in mind when creating artwork and
accepting jobs.
About the Images in This Chapter
ThesunflowerimageinFigure7-9ismadeofmanycolors.Printing
something like this using a manual four-station press would be difficult at
best. Printing it on an automatic press as process color would work
better. In contrast, printing something like the Rocks and Things logo in
Figure 7-3 would be pretty easy since there are really only two or three
colors, the background is noisy with lots of dots haphazardly placed in the
image, and the font has clearly defined edges. You could even use the
136 Part II / Creating Artwork and Logos
color of the shirt as a background and reduce the logo to one color with a
border and some background noise.
The longhorns design in Figure 7-4 would work well as a heat trans
-
fer or a screen print and could also be easily transferred using
sublimation techniques. Figure 7-4 is a spot color design; all of the colors
and lines are clearly defined and a screen can be created for each of the
colors in it. For true spot color designs, stencils (screens) are created for
each color in the image, and those screens define exactly what will be
printed on the shirt. With a true spot color design, halftone screens don’t
need to be created. Unlike spot color designs with highlights or gradients
or process color designs, you don’t need a PostScript printer to create
the film or vellum.
Figure 7-7 and the Pawsable_Paradise file have a gradient as a back
-
ground. This needs to be printed out using a PostScript printer and to be
color separated. It will also be printed on the film or vellum using half-
tone dots so that the colors will fade into one another when the actual
printing occurs on the press. This would be a more difficult item to print
for someone new to the industry but certainly manageable in Photoshop
and with a four-color press and appropriate printer. (You might also want
to consider an index print for this design since it has only a few colors.)
So where should you begin if you’re new to the industry? Spot color
designs that are one or two colors and where the colors don’t touch at all
is a good place to start. This type of design helps you learn Photoshop
and understand your press and equipment’s capabilities, as well as gain
clients who only want simple designs.
When Colors Don’t Touch
The easiest artwork to print on a manual press is artwork that is spot
color and whose colors don’t touch. The simplest of spot color designs
are those that are one color or contain between one to four colors that
don’t touch and can be easily separated. Each color has its own screen,
and no PostScript printer is necessary.
Figure 7-10 shows a single spot color design. Printing this requires a
single printout on vellum or film and a single screen. There is no need to
color separate or create process or indexed color printouts and no need
for halftones, so any inkjet printer that can lay down the ink will do. This
is the easiest of prints and is a great place to start in the field. This
Chapter 7 / Getting Creative 137
design would also be simple to print in two or three colors since the dif
-
ferent elements do not touch each other.
.
Note:
This design (Diesels.psd) is included on the companion CD.
When Spot Colors Touch
Spot colors that touch or overlap are the next easiest to design and print.
(In this section, I’m still referring to true spot color images—those that
do not blend or fade.) You still can get away with not having a PostScript
printer, you can use a two- or four-station manual press, and you can
print out film or vellum to create simple stenciled screens. Of course,
this makes the actual printing process a little more complex; for colors
that touch, you have to have your press and screens aligned perfectly so
everything lines up like it’s supposed to. You’ll want to put the colors on
in a specific order if they overlap; for instance, dark ink will usually print
over light ink, but the reverse isn’t always true. You might have to flash
in between also, and you might have to use an underbase. You’ll have to
take the design into account too, and take extra steps if the colors fit
together incorrectly in production. Additionally, you can’t have more
138 Part II / Creating Artwork and Logos
Figure 7-10: Single spot color design
colors than you have stations on your press, since you can’t take the shirt
off and put it back on again and maintain registration and alignment.
Figure 7-11 shows a design where the colors touch. Printing this
requires that the colors be separated and each color printed separately.
There are plenty of chapters in this book dedicated to color separations;
for now, it’s only important that you understand the differences between
types of prints.
In this example, there are four colors: red, white, blue, and black. Amer
-
ica Stands United is in blue with a black outline, the date is in red with a
black outline, and the flag is made up of red, white, and blue. (This design
was printed on white shirts, so the color white was never actually
printed.)
Chapter 7 / Getting Creative 139
Figure 7-11: Colors that touch
When Colors Blend, Process Color, Fake
Process Color, and Indexed Color
For printing any other design, including photos, photorealistic images,
spot color artwork with gradients or highlights, artwork where colors
blend into each other, and any kind of process color or indexed color
print, you need a PostScript printer and a fair knowledge of separations,
dot gain and loss, ink types, undercoatings, and color channels. You also
need to be somewhat experienced with your equipment. Part V of this
book, “Color Separations,” and Part VI, “Printing,” detail how to color
separate and print out this type of artwork. It’ll take some practice! Fig
-
ure 7-12 shows an image that requires a process color print.
]
Tip:
Until you’ve worked through the projects in this book and created process
artwork successfully, consider sending out your process color jobs to an
experienced printer.
In this figure, the background is black, the outer circle is a light blue, the
sky fades from orange to red using a gradient, and the mountains fade
from green into white using a gradient. There are many colors in this
image that will need to be created by blending colors and inks together,
making this print quite complex.
140 Part II / Creating Artwork and Logos
Figure 7-12: Process color print
Summary
In this chapter you learned about creating artwork. Specifically, we dis
-
cussed understanding what a client wants and how to use basic tools and
commands such as the Paint Bucket tool, the Brush and Pencil tools, the
History Brush and Art History Brush tools, and the Image and Edit com
-
mands. These tools are used just about every time you create something
in Photoshop, and some of the commands are common to other pro
-
grams. For instance, Cut, Copy, and Paste are used in other software
programs, and you can paste into Photoshop after cutting or copying from
another program.
You also learned how to use color and design wisely if you’re new to
screen printing. Single spot color prints and two- to four-color spot color
prints are the easiest, and the film or vellum can be created even if you
don’t have a PostScript printer. Process color, indexed color, and artwork
whose colors blend into one another require extra attention, including
color separating them. Color separation is covered in depth in the chap-
ters in Part V of this book.
Chapter 7 / Getting Creative 141
This page intentionally left blank.
Chapter 8
Using the ShapeUsing the Shape
Tools
The shape tools, available from the toolbox, are used to create vector
shapes for logos or other designs. Using these tools, you can easily draw
rectangles, ellipses, circles, polygons, lines, and other custom shapes. As
each shape tool is chosen, the options bar changes to reflect the choice.
From the options bar, tool-specific options can then be set. Using the
tools is a pretty straightforward process, so in this chapter we focus on
using the shape tools to create actual client-based designs.
.
Note:
Vector-based means that the shapes are drawn using mathematical formulas
and thus won’t be pixelated like raster-based images. There’s no need to
switch to a vector-based program anymore when creating shapes and text,
since Photoshop has inco rporated this feature into its latest versions.
Rectangle Tool
If you’re new to Photoshop and screen printing, designing artwork for cli
-
ents using the shape tools is a great place to start. Artwork that contains
shapes and text is not only easy to produce, but easy to print also. Vec
-
tor-based shapes can be resized without distortion, so you can use the
same artwork for a truck decal and a business card without having to
rework the design.
In Project 8-1 we use the Rectangle tool to create a common logo for
an athletic group, coach, or team. You’ll add a couple of letters here to
143
complete the design, but the text chapter is next, so I won’t go into too
much depth about that just yet.
Project 8-1: Creating the Famous XXL Logo
The design in this project can be changed to fit the needs of any client
simply by typing in their name instead of the XXL we’ll add here. Later,
we look at some examples of how this design was changed to meet other
clients’ needs.
1. Choose File>New. Choose RGB Color mode, and for Preset, select
Default Photoshop Size. Select a transparent background. (For
most of your work, you’ll want to create a transparent background,
but often in this book I use a white background so it shows up better
in print.)
2. Change the foreground color in the toolbox to black by clicking on it
and using the Color Picker.
3. Locate the shape tools from the toolbox and choose the Rounded
Rectangle tool. You can also press Shift+U to toggle through the
available shape tools.
4. From the options bar, change the radius to 10 px by typing the num-
ber into the Radius field. This specifies the corner radius and has
nothing to do with the actual size of the rectangle.
5. Placethemouseinthetop-leftcornerofthenewfileanddragto
draw the rounded rectangle. Let go of the mouse when the rectangle
is the size you want.
6
Caution!
Don’t panic because the edges look pixelated; as soon as you move on to
the next tool, it’ll straighten out!
6. Choose the Horizontal Type tool from the toolbox. It’s above the
shape tools.
7. Click once inside the rounded rectangle.
8. From the options bar, select a large font size (for this project, I’ve
used 90 pt) by typing the size in the font size field, as shown in
Figure 8-1.
9. From the options bar, choose white forthetextcolor(seeFigure
8-1).
144 Part II / Creating Artwork and Logos
10. Choose Arial asthefonttype(seeFigure8-1).Ifyouhaveamore
“collegiate” font, such as Yearbook, use that for better effect.
11. Click again inside the rectangle. In the options bar, click the Commit
button ( ). Type XXL.
12. Select the Move tool from the toolbox, choose Auto-Select Layer
in the options bar, and click on the text.
]
Tip:
If you need to go back and correct anything, like the size of the font, the
shape of the rectangle, etc., use the Histo ry palette (Window>History) to
go backward and correct errors.
13. Position the text where you want it in the rounded rectangle and
save the file. Here, it’s a little to the left; I’m thinking about adding a
dash and some clip art on the right.
This design has two colors. The rounded rectangle is black, and the text
is white. When printed, though (without color separating the artwork
first), the printout will only have black on it and the lettering will be
transparent. A printout like this on film or vellum can be used to create a
Chapter 8 / Using the Shape Tools 145
Figure 8-1: Creating the XXL logo
single screen. With this type of design, all you need to do is print the one
color on the shirt and the letters XXL will be whatever color the shirt is,
since there will be no ink there!
Of course, you can color separate the design before printing it out,
thus creating two screens. One screen will be the rectangle with the
XXL cut out, and the other will be the XXL lettering for printing another
color on the shirt. Either way, it’s an easy way to create a logo for a cli
-
ent. Figure 8-2 shows another use for this type of design.
.
Note:
Again, I’ve made the background white instead of transparent so the design
will print better in the book. You’ll want to use a transparent background for
actual screen printing.
More about Rectangles
Drawing a rectangle is just like drawing the rounded rectangle detailed
earlier. The options bar is the same as well, except the Radius field isn’t
available. Radius has to do with circles, and while a rounded rectangle
has a circular shape around its edges, regular rectangles do not.
You can draw a square instead of a rectangle either manually or by
holding down the Shift key while drawing. Additionally, the color of the
shape just drawn and still selected can be changed from the options bar.
146 Part II / Creating Artwork and Logos
Figure 8-2: A new logo created with the same
method
Options Common to All Tools
Now that you have a little experience with rectangles under your belt,
let’s take a look at some options that are available for rectangles and
other shape tools. These additional options are located on the options bar
and allow you to create shapes that follow precise specifications.
Figure 8-3 shows the additional options for the Rounded Rectangle
tool. This is a drop-down list that can be accessed from the down arrow
in the middle of the options bar. Here, you can tell Photoshop how you’d
like the rectangle to be drawn by default: unconstrained (which is the
default), as a square, as a user-specified fixed size, as any proportion of
width and height, to draw the shape from the center instead of the default
top-left corner, or to snap the shape to pixels (pixel boundaries).
The options for the Ellipse and Polygon tools are a bit different, but cer
-
tainly intuitive. For an ellipse, drawing as a circle is an option, while Snap
to Pixels isn’t (pixels are square, not round). For polygons, you can set
the radius, choose to smooth the corners, create a star, and indent the
sides of the polygon.
Additionally, the options discussed in earlier chapters including
Create new shape layer, Add to shape area, Subtract from shape area,
Intersect shape areas, and Exclude overlapping shape areas are also
available. For more information on these options, see Chapter 4, “The
Options Bar.”
Chapter 8 / Using the Shape Tools 147
Figure 8-3: Rounded Rectangle options
Ellipse Tool
The Ellipse tool is used in a similar way to the Rectangle and Rounded
Rectangle tools. Holding down the Shift key while dragging creates a cir
-
cle instead of an ellipse. Circles and ellipses can be used to create simple
logos and designs. Figure 8-4 shows a logo created using an ellipse, a sin
-
glepieceofclipart,andsomelettering.Here,thefigureisshownona
transparent background. You might prefer working on this type of back
-
ground over a white one.
Polygon Tool
The Polygon tool has more options than the Rectangle and Ellipse tools
do, including the ability to choose how many sides you want your polygon
to have. Polygons, which are closed shapes, like triangles, squares, rect
-
angles, and octagons, have three or more sides. You can create a polygon
with 100 sides if you want, although it’ll look more like a circle.
The Polygon tool comes in handy when you want to create your own
shapes or a shape that precisely matches a client’s existing logo or art
-
work. As mentioned in the last chapter, sometimes it’s easier to recreate
a logo for a client than to work with a low-resolution web graphic or
JPEG file.
148 Part II / Creating Artwork and Logos
Figure 8-4: Using an ellipse
Another common use for the Polygon tool is to create a graphic that
is the same size and shape as a sublimation blank. (Sublimation is the
process of printing out artwork using an inkjet sublimation printer and
adhering it to a sublimation substrate using a heat transfer press.) Subli
-
mation blanks come in all shapes and sizes: key chains, luggage tags,
coffee mugs, Christmas ornaments, clocks, nameplates, etc. A design can
be created to match the material’s shape exactly.
Project 8-2: Using the Polygon Tool
In this project, we learn to create a polygon that is a star, which can be
used later as a background print for a sublimation Christmas ornament
blank. After drawing the polygon, you can insert a photograph of your
favorite family member, use the type tools to add text, and add a little clip
art to make a very personal Christmas ornament.
To use the Polygon tool:
1. Open a new file and choose the Polygon tool from the toolbox.
2. Change the foreground color in the toolbox to red.
3. From the options bar, type in the number of sides you want the poly-
gon to have. For this project, choose 5.
4. Make sure that Create new shape layer is selected. It’s the
default.
5. Select a style.
6. Click the down arrow on the options bar to see the polygon options.
Check the Star choice. See Figure 8-5.
7. Drag the mouse to draw the polygon. You may have to try a few
times to get it right. Select Edit>Undo to remove any star you don’t
like.
8. Use the Move tool with Auto-Select Layer chosen in the options
bar to move the star to the correct place in the file.
9. To add a picture to the star, choose File>Open and open the file that
contains the photo to add. If prompted about the color profile, select
DiscardtheEmbeddedProfileand click OK.
10. Use the Crop tool and the Image>Image Size command to crop
and resize the image so that it will fit on the star.
Chapter 8 / Using the Shape Tools 149
11. In the file that contains the edited photo, choose Select>All then
Edit>Copy.
12. Select the file that contains the star and choose Edit>Paste.The
picture will be added to the new file. Use the Move tool to position
the photo in the center of the star. In other chapters we learn how to
smooth the edges of the photo, use blending modes, and perform
other editing tasks. You can also drag and drop the picture onto the
star if you prefer.
13. Add text if desired; text is detailed in depth in the next chapter.
14. Use File>Save As to save the file if desired.
Practice drawing other polygons too, and experiment with various sizes
and numbers of sides. From the polygon options, uncheck Star. Experi
-
ment drawing polygons again, and draw at least an octagon, pentagon,
and a triangle or square.
150 Part II / Creating Artwork and Logos
Figure 8-5: Drawing a star using the Polygon tool