Adobe After Effects 5.0- P2 doc
Bạn đang xem bản rút gọn của tài liệu. Xem và tải ngay bản đầy đủ của tài liệu tại đây (497.21 KB, 30 trang )
17
ADOBE AFTER EFFECTS 5.0
Classroom in a Book
Organizing the project
It is just as important to organize files within an After Effects Project as it is that you
organize the files for a job on your hard drive. Just as you created the organizational
folders on your drive at the beginning of this job (in “Setting up a folder structure” on
page 4), you’ll now create folders that give order to this After Effects Project.
1 Choose File > New > New Folder. Or, click the folder icon
() on the lower edge of the
Project window. An untitled folder appears in the Project window.
2 Type psd files and then press Enter (Windows) or Return (Mac OS) to name the folder.
3 Drag the Hexagon01.psd file into the psd files folder.
4 Use the arrow to expand the psd files folder so that you see the Hexagon01.psd nested
in it.
In this lesson you’ll import only .psd files, so you don’t need any other folders. Later, in
more complex projects with many kinds of files, you’ll create a Project-window folder for
each file type that you import.
Creating the first composition
You start building your animation by creating a new composition. Compositions are the
basic units of an After Effects project in which you place and manipulate images, movies,
audio, and even other compositions.
.
AE_CIB.book Page 17 Monday, October 8, 2001 12:08 PM
LESSON 1
18
Creating 2D Elements from Hexagons
1 Choose Composition > New Composition.
2 In the Composition Settings dialog box, type Hexagon Final Comp in Composition
Name.
Note: Final indicates that this is the composition that you will render at the end of the lesson.
This name distinguishes it from other intermediate compositions that you’ll create in this
lesson.
3 Using the Preset pop-up menu, select the NTSC D1 Square Pix, 720 x 540 option.
4 Make sure that the following settings are shown:
• Width: 720
• Height: 540
• Lock Aspect Ratio: unselected (no checkmark)
• Pixel Aspect Ratio: Square Pixels
• Frame Rate: 29.97
• Resolution: Full. (You can select a lower resolution. Use Half or lower if your system has
only the minimum amount of RAM, a standard monitor size, or a slow processor.)
• Start Timecode: 0;00;00;00
5 In Duration, type 400 for four seconds.
Delivery formats
At this point in the project, it’s important to consider what format you’ll use for the final delivery of your
project (such as film, Web, or television), because this determines the size at which you build your elements.
Yo u specify these settings at the composition level.
Yo u know from the job scenario described in the introductory chapter that this animation is intended
primarily for NTSC broadcast. This means that your final animation should be rendered at D1 resolution
(720 x 486). Therefore, as you build your elements you need to construct them in compositions that are large
enough for their required size in the final animation.
This D1 resolution is a non-square pixel format. However, in these lessons you build elements using square
pixel aspect ratio and place your final composition into a 720 x 486 D1 NTSC composition before you render
the final animation for delivery.
AE_CIB.book Page 18 Monday, October 8, 2001 12:08 PM
19
ADOBE AFTER EFFECTS 5.0
Classroom in a Book
6 When all these options are set, click OK.
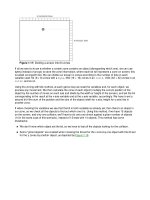
The Hexagon Final Comp now appears in the Project window and in the title bar of two
new windows: the Composition window and the Timeline window. If necessary, resize
these windows so that they all fit on your screen. The Composition window, which
usually shows you how your composition looks, is empty (solid black, or whichever
background color is currently selected) because you haven’t added any images to your
new composition.
The Timeline window is also empty, but you can see the numerous controls in it that
you’ll use to manipulate items in compositions. Notice that the right side of the Timeline
window shows the duration you specified: four seconds.
Yo u can make your Timeline window more efficient for the work you’ll do in this lesson
by closing the Parent panel. To do this, right-click (Windows) or Control + click (Mac OS)
the word Parent in the panel heading to open the contextual menu and choose Hide This.
AE_CIB.book Page 19 Monday, October 8, 2001 12:08 PM
LESSON 1
20
Creating 2D Elements from Hexagons
Placing footage in a composition
When you add footage to a composition, you position it in terms of both space and time.
You can change these positions later, but it’s efficient to put it where you want it now.
The In point is the point in time at which the footage first appears or begins playing in a
composition. The layer In point is automatically set at the position of the current-time
marker
() when you bring the layer into the composition. You want this image to start
appearing at the very first frame (00;00;00;00), so that’s the number you want to see in the
underlined current-time display, in upper left corner of the Timeline window. There are
several methods you can use to change the position of the current-time marker.
1 If the current-time marker is not at 0:00, do any one of the following:
• Click the current-time display to open the Go To Time dialog box, type 0 (the number
zero), and click OK.
• Drag the current-time marker as far to the left as possible.
• Press the Home key.
2 In the Project window, select the Hexagon01.psd file and drag it into the Composition
window.
3 Continue dragging until the bounding box (outline indicating the dimensions of the
image) is positioned slightly above center on the right side of the composition.
AE_CIB.book Page 20 Monday, October 8, 2001 12:08 PM
21
ADOBE AFTER EFFECTS 5.0
Classroom in a Book
When you release the mouse, the hexagon appears in the Composition window. The file
also appears as Layer 1 in the Timeline window, where it is listed as Hexagon01.psd—the
name of the source file.
Note: If the background in the Composition window is white, you won’t be able to see the
hexagon (because it is also white). To fix this, choose Composition > Background Color to
open the Background Color dialog box. Click the color swatch to open the color picker, and
select the black color sample. Then click OK to close both dialog boxes.
Transform Properties
The transform properties are the core of After Effects. After you master the techniques for manipulating these
settings and adding keyframes for these five properties, the possibilities are virtually endless. In this book,
almost every adjustment that you make to a layer within After Effects is based on the principles that you learn
for working with the transform properties.
To access the transform properties for a layer, you have two options. You can click the arrow to the left of a
layer name to reveal Masks, Effects, and Transform categories. Then, click the arrow next to Transform to
reveal the five transform properties for that layer: Anchor Point, Position, Scale, Rotation, and Opacity. You
can make changes to the values shown here to affect your layer.
Frequently, you need to see only some of the transform properties—not all of them—and you aren’t interested
in the Masks or Effects categories. Opening all these categories can be distracting and inconvenient because
the list becomes so long you may need to scroll to find the property you want to see. The solution is to use a
simple, single-key shortcuts to open a transform property, without opening the category levels or other
properties. This keeps your Timeline window easier to use. These shortcuts are:
A = Anchor Point
P = Position
S = Scale
R = Rotation
T = Opacity
When you use a second shortcut, that transform property replaces the first one you opened, keeping the
Timeline window trim and efficient. To reveal multiple transform properties for a layer, press Shift as you
press the additional property shortcuts.
Yo u don’t need to memorize these properties now, because the procedures in this book remind you which
shortcut to use for transform-property displays. For more information, see “Viewing layer properties in the
Timeline window” in After Effects online Help.
AE_CIB.book Page 21 Monday, October 8, 2001 12:08 PM
LESSON 1
22
Creating 2D Elements from Hexagons
Transforming the image
After Effects reserves the term transform to specific layer properties, including the layer
position, scale, rotation, opacity, and the placement of the anchor point. By the time you
finish your work with the hexagons element, you will apply each of these transform
properties at least once and some many times, in a variety of situations and combinations.
Moving the image to an exact position
Because you’ll be creating a precise pattern using the Hexagon01.psd, your next step is to
fine-tune its position within the composition.
1 If the layer is not selected, click the image in the Composition window or click the layer
name in the Timeline window.
To avoid scrolling to see an image in the Composition window, use the magnification pop-
up menu in the lower left corner of the window or press the comma key (,) to zoom out. To
increase redraw and processing speed while you work, you can reduce resolution of the
Composition window from Full to a lower value (such as Half or Third), using that pop-up
menu. These settings affect only your working views, not the size or the quality of your final
output.
Magnification (left) and Resolution (right)
2 Press P on your keyboard. The Position property appears below the layer in the
Timeline window.
AE_CIB.book Page 22 Monday, October 8, 2001 12:08 PM
23
ADOBE AFTER EFFECTS 5.0
Classroom in a Book
3 Move the layer to (or close to) the X, Y coordinates 468, 242 by doing any of the
following:
• Drag the layer within the Composition window, using the coordinate display in the Info
palette or the Position property in the Timeline window to guide you.
If you can get close to 468 and 242 but have trouble getting them exactly, try using the
arrow keys on your keyboard to nudge the image a few pixels at a time.
• Drag the underlined Position property coordinates in the Timeline window to scrub.
Drag right to increase the value or left to lower it.
AE_CIB.book Page 23 Monday, October 8, 2001 12:08 PM
LESSON 1
24
Creating 2D Elements from Hexagons
• Click the position coordinates in the Timeline window and type 468 for X and 242 for Y.
Note: These X, Y coordinates mark the position of the anchor point of the layer within the
Composition window. By default, After Effects sets the anchor point at the center of the layer.
Anchor point and layer selection handles
Adjusting the image size
In real life, you often have to work with images that are not the ideal size for your compo-
sition. In this task, you’ll decrease the size of the hexagon image so that the final bar of
hexagons that you build fits in the composition frame the way you want.
1 In either the Composition window or the Timeline window, select the Hexagon01.psd
layer.
AE_CIB.book Page 24 Monday, October 8, 2001 12:08 PM
25
ADOBE AFTER EFFECTS 5.0
Classroom in a Book
2 Press S on your keyboard. The Scale property appears below the layer in the Timeline
window, replacing the Position property.
3 Change the Scale value to 57%, either by scrubbing the value or by selecting it, typing
the new value, and pressing Enter (Windows) or Return (Mac OS).
The hexagon appears in the Composition window at the reduced size.
Setting keyframes to rotate the image
Next, you want the hexagon to rotate as it falls into place. In the following task, you’ll
animate the hexagon so that it rotates 180˚ over the first 15 frames of the four-second
composition.
You use two or more keyframes to specify how things change over time within the compo-
sition. A keyframe is a reference point that links a layer property value to a place in time.
To make the image rotate, you set one keyframe for its beginning Rotation value and
another keyframe for its final Rotation value. After Effects calculates the intermediate
rotation values so you don’t have to create keyframes for each individual frame between
the two reference points.
1 Move the current-time marker to 0:00, if necessary (by pressing the Home key,
dragging the current-time marker, or clicking the current-time display to open the Go To
Time dialog box and typing 0).
2 Select the Hexagon01.psd layer in the Timeline window.
3 Press R to open the Rotation property for the layer. There are two underlined numbers
for rotation. The first is the number of revolutions. The second is the number of
additional degrees.
4 Leaving the first number (revolutions) at zero, change the second number (degrees):
Scrub or type -180˚, being careful to make the number negative.
AE_CIB.book Page 25 Monday, October 8, 2001 12:08 PM
LESSON 1
26
Creating 2D Elements from Hexagons
5 Click the stopwatch icon to the left of the Rotation property. The stopwatch icon now
includes hands
(), and a small diamond shaped icon(), representing a keyframe,
appears in the timeline at the position of the current-time marker (0:00).
Rotation stopwatch (left) and keyframe (right)
6 Drag the current-time marker to 0:15, or click the current-time display and type 15 in
the Go To Time dialog box.
7 Scrub or type to change the second rotation value to 0˚ (zero). A new keyframe
automatically appears at the position of the current-time marker (0:15).
Important: When setting keyframes for any property within After Effects, be careful to click
the stopwatch only once. The clock hands inside the stopwatch icon indicate that the property
can change over time, so After Effects automatically adds keyframes when you move the
current-time marker and change a value for that property. If you click the stopwatch a second
time, this indicates that the property remains the same throughout the composition, so After
Effects removes all the keyframes for that property (and the hands disappear in the icon).
However, if you accidentally clear a selected stopwatch, choose Edit > Undo, or press Ctrl + Z
(Windows) or Command + Z (Mac OS) to undo that action and avoid having to redo the
work of creating the deleted keyframes. If you want to remove a specific keyframe, simply
select that keyframe and press Delete.
AE_CIB.book Page 26 Monday, October 8, 2001 12:08 PM
27
ADOBE AFTER EFFECTS 5.0
Classroom in a Book
Previewing the first animation
You can preview your composition to see results of setting the keyframes.
1 Press the Home key to move the current-time marker to 0:00.
2 Press the spacebar or click the Play button
() in the Time Controls palette to play the
animation.
Note: While the preview plays, the current-time marker moves across the timeline, and a
green line appears above it. After the marker passes 0:15, the hexagon does not move again
until the preview loops back to the starting point.
3 When you finish watching, click the Play button again to pause the preview or press the
spacebar again to stop it.
Yo u’re finished working with the Rotation property for now, so press the (`) accent grave
key to hide it again. Or, you can just press R.
Many After Effects controls, including the buttons on the Time Controls palette, have tool
tips: small windows that appear after a few seconds when the pointer hovers over the button,
tool, or option. If you do not see these, choose Edit > Preferences > General and make sure
Show Tool Tips is selected (checked).
Creating an animated pattern from a simple image
You need many more hexagon layers to build your hexagon element. Instead of repeating
all the changes you’ve made to the first layer on each additional hexagon, you’ll duplicate
the first layer many times. This not only reproduces the layer itself, but also duplicates any
changes made or keyframes set for Scale, Position, and Rotation for each new layer, saving
you a lot of time. Your first task is to create the duplicates.
1 Drag the current-time marker to 0:0, or press Home.
2 In the Timeline window or the Composition window, select the Hexagon01.psd layer,
and then choose Edit > Duplicate. A new layer appears above the original layer in the
Timeline window.
3 Duplicate the original layer eight more times, either by choosing Edit > Duplicate or
by pressing Ctrl + D (Windows) or Command + D (Mac OS).
Notice how duplicating the first layer affects the windows:
AE_CIB.book Page 27 Monday, October 8, 2001 12:08 PM
LESSON 1
28
Creating 2D Elements from Hexagons
• The appearance of the Composition window does not change. That’s because the ten
images are stacked directly above each other at exactly the same position coordinates.
• The Timeline window lists all ten layers as Hexagon01.psd because all ten layers use the
same source file. The number to the left of the name identifies each layer according to its
position in the layer stack (from top to bottom or front to back).
• All layers have Rotation, Scale, and Position settings that are identical to the first layer.
To verify this, select one or more layers and then press R, S, or P.
Moving layers into a pattern
The next step is to arrange the ten hexagons so that they form a precise honeycomb
formation. You’ll place the layers in the order shown in the illustration below.
Layers 1–10 in final positions
You do not have to use the exact coordinates listed in the following procedure. If you do
use them, make sure that the current layer coordinates are 468, 242. Otherwise, you can
just arrange the hexagons visually so that they form a tile-like pattern with evenly wide
spacing between the hexagons.
8 57 4 2
9 6 3
1
10
AE_CIB.book Page 28 Monday, October 8, 2001 12:08 PM
29
ADOBE AFTER EFFECTS 5.0
Classroom in a Book
1 In the Timeline window, select the top layer (Layer 1). Notice the layer handles (small
squares at the corners of the layer bounding box) that appear in the Composition
window. Press P to open Position properties for the layer.
Note: If you don’t see the layer handles, click the right-facing arrow button just above the
vertical scroll bar in the Composition window to open the Composition window menu, and
choose Layer Handles if it is not already checked.
2 Drag Layer 1 to the far right of the composition. Most of the hexagon should be outside
of the composition frame, with only a portion visible.
3 In the Timeline window, examine the Position coordinates shown for Layer 1.
AE_CIB.book Page 29 Monday, October 8, 2001 12:08 PM
LESSON 1
30
Creating 2D Elements from Hexagons
4 If you want to use the same Position coordinates as the sample, drag the image in the
Composition window until the coordinates are 723, 242. Or, scrub or type these Position
coordinates in the Timeline window. To move a layer precisely, try these techniques:
• After you start to drag a layer, press Shift to constrain the movement either vertically or
horizontally. Be careful not to press Shift before you drag or you’ll resize the image instead
of moving it.
• Press the arrow keys to nudge the image by small increments.
• For typing, use the Tab key to jump from one coordinate value to the next, all the way
down the layer stack.
5 Select each layer in turn and move it to the position shown in the diagram at the
beginning of this procedure. If you want to use the same coordinates as the sample, refer
to the following list:
Layer 1 723, 242
Layer 2 595, 169
Layer 3 595, 316
Layer 4 Leave in its original position (468, 242)
Layer 5 341, 169
Layer 6 341, 316
Layer 7 214, 242
Layer 8 87, 169
Layer 9 87, 316
Layer 10 -40, 242
6 Choose File > Save.
AE_CIB.book Page 30 Monday, October 8, 2001 12:08 PM
31
ADOBE AFTER EFFECTS 5.0
Classroom in a Book
Starting a new animation by creating keyframes
You now have the ten hexagons in a tight honeycomb formation. Next, you’ll set a
position keyframe for each layer.
1 Move the current-time marker to 0:15, either by dragging or typing.
2 Choose Edit > Select All to select all layers. Or, press Ctrl + A (Windows) or
Command + A (Mac OS). Then, if the Position property is not already open, press P to
open it for all layers.
3 Press Alt + P (Windows) or Option + P (Mac OS) to set a Position keyframe for all of
the layers at once. Notice that the stopwatch icons (to the left of Position) now have hands,
and diamond-shaped keyframe icons appear at 0:15 on the timeline for each layer.
4 Choose Edit > Deselect All or press Ctrl + Shift + A (Windows) or
Command + Shift + A (Mac OS) to deselect all layers. Leave the Position properties open.
This arrangement of the hexagons represents the final position in the hexagon pattern
animation.
AE_CIB.book Page 31 Monday, October 8, 2001 12:08 PM
LESSON 1
32
Creating 2D Elements from Hexagons
Continuing to animate the hexagons
Yo u’re now ready to create the starting position for each hexagon. You want the individual
hexagons to fly into the composition, spinning and coming to rest in the precise
honeycomb pattern. To do that, you’ll assign each layer a starting point that is outside of
the composition frame. Because it’s helpful to see more of the pasteboard (the gray area
outside the composition itself), your first step is to zoom out. This changes your working
view only; it does not reduce or enlarge the objects in the rendered movie.
Layers 1–10 in starting positions
If you don’t want to take the time to arrange the start position to match the ones shown
below, simply drag the files to the approximate positions, as indicated by the illustration
above. The alignment of the start positions is not as critical to the results as the precision
of the final honeycomb pattern that you arranged earlier.
1 In the Composition window, choose 50% (or lower) from the magnification pop-up
menu in the lower left corner. Or, press the comma key (,) to zoom out by one step.
2 Move the current-time marker to 0:00.
3 Move each hexagon to the approximate position shown in the illustration above this
procedure, using whichever technique you prefer. If you want to use the exact coordinates
shown in the sample, they are:
Layer 1 723, -51
Layer 2 -192, 169
AE_CIB.book Page 32 Monday, October 8, 2001 12:08 PM
33
ADOBE AFTER EFFECTS 5.0
Classroom in a Book
Layer 3 595, 607
Layer 4 468, -49
Layer 5 341, 594
Layer 6 -125, 316
Layer 7 825, 242
Layer 8 87, -94
Layer 9 87, 595
Layer 10 -140, 242
Keyframes automatically appear for each layer (at 0:00) as you specify the new positions.
4 Preview your animation by pressing the spacebar, or press 0 (zero) on the numeric
keypad to create a RAM preview. When you are finished watching the preview, press the
spacebar to stop.
5 With the Timeline window active, press Ctrl + A (Windows) or Command + A
(Mac OS) to select all layers, and then press the accent grave key (`) to hide the Position
properties. Choose Edit > Deselect All to deselect the layers.
6 Choose File > Save to save your work.
After you create a RAM preview, you can drag the current-time marker to scrub through
the composition. If you drag the current-time marker without building a RAM preview, After
Effects updates the Composition window as quickly as it can (depending on the speed of the
processor, the amount of RAM available, and the speed of the display card). For more infor-
mation, see “Allocating RAM to After Effects” on page 2. See also “Saving a RAM preview as
a rendered movie” and “Techniques for working efficiently” in After Effects online Help.
.
AE_CIB.book Page 33 Monday, October 8, 2001 12:08 PM
LESSON 1
34
Creating 2D Elements from Hexagons
RAM previews
What is a RAM preview? When you preview an animation by pressing the spacebar or clicking the Play
button in the Time Controls, the playback speed shown is not real time. The composition plays back at as
close to real time as possible; actual speed varies based on the speed of your processor. Depending on the
amount of RAM available on your system and the speed of your display card, you can run the composition
at real time by creating a RAM preview.
To create a RAM preview, After Effects first loads the frames into RAM and then plays them back. The first
cycle through the preview appears to be much slower. As After Effects builds the preview, a green line moves
across the timeline, indicating the progress of the RAM preview build. After the preview is loaded into RAM,
the animation plays back at real time or as close to real time as your system can handle.
The number of frames that appear in a RAM preview depends on how much information can be loaded into
the RAM on your system. If the composition exceeds your RAM, After Effects builds a RAM preview of as
many frames as possible and then plays those in real time. If the composition is very large and complex, you
may see just a short segment of the timeline.
The time required to build a RAM preview depends on the speed of your CPU. The frame rate of the play-
back depends on the amount of RAM available and the speed of the display card installed in your system.
There are several ways to create a RAM preview:
• Choose Composition > Preview > RAM Preview.
• Click the RAM Preview button in the Time Controls palette.
• Press 0 (zero) on the numeric keypad.
Maximizing RAM previews When the composition is simple, creating a RAM preview is almost as fast as
a simple preview. However, when compositions are more complex, the process of generating the RAM preview
can become time-consuming, and the number of frames that you see may be limited by the amount of RAM
available to After Effects. To get the most from your RAM previews, you can:
• Exit other applications (Windows) or increase the amount of memory allocated to After Effects (Mac OS).
• Lower the Resolution (in either the Composition window or Time Controls palette) to Half or Third. This
affects only previews; when you render the composition, the image is rendered with full anti-aliasing.
• Reduce the magnification of the Composition window to 50% or lower.
• Set the Quality for your layers to Draft rather than Best.
• Tu rn off the Video switch for any layers you don’t need to see in the preview.
• Limit the work area to preview smaller sections of the timeline.
RAM preview Options You can select options associated with RAM preview, including Frame Rate, Skip
Frames, Resolution, and others. These options appear in the lower portion of the Time Controls palette,
under RAM Preview Options. If you don’t see options, click the arrow at the upper right corner of the Time
Controls palette to open the Time Controls palette menu and select Show RAM Preview Options.
For more information about preview settings, see “Setting preview options” in After Effects online Help.
AE_CIB.book Page 34 Monday, October 8, 2001 12:08 PM
35
ADOBE AFTER EFFECTS 5.0
Classroom in a Book
Adding complexity to the animation
Yo u’ve created a fairly sophisticated animation for your hexagon element, but now you
can add interest and complexity by changing a few more properties. First, you’ll stagger
the starting points for the layers, so that each hexagon begins to appear at a different point
in time in the composition. Then, you’ll adjust the opacity of the hexagons so that they
fade in and then remain partially transparent.
Staggering the In points
The In point of a layer is the time at which the layer starts to appear in the composition.
Right now, all your layers begin at 0:00, as shown by the position of the colored duration
bar for each layer in the timeline. To create a more fluid animation, you’ll offset the In
points of the layers on the timeline.
1 At the bottom of the Timeline window near the center, click the double-headed arrow
() to open the In/Out panel.
Expand or Collapse button for In/Out panels
AE_CIB.book Page 35 Monday, October 8, 2001 12:08 PM
LESSON 1
36
Creating 2D Elements from Hexagons
2 Click the underlined In value for each layer, type a new value in the Layer In Time
dialog box, and click OK to set In points that are staggered by exactly three frames per
layer, as shown in the illustration below:
In point values
3 Press Home to move the current-time marker to 0:00, and then press the spacebar or
0 (zero) on the numeric keypad to preview your animation.
4 When you finish viewing the preview, click the double-headed arrow button again to
close the In/Out panel in the Timeline window, and then choose File > Save to save your
work.
The hexagons now fall into place, sequentially taking their positions from right to left.
Adjusting opacity for one layer
By making the hexagons semi-transparent, you create a more interesting interaction as
they spin over each other to form the honeycomb. First, you’ll set the opacity for one layer
so that it dissolves in over nine frames.
1 Press Home to move the current-time marker to 0:00.
2 In the Timeline window, select Layer 1 and press T to reveal the Opacity property. The
current value is 100%.
3 Set the Opacity value to 0 (zero), either by scrubbing the value or by clicking the value
and typing.
4 Click the stopwatch to animate the opacity and set the first opacity keyframe at 0:00.
5 Move the current-time marker to 0:09.
AE_CIB.book Page 36 Monday, October 8, 2001 12:08 PM
37
ADOBE AFTER EFFECTS 5.0
Classroom in a Book
6 In the Opacity value, scrub or type 50%. A second keyframe appears (at 0:09).
7 Press Home to return the current-time marker to 0:00, and then press the spacebar or
0 (zero) on the numeric keypad to preview the composition.
The Layer 1 hexagon fades up and then remains at 50% opacity.
To remember the keyboard shortcut for opening the Opacity property, think T for trans-
parency. The O key shortcut is reserved for another use.
Pasting Opacity keyframes to other layers
Now you’re ready to create the same dissolve on the other hexagons. For this, you’ll use a
time-saving cut-and-paste technique to add Opacity keyframes to the nine remaining
layers.
1 Select the Opacity keyframes on the first layer by carefully dragging a small marquee
around the two keyframes, as shown below. Or, you can click the word Opacity to select
both keyframes.
2 Choose Edit > Copy, or press Ctrl + C (Windows) or Command + C (Mac OS) to copy
the keyframes.
3 Select the Layer 2, and press I (the letter
i) to move the current-time marker to the In
point for that layer (at 0:03).
4 Choose Edit > Paste, or press Ctrl + V (Windows) or Command + V (Mac OS) to
paste the Opacity keyframes into Layer 2.
AE_CIB.book Page 37 Monday, October 8, 2001 12:08 PM
LESSON 1
38
Creating 2D Elements from Hexagons
5 With Layer 2 selected, press T to see the new Opacity keyframes. The keyframes appear
at time positions that maintain the same relationship to the current-time marker, so that
the first appears at 0:03 and the second at 0:12. Then press T again to hide them.
6 Repeat steps 3 and 4 for each of the remaining eight layers.
7 Preview the animation and save the project.
Precomposing multiple layers
Your next task is to unite your ten layers into a single layer by precomposing. This non-
destructive process makes your project more manageable and also makes it possible for
you to add transformations to the group as a whole.
1 With the Timeline or Composition window active, choose Edit > Select All to select all
ten layers.
2 Choose Layer > Pre-compose.
3 In the Pre-compose dialog box, type Hexagons Build Pre-comp to name the precom-
position so that it describes what happens inside the precomposition.
AE_CIB.book Page 38 Monday, October 8, 2001 12:08 PM
39
ADOBE AFTER EFFECTS 5.0
Classroom in a Book
4 Make sure that the Move All Attributes into the New Composition option is selected
and that Open New Composition is not selected, and then click OK.
Note: The first option (Leave All Attributes in “Hexagon Final Comp”) should be dimmed. It
is not available when multiple layers are selected.
In the Timeline window for Hexagon Final Comp, the Hexagons Build Pre-comp layer
replaces the ten individual hexagon layers.
5 Choose File > Save to save the project.
Note: You can still access and make changes to the original ten layers by double-clicking the
Hexagons Build Pre-comp item in the Project window. Any changes you make within the
Hexagons Build Pre-comp are immediately reflected in the Hexagon Final Comp.
Nice work. You have completed the first phase of construction for the hexagon element,
so you are almost half finished with Lesson 1. If you need to take a break, this is a good
time to do that. If appropriate, close the project and quit After Effects.
AE_CIB.book Page 39 Monday, October 8, 2001 12:08 PM
LESSON 1
40
Creating 2D Elements from Hexagons
Transforming a precomposition layer
So far, you have created an animated set of hexagons that fly onto the screen and settle
into a honeycomb formation. Now, you’re going to leverage that work to fill the frame
with the hexagon pattern and add some of the subtle refinements that make your good
work look even better.
Yo u’ll continue to transform the group of hexagons that you have created. The overall
effect you’ll create is one of complex motion in which the object appears to be moving in
several ways: rotating, moving laterally, and coming closer —as if the viewer is traveling
through the center of one of the hexagons.
Now you can transform all the hexagons as a unit without losing the transformations you
applied earlier to the ten original layers. The new transformations add to the existing
motions to create complex combinations of change upon change.
Reopening your project after a break
If you quit After Effects when you finished the previous section, you need to restart the
application and open the file you’ve been working on.
1 Start After Effects and choose File > Open Project.
2 Find the _aep folder inside of the AE_CIB job folder that you created at the beginning
of this lesson.
3 Select the Hexagons01_work.aep file, and click Open.
Yo u can probably open the Hexagons01_work.aep file by choosing File > Open Recent
Projects > and selecting the path and filename for this project file. After Effects typically lists
the ten most recently opened projects in the Open Recent Projects submenu.
4 In the Project window, double-click Hexagon Final Comp to open it in the Compo-
sition and Timeline windows.
If the names in the Project window are truncated and difficult to read, you can drag the
embossed bar at the right edge of the column heading to expand the column width.
AE_CIB.book Page 40 Monday, October 8, 2001 12:08 PM
41
ADOBE AFTER EFFECTS 5.0
Classroom in a Book
Scaling and collapsing the precomposed layer
First, you’ll adjust the size of the hexagons and collapse transformations for the precom-
position layer to preserve image quality. In this case, you don’t set keyframes for scale
because you want the Scale property to remain unchanged over time.
1 If necessary, click the Hexagon Final Comp tab in the Timeline window to bring it
forward.
2 Move the current-time marker to about 1:00 so that you can see the results of the scale
change as you apply it.
3 In the Timeline window, select the Hexagons Build Pre-comp layer and press the S to
open the Scale property.
4 In Scale, scrub or type 68%. In the Composition window, layer handles indicate the
layer’s bounding box. The edges of some of the hexagons are currently out of view.
5 With the Hexagons Build Pre-comp layer still selected, choose Layer > Switches >
Collapse. Or, you can click the Collapse Transformations switch in the Timeline window
Switches panel (to the right of the layer names, by default) from Off
() to On (). This
enables you to see the artwork beyond the edges of the bounding box and improves the
quality of the layer.
Before (left) and after (right) turning on Collapse Transformations switch
Note: Collapsing (activating the Collapse switch) refers to the way After Effects calculates
information for layers. When you collapse transformations for a nested precomposition layer,
the image quality improves and the amount of time required to render the final movie is
reduced. For more information, see “Maintaining image quality in nested compositions” and
“Collapsing transformation properties” in After Effects online Help.
AE_CIB.book Page 41 Monday, October 8, 2001 12:08 PM