Adobe After Effects 5.0- P4 ppsx
Bạn đang xem bản rút gọn của tài liệu. Xem và tải ngay bản đầy đủ của tài liệu tại đây (472.32 KB, 30 trang )
79
ADOBE AFTER EFFECTS 5.0
Classroom in a Book
Placing the Square Grid animations
Yo u’ll now add, duplicate, rename, and move the Square Grid Comp within the new
composition.
1 In the Project window, select the Squares Grid Comp and drag it into the Composition
or Timeline window.
2 Press Ctrl + D (Windows) or Command + D (Mac OS) five times to duplicate the layer
so that a total of six layers appears in the Timeline window.
3 In the Timeline window, select Layer 1 and press Enter or Return. The layer name
becomes active.
4 Type Square Grid 1, and press Enter or Return to enter the new name.
5 Repeat steps 3 and 4 to rename each of the other five layers, naming them according to
their position in the layer stack: Square Grid 2, Square Grid 3, and so forth.
AE_CIB.book Page 79 Monday, October 8, 2001 12:08 PM
LESSON 2
80
Building Elements from Squares
6 In the Timeline window, select Square Grid 1 and drag it to the far left edge of the
Composition window, at approximately the 220, 220 coordinates.
7 Move Square Grid 2 to the right of Square Grid 1, at approximately 660, 220.
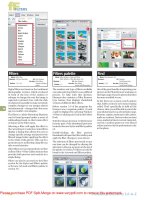
8 Move each of the remaining layers until they line up approximately as shown:
• Square Grid 3: 1100, 220
• Square Grid 4: 1540, 220
• Square Grid 5: 1980, 220
• Square Grid 6: 2420, 220
Layers 1–6 positions
Adjusting the opacity of some layers
To add variety and texture, you’ll change the opacity of two layers.
1 In the Timeline window, select the Square Grid 1 layer and press T to open its Opacity
property.
2 Scrub or type 50% as the Opacity value, and press Enter or Return. Then press T again
to close the Opacity property.
1 2 3 4 5 6
AE_CIB.book Page 80 Monday, October 8, 2001 12:08 PM
81
ADOBE AFTER EFFECTS 5.0
Classroom in a Book
3 Select the Square Grid 4 layer and repeat this process, but this time change the Opacity
value to 80%.
4 Save your work.
Rotating layers
To give this element a slightly less uniform appearance, you’ll randomize the orientations.
Because you created the original animation composition as a perfect square, you can
simply rotate a few of the duplicates. This varies the movement within the overall compo-
sition, creating the impression that you’ve done a lot more work than you actually did.
Your last task before rendering is to limit the work area.
1 Choose Edit > Select All or press Ctrl + A (Windows) or Command + A (Mac OS) to
select all layers.
2 Press R to open the Rotation properties for all of the layers.
3 Choose Edit > Deselect All or press Ctrl + Shift + A (Windows) or
Command + Shift + A (Mac OS) to deselect all layers, leaving the Rotation properties
open.
4 Scrub or type to enter Rotation values for the layers, as follows:
• Square Grid 1: 0˚ (No change.)
• Square Grid 2: 90˚.
• Square Grid 3: 180˚.
• Square Grid 4: –90˚.
• Square Grid 5: 0˚ (No change.)
AE_CIB.book Page 81 Monday, October 8, 2001 12:08 PM
LESSON 2
82
Building Elements from Squares
• Square Grid 6: 90˚.
5 Move the current-time marker to 3:00 and press N to set the work area to end at 3:00.
6 Press Home to move the current-time marker to 0:00, and then preview the animation.
The squares randomly shift as they shuffle themselves in the Composition window. If you
want to make adjustments, do so now.
7 Save the project.
Rendering the dancing squares
Yo u’ve finished working with this element, so it’s time to render the movie.
1 Close the Composition and Timeline windows, and then select the Squares01 Comp in
the Project window.
2 Choose Composition > Make Movie, or press Ctrl + M (Windows) or Command + M
(Mac OS).
3 In the Output Movie To dialog box, locate your _mov folder in the AE_CIB job folder
and type Squares01.mov in Name.
4 In the Render Queue window, choose Best Settings for the Render Settings.
AE_CIB.book Page 82 Monday, October 8, 2001 12:08 PM
83
ADOBE AFTER EFFECTS 5.0
Classroom in a Book
5 Click the underlined words Best Settings to open the Render Settings dialog box.
6 Make sure that Time Span is set to Work Area Only and that the work area indicated
starts at 0:00 and ends at 3:00. Click OK to close the Render Settings dialog box.
7 For the Output Module, choose Custom to open the Output Module Settings dialog
box, and do all the following:.
• In Format, choose QuickTime Movie.
• Select the Import into Project When Done option.
AE_CIB.book Page 83 Monday, October 8, 2001 12:08 PM
LESSON 2
84
Building Elements from Squares
• Click Format Options to open the Compression Settings dialog box.
8 Choose Animation and Millions of Colors+, and then click OK to close the dialog box.
9 Make sure that Channels is set to RGB + Alpha, and then click OK to close the Output
Module Settings. You’ll use the alpha information when you composite this layer into
your final piece in a later lesson.
10 Choose File > Save, as a precaution.
11 Click the Render button.
When rendering is complete, close the Render Queue window. The Squares01.mov now
appears in the Project window because of the option you selected in step 7.
Playing the Squares01 movie
You can now play the movie you’ve just rendered.
1 Press Alt (Windows) or Option (Mac OS) as you double-click the Squares01.mov to
open it in the Footage window, and then reduce the size of the window as needed so that
it fits on your screen.
Note: Pressing Alt or Option when you open the movie gives you access to the Magnification
menu and shortcuts. If the movie fits on your screen as is, you do not need to use the Alt or
Option key.
AE_CIB.book Page 84 Monday, October 8, 2001 12:08 PM
85
ADOBE AFTER EFFECTS 5.0
Classroom in a Book
2 Play the movie. It should look just like it did in the final Preview before rendering.
3 When you are finished, close the Footage window, save your work, and close the
project.
If you need to take a break, this is a good place to do so.
Creating pulsating strips of squares
In this section, you start to create a second squares-based element that will become part
of the overall project. The first component of this element is made up of three different
compositions: a strip of squares that moves into view from the left; a strip of squares that
moves into view from the right; and a strip of squares that is not animated. Using transfer
modes, you’ll make these subcomponents interact with each other so that you see strips
of squares that appear to pulsate, growing wider and then narrower in an apparently
random fashion.
Importing a layered source file
For this composition, you use a layered Photoshop source file. When you import this kind
of file into After Effects, you can either ignore the layering structure and use the
Photoshop file as a single flat image or you can preserve the integrity of the Photoshop
layers so that you can use them separately. To keep the layers, you’ll import the file as a
composition. The dimensions of the Photoshop layers determine the size of the After
Effects composition.
Yo u’ll continue your work within the Boxes02_work.aep project you created at the
beginning of this chapter. If it is not already open, find that file in the _aep folder in your
AE_CIB job folder and open it now.
1 Choose File > Import > File. The Import File dialog box appears.
2 In the _psd folder in your AE_CIB job folder, select the Squares.psd file.
AE_CIB.book Page 85 Monday, October 8, 2001 12:08 PM
LESSON 2
86
Building Elements from Squares
3 In Import As, select Composition.
Note: This option is available only when you select a file that contains layers.
4 Click Open (Windows) or Import (Mac OS).
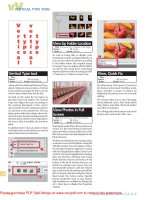
Two new elements appear in the Project window: a composition file and a folder, both
named Squares.psd.
AE_CIB.book Page 86 Monday, October 8, 2001 12:08 PM
87
ADOBE AFTER EFFECTS 5.0
Classroom in a Book
5 Double-click the composition to open it in the Composition and Timeline windows.
In the Timeline window, you see the three layers created in Photoshop. Each layer retains
all the Photoshop settings assigned to it.
Note: If you can’t see the entire image in the Composition window, resize the window and
then use the magnification menu in the lower left corner of the Composition window to
reduce the zoom. Or, press Ctrl + minus sign (–) (Windows) or Command + minus sign (–)
(Mac OS).
6 Close the Composition and Timeline windows, and then expand the Squares.psd
folder in the Project window so that you see the three layers created in Photoshop.
You can click any of these layers to see their thumbnail images in the top of the Project
window. Because you imported the source file as a composition, you can also use each of
these layers independently within your compositions. For more information about
importing layered files, see After Effects online Help.
Note: In After Effects, this composition inherits the most recently used Duration and Frame
Rate settings.
Creating a composition for pulsating squares
For this section, you begin with a new composition.
1 Choose Composition > New Composition, or press Ctrl + N (Windows) or
Command + N (Mac OS). The Composition Settings dialog box opens.
2 In Composition Name, type Moving Right Comp.
AE_CIB.book Page 87 Monday, October 8, 2001 12:08 PM
LESSON 2
88
Building Elements from Squares
3 On the Basic tab of the dialog box, set the following options:
• In Width, type 860, and deselect Lock Aspect Ratio.
• In Height, type 300.
• Make sure that the Pixel Aspect Ratio is Square Pixels.
• In Frame Rate, set 29.97.
• (Optional) In Resolution, select Half or lower, as needed for your system.
• Make sure the Start Timecode is 0:00.
• In Duration, type 500, to specify five seconds.
4 Click OK. The new composition appears in the Squares.psd folder in the Project
window if that folder was selected when you started this task.
5 Drag the Moving Right Comp out of the Squares.psd folder and place it on the top level
of the Project window hierarchy. (If necessary, enlarge the Project window so that you can
drag the composition to an empty area at the bottom of the window.)
Note: Yo u created this composition at a size (860 by 300 pixels) that is at least as large as you
will ever need for your final animation. By building elements at larger-than-needed sizes, you
accomplish two things. First, you give yourself maximum flexibility because you can always
shrink the image later by reducing the Scale property. Second, you maintain image quality,
which would be compromised if you scaled it up beyond 100%. This practice is a good general
rule to follow—but there are exceptions to it, as you’ll see later in this lesson.
AE_CIB.book Page 88 Monday, October 8, 2001 12:08 PM
89
ADOBE AFTER EFFECTS 5.0
Classroom in a Book
Creating and animating the first layer
In this composition, you’ll use just one of the Photoshop layers to animate squares that
travel from left to right. You’ll create this in a way that makes it easier for you later when
you set it to loop (play seamlessly, without any apparent beginning or end).
1 Press Home to set the current time to 0:00, if it’s not already there, and then reduce the
magnification of the Composition window so that you can see a larger area of the paste-
board.
2 In the Project window, select SquaresLayer02 (in the Squares.psd folder) and drag it
into the Composition window.
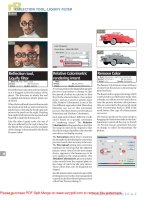
3 Press P to open the Position property and then drag the layer into the Composition
window so that it is just outside of the left edge of the composition frame (about -430,
150).
Starting position of Layer 1 on the Composition window pasteboard
4 Click the stopwatch () to set a Position keyframe. Or, press Alt + P (Windows) or
Option + P (Mac OS).
5 Move the current-time marker to 4:01.
6 Drag the SquaresLayer02 layer to the center of the composition frame, or start dragging
and press Ctrl + Shift (Windows) or Command + Shift (Mac OS) to snap the layer into
the center. A second Position keyframe automatically appears at 4:01.
Final position of Layer 1 in the composition frame
AE_CIB.book Page 89 Monday, October 8, 2001 12:08 PM
LESSON 2
90
Building Elements from Squares
7 Press Home to set the current time to 0:00.
8 Press the spacebar or 0 (zero) on the numeric keypad to preview or RAM preview the
animation, and then save the project.
Note: If RAM preview doesn’t show the entire clip, see “Allocating RAM to After Effects” on
page 2 for tips about working around RAM limitations on your computer.
Duplicating and modifying the first layer
Next, you’ll create a second layer that is almost identical to the first, using the same source
footage and moving in the same direction. The difference is that Layer 2 begins at a
position that snugs up to the end of Layer 1, so the two move in tandem, like two cars of
a train, without any gap between them. Rather than recreating everything for a new layer,
you can re-use and modify Layer 1.
1 Select Layer 1 and choose Edit > Duplicate, or press Ctrl + D (Windows) or
Command + D (Mac OS). A new layer appears, having the same position keyframes as
the original.
2 Select Layer 2 and press P to open the Position property, if it’s not already open.
3 Draw a marquee around both Position keyframes to select them. Or, click the word
Position in Layer 2.
4 Move the current-time marker to 0:00.
AE_CIB.book Page 90 Monday, October 8, 2001 12:08 PM
91
ADOBE AFTER EFFECTS 5.0
Classroom in a Book
5 In the Composition window, drag Layer 2 to the right so that the layer is positioned in
the center of the Composition window. As you drag, press Ctrl + Shift (Windows) or
Command + Shift (Mac OS) to snap the layer to the center of the composition. Notice
that both of the layer keyframes (shown as small X’s) move with the layer as you drag.
Layer 2 at 4:01 (left) and at 0:00 (right)
6 Press P to hide the Position property.
7 Preview the animation. The two layers now move in tandem from left to right, from
0:00 to 4:01.
8 Save the project.
When you moved Layer 2 and its keyframes, the center of the Composition window
became the Position value for the first keyframe. Because you also selected the second
keyframe, the two moved as a unit, maintaining their relative positions. When the
composition starts, Layer 2 is at the center of the composition, filling the frame, and Layer
1 is out of view on the left side of the frame. At the end of the motion, Layer 1 has moved
in to fill the frame and Layer 2 has passed out of the frame to the right.
Note: If you don’t see the X’s representing the layer keyframes, open the Composition window
menu and make sure that Layer Keyframes is selected.
AE_CIB.book Page 91 Monday, October 8, 2001 12:08 PM
LESSON 2
92
Building Elements from Squares
Adjusting the work area for pulsating squares
Yo u’ll take steps now that set up the animation to be easier to preview and better looking,
so you won’t have a “stutter” in the motion.
The first and last frames of this animation are identical, so the animation would stall for
one frame each time it loops. Use the keyframe navigation arrows on the far left of the
Position property to see this by jumping back and forth between the first keyframe and
the last, or by pressing J and then K.
You fix the stutter by removing one of the two identical frames. You do this by redefining
the work area, limiting it to the area in which Position keyframes occur.
1 Move the current-time marker to 4:00 (one frame before the second keyframe).
2 Press N to set the end of the work area at the current time. Or, drag the handle at the
right end of the work-area bar, watching the display in the Info palette until it reads 4:00.
You can press Shift as you drag to snap the work-area handle to the position of the
current-time marker.
The work-area bar now ends at 4:00, and the background color of the timeline beyond the
work area changes to a darker shade of gray.
3 In the Time Controls palette, click the RAM Preview
() button. The RAM preview
now plays back only those frames that are within the work area.
4 Save the project and close the Timeline and Composition windows.
When you render this composition, you’ll select a setting so that it renders only the work
area rather than the entire length of the composition.
AE_CIB.book Page 92 Monday, October 8, 2001 12:08 PM
93
ADOBE AFTER EFFECTS 5.0
Classroom in a Book
Creating a second composition for pulsating squares
Next, you’ll create a composition similar to the one you just made except for three details:
you give the composition a different name, you use different artwork, and the new layer
travels from right to left. Consequently, you do this procedure using the same steps as
before, so this is a good time to see how much you can do on your own. You can refer to
the instructions for creating the Moving Right Comp as your guide, beginning with
“Creating a composition for pulsating squares” on page 87, but be careful to include all
the following differences:
• Create the new composition, but this time name it Moving Left Comp. Otherwise, use
the same composition settings you used for the Moving Right Comp.
• Add a layer to the composition, but this time use the SquaresLayer03.psd from the
layered Photoshop footage file.
• Animate Layer 1, but this time set the 0:00 Position keyframe at the coordinates 1290,
150 (just outside the frame on the right). Then, set the 4:01 Position keyframe at the
center of the composition frame.
• Create Layer 2 by duplicating Layer 1 and set the current-time marker at 0:00.
• Select both the Layer 2 Position keyframes, and drag Layer 2 to the center of the compo-
sition frame.
• Set the work area to end at 4:00.
When you finish your work on Moving Left Comp, check your work and preview the
animation. Make sure you’ve used the Moving Left Comp name, the SquaresLayer03.psd
footage file, and that the layers travel from right to left. Then close the Composition and
Timeline windows.
Creating an all-inclusive composition for pulsating squares
Yo u’re ready to bring the different parts of your composition together: the two animations
you’ve made so far and another Photoshop layer that won’t be animated. The first task is
to create the composition that will combine all these resources.
1 Choose Composition > New Composition, or press Ctrl + N (Windows) or
Command + N (Mac OS). The Composition Settings dialog box opens.
2 In Composition Name, type Squares02 Comp.
AE_CIB.book Page 93 Monday, October 8, 2001 12:08 PM
LESSON 2
94
Building Elements from Squares
3 On the Basic tab of the Composition Settings dialog box, set the following options:
• In Width, type 860, and deselect Lock Aspect Ratio option if it is selected.
• In Height, type 300.
• Make sure that the Pixel Aspect Ratio is Square Pixels.
• Set Frame Rate to 29.97.
• (Optional) In Resolution, select Half or lower, as needed for your system.
• Make sure the Start Timecode is 0:00.
• In Duration, type 500, to specify five seconds.
4 Click OK.
Adding compositions as layers
Next, you’ll add the Moving Left and Moving Right compositions into the Squares02
Comp.
1 Press Home to set the current time marker at 0:00.
2 In the Project window, select and drag each of the following into the Composition
window, centering each one in the composition frame:
• SquaresLayer01 (in the Squares.psd folder)
• Moving Left Comp
• Moving Right Comp
AE_CIB.book Page 94 Monday, October 8, 2001 12:08 PM
95
ADOBE AFTER EFFECTS 5.0
Classroom in a Book
Notice how the image in the Composition window changes each time you add a new layer.
Note: In the Timeline window, make sure that the SquaresLayer01 is in the lowest (Layer 3)
position in the layer stack. If it is not, select it and drag it to that position.
Applying transfer modes and adjusting the work area
Transfer modes are a familiar concept to Adobe Photoshop users, but you can also use
them in After Effects. With transfer modes, the layer appearances affect each other, based
on the luminance and color properties of the individual layers. Using transfer modes with
moving footage creates interesting interactions among the layers. Your next task is to
apply the Screen transfer mode to two of the layers.
1 If the Modes panel is not open in the Timeline window, do one of the following:
• Click the Switches/Modes toggle bar.
Switches/Modes toggle bar
• On the Timeline window menu, choose Panels > Modes.
AE_CIB.book Page 95 Monday, October 8, 2001 12:08 PM
LESSON 2
96
Building Elements from Squares
2 In the Modes panel for Layer 1 (the Moving Left Comp), select Screen on the pop-up
menu. Notice the change in the composition.
3 Repeat step 2 for Layer 2 (the Moving Right Comp). Leave Layer 3 (SquaresLayer01) in
Normal transfer mode.
4 Move the current-time marker to 4:00, and press N to define that time as the end of the
work area.
5 Save your work and preview the animation. The squares interact as they pass over each
other to create pulsating shapes.
6 Close the Composition and Timeline windows.
The result of using Screen transfer mode is comparable to superimposing different film
negatives and printing (exposing and developing) the result on paper. White always
produces white in Screen transfer mode. Black superimposed on white—or any other
color—has no effect.
Rendering the pulsating squares
All that remains for this section is to render the composition as a movie, going through
the same steps that you followed when you rendered the Squares01 element.
1 In the Project window, select Squares02 Comp, and then choose Composition > Make
Movie.
2 In File Name, type Squares02.mov and designate the _mov folder in your AE_CIB job
folder. Click Save.
The Render Queue opens with the Squares02 Comp as item number one in the queue.
AE_CIB.book Page 96 Monday, October 8, 2001 12:08 PM
97
ADOBE AFTER EFFECTS 5.0
Classroom in a Book
3 In the Render Settings pop-up menu, choose Best Settings to set Quality to Best and
Resolution to Full. These settings override any settings that were left in the Composition
and Timeline windows.
4 Click the words Best Settings to open the Render Settings dialog box.
5 Make sure that Time Span is set to Work Area Only, the Start is 0:00, and the End is
4:00.
6 Click OK to close the Render Settings dialog box.
7 On the Output Module pop-up menu, choose Custom. The Options Settings dialog
box opens.
8 On the Format pop-up menu, choose QuickTime Movie.
9 Select the Import into Project When Done option.
AE_CIB.book Page 97 Monday, October 8, 2001 12:08 PM
LESSON 2
98
Building Elements from Squares
10 Click Format Options to open the Compression Settings dialog box and make sure
that Animation and Millions of Colors are selected.
11 Click OK to close the Compression Settings and the Output Module Settings dialog
boxes. You can expand the Output Module in the Render Queue to review your settings
again before rendering.
12 Save the project again.
13 Click Render.
Playing your pulsating-squares movie
After rendering, the Squares02.mov appears in the Project window. You can now play the
movie.
AE_CIB.book Page 98 Monday, October 8, 2001 12:08 PM
99
ADOBE AFTER EFFECTS 5.0
Classroom in a Book
1 Double-click the Squares02.mov to open it in the Footage window. If you need to resize
the player window, hold down Alt (Windows) or Option (Mac OS) as you double-click
to open it in the After Effects player, and then use the Magnification menu.
2 Click the Play button. The movie should look just as it did in the final Preview before
rendering.
3 When you finish, close the Footage window.
4 Choose File > Save.
Yo u’ll use this movie later in this chapter as a component of another composition. Later,
that composition will become an element you’ll render and use in the overall project.
If you need to pause before you continue, this is a good time to take a break. Be sure that
you have saved your work.
Creating a lens flare
In the previous section, you created a movie of pulsating squares. In this section, you’ll
create a lens-flare movie. Both of these movies will be components of an element that
you’ll bring together and render in the later sections in this lesson.
The lens-flare component requires no footage files, so there’s nothing to import.
Creating a composition for the lens flare
You start by creating a new composition within the Boxes02_work.aep project file. You
need a black background color while you work, so this task includes the procedure for
changing this setting.
1 Choose Composition > New Composition.
2 In the Composition Settings dialog box, type Lens Flare Comp as the name.
3 In the Preset pop-up menu, select NTSC D1 Square Pix, 720 x 540. This option
automatically enters the following settings:
• Width: 720
• Height: 540
• Pixel Aspect Ratio: Square Pixels
• Frame Rate: 29.97
4 (Optional) In Resolution, select Half or lower, as needed for your system.
AE_CIB.book Page 99 Monday, October 8, 2001 12:08 PM
LESSON 2
100
Building Elements from Squares
5 In Duration, type 400 to specify four seconds, and then click OK to close the Compo-
sition Settings dialog box. The Lens Flare Comp appears in the Project, Composition, and
Timeline windows.
6 Choose Composition > Background Color to open the Background Color dialog box.
Note: If the background in the Composition window is already black, you do not have to do
steps 6 and 7.
7 Do one of the following:
• Click the color swatch to open the color picker, and select black. Then click OK.
• Click the eyedropper and then click any available black area on the screen to select a
black sample. Then click OK.
Creating a solid layer for the lens flare
After Effects includes many effects that you can apply to your work to create complex
images quickly. But effects cannot exist by themselves; you must have at least one layer
first and then apply the effects to the layer. In this task, you’ll create the layer without
placing any footage. This layer is simply a solid color.
1 Choose Layer > New > Solid, to open the Solid Settings dialog box.
2 In Name, type Lens Flare Solid.
3 In Width, scrub or type 720.
4 In Height, scrub or type 540.
AE_CIB.book Page 100 Monday, October 8, 2001 12:08 PM
101
ADOBE AFTER EFFECTS 5.0
Classroom in a Book
5 Using either the eyedropper or the color swatch, select black.
6 Click OK to close the Solid Settings dialog box.
The Lens Flare Solid appears in the Timeline window as Layer 1 in the Lens Flare compo-
sition. The Composition window looks the same as it did before you did this task because
both the solid and the background color are black.
Applying the Lens Flare effect
The Lens Flare effect creates areas of brightness on screen as if an intense light is shining
directly on the camera lens and creating reflections of itself. You’ll set properties and
keyframes for the effect in a way that is closely similar to the way you set transformation
properties and keyframes.
1 With the Lens Flare Solid layer selected, choose Effect > Render > PS+Lens Flare.
2 In the Lens Flare dialog box, do the following:
• In Flare Brightness, type 10.
• In Lens Type, select 35mm Prime. Then click OK. A new window, the Effect Controls
window, appears on your screen, with the PS+Lens Flare effect listed on the Lens Flare
Solid tab.
3 In the Effect Controls window, in Flare Center, scrub or type –20, 270, being careful to
make the first number negative. Leave Blend With Original set at zero.
4 In the Timeline window, make sure that the current-time marker is at 0:00.
5 In the Effect Controls window, click the stopwatch next to the Flare Center option to
set a keyframe.
AE_CIB.book Page 101 Monday, October 8, 2001 12:08 PM
LESSON 2
102
Building Elements from Squares
6 Click the stopwatch next to Flare Brightness to set a keyframe for that option.
7 Move the current-time marker to 1:08, and change the Flare Center coordinates (in the
Effect Controls window) to 360, 270. Then change the Flare Brightness value to 150.
8 Move the current-time marker to 3:29. Change the Flare Center coordinates to 740,
270 and the Flare Brightness value to 10.
9 Preview the animation and then save your work.
The effect adds not only a main light but also haloes and echoes of that light. Because of
the keyframes you set, the lens flare travels across the composition frame, first growing
brighter and then dimming back to its original level of brightness.
Duplicating and adjusting the lens flare
To make the light movement more complex, you’ll add a second lens flare. You can move
some of the keyframes to different points on the timeline simply by selecting them and
dragging. Then you’ll adjust the settings for the moved keyframes so that the two lens
flares have some variety.
1 Select the Lens Flare Solid layer and press Ctrl + D (Windows) or Command + D
(Mac OS) to duplicate the layer. Or, choose Edit > Duplicate.
2 Press Shift + click to select both layers, and press U. The layer outlines open, showing
you all the keyframes you set in the original layer, which now also exist in the duplicate
layer.
3 Click the empty area of the Timeline window below the layers to deselect both layers.
4 On Layer 1, drag a marquee around the two middle keyframes (at 1:08) to select them.
5 Drag the selected keyframes to 2:08, using the display on the Info palette as your guide.
AE_CIB.book Page 102 Monday, October 8, 2001 12:08 PM
103
ADOBE AFTER EFFECTS 5.0
Classroom in a Book
6 In the Timeline window, move the current-time marker to 2:08 and change the Layer 1
Flare Brightness value to 100, which changes the value of the existing Flare Brightness
keyframe.
7 Click the Modes/Switches toggle bar in the bottom of the Timeline window to open the
Modes panel, and select Screen transfer mode for Layer 1. Leave Layer 2 in Normal
transfer mode. The two Lens Flares now overlap and interact as they pass over each other.
8 Preview the animation and save the project.
Rendering the lens flare
For easiest working convenience, you’ll render the lens flare before combining it with the
pulsating-squares movie that you created earlier in this lesson.
1 Close the Lens Flare Comp in the Composition, Timeline, and Effect Controls
windows.
2 In the Project window, select the Lens Flare Comp and choose Composition > Make
Movie.
AE_CIB.book Page 103 Monday, October 8, 2001 12:08 PM