Spinal Disorders: Fundamentals of Diagnosis and Treatment Part 38 pot
Bạn đang xem bản rút gọn của tài liệu. Xem và tải ngay bản đầy đủ của tài liệu tại đây (791.43 KB, 10 trang )
ab
cd
e
f
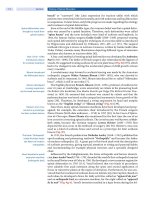
Figure 8. Surgical anatomy for left-sided thoraco-phrenico-lumbotomy
a Landmark for skin incision. b Superficial dissection. c Dissection of the rib for resection (see Fig. 6c). d The rib cartilage
is split and marked with stay sutures.
e The diaphragm is split about 2 cm medial to its rib insertion. f The medial and lat-
eral crus of the diaphragm are transected and marked with stay sutures. The segmental vessels are ligated. The thoracic
exposure is shown in
Fig. 6d, e.
352 Section Surgical Approaches
section. After repair of the diaphragma, the rib cartilage halves are refixed. The
thorax is closed as described above. The abdominal wall is sutured in three sepa-
rate layers (transverse, internal and external oblique muscles).
Pitfalls and Complications
Injuries to the thoracic duct
canresultinachylothorax
A frequent complication is to accidently open the peritoneal sac during dissec-
tion of the diaphragma. This can be avoided when the preparation of the two
body cavities is started from the abdominal site and the peritoneum freed from
the diaphragma. When taking the diaphragma down to its insertion at the spine,
care has to be taken not to injure the:
greater splanchnic nerve
ascending lumbar vein
sympathetic trunk
thoracic duct (rarely visible during preparation)
A detailed discussion of the complications associated with this approach is
included in Chapter
39 .
Anterior-Lateral Retroperitoneal Approach to L2–L5
The anterolateral retroperi-
toneal lumbar approach
is easily applicable even
in obese patients
The anterior-lateral retroperitoneal approach to the lumbar spine has been an
established operative technique since the early 1960s. This approach can be car-
ried out also from the right side. The left sided approach, however, is favored
because the inferior vena cava is less at risk. This approach is easy to perform
even in obese patients because the abdomen is hanging to the side and the flank
is exposed.
Indications
Indications for this approach are spinal disorders located between L2 and L5
(
Table 4):
Table 4. Indications for a retroperitoneal lumbotomy (L2–L5)
spinal deformities lumbar fractures/instabilities
degenerative disorders tumors
infections
Patient Positioning
For this approach the patient is positioned on the right side similarly to as per-
formed for the thoraco-phrenico-lumbotomy (
Fig. 7a, b).
Surgical Exposure
Landmarks for Skin Incision
We favor a mini-open approach to the lumbar spine, which necessitates image
intensifier localization of the skin incision. With a 6- to 8-cm incision, a two-level
fusion can be done without difficulty when using a retractor frame. The skin inci-
sion is done in the fiber direction of the external oblique muscle (
Fig. 9a).
Surgical Approaches Chapter 13 353
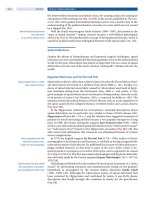
ab
cd
ef
Figure 9. Surgical anatomy for the anterior-lateral retroperitoneal approach to L2–L5
a Landmarks for skin incision. b, c, d Transsection of the external oblique, internal oblique and transverse muscles.
e Retraction of the psoas muscle exposing the vertebral column. f Medial retraction of the peritoneal sac exposing the
large abdominal vessels. Ligation of the segmental vessel.
Superficial Surgical Dissection
A muscle splitting approach
is preferred
After the incision of the skin and the subcutaneous tissue, the three layers of the
abdominal wall:
external oblique muscle (
Fig. 9b)
internal oblique muscle (
Fig. 9c)
transversus muscle (
Fig. 9d)
are separated in the direction of their fibers.
354 Section Surgical Approaches
Deep Surgical Dissection
With sponge sticks the peritoneal sac is mobilized in the medial direction to free
the psoas muscle and the anterior spinal column. The peritoneal sac can be cov-
ered with a moistened abdominal towel. The paravertebral sympathetic chain
medial to the psoas muscle as well as the ureter need to be identified and
retracted together with the peritoneum carefully in a medial direction. The psoas
is mobilized from the spine and retracted posteriorly. The genitofemoral nerve
which lies on the anteromedial side of the psoas muscle needs to be preserved.
Care has to be taken not to injure the segmental or great vessels anteriorly while
Take care with the iliolumbar
vein when retracting
the large vessels medially
liberating the spine with sponge sticks. Special attention has to be paid to the ilio-
lumbar vein at level L4–L5, which requires ligation if it limits the mobilization of
the common iliac vein. In men, the psoas muscle can be very big and covers
almost the whole lateral aspect of the vertebra. In these cases, a psoas splitting
approach can be used to approach the intervertebral discs for a fusion [8]. The
latter approach is less suited to a complete corpectomy.
Wound Closure
Each layer of the abdominal wall needs to be sutured separately. Suction drainage
is usually not needed.
Pitfalls and Complications
Care has to be taken not to injure the:
segmental vessels
ascending lumbar vein
iliac vein and artery
genitofemoral nerve on the anteromedial side of the psoas muscle
paravertebral sympathetic chain
ureter (slightly attached to the peritoneum)
A detailed description of the management of complications is outlined in Chap-
ter
39 .
Anterior Lumbar Retroperitoneal Approach
Indications
The anterior lumbar retroperitoneal approach is indicated for spinal pathology
located between S1 and L3. The indications are similar to those for the lumbo-
tomy with the exception that the approach exposes the spine at S1–L2 (
Table 4).
Patient Positioning
The patient is positioned supine with both arms abducted. The table can be
slightly bent at the level of the pelvis. The positioning should be done in a way to
allow the application of a table mounted retractor system, which facilitates the
spinal exposure (
Fig. 10).
Surgical Approaches Chapter 13 355
Figure 10. Patient
positioning for an
anterior retroperito-
neal approach
A table mounted retractor
facilitates the approach.
Surgical Exposure
Landmarks for Skin Incision
Landmarks for the skin incision are the umbilicus, symphysis and iliac wings.
The umbilicus frequently projects onto the L4 level. However, this landmark is
largely variable and necessitates image intensifier control to allow for a minimal
length skin incision. The skin incision lies usually in the midline. Approaches to
the L3/4 disc space, however, necessitate extending the incision above the level of
the umbilicus. In these cases, we recommend using a slightly parasagittal inci-
sion (
Fig. 11a).
Superficial Surgical Dissection
After skin incision and dissection of the subcutaneous tissue, the anterior rectus
sheath is exposed over a length of 6–8 cm and opened 2 cm lateral to the midline
(
Fig. 11b). The underlying rectus muscle is retracted laterally exposing the poste-
rior rectus sheath and the arcuate line (
Fig. 11c). The peritoneal sac is mobilized
medially below the arcuate line. The peritoneal sac is adherent to the inferior sur-
face of the posterior rectus sheath and needs to be liberated from it to allow fur-
ther retraction. After liberation, the posterior rectus sheath is incised about 2 cm
medial to the abdominal wall and the peritoneum can be further retracted over
the midline (
Fig. 11d).
Deep Surgical Dissection
At depth, the bifurcation is often visible with a medial sacral artery and vein.
Depending on the size of the vessels, a ligation is necessary. Coagulation at the
disc level should be avoided to preserve the presacral sympathetic plexus. In
males, damage to the sympathetic plexus may result in a retrograde ejaculation.
The L5/S1 disc is exposed between the bifurcation (
Fig. 11e )byslightlymobiliz-
ing the vessels to both sides. Manipulation at the bifurcation should be done very
carefully (if needed) to avoid injuries to the vessels, which are difficult to repair.
The ascending lumbar vein
is at risk when retracting the
common iliac vein medially
The L4/5 disc space or levels above are exposed by retracting the left common
iliac vein and artery to the contralateral side (
Fig. 11e). During this maneuver,
great care has to be taken not to tear the ascending lumbar vein from the common
iliac vein. We recommend exposing the ascending lumbar vein and ligating it
before retracting the vessels to the contralateral side. The paravertebral sympa-
thetic chain lies medial to the psoas muscle and should be mobilized laterally
while the ureter together with the peritoneum is retracted medially.
356 Section Surgical Approaches
a
b
cd
e
f
Figure 11. Surgical anatomy of the anterior retroperitoneal approach
a Landmarks for skin incision. b Exposure of the anterior rectus sheath. c Dissection of the posterior rectus sheath close
to the abdominal wall (arcuate line).
d Exposure of the anterior spinal column. e Deep surgical dissection at the L5/S1
level accessing below the bifurcation.
f Deep surgical dissection at the L4/5 level retracting the common iliac artery and
vein medially.
Surgical Approaches Chapter 13 357
Wound Closure
The posterior rectus sheath should be readapted if possible. Interrupted sutures
are placed in the anterior rectus sheath using slowly dissolving sutures. We do
not routinely use a suction drainage.
Pitfalls and Complications
Care has to be taken not to injure the:
segmental vessels
ascending lumbar vein
common iliac vein and artery
paravertebral sympathetic chain
ureter (slightly attached to the peritoneum)
Injury to the sympathetic
chain can result
in retrograde ejaculation
in males
Injuries of the sympathetic chain may result in retrograde ejaculation (in males)
or a sympathectomy syndrome with disturbed capability for vasoconstriction.
This may result in the feeling of a hot (ipsilateral) or cold (contralateral) leg or
foot, respectively. Weakness of the abdominal wall particularly in multiparas can
result in abdominal herniations and needs to be repaired. A detailed description
of the management of complications is provided in Chapter
39 .
Posterior Approach to the Thoracolumbar Spine
The posterior approach has been the most commonly used access to the spine
since the 1950s. The exposure is straightforward but the collateral damage to the
muscle is not negligible [23, 24, 39, 40]. Wiltse et al. [68] and Fraser et al. [21] have
therefore suggested a so-called “muscle splitting approach”whichcanbeused
when midline exposure is not necessary for decompression, e.g. for posterolat-
eral fusion of a spondylolisthesis. Minimal-access surgery is preferred whenever
possible. The target level should be determined with image intensifier to expose
the spine only as much as is needed.
Indications
There are a wide variety of indications for this approach (Table 5):
Table 5. Indications for the posterior approach to the thoracolumbar spine
spinal stenosis thoracolumbar fracture/instability
disc herniation tumors
painful motion segment degeneration infections
spinal deformities
Patient Positioning
An unobstructed abdomen
is key to successful
decompressive surgery
The patient is positioned prone on rubber foam blocks (Fig. 12a). Aheadrest with
support for mouth, nose and eyes is used to avoid pressure sores (
Fig. 12b). It is
important that the abdomen is freely hanging and not compressed (
Fig. 12c).
This is particularly important for decompressive surgery where a compressed
abdomen can result in congested epidural veins and result in excessive bleeding.
358 Section Surgical Approaches
a b
c
Figure 12. Patient positioning for a posterior thoracolumbar approach
a Rubber foam blocks supporting the patient in prone position. b Headrest. c Positioning of the patient with free hang-
ing abdomen.
Surgical Exposure
Landmarks for Skin Incision
The landmarks for the posterior approach are:
spinous processes
posterior superior iliac spine
iliac wings
The line drawn between the bilateral posterior superior iliac spine usually pro-
jects to the disc level of L4–L5 (
Fig. 13a). However, this is unreliable and image
intensifier control is necessary in every case.
Surgical Approaches Chapter 13 359
ab
cd
Figure 13. Surgical anatomy of the posterior thoracolumbar approach
a Landmarks for skin incision. b Superficial surgical dissection. c Deep surgical dissection. d Muscle retraction with pin-
pointed retractors to minimize muscle damage. Note the decortication at L4–S1 on the left side as preparation of the
bone graft bed.
Superficial Surgical Dissection
After the incision of the skin in the midline above the spinous processes and the
dissection of the subcutaneous layers, the thoracolumbar fascia is incised with a
cautery knife (
Fig. 13b). The paraspinal musculature is subperiosteally detached
from the spinous process and the laminae. Sponges are used to push the paraspi-
nal muscles laterally and control bleeding by densely packing the created space
between the spinous process and the muscle (
Fig. 13c). Care has to be taken not
to injure:
facet joint capsules
Deep Surgical Dissection
In spinal fusion cases, the posterolateral bed has to be prepared for the bone
graft. Therefore, the multifidus muscle must be detached from the laminae, facet
360 Section Surgical Approaches
Pin-pointed retractors
minimize soft tissue damage
joint and transverse process (Fig. 11d).Whiledissectingthetransverseprocess,
the periarticular vessels which cross around the facet joint and transverse pro-
cess usually tend to bleed and need to be controlled by electrocautery. We prefer
to use pinpointed rather than rack type retractors because it causes less tissue
damage. The retractors should be released intermittently (
Fig. 11d).
Wound Closure
The thoracolumbar fascia needs to be closed over suction drains. The fascia
needs to be sutured tightly either by close interrupted or running sutures.
Pitfalls and Complications
The posterior access is usually a safe approach to the spine. In slim patients, how-
ever, the interlaminar window at L5/S1 can lie very superficially and can be
injured with the cautery knife causing an unintended durotomy.
Landmarks for Screw Inser tion
Computer assisted surgery
provides a false security
in inexperienced hands
Screw fixation has become a standardized technique throughout the entire spine.
However, the prerequisite for a safe screw insertion is critically dependent on a
profound knowledge of the surgical anatomy. Preoperative planning of the screw
trajectories with CT scans is mandatory if an altered anatomy (e.g. in spinal
deformities) is expected. Computer assisted surgery [7, 42, 55, 60] does not com-
pensate for insufficient knowledge of the anatomy and can even be dangerous in
inexperienced hands.
Cervico-occipital Spine
Screw Placement of the Occiput
Screw insertion must be
below the external occipital
protuberance
Screw fixation of the occiput should be in the area with the thickest bone, which
is in the midline between the superior nuchal and inferior nuchal line [54]
(
Fig. 14). Above the superior nuchal line, injuries to the intracranial sinus must
be expected. There is a wide variation in thickness of the occipital bone [61]. The
maximum thickness of the occipital bone ranges from 11.5 to 15.1 mm in males
and from 9.7 to 12.0 mm in females and is found at the level of the external occipi-
talprotuberance[15].FixationcanbedoneusingaY-plate[26]orbilateraltita-
nium plates [45]. The screws are inserted either in the midline or 2–3 mm para-
sagittally, respectively. The parasagittal cortical bone is substantially thinner and
ranges between 3 and 7 mm [30]. The screw holes can be prepared using a drill
guide (2.5 mm) with an adjustable drill penetration depth. Initially the depth is
set at 4 mm and is increased incrementally until the distal cortex is penetrated. In
areas of the occiput which are thicker than 7 mm, unicortical fixation is as strong
as bicortical fixation [61]. The standard screw diameter is 3.5 mm and sometimes
requires pre-taping. In case of a cerebrospinal fluid flow from the hole, insertion
ofthescrewsufficestoclosetheleak.
Posterior Atlantoaxial Transarticular Screw Fixation
The vertebral artery
is at risk laterally
and the spinal cord medially
Atlantoaxial transarticular screw fixation [27, 28] is a frequent stabilization tech-
nique for degenerative and traumatic disorders (
Fig. 15a–c). Although lateral
image intensifier control is sufficient, we recommend using a simultaneous bipla-
Surgical Approaches Chapter 13 361